
_______________________________
In This Chapter
- Variables
- Arrays
- Hash Tables
- CSV Files
- Operators
- Loops
- Functions
- PowerShell Tools
- ISE
- ISE Plug-Ins
_______________________________
Exchange Online PowerShell: Where to Begin
This book is not a beginner’s guide to PowerShell and while we assume that you, the reader, know at least something about PowerShell, we will quickly cover some basic PowerShell topics. What is covered in this chapter is necessary in order to form our building blocks for the more advanced chapters later in this book. Those building blocks will provide practical knowledge for using PowerShell with Exchange Online. Theory can be useful, but for production messaging environments, practical tips and tricks (and scripts!) are far more useful for working in your environment.
In the Introduction, we covered one-liners, cmdlets and getting help in the PowerShell interface. We are now going to turn our attention to building PowerShell parts that make up these elements in PowerShell. Remember that a PowerShell cmdlet consists of a verb and a noun. Remember that PowerShell cmdlets provide various parameters as we saw with the Get-Help in the Introduction to this book.
In the next few pages we will introduce you to some important concepts that are key to building your scripts for Exchange Online. These concepts include variables, arrays, loops and more. Learning these will provide you with the building blocks for your scripts. There will be some basic topics which will introduce you to these elements. These topics will give you the tools to begin building scripts in future chapters of this book.
When scripting, a variable is a place for storing data. A variable can store data for different lengths of time, but most importantly, the data stored in the variable can be retrieved or referenced by cmdlets later in a script for performing a task. The data stored in variables is of a certain type, such as strings, numerals, arrays and more. Variables are essential in PowerShell scripting, and it should become apparent how useful they are when working with Exchange Online.
Example - Variables
Variable Variable Type
$Value = 1 Numeric
$FirstName = “Damian” String
Variables are not restricted to static content or a single object or value, and they can store complex, nested structures as well. For example, if we use a variable to store information on all mailboxes:
$AllMailboxes = Get-Mailbox
The $AllMailboxes variable stores information on each mailbox as a single object and can contain as many objects as there are mailboxes in the Exchange environment. This content is unlikely to change as the script using that information will likely be stored for repeated use in a script. However, a variable containing the current value of a property of a mailbox or server might change repeatedly in a script loop, replacing the variable content on each pass. For example, while looping through an array (example on page 4), the mailbox name could be stored in a temporary variable (e.g. $name) and with each pass of in the loop, the contents of $name would change to the mailbox name in the current line of an array. Thus, the contents of a variable is not necessarily static and can be changed during the processing of a script.
Arrays are used to store a collection of objects. This collection of data is more complex than what would be stored in a normal variable (above).
Example
$Values = 1,2,3,4,5
$Names = “Dave”,“Matt”,“John”,“Michael”
As you can see from the above example, the array contains a row of values which can be used by a script for queries or manipulation.
Even more complex than arrays are multi-dimensional arrays. The $AllMailboxes variable example above is an example of this type of variable. This type is used to store more complex, structured information.
Example of Arrays (Multi-dimensional)
If we were to store all the information about all the Exchange Servers in an array of arrays, there would be a ‘list’ of arrays. Each line is essentially its own array of values. Visually, this is how the data is stored in the array [the top line contains the column descriptions for the underlying values]:
“Alias”,“ArchiveQuota”,“RetentionHoldEnabled”,“RecipientType”
“Damian”,“100 GB (107,374,182,400 bytes)”,“False”,“MailUser”
“Dave”,“100 GB (107,374,182,400 bytes)”,“False”,“MailUser”
“Brian”,“100 GB (107,374,182,400 bytes)”,“False”,“MailUser”
“RoomTest”,“100 GB (107,374,182,400 bytes)”,“False”,“MailUser”
Hash tables are similar in form and function to arrays, but with a twist. To initialize a hash table, the command is similar to an array:
$Hash = @ { }
Notice the use of the ‘{‘ brackets and not ‘(‘. Once initialized we can populate the data like so:
Example
In the below data sample, the name of each mailbox matched up with the Quota size for their mailbox. As can be seen by the data set, the data is stored in pairs:
$Mailboxes = @{Damian = ‘100 GB ’; Dave= ‘100 GB ’ ; Brian= ‘100 GB’}
To display the contents of the hash table, simply run ‘$Mailboxes’:

In most scenarios, an array is the way to go for data storage and manipulation. However, hash tables provide for more complex data storage and indexing with its data pairs.
CSV files are files used to store static data, outside of using variables. This data can be pre-created and then used by a script post creation or a CSV file can be generated by a script either as an end result or an intermediary step for a script to be used at a later point. CSV files can be considered an alternative option to using arrays. They can be used to contain data in a way similar to how an array would store data. One of the differences is that CSVs are files and arrays are stored in memory (RAM), which means that arrays only exist while a script is running and CSV files can be used to store information which should be kept, like for input or output purposes. They can also be looped through, like an array. CSV files can be manually created in a program like Excel for total control or created by a running script with an Export-CSV cmdlet to export the data.
Arrays are preferable for storing data within a script because no file is created and left behind to cleanup at a later date. The exception would be if I have an external program or process that generates a CSV file which contains lists of values that need to be imported or used for a process involving a PowerShell script.
The format of the CSV file looks something like this:


PowerShell scripts that use CSV files commonly read CSV files and store the contents in a variable to be used by the script. Import-CSV is the command to perform this task.
Example
$CSVFileData = Import-CSV “C:TempMailboxData.csv”
In the section on Loops, we will review what can be done with data stored in the variable, after it has been imported from a CSV file.
Operators are used in PowerShell to compare two objects or values. This can be particularly useful for when “If..Then” or “Where-Object” is used.
Operators can include the following:
|
-eq |
Equal |
-and |
TRUE when both are TRUE |
|
-lt |
Less than |
e.g. (3 -eq 3) -and (1 -lt 3) |
|
|
-gt |
Greater than |
TRUE |
|
|
-ne |
Not equal |
-or |
TRUE when either is TRUE |
|
-ge |
Greater than or equal |
e.g. (3 -lt 3) -or (2 -eq 2) |
|
|
-le |
Less than or equal |
TRUE |
|
|
-like |
Like Good for single wildcards e.g. “*mailbox” |
-xor |
TRUE when only one is TRUE e.g. (1 -eq 1) -xor (2 -eq 2) FALSE |
|
-match |
Matches criteria (non-case sensitive) Also can use double wildcards e.g. “*mailbox*” |
-not / ! |
When a condition is not TRUE e.g. -not (1 -eq 1) FALSE |
|
-cmatch |
Match criteria (case-sensitive) e.g. “*Mailbox*” |
||
|
-contains |
Exact match |
Example
$Mailbox = Get-Mailbox
If ($Mailbox -eq “Damian”) {
Set-Mailbox $Mailbox -ForwardingSMTPAddress [email protected]
}
The above example configures email forwarding for a mailbox that matches the name Damian and forwards all messages to the email address of [email protected].
Another example would be if there are mailboxes with small quotas (2GB) that need to be increased to 5GB:
If ($Quota -lt 2000000) {
Set-Mailbox $Mailbox -IssueWarningQuota 5gb
}
Operators will work with strings and numbers types. Less than and greater than operators will work against text:
If (“Mouse” -lt “Wolf) {
Write-Host “The Wolf eats the Mouse!”
}
The output from this comparison would result in:
The Wolf eats the Mouse!
The operators, with strings, work off the numerical values of each letter in the words added together and compared.
Loops can be used to process or generate a series of data, perhaps an array (or an array of arrays) of data stored in variables (like our $CSVFileData variable in the previous section). A loop can also use a counter for a series of values as well. Here are a few different ways to create loops in PowerShell:
Types
Foreach { }
Do { } While ()
Foreach loops can be used to process each element of an array either stored in a variable or a CSV file. The array can have a single or multiple elements. The Foreach loop will stop when there are no more lines to read or process, although the more lines there are, the longer it will take to complete.
Example
Let’s take our $CSVFileData variable that has stored the data we pre-created in a CSV file. The variable now contains three ‘rows’ of usable data. We can use the data to manipulate mailboxes by changing parameters, creating a report to send to IT Admins or maybe to move mailboxes to different mailbox databases.
** Note ** In the below code, with each loop, the variable $line, will be filled with a row from the CSV variable. You can then do something with that data in $line. After the loop is finished, Foreach will read the next line in $CSVFIleData and enter it in $line. And so forth until all rows have been read.
A simple example of a Foreach loop would look like this: (Complete code):
$CSVFileData = Import-CSV “C:Data.csv”
Foreach ($Line in $CSVFileData) {
$DisplayName = $Line.DisplayName
$Size = $Line.ReceiveQuota
Write-Host “The user $DisplayName has a mailbox Receive Quota of $Size.”
}
The output would look like this:

In this example, the loop created a simple visual representation of the data, but the representation was repeated in a standard manner using a loop and a write-host cmdlet.
Do While and While loops allow a loop to continuously run until a condition has been met. The key difference between the two is that a While loop will evaluate a condition prior to any code executing (the code between the brackets of a While loop may not even run once) whereas a Do While loop will execute code first (guaranteeing at least one time execution of code) and then checking for a particular condition. Whether this conditional exit is an incremental counter, waiting for a query result or a certain key to be pressed, the Do While loop provides some interesting functionality that can be used in PowerShell and with your Exchange Online.
When looping code with a While loop, an example of conditional exit is the counter variable. Simply put, the counter variable keeps track of the number of times a loop has run. Each time the below loop runs, the counter value increases by 1 ($Counter++). When the $counter variable reaches 1,000, the script block will stop processing and PowerShell will move on to the next section of code.
Example – While Loop
$Counter = 1
While ($Counter -lt 1000) {
Write-Host “This is pass # $Counter for this loop.”
$Counter++
}
** Note ** The $Counter++ near the end of the loop, which is shorthand for $Counter = $Counter +1.
Also notice that the ‘While’ statement is at the top of the loop unlike the Do...While loop that follows.
Example – Do While Loop
$Counter = 1
Do {
Write-Host “This is pass # $Counter for this loop.”
$Counter++
} While ($Counter -ne 1000)
In the above sample, we use a counter variable ($counter) which is incremented by 1’s using $Counter++. On each pass the script writes a line to the screen (write-host “This is pass # $Counter for this loop.”). The resulting output from the code loops something like this:

Once the variable ($Counter) gets to 1,000, the script will exit.

Notice that a result with 1,000 is not shown above and this is because the counter is increased after the write-host statement and the $Counter variable is increased from 999 to 1,000 and exits. In order to show a result with 1,000 the $counter variable needs to be moved:
Example
$Counter = ٠
Do {
$Counter++
Write-Host “This is pass # $Counter for this loop.”
} While ($Counter -ne ١٠٠٠)
Export-CSV – This cmdlet can create a CSV file to be used by another script or another section of code in the same script.
When exporting to a CSV file, make sure to use the –NoType option in order to remove the extraneous line that gets inserted into the exported CSV. This extra line can affect the use of the CSV file later. See below for an example of what happens when exporting a complete list of mailboxes to a CSV file:
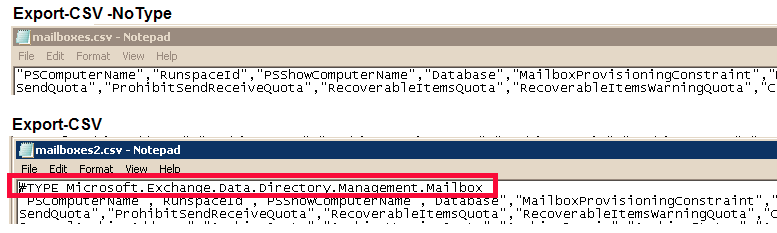
** Note ** In order to use the CSV later in the script, the –NoType option should be used.
These cmdlets are most useful for pulling in information from an external source or exporting the information for a later script or for reporting purposes. When importing the contents of a CSV file, we can use a variable to store the contents to be pulled out later by a loop or some other method.
Functions are blocks of code that can be called upon within the same script. This block of code becomes a reusable operation that can be called on multiple times in a script. The function, since it is comprised of reusable code, helps to save time in coding by removing duplicate coding efforts as well as reducing the size of the script removing duplicate code. Which, depending on how much code is involved and how often it is called, can improve the performance and efficiency of a PowerShell script, as well as make it more maintainable.
Example
# Check for Old Disclaimers
Function Check-OldDisclaimers {
$RuleCheck = (Get-TransportRule).ApplyHtmlDisclaimerText
$RuleCheck2 = Get-TransportRule | Where {$_.ApplyHtmlDisclaimerText -ne $Null}
If ($RuleCheck -eq $Null) {
Write-Host “There are no disclaimers in place now.” -ForegroundColor Green
} Else {
Foreach ($Line in $RuleCheck2) {
Write-Host “There is a transport rule in place called $Line that is a disclaimer rule.”
}
}
} #End of the Check-OldDisclaimers function
Check-OldDisclaimers
In the above example, the function is begun with the word ‘Function’ and enclosed in { } brackets. The function is then called by the very last line where the ‘Check-OldDisclaimers’ matches the name of the function, which executes the code contained within the brackets.
The previous code sample checks for disclaimers configured in Exchange Online. The last line of the script above calls the function (with the code contained within the ‘{‘ and ‘}’ brackets) and the code in the brackets executes. The PowerShell function by itself will not do anything unless it is called upon.
PowerShell ISE [Integrated Scripting Environment] is one of THE tools you should get familiar with when working with PowerShell. The tool comes installed by default with Windows 2012, 2012 R2 and 2016. If you are using an older version of Windows (2008R2 and before) ISE is not pre-installed and it will be necessary to download the installation and install it on the server.
The ISE has many useful features such as color coding of PowerShell cmdlet types as well as the indicators that are provided for loops (Foreach, If Else, etc.), to aid in checking matching brackets for example. ISE’s built-in spell checker make this tool very useful. ISE is also PowerShell-aware which means you can quickly find the relevant cmdlet or recently defined variable after only typing a few characters. If working with Exchange, the Exchange PowerShell Module needs to be available for ISE to use otherwise it won’t be able to look up those cmdlets needed or used with Exchange Servers.
PowerShell ISE Graphical Interface

The ISE tool is a great way to help visualize a script (indentation, color, etc), while not necessary or required to assist the coder visually in writing PowerShell scripts. ISE can also be used to interactively debug scripts, stepping through the code as it is executed, allowing you to inspect variables for example.
Logical groupings are denoted by the ‘-’ symbol on the left of the screen:

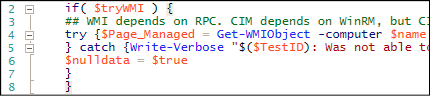
Different components of the PowerShell scripts are shown in different colors. Comments are green, variables are red and cmdlets are color coded blue:

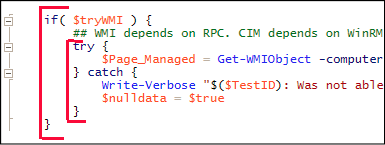
Loops can be verified by click at or near a bracket to see where the closing bracket is [paired brackets highlighted]:

If we click on the ‘-’ sign on the left side, it will collapse A section of code is enclosed by a bracket pair:
Some of the formatting is NOT done by the ISE tool. Indentation is up to you to do. I recommend the use of indenting each loop. Following is an example of this. This technique is used for readability and is not required for the code to run properly:
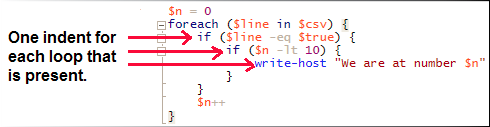
** Note ** Each indent is created by using the TAB key.
In the next example of indentation, without indentation, the script would be hard to read and understand where the different loops or groupings start / end:
Now notice the red brackets highlight the bracketing to show the way cmdlets are grouped.
Indentation falls into the same category as comments. While not required to be used, they make the script much easier to use, understand and troubleshoot in case of problems or errors. Creating a script is one of many uses for the tool, as the ISE tool also allows for running the script. In the lower portion of the tool is a PowerShell interface used for script execution.

PowerShell modules can be imported in order to expand its capabilities. For Active Directory this module can be loaded with this one-liner.
Active Directory

After the module is loaded, AD cmdlets such as Get-AdUser and Get-ADDomain Controller can now be run. Modules can also be pre-loaded into a PowerShell profile to make this even easier. Read up more on this here:
Notepad and Notepad++. Notepad is a very basic way to edit a PowerShell script. It is best used for quickly copying and pasting scripts or scripts that require very little work. Notepad++ is program similar to the PowerShell ISE in that it can handle multiple languages, however the ISE is much more versatile. Auto-Completion of PowerShell cmdlets and variable names are incredibly useful while coding longer scripts.
Visual Studio Code is also a viable alternative to PowerShell ISE. The product is a noteworthy take on PowerShell script editing and is worth a look at here - https://4sysops.com/archives/visual-studio-code-vscode-as-powershell-script-editor/. Visually it has a more modern take on script editing:

It has visual identifiers for comments, variables, text strings and has even more advanced features for identifying correct brackets keywords and more.
ISE Plug-ins and Additional Tools
Plug-ins for ISE provide even more functionality for those coding in PowerShell. Additional functionality and features can be added to PowerShell ISE with plug-ins created by third party authors. Here are some sample plug-ins for the PowerShell ISE program:
ISE Steroids - http://www.powertheshell.com/isesteroids/
ISE Steroids makes coding within the ISE more interactive. The plug-in provides assistance with your coding, making sure that the correct syntax is used.
For example, the right use of quotes ‘ or “ is shown below:

The plug-in also provides help on PowerShell cmdlets:

PSharp Plug-in for PowerShell
The PSharp ISE plug-in, created by PowerShell MVP Doug Finke, was designed to make PowerShell ISE more powerful than it already is. The plug-in allows for identifying variables, commands and functions with a single keystroke. Like any other, it is worth evaluating to see if it meets your needs.

http://www.powershellmagazine.com/2013/08/18/psharp-makes-powershell-ise-better/