This chapter presents a user interface to view and edit bindings.
A good way to learn about how a widget works is to examine the bindings that are defined for it. This chapter presents a user interface that lets you browse and change bindings for a widget or a class of widgets.
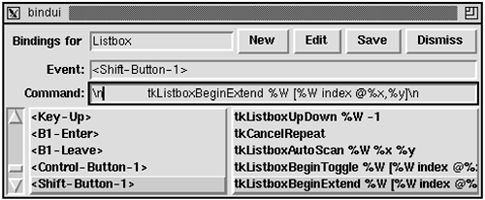
The interface uses a pair of listboxes to display the events and their associated commands. An entry widget is used to enter the name of a widget or a class. There are a few command buttons that let the user add a new binding, edit an existing binding, save the bindings to a file, and dismiss the dialog. Here is what the display looks like:

Example 46-1. A user interface to widget bindings
proc Bind_Interface { w } {
   # Our state
   global bind
   set bind(class) $w

   # Set a class used for resource specifications
   set frame [toplevel .bindui -class Bindui]
   # Default relief
   option add *Bindui*Entry.relief sunken startup
   option add *Bindui*Listbox.relief raised startup
   # Default Listbox sizes
   option add *Bindui*key.width 18 startup
   option add *Bindui*cmd.width 25 startup
   option add *Bindui*Listbox.height 5 startup

   # A labeled entry at the top to hold the current
   # widget name or class.
   set t [frame $frame.top -bd 2]
   label $t.l -text "Bindings for" -width 11
   entry $t.e -textvariable bind(class)
   pack $t.l -side left
   pack $t.e -side left -fill x -expand true
   pack $t -side top -fill x
   bind $t.e <Return> [list Bind_Display $frame]

   # Command buttons
   button $t.quit -text Dismiss
      -command [list destroy $frame]
   button $t.save -text Save
      -command [list Bind_Save $frame]
   button $t.edit -text Edit
      -command [list Bind_Edit $frame]
   button $t.new -text New
      -command [list Bind_New $frame]
   pack $t.quit $t.save $t.edit $t.new -side right

   # A pair of listboxes and a scrollbar
   scrollbar $frame.s -orient vertical
      -command [list BindYview
         [list $frame.key $frame.cmd]]
   listbox $frame.key
      -yscrollcommand [list $frame.s set]
      -exportselection false
   listbox $frame.cmd
      -yscrollcommand [list $frame.s set]
   pack $frame.s -side left -fill y
   pack $frame.key $frame.cmd -side left
      -fill both -expand true

   foreach l [list $frame.key $frame.cmd] {
      bind $l <B2-Motion>
         [list BindDragto %x %y $frame.key $frame.cmd]
      bind $l <Button-2>
         [list BindMark %x %y $frame.key $frame.cmd]
      bind $l <Button-1>
         [list BindSelect %y $frame.key $frame.cmd]
      bind $l <B1-Motion>
         [list BindSelect %y $frame.key $frame.cmd]
      bind $l <Shift-B1-Motion> {}
      bind $l <Shift-Button-1> {}
   }
   # Initialize the display
   Bind_Display $frame
}
The Bind_Interface command takes a widget name or class as a parameter. It creates a toplevel and gives it the Bindui class so that resources can be set to control widget attributes. The option add command is used to set up the default listbox sizes. The lowest priority, startup, is given to these resources so that clients of the package can override the size with their own resource specifications.
At the top of the interface is a labeled entry widget. The entry holds the name of the class or widget for which the bindings are displayed. The textvariable option of the entry widget is used so that the entry's contents are available in a variable, bind(class). Pressing <Return> in the entry invokes Bind_Display that fills in the display.
The Bind_Display procedure fills in the display with the binding information. The bind command returns the events that have bindings, and what the command associated with each event is. Bind_Display loops through this information and fills in the listboxes.
The two listboxes in the interface, $frame.key and $frame.cmd, are set up to work as a unit. A selection in one causes a parallel selection in the other. Only one listbox exports its selection as the PRIMARY selection. Otherwise, the last listbox to assert the selection steals the selection rights from the other widget. The following example shows the bind commands from Bind_Interface and the BindSelect routine that selects an item in both listboxes:
Example 46-3. Related listboxes are configured to select items together
foreach l [list $frame.key $frame.cmd] {
   bind $l <Button-1>
      [list BindSelect %y $frame.key $frame.cmd]
   bind $l <B1-Motion>
      [list BindSelect %y $frame.key $frame.cmd]
}
proc BindSelect { y args } {
   foreach w $args {
      $w select clear 0 end
      $w select anchor [$w nearest $y]
      $w select set anchor [$w nearest $y]
   }
}
A single scrollbar scrolls both listboxes. The next example shows the scrollbar command from Bind_Interface and the BindYview procedure that scrolls the listboxes:
The BindYview command is used to change the display of the listboxes associated with the scrollbar. The first argument to BindYview is a list of widgets to scroll, and the remaining arguments are added by the scrollbar to specify how to position the display. The details are essentially private between the scrollbar and the listbox. See page 501 for the details. The args keyword is used to represent these extra arguments, and eval is used to pass them through BindYview. The reasoning for using eval like this is explained in Chapter 10 on page 136.
The Listbox class bindings for <Button-2> and <B2-Motion> cause the listbox to scroll as the user drags the widget with the middle mouse button. These bindings are adjusted so that both listboxes move together. The following example shows the bind commands from the Bind_Interface procedure and the BindMark and BindDrag procedures that scroll the listboxes:
The BindMark procedure does a scan mark that defines an origin, and BindDragto does a scan dragto that scrolls the widget based on the distance from that origin. All Tk widgets that scroll support yview, scan mark, and scan dragto. Thus the BindYview, BindMark, and BindDragto procedures are general enough to be used with any set of widgets that scroll together.
Editing and defining a new binding are done in a pair of entry widgets. These widgets are created and packed into the display dynamically when the user presses the New or Edit button:
Example 46-6. An interface to define bindings

proc Bind_New { frame } {
   if [catch {frame $frame.edit} f] {
      # Frame already created
      set f $frame.edit
   } else {
      foreach x {key cmd} {
         set f2 [frame $f.$x]
         pack $f2 -fill x -padx 2
         label $f2.l -width 11 -anchor e
         pack $f2.l -side left
         entry $f2.e
         pack $f2.e -side left -fill x -expand true
         bind $f2.e <Return> [list BindDefine $f]
      }
      $f.key.l config -text Event:
      $f.cmd.l config -text Command:
   }
   pack $frame.edit -after $frame.top -fill x
}
proc Bind_Edit { frame } {
   Bind_New $frame
   set line [$frame.key curselection]
   if {$line == {}} {
      return
   }
   $frame.edit.key.e delete 0 end
   $frame.edit.key.e insert 0 [$frame.key get $line]
   $frame.edit.cmd.e delete 0 end
   $frame.edit.cmd.e insert 0 [$frame.cmd get $line]
}
The -width 11 and -anchor e attributes for the label widgets are specified so that the Event: and Command: labels will line up with the Bindings for label at the top.
All that remains is the actual change or definition of a binding and some way to remember the bindings the next time the application is run. The BindDefine procedure attempts a bind command that uses the contents of the entries. If it succeeds, then the edit window is removed by unpacking it.
The bindings are saved by Bind_Save as a series of Tcl commands that define the bindings. It is crucial that the list command be used to construct the commands properly.
Bind_Read uses the source command to read the saved commands. The application must call Bind_Read as part of its initialization to get the customized bindings for the widget or class. It also must provide a way to invoke Bind_Interface, such as a button, menu entry, or key binding.
Example 46-7. Defining and saving bindings
proc BindDefine { f } {
   if [catch {
      bind [$f.top.e get] [$f.edit.key.e get]
         [$f.edit.cmd.e get]
   } err] {
      Status $err
   } else {
      # Remove the edit window
      pack forget $f.edit
   }
}
proc Bind_Save { dotfile args } {
   set out [open $dotfile.new w]
   foreach w $args {
      foreach seq [bind $w] {
         # Output a Tcl command
         puts $out [list bind $w $seq [bind $w $seq]]
      }
   }
   close $out
   file rename -force $dotfile.new $dotfile
}
proc Bind_Read { dotfile } {
   if [catch {
      if [file exists $dotfile] {
         # Read the saved Tcl commands
         source $dotfile
      }
   } err] {
      Status "Bind_Read $dotfile failed: $err"
   }
}
