
![]()
Applying the Proper Security Model to Support Your Solutions
Although one chapter is not nearly enough to cover all of its facets, I would be remiss to completely omit security considerations in this book. The world of Salesforce.com security is vast and involves a number of features and intricacies. However, I believe that I can break down the key security elements, as they relate to Salesforce.com development without code, in a meaningful, understandable way to help you as you build declarative solutions on the platform.
It’s hard, if not impossible, to find two organizations with identical security models. Each organization has its own needs, considerations, and concerns, resulting in a unique sharing configuration. It hardly needs to be mentioned that security should be a key piece of any implementation. Even if your client or organization has not presented you with specific security requirements, you will need to ensure that your solution has not put the company at an inappropriate, avoidable level of risk. I am purposefully using the word “inappropriate,” as all solutions inevitably carry some security risks (even if the risk is that the system is too restrictive).
In this chapter, I’ll walk you through specific security elements that should be assessed and updated, as needed, when developing declarative solutions within Salesforce.com and explain how they can be addressed together to build an effective, reliable security model. In particular, I will focus on those security elements that directly impact your users’ ability to access data within the org. This chapter will cover the following topics:
- object and field permissions
- profiles
- permission sets
- organization-wide sharing defaults
- sharing rules
This chapter’s primary focus will be on how your users will interact with objects, fields, and records within Salesforce.com. I will not be covering any security topics related to login restrictions, such as IP ranges or login time. Additionally, since this book focuses on configuration-based solutions, I will not be addressing any items specifically related to code (e.g., access to Apex classes, access to Visualforce pages, Apex sharing rules).
Establishing a Sensible Strategy
There is no one-size-fits-all solution that can be assumed to work perfectly across all organizations, even pertaining to those with similar security requirements. To that end, I will not provide a specific approach that you must always follow. However, there are some key considerations that you should review to ensure that you create a successful security component as part of your implemented solutions. The following are some questions you should ask yourself:
- What permissions will be needed to perform critical or required operational activities? Each user will need at least the permissions necessary to carry out her responsibilities within Salesforce.com. This may seem obvious, but it is overlooked quite often.
- Do requirements exist that call for the explicit prevention/restriction of access for specific individuals or groups of individuals? If so, you must be careful not to establish an oversimplified security model that grants too much access to certain individuals. You should only provide higher levels of access to those required to have it.
- Does an open-sharing model present notable risk? Just because there is not a requirement to provide specific field or object permissions, it does not mean that restricting access to the field or objects for the related user(s) is your only option. You may decide that you are willing to allow individuals to have more access than is required per documented business needs. This comes down to an analysis of the potential value in providing the additional access versus the associated risk in doing so.
- If you are rebuilding a solution from another system in Salesforce.com: were there any security configurations lacking in my previous app that I would have wanted? What about configurations that were present but did not prove helpful or effective? You may be able to glean significant value from looking at your own past experience to determine specific configurations that should or should not be included in your current solution.
No matter the size or complexity of the solution you are building, you will need to ask these questions and others to have a strong grasp of your organization or client’s security requirements. Tread carefully and pay attention to detail. Repeated audits and deep testing of your security configurations are a wise investment.
Understanding the Salesforce.com Security Model
Before I dive into each element that impacts your users’ ability to see and/or interact with data within your Salesforce.com org, I want to provide some context around how the security model works overall. There are two high-level groupings that are critical to understand:
- object and field permissions
- record access via sharing
Object and Field Permissions
A user’s permission to modify a specific object or field can be broken down to four parts encompassed by CRUD (“Create,” “Read,” “Update,” “Delete”). For standard and custom objects in Salesforce.com, edit is the term used in place of update. That explains why I previously referred to these permissions as “CRED.” Logical rules exist in the program to ensure a sensible configuration of the CRED settings. For example, “Create,” “Edit,” and “Delete” cannot be granted if “Read” has not been granted, since “Read” is required for any of the dependent actions. Additionally, “Edit” is required in order for the “Delete” permission to be provisioned. Figure 14-1 shows full access being granted for the Account object.

Figure 14-1. Full CRED permissions to Account records enabled for a specific profile in Salesforce.com
Additionally, special permissions called “View All” and “Edit All” can be granted to ensure the highest-possible levels of “Read” and “Edit” access, respectively. If these permissions are enabled for a particular user, that user can view or edit all records for that object regardless of the organization-wide default setting or any other sharing rules.
Overlaying object permissions are field permissions, known as “Field-Level Security” within Salesforce.com. Two settings are presented at the field level: “Visible” and “Read-Only.” These values are represented differently with the newer “Enhanced Profile User Interface” setting enabled. To use that view, navigate to Setup ![]() Customize
Customize ![]() User Interface and check “Enable Enhanced Profile User Interface.” Enabling that setting will make the field-level security setting terms identical to those at the object level. Table 14-1 shows the equivalent object-level permissions for “Field-Level Security” settings.
User Interface and check “Enable Enhanced Profile User Interface.” Enabling that setting will make the field-level security setting terms identical to those at the object level. Table 14-1 shows the equivalent object-level permissions for “Field-Level Security” settings.
Table 14-1. “Field-Level Security” Permissions Translated to the Equivalent Permissions at the Object Level
Enhanced Profile User Interface | Standard Profile User Interface | |
|---|---|---|
Visible | Read-Only | |
No access | ||
“Read” | ✓ | ✓ |
“Read”, “Edit” | ✓ | |
Figures 14-2 and 14-3 show possible configurations for the Created By field, as presented via the two profile user interfaces that are available within Salesforce.com.

Figure 14-2. In this configuration, the profile has read-only permission for accessing the Created By field. This image shows the original view, in which the “Enhanced Profile User Interface” is disabled.1
![]()
Figure 14-3. This image shows how these permissions are displayed when “Enhanced Profile User Interface” is enabled. The profile has read permission for accessing the Created By field.
Record Access via Sharing
Object permissions are not the only determinant of whether you can view or edit a record. If your org does not have an open-sharing model, the object permissions alone will not necessarily allow you to view or modify any records. In that case, you must also be granted the ability to view or manipulate the desired record via sharing. For example, although you may have the ability to read/view Account records, you will not be able to view those that have not been shared with you through your org settings. Table 14-2 breaks down how the CRED permissions work for record access in terms of allowing a user to view a specific record.
Table 14-2. Combinations of Object Permissions and Sharing Access and How They Impact the Ability to View Records
Account read permission | Access to Account record “A” | Able to view Account record “A”? |
|---|---|---|
No | No | No |
Yes | No | No |
Yes | Yes | Yes |
Access to one or more records can be granted to a user a few different ways:
- organization-wide defaults
- sharing rules
- “View All”/“Edit All” permissions
Practical Application of Security Elements
So far in this chapter, we’ve been looking at a high-level conceptual security framework for field- and object-level security. Now it’s time to dive into these areas in more detail and see how to apply these elements within your own org.
Field-Level Security
When you create a new field, you have an opportunity to properly configure the related security settings. Although it might be tempting to rush through the “Field-Level Security for Profile” screen to set up your new field, I highly recommend that you take the time to closely review the access that is granted to each profile and adjust the settings as needed. You might not need to create any new User profiles in conjunction with an implementation of functionality; however, you will need to at least ensure that related permissions have been properly set for your existing profiles. Figure 14-4 shows the screen you are presented with when creating a new custom field.
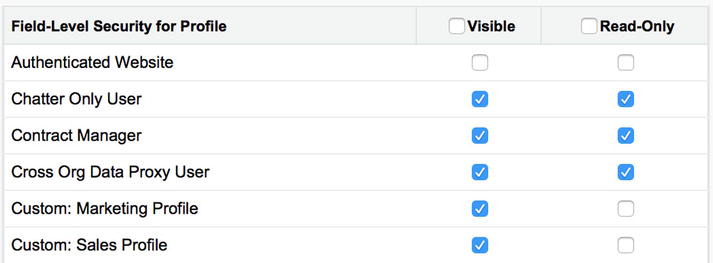
Figure 14-4. When you create a new field, you will need to review the security settings associated with existing profiles on the “Field-Level Security for Profile” screen
Once you have configured the initial settings, you can update them by following these navigation paths:
- Standard objects: Setup
 Customize [object name] Fields Field Label
 - Custom objects: Setup Create [object name] Field Label
Once you are on the custom field detail page, click the “Set Field-Level Security” button. The screen format is identical to the screen shown in Figure 14-4.
Object-Level Security
Salesforce.com handles object-level security settings differently from how it handles field-level security. As you saw in Figure 14-4, you are prompted to set the permission level for each profile during field creation. However, no such screen exists to set profile permissions for the creation of custom objects. With the exception of the standard “System Administrator” profile (which has full access to all standard and custom objects), profiles are not initially granted any permission to access a new custom object.
You can establish your object-level permissions in one of two ways: If only a few profiles require permission to access the object in question, you can simply navigate to the profile itself and update the permissions for the specific object. You will need to scroll down to either the “Standard Object Permissions” or the “Custom Object Permissions” section, depending on the type of object. Figure 14-5 shows the “Custom Object Permissions” section in edit mode.

Figure 14-5. The “Custom Object Permissions” section of the “Profile Edit” screen, which allows you to modify object permission for a particular profile
A valuable option for quickly applying object permissions across multiple profiles is enabling the “Enhanced Profile List View” permission and managing your profiles from the profile list view screen. To enable the appropriate view, navigate to Setup ![]() Customize
Customize ![]() User Interface and select “Enable Enhanced Profile List Views.” This interface will allow you to update profiles with object permissions en masse. Once that is enabled, navigate to Setup
User Interface and select “Enable Enhanced Profile List Views.” This interface will allow you to update profiles with object permissions en masse. Once that is enabled, navigate to Setup ![]() Manage Users
Manage Users ![]() Profiles. There, you can create a list view that displays Profile Name and the related permissions. Figure 14-6 shows the desired settings that should be selected to apply permissions for an object called “New Custom Object.”
Profiles. There, you can create a list view that displays Profile Name and the related permissions. Figure 14-6 shows the desired settings that should be selected to apply permissions for an object called “New Custom Object.”

Figure 14-6. When creating a list view for the enhanced profile list view screen, you can select all permissions related to your new object(s) in order to quickly apply a mass edit
Once you’ve created your list view, select the profiles you want to update by checking them and then double-click the permission to be added or removed. See Figure 14-7 for a view of the screen just before double-clicking the permission.

Figure 14-7. To add or remove a permission to multiple profiles at once, select the applicable profiles and double-click the applicable permission setting
After double-clicking on the permission, the window shown in Figure 14-8 will appear, allowing you to add or remove individual settings and apply the change to all of the selected profiles.
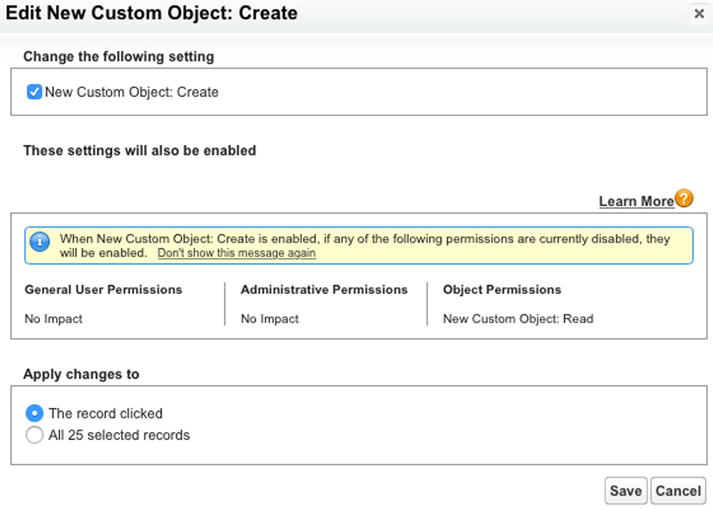
Figure 14-8. After selecting multiple rows (profiles) from an enhanced profile list view, double-clicking a field to edit it will bring up the “Edit New Custom Object” window. Here, you can apply the change to the record that was clicked or to all selected records
Using Permission Sets and Validation Rules
As you’ve seen thus far, managing your field- and object-level security requirements centers on the configuration of your User profiles. A few other features can be utilized to extend your security configuration further to meet certain requirements. While it is commonly the case that all Users in an existing profile would need the same permissions to access a new field or object, there can be variance within that group of Users. That variance might lead you to consider using permission sets or validation rules in your security model.
Take a User profile called “Tier 1 Support,” with 50 Users, as an example. Assume that 10 of those 50 support individuals need the ability to edit records for a new custom object called Asset Warranty; these users need to be able to update a few fields on that record based on customer input. The remaining 40 users within that profile, however, need only to view Product Warranty records. You have three primary options for providing the first group (the 10 Users) with the required “Product Warranty Edit” permission. Figure 14-9 presents a visual representation of these options.
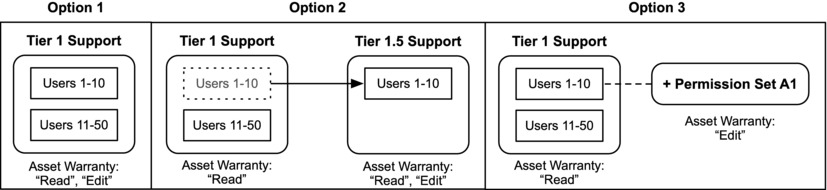
Figure 14-9. Three possible options for providing additional permissions to a subset of Users in one profile
So, which option is the best? As always, it depends on your situation.
- Option 1: In this scenario, you grant all of the Users within the group profile the “Account Read” and “Account Edit” permissions. This is the simplest approach and it may be a completely legitimate solution for your organization. However, you are potentially introducing risk by providing 40 individuals the extraneous ability to edit Asset Warranty records.
- Option 2: Here, you separate out the 10 higher-access Users and provide only them with “Read” and “Edit” permissions to access the Asset Warranty object. This will definitely meet your needs, although you now have an extra profile to manage. If you frequently were to go down this route for similar situations, you would potentially find yourself with an inordinate number of profiles. Most likely, you would not want to create a completely new profile for minor permission differences.
- Option 3: Here, you use a permission set to grant “Edit” access only to specified individuals. This allows you to avoid Option 1, in which users have extraneous permission, and Option 2, in which a second profile must be maintained.
The permission set is an extremely effective feature within Salesforce.com; I highly encourage you to consider using it when it is applicable. Before the days of the permission set, all you had to work with for object and field permissions was the User profile. This required provisioning users a profile for each unique set of permissions; in some cases, those unique sets resulted in an extreme number of profiles (even in some smaller organizations).
Permission sets provide the ability to enforce a “least privilege” model by establishing the minimal number of impactful profiles and giving them the broadest set of permissions. Once the profiles are put in place, you can focus on variances and additional needs by creating and assigning permission sets to users. With permission sets, you avoid the need to create new profiles for minor differences in permissions. Instead, you can create one primary profile for the similar permission groupings and then layer a permission set on top of the profile for each unique group of permissions. Figure 14-10 shows the difference between a profile-only approach and one that uses permission sets.

Figure 14-10. Without permission sets, each unique grouping of permissions must be assigned its own profile. With permission sets, on the other hand, you can consolidate similar groupings and assign permission sets to handle the variances.
Another type of exception to the profile-only approach may emerge, as well. Say you have a hypothetical profile of 100 users. If you want 99 of them to have the ability to edit the NewObj object but 1 of them explicitly not to have editing permission, your options differ slightly from the “Tier 1 Support” example I used earlier in which you only wanted to grant 10 of 50 users access to edit records. Here, again, you could move one of the two groups to a different profile or you could add a permission set to grant the additional permission. You could also take a restrictive approach that would basically grant editing permission to the set of 100 users but block that access for that 1 user. Creating a validation rule would prohibit a specific user from editing the field in question. Figure 14-11 shows these two options.

Figure 14-11. If you have a very small subset of users that require reduced access, you can add a profile or restrict the access by creating a validation rule
Option 1 or 2 may best meet your requirements. Although it should only be seen as a way to handle outlier scenarios and exceptions, you may also consider looking at Option 3. By taking that approach, you minimize the setup and maintenance required for your profiles and permission sets. Of course, there’s a cost (isn’t there always?). In the case of Option 3, you have to manage the validation rule itself.
The validation rule can be formulated a few different ways for this example. One way is to construct it to restrict changes to the Name field for new and existing records for the user ID “005F0000004gHbf.” You would build the following formula for the validation rule:
ISCHANGED(Name) && $User.Id = "005F0000004gHbf"
To restrict changes to the Name field for existing records only for this user ID, the formula would be:
NOT(ISNEW()) && ISCHANGED(Name) && $User.Id = "005F0000004gHbf"
To apply this to an entire object, you would replace “Name” with “Last Modified Date.” For example, to restrict changes to all records for a given object made by the same user, you would use:
ISCHANGED(LastModifiedDate) && $User.Id = "005F0000004gHbf"
However, going with a validation rule for security elements also has trade-offs. The previous option requires additional administration responsibilities to maintain the security model. You can minimize those responsibilities by creating a custom setting and managing the affected users via a custom setting field (as opposed to hardcoding the User ID), but you’ll still need to make sure that your administrators are aware of these exceptions.
![]() Note Using validation rules as part of a security model is not intended to be best practice but rather a workaround for very specific, extreme circumstances. An example of a situation in which you might want to use a complex validation rule involving multiple fields and preventing a certain update is if you wanted to exempt your system administrator from a general rule and allow an override.
Note Using validation rules as part of a security model is not intended to be best practice but rather a workaround for very specific, extreme circumstances. An example of a situation in which you might want to use a complex validation rule involving multiple fields and preventing a certain update is if you wanted to exempt your system administrator from a general rule and allow an override.
Record Access Through Sharing
As I mentioned earlier in the chapter, your profile-based permission to access a certain object does not necessarily mean that you can view or edit that particular record. The sharing model must be considered, as well. The following are a few key areas you should review related to record sharing when you are building solutions within Salesforce.com.
Organization-Wide Defaults
When you create a new custom object, an organization-wide default is set to control the sharing behavior for that particular object. These defaults allow you to “shut down” record access for an entire org before you open it back up for specific use cases via other sharing mechanisms. To manage these settings, navigate to Setup ![]() Security Controls
Security Controls ![]() Sharing Settings. For each object, you have three main options in terms of settings:
Sharing Settings. For each object, you have three main options in terms of settings:
- “Public Read/Write” (default setting): Allows all users with “Read” and “Edit” permissions for an object to view and edit all records related to the object. This is known as an “open sharing” model.
- “Public Read Only”: Only allows all users with “Read” permission for an object to view all records related to it.
- “Private”: Restricts all users from viewing or editing an object. This is known as a “closed sharing” model.
![]() Note The “Public Read/Write/Transfer” setting is an additional option for Leads and Cases. This is similar to “Public Read/Write” but allows an additional sharing of the ability to transfer record ownership.
Note The “Public Read/Write/Transfer” setting is an additional option for Leads and Cases. This is similar to “Public Read/Write” but allows an additional sharing of the ability to transfer record ownership.
It is critical to understand that a user always needs to have the proper object permissions to view or edit a new custom object. Even if you set the organization-wide default to “Public Read/Write,” a user without “Read” access for the object will not be able to view it. Figure 14-12 shows how this works.
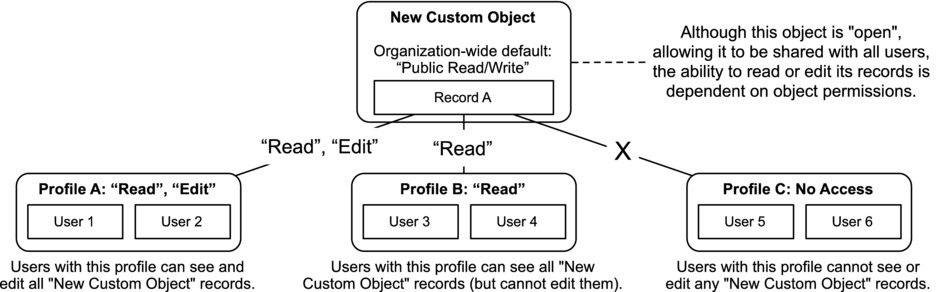
Figure 14-12. Even if your organization-wide default is set to “Public Read/Write,” individual users will still need to have the proper permissions to read or edit records of that object type
The obvious exception to the organization-wide default sharing rules is for the owner of a record since the purpose of a sharing rule is to share a record beyond its owner. The owner of a record interacts with it as though the organization-wide default is set to “Public Read/Write.” For example, if the user Bunker Jones owns a record that is set to private, he can potentially see or edit the record. I say “potentially” because the object permissions still trump everything else. Bunker can only do what his permissions allow, even if he is the record owner. Figure 14-13 shows an object’s access to a record when it has a “Private” sharing model.
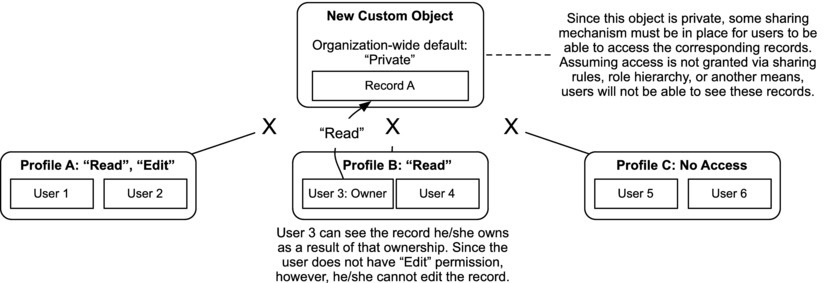
Figure 14-13. A record owner can view and/or edit the record(s) he owns depending on the permissions granted to him. In this case, the owner does not have “Edit” permission, so he can only view the owned record
![]() Note While you can start with either an open (“Public Read Only” or “Public Read/Write”) or closed (“Private”) default setting for sharing your object, the related security settings and rules in Salesforce.com are designed to grant additional access, not to restrict it. In other words, you wouldn’t share object records with all users and then identify specific users or groups that should be removed from that group. Rather, you would start with a closed sharing model and then grant access to the appropriate users. This is sometimes referred to as the “principle of least privilege.”
Note While you can start with either an open (“Public Read Only” or “Public Read/Write”) or closed (“Private”) default setting for sharing your object, the related security settings and rules in Salesforce.com are designed to grant additional access, not to restrict it. In other words, you wouldn’t share object records with all users and then identify specific users or groups that should be removed from that group. Rather, you would start with a closed sharing model and then grant access to the appropriate users. This is sometimes referred to as the “principle of least privilege.”
There are also two additional items related to organization-wide default settings that should be assessed and configured properly: The first is the “Grant Access Using Hierarchies” option, which is presented to you when you create a new custom object. When selected, it shares the record with all users who are higher in the hierarchy than the owner. This applies to users in public groups, as well. If a user is granted access to a record via a public group and that group is configured to grant access using hierarchies, that record will only be shared with users who are above the owner in the hierarchy. As with the previously discussed scenarios, for this to apply the impacted users must have the proper object permissions in place; if they do not have “Read” permission for a record that is shared with them, they will be prevented from viewing the record.
Figure 14-14 shows how this feature works. In this example, assume that the record owner has a Role 3c status and that “Grant Access Using Hierarchies” is enabled. Note that although Role 2a is higher than Role 3c, because they are not directly related in the hierarchy. Users in Role 2a are not granted access to the records owned by users in Role 3c when using this setting.

Figure 14-14. When the “Grant Access Using Hierarchies” setting is enabled for an object, a record owned by a user in Role 3c would be automatically shared with users in Role 2b and Role 1
The other configuration to take note of when establishing the default settings is the (relatively new) ability to set the “Default Internal Access” and “Default External Access” separately. This is extremely useful if you have a Portal or a Community associated with your org. You could, for example, set the organization-wide default for your custom object to “Public Read/Write” for internal users and “Private” for external users. Although I am not specifically covering Portals or Communities in this book, I encourage you to assess your internal and external sharing defaults separately and carefully if you are using either external feature.
![]() Note For custom objects that look up to another object via a Master-Detail relationship, you have the option of inheriting the organization-wide default setting from the Master object or setting it up independently on the Detail object. The selection name is “Controlled by Parent.”
Note For custom objects that look up to another object via a Master-Detail relationship, you have the option of inheriting the organization-wide default setting from the Master object or setting it up independently on the Detail object. The selection name is “Controlled by Parent.”
Sharing Rules
If your organization-wide default setting for your new object(s) is set to “Public Read/Write,” your sharing model is complete. All records for the applicable objects have been shared to the full extent with all users. There is no value in any additional sharing, as it would be redundant.
However, for any objects that have a “Public Read Only” or “Private” sharing default, you will need to review your requirements to determine if the defaults are sufficient. With sharing rules, you can augment the default sharing to create customized access for specific users or users that are members of particular groups or roles. Figure 14-15 shows the type of access that can be provided for different organization-wide defaults via sharing rules for objects.
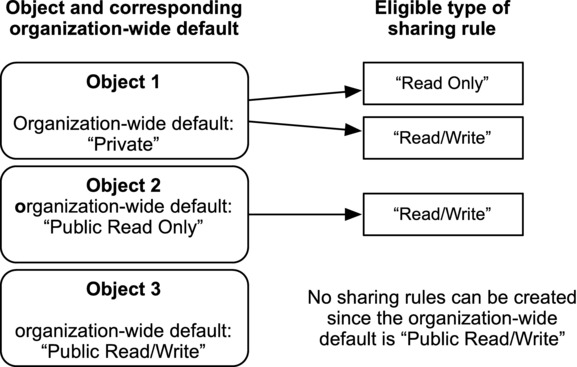
Figure 14-15. The organization-wide defaults for a given object grant more access than already provided via sharing rules
There are three primary types of sharing rules that you can configure yourself:
- criteria-based sharing rules
- owner-based sharing rules
- manual sharing rules
All three rule types allow you to share records with users who are members of specified public groups or roles. Additionally, there are record-based sharing rules, which allow for more granular sharing made directly to users.
Criteria-based rules can satisfy fairly complex sharing needs. You can use Salesforce.com’s criteria builder in the way that was discussed in Chapter 4. Figure 14-16 shows an example of a criteria-based sharing rule for a custom object.

Figure 14-16. A criteria-based sharing rule for a custom object
![]() Note If you want to venture outside of the “development without code” world, Apex sharing rules can go even further than criteria-based sharing rules in handling complexity.
Note If you want to venture outside of the “development without code” world, Apex sharing rules can go even further than criteria-based sharing rules in handling complexity.
Owner-based rules have only one criterion, and that is the role or group of the record owner. Records that are owned by a User with an applicable role or public group will be shared with users in one or more roles or groups. Figure 14-17 shows an owner-based rule that shares records with an owner in Role 1 with Users in Role 3a.
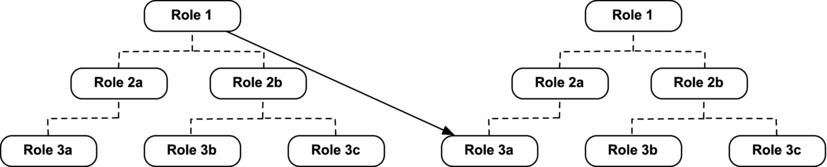
Figure 14-17. This diagram represents an owner-based sharing rule that shares records owned by users in Role 1 with users in Role 3a
In addition to identifying a particular role or group to share records with when using owner-based rules, you can include all Users in lower levels of that group by selecting them, either in the criteria or in the “Shared With” assignment. Figure 14-18 shows how records owned by Users in Role 2b or lower-level roles can be shared with Users in Role 2a.
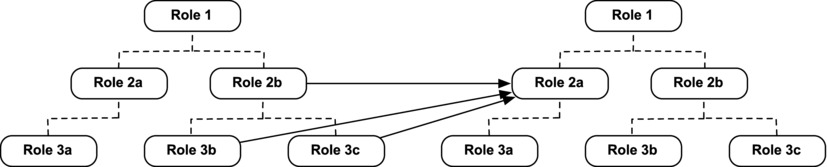
Figure 14-18. An owner-based sharing rule that shares records owned by users in Role 2b or lower-level roles with users in Role 2a
Figure 14-19 displays two owner-based sharing rules, each with unique criteria and access levels.

Figure 14-19. The “Sharing Rules” screen with two owner-based sharing rules
Manual sharing rules are rules that allow records to be shared on an individual record basis. They are managed on the record itself, not on the “Sharing Settings” screen. The key difference between manual sharing rules and the other two types is that manual sharing rules allow records to be shared with specific users in addition to users in groups and roles. Figure 14-20 shows the screen that results from creating a record-based rule to provide Read Only access to three users in different categories: users in a public group, users in a role, and individual users.

Figure 14-20. Three manual sharing rules. Record-based rules can be shared with individual Users in addition to groups and roles
Let’s take a look at a scenario in which all three types of sharing rules are applied to records from the same object. Figure 14-21 shows the different sharing rules and the users that would be given access to the applicable record(s) as a result.
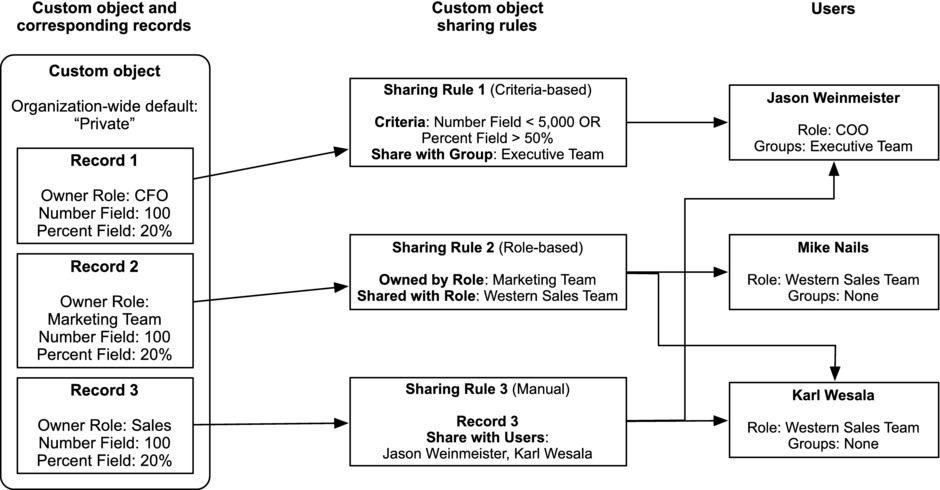
Figure 14-21. In this example, multiple records for the same object are shared via different types of sharing rules. The users with whom the records are shared are shown on the right
It is important to understand the reasons why the sharing rules are being applied as shown in Figure 14-20:
- Record 1 is being shared with Jason Weinmeister through Sharing Rule 1:
- Record 1 meets the sharing rule criteria.
- Jason is a member of the public group that Record 1 is shared with.
- Record 2 is being shared with Mike Nails and Karl Wesala through Sharing Rule 2:
- The role of Record 2’s owner matches the “owned by” role specified in the sharing rule.
- Mike and Karl are members of the role that Record 2 is shared with.
- Record 3 is being shared with Jason Weinmeister and Karl Wesala through Sharing Rule 3:
- Record 2 is being manually shared in Sharing Rule 3.
- The sharing rule grants access specifically to Jason and Karl.
Special permissions called “View All” and “Modify All” can be granted to ensure the highest-possible respective levels of “Read” and “Edit” access. If these permissions are enabled, the organization-wide default has no impact on these settings and the associated user(s) can view or edit all of the records for the corresponding object. For example, consider an object with an organization-wide default setting of “Private.” Typically, access must be granted via ownership or sharing, as described earlier in the chapter. However, “View All” would allow a user to view all records, regardless of what sharing rules exist.
Object Permission and Record-Sharing Overlap
Let’s take a look at a few examples to make sure the basic framework is clear before we more closely review the specific functionality that will help you to accurately and reliably satisfy your security-related requirements.
Figure 14-22 shows three different objects and four corresponding records for each of them. A user’s “View All/Read” access to each record is indicated by the shading. A white record represents a record that is accessible to the user in question and a shaded record represents a record that is inaccessible to the user. The record access granted via sharing is denoted by a line around the particular record and the object read permission is specified below each object. Each circled number is followed by a corresponding explanation for why the record is or is not accessible to the user.
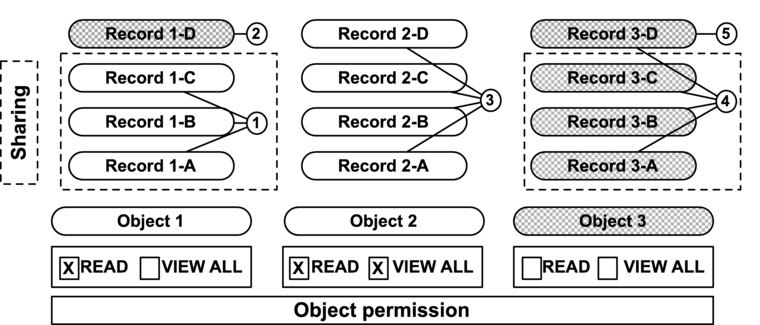
Figure 14-22. This diagram shows how sharing and object permission granted for record access impact a user’s ability to access (view) a particular set of records
The records are or are not accessible for the following reasons:
- Records 1-A, 1-B, 1-C: Accessible
- User has object “Read” permission.
- Access to records has been granted shared via sharing rules.
- The user has the ability to view records for this object and these particular records have been shared with her.
- Record 1-D: Inaccessible
- User has object “Read” permission.
- Access to records has not been granted shared via sharing rules.
- Although the user has the ability to view records for this object, this particular record has not been shared with him. Therefore, the user cannot it.
- Records 2-A, 2-B, 2-C, 2-D: Accessible
- User has object “Read” permission.
- Access to records has not been granted shared via sharing rules.
- User has object “View All” permission.
- Since the user has the “View All” permission, she can access these records. This example mirrors number two (Record 1-D) with one key exception: in this case, the user has the “View All” permission. As a result, the user can view all records for this object, regardless of sharing through other means.
- Records 3-A, 3-B, 3-C: Inaccessible
- User does not have object “Read” permission.
- Access to records has been granted shared via sharing rules.
- In this case, access to the specific records has been granted to the user. However, the user does not have permission to view/read this object’s records. As a result, the user cannot view this record.
- Record 3-D: Inaccessible
- User does not have object “Read” permission.
- Access to records has not been granted shared via sharing rules.
- In this case, access to the specific records has not been granted to the user and she does not have “Read” permission to access this object’s records, so she cannot view the records.
Recap
The most critical takeaway from this chapter is that security requirements and needs must be analyzed as a part of all implementations, even if your security model is well established. Of course, that does not mean that you need to rehash every security-related element across your entire org every time an enhancement or fix is deployed. However, it does mean that any aspects related to permission, sharing, or visibility that pertain to your solution must be updated as needed. In this chapter, the security model was reviewed, specifically in regard to object and field permissions and sharing settings. With the right balance of permissions and access granted via sharing, you can ensure that your users will be able to perform the actions that are needed in their positions while minimizing risk for your client or organization.
__________________________
1All Salesforce.com screenshots in this chapter © copyright Salesforce.com, Inc. Used with permission.