Chapter 5: Working with Data
In this chapter, we are going to review how to work with data so that we can document security events in a way that will allow us to hunt for them effectively. The goal of this approach is to understand the data we are collecting and have everything documented in a way that will allow us to have an idea of what can we hunt for, as well as which data may be missing from our collection process. First, we are going to cover two data models that can be used to help us understand our data sources: OSSEM data dictionaries and MITRE CAR. Then, we are going to close this chapter by reviewing Sigma rules: an open signature format that can be applied to any log file and that can be used to describe and share detections.
In this chapter, we will cover the following topics:
- Using data dictionaries
- Using MITRE CAR
- Using Sigma
Let's get started!
Technical requirements
The following are the technical requirements for this chapter:
- A computer with Python 3 installed (https://www.python.org/downloads/)
- Access to the MITRE ATT&CK Framework (http://attack.mitre.org/)
- Access to the OSSEM project (https://bit.ly/2IWXdYx)
- Access to MITRE CAR (https://car.mitre.org/)
Using data dictionaries
We discussed some of the different data sources that we can collect data from in Chapter 3, Where Does Data Come From?, where we stated that we can typically distinguish between three types of data logs sources: endpoint data sources, network data sources, and security data sources.
In this chapter, we are going to learn how using data dictionaries will help us relate the data sources to the data analytics we've gathered. We'll use these data dictionaries to give the events meaning through standardization.
The amount of data that will be collected will vary, depending on the organization's infrastructure, security policies, and resources. So, the first thing you must do is identify the data sources that you have available in your organization's environment. Once you have identified all these data sources, you can use a Collection Management Framework (CMF) to record which tools you are using and which information you are gathering from them.
Important Note
We talked about CMFs in Chapter 1, What Is Cyber Threat Intelligence?, but if you need more information, you can check out Dragos' paper about CMF for ICS: https://www.dragos.com/wp-content/uploads/CMF_For_ICS.pdf?hsCtaTracking=1b2b0c29-2196-4ebd-a68c-5099dea41ff6|27c19e1c-0374-490d-92f9-b9dcf071f9b5. A CMF could be as simple as an Excel worksheet, as long as it allows you to track your data sources comfortably.
If you have trouble identifying the possible data sources, bear in mind that you can use the MITRE ATT&CK Framework for this too. Each technique that's covered by the frameworks has a score card, along with a list of possible data sources that can be leveraged to detect it. See, for example, the score card of the phishing technique:

Figure 5.1 – MITRE ATT&CK T1566 phishing score card on 4/21/2020
Roberto Rodriguez also created the ATT&CK Python Client (https://github.com/hunters-forge/ATTACK-Python-Client), which is very useful for interacting with the ATT&CK data in a friendly and faster way. For example, you could get a list of all the available data sources by technique just by running the following script after installing it through pip3 install attackcti. Open the Python interpreter and type in the following lines to get a list of techniques related to their data sources:
from attackcti import attack_client
lift = attack_client()
enterprise_techniques = lift.get_enterprise_techniques()
for element in enterprise_techniques:
try:
print('%s:%s' % (element.name, element.x_mitre_data_sources))
except AttributeError:
continue
We will learn more about this later on, when we review how to measure the effectiveness of your hunting team.
Once you've identified your data sources, it's time to start understanding your data so that you can map potential malicious activity to it. With this system, you can start mapping even before you start to analyze the data itself. There are a couple data models that can be followed to do this. First, we are going to talk about Roberto and Jose Rodriguez' OSSEM project, which has gained a lot of traction since it was launched. It is also the one we are going to use in the following chapters to plan our hunts.
Open Source Security Events Metadata
In case you aren't familiar with it, the Open Source Security Events Metadata (OSSEM) Project provides an open source standardized model for security events. These events are documented in the form of dictionaries so that you can relate the data sources to the data analytics that's going to be used. This will help you detect the adversary in the environment, whether it is Windows-, macOS-, or Linux-based. The data dictionaries will give meaning to the events to help us understand them. Standardizing the way we parse data will not only allow us to query and correlate it, but the sharing of the detections themselves.
One of the really useful components of OSSEM is the data dictionary section, which strives to provide documentation for the different events that are available through security monitoring tools such as Endpoint Detection and Response (EDR).
The OSSEM project is divided into four categories:
- ATT&CK Data Sources: Descriptions of the data sources are mentioned in the MITRE ATT&CK Enterprise Matrix.
- Common Information Model (CIM): This provides us with a standard way to parse security events. Here, you can find a schema or template for each of the entities that could appear in a security event.
- Data Dictionaries: These contain specific information about security events, organized according to the related operating system. Each dictionary represents an event log. The ultimate goal of our data dictionaries is to avoid the ambiguities that may occur by consuming data from different sets of data sources.
- Data Detection Model: The objective of this model is to establish the relationship between ATT&CK and secondary data sources, enabling the correlation with threat actor techniques.
Let's review how this could work by looking at a little example with MITRE ATT&CK Technique T1574.002 – DLL Side-Loading. Consider a malicious artifact in the form of an .exe file that, once executed, will load a malicious dynamic-link library (DLL).
Just by looking at the ATT&CK Framework, we can see that this technique is associated with three types of data sources: Loaded DLLs, Process monitoring, and Process use of network:

Figure 5.2 – MITRE ATT&CK T1574.002 – DLL Side-Loading score card on 4/21/2020
Since an .exe file was executed, a process must have been created. Although the project has gone through major changes during the writing of this book, if we check the OSSEM Detection Data Model (http://bit.ly/3rvjhvj) and search for those data sources, we will find something similar to the following:
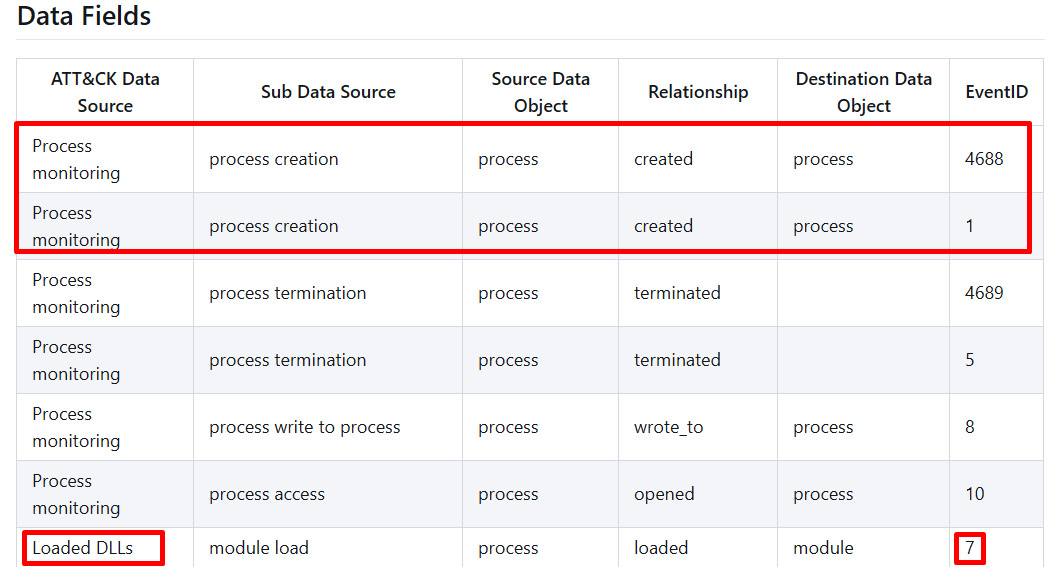
Figure 5.3 – Detection data model – process object relationships
Here, we can see that process creation is related to Sysmon EventID 7 and WMI EventID 4688, while Loaded DLLs is related to Sysmon EventID 7. We could also check the process use of network, but for the sake of this example, we are going to assume the DLL is contained within the malware.
Important Note
System Monitoring (Sysmon) is part of Mark Russinovich's Sysinternals Suite (https://docs.microsoft.com/en-us/sysinternals/downloads/sysinternals-suite). It is a system service and a device driver that monitors and logs system activity to the Windows event log. We can use XML rules to adjust its configuration to include and exclude uninteresting items according to our collection needs.
Sysmon provides information about file creation and modification, network connection, process creation, loading drivers or DLLs, and other really interesting features, such as the possibility to generate hashes of all the binary files that are running on a system.
So far, we know that there are at least two events we can check to verify whether this technique is being used. However, let's say we did our homework and created the data dictionaries for these events (process creation, https://github.com/hunters-forge/OSSEM/blob/master/data_dictionaries/windows/sysmon/events/event-1.md, and image loaded, https://github.com/hunters-forge/OSSEM/blob/master/data_dictionaries/windows/sysmon/events/event-7.md). By doing this, we can see which other fields can be used to relate these two processes together; for example, process_guid, process_name, process_path, file_name_original, hash, and so on.
This is a basic example, but it's specific enough to show you how creating data dictionaries and working with a detection model can help you save time and understand what to look for, even before you start querying your data. We will learn more about data dictionaries in the following chapters.
Lastly, bear in mind that the OSSEM project is still in its alpha stage, so all contributions are welcome!
Next, we are going to go through the data model that's implemented by MITRE CAR.
Using MITRE CAR
The data model that's implemented by MITRE Cyber Analytics Repository (MITRE CAR) (https://car.mitre.org/) was inspired by STIX's Cyber Observable eXpression (CybOX ™), and is an "organization of objects that may be monitored from a host-based or network-based perspective." Each of the objects is defined by the actions that can happen to it and the observable properties, called fields, that can be captured by a sensor.
So, for example, the CAR data model for a file looks as follows:
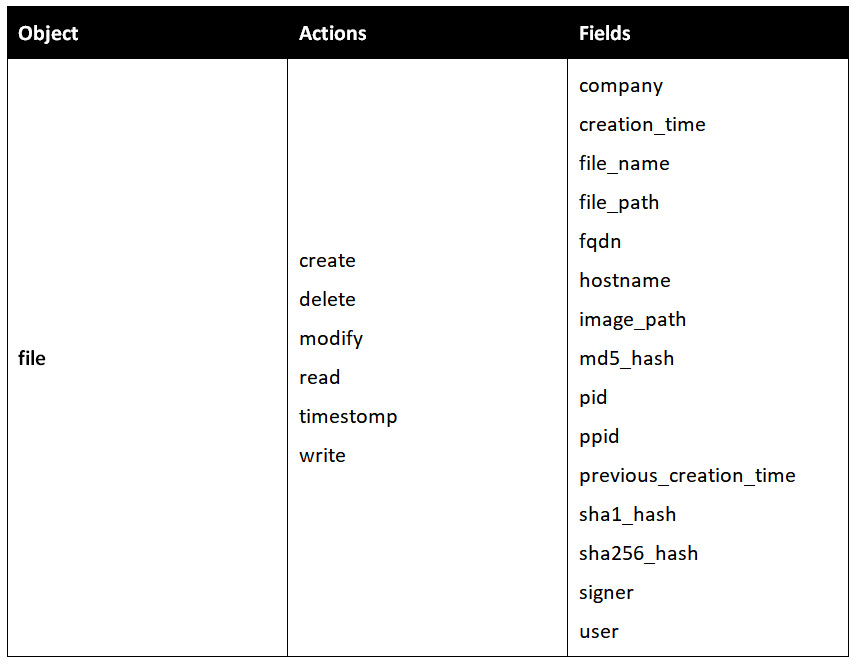
Figure 5.4 – MITRE CAR file data model example
To put it mildly, CAR's intent is to record detections based on the ATT&CK Framework. So, every analytic provided by CAR (https://car.mitre.org/analytics/) references the ATT&CK tactics and techniques detected, accompanied by the hypothesis behind the analytic.
Perhaps the most interesting thing about MITRE CAR is that it provides a list of possible detection implementations that you can just copy, paste, and use in your own environment. CAR even offers support for different systems, as shown in the following screenshot:

Figure 5.5 – MITRE CAR CAR-2014-04-003: PowerShell execution implementations
Finally, at the bottom of the page, you'll find an event snippet that can be run in order to trigger the analytic as follows:
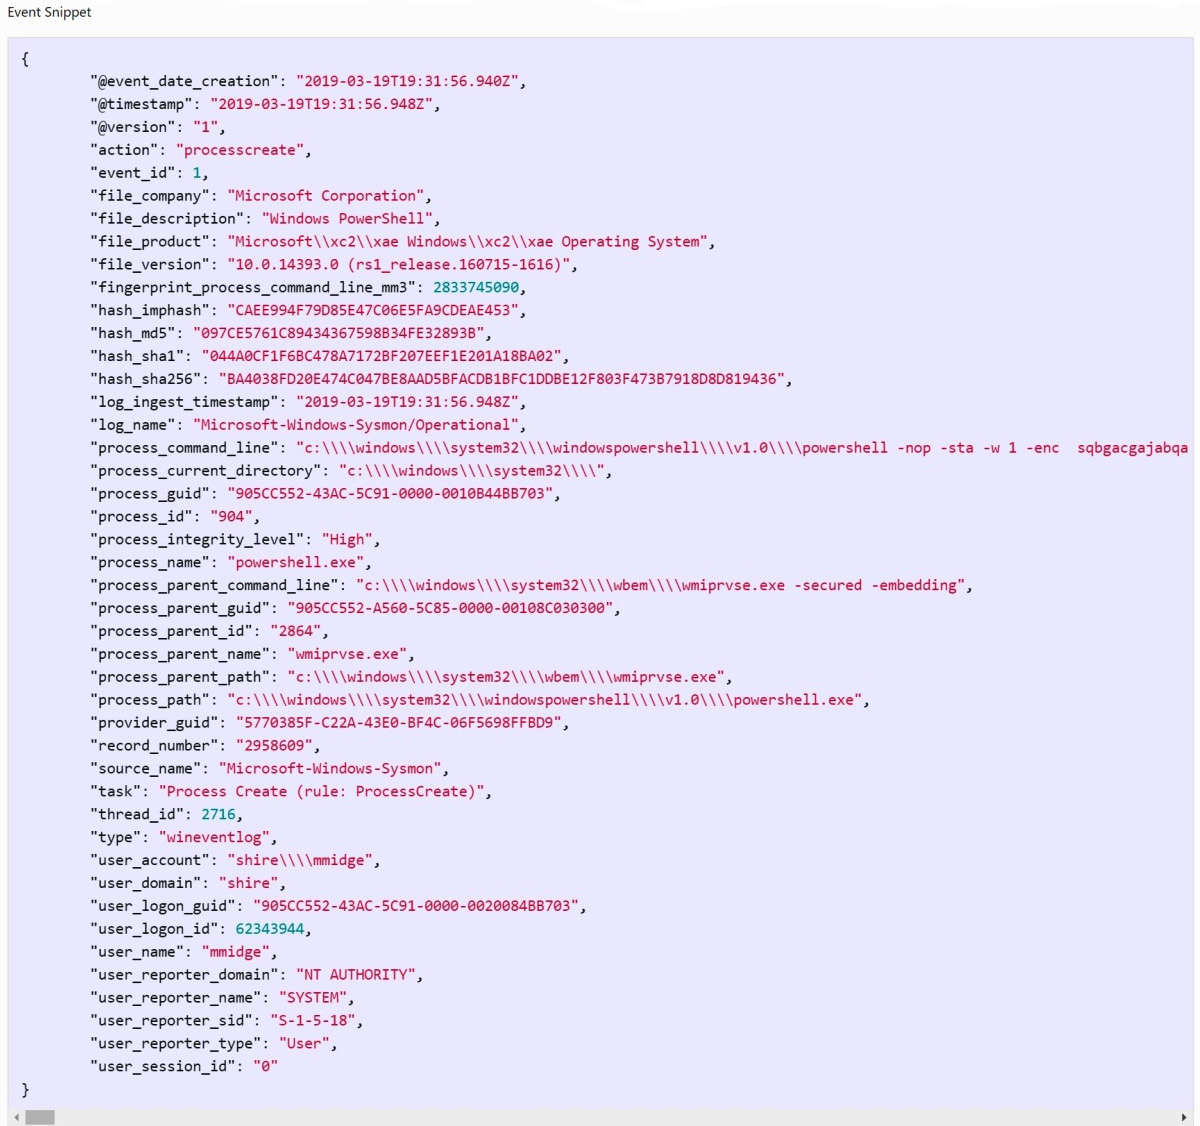
Figure 5.6 – MITRE CAR CAR-2014-04-003: PowerShell event snippet
Next, we are going to review CARET, the graphical user interface of the CAR project, which helps us visualize the relationship between the MITRE ATT&CK Framework and the CAR repository.
CARET – The CAR Exploitation Tool
CARET (https://mitre-attack.github.io/caret/) is the graphical user interface of the CAR project and serves as a representation of the relationships between the MITRE ATT&CK Framework and the CAR repository. Its goal is to help you determine which TTPs you may detect, what data you have or are missing, and which sensors are needed to gather the data.
The following screenshot shows an example of how to use CARET to review the analytics that are available to help us detect Lazarus Group TTPs:

Figure 5.7 – CARET – Lazarus Group TTPs analytics
Using Sigma
To put it simply, Sigma rules are the YARA rules of log files. They were created by Florian Roth (https://github.com/Neo23x0/sigma). Sigma is an open signature format that can be applied to any log file and that can be used to describe and share detections.
Since they were first presented in 2007, Sigma rules have been widely adopted by the cybersecurity community and can be converted into many SIEM formats. If you are not familiar with SIEMs, you are probably not aware that each vendor will use its own proprietary format. Add this to the already mentioned differences between data sources and you'll realize that having a common language for sharing detections is pretty useful and can solve lots of problems.
But how does this work? First, we create the Sigma rule file, which is a generic YAML-based formatted file. Then, once we've filled in all the information for the rule, we convert the file in two different ways: one for the specific formatting needed for our SIEM product; the other for the specific mapping for the fields our environment is using. The first ones are written by the community, while the others are gathered from a list of config files available (/sigma/tool/config). Alternatively, you can set up your own to make sure that the rule converts into a compatible mapping.
You can read the specifications on writing a Sigma rule by going to the repository's wiki page (https://github.com/Neo23x0/sigma/wiki/Specification), but the following is the general structure of a Sigma rule:
title
id [optional]
related [optional]
- type {type-identifier}
id {rule-id}
status [optional]
description [optional]
author [optional]
references [optional]
logsource
category [optional]
product [optional]
service [optional]
definition [optional]
...
detection
{search-identifier} [optional]
{string-list} [optional]
{field: value} [optional]
...
timeframe [optional]
condition
fields [optional]
falsepositives [optional]
level [optional]
tags [optional]
...
[arbitrary custom fields]
Basically, Sigma rules are divided into four sections:
- Metadata: All optional information after the title
- Log source: Log data that the detection should be applied to
- Detection: The searcher's identifiers that are going to be needed
- Condition: A logical expression that defines the requirements that must be met for an alert to be triggered
Florian Roth published an article explaining how to write Sigma rules (https://www.nextron-systems.com/2018/02/10/write-sigma-rules/), in which he advises us to use an existing rule in the repository as a base for creating our new rule with the status set to experimental. This will let other people know that the rule has not been tested yet.
So, the first step would be to clone the Sigma repository and install sigmatools either from the repository, as shown here, or through pip install sigmatools:
git clone https://github.com/Neo23x0/sigma/ pip install -r tools/requirements.txt
Then, we open the repository folder and choose a similar rule to the one we are going to create. Once we've adjusted as many fields as necessary, it's important to double-check that the information in our logsource is accurate, since it's going to be used by the Sigma tool for testing the new rule. In the following screenshot, you can see an example of a Sigma rule that triggers when exclusions bypassing Windows Defender are added:

Figure 5.8 – Sigma rule repository example
To test our rule once it's been completed, we should run a command similar to the following:
sigmac -t es-qs -c tools/config/helk.yml ./rules/windows/other/win_defender_bypass.yml
The result of running the previous command should look something similar to this:
(event_id:(" 4657" OR "4656" OR "4660" OR "4663") AND object_name.keyword:*\Microsoft\Windows Defender\Exclusions*)
The -t and -c arguments specified the target and the configuration file, respectively. For this example, I chose Elasticsearch query syntax as the target conversion language and the helk.yml config file to convert the fields. As mentioned before, you can use one of the community-provided configuration files, such as the one for HELK, or one specifically crafted for your own environment.
The Sigma2attack functionality allows you to generate an ATT&CK navigator that highlights the techniques that will be used in the security event.
Since this process is a little bit tedious, the evt2sigma project tries to create a Sigma rule from a log file (https://github.com/Neo23x0/evt2sigma).
Finally, the David Routin contribution, sigma2elastalert, allows us to convert Sigma rules into ElastAlert configurations.
In this section, we have learned about what Sigma rules are, what they are used for, how they are structured, and how to work with them. In the following chapters, we are going to create our own Sigma rules based on our own hunts.
Summary
So far, we have discussed the importance of having a way to standardize logs and share detections. First, we covered the importance of using data dictionaries, the OSSEM project, and the MITRE CAR project. Then, we reviewed Sigma rules, a powerful tool that allows us to share detection between security analysts and researchers. In the next chapter, we are going to learn about how to emulate threat actors in our environment so that we can start hunting!