
2
Understanding Dependency Injection by Example
Dependency injection (DI) is a software design pattern that exists in every modern architecture. However, you may wonder how this pattern found its way into the second chapter of a test-driven development (TDD)-focused book.
DI is a pattern that has several benefits that we are going to discover throughout the book, though the core benefit is that DI opens an application for unit testing. We cannot exercise unit testing without a solid understanding of this pattern, and if we cannot unit test, by virtue, we cannot practice TDD. Considering this, DI understanding forms the foundation of Section 1, Getting Started and Basics, and Part 2, Building an Application with TDD, which explains the early introduction.
We will build an application and then modify it to support DI while learning the concepts, but the ideas in this chapter will be repeated and exercised throughout this book.
In this chapter, you will be exploring these topics:
- The weather forecaster application (WFA)
- Understanding dependency
- Introducing DI
- Using DI containers
By the end of this chapter, the application will be unit test-ready by having the necessary DI changes implemented. You will have a fair understanding of dependency and will have gained confidence in refactoring code to support DI. You will have also covered half the way to write your first proper unit test.
Technical requirements
The code for this chapter can be found at the following GitHub repository:
There, you will find four directories. Each one will be a snapshot of our progress.
The WFA
Throughout this chapter, we will be using an ASP.NET Web API application in our learning process. We will be refactoring all the code in this application to enable DI. Then, in Chapter 3, Getting Started with Unit Testing, we will apply unit tests on the refactored application.
When a new ASP.NET Web API application is created, it comes with a sample random weather forecaster. The application in this chapter will build on top of the original weather sample and will add a real weather forecasting capability to the existing random one. We will creatively call our application the WFA.
The first step is going to be creating a WFA application and making sure it is running.
Creating a sample weather forecaster
To create a sample application, navigate your console to the directory where you want to create this application and execute the following commands:
md UqsWeather
cd UqsWeather
dotnet new sln
dotnet new webapi -o Uqs.Weather -f net6.0
dotnet sln add Uqs.Weather
The preceding code will create a Visual Studio (VS) solution called UqsWeather and will add an ASP.NET Web API project to it. This will produce a similar output to this console window:
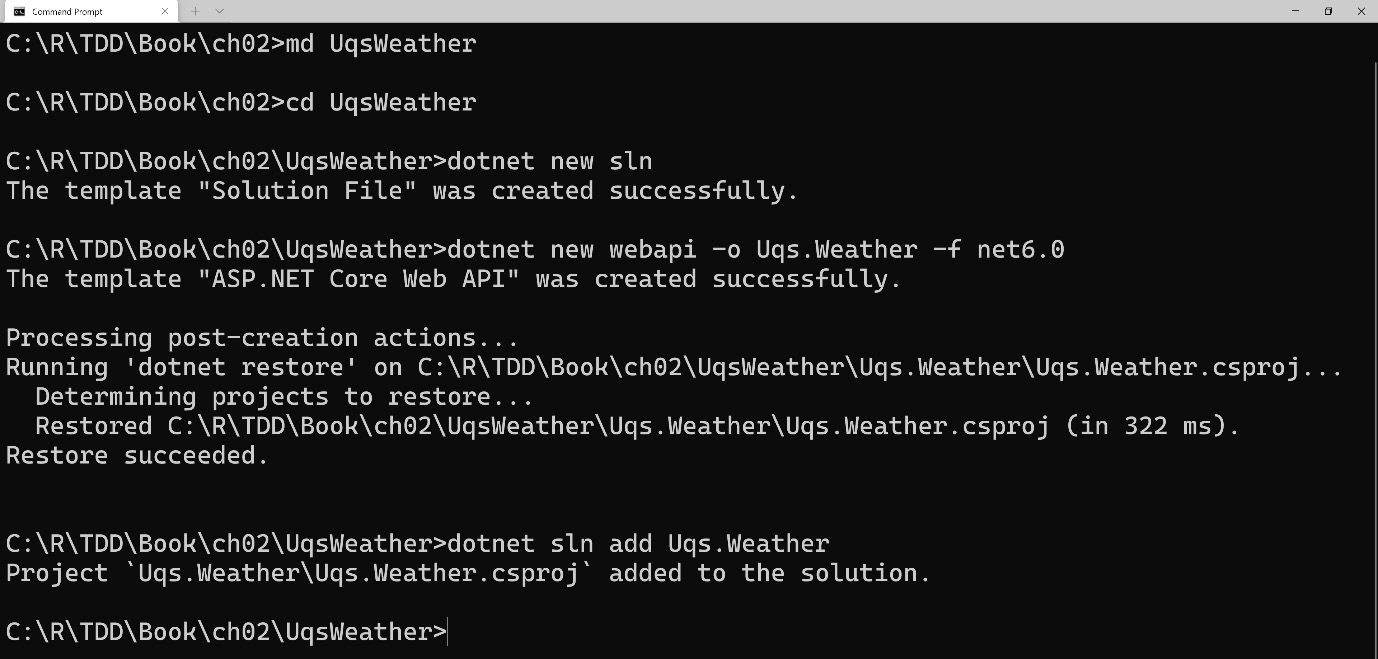
Figure 2.1 – The output of creating a weather application via the command-line interface (CLI)
To check what we have created, go to the directory and open the solution using VS, and you will see the following:
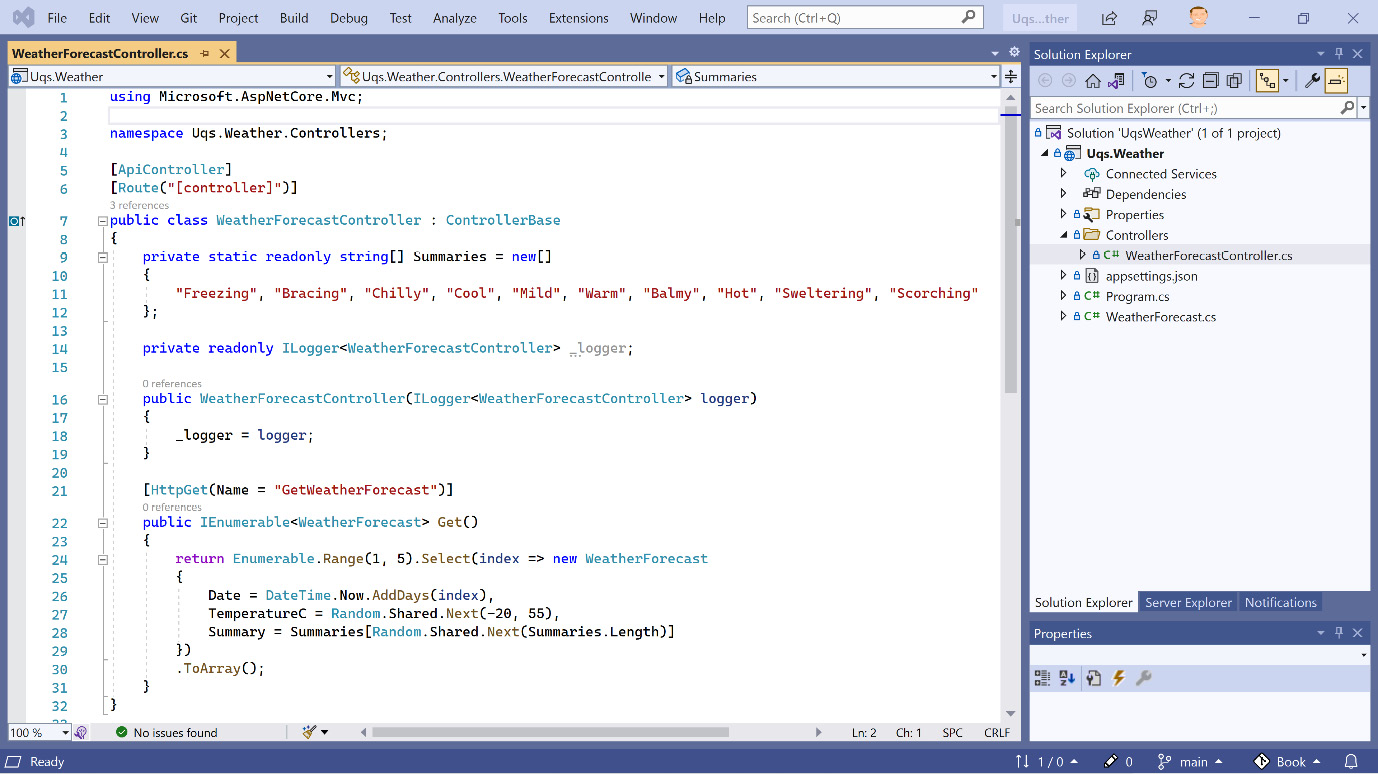
Figure 2.2 – Newly created project opened in VS
What is interesting here is the sample files that were generated automatically: WeatherForecast Controller.cs and WeatherForecast.cs.
This is the default template; we haven’t done any modification yet. It would make sense to check whether, so far, the application is loading properly. You can run the application and it will launch your default browser with the Swagger UI interface. We can see the only available GET application programming interface (API), WeatherForecast, as illustrated in the following screenshot:
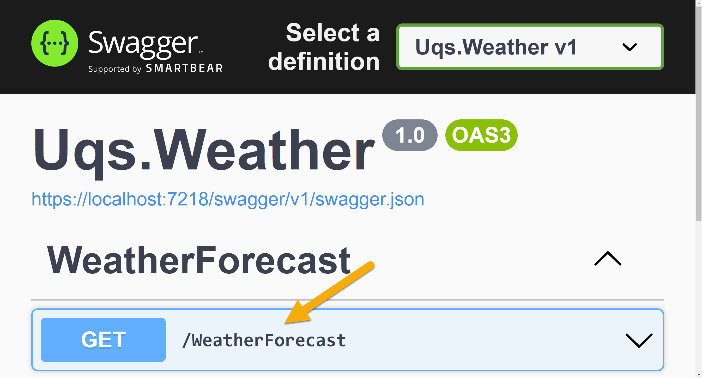
Figure 2.3 – Swagger UI showing the available GET API
To manually call this API and check whether it is generating output, from the Swagger UI page, expand the down arrow on the right of /WeatherForecast. Hit Try it out. Then, hit Execute. You will get a response like this:
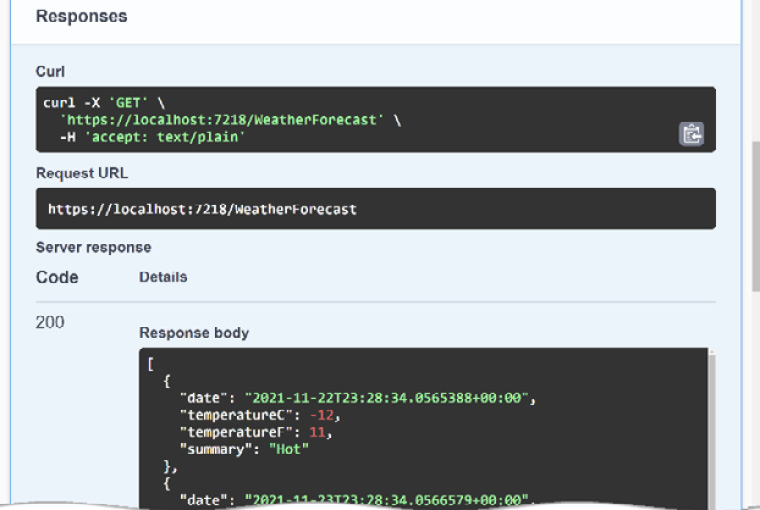
Figure 2.4 – Swagger API call response
You can find this sample under the GitHub chapter directory, in a directory called 01-UqsWeather. Now, it’s time to make the application a bit realistic by adding a real forecasting feature.
Adding a real weather forecaster
The template app has a sample random weather generator. I decided to give the app a spin by adding a real weather forecast as well. For this, I am going to use a weather service called OpenWeather. OpenWeather provides a free RESTful API weather service (where REST stands for REpresentational State Transfer) and will act as a more realistic example.
I have also created a public NuGet package to serve the chapter and act as a client for the OpenWeather RESTful APIs. So, rather than dealing with the REST API calls, you call a C# method, and it does the RESTful API calls in the background. In the following sections, we will obtain an API key and write the GetReal API.
Getting an API key
To be able to run the application from the companion source code or to create one yourself, you need an API key. You can sign up at https://openweathermap.org and then obtain an API key. After signing up, you can generate a key by going to My API keys and hitting Generate, similar to this:
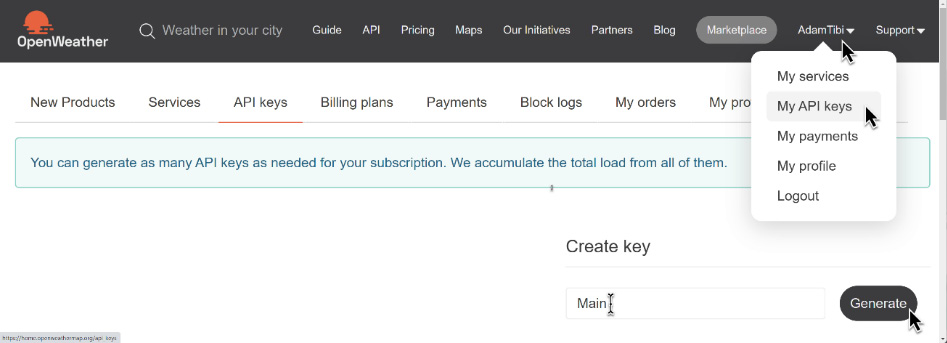
Figure 2.5 – Generating an API key
Once you have obtained the key, save it in your appsettings.json file, like this:
{
  "OpenWeather": {
    "Key": "yourapikeygoeshere"
  },
  "Logging": {
  …
The API key is done. Let’s get a client library to access the API.
Getting the client NuGet package
There are many OpenWeather API client libraries; however, I chose to create one to specifically fit the requirements of this chapter. The code of the package and how it is tested are discussed in Appendix 2, Advanced Mocking Scenarios. If you are curious and would like to check the source code, you can visit its GitHub repository at https://github.com/AdamTibi/OpenWeatherClient.
You can install the NuGet package via the VS graphical user interface (GUI) by going to Manage NuGet Packages… and searching for AdamTibi.OpenWeather or via the .NET CLI, by going to the project directory and writing this:
dotnet add package AdamTibi.OpenWeather
The configuration is done, so now, we can modify the code.
Mapping feeling to temperature
Here is a simple method that will map the temperature in °C to a single word describing it:
private static readonly string[] Summaries = new[]
{
    "Freezing", "Bracing", "Chilly", "Cool", "Mild",
    "Warm", "Balmy", "Hot", "Sweltering", "Scorching"
};
private string MapFeelToTemp(int temperatureC)
{
    if (temperatureC <= 0) return Summaries.First();
    int summariesIndex = (temperatureC / 5) + 1;
    if (summariesIndex >= Summaries.Length) return
       Summaries.Last();
    return Summaries[summariesIndex];
}
The output for 0 or less is Freezing, between 0 and 5 it is Bracing, then it is going to change every 5 degrees. 45 degrees onward, it is Scorching. Don’t take my word for the output—we will unit test it. Imagine if we didn’t!
Random weather API
I kept the random weather API, but I made it use the preceding MapFeelToTemp string, as follows:
[HttpGet("GetRandomWeatherForecast")]
public IEnumerable<WeatherForecast> GetRandom()
{
    WeatherForecast[] wfs = new
        WeatherForecast[FORECAST_DAYS];
    for(int i = 0;i < wfs.Length;i++)
    {
        var wf = wfs[i] = new WeatherForecast();
        wf.Date = DateTime.Now.AddDays(i + 1);
        wf.TemperatureC = Random.Shared.Next(-20, 55);
        wf.Summary = MapFeelToTemp(wf.TemperatureC);
    }
    return wfs;
}
This is a trivial API generating a random temperature and then making a summary out of the generated temperature. We are generating FORECAST_DAYS = 5 days, starting from the next day.
Running this project and hitting the Swagger UI output will give us this:
[
  {
    "date": "2021-11-26T22:23:38.6987801+00:00",
    "temperatureC": 30,
    "temperatureF": 85,
    "summary": "Hot"
  },
  {
    "date": "2021-11-27T22:23:38.7001358+00:00",
    "temperatureC": -15,
    "temperatureF": 6,
    "summary": "Freezing"
  },
…
You can see how random the output is, as the next day is hot but the day after is freezing.
Real weather API
The real weather API should make more sense. This is the newly added API:
[HttpGet("GetRealWeatherForecast")]
public async Task<IEnumerable<WeatherForecast>> GetReal()
{
    …
    string apiKey = _config["OpenWeather:Key"];
    HttpClient httpClient = new HttpClient();
    Client openWeatherClient =
       new Client(apiKey, httpClient);
    OneCallResponse res = await
      openWeatherClient.OneCallAsync
        (GREENWICH_LAT, GREENWICH_LON, new [] {
            Excludes.Current, Excludes.Minutely,
            Excludes.Hourly, Excludes.Alerts },
            Units.Metric);
    …
}
The method creates a HttpClient class for the sake of passing it to the OpenWeather Client class. It then fetches the API key and creates an OpenWeather Client class. To limit our scope, this will only forecast for Greenwich, London.
Important Note
The previous code is not clean and will be cleaned shortly in this chapter. If you really want to know the reason right now, it is instantiating (newing) the HttpClient and the Client classes in the controller, and this is not a good practice.
We are calling a RESTful API of OpenWeather called OneCall. This API returns today’s weather and forecasts 6 consecutive days; this is good as we only need the next 5 consecutive days. The Swagger UI output of this one is shown here:
[
  {
    "date": "2021-11-26T11:00:00Z",
    "temperatureC": 8,
    "temperatureF": 46,
    "summary": "Chilly"
  },
  {
    "date": "2021-11-27T11:00:00Z",
    "temperatureC": 4,
    "temperatureF": 39,
    "summary": "Bracing"
  },
…
The best way to explain concepts is by example, so consider this test problem that will give you a firsthand experience of what DI is.
C to F conversion API
To have all the world come together and to keep everybody happy, we will add another method to convert °C to °F. We will have an API on our controller called ConvertCToF, and it looks like this:
[HttpGet("ConvertCToF")]
public double ConvertCToF(double c)
{
    double f = c * (9d / 5d) + 32;
    _logger.LogInformation("conversion requested");
    return f;
}
This API converts a temperature from °C to °F and logs every time this API is requested, for statistical purposes. You can invoke this API from Swagger UI as before, or invoke it from the browser like this:
https://localhost:7218/WeatherForecast/ConvertCToF?c=27
The output will look like this:
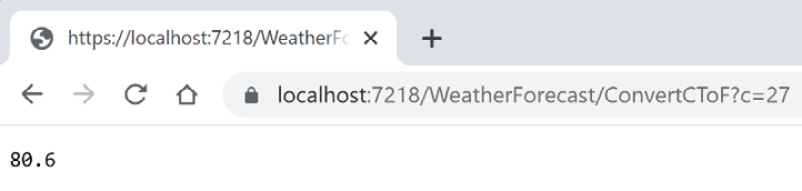
Figure 2.6 – Results of executing the ConvertCToF API from the browser
This is a Unified Modeling Language (UML) diagram showing what we have so far:
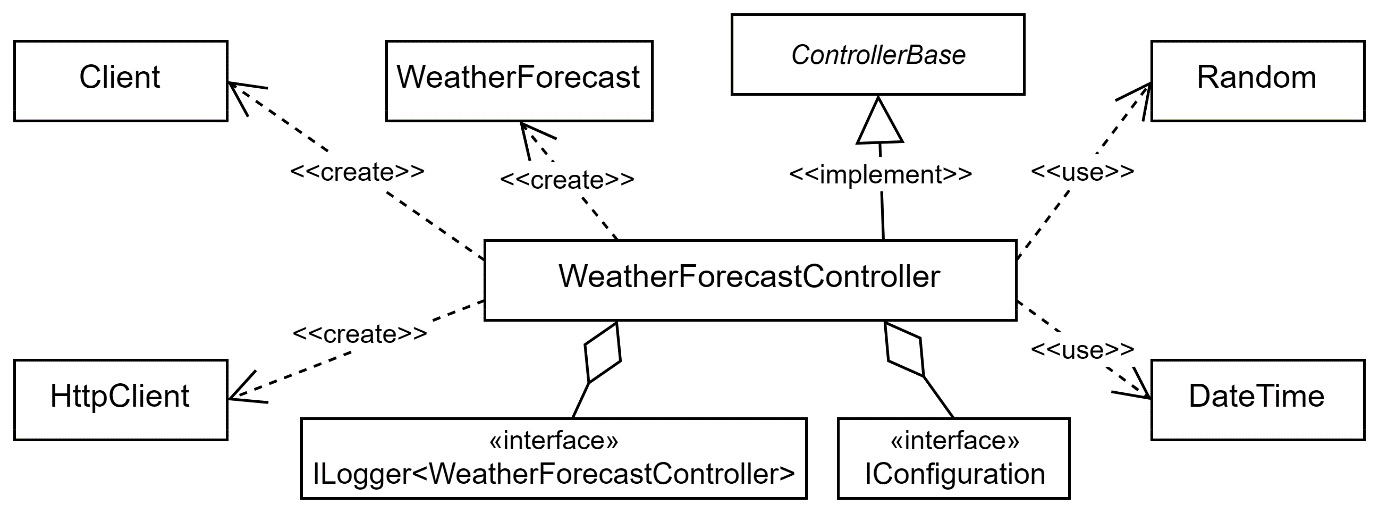
Figure 2.7 – UML diagram showing the WFA application
You can see all the changes in WeatherForecastController.cs; it is always in the Ch02 source code in GitHub under a directory called 02-UqsWeather.
The application is ready for critique, and I can tell you from now that the code you’ve just seen is not unit-testable. We can perform other categories of testing, but not unit testing, although it will be unit-testable by the end of this chapter. I invite you to open the project in VS and follow along, as we will implement exciting and important concepts.
Now that the project is ready, we need to set some basics right, and the first in the list is understanding dependency.
Understanding dependency
If your code does something useful, chances are your code depends on other code or another component, which in turn depends on another component. A clear understanding of the dependency terminology should give you a better grasp of unit testing and will definitely aid in having clearer conversations with your colleagues.
The plan in this section is to familiarize you with the concept of dependency, which should make understanding the DI pattern easier. Understanding dependency and DI are prerequisites for writing any serious unit testing. Next, we will explore what dependencies are, though when it comes to unit testing, we don’t care for all dependencies, so we will define what a relevant dependency is.
Before we dive into dependencies, let’s first define abstraction types and concrete types.
Abstractions and concrete types
To have you and me on the same channel, I will define the terminology to be used.
A concrete class is a class that can be instantiated; it could be something like this:
FileStream fileStream = new FileStream(…)
FileStream is a concrete type that can be instantiated and used directly in the code.
An abstraction type can be an abstract class or an interface. Examples of abstract classes are Stream, ControllerBase, and HttpContext. Examples of interfaces are IEnumerable, IDisposable, and ILogger.
I will be overusing these terms in the book, so it’s worth defining them.
What is a dependency?
First, what it isn’t: it is not equivalent to the same term used in UML.
In this book’s context and when speaking with other developers within unit testing boundaries, it can be defined in this way: if class A uses a type of B where B is an abstraction type or a concrete class, then A has a dependency on B.
The term uses can be narrowed down to the following:
- B is passed to the constructor of A. Example from WFA: the logger is passed to the controller’s constructor, which makes ILogger<WeatherForecastController> a dependency, as illustrated here:
public WeatherForecastController(
ILogger<WeatherForecastController> logger, …)
- B is passed to a method in A, as follows:
public void DoSomething(B b) { …
- B has a static method that is called from a method in A. Example from WFA: DateTime.Now is called from GetRandom, which makes DateTime a dependency, as illustrated here:
wf.Date = DateTime.Now.AddDays(i + 1);
- B is instantiated anywhere inside A, whether instantiated in a method, in a field, or in a property. In the following example, HttpClient is instantiated in the code:
HttpClient httpClient = new HttpClient();
Based on this definition, we have all of the following as dependencies on WeatherForecast Controller:
- Random
- DateTime
- Client
- HttpClient
- ILogger<WeatherForecastController>
- IConfiguration
- WeatherForecast
Data transfer objects (DTOs) are not considered dependencies, although they look like concrete classes, but they act as a vehicle to carry data from one place to another. We will show an example of a DTO in the The WeatherForecast class dependency section.
Note that record, record struct, and struct usually follow the same concept as a DTO.
We will have more analysis of dependencies across Part 1, Getting Started and Basics, and Part 2, Building an Application with TDD. For an experienced TDD practitioner, spotting dependencies is second nature.
Dependency relevance
Dependencies lead our class to interact with components external to our code. A dependency is relevant for DI in the context of unit testing if it has a method or a property that might cause a side effect when triggered or when it leads to other behavior that is not very relevant to the class being tested.
This is an overloaded definition, and it is not meant to be all clear at this point. Examples will be provided from here until the end of Part 2 to show when a dependency is relevant.
We care for pinpointing a dependency if we want to change its behavior when testing it. If _logger.LogInformation is writing to the disk, we want sometimes to change this behavior, especially when testing. As always, clarifying with examples is best, so in this section, we will demonstrate multiple examples and explain why they are relevant.
The logging dependency
Consider this _logger field:
private readonly ILogger<WeatherForecastController>
    _logger;
During the application lifespan, the _logger field might be triggered to write logs. Depending on the configuration of the logger, it might write logs in memory, in the console while debugging, in a log file on the disk, in the database, or on a cloud service such as Azure Application Insights or Amazon CloudWatch. We use the _logger field when we log in the ConvertCToF method, as follows:
_logger.LogInformation("conversion requested");It is relevant because we have a side effect that will extend to other components in the system, and when unit testing at a later stage, we want to eliminate this side effect.
The configuration dependency
There is another field in the class, the _config field, as illustrated here:
private readonly IConfiguration _config;
The _config field is needed to get the API key from the configuration. It is passed through the constructor of the controller class, similar to the _logger field.
During runtime _config can load configuration based on configuration; pun not intended. Your configuration can be in the cloud, in appsettings, or in a custom format. We can see this dependency in use here:
string apiKey = _config["OpenWeather:Key"];
It is relevant as we need to go through the configuration to read the API key. Accessing configuration is also causing a side effect.
The HTTP dependency
Digging through the code, you find that we have instantiated HttpClient and used it in the code:
HttpClient httpClient = new HttpClient();
It is obvious that we have a dependency on HyperText Transfer Protocol (HTTP). Every time the method containing this code, GetReal API, is invoked, it issues an HTTP call.
Unlike the logging and configuration dependencies, where the dependency is built against an abstraction (IConfiguration and ILogging<>), httpClient is instantiated in the code—this makes what is called a hard or a concrete dependency.
We do care about the distinction between instantiating a dependency in code or passing it from outside, through the constructor. It’ll be clear why later on.
It is relevant as we don’t want to depend on the network while we are testing.
The OpenWeather client dependency
The OpenWeather client is a dependency on a dependency. It is a dependency itself and it is relying on the HTTP dependency, represented by httpClient, as well. You can see this in the following snippet:
Client openWeatherClient = new Client(apiKey, httpClient);
Also, this is another example of a concrete dependency as it is being instantiated inline.
It is relevant as we don’t want to depend on HTTP (or the network) while we are testing.
The time dependency
Consider this line in the code:
wf.Date = DateTime.Now.AddDays(i + 1);
What is important here is the Now property. Now has code that will call the operating system (OS), a dependency, asking for the current time. The Now property is static, as we can see here:
public static DateTime Now { get; }The fact that this is static will make it slightly more difficult to deal with regarding DI, as we will see soon.
It is relevant as we want a predictable time during testing. Taking the current time will not lead to consistent results, as time is changing.
The randomness dependency
This is an example of depending on an algorithm to generate randomness:
wf.TemperatureC = Random.Shared.Next(-20, 55);
The Next method is a static method as well and it is calling the time in the background to generate a seed; also, it is depending on a randomization algorithm. We want to control the outcome so that we can test it.
It is relevant as we want predictable output.
The WeatherForecast class dependency
We are instantiating this class as a DTO, as we want to transfer the data from our method to the client. This data structure will be serialized into JavaScript Object Notation (JSON). The code is illustrated here:
WeatherForecast[] wfs = new WeatherForecast[FORECAST_DAYS];
It is not relevant as this object does not cause a side effect and it just carries data.
If the code depends on abstractions and the objects are not instantiated in the class (the controller in the previous example), then this is generally good. If the code depends on concrete classes that are instantiated in the class, then we are not following best practices as we are violating one good object-oriented programming (OOP) practice: depend on abstraction, not concrete. This will be our next topic.
Depend on abstraction, not concrete
The title is popular advice in OOP best practices. This advice applies to two cases: the method signatures and the code inside the methods. We will explore both cases in this section.
Abstracted parameters in the method signature
When designing a method, including a class constructor, the advice is to check whether you can accept an abstracted type rather than a concrete type. As always, let’s explain this with examples.
For an example of an abstract class, take the well-known Stream class from .NET, as illustrated in the following code snippet:
public abstract class Stream : …
A Stream object represents a sequence of bytes, but the class doesn’t care about the physical source of the bytes—let it be from a file or from memory or others. This is the wisdom behind making it an abstract class.
We have FileStream, which inherits Stream as an example of a concrete class, as illustrated here:
public class FileStream : Stream
FileStream understands the specifications of reading a stream of bytes from a disk file.
We have also MemoryStream, which inherits Stream as another example of a concrete class, as illustrated here:
public class MemoryStream : Stream
Here is a UML diagram to summarize the relationship:
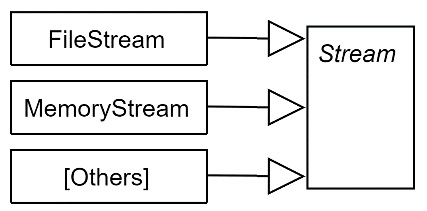
Figure 2.8 – Stream and its children
Having Stream as an abstract class opened the way for decoupling the implementation and simpler code. Consider this method from the System.Text.Json.JsonSerializer class, which accepts a parameter of the type Stream:
public static void Serialize (Stream utf8Json, object?
    value, …);
This method converts the provided value to Unicode Transformation Format 8 (UTF-8)-encoded JSON text and writes it to the Stream class.
Because this method doesn’t care for the way the Stream class is dealing with the underlying physical persistence, it is accepting the Stream parent abstract class as a parameter. If there is no abstraction, then you will have multiple overloads of the same method. Each one of them accepts a different stream type, like this (these overloads don’t exist; they are hypothetical):
public static void Serialize (FileStream utf8Json, …);
public static void Serialize (MemoryStream utf8Json, …);
public static void Serialize (SqlFileStream utf8Json, …);
public static void Serialize (BufferedStream utf8Json, …);
More Stream overloads…
This is an example of the benefits of accepting an abstraction type as a method argument. Here is another example. Consider this code:
public static int Sum(int[] elements)
{
    int sum = 0;
    foreach (int e in elements) sum += e;
    return sum;
}
This method takes an array and returns the sum of its elements. At first glance, the method’s signature looks fine, but if you think about it, this method forces the caller to convert any collection to an array before calling the method, which is an unnecessary conversion and a waste of performance as this method doesn’t depend on the specific features of an array. It is just doing a foreach construct, which means it is accessing the array elements sequentially. Does it really need to accept an array?
Converting the signature parameter to IEnumerable<int>, which is an abstraction, would allow this method to accept a considerable number of concrete classes, as illustrated here:
public static int Sum(IEnumerable<int> elements)
You initially were only able to call this method with an int[] array; now, it can be passed to any object of a class that implements IEnumerable<int>, and there are plenty of them. Here are a few:
int[] array = new int[] { 1, 2 };
List<int> list = new List<int> { 1, 2 };
Queue<int> queue = new Queue<int>();
queue.Enqueue(1);
queue.Enqueue(2);
// More collections
Sum(array);
Sum(list); // new benefit
Sum(queue); // new benefit
Going back to the WFA application, our controller constructor is already doing something right as it depends on abstractions, as illustrated in the following code snippet:
public WeatherForecastController(
  ILogger<WeatherForecastController> logger,
    IConfiguration config)
Always think of the common denominator abstraction type that satisfies the requirement to have your method as open as possible.
Direct instantiation of a dependency
We have just discussed using abstractions, when possible, in our method signature. This reduces coupling and increases the usability of the method. This section will extend the advice to the code.
If we are instantiating classes directly in the code, we depend on concrete objects. If we depend on concrete objects, then we cannot change their behavior at runtime. Let’s take an example from our WFA application where we are instantiating the Client class in our method, as per this line of code:
Client openWeatherClient = new Client(apiKey, httpClient);
Then, whenever we use the openWeatherClient object, such as calling the OneCallAsync method, we will be firing an HTTP request over the network to a RESTful API on the OpenWeather end. This is good for the production code, but not good for testing the code; when we are testing, we want to eliminate this behavior.
Isolation
In this case, we can avoid the HTTP call and work around this using an isolation framework during testing. However, this is only kept as a last resort. We will explain what isolation frameworks are in Chapter 3, Getting Started with Unit Testing.
When testing the code, we don’t want it to fire an HTTP request for many reasons, including the following:
- We have a limited number of calls that we can make per time—a quota.
- Our testing environment is behind a firewall that bans outbound traffic.
- The REST service on the other end of the network is temporarily down, so we will get a false-negative result that our test has failed.
- Calling a service over the internet is slow, compared to dealing with CPU and memory.
Can you see where we’re going? The code works, but it is not testable in isolation of the HTTP calls.
Important Note
Some test categories should fire HTTP and reach the other end, such as integration tests. In the previous context, I meant tests that validate the business logic and do not test for connectivity—one of them is a unit test.
Instantiating concrete classes would not work if we were to unit test a piece of functionality. What we want to do during unit testing is to check if a false attempt to fire a call is made but not actually executed, and that would be enough. So far, the takeaway is that creating concrete classes in code is not compatible with DI and, accordingly, not compatible with unit testing.
The main solution to avoid instantiating classes in the business logic is DI, which is what we will see shortly.
Best practices recap
Our discussion in the Depend on abstraction, not concrete section boils down to these two examples of do and do not. Let’s start with the bad or the do-not-do example, as follows:
public class BadClass
{
    public BadClass() {}
    public void DoSometing()
    {
      MyConcreteType t = new MyConcreteType();
      t.UseADependency();
    }
}
Here’s the equivalent good class example:
public class GoodClass
{
    private readonly IMyClass _myClass;
    public GoodClass(IMyClass myClass)
        { _myClass = myClass; }
    public void DoSometing()
    {
      _myClass.UseADependency();
    }
    public void DoSometingElse(SecondClass second)
    {
      second.UseAnotherDependency();
    }
}
Here are the good practices:
- Having abstractions as parameters encourages decoupling and opens the method to accept more types.
- Depending on abstractions allows changing an object’s behavior without changing the code in the class.
One question you would ask is this: If I did not instantiate the objects that were passed to the constructor or the method at runtime, then who did? Surely somewhere along the line, some process has instantiated my dependencies and passed them to my class. The answer to this question can be found in the next section.
Introducing DI
When I first learned how to do DI in code, I had a euphoria as if I had discovered a secret in software engineering; it is like code magic. We have been exploring dependencies in the previous sections and now, we are about to discover injecting these dependencies into our classes. The next step is explaining what DI is and using practical samples from the WFA application to make sure you are experimenting with a variety of scenarios. The best way to introduce DI is with a familiar example.
First example of DI
DI is all over any modern .NET code. In fact, we have one example right here in the ASP.NET template code:
public WeatherForecastController(
    ILogger<WeatherForecastController> logger)
{
    _logger = logger;
The logger object, which is a dependency, is injected into the controller when a new instance of the controller is created. There is nowhere in the controller that we are instantiating the logger class. It has been injected into the controller’s constructor.
What does injection in this context mean? It means the ASP.NET framework found an incoming request that needs this controller to be instantiated. The framework realized that to create a new instance of WeatherForecastController, it needs to create an instance of a concrete class that implements ILogger<WeatherForecastController>, to do something similar to this:
ILogger<WeatherForecastController> logger = new
    Logger<WeatherForecastController>(…);
var controller = new WeatherForecastController(logger);
The constructor of the controller required an instance of a concrete class that implements ILogger<WeatherForecastController>, and the framework resolved that Logger<> implements ILogger<> and can be used as a parameter for the construction of the controller.
How did it resolve this? We will learn about this in the DI containers; what is important now is that it knew what to do in order to instantiate the controller class.
Now is the time to give every subject in our play a DI-related name, as follows:
- DI container: The software library that is managing the injection
- Service: The requested dependency (ILogger<> descendant object)
- Client: The class requesting the service (the controller, in the previous example)
- Activation: The process of instantiating the client
- Resolution: The DI container finding the right service required to activate the client
Testing an API
Let’s dig deeper into DI with an example. Consider this test problem that will give you firsthand experience of what DI is. Take the ConvertCToF method we created earlier in our WFA application.
We want to do some tests for this method in order to validate whether the temperature conversion is done accurately. We have been given a few examples of °C and the equivalent °F for our tests, as follows:
- -1.0 C = 30.20 F
- 1.2 C = 34.16 F
To satisfy the tests, we want to use an old-school console application that will throw an exception if the conversion doesn’t match the examples.
You can add the console application via the VS GUI or you can execute the following lines from the solution directory:
dotnet new console -o Uqs.Weather.TestRunner
dotnet sln add Uqs.Weather.TestRunner
dotnet add Uqs.Weather.TestRunner reference Uqs.Weather
This adds a new console application called Uqs.Weather.TestRunner to the existing solution, and references the existing ASP.NET Web API application. In VS, add this code to the Program.cs file of the console application:
using Microsoft.Extensions.Logging;
using Uqs.Weather.Controllers;
var logger = new Logger<WeatherForecastController>(null);
//fails
var controller = new WeatherForecastController(logger,
    null!);
double f1 = controller.ConvertCToF(-1.0);
if (f1 != 30.20d) throw new Exception("Invalid");
double f2 = controller.ConvertCToF(1.2);
if (f2 != 34.16d) throw new Exception("Invalid");
Console.WriteLine("Test Passed");
The code in the current format doesn’t run as it fails at the var logger line. We’ll fix that in a moment, but let’s analyze the code first. The code instantiates a controller, in the way we instantiate any class in .NET; then, it calls the ConvertCToF method and tries different values. If all values pass, then it will print Test Passed; otherwise, it will throw an exception.
To instantiate a Logger<> object, we need to pass to its constructor an object of ILoggerFactory type. If you pass null, it will fail at runtime. Besides, the bad news is that an instance of a concrete implementation of ILoggerFactory is not meant to be instantiated manually unless you are integrating a logging framework or handling a special case, and testing is not a special case! In brief, we cannot easily do this.
What if we try to pass to the controller’s constructor two null values, and ignore creating a Logger<> object, like this:
var controller = new WeatherForecastController(null, null);
The problem is that if you pass a null value, your _logger object in the controller will be null and your code will fail at this line with the infamous NullReferenceException exception, as illustrated here:
_logger.LogInformation("conversion requested");What we really want is just to instantiate the controller. We are not testing the logger; we want to pass to the constructor anything that will create an object from our controller, but the logger is standing in our way. It turns out that Microsoft has a class called NullLogger<> that does just that—getting out of the way! The documentation from Microsoft states “Minimalistic logger that does nothing”.
With the enlightenment of this class, the first few lines of the code will look like this:
var logger = NullLogger<WeatherForecastController>
    .Instance;
var controller = new WeatherForecastController(logger, …);
We are getting a reference to NullLogger<> through the Instance field. When we call _logger.LogInformation, nothing will happen, which fits what we’re looking for. If we run this console application now, we will get a Test Passed message.
Important Note
Testing methods via a console application is not the best practice for testing. Also, throwing exceptions and writing messages are not ideal for reporting failed and passed tests. The right way will be covered in the next chapter.
The constructor of the controller accepts an ILogger<> object, which gave us the flexibility of passing a NullLogger<> object as the latter implements ILogger<>, as illustrated here:
public class NullLogger<T> : Microsoft.Extensions.Logging
    .ILogger<T>
And the UML diagram of the logging classes looks like this:
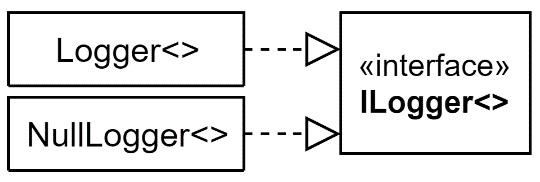
Figure 2.9 – UML of Logger<>, NullLogger<>, and ILogger<>
At this point, it is worth analyzing what we’ve done so far. Here’s what we’ve achieved:
- At runtime (when the APIs are launched), Logger<> was injected into the controller and it should be writing logs as expected.
- At test time, we are not interested in the activities of logging; we are testing another scenario, so we’ve passed NullLogger<>.
- We were allowed to inject into ILogger<> different types as ILogger<> is an interface, which is an abstraction. We would have failed to do this if our constructor expects a Logger<> type (the concrete type with no I).
In the first scenario, it was the DI container that injected the object at runtime. In the second scenario, this was us manually injecting a different logger for testing purposes. The annotated code in the following screenshot shows a summary of this section:
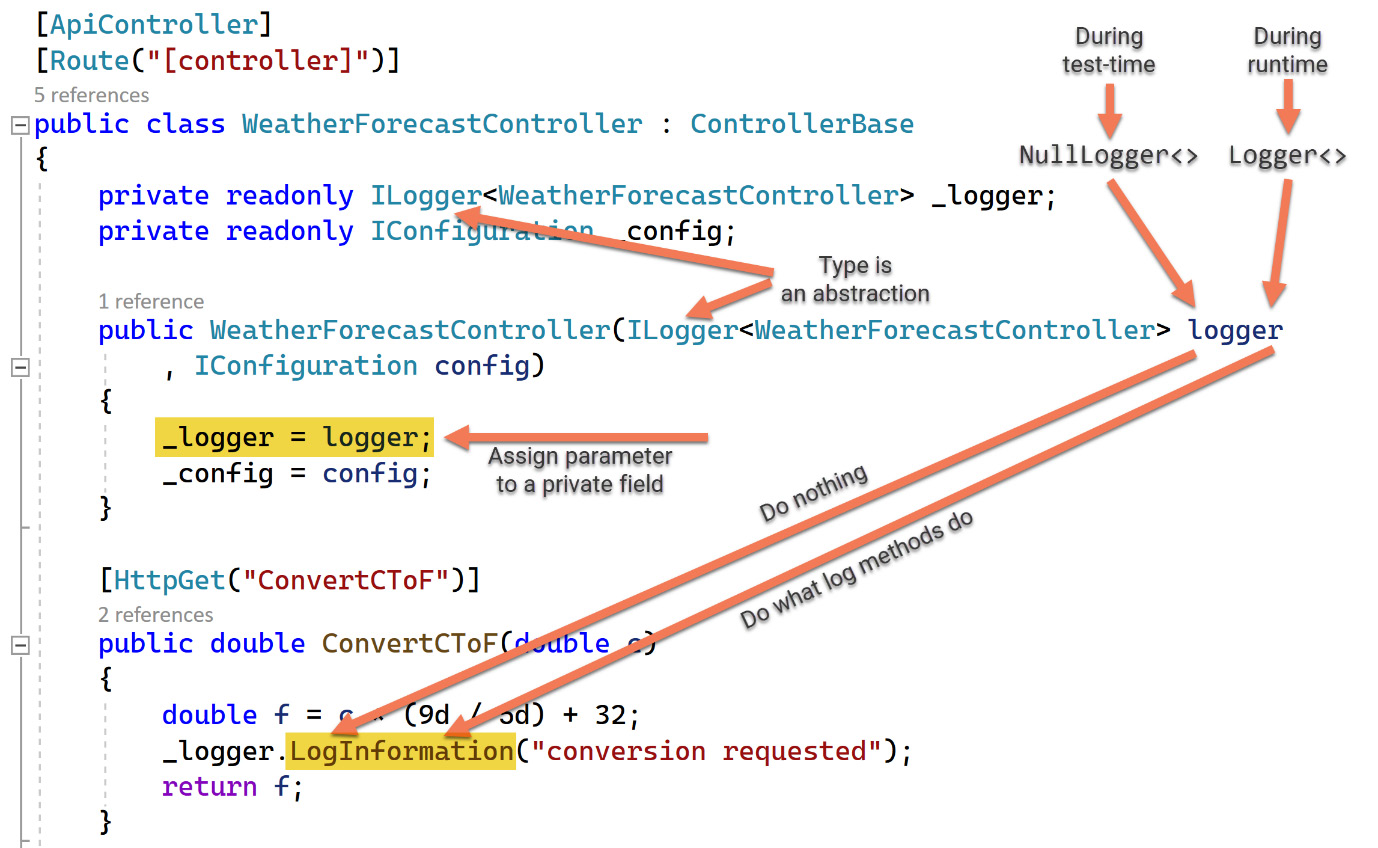
Figure 2.10 – Annotated code showing DI at test time and at runtime
The conclusion here is that if our parameters use abstract types such as interfaces, ILogger<>-type interfaces, or abstract classes, we can open our classes for more reusability where DI can be utilized.
The LogInformation method is changing behavior based on the injected object, so it is acting as a seam. This drives us naturally to our next section about seams.
What are seams?
As an English term, a seam is where two pieces of fabric are stitched together. The term in a DI context resembles areas in the code where we can change the behavior without changing the code explicitly. We can point to the example from our previous convert method, shown here:
public double ConvertCToF(double c)
{
    double f = c * (9d / 5d) + 32;
    _logger.LogInformation("conversion requested");
    return f;
}
Take the LogInformation method. We want this method to write into some production instrument, but when we’re testing, we want it to do nothing (if our test scenario is not about logging). We want to test other functionality, but _logger.LogInformation is standing in our way, trying to write somewhere, so we want to change its behavior.
LogInformation is a seam, as the behavior can change here. From the previous section, if we inject into the class a Logger<> object, then LogInformation will behave in one way, and if we inject NullLogger<>, it will behave in another way.
Inversion of control
You will often hear the term inversion of control (IoC) used to mean DI. You may also hear IoC container, as well, to mean a DI container. From a pragmatic point of view, you don’t need to worry about the differences in the meaning of these terms. Practitioners have different definitions of IoC and how it relates to DI. Just search for one term versus the other and you’ll find forums full of contradicting definitions.
Here are the common points that practitioners agree on:
- IoC is reversing the flow of events from the software to the user interface (UI) or the other way around.
- DI is a form of IoC.
DI is the most popular term and the most modern one. The term IoC is from a different era, is more generic, and has a less practical use, so I recommend using the term DI.
After all these examples, best practices, and definitions, I kept the best to last, which is the practical section of this chapter. This is how you can take all the previous literature and write useful code with it.
Using DI containers
A DI container is a library that injects a service into the client. A DI container provides extra functionality other than injecting dependencies, such as the following:
- Registering the classes that need to be injected (registering the services)
- Implementing how the services need to be instantiated
- Instantiating what has already been registered
- Managing the created service lifetime
Let’s clarify a DI container role with an example from the previous code. We have the logger service being injected, but who is responsible for this?
There is a DI container called Microsoft.Extensions.DependencyInjection that will inject _logger. This happened in the first line of Program.cs, as illustrated here:
var builder = WebApplication.CreateBuilder(args);
This previous method call registers a default logger. Unfortunately, while we can see the code in the .NET source code, it is not obvious in our Program.cs source code. In fact, the previous line registers plenty of other services.
By adding a single line for experimentation, directly following the previous line in Program.cs, we can see how many registered services are created:
int servicesCount = builder.Services.Count;
This will give us 82 services. A few of these services are for logging-related activities. So, if you want to see what they are, you can have this line directly after the previous line:
var logServices = builder.Services.Where(_ =>
    x.ServiceType.Name.Contains("Log")).ToArray();
You can see here that we are filtering on any service that has the word Log as part of its name. If you have a breakpoint after this line and go to VS Immediate Window and type logServices, you can see a glimpse of all the registered log-related services, as illustrated in the following screenshot:
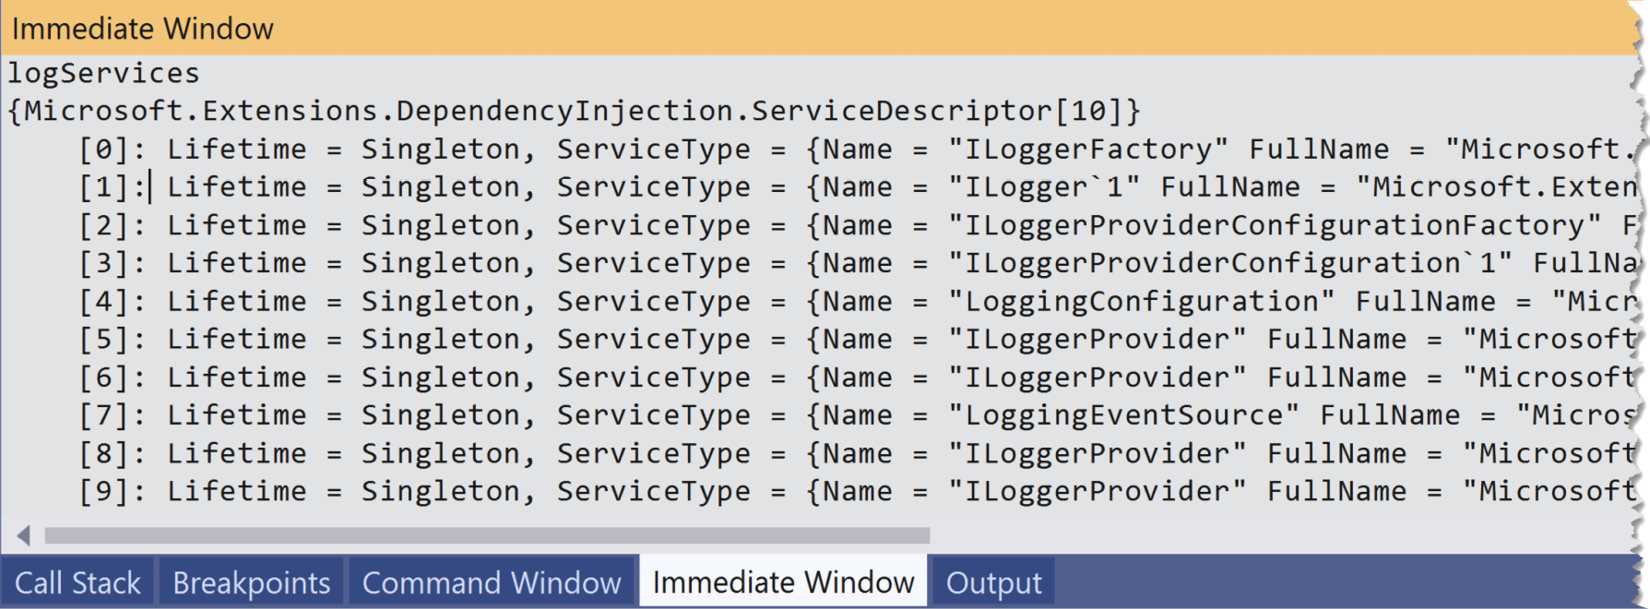
Figure 2.11 – Immediate window showing the registered logging-related services
The screenshot shows that we have 10 registered logging-related services. The one being injected for us at runtime is the second one (index number 1).
Note
You might get a different list of pre-registered services than this, depending on your ASP.NET version.
We will change our implementation in the controller to move everything to be dependency-injected and experiment with various scenarios of writing DI-ready code.
Container role
The container activities are being executed in the background by the DI container. A container is involved in booting up classes in your application, as illustrated in the following screenshot:
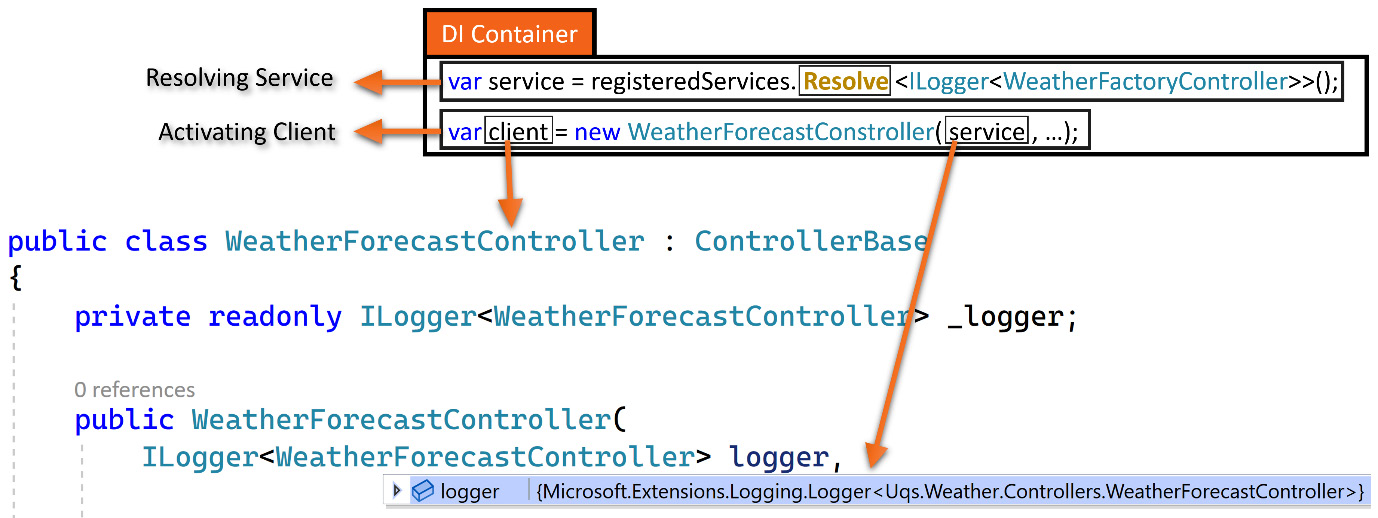
Figure 2.12 – Container in action (pseudo code)
The code of the DI Container box is a pseudo code. It is trying to summarize how the DI resolves the service required by the client from a list of already registered services. Then, the DI activates the client and passes it to the service. This is all happening at runtime.
The registration is an activity we will explore in many examples later on. In this scenario, there was an instruction that stated whenever an ILogger<> object is requested by the client, substitute it with a concrete class of the Logger<> type.
It is important to note that while the client is requesting an interface, the DI has been instructed earlier on how to construct a concrete class for this abstraction; the DI container knew earlier that to construct an Ilogger<> object, it needs to initialize a Logger<> object.
Third-party containers
We have been working so far with a built-in DI container that is automatically wired with new ASP.NET projects, and that is the Microsoft.Extensions.DependencyInjection Microsoft DI container, but this is not the only DI container available for .NET 6—there are other third-party options.
Microsoft has developed a DI container in recent years. Third-party containers gradually diminished in popularity in favor of the one shipped with .NET. Also, some frameworks did not make the leap with the introduction of .NET 5. Who’s left strong today, with .NET 6, are Autofac and StructureMap. There are other containers supporting .NET 6, but they are not as popular.
If you are experienced in unit testing and you want more features that are not supported in Microsoft.Extensions.DependencyInjection, then have a look at other frameworks such as Autofac. But for non-monolithic, mid-size projects, I would recommend sticking with the Microsoft one as it is fairly supported and there are plenty of third-party plugin components. You can always swap to another framework at a later stage. My advice is not to spend valuable time choosing a DI container. Start with the Microsoft one until your requirements exceed it.
Service lifetime
When a service is registered to be passed to the client, the DI container has to decide about the lifetime of the service. The lifetime is the time interval from when the service is created until when it is released for garbage collection or disposed of.
The Microsoft DI container has three major lifetimes that you can specify when registering a service: transient, singleton, and scoped lifetime scopes.
Note that if the service implements the IDisposable interface, the Dispose method is invoked when the service is released. When a service is released, if it has dependencies, they are also released and disposed of. Next, we will explore the three major lifetimes.
Transient lifetime
Transient services are created every time they are injected or requested. The container simply creates a new instance for every request.
This is good in terms of not having to worry about thread safety or service state modification (by another requesting object). But creating an object for every request has adverse performance implications, especially when the service is in high demand, and activating it may not be cheap.
You will see an example of a transient service in the Refactoring for DI section later on.
Singleton lifetime
Singleton services are created once on the first client request and released when the application terminates. The same activated service will be passed to all requesters.
This is the most efficient lifetime as the object is created once, but this is the most dangerous one as a singleton service should allow concurrent access, which means it needs to be thread-safe.
You will see an example of a singleton service in the Refactoring for DI section later on.
Scoped lifetime
Scoped services are created once per HTTP request. They stay alive from the beginning of the HTTP request until the end of the HTTP response and they will be shared between clients.
This is good if you want one service to be used by several clients and the service applies to a single request only.
This lifetime is the least popular compared to the transient and the singleton lifetimes. Performance-wise, it sits in the middle between the transient and the singleton lifetimes. There is only one thread executing each client request at a given time, and because each request gets a separate DI scope, you don’t have to worry about thread safety.
One popular example of using scoped services is using Entity Framework’s (EF’s) DB context object as scoped, which allows the request to share the same data and to cache data when required between clients.
Here is another example. Suppose you have a logging service that will allow the client to log, but it will only flush from memory to the destination media (say, saving to the database) when the HTTP request is over. Ignoring other conditions, this could be a candidate for a scoped lifetime.
We will have an example of a scoped lifetime in Chapter 9, Building an Appointment Booking App with Entity Framework and Relational DB.
Choosing a lifetime
If your concern is performance, then think of a singleton. Then, the next step is checking whether the service is thread-safe, either by reading its documentation or doing other types of investigation.
Then, fall down to scoped if relevant, and then fall down to transient. The safest option is always transient—if in doubt, then choose transient!
Important Note
Any class that gets injected into the singleton will become a singleton, regardless of the lifetime of the injected object.
Container workflow
Before we see some examples of service registration and lifetime, it’s a good time to generalize our understanding of DI containers and look at a workflow diagram of the DI activation process:
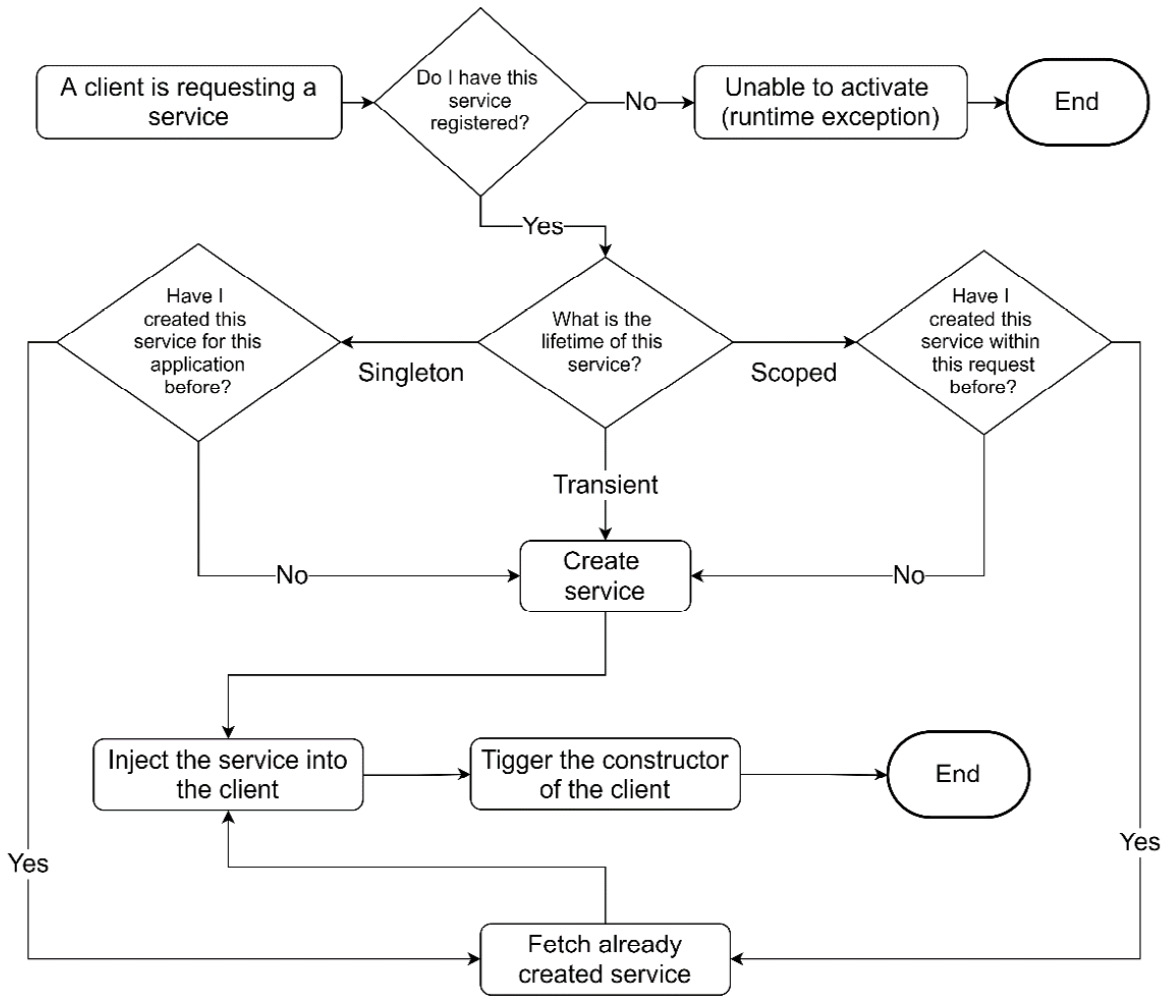
Figure 2.13 – The workflow of a DI container
In this diagram, it is clear that the DI container has two major concerns when activating a class, which are registration and lifetime.
Refactoring for DI
If you have done your DI right, then you are halfway with respect to implementing your unit tests. When writing a unit test, you will be thinking about how everything should be DI-ready.
There are certain factors that will determine how your services should be injected, as outlined here:
- Does my seam belong to an abstracted method? In another way, does the method in question exist in an abstraction? This is the case with the ILogger.LogInformation method that we saw earlier, but we will cover this scenario again in more detail in the Injecting the OpenWeather client section.
- Is my seam a static method? This will be covered in the Injecting DateTime and Injecting the random generator sections.
Injecting the OpenWeather client
One offending line is the Client class instantiation in WeatherForecastController.cs, as illustrated here:
string apiKey = _config["OpenWeather:Key"];
HttpClient httpClient = new HttpClient();
Client openWeatherClient = new Client(apiKey, httpClient);
OneCallResponse res =
   await openWeatherClient.OneCallAsync(…)
The sole purpose of accessing _config was to get the API key for Client and the sole purpose of instantiating HttpClient was to pass it to the constructor of Client. So, if we were to inject openWeatherClient, then the first two lines would not be needed.
Which method or property are we using from the to-be-injected class? The answer, by looking through the code, is OneCallAsync only. Then, what is the highest type (a class, an abstract class, or an interface) in the hierarchy of Client that has this member? To do this, hold the Ctrl button and click on the class name in VS, and you will find that Client implements IClient, as illustrated here:
public class Client : IClient
Then, hold Ctrl and click IClient, and you will find the following interface:
public interface IClient
{
    Task<OneCallResponse> OneCallAsync(decimal latitude,
       decimal longitude, IEnumerable<Excludes> excludes,
       Units unit);
}
Clearly, my implementation can depend on IClient rather than Client.
In the controller constructor, add IClient and add _client as a field, as follows:
private readonly IClient _client;
public WeatherForecastController(IClient client, …
{
    _client = client;
    …
The last step is doing the following modifications to these two lines:
Client openWeatherClient = new Client(apiKey, httpClient);
OneCallResponse res =
    await openWeatherClient.OneCallAsync(…);
Remove the first line as we are no longer instantiating Client, and modify your second line to use _client instead of the previous openWeatherClient. This will result in this code:
OneCallResponse res = await _client.OneCallAsync(…);
We have done all our modifications to the controller. What is left is registering with the DI container how to inject an object that matches IClient for our controller constructor. Let’s run the project in its current state and we will get the following error:
System.InvalidOperationException: Unable to resolve service
  for type IClient' while attempting to activate
    'WeatherForecastController'
The DI container tried to look for a concrete class that implements IClient so that it can create it and pass it to the constructor of WeatherForecastController. We know that there is a concrete class called Client that implements IClient, but we have not told the DI container about it yet.
In order for the DI container to register a service, it requires two bits of information, as follows:
- How to create the required service?
- What is the lifetime of the created service?
The answer to point 1 is we need to create an instance of Client whenever IClient is requested.
Point 2 is the trickier one. Client is a third-party class that is documented online. The first action is looking through the documentation to see whether it has a recommended lifetime and in this case, the documentation of Client specifies Singleton as the recommended one. In other cases where this is not documented, we have to figure it out in other ways. We will have more examples later on.
To register our dependency, in the Program.cs file, look for the comment provided by the Add services to the container template and add your code underneath it, as follows:
// Add services to the container.
builder.Services.AddSingleton<IClient>(_ => {
    string apiKey =
        builder.Configuration["OpenWeather:Key"];
    HttpClient httpClient = new HttpClient();
    return new Client(apiKey, httpClient);
});
Here, we are constructing Client in the same way we did it before. Once Client is first requested, only one instance will be created per application, and the same instance will be provided for all clients upon request.
Now, as we have finished with the DI of all dependencies required by the GetReal method, let’s tackle the Now dependency in the GetRandom method.
Injecting DateTime
We are using DateTime in our GetRandom method and it is tricky to inject. Let’s look at DateTime class usage in the code. We are using the following:
- AddDays method
- Now property, which returns a DateTime object
All this is clear in one line of code, shown here:
wf.Date = DateTime.Now.AddDays(i + 1);
The AddDays method is a method that relies on an arithmetic calculation of days, which can be verified by looking at the DateTime source code on GitHub, at https://github.com/microsoft/referencesource/blob/master/mscorlib/system/datetime.cs.
We don’t have to worry about injecting it as it is not reaching an external dependency; it is just executing some C# code, or we might want to inject it to control how the AddDays method is being calculated. In our case here, injecting AddDays is not required.
The second point is the Now property. If we were to write a unit test that involves testing the value of Now, then we’d want to freeze it to a constant value to be able to test. At this stage, the picture of freezing it may not be clear, but it will be clearer when we unit test GetRandom in the next chapter.
We need to provide an injected Now property, but Now is a static property, as we can see here:
public static DateTime Now
Static properties (and methods) do not adhere to the same polymorphism principles that instance properties adhere to. So, we need to figure out another way to inject Now than what we used before.
The next code is preparing Now in a way suitable to work polymorphically. Create an interface like this one to act as an abstraction:
public interface INowWrapper
{
    DateTime Now { get; }
}
We will have our code depending on this abstraction type. Also, we will have to provide an implementation for a concrete NowWrapper class, so our code simply looks like this:
public class NowWrapper : INowWrapper
{
    public DateTime Now => DateTime.Now;
}
I have added two files under a directory called Wrappers in the project. I have added INowWrapper.cs and NowWrapper.cs under it.
Wrapper and Provider
Some developers like to have a Wrapper suffix for this category of types, and others like to use a Provider suffix such as NowProvider. I don’t like to use the name Provider as it is already a design pattern and it might be misleading. My advice is to pick one convention and stay consistent.
As usual, we have two points to consider when registering a non-concrete type for injection, as follows:
- How to create the required service?
- What is the lifetime of the created service?
The first point is easy—we just instantiate the NowWrapper class. The second point depends on the DateTime.Now original property. Since I know that this is a web environment where multiple requests may be hitting my static property simultaneously, the first thing I would be checking is the popular .NET thread-safety topic. In other words, if this property is accessed simultaneously by multiple threads, would that lead to undetermined behavior?
Static members of DateTime, including the Now property, are written with thread safety in mind, so calling Now simultaneously should not lead to an undetermined behavior.
Given this is the case, then I can have my DI as a singleton. Let’s register INowWrapper for injection. As with the previous example, add INowWrapper to the controller constructor, like this:
public WeatherForecastController(, INowWrapper nowWrapper, )
{
    _nowWrapper = nowWrapper;
…
Replace DateTime.Now with _nowWrapper.Now, as follows:
wf.Date = _nowWrapper.Now.AddDays(i + 1);
And lastly, register your dependency in the Program.cs file, using the following code:
builder.Services.AddSingleton<INowWrapper>(_ =>
    new NowWrapper());
This means that when the first INowWrapper instance is requested, the DI container will instantiate it and keep it for the lifetime of the application.
Injecting the random generator
The random number generator is unpredictable by design; otherwise, it wouldn’t be random! There is a problem in unit testing it if it is not DI-injected, because the unit tests should be testing against a fixed (determined) value. Let’s look at the offending line here:
wf.TemperatureC = Random.Shared.Next(-20, 55);
Shared is a static method, so we have the same issue that we had in the previous task with Now. First, we need to determine thread safety. There is no definite mention in the Next documentation if it is thread-safe; on the contrary, claims online mention that it is not thread-safe. So, the safest option here is to assume that it is not thread-safe. Here, we can wrap the entire class or the particular method. I will choose to wrap the entire class in case we need it later to use another method from the Random class. Let’s write our interface, as follows:
public interface IRandomWrapper
{
    int Next(int minValue, int maxValue);
}
And here, we have the concrete class implementing it:
public class RandomWrapper : IRandomWrapper
{
    private readonly Random _random = Random.Shared;
    public int Next(int minValue, int maxValue)
        => _random.Next(minValue, maxValue);
}
Add this as usual to the controller constructor and replace the code in GetRandom with this:
wf.TemperatureC = _randomWrapper.Next(-20, 55);
I did change the behavior slightly in the class; initially, it was creating a new Random instance every time we call Next, but now it is creating one _randomWrapper per requesting class.
As our Next class implementation depends on the thread-unsafe _random.Next, then our class is not thread-safe as well. So, when injecting it, we cannot inject it as a singleton; we have to inject it as a transient, so our Program.cs code looks like this:
builder.Services.AddTransient<IRandomWrapper>(_ =>
    new RandomWrapper());
This might have worked as a AddScoped registration method, but the documentation is insufficient for me to decide, and transient is always the safest.
You can now run the application, and from the Swagger UI, execute both APIs to make sure that everything is working as expected.
The DI changes that we have done are all in the Ch02 source code in GitHub under a directory called 03-UqsWeather.
Lifelike DI scenario
The most common scenario for using DI is with unit testing, though I have seen it being used elsewhere to change the behavior of a certain component at runtime. Take the case where you want to change a functionality of a system based on a configuration, and another case where you want to change a system behavior per hosting environment. Consider the next example of load-testing our WFA application.
Using DI as a load-testing example
A common non-functional requirement (NFR) for critical systems is load testing. Load testing is an artificial simulation of calls to a system to measure how it handles high volumes of concurrent calls. For our WFA, load testing would look like this:
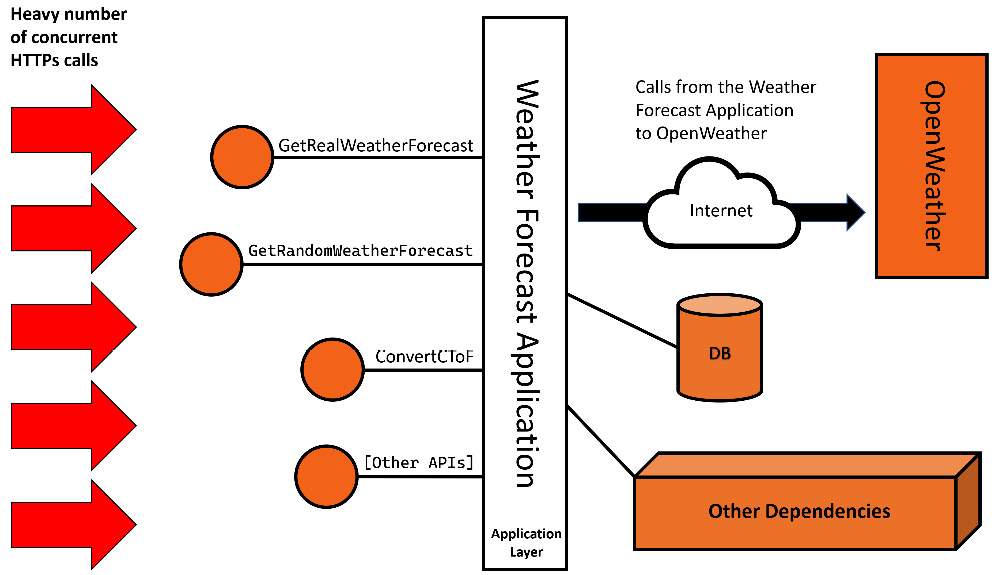
Figure 2.14 – WFA under load testing
A load-testing framework would start the test by issuing a pre-agreed number of calls to the APIs and measuring response times and failures. In turn, the APIs will exert loads on their dependencies.
The complete WFA might have multiple dependencies, but what we are interested in specifically, in this example, is the OpenWeather API that we are calling in the background. If we are to load-test the WFA application, we will, by design, issue a heavy number of calls to OpenWeather and this should not be the case, for many reasons. Here are a few:
- Consuming the number of allocated calls quota
- Contractual agreement against load-testing their system through yours
- Being banned for an exorbitant number of calls in a short period
- Ethical reasons, as this might affect their overall service quality
Unless your system requires specifically to load-test with the third party connected and you have an agreement with the third party to do so, I wouldn’t do it.
What can we do to work around this and conduct our load test without calling OpenWeather?
A solution could be to add a configuration key to the WFA. When this key is true, we want every call in all our application to OpenWeather to return a stubbed response (canned response). More about dummy, mock, stub, and fake will be discussed in the next chapter. For now, we will refer to this type of response as a stubbed response.
Enabling an OpenWeather stubbed response
Let’s enable a stub response representing OpenWeather. Where do we start? I would directly look for the seam that is causing the call to OpenWeather. It is in our WeatherForecastController class, as illustrated here:
OneCallResponse res = await _client.OneCallAsync(…)
What we need to do is to keep the previous code the same but make this method change behavior by not going over the network and instead return some saved value when under a load test. Here is the plan to achieve this:
- Add a configuration to denote load testing.
- Add a stubbed response class.
- Register a condition to swap responses based on the configuration.
Adding configuration
We want the configuration to be off by default unless we explicitly set it on. In your appsettings.json file, add the following code:
"LoadTest": {
  "IsActive" : false
}, …
And in our appsettings.Development.json file, add the same configuration, but set it to true. This should result in true when you load the application locally.
Adding the stub class
OneCallAsync is a method on the IClient interface. If you look at the code, we are passing the client object, which becomes _client, as an argument to the constructor. Here is where we can do some magic—we need to pass to the constructor our stubbed implementation of IClient, then figure out a way to pass it through the constructor.
Add a class called ClientStub to the root of your project to hold the implementation of our stubbed IClient interface, as follows:
public class ClientStub : IClient
{
    public Task<OneCallResponse> OneCallAsync(
        decimal latitude, decimal longitude,
        IEnumerable<Excludes> excludes, Units unit)
    {
        const int DAYS = 7;
        OneCallResponse res = new OneCallResponse();
        res.Daily = new Daily[DAYS];
        DateTime now = DateTime.Now;
        for (int i = 0; i < DAYS; i++)
        {
            res.Daily[i] = new Daily();
            res.Daily[i].Dt = now.AddDays(i);
            res.Daily[i].Temp = new Temp();
            res.Daily[i].Temp.Day =
                Random.Shared.Next(-20, 55);
        }
        return Task.FromResult(res);
    }
}
IClient is defined in the NuGet package for the OpenWeather client. It has one method to implement OneCallAsync. I looked for the used properties and generated a 7-day fake forecast. Note that you might need to make a full stub in other scenarios.
Now, both Client and ClientStub implement IClient, as per this diagram:
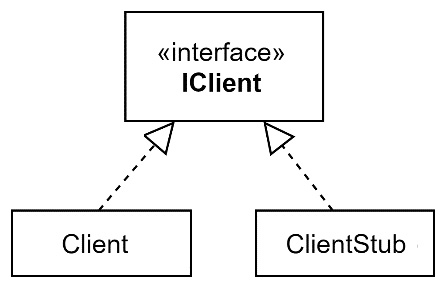
Figure 2.15 – IClient, Client, and ClientStub relationship
Now comes the step that developers forget to do often: registering the service. Remember that every time you forget to register a service, you are not alone.
Updating IClient registration
We are going to use our DI container to decide when to inject an instance of Client and when to inject an instance of ClientStub. In Program.cs, modify the initial register of IClient so that it looks like this:
builder.Services.AddSingleton<IClient>(_ => {
    bool isLoad =
    bool.Parse(builder.Configuration["LoadTest:IsActive"]);
    if (isLoad) return new ClientStub();
    else
    {
        string apiKey =
            builder.Configuration["OpenWeather:Key"];
        HttpClient httpClient = new HttpClient();
        return new Client(apiKey, httpClient);
    }
});
Whenever an instance of IClient is requested, the DI container will decide what to inject, ClientStub or Client, based on the configuration.
We now have the stubbing implementation completed and ready to run. Have a look at the output of the GetReal method when you run the project. You will notice you are getting the stubbed version if you’ve enabled load testing.
Points to note
We have seen, dare I say it, a beautiful way of swapping implementation. While this example is small and contained, the implementation will shine more in larger projects. Consider these points:
- Separation of concerns where the code to load different versions is taken away from the controller class to the registration section.
- The developer will not need to worry about or remember to do additional implementation when passing IClient to new controllers.
Similar to this scenario, you can use DI whenever a swap of implementation is required under certain conditions.
This scenario is located in the Ch02 source code in GitHub under a directory called 04-UqsWeather.
Method injection
You have seen across the chapter that we have been injecting parameters through the constructor. There is another less popular form of injection, called method injection. This is an example from the WFA controller:
public double ConvertCToF(double c,
    [FromServices] ILogger<WeatherForecastController>
       logger)
{
    double f = c * (9d / 5d) + 32;
    logger.LogInformation("conversion requested");
    return f;
}
Notice the FromServices attribute. This instructs the DI container to inject a dependency into a method in the same way it is injected into a constructor. Obviously, this is not needed in a constructor.
You would use method injection when you have multiple methods in a class. One of them uses a special service. The benefit here is a cleaner class constructor and a bit of performance saving because the class—for example, the controller—might be instantiated, but the injection service would have a chance of not being used. So, there is a performance waste in injecting it but not using it.
In this example case, the logger was only used in the ConvertCToF method, so it can be moved from the constructor to the method. It needs to be injected only when ConvertCToF, not the controller, is instantiated to serve any other method.
Best practices recommend classes with a single responsibility. This leads to related methods with related services, so you won’t find method injection as a popular pattern, but method injection is there if you need it.
Property injection
Property injection is injecting a service into a property on a class. This is not supported by Microsoft containers, but it is supported by third-party containers.
I have seen this used with legacy systems where a DI container is gradually being introduced and code changes are at a minimum. However, I have never seen or used this in a greenfield application.
I trust that it was not added to the Microsoft container, as it is not popular and not encouraged.
Service locator
Every container comes with or integrates with a service locator. A service locator finds and activates a registered service. So, the DI container registers a service and the service locator resolves what is already registered. Here is a typical pattern of using a service locator:
public class SampleClass
{
    private readonly IServiceProvider _serviceProvider;
    public SampleClass(IServiceProvider serviceProvider)
    {
        _serviceProvider = serviceProvider;
    }
    public void Method()
    {
        MyClass myClass =
            _serviceProvider.GetService<IMyClass>();
        myClass.DoSomething();
    }
}
IServiceProvider is an abstraction that supports service location. It can be injected into a class like any other service. Notice when we called the GetService method that it got us whatever is registered with IMyClass.
Obviously, you could have done the same thing by injecting IMyClass into the constructor, and it is even better to do so. You can see this being done here:
public SampleClass(IMyClass myClass)
But there are situations where you will want to avoid injection and prefer to use a service locator. This is more often used in legacy applications where DI is not fully implemented.
Using a service locator in code will complicate your unit tests, so it is better avoided, and some practitioners would consider using it as an anti-pattern.
Summary
This is a long chapter, I admit, but my defense is that it has plenty of examples to cover many real-life DI scenarios. Also, DI automatically encourages good software engineering practices, so we had to include the relevant practices. If you were to develop TDD-style, you would spend around 10% of your coding time doing DI-related tasks, and I hope this chapter did the right job and added to your knowledge.
DI is mainly used with unit tests, so without it, DI may feel less interesting. The next chapter, Getting Started with Unit Testing, will use the WFA application that we refactored here, and hopefully, you will appreciate further this design pattern.
Further reading
To learn more about the topics discussed in the chapter, you can refer to the following links: