Chapter 23
Computer Forensics
Lab Exercises
23.01 Windows Registry Forensics
23.02 Digital Evidence in RAM and on the Hard Drive
23.03 Steganography
23.04 Imaging, Recovering Deleted Files, File Signatures, and Analyzing Images
Lab Analysis
Key Term Quiz
Comparing cybersecurity to digital forensics is like comparing before to after. Acybercrime incident is any illegal, unauthorized, or unacceptable action that involves a computing system or network.Incidents are breaches of cybersecurity measures that were implemented before the incident occurred.
Incident response is the forensic examination of systems and networks after they have been attacked. It also involves taking actions to remediate an ongoing incident, such as blocking the attackers and restoring any lost availability as quickly as possible.
Forensic science uses scientific and mathematical processes to analyze physical evidence. This evidence can be used to inculpate, prove that somebody did something, or exculpate, prove that someone didn’t do something, in both civil and criminal cases. Usually, the investigator will subsequently testify as an expert witness in a court of law.
Digital forensics is a subcategory of forensic science. Digital forensics deals with the acquisition and investigation of material on digital devices, often in relation to a computer crime. With so many devices such as phones, tablets, and more in great usage today, the term “computer forensics” alone isn’t as accurate as it used to be.
All forensic investigations of computing devices are considered digital forensics, including more devices than just traditional computers. Digital forensics is a subcategory of forensic science, and computer forensics is a subcategory of digital forensics. There are other subcategories of digital forensics, such as network forensics, and mobile device forensics.
In addition to inculpating or exculpating a suspect, digital forensics has a third major purpose: to figure out what happened in a cyberattack. In this way, digital forensics ensures integrity and future functionality of computer systems and network infrastructures. It also helps protect a company’s reputation, money, and time.
Forensic readiness adds value to your cybersecurity process. Evidence for a company’s defense can be gathered with minimal disruption to the business. It’s likely to improve your company’s position in responding to other security-related issues, such as copyright infringement, fraud, and extortion. A well-managed process can reduce the cost of internal and external investigations. It can improve and simplify working with law enforcement agencies. It can also prepare a company for when major incidents occur, when a more in-depth and well-organized investigation would be needed.
Some examples of cybercrimes that a forensic investigation could uncover include fraud (through the manipulation of records), spam, phishing, circumvention of security controls, unauthorized access, system modification, theft of intellectual property, piracy, rigging systems (such as the stock market), espionage, infiltration and exfiltration of data, identity theft, writing and spreading of malware, denial of service, bandwidth consumption, the creation and distribution of child pornography, and much more.
Computing devices can be part of a forensic investigation in a few different ways. First, a computing device can be the tool used to commit a crime. Second, when a computing device is hacked, it is the target of a crime. Third, storage locations on a computing device can be used as repositories for evidence of a crime.
Digital evidence is the foundation for identifying, capturing, and prosecuting cybercriminals. Digital evidence is information stored or transmitted in binary form that may be relied on in court, and it comprises both data and metadata. This could include contact information, evidence of malicious attacks on systems, GPS location and movement records, transmission records (authorized and unauthorized), system use or abuse, account usage (authorized and unauthorized), correspondence records, and content such as images and documents.
Digital evidence can potentially answer common questions. It can gather information about individuals: Who? It can determine events that transpired: What? It can identify which systems and networks were affected: Where? It can construct a timeline: When? It can discover tools and exploits used: How? Sometimes digital evidence can even reveal motivations of the attackers: Why?
Where can you find digital evidence? Different cybercrimes result in different types of digital evidence. Cybercriminals may leave evidence of their activities in log files. Cyberstalkers use e-mail to harass their victims. Child pornographers store images on their computers.
Host-based information on computing devices can include both volatile data stored in RAM, which is lost when there’s no power, and nonvolatile data on the hard drive, which remains stored when there’s no power.
Removable media and devices could also contain artifacts and remnants of significance for the forensic investigator. Network data can consist of live traffic, stored communications, or logs from routers, switches, IDSs (intrusion detection systems), IPSs (intrusion prevention systems), firewalls, applications, and servers. The Windows Registry, web traffic captures, and e-mail are also great sources of digital evidence.
Due diligence requires that the forensic investigator look at as much of this information as possible, but the sheer volume makes it nearly impossible to examine each and every source of data in every case. This is where keyword searches can come into play. Searching for words that have significance in a particular case can bring digital evidence to light very quickly.
Evidence transmitted over the Internet and stored in the cloud is quite different from a company’s network data. In the former case, you’re at the mercy of third-party companies that are in possession of important data on their devices. These companies, such as Internet service providers (ISPs) and major corporations like Microsoft, Apple, and Google, are not too eager to hand over information to private companies conducting investigations, or even to law enforcement agencies. Sometimes, for this reason, an undercover officer will initiate a chat conversation and save the conversation as digital evidence.
![]() 30 MINUTES
30 MINUTES
Lab Exercise 23.01: Windows Registry Forensics
The Windows Registry can be an amazing treasure trove and repository of digital evidence for forensic investigators investigating a Windows operating system. This hierarchical database contains configuration information and settings for software, hardware, user preferences, and operating system configurations. Simply put, the registry enables software, hardware, the operating system, and users to perform their jobs. When you install or remove a program, add or remove a hardware device, or change an operating system setting or preference with the Control Panel or another component, a corresponding change is made somewhere in the registry. You can think of the registry as the DNA of any Windows operating system.
Editing the registry directly is very risky. One small mistake can keep your system from ever booting up again! That’s why components such as Control Panel applets and installation wizards exist. They allow for indirect configuration of the registry, removing the potential of a human screwing it up.
For further background before you complete this lab exercise, check out Microsoft’s own explanations and illustrations about the registry in a collection of hierarchical links here:
https://docs.microsoft.com/en-us/windows/win32/sysinfo/registry.
Learning Objectives
In this lab exercise, you’ll search the Windows Registry for digital evidence. At the end of this lab exercise, you’ll be able to
• Navigate the registry, looking for digital evidence
• Interpret values in the registry that could inculpate, exculpate, and shed some light on a cybersecurity attack
Lab Materials and Setup
The materials you need for this lab are
• The Principles of Computer Security: CompTIA Security+ and Beyond textbook
• A Windows 10 machine that has connected to at least one SSID/Wi-Fi network, for Steps 1 and 2. (Note that the Windows 10 VM you created in Chapter 1 cannot be used for these steps.)
• Any Windows 10 machine that acquired an IP address dynamically, through DHCP, for Step 3. (The Windows 10 VM you created in Chapter 1 can be used for this step.)
• A Windows 10 machine that has had various files accessed through programs that maintain lists of recently accessed files for Step 4. (The Windows 10 VM you created in Chapter 1 can be used if you open multiple files within it.) This step works best with as many files and types of files as possible.
• A Windows 10 machine that has had various files opened or saved through Windows Explorer for Steps 5 and 6. (The Windows 10 VM you created in Chapter 1 can be used if you open and/or save multiple files within it.) This step works best with as many files and types of files as possible.
• A Windows 10 machine that has had various USB devices plugged into it for Steps 7 and 8 (Step 8 requires a USB storage device). (The Windows 10 VM you created in Chapter 1 can be used if you connect USB devices to it through the hypervisor.) This step works best with as many USB devices plugged into the system.
• A web browser with an Internet connection
Let’s Do This!
Before you begin, go to www.digital-detective.net/dcode/ and click the red Download DCode button near the bottom of the page. Then extract the ZIP file that was downloaded to your Downloads folder. Run the executable in the extracted folder, accept the license agreement, and install the program with all defaults. In the Windows Protected Your PC Warning window, before the installation starts, click More Info and then click the Run Anyway button. (As the message states, the app is flagged as unrecognized, not malicious.) This program will be used to help you decode Windows Registry timestamps in this lab exercise. Go through the installation, accepting all defaults.
When you make your screenshots for this chapter, feel free to crop out or redact anything that you don’t feel comfortable showing.
![]() 1a–1c
1a–1c
![]() 1d
1d
Step 1 Locate potentially sensitive and valuable information stored in the registry related to Wi-Fi networks (SSIDs, dates, and more).
a. Click the Start button or in the search box and type regedit to open Registry Editor. Click Yes at the User Account Control prompt.
b. To navigate the Windows Registry, you can use the tree in the pane on the left, or you can type directly into the address bar at the top and press ENTER. Navigate to ComputerHKEY_LOCAL_MACHINESOFTWAREMicrosoftWindows NTCurrentVersionNetworkListProfiles. This key contains digital evidence about all the SSIDs (service set identifiers)/Wi-Fi networks you’ve ever connected to.
c. Click each Profiles subkey. In the right pane, you’ll see values with three columns: Name, Type, and Data. See Figure 23-1. The values of greatest interest are DateCreated, DateLastConnected, Description, and ProfileName. In most cases, the ProfileName and Description data will be the same or will show a variation with a number at the end.

FIGURE 23-1 Digital evidence of Wi-Fi networks in the registry
To decode the REG_BINARY hex data values for DateCreated and DateLast Connected, launch DCode. With Hexadecimal (Little-Endian) selected for Format in the Value Input section located on the top right, type the 32 hexadecimal digits (without the spaces) from the Data column of Registry Editor for each (one at a time) into the Value field in DCode and then click the Decode button.
As shown in Figure 23-2, you’ll see two important timestamps on the left. The first one will show you the timestamp in UTC time, while the second one will show you the timestamp using your time zone. To change your time zone, click the Select button on the right side, make a selection, and click OK. The Date Output drop-down enables you to change the format of the timestamp, if desired.

FIGURE 23-2 DCode decoded timestamps
Notice that the data for DateLastConnected from Registry Editor, shown in Figure 23-1, was entered into the Value field in DCode, shown in Figure 23-2. This means the last time I connected my laptop to the FLCCwifi Wi-Fi network was February 27, 2020, at 2:09:16 P.M.
Submit a pair of similarly matching screenshots of digital evidence from Registry Editor and DCode.
d. Explain how information like this can be of great significance for a forensic investigation.
![]() 2a, 2b
2a, 2b
![]() 2c
2c
Step 2 Locate potentially sensitive and valuable information stored in the registry related to Wi-Fi router MAC addresses.
a. Navigate to ComputerHKEY_LOCAL_MACHINESOFTWAREMicrosoftWindows NTCurrentVersionNetworkListSignaturesUnmanaged.
b. As shown in Figure 23-3, in each one of these subkeys, you’ll be able to see the MAC address of the router of the Wi-Fi networks you connected to, in the Data column for DefaultGatewayMAC.

FIGURE 23-3 Digital evidence of the router’s MAC address in the registry
Submit a screenshot of digital evidence showing the matching DefaultGatewayMAC values for your previous screenshots.
c. Explain how information like this can be of great significance for a forensic investigation.
![]() 3a, 3b
3a, 3b
![]() 3c
3c
Step 3 Locate potentially sensitive and valuable information stored in the registry related to networking settings.
a. Navigate to ComputerHKEY_LOCAL_MACHINESYSTEMCurrentControlSetServicesTcpipParametersInterfaces.
This key contains subkeys for all interfaces on the machine, which contain recent values for networking settings, including IP address, subnet mask, default gateway, DNS server, DHCP server, and other parameters given to the client in a DHCP lease. See Figure 23-4.

FIGURE 23-4 Digital evidence of networking configuration settings in the registry
b. Submit a screenshot of digital evidence showing network settings for one of your machine’s interfaces.
c. Explain how information like this can be of great significance for a forensic investigation.
![]() 4a–4e
4a–4e
![]() 4f
4f
Step 4 Locate potentially sensitive and valuable information stored in the registry related to files recently opened or run.
a. Navigate to ComputerHKEY_CURRENT_USERSoftwareMicrosoftWindowsCurrentVersionExplorerRecentDocs.
Many programs maintain a list of files that have been most recently accessed. When one of these programs is run, you’ll see the names of the recently accessed files, usually when selecting File | Open from the menu bar.
These filenames are stored in multiple registry keys, but the RecentDocs key is the most well-known and complete one. It contains digital evidence of files and folders that were recently opened or run through Windows Explorer.
b. Double-click an item in the Name column in the right pane to see the name of the file. As shown in the dialog in Figure 23-5, the file I’m currently typing this chapter into, 011_23w.docx, is easily viewable on the right side: 011 is the McGraw-Hill project number for this book, this is Chapter 23, and this is my initial write (w).

FIGURE 23-5 Digital evidence of the file I’m currently typing this chapter into
c. How was I able to so quickly locate the value of 46 as the one that contained the name of the file I’m currently working on? The numbers of the values in RecentDocs do not represent the order in which files and folders listed in the data section were accessed. In RecentDocs, the value MRUListEx contains the order. In Figure 23-6, notice the highlighted value 2E at the top. This 2E in hexadecimal converts to 46 in decimal, and that’s how I knew to look in the value 46 for the file that I’m currently working on. Convert the non-zero hex values to decimal and then open up the values in RecentDocs that correspond to those decimal values.
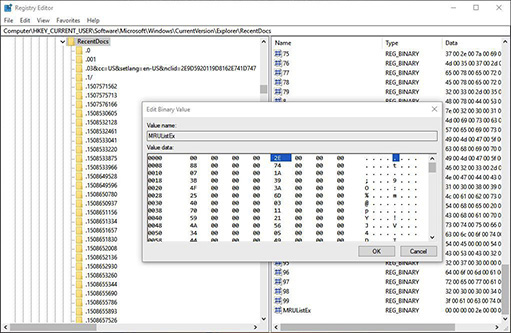
FIGURE 23-6 Identifying the order of RecentDocs values
The first entry of 00 00 00 00 corresponds to a value in RecentDocs of 0 (and refers to a folder I opened). The entries are actually stored in little-endian format of 4-byte values. In simplistic terms, that means we read the bytes in reverse order. The next entry reads 2E 00 00 00. When taking little-endian into account, that is read as 00 00 00 2E.
d. Scroll down and look at the subkeys of RecentDocs, and notice that each one is a file extension of a recently opened file. Open some of these subkeys, and find specific files by file type that you opened or ran recently. Each subkey has its own MRUListEx value that contains the order to read the values in each subkey, like we saw in the previous step.
e. Submit a screenshot of digital evidence showing a file you recently opened or ran recently, and a corresponding screenshot of digital evidence showing its hex value in MRUListEx. You can either use RecentDocs or one of its subkeys.
f. Explain how information like this can be of great significance for a forensic investigation.
![]() 5a, 5b
5a, 5b
![]() 5c
5c
Step 5 Locate potentially sensitive and valuable information stored in the registry related to specific file types recently opened or saved.
a. Navigate to ComputerHKEY_CURRENT_USERSoftwareMicrosoftWindowsCurrentVersionExplorerComDlg32OpenSavePidlMRU.
This key contains the most recently opened or saved files through Windows Explorer dialog boxes and even web browsers using Open and Save. The subkey * stores the full paths to the 10 most recently opened or saved files. The other subkeys are groups by file extension, which makes searching for a specific type of file real handy. Notice in Figure 23-7 that I’ve found the screenshot I made for Figure 23-5. The folder name, Chapter 23, and the filename, F23-05.JPG are both visible.

FIGURE 23-7 Digital evidence of files opened or saved in the registry
b. Submit a screenshot of digital evidence showing a different type of file you recently opened or saved recently, and a corresponding screenshot showing its hex value in MRUListEx. Use one of the subkeys of OpenSavePidlMRU.
c. Explain how information like this can be of great significance for a forensic investigation.
![]() 6a, 6b
6a, 6b
![]() 6c
6c
Step 6 Locate potentially sensitive and valuable information stored in the registry related to recently used programs.
a. Navigate to ComputerHKEY_CURRENT_USERSoftwareMicrosoftWindowsCurrentVersionExplorerComDlg32LastVisitedPidlMRU.
This key is related to the OpenSaveMRU key, giving further information. When a new value is added to the OpenSaveMRU key, a corresponding value is created here to contain a recently used path to an executable that the item was saved to or opened from. Only unique entries will be created for program filenames, but when that program is used in another folder, the data is updated. Again, MRUListEx identifies the order of the numbers in the Name column. Notice in Figure 23-8 that I’ve been using SnippingTool.exe to make the screenshots for this book.

FIGURE 23-8 Digital evidence of a program used in the registry
b. Submit a screenshot of digital evidence showing a program you recently used.
c. Explain how information like this can be of great significance for a forensic investigation.
![]() 7a, 7b
7a, 7b
![]() 7c
7c
Step 7 Locate potentially sensitive and valuable information stored in the registry related to USB devices.
a. Navigate to
ComputerHKEY_LOCAL_MACHINESYSTEMCurrentControlSetEnumUSB.
This key will show information about USB devices and memory cards that have been plugged into this machine including timestamps and hardware identifiers.
You’ll find phones, cameras, tablets, webcams, memory cards, USB drives, and more. Notice in Figure 23-9 that I’ve found information about an iPhone that I connected to the laptop I’m working on.

FIGURE 23-9 Digital evidence of a phone connected to my laptop
You’ll also notice the following VID numbers and corresponding manufacturers as well. A simple Google search will reveal some of the vendors I’ve patronized (Google “VID” and the 4-digit number).
VID 043E LG Electronics USA
VID 045E Microsoft Corp.
VID 046D Logitech, Inc.
VID 04A9 Cannon, Inc.
VID 04F2 Chicony Electronics Co.
VID 058F Alcor Micro Corp.
VID 05AC Apple, Inc.
As shown in Figure 23-10, I’ve found digital evidence of my Blue Yeti stereo microphone.

FIGURE 23-10 Digital evidence of a USB microphone connected to my laptop
This key can also be used to identify the last time the USB device was connected to the system, by looking at the last write time on the key of the device serial number.
Each subkey will begin with VID, followed by a 4-hex-digit value, which represents the vendor ID followed by &PID and a 4-hex-digit value, which represents the product (device) ID.
Expand each subkey, and click the next-level subkey. In the right pane, you’ll notice values corresponding to the USB device.
Click the Device Parameters subkey for even more information. Access will be denied to the Properties subkey, though.
b. Submit a screenshot of digital evidence showing a USB device that was once plugged into your system.
c. Explain how information like this can be of great significance for a forensic investigation.
![]() 8a, 8b
8a, 8b
![]() 8c
8c
Step 8 Locate potentially sensitive and valuable information stored in the registry related to USB storage devices.
a. Navigate to
ComputerHKEY_LOCAL_MACHINESYSTEMCurrentControlSetEnumUSBSTOR.
This key contains information on any USB storage devices including memory cards that were plugged into your system (duplicating entries from the previous step for just this subset of USB storage devices). Navigate it the same way you did for the key in the previous step.
The serial number of a device stored in this key can be used to match the mounted drive letter, user, and the first and last times this device was connected.
b. Submit a screenshot of digital evidence showing a USB storage device that was connected to your machine.
c. Explain how information like this can be of great significance for a forensic investigation.
![]() 30 MINUTES
30 MINUTES
Lab Exercise 23.02: Digital Evidence in RAM and on the Hard Drive
What’s stored in RAM (Random Access Memory)? Quite literally, every file and program that’s open or running is stored in RAM. Digital evidence in RAM can include data from files, information from running programs, pictures, web browsing and communication information, usernames and passwords, as well as private keys, process information, malware, clipboard contents, and more.
From the world of networking, some examples of what a forensic investigator can find in RAM include the ARP cache, DNS cache, and network connection information including IP addresses, ports, and more (from netstat).
RAM is volatile. When you turn your machine off, the contents of RAM are erased.
The hard drive, which is nonvolatile, can be a great source of digital evidence as well. When a file is deleted, it stays right where it is on the hard drive. The operating system puts that location back in a pool of addresses that can be written to, but the data is still there. Therefore, searching unallocated areas of the hard drive can be very beneficial for forensic investigators, even if the file system doesn’t recognize those locations.
The smallest unit that can be accessed on a storage device like an HDD (hard disk drive) or SSD (solid state drive) is a sector. A group or allocation unit of sectors comprising the smallest unit of disk allocation for a file in an operating system’s file system is called a cluster. The default cluster size is 4 KB (4096 bytes). While hard drives can address sectors, operating systems can only access clusters. Therefore, operating systems store files in groups of clusters, not sectors. Let’s say a file has a size of 3000 bytes. It will be allocated on one cluster since it’s less than 4096 bytes. If a file is 5000 bytes long, it will be allocated on two clusters, since it’s greater than 4096 bytes and less than 8193 bytes (byte number 8193 would require a third cluster). That’s why when you right-click a file, you’ll see that the size contains one value and the size on disk contains a higher value, rounded up to the next 4 KB cluster size. The file I’m editing now to write this lab exercise shows a size of 40.9 KB and a size on disk of 44.0 KB. That means the file is only using 0.9 KB of 4 KB of the last cluster allocated to it. File slack represents the space between the end of a file and the end of the last disk cluster that the file is stored on. That means, if I don’t write anything else into this file, 3.1 KB of previous information of whatever was on the hard drive at that point will be available. Even if I make a new file, there’s no concern that the 3.1 KB of file slack will be written to because that cluster belongs to this file.
Learning Objectives
In this lab exercise, you’ll strategically search for digital evidence in volatile and nonvolatile storage areas. At the end of this lab exercise, you’ll be able to
• Find digital evidence in RAM
• Find digital evidence on the hard drive
Lab Materials and Setup
The materials you need for this lab are
• The Principles of Computer Security: CompTIA Security+ and Beyond textbook
• Any Windows 10 machine (host or VM)
• Google Chrome web browser with an Internet connection
Let’s Do This!
Before you begin, go to https://mh-nexus.de/en/hxd/. Scroll down the page to see a couple of download links. The first one is the latest/current one. Click Download Page in that section.
Pick a download link and click Download Per HTTPS. I chose the fifth one from the top, English Installable.
Extract the ZIP, run the HxDSetup.exe installer. Click Yes at the User Account Control prompt (Windows warns that this app comes from an unknown publisher, not that the app is malicious). Click OK in the Language screen, click Next at the welcome screen, accept the license agreement, and click Next. Keep the default destination location and click Next. Make sure the desktop shortcut and Quick Launch shortcuts are selected and click Next. Then click Install. Remove the checkmark from the Launch HxD Hex Editor checkbox (you’re going to need to run this program as administrator), but feel free to keep the checkmark in the View Readme.txt checkbox, and then click Finish.
Run HxD as an administrator by right-clicking the icon and selecting Run As Administrator. (Step 1 doesn’t need you to run as administrator, but Step 2 does.)
Throughout this chapter, when saving screenshots of steps, feel free to crop out or redact anything you don’t feel comfortable showing.
![]() 1a–1d. Feel free to crop or redact any portions of the screenshots.
1a–1d. Feel free to crop or redact any portions of the screenshots.
Step 1 Visit a website that received your credentials securely with TLS. See those credentials and more in RAM in plaintext.
a. Using Google Chrome, go to any website and log in with fake credentials.
b. In HxD, choose Tools | Open Main Memory and then start double-clicking each Chrome process (or you can click each one and then click OK).
Chrome uses multiple processes for each tab, plug-in, and extension for stability, preventing the crash of one item from bringing everything down, as well as load balancing, which enables multiple web apps to run in parallel.
c. Press CTRL-F (or click Search and then Find). Make sure that the Search Direction radio button is set to All, and type the fake username or password that you submitted. When you find one, the other one is usually nearby, as is the website address/URL. Press F3 (or click Search | Find) to keep going in the event of multiple hits. As shown in Figure 23-11, in Google Chrome, I went to mail.flcc.edu and provided a username of professorweissman and a password of thisisnotreallymypassword! The ! symbol is encoded with %21.

FIGURE 23-11 URL, username, and password in plaintext in RAM
Search manually through each process’s RAM allocation. Encryption is for data in motion and data at rest, but not data being used. TLS (Transport Layer Security) doesn’t help, here.
In an actual forensic investigation, you may not know a username and certainly not a password, so searching by the strings username= or password= would be the way to look for potential credentials. Sometimes the field names used by the web forms will differ and will have variations including strings of id= and pass=.
Unfortunately, you will get lots of false positives, so keep at it until you find some real digital evidence that can be used.
d. You may see other keywords that might be related to a crime, to either inculpate or exculpate a suspect or to figure what happened in a cyberattack. Perform at least three such searches with buzzwords to see if anything related comes up.
![]() 2a, 2b
2a, 2b
Step 2 Find information on your hard drive that you’d never believe would be there.
a. In HxD, click Tools and then Open Disk to examine the hard drive. You can click either one of the logical disks or one of the physical disks. This is where unallocated space and file slack comes into play!
b. Press CTRL-F (or click Search | Find) and perform at least three searches for strings such as your first name, your last name, names of other people, names of companies, websites, e-mail addresses, places, and other search terms that are related to you.
You might be amazed at some of the results, which can include actual e-mails, websites, contents of files, and more. To make it even crazier, some of the results could be from months or even years ago!
![]() 30 MINUTES
30 MINUTES
Lab Exercise 23.03: Steganography
Steganography is the process of hiding information, messages, or files inside of other files. A common type of steganography uses substitution to replaces bits of a host/target file with bits of secret information, messages, or files.
Color JPEG images (usually having a .JPG filename extension) use 24 bits for each pixel (picture element), the smallest element of a picture. Using the RGB (red, green, blue) color model, 8 bits are used to store the red value, 8 bits are used to store the green value, and 8 bits are used to store the blue value, allowing for a wide range of possible colors and shades.
When you look at 8 bits, a byte, the bit at the far left is the most significant bit (MSB) and the bit at the far right is the least significant bit (LSB). Think back to binary numbers and the column values in binary: 128 64 8 4 2 1. If a 1 bit is in the 128s column, it is the most significant bit in the byte, as it represents a value greater than any other 1 bit in the byte. Likewise, a bit in the 1s column is the least significant bit, as it represents a value smaller than any other 1 bit in the byte.
Now think of a byte representing a value for the red, another byte representing a value for the green, and another byte representing a value for the blue. One form of steganography relies on the fact that changing the two least significant bits and the corresponding shade of red, green, or blue is not perceptible. If the 2s column and the 1s column have 1s in them, and you change them to 0s, or vice versa, you’re changing the red, green, or blue by a maximum value of 3 (2 + 1) or –3 (–2 – 1). Try it out, by changing RGB values by 3 or less (and then more), here: www.rapidtables.com/web/color/RGB_Color.html.
The RIT orange uses an RGB value of 247 105 2 as seen here: www.rit.edu/marketing/brandportal/brand-elements/colors.
Here’s how each of those numbers looks in binary:
247 = 11110111 105 = 01101001 2 = 00000010
Let’s say we have another file (any type), whose first byte is 10101010, and we want to hide it in a file that has a pixel value of the RGB value for RIT orange. We’re going to take 2 bits at a time, and put each pair of 2 bits in the two least significant bits positions in the target file, like this:
246 = 11110110 106 = 01101010 2 = 00000010
• In the first byte, 10 replaced 11, which means 247 became 246 (binary 3 was replaced by binary 2).
• In the second byte, 10 replaced 01, which means 105 became 106 (binary 1 was replaced by binary 2).
• In the third byte, 10 replaced 10, which means nothing changed.
• The fourth byte, not shown here, would get the last 2 bits of 10101010.
Although the maximum a value can change was 3, as shown earlier, you can see here that it’s possible that there could be 2, 1, or even 0 bit changes as well.
Finding duplicate images with differing hash values can be an indicator that steganography occurred. Another clue is simply the presence of a steganography tool on a suspect’s system. In fact, you can apply what was done in Lab Exercise 23.01 here. If you find a steganography tool on a suspect’s system, you can use the registry to find files that were recently opened or saved by that tool and have an idea of certain files that might be hiding other files.
In reality, though, it’s very difficult to detect steganography and even more difficult, if not impossible, to recover hidden files from other files because of encryption, as you’ll see in this lab exercise.
Learning Objectives
In this lab exercise, you’ll hide and recover files inside of other files. At the end of this lab exercise, you’ll be able to
• Understand how steganography works
• Perform steganography with multiple tools to hide files
• Perform steganography with multiple tools to recover files from hiding
• Understanding why it’s much easier to hide than to recover in steganography
Lab Materials and Setup
The materials you need for this lab are
• The Principles of Computer Security: CompTIA Security+ and Beyond textbook
• Any Windows 10 machine (host or VM)
• A web browser with an Internet connection
Let’s Do This!
Download Hide’N’Send from https://www.softpedia.com/get/Security/Encrypting/Hide-N-Send.shtml.
Extract the ZIP file.
Download S-Tools from either https://www.insecure.in/steganography.asp
or
https://packetstormsecurity.com/files/download/21688/s-tools4.zip.
Extract the ZIP file.
![]() 1d, 1g, 1i, 1o, 1p. Feel free to crop or redact any portions of the screenshots.
1d, 1g, 1i, 1o, 1p. Feel free to crop or redact any portions of the screenshots.
![]() 1j
1j
Step 1 Hide a file in another file and unhide the hidden file.
a. Inside the extracted HideNSend folder, click Hide’n’Send.exe to launch the program.
b. Save or copy a JPEG image to the HideNSend folder.
c. Make a copy of the image you selected in the same folder (right-click the image icon and select Copy and then right-click a blank space in the folder and select Paste). You should now have two copies of the same image (with different names) in the HideNSend folder. Feel free to rename them original and steg (or something similar), by right-clicking each, typing in a filename, and pressing ENTER.
d. Create a text file in the HideNSend folder by right-clicking in a blank area, selecting New, and selecting Text Document. Then, with the filename highlighted, type secret and then press ENTER. Double-click the file to open it in Notepad and type a secret message.
e. In the Hide’N’Send window, click the Hide tab if it is not selected.
f. Click the folder icon in the Image section and then browse to and select the JPEG image called steg (or whatever name you used).
g. Click the folder icon in the Concealed File section and then browse to and select the text file you made. See Figure 23-12.

FIGURE 23-12 Hiding secret.txt file inside of jonathan.jpg file
Feel free to click the drop-downs in the Settings section to see other choices, but the defaults do not need to be adjusted.
h. Click the HIDE button.
i. Provide and confirm a password in the Password and Repeat Password textboxes. A pop-up with the message “Data successfully hidden!” should appear. Click OK to dismiss it.
j. Compare the original JPEG with the one you just hid a text file in by appearance and size. How do they compare visually? How do the sizes of the file compare?
k. Click the Extract tab.
l. Click the folder icon in the Image section and then browse to and select the image with the text file hidden inside.
m. Click the folder icon in the Extraction Directory section and then browse to and select your desktop.
n. Click the EXTRACT button.
o. Provide and confirm a password. A pop-up with the message “Data successfully extracted!” should appear. Click OK to dismiss it.
p. You’ll now be able to see and read the file that was hidden in the JPEG on the desktop.
![]() 2d–g, 2m–n
2d–g, 2m–n
![]() 2i
2i
Step 2 Hide a file in another file and unhide the hidden file again, this time with a different program.
a. Inside the extracted folder (which will be called either S-Tool or s-tools4, depending on which link you downloaded the program from), click S-Tools.exe to launch the program.
b. The program requires the target file to be a bitmap image (BMP). Save or copy a BMP to the extracted folder. You can get one from here: www.fileformat.info/format/bmp/sample/index.htm.
c. This time, create multiple text files in the extracted folder and populate them with some data.
d. Drag the BMP you chose into the S-Tools window, as shown in Figure 23-13.

FIGURE 23-13 The target file in which another file will be hidden
e. Select all of the text files (CTRL-click) you created, and drag-and-drop the group on the BMP in S-Tools.
f. Feel free to leave or change the encryption algorithm. Provide and verify a passphrase as shown in Figure 23-14 and click the OK button.

FIGURE 23-14 Hiding multiple files in the target file
g. A new image with “hidden data” in the title bar will appear. Right-click that image, select Save As, add the .bmp extension to the filename of hidden, and save it to the extracted folder.
h. Close S-Tools.
i. Compare the original BMP with the one you just hid a text file in by appearance and size. How do they compare visually? How do the sizes of the file compare?
j. Reopen S-Tools.
k. Drag hidden.bmp into the S-Tools window.
l. Right-click the image, select Reveal, enter and verify the passphrase, select the encryption algorithm (if not currently selected), and click the OK button.
m. You’ll see the revealed files in the Revealed Archive. Right-click each, click Save As, and save them to the desktop. You’ll now be able to see and read the files that were hidden in the JPEG on the desktop.
n. Try it again, but this time hide a JPEG image inside the BMP. You’ll be able to use only a JPEG that’s small enough to be hidden in the BMP, so if you get a message that your JPEG is too big, find a smaller one.
![]() 1–2 hours
1–2 hours
Lab Exercise 23.04: Imaging, Recovering Deleted Files, File Signatures, and Analyzing Images
A bitstream copy literally copies a hard drive, flash drive, or other storage medium, bit by bit. As such, a bitstream image, the file that contains the bitstream copy, is considered an exact replica of the original. Forensic investigators should never work on originals but should instead always work on bitstream copies. The first thing that should be done after acquiring the bitstream image is a hash of both the original and the bitstream image to prove that the bits came across exactly as they were on the original. Unallocated space and file slack can be seen and analyzed in the bitstream image using forensic software. Deleted files that exist in whole or partially on the hard drive can be seen and analyzed, in addition to other digital evidence still recognized by the file system in allocated space. Being able to identify file types by their signatures is a very important skill for forensic investigators. Forensic tools are great at automatically creating findings reports.
Learning Objectives
In this lab exercise, you’ll perform many important tasks that forensic investigators perform using Autopsy digital forensics software as well as a hex editor.
Here’s a description of Autopsy from www.sleuthkit.org/autopsy/: “Autopsy® is a digital forensics platform and graphical interface to The Sleuth Kit® and other digital forensics tools. It is used by law enforcement, military, and corporate examiners to investigate what happened on a computer. You can even use it to recover photos from your camera’s memory card.”
At the end of this lab exercise, you’ll be able to
• Make a bitstream image of a flash drive
• Recover deleted files from a flash drive
• Understand how file signatures work
• Manipulate file signatures
• Analyze a USB image
• Analyze a hard drive image
• Generate a report of your forensic investigation
Lab Materials and Setup
The materials you need for this lab are
• The Principles of Computer Security: CompTIA Security+ and Beyond textbook
• Any Windows 10 machine (host or VM)
• A USB flash drive
• A web browser with an Internet connection
Let’s Do This!
Download Autopsy at www.autopsy.com/download/. Accept all defaults during the installation.
![]() 1c, 1g, 1i–1m. Feel free to crop or redact any portions of the screenshots.
1c, 1g, 1i–1m. Feel free to crop or redact any portions of the screenshots.
Step 1 Create files and folders on a flash drive and then delete them. Use Autopsy to attempt to recover the deleted items.
a. Launch Autopsy from the desktop shortcut, Start button, or the search box. Right-click the icon and select Run As Administrator.
b. For Enable Central Repository question, click Yes.
c. On a flash drive, create a text file, Word document, Excel spreadsheet, and folder. Copy an image to the same root of the flash drive as well. Rename all files with a name that you can easily spot, such as today’s date.
d. In Autopsy, click New Case. On the Case Information screen, fill in a Case Name, and keep the defaults for Base Directory and Case Type.
e. Fill in the Optional Information, as you see fit, and click the Finish button.
f. For the Select Type Of Data Source To Add screen, keep the default selection of Local Disk and click Next.
g. Click the Select Disk button at the top of the Select Data Source screen, select the USB Drive, and click OK.
h. Click Next, click Next with Ingest Modules selected, and then click Finish.
i. After Autopsy finishes analyzing, click the Deleted Files item in the left pane, as shown in Figure 23-15.

FIGURE 23-15 Recovering deleted files
j. From the left pane, click File System. In the Listing tab, click the Modified Time column twice to sort in reverse order. You should see the files you just created and deleted at the top of the listing.
k. Select the Text tab, and click each item. In the pane below, you’ll see a representation of the data. Change to the Hex and File Metadata tabs to explore more.
l. Right-click each item and select Open In External Viewer, and the application corresponding to that file’s extension will open with the file loaded into it.
m. Right-click each item and select Extract File(s), and you’ll be able to save the files to the hard drive by browsing to a location and clicking Save. Note that because of the way flash technology works, some files may be only partially recovered or not at all.
![]() 2a–2f
2a–2f
![]() 2f, 2g
2f, 2g
Step 2 A file signature, aka file header, aka magic number, is a set of bytes, usually 2–4 bytes at the beginning of a file that identify the file format. This is important information that tells the operating system which program to load the file into and for forensic tools to classify the file as a certain type.
Check out the most thorough list of file signatures, maintained by Gary Kessler at this website: www.garykessler.net/library/file_sigs.html.
Now you will analyze file signatures.
a. Open HxD, once again. From HxD, click File | Open, and then browse to C:WindowsSystem32, and double-click calc.exe (or right-click the file and then click Open).
You’ll notice in HxD that the first 2 bytes in hex, 4D 5A, decode to MZ in ASCII/Unicode. All Windows binaries, including executables (EXEs) and dynamic link libraries (DLLs), have this famous MZ header (the initials of Mark Zbikowski, one of the original architects of MS-DOS), as shown in Figure 23-16.

FIGURE 23-16 The MZ header
Another famous signature is a Java compiled bytecode file (with a .class extension), which has the signature CAFE BABE. Notice in Figure 23-17 that the signature here is the actual binary represented in hex, as opposed to the MZ header, which is ASCII/Unicode.

FIGURE 23-17 Java’s CAFE BABE
b. For forensics investigators, image files, specifically JPEGs, are obviously very important for a case.
A standard JPEG/JFIF (JPEG File Interchange Format) file will have a signature of FF D8 FF E0. This is an older format used by JPEG images and is mostly used for images that are transmitted and stored on the Web.
A standard JPEG with EXIF (Exchangeable Image File Format) metadata will have a signature of FF D8 FF E1. This is the JPEG format used by digital cameras and other devices that capture images, which includes metadata about the picture including camera make/model, picture specs (rotation, aperture, shutter speed, focal length, metering mode, ISO speed) timestamp, geolocation coordinates, thumbnail of the image, description of the image, and even copyright information. Images in this format will also be found on the Web.
Go to https://images.google.com/ and use Google Images to find a JPEG/JFIF file as well as a JPEG file with EXIF metadata. Download the files from the website to your hard drive, and open them in HxD. Keep going until you have one of each. Screenshot the file headers of each.
c. Go to my FLCC page at https://www.flcc.edu/directory/[email protected]&dept=430.
Download the image of me and examine the EXIF data. What date and time was the picture taken?
d. Open any JFIF file with HxD and change the FF D8 FF E1 signature to 46 4C 43 43, by clicking in the left pane and typing in the new hex digits. You’ll notice the ASCII/Unicode characters of FLCC in the Decoded text section.
Refer to asciitable.com for a great chart mapping values to characters.
Select the last C in FLCC and press the lowercase C on the keyboard. You’ll notice the hex digits of 43 change to the value for the lowercase c, 63. Now change the 63 to 43, and watch the lowercase c turn back into the uppercase C.
e. Click File, click Save As, enter the filename flcc.jpg, browse to the desktop, and then click the Save button.
f. Double-click the flcc.jpg file on the desktop. What happens? Why?
g. If a suspect wants to perform anti-forensics and thwart any forensic investigation, would it be better for the suspect to change the extension of the file or the signature of the file? Why?
![]() 3c–3e
3c–3e
Step 3 In this last step of the lab exercise, you can pivot in many different directions.
You’re about to enter the world of a phenomenal forensics scenario, complete with documents, artifacts, and evidence. The scenario is described as follows, from https://digitalcorpora.org/corpora/scenarios/m57-patents-scenario:
The 2009-M57-Patents scenario tracks the first four weeks of corporate history of the M57 Patents company. The company started operation on Friday, November 13th, 2009, and ceased operation on Saturday, December 12, 2009. As might be imagined in the business of outsourced patent searching, lots of other activities were going on at M57-Patents.
Two ways of working the scenario are as a disk forensics exercise (students are provided with disk images of all the systems as they were on the last day) and as a network forensics exercise (students are provided with all of the packets in and out of the corporate network). The scenario data can also be used to support computer forensics research, as the hard drive of each computer and each computer’s memory were imaged every day.
a. Read through the exercise slides.
b. Read through the detective reports, warrant, and affidavit items.
c. Download one of the USB drive images and analyze it in Autopsy. When you click Add Data Source, this time, select Disk Image or VM File and browse to the USB image that you downloaded. Go through as many buttons and options in Autopsy as possible, including Timeline, Keyword Lists, and Keyword Search at the top, and all parts of the tree at the left, especially Email Addresses. For digital evidence of great interest to the case, right-click each item in the pane at the top right select Add File Tag, and then make an appropriate selection. When you’re done, click the Generate Report button at the top, try multiple report modules, and examine the different reports.
d. Download one of the redacted drive images and analyze it in Autopsy in the same fashion.
e. Feel free to explore the RAM images, network traffic, and documentation as desired.
Lab Analysis
1. What are some examples of digital evidence that can be gleaned from the registry?
![]()
2. What are some examples of digital evidence that can be gleaned from RAM and the hard drive?
![]()
3. How is steganography performed?
![]()
4. What is a bitstream copy and why is it of great importance for digital evidence?
![]()
Key Term Quiz
Use the terms from the list to complete the sentences that follow.
bitmap
file slack
key
signature
1. A registry ____________ contains values that can be used as digital evidence.
2. Unallocated space on the hard drive is known as ____________.
3. In steganography, a great choice for a target file is a ____________.
4. A file ____________ uniquely identifies the type of the file.