
C H A P T E R 9
Build Automation
In the early days of software development the phrase build automation referred to automating the steps necessary to compile and link a program to create an application. Today, that phrase encompasses so much more. Creating an automated build refers to things that include build integration, unit testing, code analysis, and deployment. This book distinguishes between build automation and continuous integration (CI). By way of analogy, think of the build tools as musical instruments and build automation as the playing of those instruments. In this analogy, the practice of continuous integration is the orchestration, which is discussed in Chapter 10.
This chapter covers build tools in their traditional role of compiling and integrating the application. In addition, this chapter delves into common build tasks and how the build tools serve as general scripting tools that can create folders, copy files, archive files, execute programs, and perform all manner of other tasks.
This chapter also covers the next logical step in the build process: automated deployment. There are two distinct activities within automated deployment. They are
- Packaging: Creating a build package that contains all the application files, database scripts, or anything else needed for deployment.
- Deploying: The act of setting up the target environment. This includes installing files, setting the configuration, stopping and starting services, upgrading the database, converting the data in the database, or other tasks that put the target environment into a ready-for-use state.
The key concept here is automated. Ideally, once the script starts, all the tasks should run without manual intervention. It should not require that the build output be manually copied to a server. There should not be any post-deployment configuration. Having said this, there are often obstacles between the vision of automation and the reality of the situation and circumstances. The goal is to use build automation to remove error-prone steps, establish repeatability and consistency, and strive to improve the build and deployment processes over time. Table 9-1 lists ruthlessly helpful build automation practices.


Build Tools
Build tools are software programs and platforms that automate the software build processes. Generally speaking, build tools run a script that defines how that build process is to be carried out. Because of the widely-used make utility, an important scripting form is the makefile format.1 As MSBuild and NAnt have become popular build tools for .NET developers, the prevalent form of scripting uses XML to describe the build process and its dependencies. Whatever the format, the script is what the developer creates. The script defines the build steps and the dependencies of those steps. The script defines any actions to perform within each step and the order of those actions.
It is hard to advocate for one build tool over another. Your organization may have a number of developers very familiar and proficient with NAnt. Since MSBuild is a part of the .NET Framework, more and more developers are learning how to write MSBuild scripts. Other build tools offer important features that make them well suited for key tasks. Table 9-2 offers a list of build tools worth evaluating.
__________
1 For more information see http://en.wikipedia.org/wiki/Makefile.
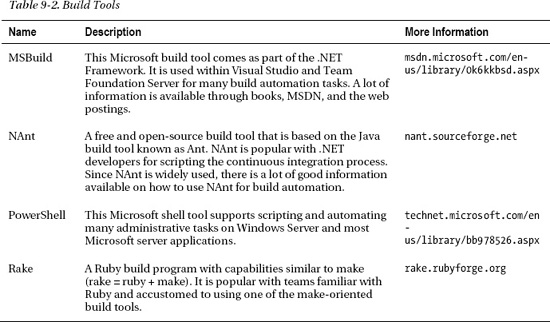
MSBuild has been part of the .NET Framework since version 2.0. It is heavily used within Visual Studio and Team Foundation Server. Today, many .NET developers are turning to MSBuild as the build automation tool of choice. However, it is not uncommon for continuous integration servers to use MSBuild only to compile the source code and to use NAnt, PowerShell, or Rake scripts to perform other steps. There are many good reasons to use various build tools in your development organization, and those reasons make tool selection important. Select the build tools appropriate to you.
Since MSBuild is a part of the .NET Framework, and this book is targeted toward the .NET developer, all the samples are MSBuild scripts. This approach also eliminates the need for you to get a third-party build tool to run the samples. Many of the concepts presented are generally applicable to other build tools and scripting languages.
MSBuild Fundamentals
Some developers are surprised to learn that MSBuild is part of the .NET Framework and that Visual Studio uses MSBuild to perform many build steps. In fact, Visual Studio project files are MSBuild scripts. In addition, Microsoft Team Foundation Server relies very heavily on MSBuild to perform many build automation steps. Increasingly, knowing the fundamentals of MSBuild is important to understanding how .NET applications are built with the Microsoft tool set.
![]() Practice 9-1 Learn the Fundamentals of Build Automation Scripting with MSBuild
Practice 9-1 Learn the Fundamentals of Build Automation Scripting with MSBuild
This section is not going to teach you everything you need to know about MSBuild and how to write sophisticated MSBuild scripts. For tutorials and MSBuild in depth, take a look at the resources available in Appendix A. This chapter touches upon many of the key concepts and illustrates how to perform common build tasks using MSBuild.
Tasks and Targets
MSBuild uses a task to execute an action during the build process. The tasks are grouped under one or more targets. To execute an MSBuild script one or more targets are invoked. Perhaps an example would be helpful right now.
The MSBuild script in the SamplesCh09�_GeneralHelloWorld
unner.msbuild file is shown in Listing 9-1. This is an ordinary XML file. The outermost element is the Project element. This script has a single Target element within the Project element. This is an MSBuild target. The target has a Name attribute, which is assigned a value of Hello. Within the Target element is a single Message element, which is an MSBuild task. This task takes two parameters, which are passed through the Text and Importance attributes.
Listing 9-1. The Message Task Called Within the Hello Target
<?xml version="1.0" encoding="utf-8"?>

<Project DefaultTargets="Hello"

         xmlns="http://schemas.microsoft.com/developer/msbuild/2003"

         ToolsVersion="4.0"

         >

  <Target Name="Hello">

    <Message Text="Hello world!"

             Importance="high"

             />

  </Target>

</Project>
The output from running the SamplesCh09�_GeneralHelloWorld unner.msbuild script file is shown in Listing 9-2. The script is executed from the command line as follows:2
%MSBuildRoot%msbuild.exe "runner.msbuild"
The output tells you when the build started and the name of the project file that MSBuild is running. The MSBuild engine then writes to the output log that Target Hello is executed. This target has the one task to execute, which is to write the message to the output. There it is. The text Hello world! is written to the log.
__________
2 The msbuild.exe is located in the .NET Framework 4.0 installation folder, which is customarily C:WindowsMicrosoft.NETFrameworkv4.0.30319. Create the environment variable MSBuildRoot to reference the proper folder for your environment.
Listing 9-2. The Output from Running the HelloWorld Sample Script
Build started 9/25/2011 3:32:45 PM.
__________________________________________________
Project "C:SamplesCh09�_GeneralHelloWorld
unner.msbuild" (default targets):
Target Hello:
Hello world!
Build succeeded.
0 Warning(s)
0 Error(s)
Time Elapsed 00:00:00.13
The next example is more involved, but the concept is pretty much the same. There is a target and the target has a task. The MSBuild script in the SamplesCh09�_GeneralBuild
unner.msbuild file is shown in Listing 9-3. This script has a single Target element with a Name attribute of BuildAll. The task is the MSBuild task, which is the task to execute another script. In this case, the two scripts that are executed are both Visual Studio project files, which are defined as ProjectToBuild elements under the ItemGroup element. And so, when the target in this script is invoked it will invoke the Build target in two other scripts, both of which are Visual Studio projects. In this way, the runner.msbuild script is automating the build for these two projects.
Listing 9-3. The MSBuild Task Called Within a Target Element
<?xml version="1.0" encoding="utf-8"?>

<Project DefaultTargets="BuildAll"

         xmlns="http://schemas.microsoft.com/developer/msbuild/2003"

         ToolsVersion="4.0">


  <ItemGroup>

    <ProjectToBuild Include=".Lender.Slos.FinancialLender.Slos.Financial.csproj" />

    <ProjectToBuild

Include=".Tests.Unit.Lender.Slos.FinancialTests.Unit.Lender.Slos.Financial.csproj" />

  </ItemGroup>


  <Target Name="BuildAll">

    <MSBuild Projects="@(ProjectToBuild)"

             Targets="Build"

             Properties="Configuration=DEBUG"

             />

  </Target>

</Project>
This is the basic idea of MSBuild scripts: invoke targets which execute tasks. A task can even invoke targets in another script. There is a lot more to tasks and targets—rather than delve into the details, let’s stay at the high level to look at other major features of an MSBuild script.
PropertyGroup and ItemGroup
Properties are used in MSBuild scripts to store values and pass values to tasks. Properties are declared in the script file as child elements of a PropertyGroup element. The name of the child element is the name of the property. The content within the child element is the value of the property.
The MSBuild script in the SamplesCh09�_GeneralProperties
unner.msbuild file is shown in Listing 9-4. Near the top of the script a PropertyGroup element is defined. The child element of GlobalProperty is a property with the value of DEBUG. The Target with the name First writes the value of the GlobalProperty to the log by referencing the value using the $(GlobalProperty) notation. Within this same target the value of LocalProperty is also written to the log. It is important to know that although the LocalProperty is not yet defined, MSBuild does not raise an error when the property is referenced.
Within the Target section named Second, there is a PropertyGroup element that defines the LocalProperty and assigns the value of Lender.Slos to that property. The values of both the GlobalProperty and LocalProperty properties are written to the log. Within the Target named Third, there are no properties defined. In this target section, the values of both the GlobalProperty and LocalProperty properties are written to the log.
Listing 9-4. Properties Declared Outside and Within a Target Section
<?xml version="1.0" encoding="utf-8"?>

<Project DefaultTargets="First;Second;Third"

         xmlns="http://schemas.microsoft.com/developer/msbuild/2003"

         ToolsVersion="4.0"

         >

  <PropertyGroup>

    <GlobalProperty>DEBUG</GlobalProperty>

  </PropertyGroup>


  <Target Name="First">

    <Message Text="In the First target the global property is: '$(GlobalProperty)'"

             Importance="high"

             /glt;

    <Message Text="In the First target the local property is: '$(LocalProperty)'"

             Importance="high"

             />

  </Target>


  <Target Name="Second">

    <PropertyGroup>

      <LocalProperty>Lender.Slos</LocalProperty>

    </PropertyGroup>


    <Message Text="In the Second target the global property is: '$(GlobalProperty)'"

             Importance="high"

             />

    <Message Text="In the Second target the local property is: '$(LocalProperty)'"

             Importance="high"

             />

  </Target>
  <Target Name="Third">

    <Message Text="In the Third target the global property is: '$(GlobalProperty)'"

             Importance="high"

             /glt;

    <Message Text="In the Third target the local property is: '$(LocalProperty)'"

             Importance="high"

             />

  </Target>

</Project>
The output from running the SamplesCh09�_GeneralProperties
unner.msbuild script file is shown in Listing 9-5. The output from the First target displays the expected GlobalProperty value of DEBUG. The yet-to-be-declared LocalProperty value is an empty string. The output from the Second target displays the expected GlobalProperty and LocalProperty values. The output from the Third target displays the expected GlobalProperty value. The output from the LocalProperty value is not an empty string; it is Lender.Slos. It is helpful to know that even when a property is declared within a target, once the target is called and the property value is set, that is the property’s value which is set for the remainder of the script’s execution.
Listing 9-5. The Output from Running the Properties Sample Script
Build started 9/25/2011 3:32:45 PM.
__________________________________________________
Project "C:SamplesCh09�_GeneralProperties
unner.msbuild" (default targets):
Target First:
In the First target the global property is: 'DEBUG'
In the First target the local property is: ''
Target Second:
In the Second target the global property is: 'DEBUG'
In the Second target the local property is: 'Lender.Slos'
Target Third:
In the Third target the global property is: 'DEBUG'
In the Third target the local property is: 'Lender.Slos'
Build succeeded.
0 Warning(s)
0 Error(s)
Time Elapsed 00:00:00.19
Next, let’s take a look at the concept of the MSBuild Item. Items are declared in the script file as child elements of an ItemGroup element. The name of the child element defines the Item type. Item types are essentially named lists of items. Items are usually passed as parameters to tasks.
The MSBuild script in the SamplesCh09�_GeneralItems
unner.msbuild file is shown in Listing 9-6. Near the top of this script, there are two ItemGroup elements defined. The first ItemGroup element contains two ContentToInclude elements. The first ContentToInclude element defines the items to include in that list by assigning the Include attribute a value, which is $(SourcePath)***.ico. This tells MSBuild to generate the item list by recursively looking for files under the $(SourcePath) folder, where the filename has an extension of ico. The second ContentToInclude element adds all the filenames with an extension of bmp to the item list with the same name.
The second ItemGroup element contains two ContentToExclude elements. The first ContentToExclude element defines the items to include in that list by assigning the Include attribute a value, which is $(SourcePath)***.gif. This tells MSBuild to generate the item list by recursively looking for files under the $(SourcePath) folder, where the filename has an extension of gif. The second ContentToExclude element adds all the filenames that match the wildcard of Webcontrol*.bmp.
In Listing 9-6, near the bottom of the script, there is a target named CopyToOutput. Within the target is an ItemGroup that contains the ContentFiles element. The way these attributes are assigned tells MSBuild to generate the item list by including the items from the ContentToInclude item list and to exclude the items from the ContentToExclude item list. The ContentFiles item list is then used in the parameters to the Copy task.
The Copy task has two attributes that act as parameters for this task. The first is the SourceFiles attribute that has the @(ContentFiles) item list assigned to it. The second is the DestinationFiles attribute that has this expression assigned to it:
@(ContentFiles->'$(OutputPath)\%(RecursiveDir)%(Filename)%(Extension)')
This expression has special meaning. It uses the MSBuild item metadata to transform the ContentFiles items into a new list of items.3 The new items have the same relative path, filename, and extension of the ContentFiles items, but they have the base folder defined in the OutputPath property. The Copy task receives a transformed file as the destination file for each of the source files.
_________
3 For more information on the MSBuild Well-known Item Metadata see http://msdn.microsoft.com/enus/library/ms164313(v=VS.100).aspx.
Listing 9-6. Item Lists as Parameters to the Copy Task
<?xml version="1.0" encoding="utf-8"?>

<Project DefaultTargets="CopyToOutput"

         xmlns="http://schemas.microsoft.com/developer/msbuild/2003"

         ToolsVersion="4.0"

         >

  <PropertyGroup>

    <SourcePath>.Content</SourcePath>

    <OutputPath>.Output</OutputPath>

    <DefineConstants>DEBUG;TRACE</DefineConstants>

  </PropertyGroup>


  <ItemGroup>

    <ContentToInclude Include="$(SourcePath)***.ico" />

    <ContentToInclude Include="$(SourcePath)***.bmp" />

  </ItemGroup>


  <ItemGroup>

    <ContentToExclude Include="$(SourcePath)***.gif" />

    <ContentToExclude Include="$(SourcePath)**Webcontrol*.bmp" />

  </ItemGroup>


  <Target Name="First">

    <Message Text="In the DefineConstants property is: '$(DefineConstants)'"

             Importance="high"

             />
  </Target>


  <Target Name="Second">

    <Message Text="In the ContentToInclude is: '@(ContentToInclude)'"

             Importance="high"

             />

  </Target>


  <Target Name="Third">

    <Message Text="In the ContentToExclude is: '@(ContentToExclude)'"

             Importance="high"

             />

  </Target>


  <Target Name="CopyToOutput"

          DependsOnTargets="First;Second;Third;Clean"

          >

    <ItemGroup>

      <ContentFiles Include="@(ContentToInclude)"

                    Exclude="@(ContentToExclude)"

                    />

    </ItemGroup>


    <Message Text="In the ContentFiles is: '@(ContentFiles)'"

             Importance="high"

             />


    <Copy SourceFiles="@(ContentFiles)"

          DestinationFiles="@(ContentFiles->

'$(OutputPath)\%(RecursiveDir)%(Filename)%(Extension)')"

          />

  </Target>


  <Target Name="Clean" >

    <RemoveDir Condition="Exists('$(OutputPath)')"

               Directories="$(OutputPath)"

               />

  </Target>

</Project>
The output from running the SamplesCh09�_GeneralItems
unner.msbuild script file is shown in Listing 9-7. Notice that the contents of the ContentFiles item list is a semicolon-separated list of files that includes all the files in the ContentToInclude item list but excludes the files in the ContentToExclude item list. The Copy task logs a message indicating the source file path and destination file path, which results from the transformation expression, for each file that is copied.
Listing 9-7. The Output from Running the Items Script
Build started 9/25/2011 3:32:45 PM.
__________________________________________________
Project "C:SamplesCh09�_GeneralItems
unner.msbuild" (default targets):
Target First:

    In the DefineConstants property is: 'DEBUG;TRACE'

Target Second:

    In the ContentToInclude is:

'.Contenticonsinstall.ico;.Contenticonssearch.ico;.Contenticonssearch4people.ico;.Co
ntenticonsshare.ico;.ContentimagesWebcontrol_Pagecatalogpart.bmp;.ContentimagesWebcont
rol_Sqldatasrc.bmp;.Contentimageswindow.bmp'

Target Third:

    In the ContentToExclude is:

'.Contentanimationsdownload_FTP_00.gif;.Contentanimationsstatus_anim.gif;.Contentimage
sWebcontrol_Pagecatalogpart.bmp;.ContentimagesWebcontrol_Sqldatasrc.bmp'

Target Clean:

    Removing directory ".Output".

Target CopyToOutput:

    In the ContentFiles is:

'.Contenticonsinstall.ico;.Contenticonssearch.ico;.Contenticonssearch4people.ico;.Co
ntenticonsshare.ico;.Contentimageswindow.bmp'

    Creating directory ".Outputicons".

    Copying file from ".Contenticonsinstall.ico" to ".Outputiconsinstall.ico".

    Copying file from ".Contenticonssearch.ico" to ".Outputiconssearch.ico".

    Copying file from ".Contenticonssearch4people.ico" to

".Outputiconssearch4people.ico".

    Copying file from ".Contenticonsshare.ico" to ".Outputiconsshare.ico".

    Creating directory ".Outputimages".

    Copying file from ".Contentimageswindow.bmp" to ".Outputimageswindow.bmp".


Build succeeded.

    0 Warning(s)

    0 Error(s)


Time Elapsed 00:00:00.24
Basic Tasks
Many tasks are included with MSBuild. The samples use a number of the MSBuild tasks throughout. These tasks provide for the basic functionality that MSBuild offers. As you will learn, a lot of the power of MSBuild comes through the third-party tasks provided in task libraries.
Some of the commonly used basic MSBuild tasks include
- Message: Writes a message to the log
- Warning: Writes a warning to the log based on an evaluated condition
- Error: Stops the build based on an evaluated condition and writes an error to the log
- Exec: Runs a program or command with the specified arguments
- CallTarget: Invokes a target in the project file
- MSBuild: Invokes targets in another project file
- Copy: Copies files from a source to a destination
- Move: Moves files to a new location
- Delete: Deletes files
- MakeDir: Creates a directory
- RemoveDir: Removes a directory and all of its files and subdirectories
- ReadLinesFromFile: Reads from a text file
Logging
There usually comes a time when the build script does not perform the build actions as expected. In order to diagnose and correct the problem a logging facility can be used to review the progress and state of the build script. With MSBuild the default output uses ConsoleLogger to write to the console window. To capture the log output to a file MSBuild provides the FileLogger facility, and the parameters for the logger can be passed to MSBuild using the command-line option /logger (or /l for short). It is also possible to write your own logger by implementing the ILogger interface directly or deriving from the Logger base class.4 The MSBuild log records build events, messages, warnings, and errors. Within the scripts that you create, writing messages to the log can help diagnose any build script issues when the script is being developed or running remotely on the build server.
![]() Practice 9-2 Use a Logger to Record Information That Helps Diagnose Build Script Issues
Practice 9-2 Use a Logger to Record Information That Helps Diagnose Build Script Issues
Within the MSBuild script the Error task is used to report an error to the log. If the Condition attribute of the Error element evaluates to true, the value of the Text attribute is logged and the build stops. Similarly, the Warning task is used to report a warning message based on a conditional statement, but the build continues. Within the MSBuild script the primary way to write an informational message to the log is with the Message task. The Message task has an Importance attribute that the logger interprets to determine if the message should be written to the log, based on the verbosity level. The Importance attribute can be set to high, normal, or low. In Listing 9-8 the sample runner.msbuild script file is shown. It has three Message tasks, each having the Importance attribute set to a different value.
Listing 9-8. Writing Messages to the Log
<?xml version="1.0" encoding="utf-8"?>

<Project DefaultTargets="Default"

         xmlns="http://schemas.microsoft.com/developer/msbuild/2003"

         ToolsVersion="4.0">


  <Target Name="Default">

    <Message Text="This message is 'high' importance"

             Importance="high"

             />

    <Message Text="This message is 'normal' importance"

             Importance="normal"

             />

    <Message Text="This message is 'low' importance"
             Importance="low"

             />

  </Target>

</Project>
__________
4 For more information see http://msdn.microsoft.com/en-us/library/ms171471.aspx.
When the SamplesCh09�_GeneralLogging
unner.msbuild file is run through MSBuild from the command line, as shown in Listing 9-9, the logging option (/l) is used to provide the parameters for logging. In this example, the FileLogger,Microsoft.Build.Engine part indicates that the built-in file logger is the logger to use. The logfile=logs
ormal.log part provides the relative path to the log filename.
Listing 9-9. Running MSBuild with the File Logging Option
%MSBuildRoot%msbuild.exe "runner.msbuild"

/l:FileLogger,Microsoft.Build.Engine;logfile=logs
ormal.log
When the script is run, MSBuild creates or overwrites the log file. The optional append parameter can be used to append the log file if it already exists. Since the optional verbosity parameter is not provided, the global verbosity setting is used for the file logger. After the command line is run the output is logged to the normal.log file. The output in this file is shown in Listing 9-10.
Listing 9-10. Output in the normal.log File
Build started 9/25/2011 3:32:45 PM.
__________________________________________________
Project "C:SamplesCh09�_GeneralLogging
unner.msbuild" (default targets):
Target Default:
This message is 'high' importance
This message is 'normal' importance
Build succeeded.
0 Warning(s)
0 Error(s)
Time Elapsed 00:00:00.10
To provide more detailed output in the log file, include the optional verbosity parameter and assign it the detailed value. Two separate command lines that set the verbosity are shown in Listing 9-11. The first command line includes that /v=detailed option, which sets the global verbosity level for all loggers. The second command line adds the verbosity level option to override the global verbosity setting for only that file logger.
Listing 9-11. Running MSBuild with the Detailed Logging Options
%MSBuildRoot%msbuild.exe "runner.msbuild" /v=detailed

/l:FileLogger,Microsoft.Build.Engine;logfile=logsdetailed.log


%MSBuildRoot%msbuild.exe "runner.msbuild"

/l:FileLogger,Microsoft.Build.Engine;logfile=logsdetailed.log;verbosity=detailed
When the runner.msbuild script file is run with the verbosity level set to detailed, a lot more information is written in the log file, as shown in Listing 9-12. Notice that the low importance message is now written to the log file. In addition, there is now a line that indicates that a task starts executing and that a task is done, for each task that is executed. At the beginning of the script, there is more information that includes the build tool version and the Message task used in the script.
Listing 9-12. Output in the detailed.log File
Build started 9/25/2011 3:32:45 PM.
__________________________________________________
Project "C:SamplesCh09�_GeneralLogging
unner.msbuild" (default targets):
Building with tools version "4.0".
Target Default:
Using "Message" task from assembly "Microsoft.Build.Tasks.v4.0,
Version=4.0.0.0, Culture=neutral, PublicKeyToken=b03f5f7f11d50a3a".
Task "Message"
This message is 'high' importance
Done executing task "Message".
Task "Message"
This message is 'normal' importance
Done executing task "Message".
Task "Message"
This message is 'low' importance
Done executing task "Message".
Done building project "runner.msbuild".
Build succeeded.
0 Warning(s)
0 Error(s)
Time Elapsed 00:00:00.08
Having the ability to control the global verbosity level independently of the verbosity level of the logger is very helpful. The valid values for the verbosity option include
The important point is that while writing scripts you should include many Message tasks. These informational messages serve to describe and record how the script is behaving as it runs. By including messages that have the Importance attribute set to low, the script can provide detailed output to the log file during development. Later, when the script is running on the build server the normal output will not include this verbose information unless or until the verbosity level is raised.
Parameters and Variables
Since the goal is to write a single build script that can perform a variety of tasks under various conditions, it is important to be able to provide the build script with parameters and variables. Each build tool has different mechanisms for passing in these parameter values. The key concept is to use these variables to write a single script that can perform a range of tasks under different circumstances and conditions.
![]() Practice 9-3 Use Parameters to Provide Script Values and Control Logic and Actions
Practice 9-3 Use Parameters to Provide Script Values and Control Logic and Actions
When running MSBuild from the command line, parameters can be passed to the build script using the parameter option (/p). Usage of the parameter option is illustrated in Listing 9-13. The first parameter is named ParamOne and has the value of 42. The second parameter is separated from the first parameter with a semicolon. The second parameter is named ParamTwo and has the value of First;Second;Third. Notice how the second parameter value is enclosed in quotation marks so that the value can include semicolons. The third parameter is named ParamThree and has the value of C:My Documents. This third parameter uses the double backslash notation as an escape character to indicate that the trailing backslash is part of the ParamThree value.
Listing 9-13. Passing MSBuild Parameters Through the Command Line
%MSBuildRoot%msbuild.exe "runner.msbuild"

/p:ParamOne=42;ParamTwo="First;Second;Third";ParamThree="C:My Documents\"
In Listing 9-14, the three Message tasks show how to insert the parameter values as part of the Text that is written to the log. The $(ParamOne) notation indicates that the value stored in the ParamOne property is written into the Parameter 1: '42' output line. At the bottom of Listing 9-14, the output from each of the three parameters is shown. These parameter values can be used in a wide variety of ways, which are shown over the course of this chapter.
Listing 9-14. The Script Logging the Values from the Parameters
...


    <Message Text="Parameter 1: '$(ParamOne)'"

             Importance="low"

             />
    <Message Text="Parameter 2: '$(ParamTwo)'"

             Importance="low"

             />

    <Message Text="Parameter 3: '$(ParamThree)'"

             Importance="low"

             />

...


  Parameter 1: '42'

  Parameter 2: 'First;Second;Third'

  Parameter 3: 'C:My Documents'
Providing a long list of parameters and dealing with special character escaping on the command line is not the only way to pass values in to an MSBuild script. Another way to pass values into the script is through the use of environment variables. This is a helpful technique to use when the same build script runs on a variety of machines with different configurations. For example, if a build script is written to run FxCop then an FxCopRoot environment variable can be created on each of the machines where the script will run. The FxCopRoot environment variable contains the path to the FxCopCmd.exe program that is specific to that machine. In Listing 9-15, the build script inspects the FxCopRoot property, which MSBuild generates and sets according to the corresponding environment variable. The logical condition is examined in the Condition attribute of the Error task. If the value is empty, the script throws an error explaining that the FxCopRoot environment variable is required. If the property value is not empty, the error condition is not met and the script proceeds to write out the FxCop installation folder as part of the message to the log.
Listing 9-15. Script Property Values from an Environment Variable
...


    <Error Condition="'$(FxCopRoot)'==''"

           Text="Environment variable 'FxCopRoot' must be set."

           />

    <Message Text="FxCop Installation Root: '$(FxCopRoot)'"

             Importance="low"

             />

...
A third way that an MSBuild script can set a property value from an external source is from the Windows registry. In Listing 9-16, there are two property values that are assigned values from the registry. The first is the Username property, which is set to the username of the currently logged on user. The second is the DotNetFxRoot property, which is set to the .NET Framework installation folder. Property values from the command line, environment variable, and the registry are all powerful ways to write one build script that performs a variety of tasks under many different circumstances.
Listing 9-16. Script Properties Read from the Registry
...


    <PropertyGroup>

      <Username>$(Registry:HKEY_CURRENT_USERVolatile Environment@USERNAME)</Username>
      <DotNetFxRoot>$(Registry:HKEY_LOCAL_MACHINESOFTWAREMicrosoft

.NETFramework@InstallRoot)</DotNetFxRoot>

    </PropertyGroup>


    <Message Text="Current user's login id: '$(Username)'"

             Importance="low"

             />

    <Message Text=".NET Framework Installation Root: '$(DotNetFxRoot)'"

             Importance="low"

             />

...
Libraries and Extensions
Every build tool provides a base set of features that form the foundation of the tool’s build automation functionality. However, there are also many common build tasks that are not included in the many build tools. For additional capabilities most build tools provide facilities to extend the functionality.
For MSBuild there are libraries available that provide a broad range of additional functionality. Two of the commonly used libraries are
- MSBuild Extension Pack
- MSBuild Community Tasks
Both of these libraries are free and open source. Information on how to obtain these libraries is provided in Appendix A. Both the Extension Pack and the Community Tasks include help documentation that is very thorough and includes many examples of how to use the tasks provided within the library. Both libraries are widely used to extend MSBuild scripts and there are many examples available in books and on the Internet that explain how to use these libraries to accomplish common tasks.
![]() Practice 9-4 Extend the Power of Build Automation by Using Task Libraries
Practice 9-4 Extend the Power of Build Automation by Using Task Libraries
In addition to using an MSBuild library that others have developed, you can create your own MSBuild custom tasks library. This is a straightforward process, but it is a little beyond the scope of this book. In Chapter 11, there is sample code that calls StyleCop from an MSBuild script by using a custom build task. The resources in Appendix A include books and articles on MSBuild that delve into writing custom MSBuild tasks.
Import and Include
Over time the build scripts that you write may get quite long and repeat sections and tasks across many build scripts. Most build tools provide a way to import and include partial scripts to promote reuse. Using this approach, the reused sections of the script are placed in a common script that is included within the main build script.
In MSBuild the Import task is used to include one script within another build script. The Import element uses the Project attribute to reference the file within the calling script. For all intents and purposes, the Import task inserts the contents of the imported file’s Project section within the main script at the Import line, when the script begins to execute. In this way, the main script references targets and properties as if they are defined in the main script. Any MSBuild files that are intended to be imported are, by convention, named with the Targets file extension.
In Listing 9-17, the entire contents of the main MSBuild script file are shown. The Import task provides the relative path to the Common.Targets file. The Default target references a Preconditions target defined in the Common.Targets file. Also, the property BinariesOutputPath can be referenced because it is defined in the Common.Targets file.
Listing 9-17. Script that Imports Common.Targets File
<?xml version="1.0" encoding="utf-8"?>

<Project DefaultTargets="Default"

         xmlns="http://schemas.microsoft.com/developer/msbuild/2003"

         ToolsVersion="4.0">


  <Import Project=".BuildImportTargetsCommon.Targets"/>


  <Target Name="Default"

          DependsOnTargets="Preconditions">

    <Message Condition="Exists('$(BinariesOutputPath)')"

             Text="Yes, the '$(BinariesOutputPath)' folder exists."

             Importance="low"

             />

    <Error Condition="!Exists('$(BinariesOutputPath)')"

             Text="No, the '$(BinariesOutputPath)' folder does NOT exist."

             />

  </Target>

</Project>
Let’s take a look at the contents of the Common.Targets file, which is shown in Listing 9-18. There is a PropertyGroup section that defines two properties, ArtifactsPath and BinariesOutputPath. The values in these properties are accessible to any script that imports this file. Notice the Condition attribute on the ArtifactsPath property. This property will not be set if that property is already set in the script that imports this file. This technique allows you to override a property value defined in an imported targets file by defining it in the main script before the Import target statement.
The Common.Targets file also defines a Target element with the name Preconditions. This target uses properties that are assumed to already be defined before this script is imported. It also uses the ArtifactsPath and BinariesOutputPath properties that are defined earlier in this file.
Listing 9-18. Script Within the Common.Targets File
<?xml version="1.0" encoding="utf-8" ?>

<Project xmlns="http://schemas.microsoft.com/developer/msbuild/2003"
         ToolsVersion="4.0"

         >

  <PropertyGroup>

    <ArtifactsPath Condition="'$(ArtifactsPath)'==''">

.Artifacts</ArtifactsPath>

    <BinariesOutputPath Condition="'$(BinariesOutputPath)'==''">

$(ArtifactsPath)Binaries</BinariesOutputPath>

  </PropertyGroup>


  <Target Name="Preconditions" >

    <Error Condition="'$(FxCopRoot)'==''"

           Text="Environment variable 'FxCopRoot' must be set."

           />

    <Message Text="FxCop root: '$(FxCopRoot)'"

             Importance="low"

             />

    <MakeDir Condition="!Exists('$(ArtifactsPath)')"

             Directories="$(ArtifactsPath)"

             />

    <MakeDir Condition="!Exists('$(BinariesOutputPath)')"

             Directories="$(BinariesOutputPath)"

             />

  </Target>

</Project>
Inline Tasks
Some build tools provide the facility to define custom task logic as inline code within the build script. In general, because these inline-code tasks are often reused, they are commonly written in a script file that is imported. The purpose of these inline tasks is not to replace custom task libraries but to provide a way to write a short function without resorting to writing a full-blown custom task.
![]() Practice 9-6 Define Custom Task Logic as Inline Code to Perform Simple Tasks
Practice 9-6 Define Custom Task Logic as Inline Code to Perform Simple Tasks
Version 4.0 of MSBuild adds the facility to write custom tasks inline in the project file, which is called Inline Tasks.5 The inline code can be written in C#, VB.NET, or JavaScript. Listing 9-19 shows the relevant section of the runner.msbuild sample script file. The Example1 target calls the ExecuteSum task, which is defined as the inline task, shown in Listing 9-19. The caller provides the values from the Values property by assigning this property’s value to the Input attribute. The output from the ExecuteSum task is returned and stored in a property named SumFromTask.
__________
5 For more information see http://msdn.microsoft.com/en-us/library/dd722601.aspx.
Listing 9-19. Script That Calls the ExecuteSum Inline Task
...


  <PropertyGroup>

    <Values>16.37|11.13|1129.7057|2.417|6569.1</Values>

  </PropertyGroup>


...


  <Target Name="Example1">

    <ExecuteSum Input="$(Values)">

      <Output PropertyName="SumFromTask" TaskParameter="TaskMessage"/>

    </ExecuteSum>


    <Message Text="Sum from 'ExecuteSum' task: $(SumFromTask)"

              Importance="high"

              />

  </Target>

...
In Listing 9-20, the build script that defines the ExecuteSum inline task is shown. Some important features to note include the use of input and output parameters. The Input property is defined as a parameter of an element within the ParameterGroup. Also, the TaskMessage parameter is defined as an output parameter that is a decimal type. Within the Code element the inline C# code is defined. The Input parameter is accessed just like a property of a class. Similarly, the TaskMessage parameter is set as if it is a property of a class.
Listing 9-20. Script That Defines the ExecuteSum Inline Task
...


  <UsingTask TaskName="ExecuteSum"

              TaskFactory="CodeTaskFactory"

              AssemblyFile="$(MSBuildToolsPath)Microsoft.Build.Tasks.v4.0.dll" >

    <ParameterGroup>

      <Input Required="true"/>

      <TaskMessage ParameterType="System.Decimal" Output="true"/>

    </ParameterGroup>


    <Task>

      <Code Type="Fragment" Language="cs">

        const string Separators = ",;|";

        var sum = decimal.Zero;


        if (!string.IsNullOrWhiteSpace(Input))

        {

          foreach (var value in Input.Split(Separators.ToCharArray()))

          {

            decimal decimalValue;
            if (decimal.TryParse(value, out decimalValue))

            {

              sum += decimalValue;

            }

          }

        }


        TaskMessage = sum;

      </Code>

    </Task>

  </UsingTask>

...
Common Tasks
There are common build automation tasks that come up time and time again. Many of these are made easier by the custom tasks available in extension libraries. It is important to review the tasks in several libraries to remove the need to rediscover the challenges and reimplement the solutions associated with these custom tasks. This section covers a handful of samples that illustrate how to perform these common tasks within MSBuild, using the MSBuild Extensions Pack or with the MSBuild Community Tasks. The larger message of this section is that it is very helpful for you to develop small, focused build scripts that use these libraries to accomplish tasks that are common in your situation. In practice, these targeted scripts isolate the techniques involved and help refine the approach before bringing them to the main build script. In addition, any effort to track down or isolate problems in getting the small script to work is a lot easier to debug.
Date and Time
Very common tasks involve determining today’s date, the current time, and event durations. Perhaps the script needs to write an informational message to log when the build begins. Other applications include creating folder names that include the date and time as part of the string. Whatever the need, it is helpful to learn how to effectively determine the date, time, or duration for use in the build script.
![]() Practice 9-7 Make Effective Use of the Date, Time, and Duration Functions Within a Script
Practice 9-7 Make Effective Use of the Date, Time, and Duration Functions Within a Script
Within an MSBuild script there are a few ways to determine the current date and time. The MSBuild Extension Pack provides the MSBuild.ExtensionPack.Framework.DateAndTime task to help perform a number of time-related operations. This task allows you to easily determine the current date and time and calculate elapsed time. The SamplesCh091_DateAndTime
unner.msbuild script file provides several examples of how to use this Extensions Pack to work with time-related values.
One of the simplest ways to determine the current date and time from within an MSBuild script is by using property functions. This technique is illustrated in the fragment of the build script in Listing 9-21. The TodaysDate property is assigned today’s date based on the property function $([System.DateTime]::Today.ToString("dddd, MMMM dd, yyyy")). This approach uses the syntax that MSBuild defines to get a value from a static class property: the Today property of the .NET System.DateTime class. The call to the ToString method uses the conventional .NET format string to assign the value to the TodaysDate property. A similar approach assigns the current time to the CurrentTime property.
Listing 9-21. Script That Assigns the Current Date and Time to Properties
...


    <Message Text="Use the MSBuild property functions to get the current date and time"

             Importance="low"

             />

    <PropertyGroup>

      <TodaysDate>$([System.DateTime]::Today.ToString("dddd, MMMM dd, yyyy"))</TodaysDate>

      <CurrentTime>$([System.DateTime]::Now.ToString("h:mm:ss tt"))</CurrentTime>

    </PropertyGroup>


    <Message Text="    Today's date is: $(TodaysDate)"

             Importance="high"

             />

    <Message Text="    Current time is: $(CurrentTime)"

             Importance="high"

             />

...
When the SamplesCh091_DateAndTime unner.msbuild script file is executed the messages that are written out display today’s date and the current time, which is illustrated in Listing 9-22.
Listing 9-22. Output That Displays the Current Date and Time
...


Using the MSBuild property functions to get the current date and time

      Today's date is: Sunday, September 25, 2011

      Current time is: 3:32:45 PM

...
Assembly Info
The assemblies that are created during the build process contain properties that can help the .NET Framework to properly identify and reference the correct assemblies. Among these assembly properties is the Assembly Version property. It is very helpful to have the build server track and provide the proper build number to the build script to establish the correct Assembly Version property value. From the build server’s perspective, this is a “build number” that is defined, incremented, and passed to the build script when it is run. For example, it is common for a build server to maintain a build number in a specified format (such as, {major version}.{minor version}.{build counter}.{vcs revision number}) and pass the value in to the script as a “build number” property value. The trick is to write the build script in a way to properly receive the build number and assign it to the assemblies as their version number. Having a version numbering system that ties the assembly back to the build and revision number is very helpful when debugging and diagnosing problems.
There is an MSBuild Extension Pack task that helps deal with the assembly information for .NET Framework projects. The MSBuild.ExtensionPack.Framework.AssemblyInfo task is able to properly assign assembly information from within a build script. In Listing 9-23, this extension task is used to assign four assembly information values to each of the AssemblyInfo.cs files under the source folder. The ItemGroup element uses wildcarding to provide a recursive list of all the assembly information files. Later, this list of files is passed to the MSBuild.ExtensionPack.Framework.AssemblyInfo task using the AssemblyInfoFiles attribute. This task applies each of the property values to the assembly information files. The property values include the correct company name, copyright notice, assembly version, and file version. The result is consistent and correct assembly information assignment across the entire set of source files.
Listing 9-23. Script That Updates the AssemblyInfo.cs Files
...


<Target Name="AssemblyInformation" >

  <ItemGroup>

    <AssemblyInfoFiles Include="$(SourceFolder)**AssemblyInfo.cs" />

  </ItemGroup>


  <Time Format="yyyy">

    <Output TaskParameter="FormattedTime" PropertyName="CurrentYear" />

  </Time>


  <PropertyGroup>

    <AssemblyCompany>Lender Inc.</AssemblyCompany>

    <AssemblyCopyright>Copyright © $(CurrentYear) $(AssemblyCompany)</AssemblyCopyright>

    <AssemblyVersion>$(BUILD_NUMBER)</AssemblyVersion>

    <AssemblyFileVersion>$(BUILD_NUMBER)</AssemblyFileVersion>

  </PropertyGroup>


  <MSBuild.ExtensionPack.Framework.AssemblyInfo

    AssemblyInfoFiles="@(AssemblyInfoFiles)"

    AssemblyCompany="$(AssemblyCompany)"

    AssemblyCopyright="$(AssemblyCopyright)"

    AssemblyVersion="$(AssemblyVersion)"

    AssemblyFileVersion="$(AssemblyFileVersion)"

    />

</Target>

...
XML Peek and Poke
There are many XML files associated with a build. Some are configuration files that are part of the source. Others are output files and reports generated during the build. In both cases, it is helpful to have the build script be able to read or write to an XML file. For example, after running FxCopCmd.exe the build script can read the XML report to determine the number of errors that were written to the report. If the number of errors and warnings that are in the report exceed defined threshold limits, the build script can fail the build. The SamplesCh093_XmlPeekAndPoke unner.msbuild script file demonstrates how to stop the build if an FxCop report contains errors or warnings that exceed the thresholds.
![]() Practice 9-9 Read and Write XML Data from Within the Build Script
Practice 9-9 Read and Write XML Data from Within the Build Script
There are custom task libraries that read or write to an XML file for use in MSBuild scripts. In Listing 9-24, the MSBuild Community Tasks library is used to update the Web.config file’s connection string. This listing is an excerpt from the SamplesCh093_XmlPeekAndPoke
unner.msbuild script file. The ConnectionString property contains the properly formatted connection string based on the externally defined parameters for the server name, database name, user id, and password. The XmlUpdate task uses the XPath attribute value to update the Web.config file’s connection string with the proper value.
Listing 9-24. Script That Updates the ConnectionString Element in a config File
...


<Target Name="UpdateConnectionStrings">

  <PropertyGroup>

    <ConfigFile>.inWeb.config</ConfigFile>

    <ConnectionKey>Lender.Slos.Database</ConnectionKey>

    <ConnectionString>Data Source=$(ServerName);Initial Catalog=$(DatabaseName);

User Id=$(UserId);Password=$(Password);Trusted_Connection=False;</ConnectionString>

  </PropertyGroup>


  <Error Condition="!Exists('$(ConfigFile)')"

         Text="Config file not found '$(ConfigFile)'"

         />

  <XmlUpdate ContinueOnError="False"

             XPath="/configuration/connectionStrings/


add[@name='$(ConnectionKey)']/@connectionString"

              XmlFileName="$(ConfigFile)"

              Value="$(ConnectionString)"

              />

  <Message Text="Connection string updated successfully in '$(ConfigFile)'"

           Importance="low"

           />

</Target>

...
Zip Archive
Many build scripts are written to package the deliverables for later deployment. Ahead, the section on automated deployment describes several options that are applicable under different deployment situations. This section focuses on the common task of creating a zip archive file to store build artifacts or otherwise organize the build output. Some common applications of this task include packaging database scripts, content files, binaries, and build reports. There are so many good reasons to compress, archive, and store files during the build process that this is a common task.
![]() Practice 9-10 Learn How to Create Zip File Archives from Within the Build Script
Practice 9-10 Learn How to Create Zip File Archives from Within the Build Script
Using the MSBuild Community Tasks library to create a zip archive file is a widely-used technique. Let’s look at a piece of the SamplesCh094_Zip
unner.msbuild build script file shown in Listing 9-25. Starting at the bottom of the listing, there is a Target element with the name Package. This target calls the Zip task, which is part of the Community Tasks library. The Zip task takes all the files defined within the FilesToZip item array and adds them to the archive file defined in the ZipFileName attribute. Notice that the ZipFileName attribute is formatted based on the project name and build number to create a unique zip filename.
The earlier Target section named CopyToPreserve is responsible for copying the correct source files to the proper destination folder, using the Copy task. Therefore, the CopyToPreserve target needs to be called first. Once it copies the files, the Package target is called to create the zip archive file and add those files to the archive. At some later stage in the build script another target could copy all the archive files to a file server for storage and future use.
Listing 9-25. Script That Creates a Zip File Archive
...


  <Target Name="CopyToPreserve" >

    <PropertyGroup>

      <SourceFolder>.Lender.Slos.Financialin$(Configuration)</SourceFolder>

    </PropertyGroup>


    <ItemGroup>

      <ContentExclude Include="$(SourceFolder)***.pdb" />

      <ContentExclude Include="$(SourceFolder)***.gif" />

      <ContentExclude Include="$(SourceFolder)**Webcontrol_*.bmp" />

    </ItemGroup>


    <ItemGroup>

      <ContentFiles Include="$(SourceFolder)**"

                    Exclude="@(ContentExclude)"

                    />

    </ItemGroup>


    <Copy SourceFiles="@(ContentFiles)"

          DestinationFiles=

"@(ContentFiles->'$(PreservePath)\%(RecursiveDir)%(Filename)%(Extension)')"

          />

  </Target>
  <Target Name="Package">

    <ItemGroup>

      <FilesToZip Include="$(PreservePath)***.*"

                  Exclude="$(ArtifactsPath)***.zip"

                  />

    </ItemGroup>


    <Zip Files="@(FilesToZip)"

         WorkingDirectory="$(ArtifactsPath)"

         ZipFileName="$(ArtifactsPath)$(ProjectName).$(Configuration).v$(BUILD_NUMBER).zip"

         ZipLevel="9"

         />

  </Target>

...
Automated Deployment
Manual deployments are tedious, tiresome, and time consuming. Many times steps are missed; other times the steps are done improperly. People make mistakes. The bigger problem is that manual deployments often become an error-prone part of the project that hurts the reputation of those who deploy the application. Many developers feel that they are saddled with the task of deploying the application and that breeds apathy and carelessness. Repeatedly performing any set of tedious and unwelcome tasks is a recipe for problems.
Automated deployment offers a way out of the morass of manual deployments. Consider the tasks associated with a typical web application deployment:
- Take the target web site offline
- Copy files and folders
- Update the database schema
- Set read/write permissions on folders
- Assign the proper configuration settings
- Bring the site back online
Many of these steps can be replaced by an automated script using straightforward techniques. You and your team can improve the reliability of deployments by automating just a few of these steps. By automating the entire deployment you can expect dramatic results in shorter deployment times, fewer and less frequent errors, and greater confidence that the deployment is complete and correct.
Build Once, Deploy Many
Ideally, the build creates a set of artifacts that can be deployed to a target environment. The purpose of the deployment is to make the application available for evaluation and use. For example, if the build-artifacts are deployed to a test environment, the quality assurance (QA) testers are then able to independently verify and validate that specific build. The trick is to be able to deploy the same build-artifacts to all the environments. The confidence in the build increases as the same build moves from integration, to testing, to staging, and into production. Being able to track and confirm the stability, completeness, correctness, and reliability of the same build across target environments is a valuable practice.
![]() Practice 9-11 Deploy the Same Build to Multiple Target Environments to Confirm Readiness
Practice 9-11 Deploy the Same Build to Multiple Target Environments to Confirm Readiness
The practice of “build once, deploy many” is founded on the idea that the automated deployment is loosely coupled to the automated build. The automated deployment script ought to be able to take a build number or some other parameters that the script uses to select the proper build artifacts. This idea is sometimes referred to as artifact build dependency. Some common artifact dependencies include
- Latest Successful Build: Used to deploy the latest software. This is often used for continuous deployment and stability testing.
- Latest Tagged Build: Used to deploy the software based on a provisional designation. Designating this build is sometimes called tagging or pinning. This is useful for QA to select a build for deployment to system test or staging.
- Specific Build Number: Used to deploy the software based on a fixed designation. This is useful for establishing a consistent deployment and redeployment of the same build to system test, staging, and production environments.
To make the “build once, deploy many” strategy work well, the automated deployment script should be able to deploy to any of the target environments. Stated another way, the deployment script should be written so that it takes in parameters that control its logic and actions so as to deploy properly to all target environments.
An outline of an automated deployment script’s parameters could include
- Artifact Dependency: A parameter that controls how the script obtains the artifacts for the deployment.
- Target Environment Server: A parameter that controls which server the script deploys the artifacts to.
- Target Database Connection: A parameter that controls which database the script configures as the database for the target environment.
- Target Configuration Settings: A parameter that controls how the deployment script establishes the proper configuration settings.
With these parameters the automated deployment script retrieves the proper artifacts, properly sets the Web.config file or other configuration settings, and deploys to the correct server.
Packaging Tools
Packaging is often unappreciated until the time comes to hand the responsibility of deployment over to the internal IT department, the customer’s IT department, or some other person responsible for installing the application. In far too many cases there is a last minute rush to assemble the artifacts and write up instructions for others to follow. It would be so much easier to have thought through the final delivery beforehand. Today, many customers and IT departments simply will not accept a cobbled-together deliverable. It is important to take the time early in the development process to consider how the application needs to be packaged. Find out what is preferred and what is acceptable to the consumer of the package. Figure out what the development team can reasonably put together. Determine if there is a significant gap. Perhaps the customer expects an MSI but the developers are publishing the web application from Visual Studio or Team Foundation Server. Asking the right questions and developing the appropriate strategy for packaging the deliverables is important. It sets the stage for a smooth rollout and delivery, which makes everyone’s life a whole lot easier.
![]() Practice 9-12 Define the Packaging Approach That Works for Both the Customer and the Team
Practice 9-12 Define the Packaging Approach That Works for Both the Customer and the Team
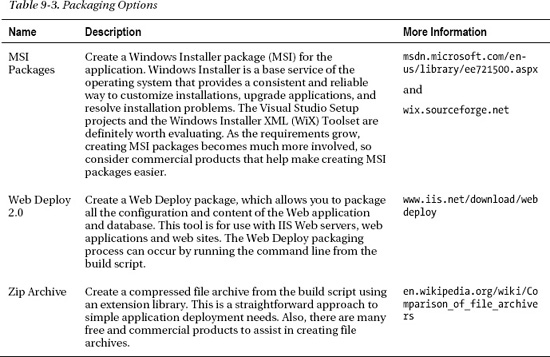
There are many packaging tools that offer benefits for different circumstances. Table 9-3 provides a list of packaging options worth considering. At Microsoft, the IIS team and the ASP.NET team worked hard to put together the latest Web Deployment Tool (Web Deploy 2.0). Although it is often used within Visual Studio to publish a web application directly, with Web Deploy you can create a deployment package. The package this tool creates is literally one zip archive file. It can easily be deployed on a remote server using the IIS Admin Tool or from the command-line. If you are deploying a web application to IIS then you will benefit from all the experience and expertise in Web Deploy 2.0. There are several resources in Appendix A that can help you get proficient at making Web Deploy packages.
Deployment Tools
Packaging and deployment go hand in hand. Often the selected packaging approach implies a deployment strategy. For example, using Web Deploy to create a deployment package means you will want to use Web Deploy to deploy to the target environment. Perhaps the most important thing to consider and work out is how to automate the deployment with a scripting tool. Combine the effectiveness of the deployment tool and the build tool in complementary ways to eliminate as many manual steps as possible to create an automated, flexible, reliable, and repeatable deployment process.
![]() Practice 9-13 Use a Tool That Makes Deployments Automated, Robust, and Reliable
Practice 9-13 Use a Tool That Makes Deployments Automated, Robust, and Reliable
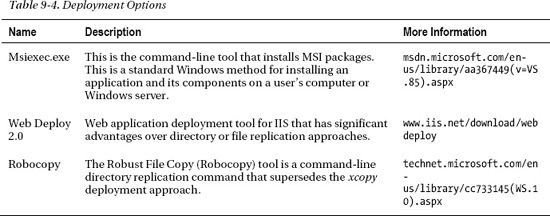
The deployment options in Table 9-4 complement the packaging options presented in Table 9-3. Each of these can be automated with a build tool or through the command line.
Summary
In this chapter you learned about build tools. More specifically, you learned practices related to using build tools to perform common build automation tasks. You also learned about better practices related to the logical next steps of packaging and deploying the build. For you, your team and your organization it is important to develop proficiency and mastery of build automation in order to reduce-to-practice the many tedious and inglorious activities of building, packaging, and deploying the application.
In the next chapter all the build automation you learned in this chapter is orchestrated through the practices of continuous integration. Chapter 10 introduces the continuous integration lifecycle, which employs and is underpinned by build automation. In Chapter 11 you will learn about code analysis and see examples of how to automate analysis tools, like StyleCop and FxCop, with build automation. In addition, build automation provides the means to automate the unit testing frameworks and test runners you will learn about in Chapter 12.