
C H A P T E R 10
Continuous Integration
The practice of continuous integration (CI) has the ability to transform software development from a set of manual processes to a logical series of reproducible, automated processes. At the heart of continuous integration is the CI server, which is the fundamental tool and technology that initiates, performs, coordinates, and reports on the CI phases. This chapter introduces you to CI server alternatives and describes their basic product offerings.
In this chapter you will learn about the CI lifecycle. This lifecycle is a conceptual model that describes the series of development processes that establish an effective, automated progression from source code to accepted deliverable. The CI lifecycle consists of the following major processes:
- Rebuilding: Source code is integrated and compiled into binaries.
- Unit Testing: Automated testing is performed to check the integrity of the build.
- Analysis: Code analysis and monitoring is carried out to confirm code quality.
- Packaging: Build artifacts are assembled and delivered as an installation package.
- Deployment: The installation package is deployed to a target environment.
- Stability Testing: Automated testing verifies the stability of the deployment.
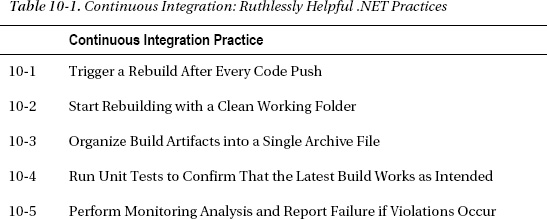
Each of these processes is described in detail with a description of the steps involved within each process. Along the way many specific practices for continuous integration are described, summarized in Table 10-1. By using these CI practices, you can expect to save time, improve team effectiveness, and move the focus toward early detection of problems and prevention.
COMMENTARY
Case Study
You are the lead software developer working at Lender Inc., a fictional bank that originates student loans using their internally-developed Student Loan Origination System (SLOS) software. As the technical lead, you are assigned the task of improving the software development processes. Based on the retrospectives from past projects, you will bring about changes and improvements that address the pain points of previous projects.
SLOS PROCESS IMPROVEMENT
You are clearly aware that SLOS process improvements are needed and you plan to work with individual developers to improve their development practices. It is the systemic problems you plan to address with continuous integration. You intend to take the following actions to improve the situation:
- Set up a CI server.
- Configure the CI server to monitor the version control system for changes.
- After each code push, have the CI server get the latest code and rebuild the solution.
- Run all automated tests from the CI server.
- Have the CI server monitor the quality of the code by running code analysis tools.
- Perform automated deployments, which are complete, consistent, and correct, to the system test environment.
- Use the CI server's reporting capabilities to communicate progress and status to the entire project team.
The CI Server
At the heart of continuous integration is the tool and technology of the continuous integration server. The CI server is an application, usually running in the background as a service application, which initiates, executes, and reports on all the processes of the continuous integration lifecycle. The CI server provides key capabilities such as
- Integrating with and monitoring the version control system
- Triggering events, such as on source code commits, on a schedule or in sequence
- Running build automation and deployment scripts
- Running tests
- Performing analysis
- Providing notification, status messages, and build logs
- Storing artifacts and related output
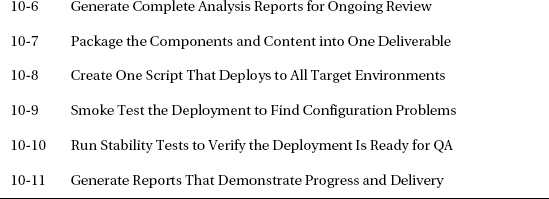
There are many CI servers available. Table 10-2 provides a list of some widely-used CI servers, which are worth evaluating.
In the sections that follow, each of these four CI servers is summarized. The goal is to provide you with enough information to begin an evaluation of the CI server that is right for your project and organization.
CruiseControl.NET
CruiseControl.NET is the.NET version of the CruiseControl continuous integration software package. It is commonly abbreviated as CCNet. The primary component is the CCNet Server, which is the automated integration server. The CCNet Server runs as either a console application or a Windows service. In general, running the service is preferable so that the CCNet Server runs in the background and requires no user intervention.
Another significant component of CCNet is the Web Dashboard application, which provides project status and reporting information. The Web Dashboard provides build progress, drill-down detail, and history on the CCNet projects. It is an effective way to communicate build information to all project stakeholders.
A third component of CCNet is the CCTray utility. This is a client system tray application that provides feedback on build status and progress. This utility is especially useful to developers as build notifications are received through a tray application instead of by e-mail. It notifies on events such as whether the most recent build was successful or failed.
There are many reasons to choose CCNet. There is a lot of information available in Internet postings that provide tutorials and detailed examples. Some other reasons to choose CCNet include
- Free and open source
- .NET-based
- Widely-used and well documented
- Integration with a wide variety of tools and technologies
__________
1 Jenkins was previously the Hudson CI server. After Oracle’s acquisition of Sun, the source code was forked and Oracle continues development under the Hudson name.
CCNet does have drawbacks. Perhaps the biggest drawback is that the CCNet Server is controlled through XML configuration files. For those familiar with CruiseControl for Java or Ruby this might be an advantage because the configuration blocks follow a similar model. There is a lot of documentation on the configuration blocks; however, the learning curve can take some time to climb.
Jenkins
Jenkins is a Java-based continuous integration server package. It is commonly used for Java projects but is suited for .NET projects because Jenkins can work with many common .NET version control systems, can run MSBuild scripts, and has a very active plug-in development community; much of what any CI server does is not .NET specific. The primary component of Jenkins is the server, which runs within a Java servlet container, such as Apache Tomcat. Jenkins is easy to install and use; the fact that it is Java-based should not represent an impediment to .NET development shops. Jenkins provides an impressive browser-hosted project management dashboard. For those familiar with using Jenkins for Java development, the advantage is in using a familiar technology. Some of the reasons to evaluate and choose Jenkins include
- Free and open source
- Widely-used and well documented
- Integration with a wide variety of tools and technologies
- Vibrant user community
TeamCity
TeamCity is a Java-based continuous integration server package. The TeamCity installation and configuration is quick and easy. The fact that it is Java-based should not be an impediment to .NET development shops. The TeamCity server is a main component, but the browser-hosted interface serves as the primary way to administer TeamCity users, agents, projects, and build configurations.
The TeamCity browser-hosted dashboard is superb. It provides project status and reporting information suitable for a broad range of users and project stakeholders. It provides build progress, drill-down detail, and history information on the projects and configurations.
With TeamCity there is a system tray utility to provide feedback on build status and progress. The tray utility is useful so build notifications are received in the tray instead of by e-mail. The TC tray application notifies on events such as whether the most recent build was successful or failed.
There are a lot of good reasons to choose TeamCity. The product is very well documented and there are a lot of examples and tutorials available. Out on the Internet there are many postings ranging from setting up basic CI with TeamCity to advanced topics such as using TeamCity's built-in NUnit test runner. Some other reasons to choose TeamCity include
- Professional Server is free for up to 20 build configurations. You can run as many instances of Professional Edition Server as needed. Larger organizations may require the purchase of the Enterprise Server version.
- Easy to set up, easy to use, and easy to configure
- Widely-used and well documented
- Integration with a wide variety of tools and technologies
In this chapter, TeamCity is the CI server used to illustrate the key concepts in the continuous integration lifecycle.
Team Foundation Server
The primary benefit of Team Foundation Server (TFS) is that it is an integrated CI environment with strong Visual Studio integration. It is supported by Microsoft. TFS is integrated with Visual Studio in a way that is geared toward developing software within the entire “enterprise” using an Application Lifecycle Management approach. This is an integrated-whole solution, not a best-of-breed solution. Some of the reasons to choose TFS include:
- Strong IDE integration with Visual Studio
- Metrics tracking, check-in policy enforcement, and Windows authentication
- Widely-used and well documented
TFS is a significant investment in budget and configuration management resources. Team Foundation Server is a good choice when the development team is large, the TFS/Visual Studio integration is important, and the Application Lifecycle Management approach is attractive.
CI Lifecycle
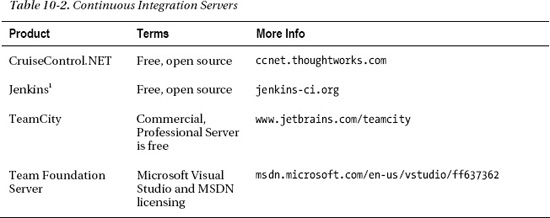
The continuous integration lifecycle (shown in Figure 10-1) is a model for how the CI server manages and moves through the phases. It starts with the latest code push and ends with a report on the stability of the deployment. All along the way, each phase provides a report on the actions performed during and the results from each phase. Once the CI server has successfully performed the packaging, a new deliverable joins the steady stream of deliverables that flows from the lifecycle. As each phase continues successfully, it confirms that the source code is sound and that development is progressing.
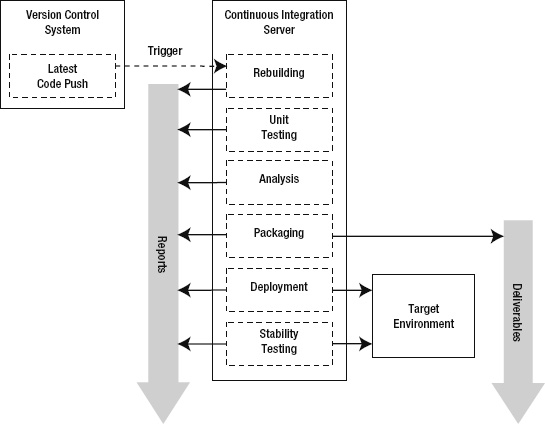
Figure 10-1. The continuous integration lifecycle
Within TeamCity the CI lifecycle is implemented through project configurations. Figure 10-2 illustrates the TeamCity project administration interface with all six of these configurations created. Each configuration defines how the process is triggered, the steps taken, and how the results are handled. When each configuration is run, TeamCity maintains a log of activities and reports either the success or failure of the run.
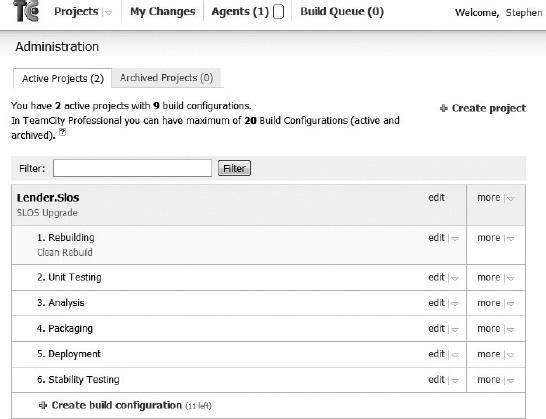
Figure 10-2. The SLOS project in TeamCity
Rebuilding
The first phase in the continuous integration lifecycle is the Rebuilding phase. The aim of this phase is to carry out the build automation steps. Figure 10-3 illustrates the Rebuilding phase of the CI lifecycle. The goal of this phase is to provide timely feedback to all of the developers about the health of the build. In other word, the team is trying to avoid Integration Hell.2 The phase starts with a clean directory, gets all the latest source code, and rebuilds the solution from the source code. If, for many possible reasons, the build breaks, then the team is notified that there is an integration issue that requires urgent attention. Speed is very important. Ideally, the Rebuilding phase on the CI server should have a goal of less than 5 minutes. Note: For large software development projects the goal of 5 minutes is not realistic. Builds can take 30 minutes or more. This is especially true when the Rebuilding phase starts with a clean folder, as described in Practice 10-2. These are ideals that actually present a dilemma that is often resolved by a compromise between getting timely builds and having “clean” build conditions. Over time, strive to use faster CI server hardware and incremental builds to move toward the goal of very fast builds.
The rebuilding begins with a triggering event; typically, the CI server detects that a source code change was pushed to the version control system (VCS). A working directory is created or cleaned; this establishes a reproducible and known initial condition. The CI server then gets all the latest source code, content, and other input necessary to compile the source code.
___________
2 Ward Cunningham describes Integration Hell in his wiki: http://c2.com/cgi/wiki?IntegrationHell.
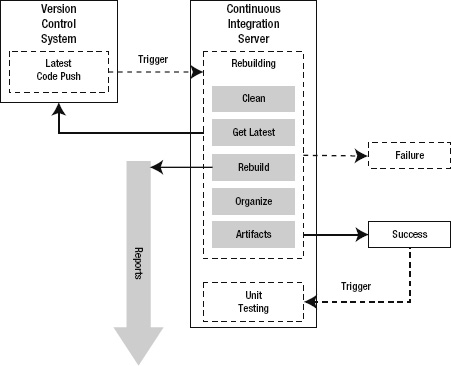
Figure 10-3. The Rebuilding phase in the CI lifecycle
With a clean working folder and the latest code from VCS, all the prerequisites are in place. The CI server now runs the build automation script. The build automation script performs a complete rebuild. The rebuild is usually the automated method of performing the same build steps to generate the target output manually through Visual Studio. After a successful rebuild, the binaries and other output may be scattered under various project output directories. The next step copies and organizes these binaries, content, and target output into a coherent arrangement of files and folders. The CI server makes this output available as build artifacts.
At any time during the Rebuilding phase, any of the steps might result in a failure. Usually, a build failure is the result of a compilation error; however, it could be the result of a configuration or build script error. Whatever the reason, the CI server reports the failure and sends out notifications. Since the CI server maintains a log of all output from each of the build steps, the build log is the primary way to understand why a build failed.
When the Rebuilding phase results in success, the CI server sends notification of a successful build. There are two key results from a successful build.
- First, the CI server publishes the build artifacts and makes them available as the input for many of the subsequent phases.
- Second, the CI server triggers the next phase in the lifecycle, which is the Unit Testing phase.
Rebuilding Trigger
The rebuild ought to be triggered after every code push to the version control system. This provides timely feedback to the developer who pushed the change set, and it catches integration problems at the earliest point in time. The CI server vigilantly monitors the VCS and initiates the Rebuilding phase immediately after code is pushed.
![]() Practice 10-1 Trigger a Rebuild After Every Code Push
Practice 10-1 Trigger a Rebuild After Every Code Push
The choice of the word immediately describes the ideal. In real-world scenarios, use a VCS setting delay or a schedule-based trigger to allow a window of opportunity for multistep commit operations. Frequent integration is the top priority and the key principle behind this practice. It makes it very clear that a code change broke the build. To avoid confusion, the development team must immediately stop all other code pushes when the build fails. Fixing the build is the team's first priority. As long as the build is broken, the only code change that should happen is a change that directly relates to fixing the build.
In order to make sure VCS triggering is effective, the entire Rebuilding phase must run quickly by following these guidelines:
- Use a fast-performing CI server
- Make sure the rebuild step runs quickly
- Cut back the artifacts to the minimum and essential
- Encourage code pushes that balance frequency and substance
The TeamCity build triggering configuration is illustrated in Figure 10-4. This configuration is set to trigger a rebuild after a VCS change is detected. Any CI server ought to support a VCS trigger that uses the project's version control settings to monitor and respond to check-in activity.
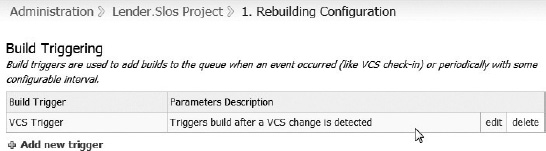
Figure 10-4. The TeamCity VCS trigger
In some large projects there are many developers pushing code changes frequently. In those situations it is sometimes argued that making a switch from a VCS-driven build trigger to an infrequent schedule-driven trigger is warranted. The thinking is that the CI lifecycle is incessantly driven by the frequent code pushes. Similarly, when the build phase takes a long time, a switch to a schedule-driven process is sought. It is better to focus the effort on speeding up the build or changing the developer practices. Avoid dropping the VCS trigger because other triggers postpone the feedback and increase the likelihood of integration problems.
The arrangement for VCS triggering is adjusted depending on the type of build. For very large software products the complete, end-to-end build can take a very long time, sometimes hours. Consider dividing up the build types based on concepts, such as
- Development: VCS triggering with an incremental build, not with a clean working folder; since build speed is an issue the goal is to provide efficient feedback.
- Nightly Integration: Schedule triggering with a complete build, starting with a new working folder and followed by full stability and integration test suites.
Clean Working Directory
The ability to reproduce the build is an essential characteristic of the Rebuilding phase. Given identical conditions, each build should be 100% reproducible. The reason this is important is that it eliminates the unknown variables and the sources of confusion. It verifies that the build script is able to compile the binaries and generate the output using only the source code in VCS. For this reason the CI server needs to start with an empty working folder.
![]() Practice 10-2 Start Rebuilding with a Clean Working Folder
Practice 10-2 Start Rebuilding with a Clean Working Folder
A CI server usually offers the option of either creating a new working folder for each build or cleaning all the files from the working folder before the build. The advantage of a new working folder is that folders from prior builds are available, if the need should arise. In this case, old directories will eventually need to be deleted to save disk space. The alternate approach reuses the working folder, but the CI server cleans up before the build begins. This second approach assumes that the working folders from prior builds are no longer needed, which is often the case; either the build failed or, if it was successful, then the artifacts are already saved.
In some large projects the source control repository is very large or the version control system is slow. Either starting with a new working folder or cleaning the working folder adds an unacceptably long delay to the build. In this case, perform an incremental build using the existing working folder, since build speed is important to provide timely feedback. Another approach adds a “clean up” step within the build script to remove all intermediate files and output folders. This “clean up” step is shown later on as the first step in Figure 10-6. In general, it is helpful to start with the cleanest conditions possible and keep the build times reasonably short.
Get Latest Source Code
In the next step of this phase, the CI server creates a local working copy of the files using the VCS settings. For TeamCity this is accomplished by configuring a VCS Root for the project, which is illustrated in Figure 10-5. Using the VCS settings, the CI server performs a “check-out” of the latest revision of the source code. Now the working folder contains the source code from the check-in that triggered the Rebuilding phase.
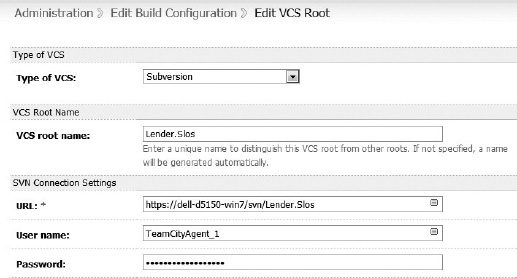
Figure 10-5. The TeamCity VCS Root
Rebuild the Solution
Once the CI server retrieves the latest source code from version control, the next stage is to rebuild the entire solution. Since Visual Studio works together with MSBuild, this is easily accomplished using an MSBuild script. Most build scripting tools make it easy to rebuild given a Visual Studio solution file name as input. The goal is to have the CI server be able to run a script or command-line tool to rebuild the necessary Visual Studio project or solution files.
TeamCity supports more than one build step within a configuration. Figure 10-6 illustrates three steps in the Build phase. In this example, the second step performs the solution rebuild. It uses MSBuild to run the runner.msbuild script with a target name of Rebuild.
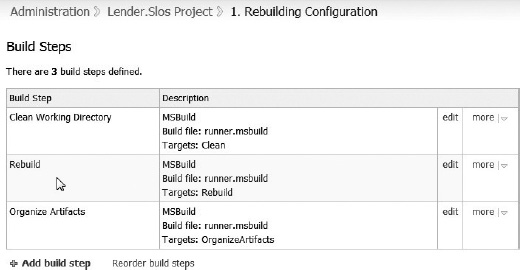
Figure 10-6. The TeamCity build steps
In some large projects it is helpful to have multiple build steps that build the solution by calling various scripts or performing various actions. Either the multiple build steps are configured, as shown in Figure 10-6, or a primary build script encapsulates all the steps to happen in the proper sequence, calling secondary scripts as needed. Whatever the choice, this stage of the Rebuilding phase fully and completely rebuilds the entire solution from the bottom up.
In TeamCity each MSBuild step has a number of configuration options. In Figure 10-7 the MSBuild step calling the Rebuild target is illustrated. Each step is configured to call an MSBuild script file, which in this case is named runner.msbuild. In TeamCity, the MSBuild configuration supports earlier versions of .NET as well as the 32-bit and 64-bit platforms. Two more important configuration settings are the targets and the command-line arguments. The targets allow you to specify one or more MSBuild targets that allow you to execute multiple targets in one step. Also, the command-line parameters to MSBuild.exe can be specified, which gives you full control of MSBuild execution.

Figure 10-7. Defining the MSBuild configuration for a TeamCity build step
Organize Artifacts
In general, the artifacts are any files you want to save as the results of running a build configuration. In this step, files are copied from the output folders to organize the artifacts into a coherent and consistent layout. The goal is to arrange the files in a way that is best suited for the subsequent steps in the CI lifecycle. Strive to copy just the minimum files but also include all the essential files needed for any subsequent phases. To save space, it is often best to compress everything into one archive file.
An effective way to accomplish this task is with a build script. The third step shown in Figure 10-6 performs this task. The OrganizeArtifacts target of the build script copies all the relevant files from the build output folders into a folder structure that supports the upcoming Unit Testing, Analysis, and Packaging phases.
Unit Testing
The next phase in the CI lifecycle is commonly referred to as the Unit Testing phase. The basic steps in the Unit Testing phase are shown in Figure 10-8. Customarily, this phase involves running unit tests and all automated tests that meet all of the following criteria:
- Fast running tests, with no single test running longer than 10 seconds
- Tests focused on checking that the system continues to work as intended
- Automated tests that can run in isolation on the CI server
Unit tests, by definition, must meet these criteria. However, other automated integration testing, specifically the surface tests (discussed in Chapter 8) are designed to meet all the criteria. The important goal is to provide immediate feedback, by reporting a failure if the system is no longer working the way the developers had intended it to work.
The Unit Testing phase begins with a triggering event; usually, the CI server starts this phase right after a successful build completes. A working directory is created and the files are copied in from the latest successful build's artifacts. With the files in place the automated testing begins.
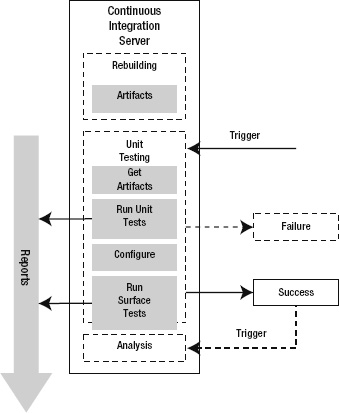
Figure 10-8. The Unit Testing phase in the CI lifecycle
At any time during the testing, one or more tests might fail. Any failing test results in a failure of the current run. The CI server sends out failure notification. The primary way to understand why a test failed is to look at the test-results report. When the testing completes without any failed tests, the CI server sends notification of a successful run.
Just like in the Rebuilding phase, speed is very important. The Unit Testing phase on the CI server should not take longer than 10 minutes and the ideal is well under 5 minutes. The purpose of this phase is to provide timely feedback to developers when the recent code push has created an issue. It is important that the developers address the failed tests as their top priority. Invariably, the cause of the failed test is found in the code that was just pushed; however, a failed test can have several causes and remedies:
- The code-under-test is not working as intended; fix the code.
- The test is incorrect or incomplete; fix the test code.
- The test is not isolated, stable, or otherwise reliable; fix the test code.
- The test is obsolete; remove the test code.
The CI server publishes a report of the results from the testing. This report provides important measures of progress and visibility into the project. The CI server can then trigger the next phase in the lifecycle, which is the Analysis phase.
Testing Trigger
The Unit Testing phase ought to be triggered to begin right after a successful Rebuilding phase completes. This sequencing provides the team with feedback that is correlated between the recent code change set and the failing tests.
The TeamCity build triggering for the Unit Testing phase is illustrated in Figure 10-9. This trigger is set to begin this phase as soon as the last build step successfully completes in the Rebuilding phase. The CI server ought to support a successful-build trigger, which helps to properly sequence the phases.
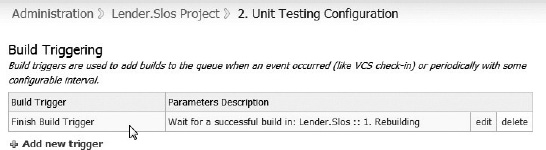
Figure 10-9. The TeamCity Finish Build Trigger event
Get Artifacts
At the end of the last successful rebuild the artifacts were organized and saved. The Unit Testing phase begins by retrieving the artifacts it needs to run the tests. The artifacts files are copied to this configuration's current working directory.
Run Unit Tests
With all the necessary artifact files in the proper place the CI server is ready to run the suite of unit tests. Most CI servers support the common testing frameworks. In cases where the CI server does not directly support the testing framework, the other options include running the tests using a command-line runner, which is described in Chapter 12, or with a build script.
![]() Practice 10-4 Run Unit Tests to Confirm That the Latest Build Works as Intended
Practice 10-4 Run Unit Tests to Confirm That the Latest Build Works as Intended
Unit tests are the essence of test-driven development. They are the fundamental way that developers know that the system is working as intended. The CI server needs to run all the unit tests and report the failure of any unit test. If a unit test fails then the system is not working as the developers had intended and all development should stop unit the failing test is resolved.
Configure Surface Tests
Any automated integration tests that run on the CI server might require a minimal amount of configuration. As an example, in order to run the Surface tests described in Chapter 8, the CI server needs a change to the configuration file to set the proper database connection string. In this step, the required configuration changes are made so that the CI server can properly run the automated integration tests.
Run Surface Tests
In a manner similar to running the unit tests, the CI server runs the surface tests. This is an optional suite of automated integration tests that are very useful in brownfield application development. The tests check that an entire integrated subsystem or module continues to work properly. Surface tests are important during major redesign, refactoring, or restructuring projects.
Analysis
The Analysis phase involves running code analysis to achieve two important purposes. One purpose is to monitor the system. The other purpose is to generate reports that are used for later code analysis. The subject of Code Analysis is presented in depth in Chapter 11. What is important to know, as it relates to the CI lifecycle, is that during this phase the monitoring and report generation is carried out by the CI server.
The Analysis phase begins with a triggering event. A working directory is created and the files are copied in from the latest successful build's artifacts. With the files in place the analysis begins (see Figure 10-10).
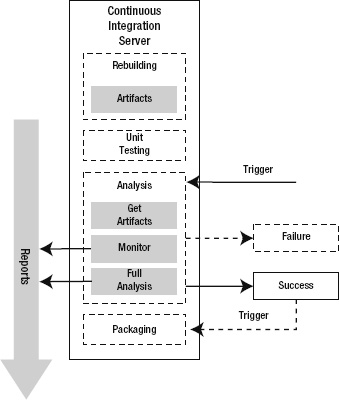
Figure 10-10. The Analysis phase in the CI lifecycle
In Figure 10-10 the Monitor and Full Analyses are shown as two distinct steps. The monitoring analysis is performed with a specific goal in mind; fail the build if any quality standards or other analysis thresholds are not met. For example, a build failure might be reported if any of the mandatory FxCop rules are violated. The full analysis is performed with the goal of generating reports. The reports should be reviewed later as part of the effort to evaluate and improve the code. These two steps are conceptually distinct; however, in practice they may occur together or as several separate steps in reverse order.
If the analysis results in a failure then the CI server sends out notification and the analysis reports are used to resolve the failure. When the analysis successfully completes, the CI server can then trigger the next phase in the lifecycle, which is the Packaging phase.
Analysis Trigger
To this point, the trigger events have focused on putting together a sequence of build events. The rebuilding is triggered by a code push and the automated testing is triggered by a successful rebuild. For the Analysis phase, the triggering choices depend on the answers to a number of questions:
- How quickly is the analysis performed?
- How often are the reports from the analysis reviewed?
- Are the monitoring analysis and full analysis performed together or separately?
An effective solution is to create two separate analysis configurations. One configuration is focused on performing the fastest-running analysis with the goal of providing developers timely feedback on things like violations of coding standards, FxCop rules, or code quality metrics. This configuration is triggered by the last successful run of unit testing. The second configuration is focused on generating complete and thorough analysis reports that take a long time to run. If these full reports are reviewed once daily then that helps determine a schedule trigger of running once a day during off-hours. A TeamCity schedule trigger event, running daily at 4 AM, is illustrated in Figure 10-11.
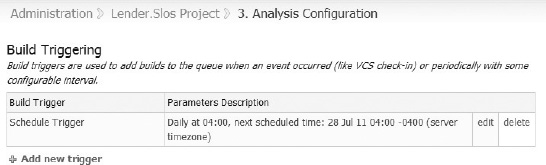
Figure 10-11. The TeamCity schedule trigger event
Monitoring Analysis
The monitoring analysis is theoretically a separate step in the Analysis phase. The monitoring can come before, after, or as a part of full analysis. The idea of monitoring is to perform analysis for the purpose of keeping an eye on the system. It is used to verify that established thresholds continue to be met as the system is developed and enhanced. Examples of specific monitoring analysis steps would include
- Running FxCop with an enforced rule set; fail the build if there are violations.
- Running StyleCop using mandatory coding standards; fail the build if violations are reported.
- Running tests under code coverage; fail the build if the percentage coverage is below a lower limit.
- Running code quality metrics; fail the build if maximum cyclomatic complexity is above a defined threshold.
Within a build script, for example, perform one or more automated analysis steps. Evaluate the results and compare them to expected results. If there are violations or the results are outside an acceptable range, then the CI server reports a failure. The team uses this notification to take timely and appropriate action to keep the system under control.
![]() Practice 10-5 Perform Monitoring Analysis and Report Failure if Violations Occur
Practice 10-5 Perform Monitoring Analysis and Report Failure if Violations Occur
In Chapter 11 the many code analysis tools, technologies, and approaches are discussed in depth. Ongoing monitoring with these tools and approaches is performed by the CI server in this step of the Analysis phase.
Full Analysis
As part of the ongoing effort to understand and improve the software system, a complete set of full analysis is performed. The output of this analysis is reviewed from time to time to find opportunities to improve the system. These analysis reports help the team notice trends or new circumstances that warrant time and attention.
![]() Practice 10-6 Generate Complete Analysis Reports for Ongoing Review
Practice 10-6 Generate Complete Analysis Reports for Ongoing Review
Much of this analysis presents important information the team needs to know, but the pressures of the project schedule often keep the review from becoming a priority. As is discussed in Chapter 11, the full analysis is about problem detection and prevention and ongoing code improvement. For projects that value these analysis reports, the CI server provides a way to generate the reports on a recurring schedule starting early in the project.
Packaging
To this point, the CI lifecycle has followed from code push, to rebuilding, to unit testing and through analysis. Assuming a sequence of continuous, successful phases is complete, confidence that the artifacts are healthy will be high. This phase assembles the healthy artifacts into one or more installation packages and readies them for the Deployment phase.
For commercial software applications, the Packaging phase can get somewhat involved. There might be installation packages for different products, target platforms, databases, and languages. In other situations, these artifacts might need to be combined with the latest documentation, release notes, or other redistributable packages. On other projects, the packaging is more about removing test assemblies and other files, with the goal of creating a pristine subset of the same artifacts.
The installation packages are the project deliverables. Early in the project these deliverables are often called nightly builds and, as the release approaches, they are seen as release candidates. The important point is that after the packaging successfully completes, the deliverable is made available to QA or other project stakeholders. This step might be as simple as creating a properly-named folder on a file server and copying the packages to that folder. In another case, the packages are delivered through an elaborate release management system.
Once the packaging is successfully completed and the result is made available, the CI server reports and notifies that a new deliverable is available. The Packaging phase is shown in Figure 10-12.
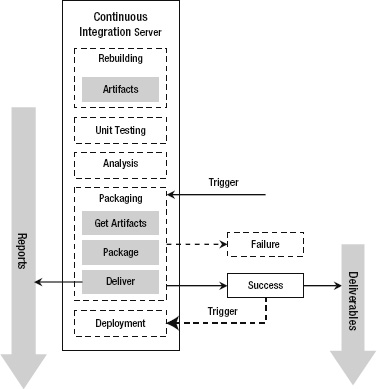
Figure 10-12. The Packaging phase in the CI lifecycle
Packaging Trigger
The Packaging phase can be trigged by the successful completion of the previous phase. Generally, this is not the case. In projects where developers are frequently pushing code changes, a succession of triggered events will generate a lot of deliverables. There are many intermediate deliverables that are not used and take up space on the server. Also, it is confusing and difficult to sort out which deliverable has what functionality and fixes.
For most projects, the Packaging phase is triggered by a nightly scheduling event. This establishes a daily rhythm of deliverables. The nightly deliverable has the functionality and fixes added from the previous day's work. For the QA team and other project stakeholders the nightly delivery occurs at a manageable and predictable pace.
Package Deliverable
For large software applications, the packaging phase can be somewhat involved. There could be installation packages for different product lines, different target platforms, different databases, and multiple languages. In other situations, the binary artifacts might need to be combined with the latest documentation, release notes, and redistributable software packages. In contrast, for some projects the packaging simply removes test assemblies and non-redistributable components, creating a pristine subset of the artifacts.
No matter how simple or complex the gathering and assembling is, the packaging of the deliverable takes place during this step. The goal is to package everything into one deliverable file. At this point, it is important to explicitly mention build versioning. The CI server ought to have a mechanism that helps assign the appropriate version number to the deliverables based on your versioning scheme. Also, for each “formal” build, if the source code in the source control system is tagged with that build version number it helps make debugging and diagnosing issues a lot more effective. A good versioning scheme ties each deliverable back to all the coding changes that comprise and impact the deliverable.
Some of the most common approaches to package project deliverables include creating a zipped archive or building a Microsoft Windows Installer (MSI) file.
Make Deliverable Available
All of the individual deliverable files, in their totality, represent the intermediate deliverables of the project as it proceeds through the development lifecycle. It is important to keep these intermediate deliverables in case it is necessary to go back and install a prior version of the application. It is also visible evidence of ongoing progress.
After the packaging is done, the CI server makes the deliverable available. This step can be as simple as creating a named folder on a file server and copying the packages to that folder. Figure 10-13 illustrates how the deliverables are made available within folders on a shared network resource. The CI server runs a build script that creates the proper folder and copies the deliverable file under each folder.
In another project situation, the packages are delivered through a more elaborate process. For example, the CI server might need to update a database, copy files to a website, or interface with a release management system.
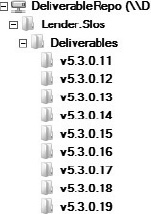
Figure 10-13. Using directory folders to distribute the packaged deliverables
Deployment
The Deployment phase takes the deliverable and automates the deployment to a target environment. The target environment might include
The Deployment phase is not just one configuration. In fact, there should be a separate configuration for each target environment. The steps to deploy to each environment may be the same, but the parameters for each configuration are very different.
This phase is concerned with retrieving the appropriate deliverable and performing all the automated deployment steps. Figure 10-14 illustrates the basic steps within the Deployment phase.
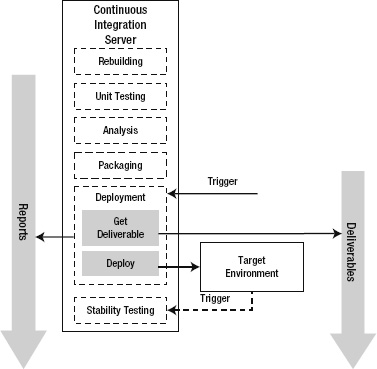
Figure 10-14. The Deployment phase in the CI lifecycle
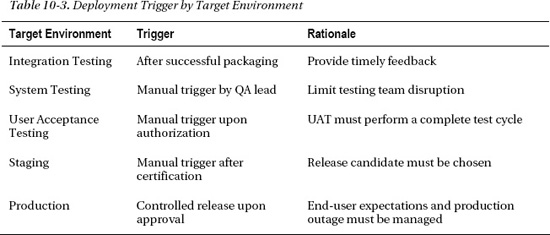
Deployment Trigger
Triggering a deployment to a target environment varies widely depending on the target environment. For the integration environment, the deployment ought to be triggered to begin right after a successful Packaging phase completes. In contrast, the deployment to the production environment needs to be carefully controlled and should not occur until everyone has signed off on the deployment. How each trigger might vary depending on the target environment is presented in Table 10-3.
Get the Deliverable
In the Packaging phase, the deliverable is made available. The CI server retrieves the deliverable that is appropriate for the target environment. For the integration testing environment, the latest deliverable is used. For the system testing environment, the QA lead can request a specific deliverable version.
Deploy to Target Environment
The next step is the automated deployment to the target environment. This step usually involves running an automated deployment script. This script can perform actions such as stopping the web server, deleting files, running database scripts, changing configuration settings, and restarting the web server.
For the sake of consistency it is helpful to have one script deploy to all the target environments. This goes a long way toward verifying and validating the deployment script. Parameters to the build script are used to set target environment–specific variables.
![]() Practice 10-8 Create One Script that Deploys to All Target Environments
Practice 10-8 Create One Script that Deploys to All Target Environments
With TeamCity, each configuration can have its own parameters. This is very useful for deployment configurations. As illustrated in Figure 10-15, a deployment script can use the DeploymentServerName parameter to target that specific server for the deployment. In this way, multiple configurations are created with each targeting a different server for the deployment.
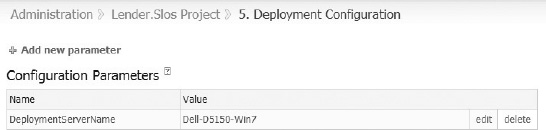
Figure 10-15. The TeamCity configuration parameter
Stability Testing
The CI lifecycle progression started with the code change and built the solution. The subsequent processes tested, analyzed, packaged, and deployed the deliverable to the target environment. What is established so far is that a new deliverable is deployed and ready for independent verification and validation. Before anyone begins expending time and effort evaluating this new release, the CI server ought to make sure the deployment is ready and stable. The Stability Testing phase runs automated integration tests to find out if the deployment is healthy and all set for further evaluation.
The Stability Testing phase is focused on two forms of automated integration testing:
- Smoke Testing: Exercises a small set of minimal, essential functionality to verify that the system does not blow up
- Stability Testing: Performs a broader set of tests of the features and functionality that characterize the entire system as well-behaved
The Stability Testing process is illustrated in Figure 10-16. It begins with a triggering event, usually a successful deployment to the target environment. First, the suite of smoke tests is run against the target environment. The results from the smoke testing are reported. If the smoke testing is successful, then the suite of stability tests is run against the target environment. Again, the results are reported. As with any of the prior phases, if the tests fail then a failure of the Stability Testing phase is reported by the CI server.
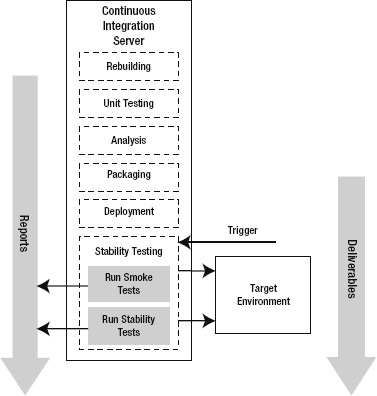
Figure 10-16. The Stability Testing phase in the CI lifecycle
The rationale behind the Stability Testing phase is to hold on to and raise the confidence level of the team that receives the deployment. For example, the QA team does not want to start system testing a deployment that is broken or has severely regressed. System stability is an important factor when QA decides to start testing a new release. With continuous integration, the QA team knows that if the system is failing the Stability Testing phase then it is senseless to begin system testing that deployment.
Stability Testing Trigger
The Stability Testing phase ought to be triggered after a successful Deployment phase completes. By running the smoke and stability tests, the CI server verifies that the latest deployment is healthy and stable. Even in the largest project, this is important. When the stability tests take a long time to completely finish, the Packaging or Deployment phases are best set to a nightly schedule. The goal is to trigger this phase and have all the stability tests run successfully against the latest deployment before the next workday begins.
Run Smoke Tests
There is a reason that there are two different sets of tests. Smoke tests find missing or improper configurations, systemic runtime issues, and failure-to-launch errors. The goal is to make sure the deployment was successful and the system carries out a set of indispensable functionality. Smoke tests reveal problems that are at the foundation of the software and its deployment.
In the early stages of new software development, before the system is stable, start defining and running the smoke tests. Continue to build up the smoke tests to detect problems early and to validate that the deployment script is working properly.
As development proceeds, the smoke tests represent a great opportunity to do multiplatform integration testing. For example, in web applications build and run your integration tests using a tool like Selenium to cover as many browsers and platforms as are required. The smoke tests should run for all “formal” builds including nightly integration, QA testing, and targeted deployments.
Run Stability Tests
As the software development team makes progress, the system begins to achieve stability. There is now a broader set of features and functionality and the system is getting bigger and more capable. Stability testing is the way to evaluate the new deliverable to ensure it has not regressed dramatically. These tests make sure that the indispensable features, functionality, and capabilities of the system work as expected for this newly deployed deliverable. Knowing that a deliverable is stable is important to the QA team.
![]() Practice 10-10 Run Stability Tests to Verify the Deployment Is Ready for QA
Practice 10-10 Run Stability Tests to Verify the Deployment Is Ready for QA
The QA team should help guide the stability testing. Sitting down with the QA lead and identifying the most important and basic functionality establishes the baseline. As more features and functionality are added, the QA team should help create new stability tests.
Generate Reports
Each phase in the CI lifecycle generates a report. For the rebuilding, it is a build log. For unit testing and analysis, there are specific results reports. For stability testing, a detailed HTML report might list all the features and functionality that passed stability testing.
The project manager and all the project stakeholders benefit from having visibility into the activities and progress underway. There is no clearer indication of progress than successful delivery.
![]() Practice 10-11 Generate Reports That Demonstrate Progress and Delivery
Practice 10-11 Generate Reports That Demonstrate Progress and Delivery
The CI server ought to provide a lot of valuable reports and general information about the project's progress. To anyone interested in gaining insight into the project, the CI server reports communicate that the right things are being done in the right way.
One particularly valuable report lists the commit numbers from the version control system that went into a build. This makes root cause analysis easier because builds are tied back to the change sets relevant to that build. Another source of reporting is that many CI servers generate reports based on information about the builds, such as build times, artifact size, number of passing and failing tests, total lines of code, and other code analysis metrics. These reports and metrics build over time to measure improvement and productivity for continuous integration and overall development. It is important to evaluate this aspect of the CI server or investigate using a tool like Sonar (http://www.sonarsource.org).
Summary
In this chapter you learned about the continuous integration server and lifecycle. You saw how the CI lifecycle begins with a source code check-in and proceeds through to deployment and stability testing.