
C H A P T E R 11
![]()
DLR in Silverlight
There are many platforms we can run DLR-based applications on. So far, our discussions and code examples have focused exclusively on using the DLR in desktop applications. In this chapter, instead of having code examples running on the .NET platform, we will look at examples that run on the Silverlight platform.
Silverlight is a client-side Web platform Microsoft developed for running Rich Internet Applications (RIAs). The Silverlight runtime runs as a plug-in in a Web browser. When you run a Silverlight application, that application runs on the Silverlight runtime. In this chapter, we'll develop many Silverlight applications that make use of the DLR. We will run those applications on the Silverlight runtime within the context of a Web browser.
Besides Silverlight, Microsoft has other Web platforms, such as ASP.NET Web Forms, ASP.NET MVC, and ASP.NET AJAX. Unlike Silverlight, which performs most of its processing in the client-side browser, the various ASP.NET platforms are server-side frameworks that perform most of their processing in the Web server. There are some projects that aim to facilitate the usage of DLR-based languages in the various ASP.NET frameworks. For example, ASP.NET Dynamic Language Support is a subproject that allows developers to write IronPython or IronRuby code in ASP.NET Web pages. The project is hosted at http://aspnet.codeplex.com. There is a project called IronRubyMvc, which facilitates the use of IronRuby in ASP.NET MVC applications. You can find the project at http://github.com/jschementi/ironrubymvc. We will not cover how to use DLR in the context of the various ASP.NET frameworks because, personally, I don't see a clear roadmap from Microsoft for supporting the DLR and dynamic languages on the ASP.NET frameworks. Readers interested in applying the DLR to ASP.NET applications can go to the ASP.NET Dynamic Language Support and IronRubyMvc web sites to find out more. In this chapter, we will focus on leveraging the DLR in client-side Web development based on Silverlight.
Different Client Side Web Scripting Approaches
There are a few ways to use dynamic languages in Silverlight applications. One way is to use dynamic languages like class libraries. With this approach, we access the dynamic languages via the DLR Hosting API. A later section in this chapter will demonstrate this approach. Another way to use dynamic languages in Silverlight applications is to use a utility program called Chiron.exe and some Silverlight application project templates. This is the first approach released by Microsoft to provide a Web scripting experience that allows people to script in Python and Ruby like they do in JavaScript. However, this approach fell somewhat out of fashion when the newer “just text” approach became available, so we'll cover only the “just text” approach.
The “just text” approach, as its name suggests, allows developers to build a Silverlight application by running code as text, without the trouble of compiling and packaging the code. Normally when developing a Silverlight application, we have to compile code and package deliverables into specific file types, such as XAP or slvx files either manually or by using tools. Every time we make some changes, we need to repeat the compilation and packaging steps if we want to manually test those changes. With the “just text” approach, changing and manually testing a Silverlight application that uses the DLR is much simplified. All we need to do is make the changes to a Web page and reload that Web page in the browser. You'll see many examples that take advantage of this approach later in this chapter. If you want to learn more about the “just text” approach after reading this chapter, one excellent document to read is Back to “Just Text” with Silverlight, which you can download at www.ironpython.net/browser/spec.v2.html.
Apache HTTP Server Configurations
To use the “just text” approach for hosting DLR-based language code in Silverlight, you need a web server and a browser that supports Silverlight. For this chapter's examples, I used Apache HTTP Server 2.2.16 as the web server and Google Chrome as the browser. You can use other web servers, such as Microsoft IIS, and other browsers such as FireFox or Internet Explorer to follow along.
I'll start by showing you how to set up the Apache HTTP Server for running the examples. The first thing to do, of course, is to download and install it. Once you have it installed, you need to configure a virtual host for the examples. To do so, you need to add the following line in C:WINDOWSsystem32driversetchosts:
127.0.0.1 ProDLR
Next, open the file C:Program FilesApache Software FoundationApache2.2confhttpd.conf in a text editor and add the following line at the end of the file:
Include conf/virtual-hosts.conf
Last, create the file C:Program FilesApache Software FoundationApache2.2confvirtual-hosts.conf. Open the file in a text editor. Copy and paste the code in Listing 11-1 into the file.
Listing 11-1. virtual-hosts.conf
<Directory "C:ProDLRsrcExamplesChapter11">

    Order allow,deny

    Allow from all

</Directory>


# Use name-based virtual hosting.

NameVirtualHost 127.0.0.1:80


<VirtualHost 127.0.0.1:80>

    ServerName ProDLR

    DocumentRoot "C:ProDLRsrcExamplesChapter11"

    CustomLog logs/ProDLR.access.log combined

    ErrorLog logs/ProDLR.error.log

</VirtualHost>
The code in Listing 11-1 sets up a virtual host that will host the web site for this chapter's examples. The web site's name is ProDLR, which means the web site's URI is http://ProDLR. The physical folder that stores the web site's files is C:ProDLRsrcExamplesChapter11. If the folder has a file called xyz.html, you can view the file in the browser if you point the browser to http://ProDLR/xyz.html. The <Directory...> entry in Listing 11-1 is to grant necessary permissions for browsers to access the files in C:ProDLRsrcExamplesChapter11. Without the <Directory...> entry, you'll get an error message that says you don't have permission to access the files when you later run the code examples.
After making these changes, remember to restart the Apache HTTP Server. You can verify that the Apache HTTP Server is set up properly by loading the page http://ProDLR/index.html. You should see a page that says your Apache HTTP Server is all set. Now that the Apache HTTP Server installed and the virtual host configured, we'll look at some examples of the “just text” approach for running DLR-based language code in Silverlight applications.
Using the Hosted Gestalt Components
The “just text” approach is made possible by a few software components, the product of a project called Gestalt whose home page is http://visitmix.com/labs/gestalt/. You can use the Gestalt components in two ways. Because the Gestalt components are hosted on http://gestalt.ironpython.net and http://gestalt.ironruby.net, the easiest way to use Gestalt is to use those hosted components. The other way to use the Gestalt components is to download them and host them ourselves. This requires more work but allows for more flexibility. In this section, we will look at how to use the hosted Gestalt components. The next section will show you how to download and host those components yourself and discuss what benefits that brings you.
Listing 11-2 shows an example that uses the Gestalt components hosted on http://gestalt.ironpython.net to run Python code in a Silverlight application. In Listing 11-2, line 3 embeds the dlr-latest.js JavaScript file from http://gestalt.ironpython.net into the HTML page. When executed, the JavaScript code in dlr-latest.js will create a Silverlight control in the HTML page. A Silverlight control created directly in an HTML page typically looks like this:
<html>

<body>

...

  <object data="data:application/x-silverlight-2," type="application/x-silverlight-2"

        width="100%" height="100%">

    <param name="source" value="xyz.xap"/>

    <param name="onError" value="onSilverlightError" />

    <param name="autoUpgrade" value="true" />

    ...other code omitted...

  </object>

</body>

</html>
As you can see, a Silverlight control in the code snippet above is created and embedded in the HTML page using an <object> tag. Within the object tag, there are several <param> tags we can use to affect the created Silverlight control. The most important <param> tag is the one whose name attribute is source. The source parameter declares the Silverlight application that will run inside the Silverlight control. The Silverlight control created by dlr-latest.js has a source parameter set to dlr.xap. The file dlr.xap is a Silverlight application that is capable of executing DLR-based language code embedded in HTML pages. Currently you don't see the file dlr.xap anywhere in the code example because that file is hosted on the Gestalt web site. I will show you the contents of dlr.xap in the next section when we download the Gestalt components and host them ourselves.
In Listing 11-2, there is a second <script> block from line 10 to line 12. The script block contains Python code that uses the HTML DOM API to change the innerHTML property of the HTML element whose id is greeting. The Python code is passed to the dlr.xap Silverlight application for interpretation. Internally, dlr.xap uses the DLR Hosting API to execute the Python code. Listing 11-3 shows the same example for the Ruby language.
Listing 11-2. PythonHtmlDomHostedGestalt.htm
1)   <html>

2)   <head>

3)     <script src="http://gestalt.ironpython.net/dlr-latest.js"

4)           type="text/javascript">

5)     </script>

6)   </head>

7)

8)   <body>

9)     <h1 id="greeting"></h1>

10)    <script type="text/python">

11)      document.greeting.innerHTML = "Hello!!!"

12)    </script>

13)  </body>

14)  </html>
Listing 11-3. RubyHtmlDomHostedGestalt.htm
<html>

<head>

  <script src="http://gestalt.ironruby.net/dlr-latest.js"

        type="text/javascript">

  </script>

</head>


<body>

  <h1 id="greeting"></h1>

  <script type="text/ruby">

    document.greeting.innerHTML = "Hello World from Ruby in Silverlight!"

  </script>

</body>

</html>
Hosting the Gestalt Components
In the previous section we used the hosted Gestalt components to run Python and Ruby code in a Silverlight application. Although using the hosted Gestalt components makes it almost effortless to start embedding Python and Ruby code in HTML pages, there are times when you would not want your Silverlight application to rely on a network connection to the Gestalt web sites or on the Gestalt web sites themselves. In such situations, you'd want to download the Gestalt components and host them yourself. This section will show you how to do so.
First you need to download the Gestalt components, which you can do at http://visitmix.com/labs/gestalt/downloads/. The file I downloaded is Gestalt-1.0.zip. Once you download the file, unzip it to C:Gestalt1.0, then copy the folder C:Gestalt1.0dlr and place it in C:ProDLRsrcExamplesChapter11. You should now have in your file system the C:ProDLRsrcExamplesChapter11dlr folder that contains the following files: dlr.js, dlr.xap, gestaltmedia.js, IronPython.slvx, IronRuby.slvx, and Microsoft.Scripting.slvx. As you can see, the dlr.js and dlr.xap files mentioned in the previous section's examples are now sitting in your local file system. Let's see some examples that use those local files instead of the ones hosted on the Gestalt web sites. Then we will dissect the file dlr.xap to see how the Gestalt components work together to allow DLR-based language code to be embedded in HTML pages.
Listing 11-4 shows basically the same example as Listing 11-2. The only difference between the two is that in Listing 11-4, instead of pulling the dlr-latest.js file from http://gestalt.ironpython.net, we use the file dlr.js in the dlr folder. Here the dlr folder is a path relative to the HTML file's location. Our example is in C:ProDLRsrcExamplesChapter11PythonHtmlDomLocalGestalt.htm. So to path of the file C:ProDLRsrcExamplesChapter11dlrdlr.js relative to PythonHtmlDomLocalGestalt.htm is /dlr/dlr.js. Listing 11-5 shows the same example for the Ruby language.
Listing 11-4. PythonHtmlDomLocalGestalt.htm
<html>

<head>

  <script src="/dlr/dlr.js" type="text/javascript"></script>

</head>


<body>

  <h1 id="greeting"></h1>

  <script type="text/python">

    document.greeting.innerHTML = "Hello World from Python in Silverlight!"

  </script>

</body>

</html>
Listing 11-5. RubyHtmlDomLocalGestalt.htm
<html>

<head>

  <script src="/dlr/dlr.js" type="text/javascript"></script>

</head>


<body>

  <h1 id="message"></h1>

  <script type="text/ruby">

    document.message.innerHTML = "Hello World from Ruby in Silverlight!"

  </script>

</body>

</html>
Dissecting the Gestalt Components
The Gestalt components we downloaded in the previous section are placed in the C:ProDLRsrcExamplesChapter11dlr folder. Let's go through those components and see how they enable DLR-based language code to be embedded in HTML pages.
The file dlr.js in C:ProDLRsrcExamplesChapter11dlr has JavaScript code that when embedded in an HTML page will create a Silverlight control. The Silverlight control's source parameter, as I mentioned earlier, is set to the dlr.xap file in C:ProDLRsrcExamplesChapter11dlr. A xap file is in fact a zip file. If you rename dlr.xap to dlr.zip and open it, you will see that dlr.zip has two files:
AppManifest.xaml and languages.config. The dlr.xap file is a Silverlight application and AppManifest.xaml specifies the entry point assembly and entry point type of the Silverlight application. The languages.config file configures which languages are supported in the dlr.xap Silverlight application.
The entry point type of a Silverlight application must be a type that is in the entry point assembly and that derives from System.Windows.Application. If you open AppManifest.xaml, you'll see that the entry point assembly of dlr.xap is Microsoft.Scripting.Silverlight.dll and the entry point type is the class Microsoft.Scripting.Silverlight.DynamicApplication.
An instance of the entry point type Microsoft.Scripting.Silverlight.DynamicApplication represents a running Silverlight application that is capable of interpreting DLR-based language code. When an example HTML page of this chapter is loaded in the browser, the Silverlight control created by dlr.js will load the dlr.xap Silverlight application and an instance of the entry point type Microsoft.Scripting.Silverlight.DynamicApplication will be created. The source code for building the Microsoft.Scripting.Silverlight.dll assembly is part of the DLR source code you can download from the DLR Codeplex web site. If you open the C:Codeple-DLR-1.0SrcCodeplex-DLR-VSExpress.sln file, you'll see that the Visual Studio solution contains a project called Microsoft.Scripting.Silverlight. That is the project that contains the source code for building Microsoft.Scripting.Silverlight.dll. Building the assembly is not as straightforward as clicking a button in Visual Studio; we'll see how to build the assembly later. For now, let's take a look at some important code snippets in the Microsoft.Scripting.Silverlight project to see how the whole “just text” works end to end.
The entry point type of the dlr.xap is Microsoft.Scripting.Silverlight.DynamicApplication and you can find its code in the file DynamicApplication.cs of the Microsoft.Scripting.Silverlight project. The class DynamicApplication registers an event handler for the Startup event that it inherits from the System.Windows.Application base class. The event handler is the method DynamicApplication_Startup in DynamicApplication.cs and it will be invoked when the dlr.xap Silverlight application is executed in a browser. One fact about Silverlight applications is that they have access to the document object model (DOM) of the HTML page that hosts them. The DOM of an HTML page provides access to all of the HTML tags and their attributes as objects. The code in the DynamicApplication_Startup method uses the DOM of the HTML page that hosts the dlr.xap Silverlight application to scan for all the <script> tags in the HTML page. If you take a look at the code in the DynamicApplication_Startup method, you'll see that it creates an instance of a class called DynamicScriptTags and then calls the FetchScriptTags method on that instance. The FetchScriptTags method uses the HTML DOM to scan for the <script> tags that contain DLR-based language code. For each <script> tag that contains DLR-based language code, the code in FetchScriptTags will create an instance of DynamicScriptTags.ScriptCode and put that instance in a list. A DynamicScriptTags.ScriptCode instance can represent either DLR-based language code inlined in a <script> tag or DLR-based language code included from an external file via a <script> tag.
The DynamicApplication_Startup method will then create an instance of the DynamicEngine class and call the Run method of DynamicScriptTags with the DynamicEngine instance. The Run method uses the DLR Hosting API to execute the DLR-based language code snippets stored as DynamicScriptTags.ScriptCode instances. One thing to note about the Run method is that it calls the CreateScope method of DynamicEngine to get a script scope that's shared by all the DynamicScriptTags.ScriptCode instances that represent code snippets inlined in a <script> tag. A later section will show an example HTML page that has two <script> tags, one containing inline Ruby code and the other containing inline Python code. You'll see that the two inlined code snippets are executed in the same script scope. If a DynamicScriptTags.ScriptCode instance represents code that is included from an external file via a <script> tag, the Run method will call the CreateScope method to create a new script scope for executing the external file's code.
The CreateScope method of DynamicEngine is of particular interest because it's where the intrinsic objects available to all DLR-based language code are injected into a script scope. This should look natural if you've read about how the DLR Hosting API works in Chapter 6. The intrinsic objects made available by the “just text” approach to all DLR-based language code are the following:
- A variable named document that represents the host HTML document. The type of the variable is System.Windows.Browser.HtmlDocument.
- A variable named window that represents the host HTML window. The type of the variable is System.Windows.Browser.HtmlWindow.
- A variable named me and another variable named xaml. Both of the variables represent the root visual element of the associated XAML code if any. The two variables point to the same object. The type of the two variables is System.Windows.UIElement.
Don't worry if you don't quite understand the intrinsic variables. There will be code examples later in the chapter to show how to use those intrinsic variables.
Scripting HTML
So far, we have seen examples that use Ruby or Python code to manipulate the DOM of the host HTML page by changing the inner text of an HTML element. Now let's look at some examples that use Ruby or Python code as event handlers for HTML events.
Listing 11-6 defines a Ruby function called onclick_event_handler. The function is registered as the event handler for the onclick event of an HTML button. When the HTML button is clicked, onclick_event_handler will be invoked and the inner text of the HTML element whose id is message will be set to “Hello!!!” Notice that the intrinsic variable document is used in the Ruby code. The intrinsic variable document represents the host HTML page, and the example Ruby code uses it to get a hold of HTML elements, such as the button whose id is click_me and the element whose id is message.
Note that in Listing 11-6, there are two <script> tags that contain inlined Ruby code. Because the two code snippets are inlined in the <script> tags, they will execute in the same script scope. That is important for the example to work. Because the two code snippets execute in the same script scope, the Ruby function onclick_event_handler is available and visible in the other <script> tag that registers the Ruby function as the event handler for the HTML button's onclick event. Listing 11-7 shows the same example for the Python language.
Listing 11-6. RubyHtmlEvent1.htm
<html>

<head>

  <script src="/dlr/dlr.js" type="text/javascript"></script>

</head>


<body>

  <h1 id="message"></h1>

  <script type="text/ruby">

        def onclick_event_handler(sender, event)

            document.message.innerHTML = "Hello!!!"

        end

  </script>


  <input id="click_me" type="button" value="click me" />

  <script type="text/ruby">

        document.click_me.attach_event('onclick',

            System::EventHandler.new(method(:onclick_event_handler))
        )

  </script>

</body>

</html>
Listing 11-7. PythonHtmlEvent1.htm
<html>

<head>

        <script src="/dlr/dlr.js" type="text/javascript"></script>

</head>


<body>

  <h1 id="message"></h1>

  <script type="text/python">

  def onclick_event_handler(sender, event):

    document.message.innerHTML = "Hello!!!"


  </script>


  <input id="click_me" type="button" value="click me" />

  <script type="text/python">

  import System

  document.click_me.AttachEvent('onclick', System.EventHandler(onclick_event_handler))

  </script>

</body>

</html>
To emphasize the fact that inlined DLR language code snippets are executed in the same script scope, Listing 11-8 shows an example that purposely defines a global Ruby variable called $message in one <script> tag and uses the variable in another <script> tag. Because the Ruby code in the two <script> tags are inlined, the $message variable defined in one <script> tag is available and visible in the other <script> tag. Listing 11-9 shows the same example for Python.
Listing 11-8. RubyHtmlEvent2.htm
<html>

<head>

        <script src="/dlr/dlr.js" type="text/javascript"></script>

</head>


<body>

  <h1 id="message"></h1>

  <script type="text/ruby">

        def onclick_event_handler(sender, event)

            document.message.innerHTML = $message

        end

  </script>


  <input id="click_me" type="button" value="click me" />

  <script type="text/ruby">
        $message = "Hello!!!"


        document.click_me.attach_event('onclick',

            System::EventHandler.new(method(:onclick_event_handler))

        )

  </script>

</body>

</html>
Listing 11-9. PythonHtmlEvent2.htm
<html>

<head>

        <script src="/dlr/dlr.js" type="text/javascript"></script>

</head>


<body>

  <h1 id="message"></h1>

  <script type="text/python">

  def onclick_event_handler(sender, event):

    document.message.innerHTML = message


  </script>


  <input id="click_me" type="button" value="click me" />

  <script type="text/python">

  import System

  message = "Hello!!!"

  document.click_me.AttachEvent('onclick', System.EventHandler(onclick_event_handler))

  </script>

</body>

</html>
The previous examples in this section show how to define a function and register it as an event handler for an HTML element's event. If you like, you can define the function and register it in one go, as Listing 11-10 shows. The example in Listing 11-10 defines an anonymous Ruby function that serves as the event handler for an HTML button's onclick event.
Listing 11-10. RubyHtmlEvent3.htm
<html>

<head>

        <script src="/dlr/dlr.js" type="text/javascript"></script>

</head>


<body>

  <h1 id="message"></h1>

  <script type="text/ruby">

        $message = "Hello!!!"

  </script>
  <input id="click_me" type="button" value="click me" />

  <script type="text/ruby">

        document.click_me.onclick do

            document.message.innerHTML = $message

        end

  </script>

</body>

</html>
We can define the function in Ruby and register the Ruby function with an HTML button's event in Python. Listing 11-11 mixes Ruby code and Python code in one HTML page. Both the Ruby code and Python code are inlined in a <script> tag and hence executed in the same script scope. Therefore, the Ruby function is available and visible in the Python code.
Listing 11-11. PythonRubyHtmlEvent.htm
<html>

<head>

        <script src="/dlr/dlr.js" type="text/javascript"></script>

</head>


<body>

  <h1 id="message"></h1>

  <script type="text/ruby">

        def onclick_event_handler(sender, event)

            document.message.innerHTML = "Hello!!!"

        end

  </script>


  <input id="click_me" type="button" value="click me" />

  <script type="text/python">

  import System

  document.click_me.AttachEvent('onclick', System.EventHandler(onclick_event_handler))

  </script>

</body>

</html>
Scripting XAML
With the “just text” approach, not only can we script the HTML DOM in DLR-based languages, we can also work with UI markups expressed in XAML. XAML is a .NET object serialization format that can serialize .NET objects into XML and vice versa. Listing 11-12 shows an example that displays a green rectangle in the browser. The rectangle is expressed in XAML by the <Rectangle> tag within the <Canvas> tag. At runtime, the XML tags will be parsed and deserialized into .NET objects that represent a canvas and a rectangle.
Listing 11-12. RectangleXaml.htm
<html>

<head>

  <script src="/dlr/dlr.js" type="text/javascript"></script>
</head>


<body>

  <script type="application/xml+xaml" width="150" height="150">

    <Canvas xmlns="http://schemas.microsoft.com/winfx/2006/xaml/presentation"

                xmlns:x="http://schemas.microsoft.com/winfx/2006/xaml"

                Width="150" Height="150">

       <Rectangle Width="50" Height="50" Canvas.Left="20" Canvas.Top="20" Fill="Green" />

    </Canvas>

  </script>

</body>

</html>
The example in Listing 11-12 contains only a XAML code snippet and does not employ any Ruby or Python code to script the XAML UI elements. The next example, shown in Listing 11-13, demonstrates how to script the XAML rectangle element and change the rectangle's color from green to red.
The first important thing to note about the code in Listing 11-13 is that the code id=”rect” is added in line 9. The id attribute uniquely identifies the XAML code from line 10 to line 16. In line 19, we refer to the XAML code by its unique id. This effectively associates the Python code from line 20 to line 23 with the XAML code and makes the intrinsic variable me in line 23 refer to the root UI visual element of the XAML code. Because the code in line 14 gives the XAML rectangle a unique name as its identifier, in line 23 we are able to refer to the XAML rectangle as me.rectangle. In line 23 we create a new instance of the SolidColorBrush class that has the red color and assign the SolidColorBrush instance to the Fill property of me.rectangle to change the XAML rectangle color to red. Because we use the SolidColorBrush class and the Colors class in line 23, we need to import them from the System.Windows.Media namespace in line 21.
Listing 11-13. PythonXamlEvent1.htm
1)   <html>

2)   <head>

3)     <script src="/dlr/dlr.js" type="text/javascript"></script>

4)   </head>

5)

6)   <body>

7)     <h1 id="message"></h1>


8)

9)     <script id="rect" type="application/xml+xaml" width="150" height="150">

10)       <Canvas xmlns="http://schemas.microsoft.com/winfx/2006/xaml/presentation"

11)               xmlns:x="http://schemas.microsoft.com/winfx/2006/xaml"

12)       Width="150" Height="150">

13)

14)         <Rectangle x:Name="rectangle" Width="50" Height="50"

15)                  Canvas.Left="20" Canvas.Top="20" Fill="Green" />

16)       </Canvas>

17)     </script>

18)

19)  <script class="rect" type="text/python">

20)  import clr

21)  from System.Windows.Media import (SolidColorBrush, Colors)

22)
23)  me.rectangle.Fill = SolidColorBrush(Colors.Red)

24)  </script>

25) </body>

26) </html>
The code in Listing 11-14 shows one more example of manipulating XAML elements in Python code. What's new in this example is how to register a Python function as an event handler for a XAML button's Click event. This is analogous to the example that registers a Ruby or Python function as an event handler for an HTML button's onclick event. The code in Listing 11-14 is largely the same as that in Listing 11-13. One difference is that Listing 11-14 has a <Button> tag in the XAML UI markup. The unique name of the <Button> tag is clickMeButton and we refer to it as me.clickMeButton in the embedded Python code. The <script> tag that contains the Python code defines a Python function called onclick_event_handler and registers the Python function to the me.clickMeButton.Click event. One caveat about the code in Listing 11-14 is that while you might think you can register the event handler like the following, you can't:
<script id="rect" type="application/xml+xaml" width="150" height="150">

  <Canvas ...>

    <Rectangle ... />

    <Button x:Name="clickMeButton" Click="onclick_event_handler" .../>

  </Canvas>

</script>
Registering a Python or Ruby function as the event handler in XAML markup is not yet supported by the “just text” approach.
Listing 11-14. PythonXamlEvent2.htm
<html>

<head>

  <script src="/dlr/dlr.js" type="text/javascript"></script>

</head>


<body>

  <h1 id="message"></h1>


  <script id="rect" type="application/xml+xaml" width="150" height="150">

    <Canvas xmlns="http://schemas.microsoft.com/winfx/2006/xaml/presentation"

        xmlns:x="http://schemas.microsoft.com/winfx/2006/xaml"

        Width="150" Height="150">


      <Rectangle x:Name="rectangle" Width="50" Height="50"

            Canvas.Left="20" Canvas.Top="20" Fill="Green" />

      <Button x:Name="clickMeButton" Width="70" Height="20"

            Canvas.Left="20" Canvas.Top="90" Content="Click Me" />

    </Canvas>

  </script>


  <script class="rect" type="text/python">

  import clr

  from System.Windows.Media import (SolidColorBrush, Colors)
  def onclick_event_handler(sender, event):

    me.rectangle.Fill = SolidColorBrush(Colors.Red)


  me.clickMeButton.Click += onclick_event_handler

  </script>

</body>

</html>
DLR Settings
Earlier in this chapter, I mentioned that the dlr.js file contains JavaScript code that when embedded in an HTML page creates a Silverlight control. Because we need to be able to create Silverlight controls with different behaviors and capabilities, the dlr.js file provides some settings we can configure when we embed the file in a host HTML page. In this section, we will look at a setting that causes a language console to show up in the host HTML page. The language console will take the code you enter, evaluate it, and display the evaluation results, much like the ir.exe command console of IronRuby and the ipy.exe command console of IronPython.
The JavaScript code in dlr.js essentially defines an object called DLR. The object DLR has some properties and functions defined for it. Examples of the properties are path, settings, and autoAdd. Examples of the functions are createSilverlightObject, getSettings and defaultSettings. The settings property of the DLR object can point to an object that can have properties such as width, height, console, and id. The console property is the one that controls whether a language console will show up in the host HTML page. This section will only cover the console property. A later section will cover the path property of the DLR object. You can refer to Back to “Just Text” with Silverlight for details on the settings you're interested in.
Listing 11-15 shows an example that displays a language console in the host HTML page by setting the console property to true. If you run the example by pointing your browser to http://prodlr/PythonConsole.htm, you'll see a language console at the bottom of the web page where you can type in Python code after the console prompt and press the Enter key to have the Python code evaluated. Note that when assigning values to the DLR object's properties, we have to do so before the dlr.js file is included in the HTML page. Listing 11-16 shows the same example for the Ruby language.
Listing 11-15. PythonConsole.htm
<html>

<head>

  <script type="text/javascript">

    window.DLR = {}

    DLR.settings = {console: true}

  </script>


  <script src="/dlr/dlr.js" type="text/javascript"></script>

</head>


<body>

  <script type="text/python"></script>

</body>

</html>
Listing 11-16. RubyConsole.htm
<html>

<head>

  <script type="text/javascript">

    window.DLR = {}

    DLR.settings = {console: true}

  </script>


  <script src="/dlr/dlr.js" type="text/javascript"></script>

</head>


<body>

  <script type="text/ruby"></script>

</body>

</html>
Speak Your Own Language in Silverlight
So far in this chapter, you've seen how to use the Gestalt project to host IronPython and IronRuby code in Silverlight. You've seen examples that use the Gestalt components hosted on http://gestalt.ironruby.net and http://gestalt.ironpython.net. You've also seen how to download the Gestalt code and host the Gestalt components yourself. It's nice to leverage the Gestalt components in a Silverlight application. However, if you ever need to host your custom language code in Silverlight or if you want to target different DLR versions for your Silverlight application, you'll need to build your own Gestalt-like components. The rest of this chapter will show you how to do that, from the ground up.
First, we will build a new custom language—the Hello language you saw in Chapter 1. To host the custom language in Silverlight, we need to implement the provider side of the DLR Hosting API for the language. Second, we will host the Hello language in Silverlight without using Microsoft.Scripting.Silverlight.dll or any Gestalt-like components. In this exercise, you'll see that hosting a custom language in Silverlight is really no different from using a class library. Finally, we will create our custom Gestalt-like components and use them to host the Hello language in a Silverlight application. To follow these examples, you need to install some software components. You also need to build the Microsoft.Scripting.Silverlight project in the DLR source code. Let's go through those steps for setting up the development environment we need for this chapter's examples.
Software Requirements
Here are the software components you need in order to try out the examples in the rest of this chapter.
- You need to have Visual Web Developer 2010 Express installed.
- You need to have the Silverlight 4 Toolkit April 2010 Release and Silverlight 4 Tools for Visual Studio 2010 installed. The easiest way to install these components is to install Microsoft Web Platform Installer 2.0. Once it's installed, you can use it to download and install both components. Alternatively, you can go to the respective web sites for Silverlight 4 Toolkit April 2010 Release and Silverlight 4 Tools for Visual Studio 2010 to download and install them.
After installing these software components, some people expressed in various discussion forums that they got an error message saying that Silverlight Developer Runtime is not installed. If you happen to run into that issue, you can fix it by downloading the Silverlight Developer Runtime at http://go.microsoft.com/fwlink/?LinkID=188039 and installing it.
Build DLR for Silverlight
Before we start coding, there's one last bit of preparation work that needs to be done—building the DLR source code with Silverlight as the target platform. This is necessary because we will be building Silverlight applications and the DLR assemblies we've been using so far are for.NET applications. The challenge here is that if you open the C:Codeplex-DLR-1.0SrcCodeplex-DLR-VSExpress.sln and try to build the Microsoft.Scripting.Silverlight project, you will get a bunch of compilation errors. Fortunately, a workaround was posted on the DLR Codeplex discussion forum and it works like a charm. Here's how to build the DLR source code for Silverlight.
- Open the Visual Studio command prompt. The command prompt seems to be installed as part of the installation of Visual Studio C++ 2010 Express.
- In the command prompt, navigate to the C:Codeplex-DLR-1.0Src folder and execute the following command:
msbuild

HostsSilverLightMicrosoft.Scripting.SilverLightMicrosoft.Scripting.Silverlight.csproj

/p:Configuration="Silverlight 4 Debug" /p:SilverlightPath="C:Program FilesMicrosoft Silverlight4.0.50826.0"
In the command, the version of Silverlight I used in 4.0.50826.0. If you want to use a different version, adjust the command accordingly. After executing the command, the Microsoft.Scripting.Silverlight project and its dependencies should all be built successfully. The assemblies generated by the build process are in the C:Codeplex-DLR-1.0SrcHostsSilverLightBinDebug folder.
- Copy the files in C:Codeplex-DLR-1.0SrcHostsSilverLightBinDebug to C:ProDLRlibSilverlightDLRdebug.
You now have the DLR binaries needed for building Silverlight applications. You'll reference those binaries in the Silverlight projects you build in the rest of this chapter.
The Hello Language
Our goal now is to implement the provider side of the DLR Hosting API for the Hello language. You can find all the code presented in this section in the HelloConsole solution of this chapter's code download. If you want to start from scratch, you can fire up Visual Web Developer 2010 Express and create a new project. The project is a C# Silverlight class library. I named the project HelloLanguage and the solution HelloConsole. You will be prompted to select a version of Silverlight as the target version for the new project. For this example, I selected Silverlight 4. The project needs to reference the Microsoft.Dynamic.dll and Microsoft.Scripting.dll assemblies located in C:ProDLRlibSilverlightDLRdebug. Those are the assemblies you built in the previous section.
Hello is a language that accepts any code as valid input and returns the string “Hello!!!” as the result of evaluating the code. To plug the Hello language into the DLR Hosting API, we need to implement the provider side of the DLR Hosting API for the language. For our simple Hello language, that means we need to implement a class that derives from LanguageContext and a class that derives from ScriptCode. The class that derives from LanguageContext is called HelloContext and is shown in Listing 11-17. LanguageContext is a class meant to be subclassed by a language implementer. The subclass is supposed to provide functionalities such as returning the script engine and compiling and interpreting the source code of the custom language. In Listing 11-17, HelloContext provides the functionality of compiling Hello language code by overriding the CompileSourceCode method it inherits from LanguageContext. The CompileSourceCode method in Listing 11-17 simply creates an instance of HelloScriptCode and returns it. Listing 11-18 shows the code of the HelloScriptCode class.
Listing 11-17. The HelloContext Class
public class HelloContext : LanguageContext

{

    public HelloContext(ScriptDomainManager domainManager,

IDictionary<string, object> options)

        : base(domainManager)

    { }


    public override ScriptCode CompileSourceCode(SourceUnit sourceUnit,

        CompilerOptions options, ErrorSink errorSink)

    {

        return new HelloScriptCode(sourceUnit);

    }

}
Listing 11-18. The HelloScriptCode Class
public class HelloScriptCode : ScriptCode

{

    public HelloScriptCode(SourceUnit sourceUnit)

        : base(sourceUnit)

    { }

    public override object Run(Scope scope)

    {

        return "Hello!!!";

    }

}
Now that we have the Hello language plugged into the DLR Hosting API, the next step is to create a Silverlight application that makes use of the Hello language. There is more than one way to host a custom language in a Silverlight application. No matter which approach we take, the basic requirement—that the custom language be plugged into the DLR Hosting API—remains the same. In the rest of this chapter, we will look at two different approaches for hosting the Hello language in Silverlight applications. One uses the compiled Hello language assembly HelloLanguage.dll as a typical .NET class library. The other is the “just text” approach.
Hello Console in Silverlight
In this section, we will create a Silverlight application that hosts the Hello language by using the DLR Hosting API and the HelloLanguage.dll assembly directly. The Silverlight application will not use the Microsoft.Scripting.Silverlight.dll assembly, nor will it use of any of the Gestalt-like files.
To begin, first create a new C# Silverlight application project. If you don't have the HelloConsole solution you created in the previous section open, you need to open it. Once you are in the HelloConsole solution, you can select File New Project… to create this section's new project. In the New Project wizard, expand the Visual C# node on the left and select the Silverlight subnode underneath the Visual C# node, as the screen capture in Figure 11-1 shows. Notice that the selected project template in the middle of the wizard dialog is Silverlight Application.
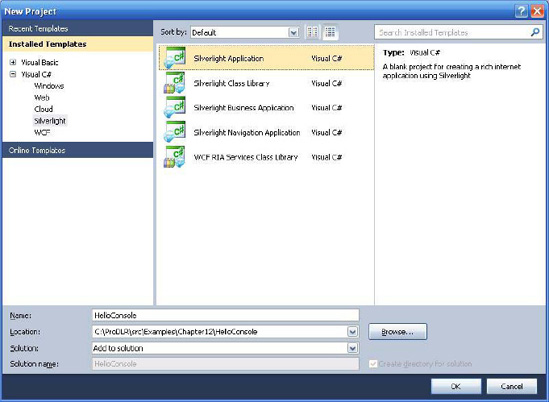
Figure 11-1. Creating a new Silverlight application project for hosting the Hello language in a Silverlight application
Once you hit OK, the next step in the New Project wizard is the configuration of the Web project that will host the new Silverlight application. Figure 11-2 shows the selections you should make in this step.
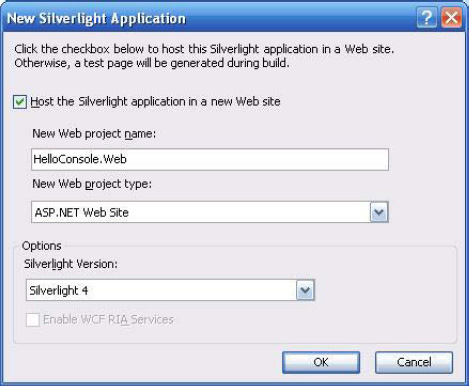
Figure 11-2. Configuring the Web project that will be used to host the new Silverlight application
After you click the OK button, you'll see two new projects added to the HelloConsole solution. The new project HelloConsole is the Silverlight application. The other new project, HelloConsole.Web, is the Web project that will host the HelloConsole Silverlight application. The HelloConsole.Web project as generated is fine for our purpose and we don't need to make any changes to it. For the HelloConsole project, you need to add to it references to the following:
- Microsoft.Dynamic.dll and Microsoft.Scripting.dll in C:ProDLRlibSilverlightDLRdebug
- Microsoft.CSharp.dll
- The HelloLanguage project in the same solution
Next, open the file MainPage.xaml and replace its contents with the code in Listing 11-19, which declares the UI of our Silverlight application in XAML. The UI is a UserControl that uses a StackPanel to lay out its child element, a TextBox. The TextBox is the Hello console in which users can type in Hello code and see the result of evaluating that code. The name of the TextBox is helloConsole.
Listing 11-19. MainPage.xaml
<UserControl x:Class="HelloConsole.MainPage"

    xmlns="http://schemas.microsoft.com/winfx/2006/xaml/presentation"

    xmlns:x="http://schemas.microsoft.com/winfx/2006/xaml"

    xmlns:d="http://schemas.microsoft.com/expression/blend/2008"

    xmlns:mc="http://schemas.openxmlformats.org/markup-compatibility/2006"

    mc:Ignorable="d"

    d:DesignHeight="300" d:DesignWidth="400">
    <StackPanel>

        <TextBox x:Name="helloConsole" KeyUp="TextBox_KeyUp"

                 Height="200" Margin="10"

                 TextWrapping="NoWrap" AcceptsReturn="True"

                 VerticalScrollBarVisibility="Visible" Text=">>>" />

    </StackPanel>

</UserControl>
The UI declarations shown in Listing 11-19 are associated with a code-behind file called MainPage.cs. The helloConsole textbox specifies an event handler for the KeyUp event of TextBox. The event handler is a C# method and its code is in MainPage.cs. Listing 11-20 shows the code in MainPage.cs. The class MainPage declares a member variable scriptEngine in line 3. The scriptEngine variable is initialized in the constructor. The initialization of the scriptEngine variable should look familiar if you have read Chapter 6. Basically, the code creates an instance of LanguageSetup that contains the setup information of the Hello language. Then it puts the LanguageSetup instance into a ScriptRuntimeSetup instance and uses the ScriptRuntimeSetup instance to create a script runtime. After the script runtime is created, the code obtains a reference to the Hello language's script engine by calling the GetEngine method on the script runtime in line 19.
The scriptEngine member variable is used in the TextBox_KeyUp method to evaluate the Hello code users type in the UI. The Hello code we want to evaluate is whatever users type after the >>> console prompt and before the Enter key is pressed. So TextBox_KeyUp checks first if the currently released key is the Enter key. If yes, then line 27 extracts the text the user typed after the last >>> console prompt. In line 28, we use scriptEngine to execute the extracted Hello code and store the execution result in a variable. In line 29 we display the execution result in the helloConsole textbox and print out a new >>> console prompt.
Listing 11-20. MainPage.cs
1) public partial class MainPage : UserControl

2) {

3)     private ScriptEngine scriptEngine;

4)

5)     public MainPage()

6)     {

7)         InitializeComponent();

8)

9)         LanguageSetup langSetup = new LanguageSetup(

10)             typeName: "HelloLanguage.HelloContext,HelloLanguage,

11)                   Version=1.0.0.0, Culture=neutral",

12)             displayName: "Hello",

13)             names: new String[] { "Hello" },

14)             fileExtensions: new String[] { ".hello" });

15)

16)         ScriptRuntimeSetup setup = new ScriptRuntimeSetup();

17)         setup.LanguageSetups.Add(langSetup);

18)         ScriptRuntime scriptRuntime = new ScriptRuntime(setup);

19)         scriptEngine = scriptRuntime.GetEngine("Hello");

20)     }

21)

22)     private void TextBox_KeyUp(object sender, KeyEventArgs e)

23)     {
24)         if (e.Key == Key.Enter)

25)         {

26)             int index = helloConsole.Text.LastIndexOf(">>>");

27)             String code = helloConsole.Text.Substring(index + 3);

28)             String result = scriptEngine.Execute(code);

29)             helloConsole.Text += result + "
>>>";

30)             helloConsole.SelectionStart = helloConsole.Text.Length;

31)         }

32)     }

33) }
If you run the Silverlight application, you'll see a textbox with the >>> console prompt showing up in the browser. If you type some dummy characters and press enter, you'll see something that looks like Figure 11-3.
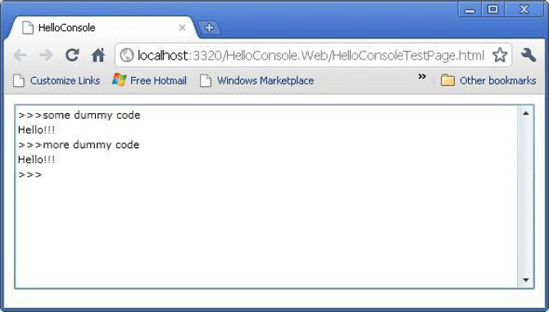
Figure 11-3. The Silverlight application running in the browser
Gestalt-like Hello Console on Silverlight
In the previous section we developed a Silverlight application that displays a console for the Hello language. The Silverlight application does not depend on the Microsoft.Scripting.Silverlight.dll assembly and does not use any of the Gestalt-like components. Now let's take the “just text” approach and use the Microsoft.Scripting.Silverlight.dll assembly to host the Hello language console in a Silverlight application. I will walk you through the steps you need to take to build your own Gestalt-like components that support your custom language. The example we'll build requires creating the following:
We need to create dlr.xap because (a) we want to support only the Hello language in our Silverlight application and (b) we want to target Silverlight 4.0 as the runtime for running the Silverlight application. For those two reasons we can't use the dlr.xap downloaded from the Gestalt web site.
To create our own dlr.xap, we will copy all files except Microsoft.Scripting.slvx, IronPython.slvx and IronRuby.slvx in C:ProDLRsrcExamplesChapter11dlr to C:ProDLRsrcExamplesChapter11hellodlr. Rename the file dlr.xap in C:ProDLRsrcExamplesChapter11hellodlr to dlr.zip. There are two files in dlr.zip: AppManifest.xaml and languages.config. Open AppManifest.xaml and replace the file's contents with the following:
<Deployment xmlns="http://schemas.microsoft.com/client/2007/deployment"

        xmlns:x="http://schemas.microsoft.com/winfx/2006/xaml"

 RuntimeVersion="4.0.50826.0"

 EntryPointAssembly="Microsoft.Scripting.Silverlight"

 EntryPointType="Microsoft.Scripting.Silverlight.DynamicApplication"

 ExternalCallersFromCrossDomain="ScriptableOnly">

  <Deployment.Parts>

  </Deployment.Parts>

  <Deployment.ExternalParts>

    <ExtensionPart Source="Microsoft.Scripting.slvx" />

  </Deployment.ExternalParts>

</Deployment>
As you can see, in AppManifest.xaml, we specify that the Silverlight runtime we want to target for our Silverlight application is version 4.0.50826.0. If you use a different version of Silverlight, you'll need to adjust the code you put into AppManifest.xaml accordingly. Next you need to modify the languages.config file. Open languages.config in a text editor and replace its contents with the following:
<Languages>

  <Language

    names="Hello"

    languageContext="HelloLanguage.HelloContext"

    extensions=".hello"

    assemblies="HelloLanguage.dll"

    external="HelloLanguage.slvx"

  />

</Languages>
Note that in the languages.config file, we configure our Silverlight application to support only the Hello language. We also specify that the binaries of the Hello language will be packaged into the HelloLanguage.slvx file. Let's perform the packaging and create the HelloLanguage.slvx file.
To create HelloLanguage.slvx, you need to build the Chapter11 Visual Studio solution if you haven't done so. Then you need to zip up HelloLanguage.dll in C:ProDLRsrcExamplesChapter11HelloConsoleHelloLanguageBinDebug. Name the zip file HelloLanguage.slvx and place it in C:ProDLRsrcExamplesChapter11hellodlr. That's it for the HelloLanguage.slvx file.
The last file we need to create is Microsoft.Scripting.slvx. We can't use the Microsoft.Scripting.slvx file downloaded from the Gestalt web site because we want to use the version of DLR assemblies we built ourselves in our Silverlight application. To create Microsoft.Scripting.slvx, you need to zip up the three files Microsoft.Scripting.dll, Microsoft.Scripting.Silverlight.dll, and Microsoft.Dynamic.dll in C:ProDLRlibSilverlightDLRdebug. Name the zip file Microsoft.Scripting.slvx and place it in C:ProDLRsrcExamplesChapter11hellodlr.
At this point, our Silverlight application is complete and we are ready to take it for a test drive. To try out the Silverlight application, open a Web browser and navigate to http://prodlr/HelloConsole.htm. Your browser will look like Figure 11-4. At the bottom of the Web page there is a console for the Hello language. If you type in any code and press the Enter key, the code you type in will be evaluated and the text “Hello!!!” will be printed out as the result of the code evaluation.
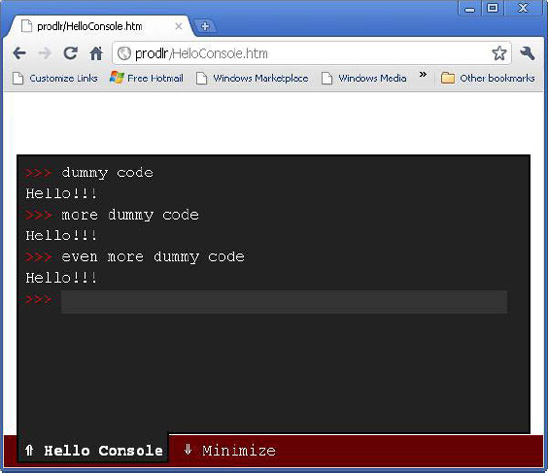
Figure 11-4. Hello language console powered by a Gestalt-like Silverlight application
Listing 11-21 shows the HelloConsole.htm code. It's pretty much the same as the examples we saw earlier that display a Python or Ruby console in the browser. One thing to note about the code in Listing 11-21 is that it sets the path property of the DLR object to “/hellodlr”. This is necessary because the default value of the DLR object's path property is “/dlr”. However, because all the Gestalt-like files that make up our Silverlight application are placed in the hellodlr folder, we need to overwrite the default value of the DLR object's path and set it to “/hellodlr”.
Listing 11-21. HelloConsole.htm
<html>

  <head>

    <script type="text/javascript">

      window.DLR = {}

      DLR.path = "/hellodlr"

      DLR.settings = {console: true}

    </script>


    <script src="/hellodlr/dlr.js" type="text/javascript"></script>

  </head>


  <body>

    <script type="text/Hello">

        dummy code

    </script>

  </body>

</html>
Summary
This chapter begins with an overview of different software projects and components that facilitate the use of DLR-based languages in various server-side and client-side Web environments. We then focused on the “just text” approach for hosting DLR-based language code in HTML pages. First, we looked at several examples that demonstrate the integration between the HTML DOM, XAML code snippets, and IronPython and IronRuby code. Some examples show how to use the HTML DOM in IronPython and IronRuby code to modify an HTML page. Others show how to register an IronRuby or IronPython function as the event handler for a XAML or HTML element's event.
Next, we developed a trivial language and used it in a Silverlight application without using any Gestalt-like components. Then we took the “just text” approach for hosting our custom language in a Silverlight application. We walked through the steps of creating HelloLanguage.slvx and our custom dlr.xap and Microsoft.Scripting.slvx. The “just text” approach as well as all of this chapter's examples are fundamentally based on the DLR Hosting API. We saw some excellent applications of the DLR Hosting API in earlier chapters of this book, and this chapter shows you one more excellent application of the DLR Hosting API.