Introduction
Simple Application Architecture Overview
Introduction to the Sock Shop Microservice Application
Application Deployment on GKE
Deleting the Cluster
Introduction
In this chapter, we will deploy a microservice architecture-based web application called sock-shop. We are providing only a brief introduction to the microservice architecture and its benefits, which will be sufficient to help you to understand the application behavior.
Simple Application Architecture Overview
Microservices are distributed and loosely coupled, independent, and deployable units, which means that if any individual service is down, this will not affect other services. Microservices communicate with one another through lightweight or language agnostic means, e.g., REST API, gRPC, or via queuing, such as RabbitMQ.
Advantages of Microservice Architecture
Easy and fast deployment: Microservices are often small in size, compared to monolithic applications, so their deployment is much faster and easier.
Faster release cycles: Every microservice is an independent deployable unit, which makes software release cycles shorter than with traditional applications, and agility, in terms of deployments and updates, is also supported.
Highly scalable: Microservices are often stateless and prefer deployment on a container. Whenever demand increases for specific services, growth can easily be scaled.
Accessible: As microservices are often small in size, developers can easily understand their functionality and how to update and enhance them efficiently, resulting in faster development cycles, with agile development methodologies.
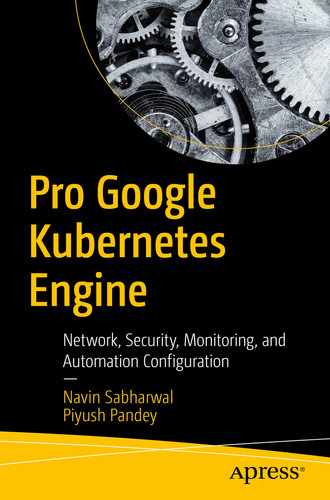
Introduction to the Sock Shop Microservice Application
Sock Shop application architecture
The Sock Shop application is packaged as a Docker image. It uses a Docker file that contains instructions on how the image is built, using a Kubernetes-based deployment configuration file, complete-demo.yaml, created for this application.
Node pools selection: For details on node pools, please refer to the relevant discussion under “Introduction to Google Kubernetes Engine (GKE)” in Chapter 1 & Chapter 4 “GKE Networking”. The Sock Shop application uses default node pools already created in Chapter 4 at the time the Kubernetes cluster was created.
Node selection: We defined node selection in the Pod definition of the YAML file that is used to deploy the application on the Kubernetes cluster.
nodeSelector : This is the most popular and simplest way to select a node for deploying the specific Pod by matching the label of the Node defined by the user.
Node affinity: This feature, introduced in Kubernetes version 1.4 version, is an enhanced version of nodeSelector. It offers a more expressive syntax to control how Pods are deployed to specific nodes.
Inter-Pod affinity: Inter-Pod affinity allows colocation by scheduling Pods onto nodes that already have specific Pods running, rather than based on labels on nodes.

nodeSelector
Services
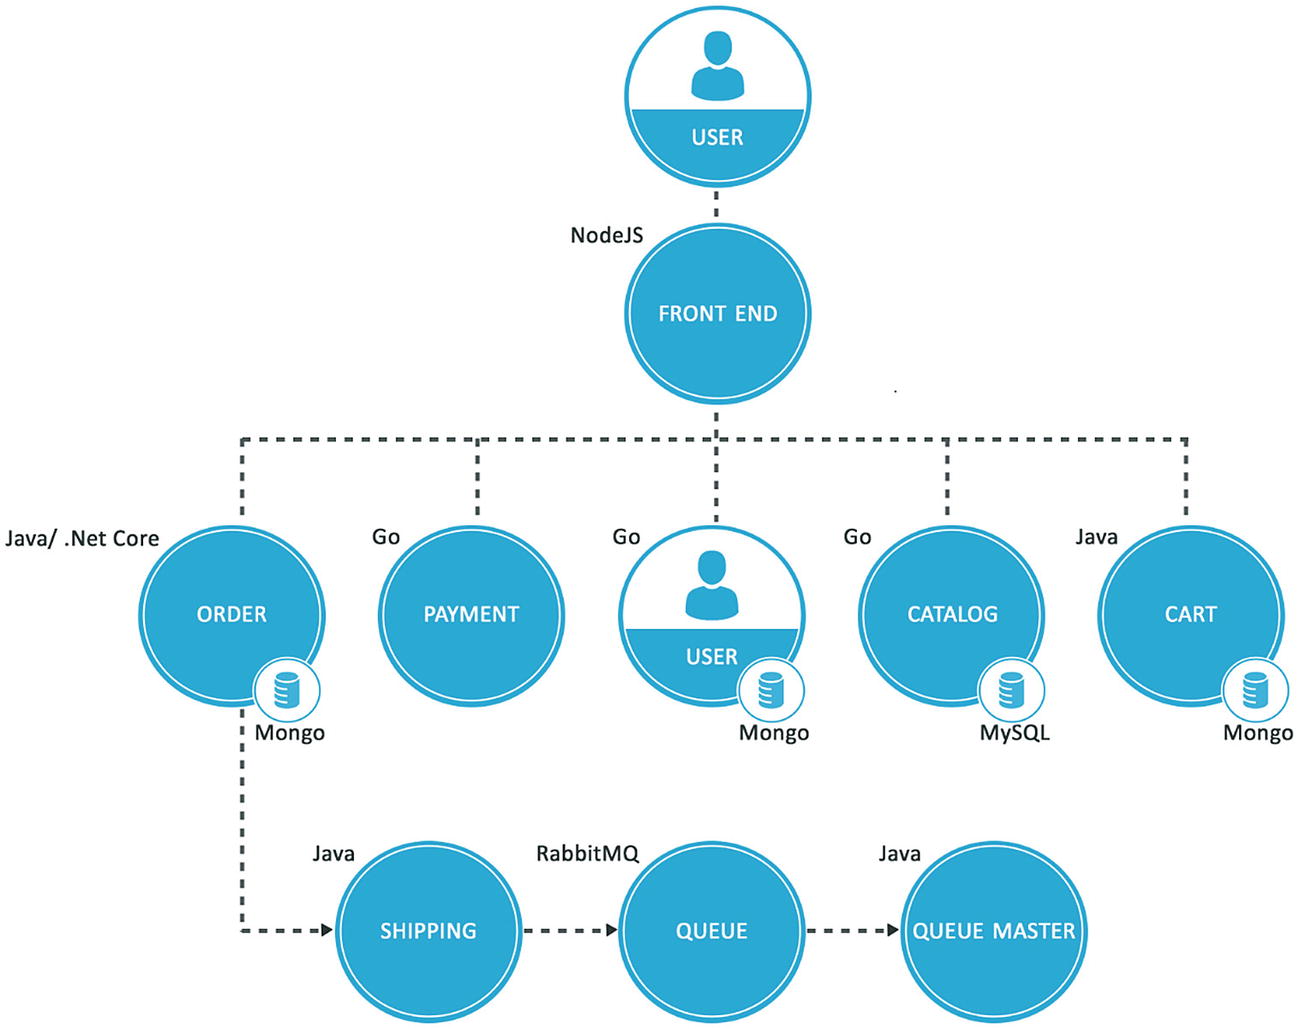
Service selector
NodePort: This is a static port on each node on which a service is exposed that makes it available from outside the cluster.
ClusterIP (default): This exposes the service on an internal IP in the cluster, which makes that service only accessible from within the cluster.
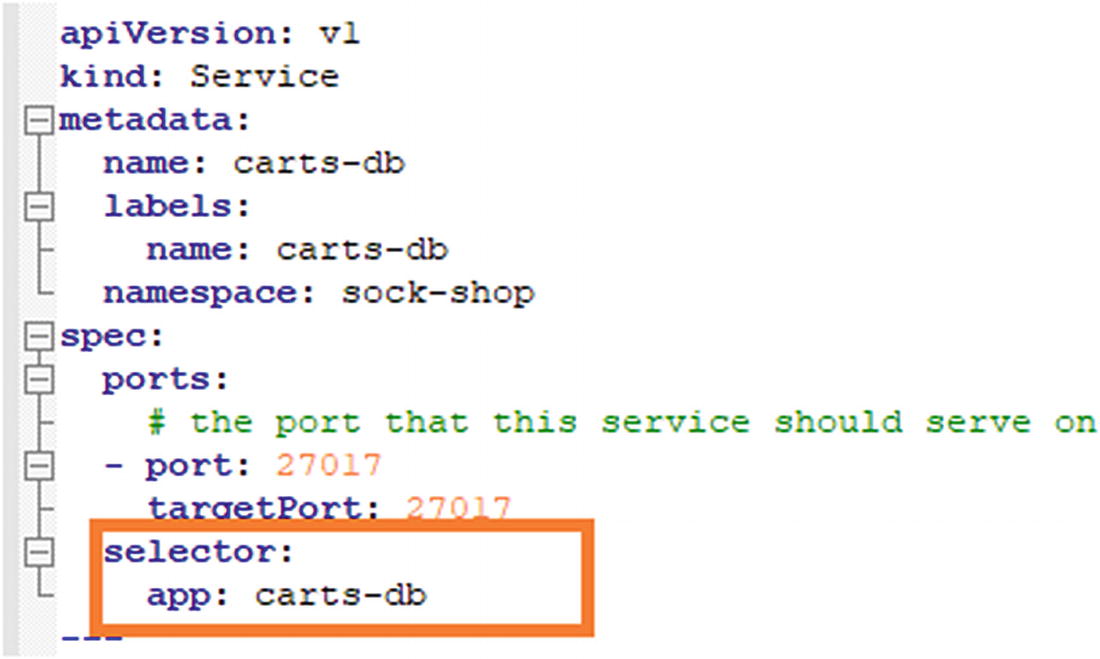
LoadBalancer: This creates external load balancers in the current cloud, in our case, on GCP, and assigns a fixed external IP to the service.
In our Sock Shop application, we are exposing the front-end service as LoadBalancer and defining it as type:LoadBalancer in the complete-demo.yaml file. GKE will deploy an external network load balancer for accessing the sock shop application service using ports mentioned in configuration.
Other services of the Sock Shop application are exposed as internal services with in cluster and are exposed & accessible within the GKE cluster (Figure 5-4).
LoadBalancer front-end service type
Persistence storage database: This stores persistence data in the form of objects. For storing the data for our Sock Shop application, we use MongoDB and MySQL databases, running as a container under Pods and exposed internally in the Kubernetes cluster.
Messaging queue: A messaging queue is an asynchronous service-to-service communication widely used in microservice architectures. The Sock Shop application uses RabbitMQ, which is an open source messaging queue framework running as a container under Pods and also exposed internally in Kubernetes the cluster.
Application Deployment on GKE
Step 1: Open the cloud shell. We will use the same cluster “clustertutorial” that we created in Chapter 4, to deploy an application by using the Google Cloud Shell that comes pre-installed with gcloud, docker, and kubectl command-line tools.
- To open the cloud shell, do the following:
Go to the Google Cloud console.
Click the Active Cloud Shell button at the top of the console window, as shown in Figure 5-5.

Cloud Shell link
A cloud shell session will start, as shown in Figure 5-6.

Cloud Shell session
Step 2: First, we will create the gcptutorialmail folder under the /home directory, then clone the complete-demo.yaml file from GitHub.
Execute the following command to create gcptutorialmail under the /home directory.
Command: mkdir gcptutorialmail
Output: The output of the preceding command should resemble that shown in Figure 5-7.
Step 3: Move into the gcptutorialmail folder by executing the following command.
Command: cd /gcptutorialmail
Output: The following should be the output of the preceding command (Figure 5-8).
Step 4: Now download the code base from Github, by executing the following command.
Command: git clone https://github.com/dryice-devops/GCP.git
Output: The result of the preceding command is shown in Figure 5-9.
Move to the GCP directory and list the code base output, as follows.
Command: cd GCP
ll - List directory
Output: The result of the preceding command is shown in Figure 5-10.

Creating the gcptutorialmail directory

Moving to the gcptutorialmail directory

Downloaded code base

Moving the code base
Step 5: Connect with the GKE cluster clustertutorial by executing the following command.
Command: gcloud container clusters get-credentials clustertutorial --zone us-central1-a --project tutorial-project-268109
Output: The result of the preceding command is shown in Figure 5-11.

Connecting to the clustertutorial cluster
Step 6: Set up the project ID for the gcloud tool.
Command: gcloud config set project tutorial-project-268109
Output: The result of the preceding command is shown in Figure 5-12.

Setting up the project Id
Step 7: Create a namespace with the name sock-shop that will serve as a placeholder for the application deployment.
Command: kubectl create namespace sock-shop
Output: The result of the preceding command is shown in Figure 5-13.

Creating a namespace
Now check the namespace, by using the following command.
Command: kubectl get namespace | grep sock-shop
Output: The result of the preceding command is shown in Figure 5-14

List namespace
Now check the cluster list, using the following command.
Command: gcloud container clusters list IP
Output: The result of the preceding command is shown in Figure 5-15.

List Cluster
Now, before deploying the application, the first requirement is to set up the credential, zone, and project for the container. To do this, use the following command.
Command: gcloud container clusters get-credentials clustertutorial --zone us- central1-a --project tutorial-project-268109
Output: The result of the preceding command is shown in Figure 5-16.

Getting a credential
Step 8: Deploy the application. In Kubernetes, Pods are the smallest unit, and an application is represented as Pods. Pods are units that also represent a container. The deployment manages multiple copies of your application, called replicas, and schedules them to run on individual nodes in your cluster. In our case, deployment is performed using the complete-demo.yaml configuration file that contains details of the deployment. We will be running only one Pod of the application.
complete-demo.yaml: A Brief Explanation
apiVersion: Defines the apiVersion of Kubernetes to interact with the Kubernetes API server. When creating an object, apiVersion will differ according to the Kubernetes version.
kind: Defines the types of the Kubernetes object, e.g., ClusterRole, Deployment, Service, Pods, etc. For our application, kind is defined as Deployment and Service.
metadata: Defines an object, e.g., carts-db
namespace: Defines the namespace name that the Kubernetes object will create, e.g., sock-shop
replicas: Replicates a Pod
selector: Allows the client/user to identify a set of objects
template: Definitions of objects to be replicated—objects that might, in other circumstances, be created on their own
containers: Defines the characteristics of a container
Name: The name of the container
Image: Specifies what Docker image will be used to create the container.
Ports: The port on which the Docker container runs
env: Variable used by the Docker image to run the container
securityContext: The securityContext field is a SecurityContext object.
volumeMounts: This is the path in the container along which mounting will take place.
volume: This defines the volume definition that we are going to use.
Step 9: Run the following command to deploy the application.
Command: kubectl apply –f complete-demo.yaml
Output: The result of the preceding command is shown in Figure 5-17.
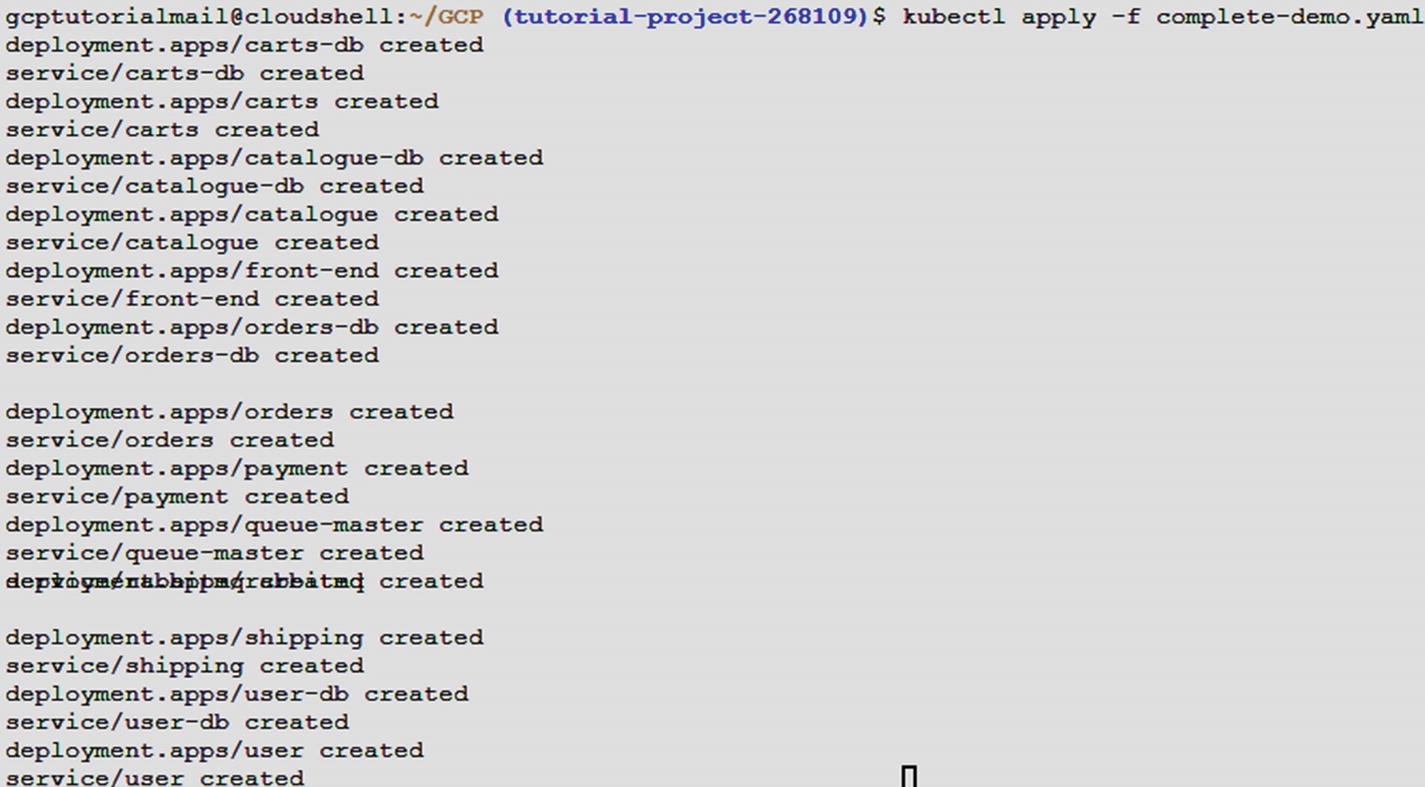
Output of the command to deploy the application

YAML code snippet
Step 10: Validate the deployment by running the following command.
Command: kubectl get services –n sock-shop
Output: The result of the preceding command is shown in Figure 5-19.

List app deployment
Step 10: Once the external IP address of the application has been determined, copy the IP address. Point the browser to a URL (such as http://35.188.192.249), to check if your application is accessible (Figure 5-20).
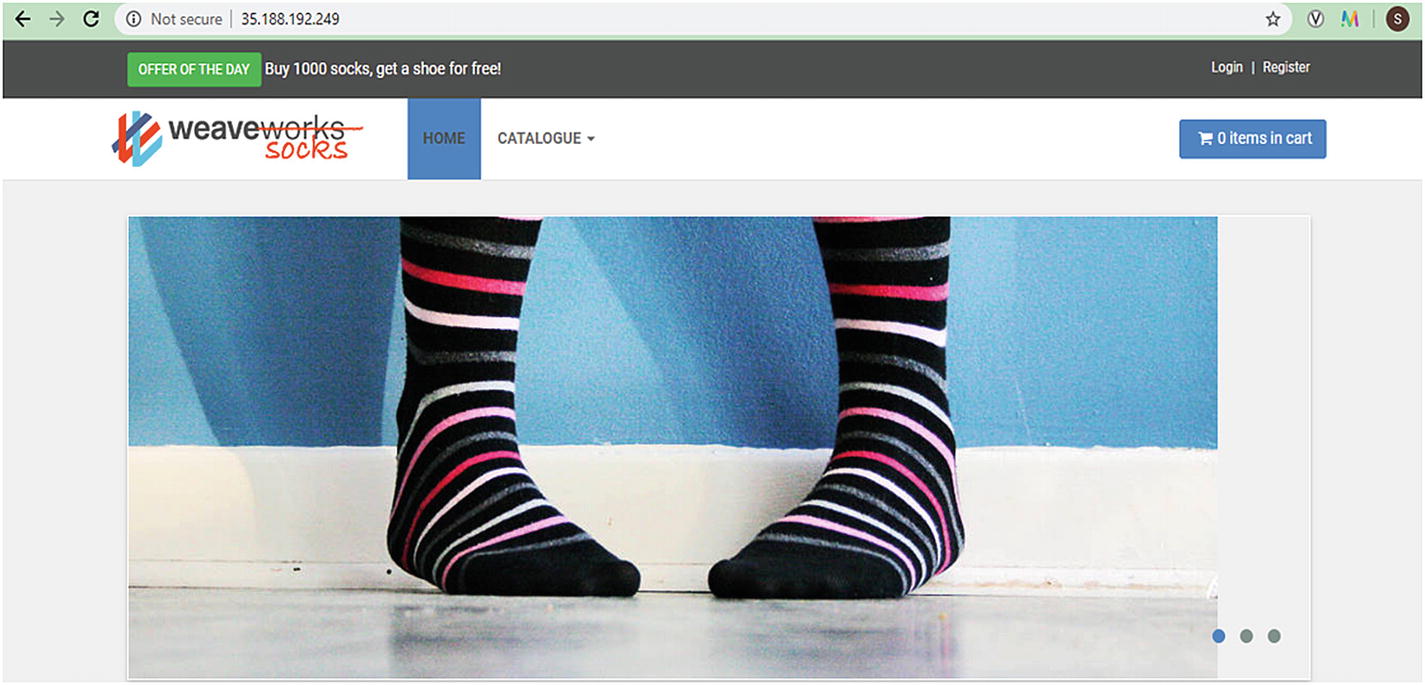
Deployed application
Deleting the Cluster
Step 1: Click Kubernetes Engine ➤ Clusters, on the Kubernetes console page, as shown in Figure 5-21.

Creating a list
Step 2: Clusters will list the cluster created, as shown in Figure 5-22.
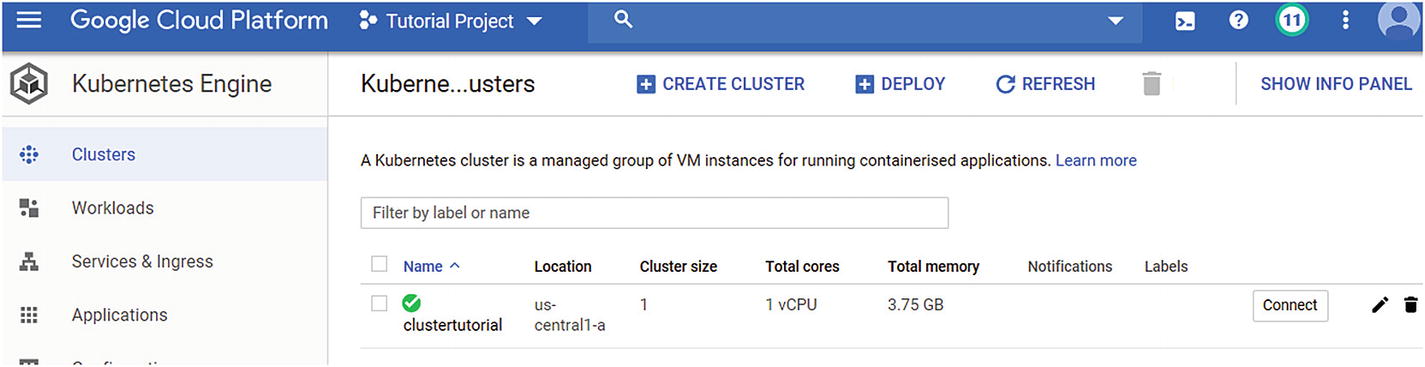
Creating the list view
Step 3: Click the cluster selection and press the delete icon at the end of the row. Wait, as it will take some time to delete the cluster (Figure 5-23).
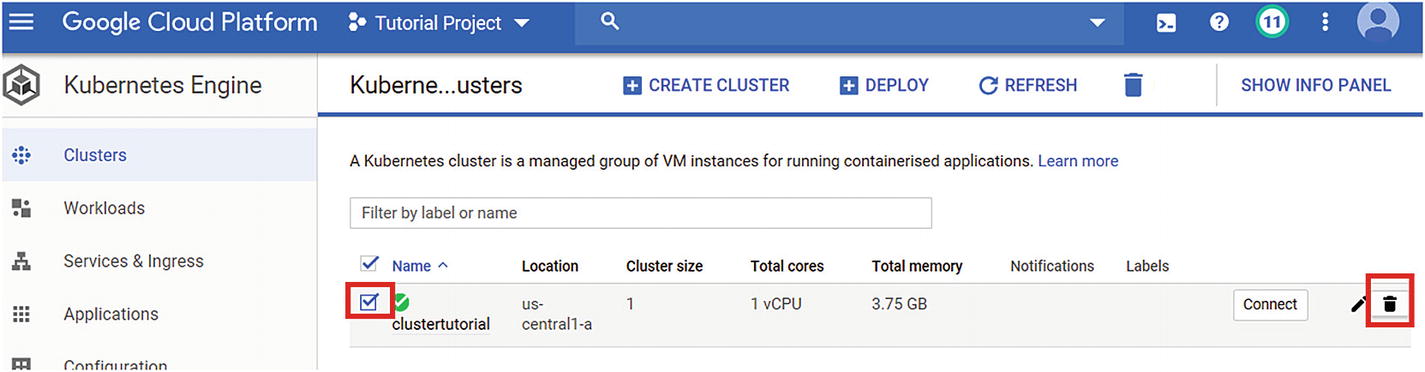
Creating the deletion
As stated, it will take some time to delete the cluster and related components, in addition to the application.
Summary
In this chapter, you have learned how to deploy a microservice application on the GKE cluster and to perform a clean-up activity by deleting the cluster. In the next chapter, we will cover security controls provided by GCP specific to GKE.