
Introduction
How will users use QuarkuShop?
How will user access to the application be controlled?
Can we handle unauthorized access? Do we know which ones to admit and which ones to reject?
How is the consumption of CPU and memory resources measured and tracked?
What will happen if the application runs out of resources?
The Security Layer: All the authentication and authorization parts.
The Monitoring Layer: All the metrics, I.e., the measurement and tracking components.
Implementing the Security Layer
Security! One of the most painful topics for developers, ![]() but it’s probably the most critical subject in any enterprise application. Security has been always a very challenging subject in IT: technology and frameworks keep evolving and hackers are evolving more and more.
but it’s probably the most critical subject in any enterprise application. Security has been always a very challenging subject in IT: technology and frameworks keep evolving and hackers are evolving more and more. ![]()
For this QuarkuShop, we will use the dedicated Quarkus components and the recommended practices and design choices. This chapter discusses how to implement a typical authentication and authorization engine.
![]() I reference the authentication and authorization process as auth2.
I reference the authentication and authorization process as auth2.
Analyzing Security Requirements and Needs
Before writing any code, we start by creating the design, using UML diagrams for example. The same is true for the security layer; we need to create the design before implementing the code. But which design? The code is there. What will we be designing?
The full QuarkuShop features have been implemented, but there is a lot to be designed.
Built the house, which is the same as writing the source code.
Validated the conformity of the building with the plans, which is the same as writing tests.
Connected the house to the electricity, water, and sewerage networks, which is the same as configuring access to databases, SonarCloud, etc.
Got the furniture and decorated the house, which is the same as creating the CI/CD pipelines.
The house is now ready and the owners want to have a security system. We start by checking the windows and doors to locate possible access points, which is where we place the locks. Only key holders can enter, depending on the person, and the owner will allocate the keys. For example, only the driver will have the car garage key. The gardener will have two keys: one to the external door and one to the garden shed, where the tools are stored. The family members living in the house will have all the keys without exceptions.
We will have also cameras and sensors to monitor and audit access to the house. When we suspect illegal access to the house, we can check the cameras and see what happened.
- 1.
We analyze and locate all the access points to our application. This process is called attack surface analysis.
Attack surface analysis helps you:
Identify which functions and parts of the system you need to review/test for security vulnerabilities.
Identify high-risk areas of code that require defense-in-depth protection; what parts of the system that you need to defend.
Identify when you have changed the attack surface and need to do some kind of threat assessment.
—OWASP Cheat Sheet Series https://cheatsheetseries.owasp.org/cheatsheets/Attack_Surface_Analysis_Cheat_Sheet.html
- 2.
We will put locks on these access points. These locks are part of the authentication process.
Authentication is the process of verifying that an individual, entity, or website is whom it claims to be. Authentication in the context of web applications is commonly performed by submitting a username or ID and one or more items of private information that only a given user should know.
—OWASP Cheat Sheet Series https://cheatsheetseries.owasp.org/cheatsheets/Authentication_Cheat_Sheet.html
- 3.
We will define an access control mechanism to be sure that only the allowed person can access a given “door”. This process is called authorization.
Authorization is the process where requests to access a particular resource should be granted or denied. It should be noted that authorization is not equivalent to authentication - as these terms and their definitions are frequently confused. Authentication is providing and validating identity. The authorization includes the execution rules that determine which functionality and data the user (or Principal) may access, ensuring the proper allocation of access rights after authentication is successful.
—OWASP Cheat Sheet Series https://cheatsheetseries.owasp.org/cheatsheets/Access_Control_Cheat_Sheet.html
QuarkuShop is a Java Enterprise application that exposes REST APIs, which is the only communication channel with the application users.
Visitor or Anonymous: An unauthenticated customer
User: An authenticated customer
Admin: The application superuser
The next step is to define which user category is allowed to access each REST API service. This can be done using the authorization matrix.
Defining Authorization Matrices for REST APIs
Operation | Anonymous | User | Admin |
|---|---|---|---|
Get All Carts |
|
|
|
Get Active Carts |
|
|
|
Get Carts by Customer ID |
|
|
|
Create a New Cart for a Given Customer |
|
|
|
Get a Cart by ID |
|
|
|
Delete a Cart by ID |
|
|
|
Operation | Anonymous | User | Admin |
|---|---|---|---|
List All Categories |
|
|
|
Create New Category |
|
|
|
Get Category by ID |
|
|
|
Delete Category by ID |
|
|
|
Get Products by Category ID |
|
|
|
Operation | Anonymous | User | Admin |
|---|---|---|---|
Get All Customers |
|
|
|
Create a New Customer |
|
|
|
Get Active Customers |
|
|
|
Get Inactive Customers |
|
|
|
Get Customer by ID |
|
|
|
Delete Customer by ID |
|
|
|
Operation | Anonymous | User | Admin |
|---|---|---|---|
Get All Orders |
|
|
|
Create a New Order |
|
|
|
Get Orders by Customer ID |
|
|
|
Check if There Is an Order for a Given ID |
|
|
|
Get Order by ID |
|
|
|
Delete Order by ID |
|
|
|
Operation | Anonymous | User | Admin |
|---|---|---|---|
Create a New Order-Item |
|
|
|
Get Order-Items by Order ID |
|
|
|
Get Order-Item by ID |
|
|
|
Delete Order-Item by ID |
|
|
|
Operation | Anonymous | User | Admin |
|---|---|---|---|
Get All Payments |
|
|
|
Create a New Payment |
|
|
|
Get Payments for Amounts Inferior or Equal a Limit |
|
|
|
Get a Payment by ID |
|
|
|
Delete a Payment by ID |
|
|
|
Operation | Anonymous | User | Admin |
|---|---|---|---|
Get All Products |
|
|
|
Create a New Product |
|
|
|
Get Products by Category ID |
|
|
|
Count All Products |
|
|
|
Count Products by Category ID |
|
|
|
Get a Product by ID |
|
|
|
Delete a Product by ID |
|
|
|
Operation | Anonymous | User | Admin |
|---|---|---|---|
Get Reviews by Product ID |
|
|
|
Create a New Review by Product ID |
|
|
|
Get a Review by ID |
|
|
|
Delete a Review by ID |
|
|
|
Implementing the Security Layer
We will use dedicated Identity storage to handle the QuarkuShop users' credentials. We use Keycloak for this purpose.

Users authenticate with Keycloak rather than with individual applications. This means that your applications don’t have to deal with login forms, authenticating users, and storing users. Once logged-in to Keycloak, users don’t have to log in again to access a different application. This also applied to logout.
Keycloak provides single-sign out, which means users only have to log out once to be logged out of all applications that use Keycloak.
Keycloak is based on standard protocols and provides support for OpenID Connect, OAuth 2.0, and SAML.
If role-based authorization doesn’t cover your needs, Keycloak provides fine-grained authorization services as well. This allows you to manage permissions for all your services from the Keycloak admin console and gives you the power to define exactly the policies you need.
- 1.
Preparing and configuring Keycloak.
- 2.
Implementing the auth2 Java components in QuarkuShop.
- 3.
Updating the integration tests to support auth2.
- 4.
Adding Keycloak to our Production environment.
Preparing and Configuring Keycloak
The first step in Security implementation is to have a Keycloak instance. This section discusses creating and configuring Keycloak step-by-step.
![]() In many tutorials, there are prepared configurations that can be imported to Keycloak to get started easily. You will not be doing this here. You will be going step by step to perform all the needed configuration. This is the best way to learn: learning by doing.
In many tutorials, there are prepared configurations that can be imported to Keycloak to get started easily. You will not be doing this here. You will be going step by step to perform all the needed configuration. This is the best way to learn: learning by doing.
① By default, there is no admin user created, so you won’t be able to log in to the admin console. To create an admin account, you need to use environment variables to pass in an initial username and password.
② Use H2 as the Keycloak database.
③ List the exposed ports.
④ This is based on Keycloak 11.0.0.
Open http://localhost:9080 to access the welcome page:

Next, click Administration Console to authenticate to the console. Use the admin credentials for the username and password:

Next, you need to create a new realm . Start by clicking Add Realm:
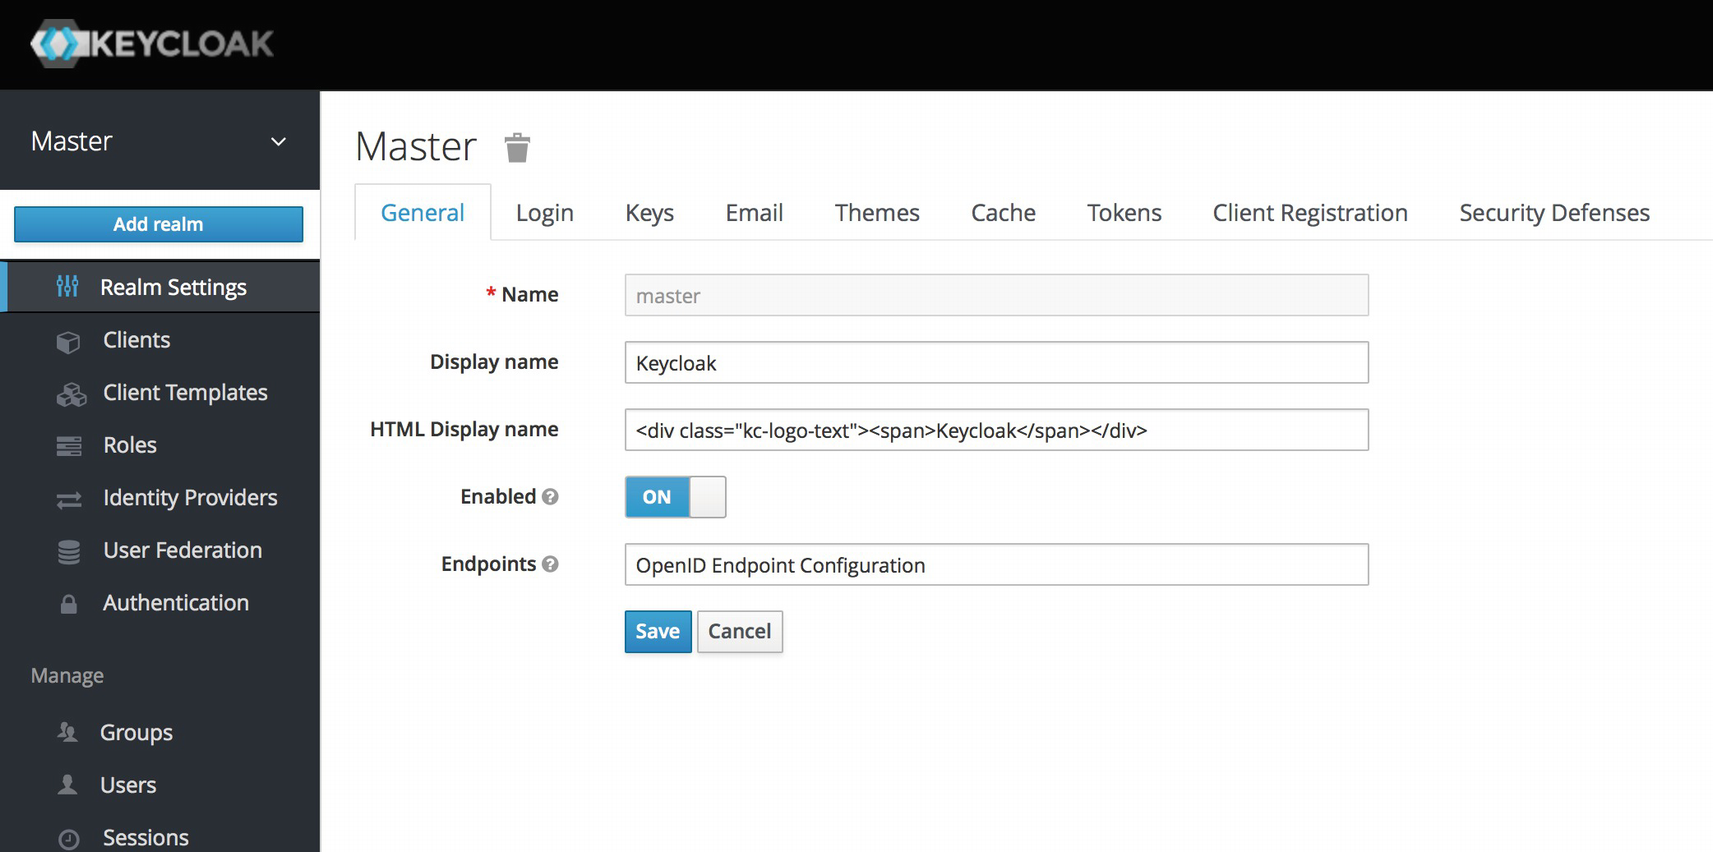
A realm is the core concept in Keycloak. A realm manages a set of users, credentials, roles, and groups. A user belongs to and logs in to a realm. Realms are isolated from one another and can only manage and authenticate the users that they control.
When you boot up Keycloak for the first time, it creates a predefined realm for you. This initial realm is the master realm. It is the highest level in the hierarchy of realms. Admin accounts in this realm have permissions to view and manage any other realm created on the server instance. When you define your initial admin account, you create an account in the master realm. Your initial login to the admin console will also be via the master realm.
You will land next on the first step of creating a new realm. Call the realm quarkushop-realm then click Create:
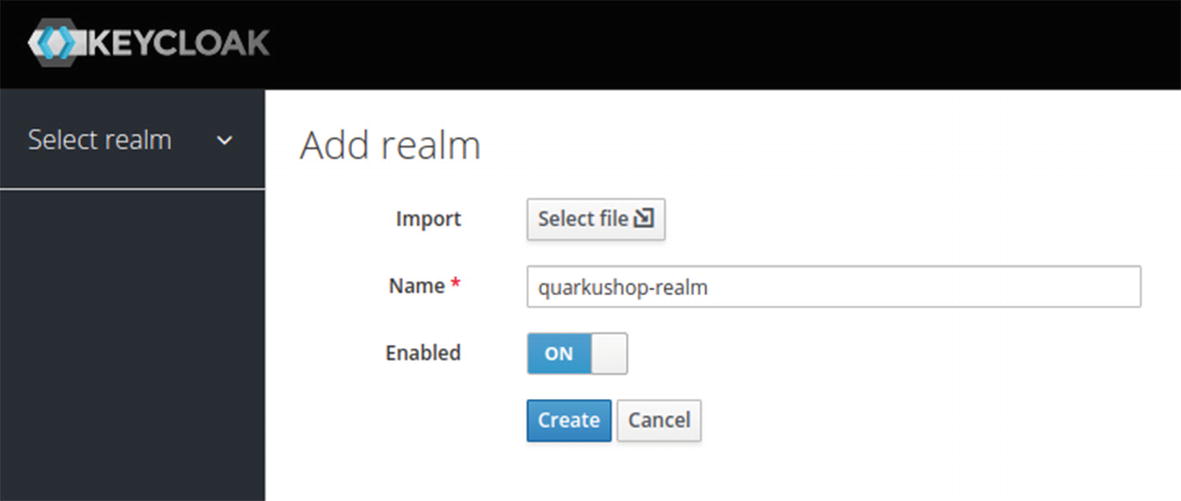
Next, you will get the quarkushop-realm configuration page:

In the quarkushop-realm, you need to define the roles that you will be using: the user and admin roles. To do this, simply go to Roles ➤Add Role:

Now you can create the admin role :

Create the user role as well:

Now that you have created the roles, you need to create the users. Just go to the Users menu:
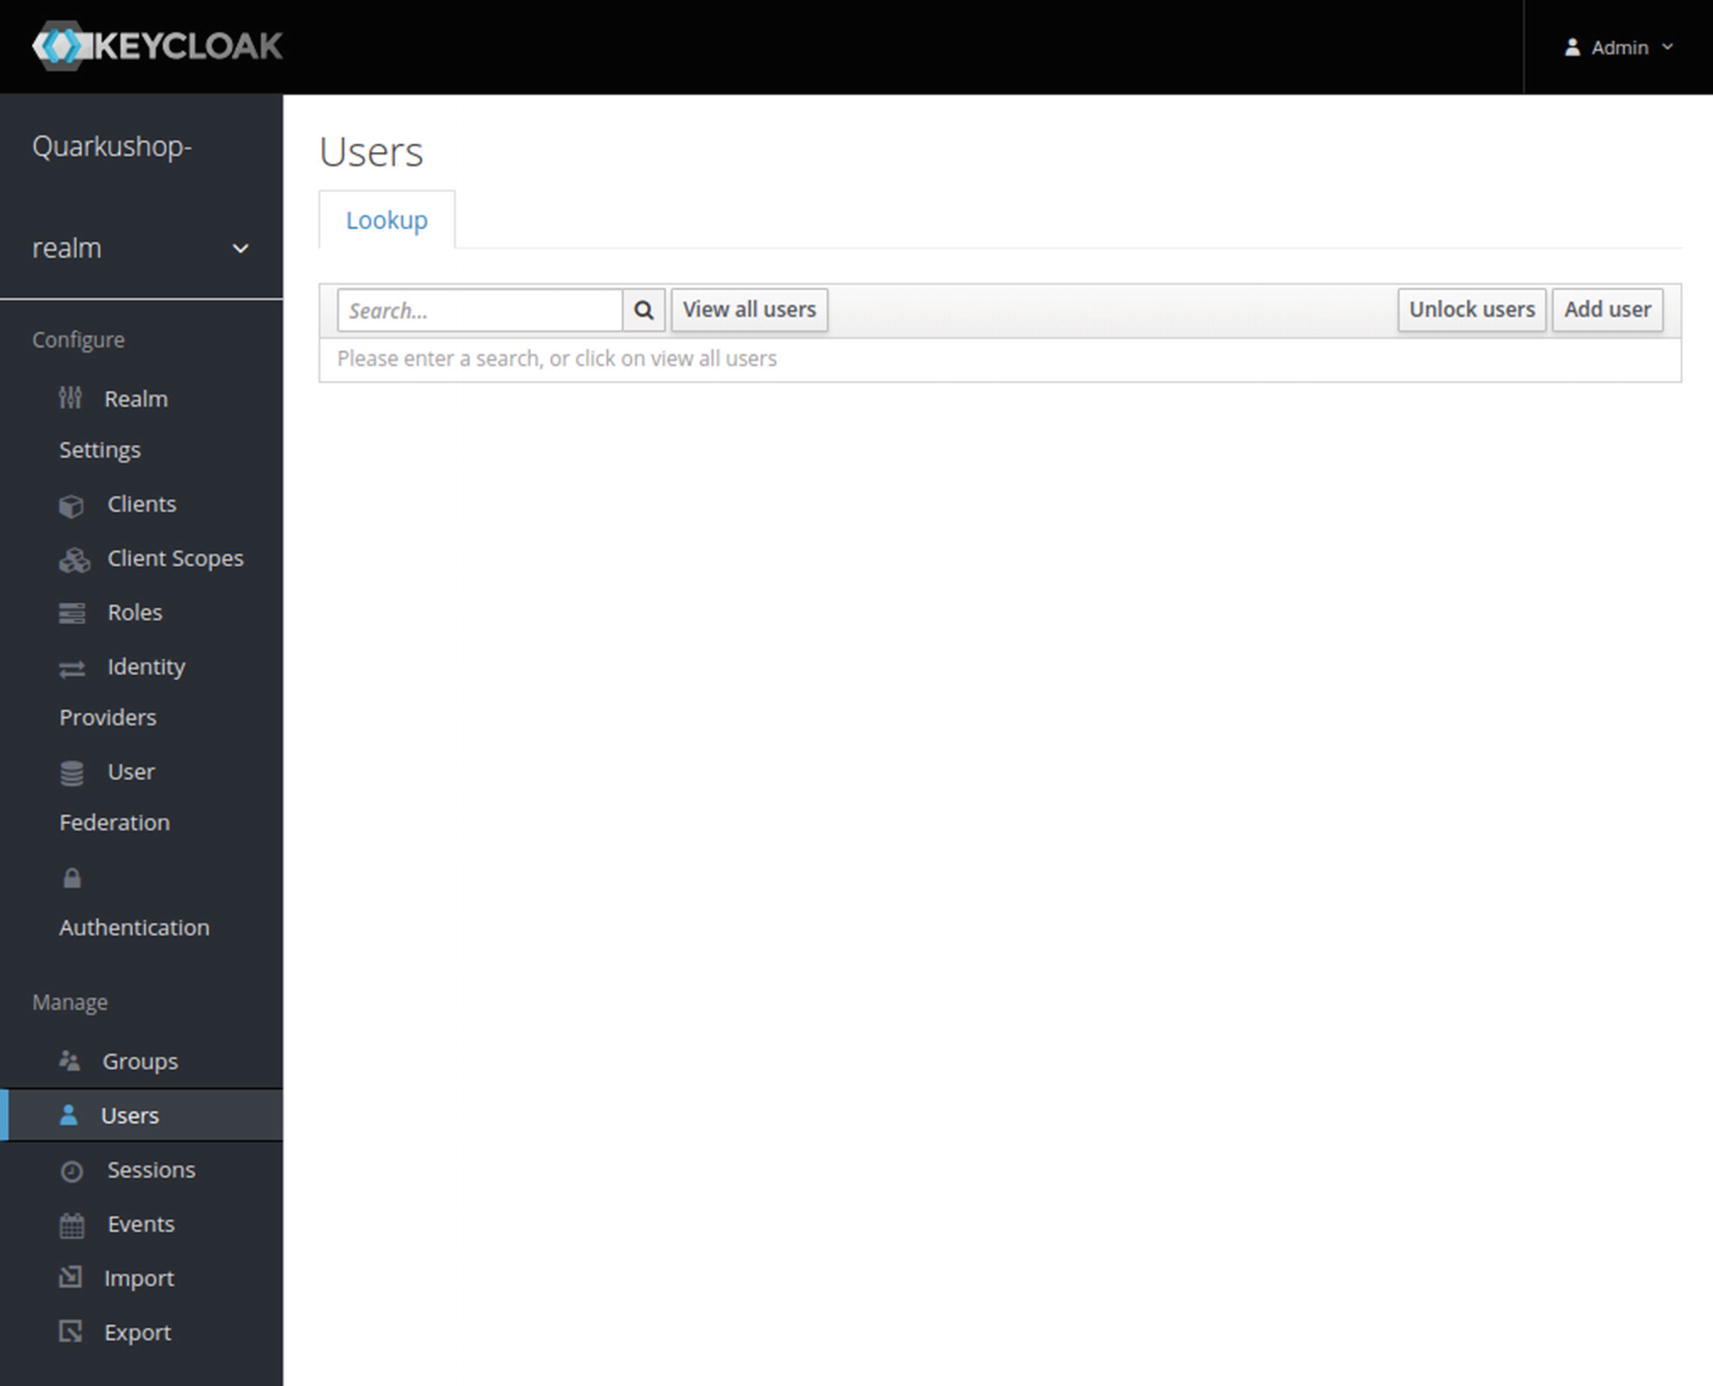
![]() Sometimes on this screen, the list of users isn’t loaded when you open the page. If this happens, just click View All Users to load the list.
Sometimes on this screen, the list of users isn’t loaded when you open the page. If this happens, just click View All Users to load the list.
Click Add User to create the users (for this example, Nebrass, Jason, and Marie):

Then after clicking Save, click the Credentials tab, where you will define the user passwords.
![]() Don’t forget to set the Temporary to OFF to prevent Keycloak from asking you to update the password on the first login. Then, click Set Password:
Don’t forget to set the Temporary to OFF to prevent Keycloak from asking you to update the password on the first login. Then, click Set Password:

Next, go to the Role Mappings tab and add all the roles to Nebrass. ![]() Yes! I’ll be the admin of this app.
Yes! I’ll be the admin of this app. ![]()

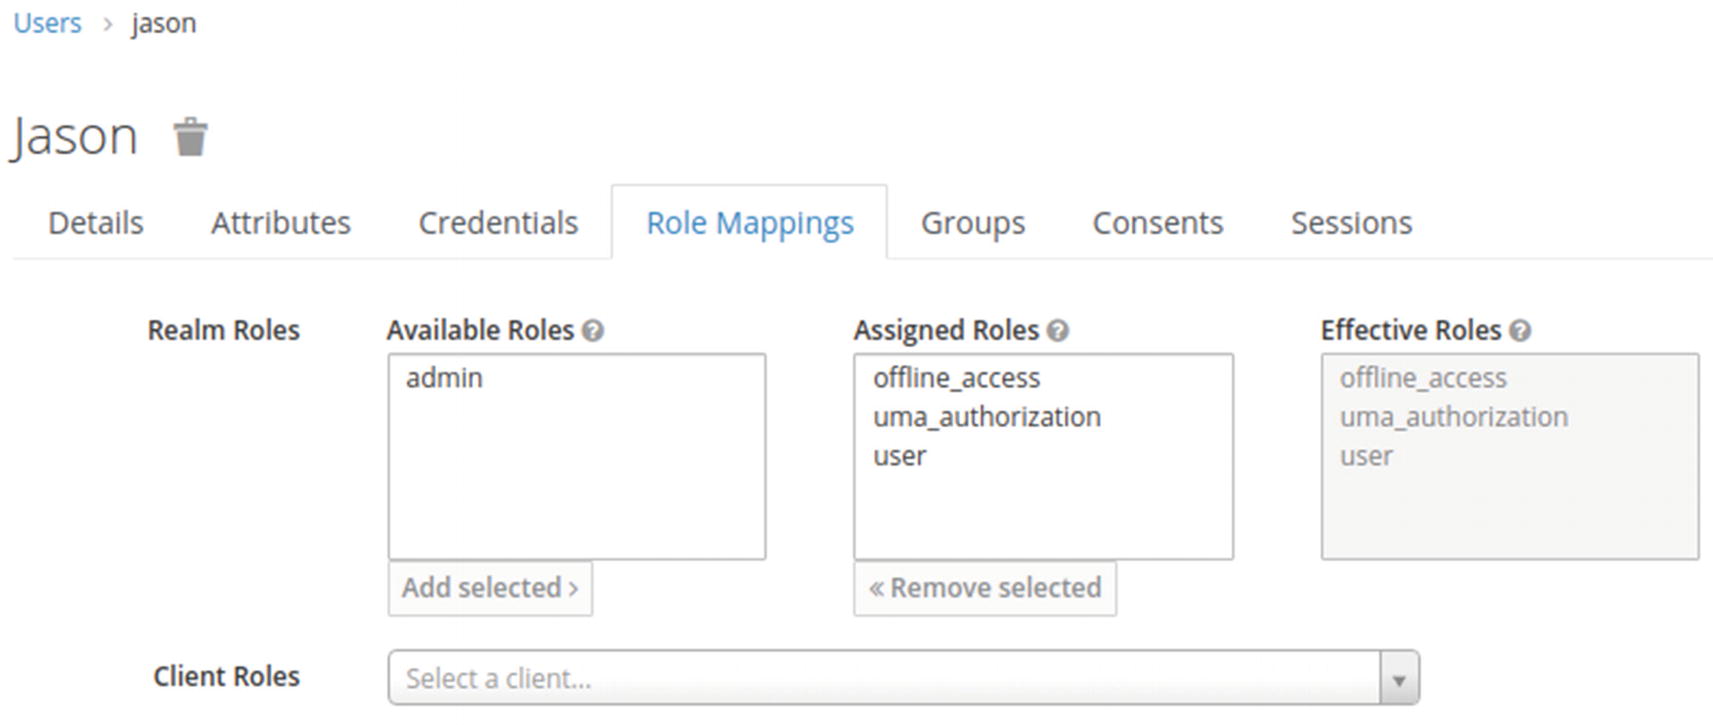
Now create the Jason user and define a password:

Add the user role to Jason:
Next, create the Marie user and define a password:

Add the user role to Marie:

You are finished configuring roles and users! Now, click Clients to list the realm clients.

Clients are entities that can request Keycloak to authenticate a user. Most often, clients are applications and services that want to use Keycloak to secure themselves and provide a single sign-on solution. Clients can also be entities that just want to request identity information or an access token so that they can securely invoke other services on the network that are secured by Keycloak.
Click Create to add a new client with the following settings:
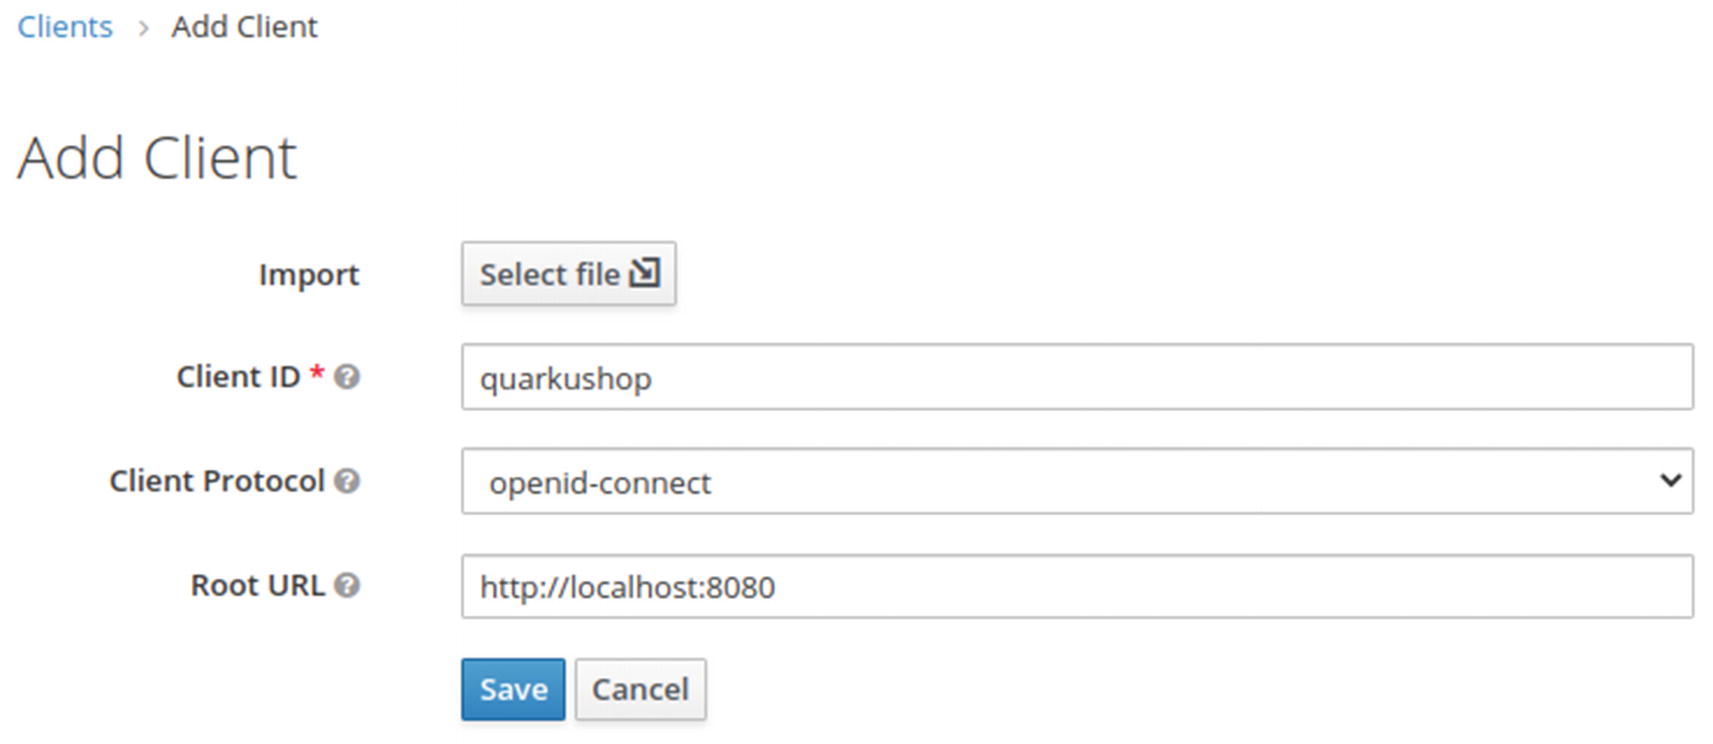
Client ID: quarkushop
Client protocol: openid-connect
Root URL: http://localhost:8080/
Click Save to get the client configuration screen:

It’s mandatory to define a protocol mapper for your client.
Protocol mappers perform transformations on tokens and documents. They can do things like map user data to protocol claims and transform any requests going between the client and auth server.
Click the Mappers tab to configure a mapper:
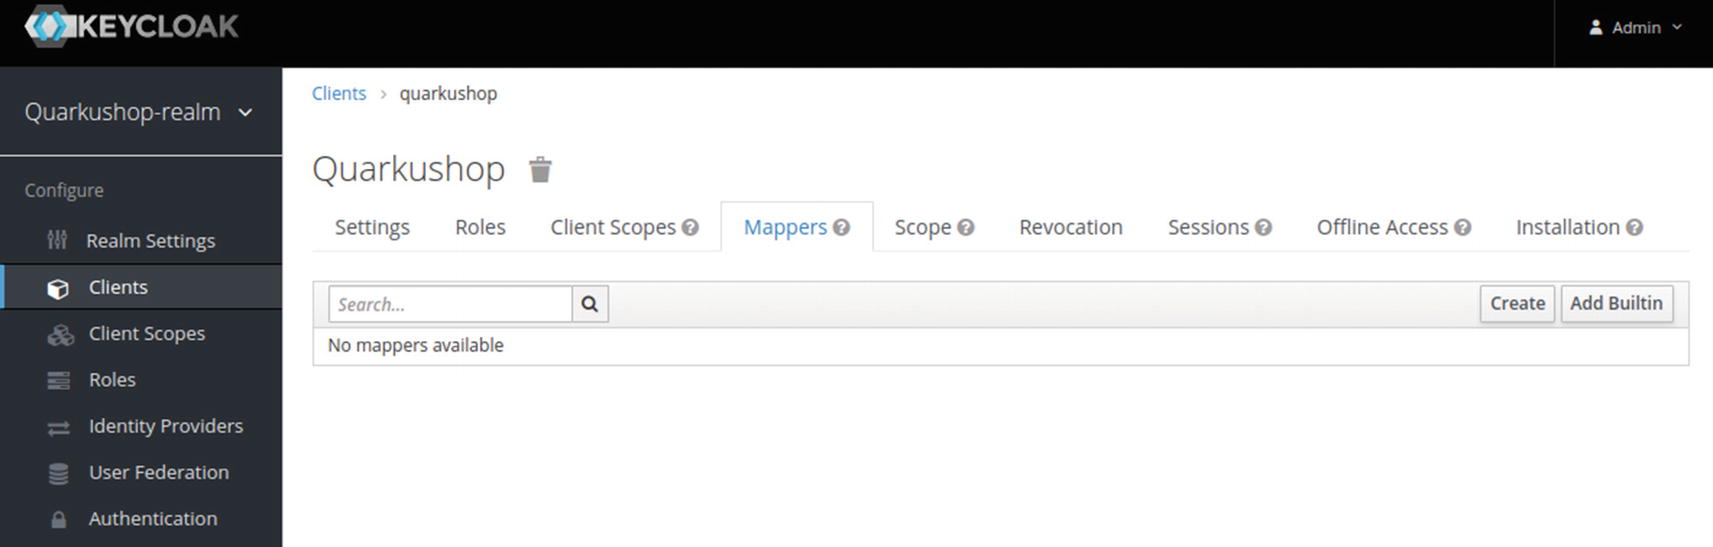
Then click Create to add a new mapper:
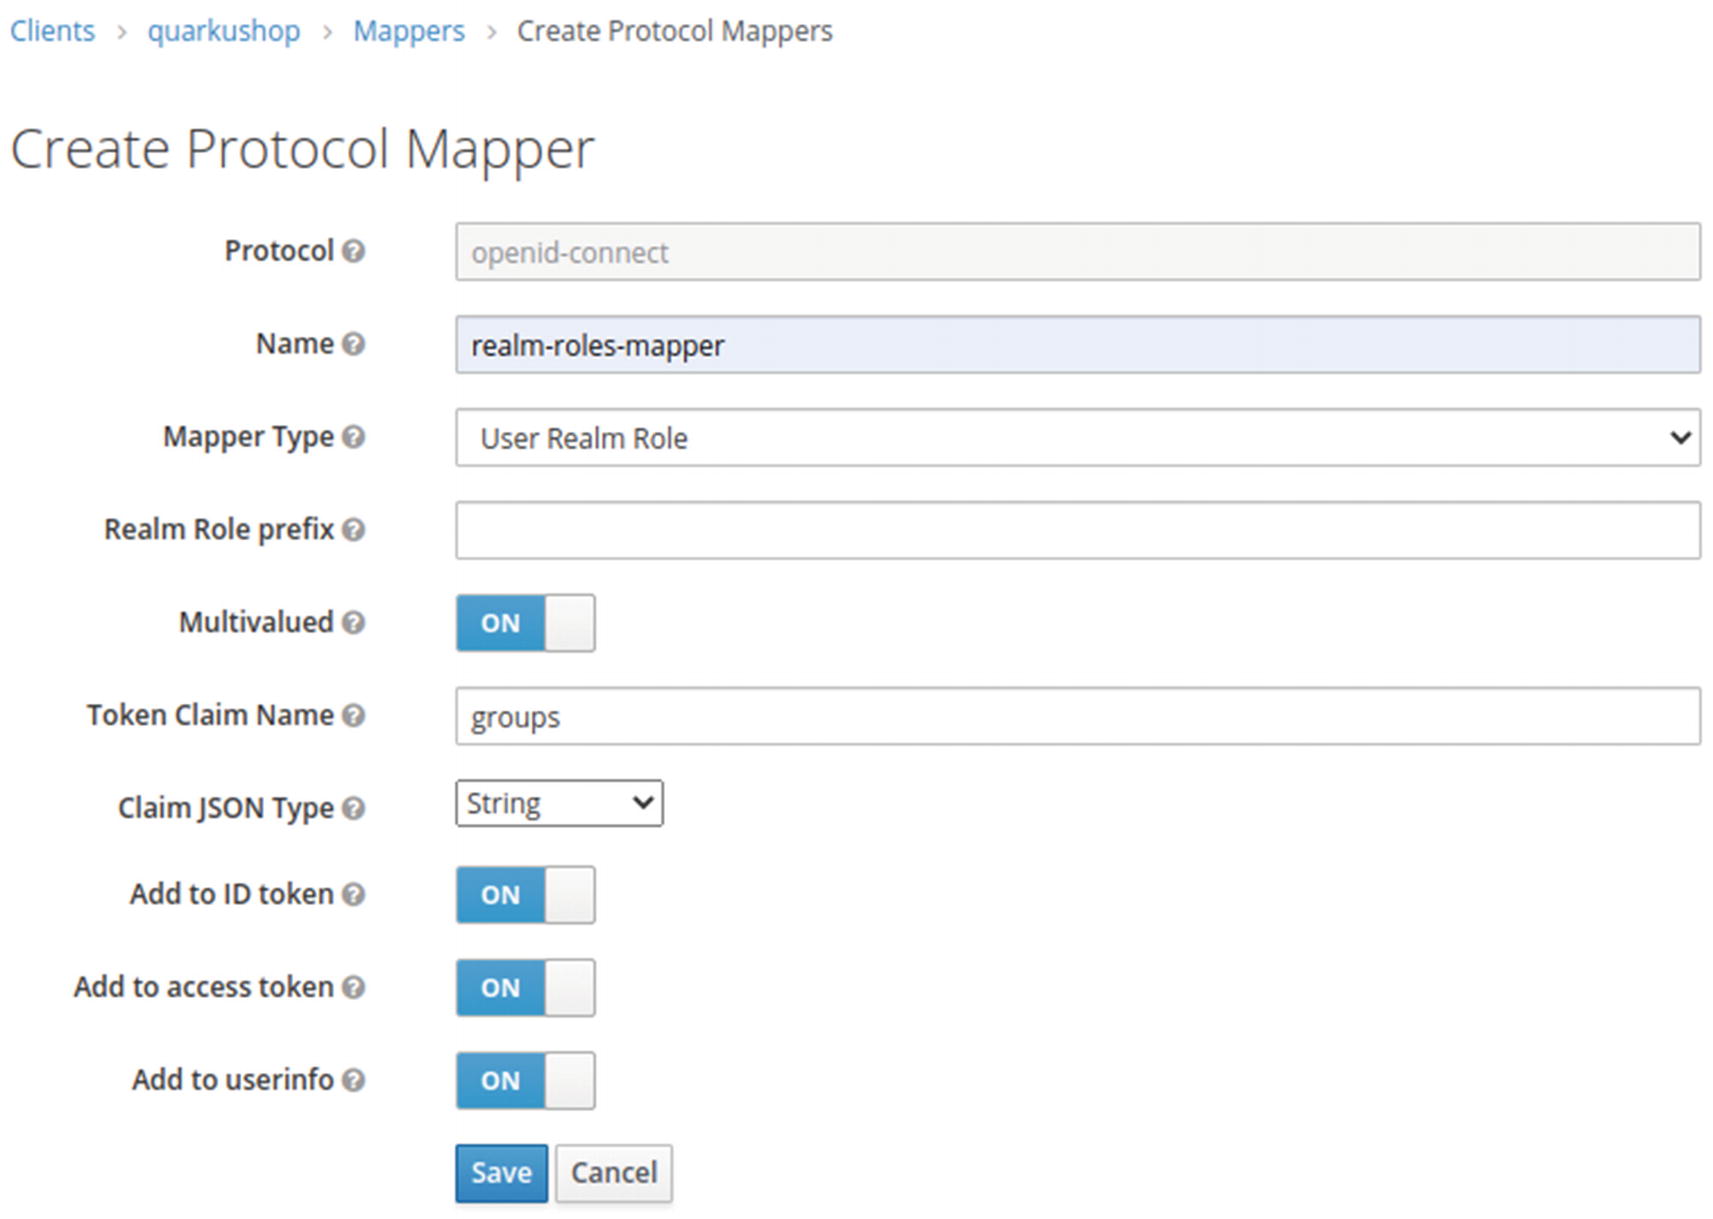
![]() Why Do We Define Token Claim Name as Groups?
Why Do We Define Token Claim Name as Groups?
We will use the protocol mapper to map the User Realm role (which can be user or admin) to a property called groups, which we will add as a plain string to the ID token, the access token, and the userinfo.
This is why we defined our mapper to affect the User roles to the Groups property embedded in the JWT token. ![]()
![]() The URL http://localhost:9080/auth/realms/quarkushop-realm/protocol/openid-connect/token is composed of:
The URL http://localhost:9080/auth/realms/quarkushop-realm/protocol/openid-connect/token is composed of:

![]() The jq is a lightweight and flexible command-line JSON processor that I’m using to format the JSON output.
The jq is a lightweight and flexible command-line JSON processor that I’m using to format the JSON output.
![]() For prettier output, I omitted the value of refresh_token, as it’s very long and useless.
For prettier output, I omitted the value of refresh_token, as it’s very long and useless.
Copy the access_token value. Then go to jwt.io and paste the JWT access_token there to decode it:
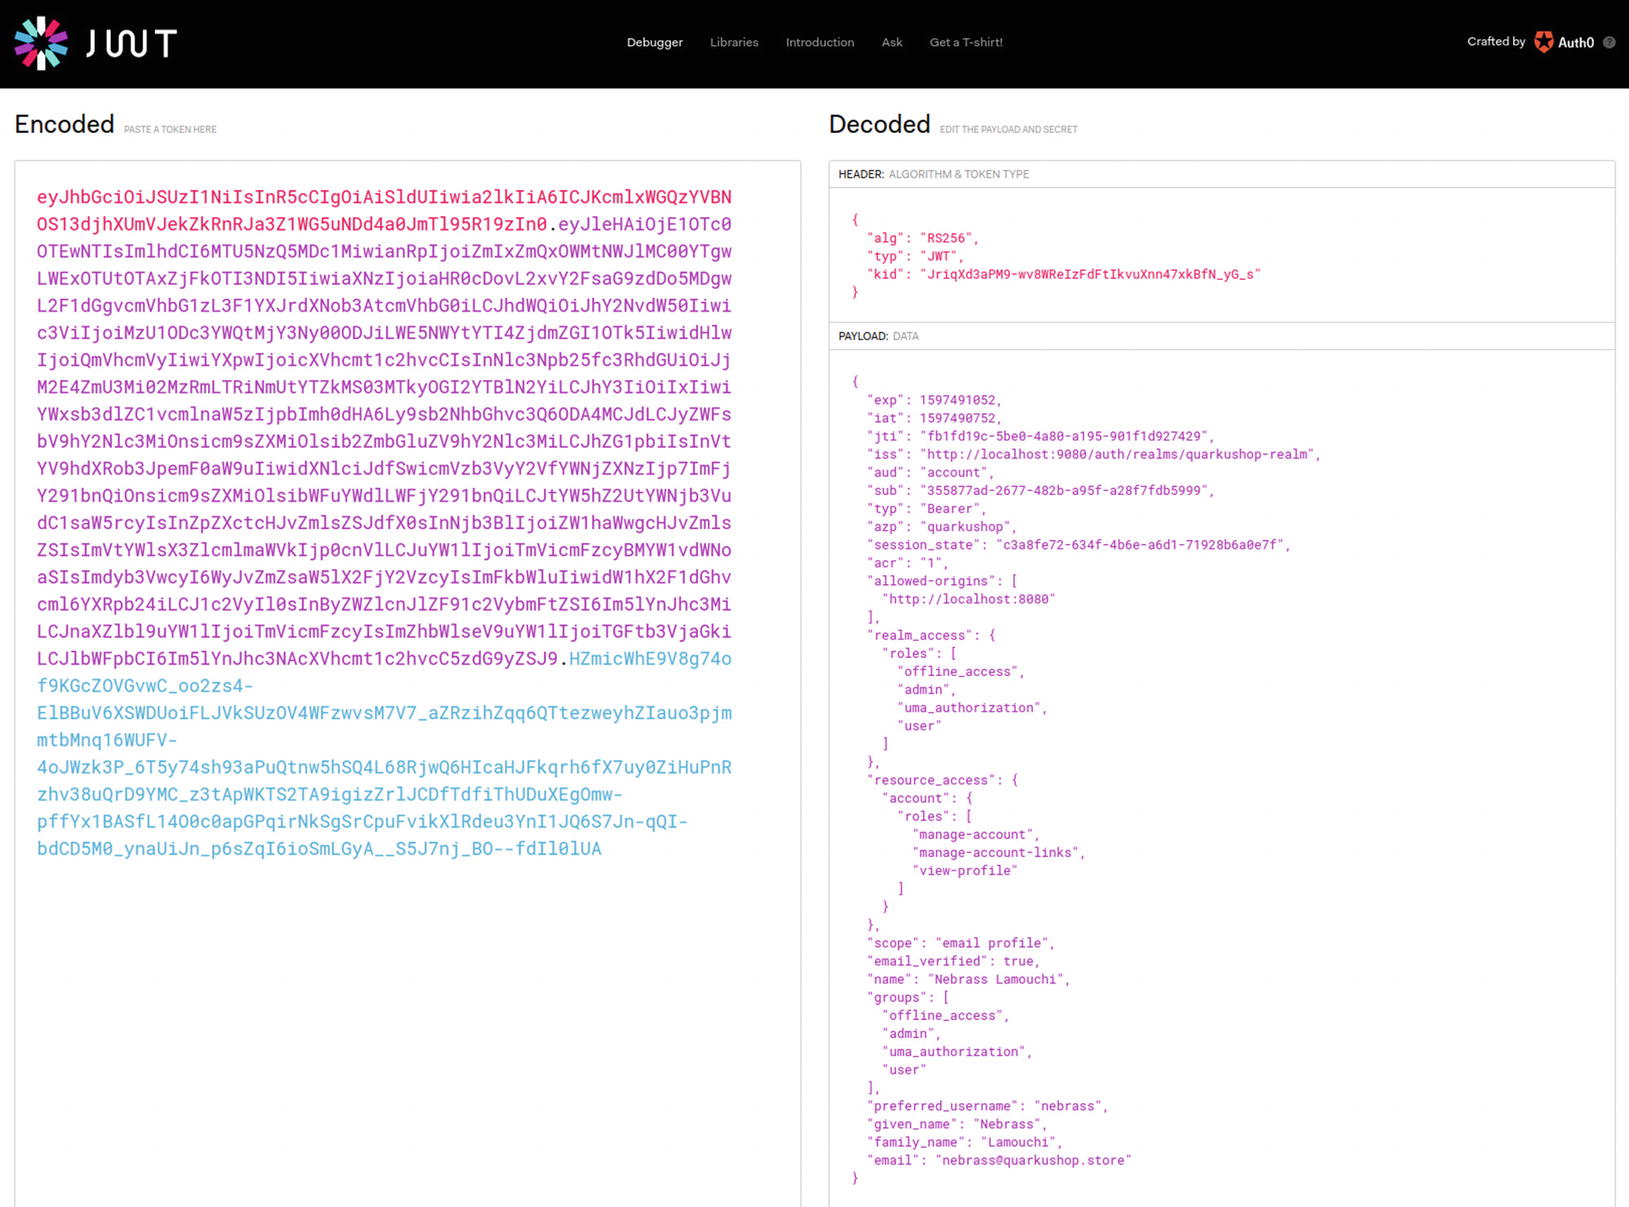
Note that there is a JSON attribute called groups that holds the Roles array that we assigned to Nebrass in Keycloak.
Good! ![]() Keycloak is running and working like expected. You’ll now begin implementing security on the Java side.
Keycloak is running and working like expected. You’ll now begin implementing security on the Java side.
Implementing the auth2 Java Components in QuarkuShop
Java Configuration Side
① Enables the HTTP CORS filter.
Cross-Origin Resource Sharing (CORS) is a mechanism that allows restricted resources on a web page to be requested from another domain outside the domain from which the first resource was served.
② Config property specifies the value of the iss (issuer) claim of the JWT token that the server will accept as valid. We already got this value in the iss field of the decrypted JWT token.
③ Config property allows for an external or internal location of the public key to be specified. The value may be a relative path or an URL. When using Keycloak as the identity manager, the value will be the mp.jwt.verify.issuer plus /protocol/openid-connect/certs.
④ A custom property with a key called keycloak.credentials.client-id, which holds the value quarkushop, which is the Realm client ID.
Java Source Code Side
In the Java code, you need to protect the REST APIs based on the authorization matrix that we created for each service.
Let’s begin with the Carts REST API, where all operations are allowed for users and admins. Only the authenticated subjects are allowed on the Carts REST API. To satisfy this requirement, we have an @Authenticated annotation from the io.quarkus.security package, which will grant access only to authenticated subjects.
![]() To differentiate between an application user and the role user, I will refer to an application user as a subject. The term subject came in the old good Java Authentication and Authorization Service (JAAS) to represent the caller that is making a request to access a resource. A subject may be any entity, including as a person or service.
To differentiate between an application user and the role user, I will refer to an application user as a subject. The term subject came in the old good Java Authentication and Authorization Service (JAAS) to represent the caller that is making a request to access a resource. A subject may be any entity, including as a person or service.
com.targa.labs.quarkushop.web.CartResource
The next REST API is the Category API, where only the admin can create and delete categories. All the other operations are allowed by everyone (the admin, user, and anonymous). To grant access to a specific role only, use the @RolesAllowed annotation from the javax.annotation.security package.
![]() JavaDoc of javax.annotation.security.RolesAllowed
JavaDoc of javax.annotation.security.RolesAllowed
@RolesAllowed: Specifies the list of security roles permitted to access the method(s) in an application.
Specifying it at a class level means that it applies to all the operations in the class.
Specifying it on a method means that it applies to that method only.
If applied to the class and operations levels, the method value overrides the class value when the two conflict.
For the Customer REST API, only the admin is allowed to access all the services. Annotating the CustomerResource class with @RolesAllowed("admin") will apply this policy.
![]() While we are using @RolesAllowed in the local method, we are overriding the policy applied by the class level @Authenticated.
While we are using @RolesAllowed in the local method, we are overriding the policy applied by the class level @Authenticated.
After OrderResource, we will deal with the OrderItem REST API, where only authenticated subjects are allowed to access all the services. Annotating the OrderItemResource class with @Authenticated will apply this policy.
Great! You have applied the first-level authorization layer! ![]()
Don’t be too confident, though. ![]() This implementation leaks more levels of authorization. For example, users are authorized to delete Orders or OrderItems, but we can’t verify that the authenticated subject is only deleting his own Orders or OrderItems and not those of other users. We know how to define access rules based on roles, but how can we gather more information about the authenticated subject?
This implementation leaks more levels of authorization. For example, users are authorized to delete Orders or OrderItems, but we can’t verify that the authenticated subject is only deleting his own Orders or OrderItems and not those of other users. We know how to define access rules based on roles, but how can we gather more information about the authenticated subject?
For this purpose, we will create a new REST API called UserResource. When invoked, UserResource will return the current authenticated subject information as a response.
① Inject a JsonWebToken, which is an implementation of the specification that defines the use of JWT as a bearer token. This injection will use an instance of the JWT token in the incoming request.
② The JsonWebToken will return the injected JWT token.
③ The getCurrentUserInfoClaims() method will return the list of the available claims and their respective values embedded in the JWT token. The claims will be extracted from the JWT token instance injected in the UserResource.
The @Context SecurityContext ctx passed as the method parameter is used to inject the SecurityContext in the current context.
![]() SecurityContext is an injectable interface that provides access to security-related information like the Principal.
SecurityContext is an injectable interface that provides access to security-related information like the Principal.
![]() The Principal interface represents the abstract notion of a principal, which can be used to represent any entity, such as an individual, a corporation, or a login ID. In this case, the principal is the JWT token.
The Principal interface represents the abstract notion of a principal, which can be used to represent any entity, such as an individual, a corporation, or a login ID. In this case, the principal is the JWT token. ![]()
![]() I will not dig into the full implementation of the authorization layer. I will stop here; otherwise, I would need to spend two more chapters just on this content.
I will not dig into the full implementation of the authorization layer. I will stop here; otherwise, I would need to spend two more chapters just on this content.
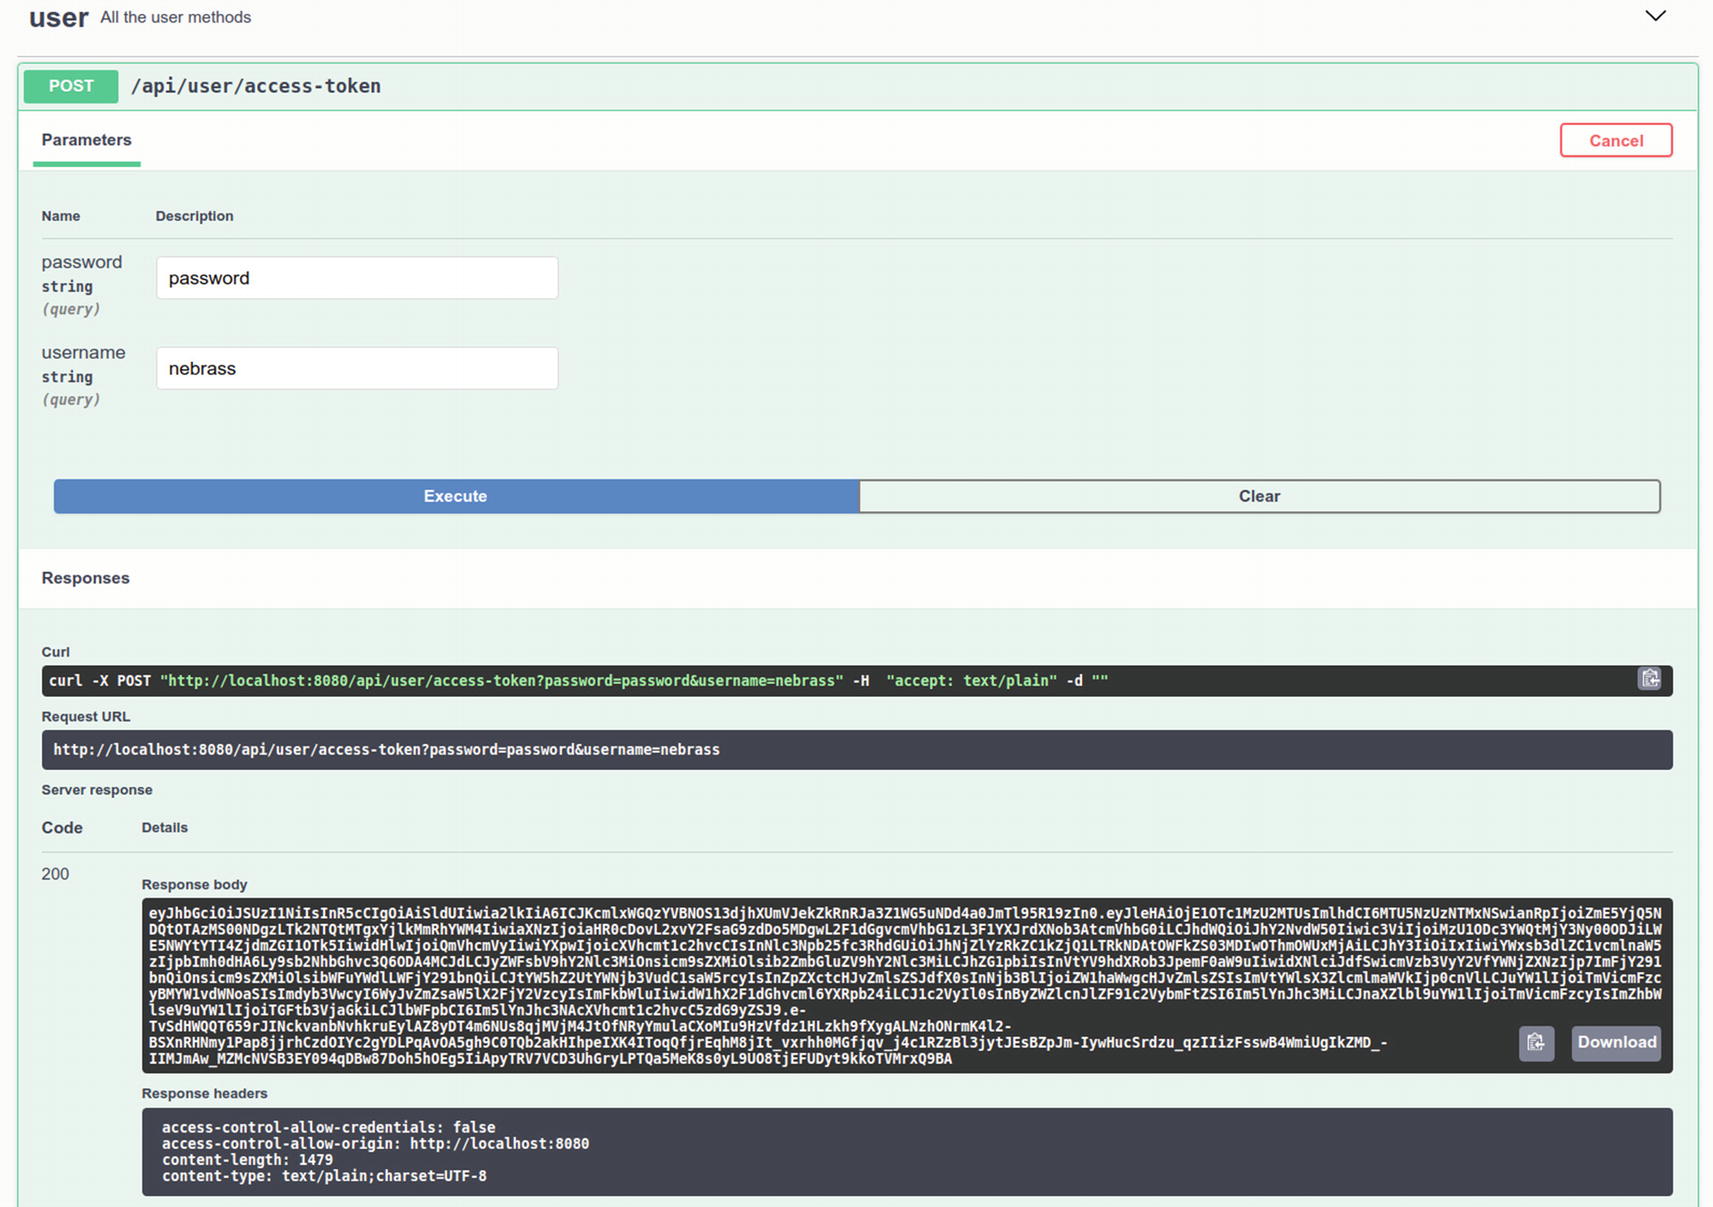
The last step of the security part is to add a REST API that returns an access_token for a given username and password. This can be useful, especially with the Swagger UI. Speaking of Swagger UI, we need to make it aware of our Security layer.
We will start by creating the TokenService, which will be the REST client that makes the request of the access_token from Keycloak.
As we are using Java 11, we can enjoy one of its great new features: the brand new HTTP client.
① The annotation creates an instance of TokenService for every HTTP request.
② Gets the mp.jwt.verify.issuer property value to build the Keycloak token’s endpoint URL.
③ Gets the keycloak.credentials.client-id property value, which is needed to request the access_token.
![]() We are getting the property value as Provider<String> and not String to avoid failing the native image build.
We are getting the property value as Provider<String> and not String to avoid failing the native image build.
Excellent! ![]() You can test the new method from the Swagger UI:
You can test the new method from the Swagger UI:
Yippee! ![]() You now need to find a way to make Swagger UI apply the access_token to request all the REST APIs.
You now need to find a way to make Swagger UI apply the access_token to request all the REST APIs.
① @SecurityScheme defines a security scheme that can be used by the OpenAPI operations.
② Add a description for the OpenAPI definition.
③ Link the created security schema jwt to the OpenAPI definition.
Check the Swagger UI again:

Note that there is the lock icon ![]() .
.
Use the getAccessToken() operation
to create an access_token and then click Authorize ![]() to pass the generated access_token to the SecurityScheme. Finally, click Authorize:
to pass the generated access_token to the SecurityScheme. Finally, click Authorize:

Now, when you click any operation, Swagger UI will include the access_token as a bearer to every request.
Excellent! You now have the Keycloak and the Security Java components. Next, you need to refactor the tests to be aware of the Security layer.
Update the Integration Tests to Support auth2
For the tests, you need to dynamically provision the Keycloak instance, as you did for the database using the Testcontainers library.
We will use the same library to provision Keycloak. We will not use a plain Docker container as we did with PostgreSQL, because there, Flyway populated the database for us. For Keycloak, we don’t have a built-in mechanism that will create the Keycloak realms for us. The only possible solution is to use a Docker Compose file that will import a sample Keycloak realms file. Fortunately, Testcontainers has great support to provision Docker Compose files.
- Two users:
Admin (username admin, password test, role admin)
Test (username user, password test, role user)
The Keycloak client has a client-id=quarkus-client: and `secret=mysecret.
The QuarkusTestResourceLifecycleManager will communicate with the provisioned Keycloak instance using the TokenService that we created, and it will use the sample Realm credentials to get access_tokens that we will use in the integration tests.
We will get two access_tokens: one for the admin role and one for the user role. We will store them, along with mp.jwt.verify.publickey.location and mp.jwt.verify.issuer, as system properties in the current test scope.
We will use it with the @QuarkusTestResource(KeycloakRealmResource.class) annotation.
Good! I implemented all the tests; you can find them in my ![]() GitHub repository.
GitHub repository. ![]()
Adding Keycloak to the Production Environment
The last step is to add the production Keycloak entries to Docker Compose in the Production VM. We also need to add the Production realms.
You can export the realm from the local Keycloak instance in very few steps.
You will get two Keycloak realm files—quarkushop-realm-realm.json and quarkushop-realm-users-0.json—in ~/keycloak-realms.
![]() The "sslRequired": "none" property disables the required SSL certificate for any request.
The "sslRequired": "none" property disables the required SSL certificate for any request.
Then, copy the two files—quarkushop-realm-realm.json and quarkushop-realm-users-0.json—to the /opt/realms directory in the Azure VM instance, which is the Production environment.
① Overrides the MP_JWT_VERIFY_PUBLICKEY_LOCATION and MP_JWT_VERIFY_ISSUER properties to ensure that the application points to the Azure VM instance instead of the localhost.
② Adds the Keycloak Docker service.
③ Defines the Keycloak cluster’s username and password.
④ Defines the Keycloak Database vendor as PostgreSQL, as we have a PostgreSQL DB instance in our services.
⑤ Defines the DB host as the postgresql-db, which will be resolved dynamically by Docker with the service IP.
⑥ Defines the Keycloak database credentials as the same as the PostgreSQL credentials.
⑦ Expresses the dependency between the Keycloak and PostgreSQL services.
![]() As you can see, all the credentials are listed as plain text in the docker-compose.yml file.
As you can see, all the credentials are listed as plain text in the docker-compose.yml file.
![]() Unfortunately, this feature is available only for Docker Swarm clusters.
Unfortunately, this feature is available only for Docker Swarm clusters.
Good! The Docker Compose services are ready to go! ![]()
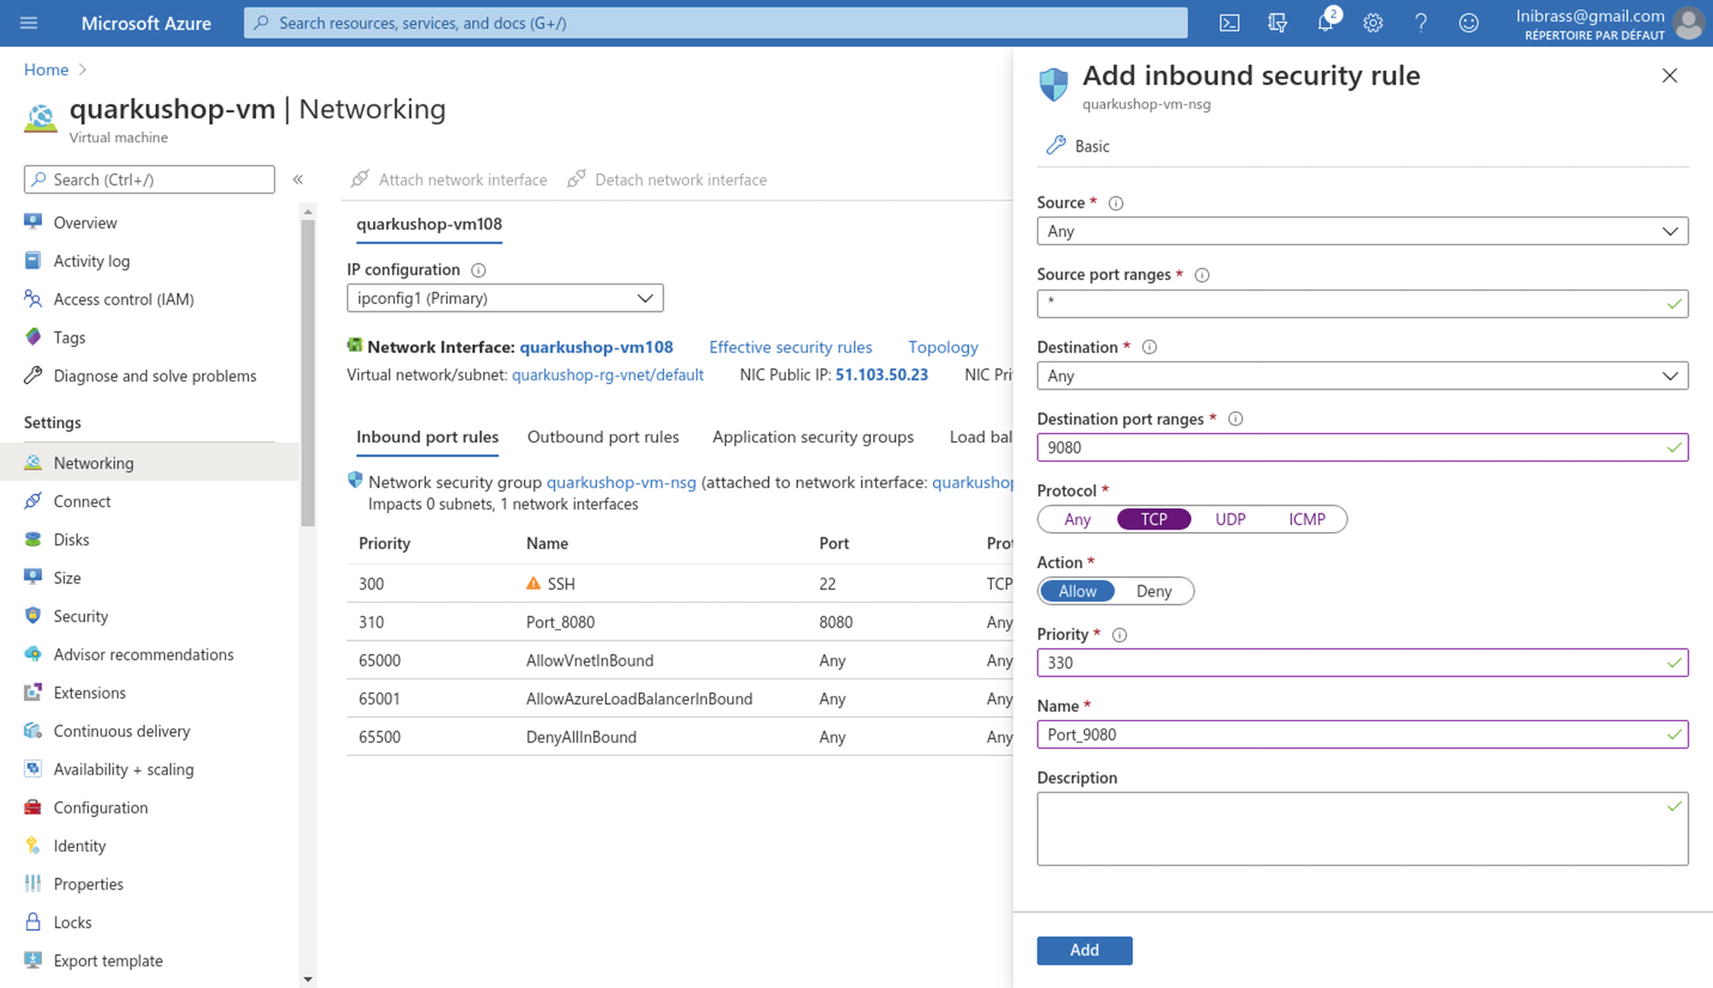
We need just to add an exception to the Azure VM instance networking rules for the Keycloak port. In the Azure VM instance, go to the Networking section and add an exception for port 9080:
Excellent! ![]() The production environment has all the needed elements to deploy a new version of the QuarkuShop container without risking the PostgreSQL DB or the Keycloak cluster.
The production environment has all the needed elements to deploy a new version of the QuarkuShop container without risking the PostgreSQL DB or the Keycloak cluster.
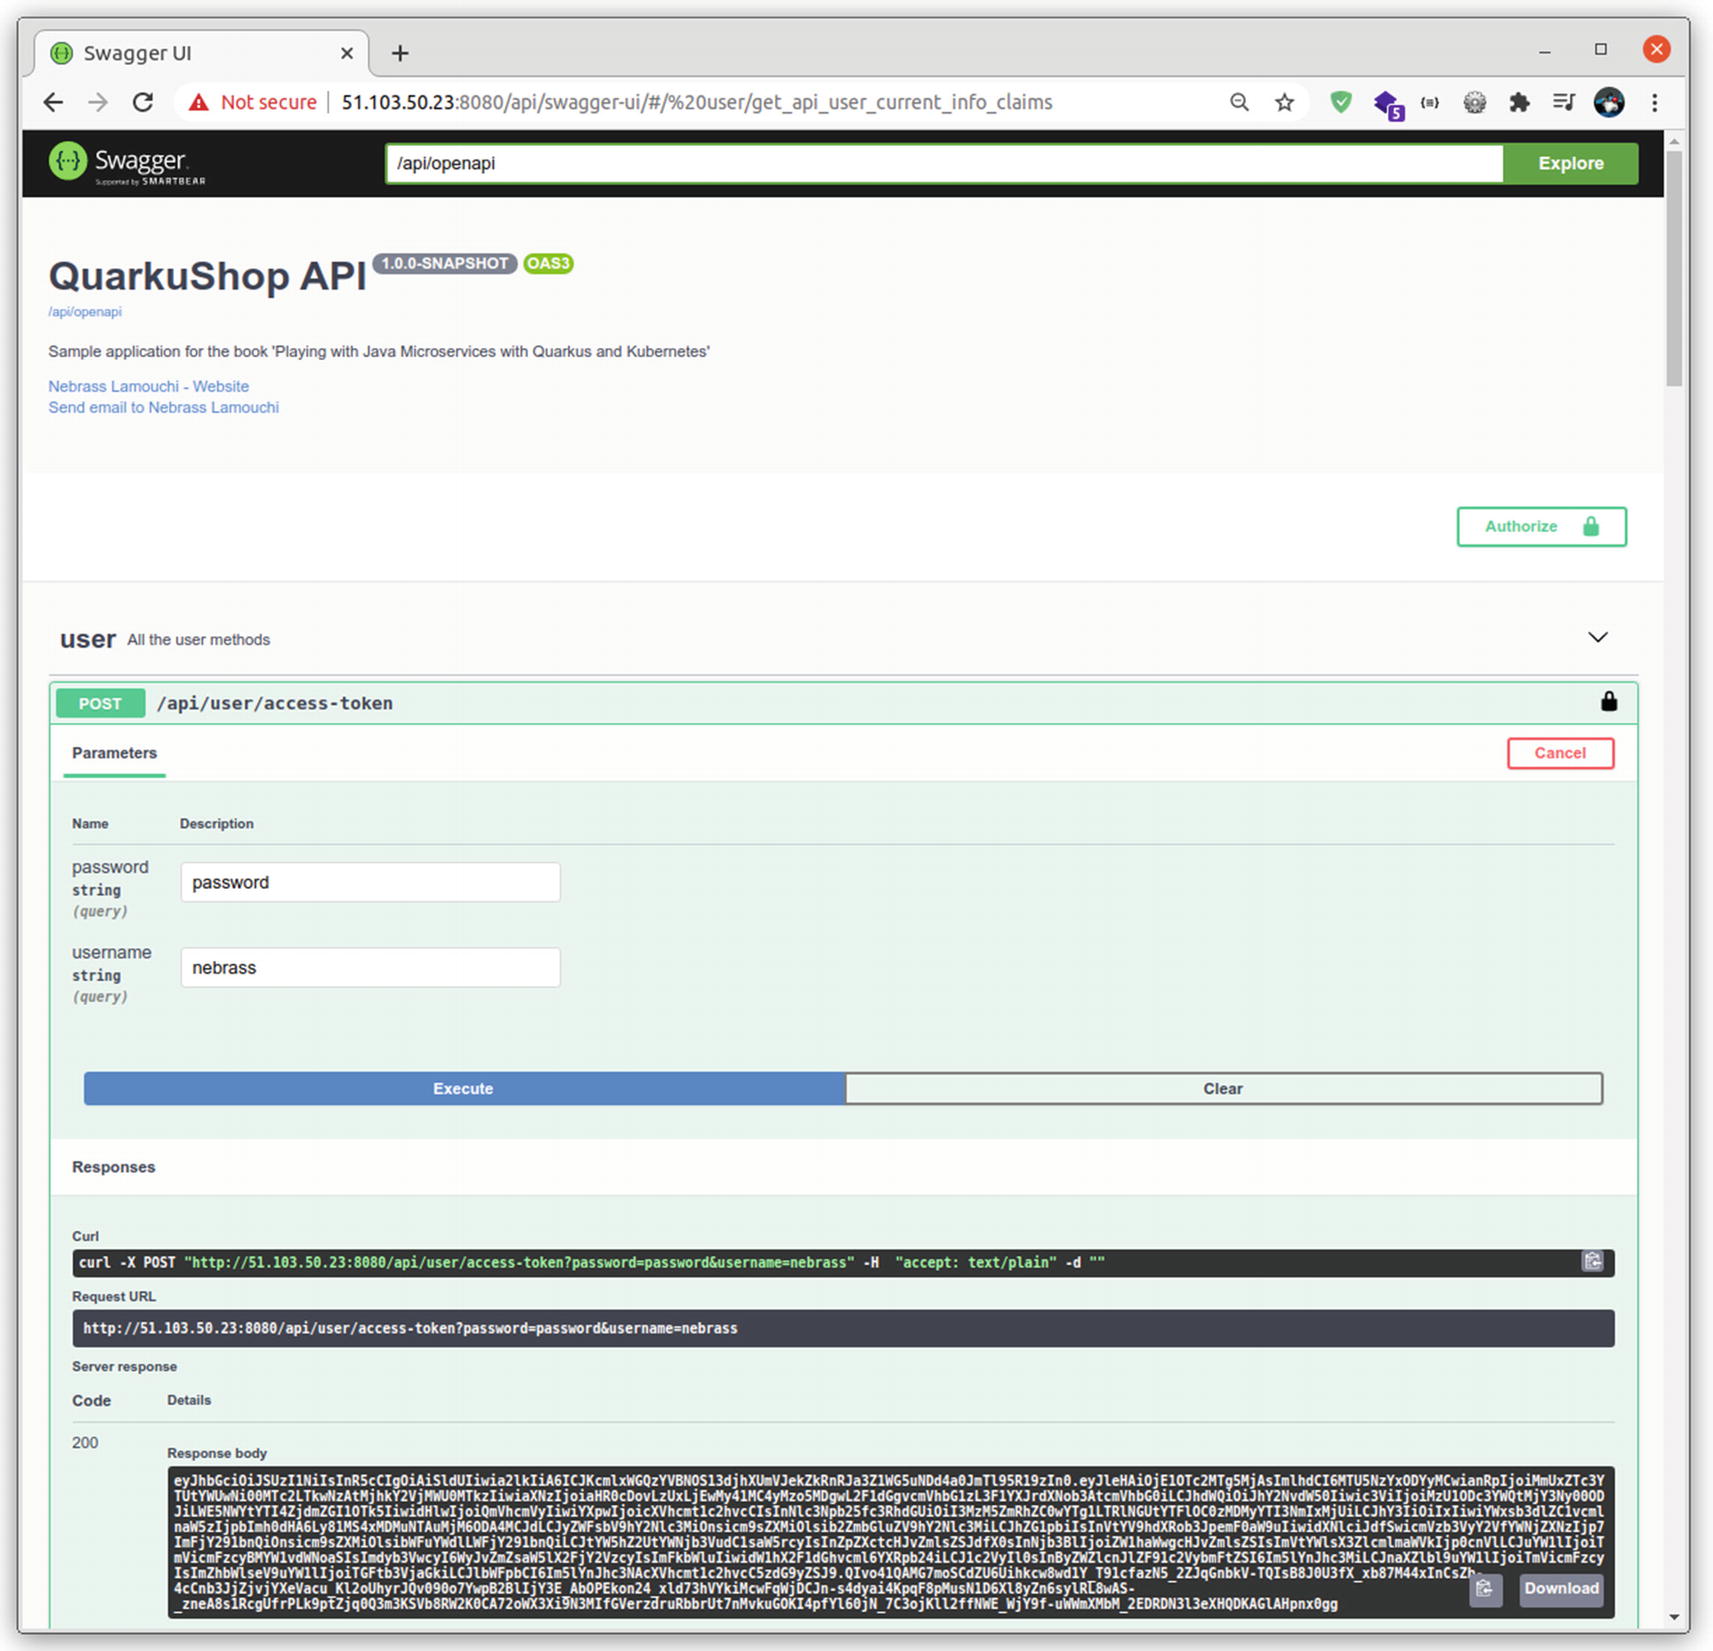
Go to the production Swagger UI and enjoy QuarkuShop: the greatest online store! ![]()
Good! ![]() It’s time to move to the next anti-disaster layer: monitoring
It’s time to move to the next anti-disaster layer: monitoring ![]() .
.
Implementing the Monitoring Layer
Security is not the only critical extra layer in an application. Metrics monitoring is also a very important layer that can prevent disasters. Imagine a situation where you have a super-secure, powerful application deployed on a server in the cloud. If you don’t regularly check the application metrics, the application may get out of resources without you even knowing.
Application monitoring is not just a mechanism of getting metrics; it includes analyzing the performance and the behavior of the different components. I will not cover all the different monitoring tools and practices in this chapter.
The application status indicator, which is also known as the health check indicator.
The application metrics service, which is used to provide various metrics and statistics about an application.
Implementing Health Checks
SmallRye Health will automatically add the health check endpoints to your Quarkus application.
![]() For those who are used to Spring Boot, SmallRye Health is the equivalent of Actuator.
For those who are used to Spring Boot, SmallRye Health is the equivalent of Actuator.
/health/live: The application is up and running.
/health/ready: The application is ready to serve requests.
/health: Accumulating all health check procedures in the application.
This JSON response confirms that the application is correctly running, and there is one check that was made confirming that the database is UP.
status: The overall result of all the health check procedures
checks: An array of individual checks
① You get the mp.jwt.verify.publickey.location property, which you will use as the Keycloak URL.
② You instantiate the Java 11 HTTPClient with 3000 milliseconds of timeout.
③ You define the name of the health check as Keycloak connection health check.
④ You verify that the Keycloak URL is reachable and the response status code is HTTP 200.
⑤ If the keycloakConnectionVerification() throws an exception, the health check status will be down.
⑥ You build the health check response and send it back to the caller.
Good! ![]() It’s as simple as that!
It’s as simple as that!
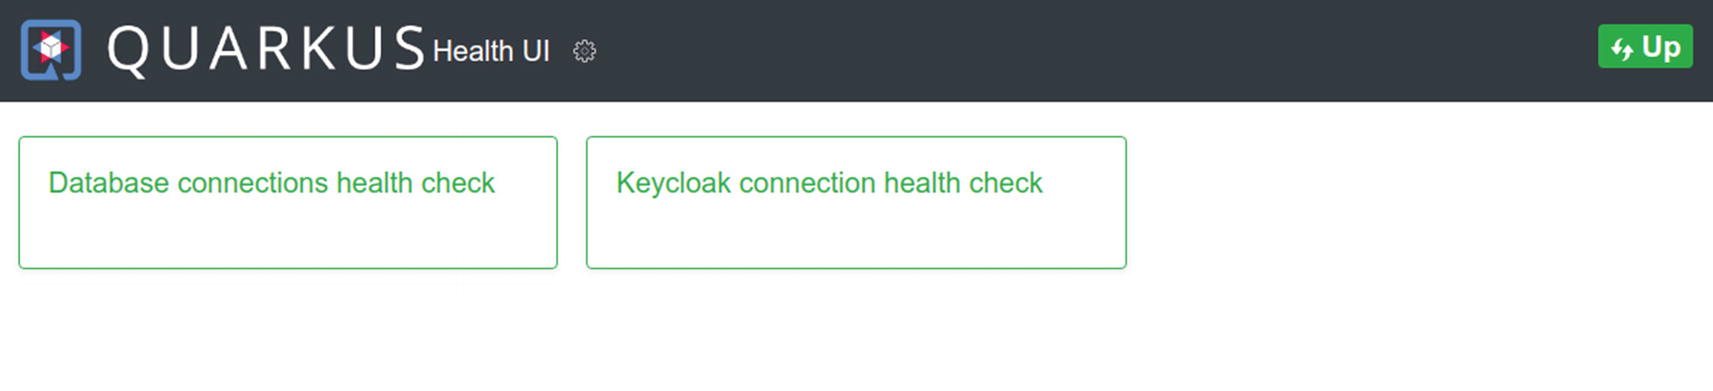
There is more! SmallRye Health provides a very useful Health UI at http://localhost:8080/api/health-ui/:
There is even a pooling service that can be configured to refresh the page in intervals you set:

Excellent. ![]() It’s time to move to the next step, in order to implement the metrics service.
It’s time to move to the next step, in order to implement the metrics service.
Implementing the Metrics Service
Metrics are important and critical monitoring data. Quarkus has many dedicated libraries for metrics exposure, along with a very rich toolset to build custom application metrics. No surprise, the first library is also from the SmallRye family. It’s called quarkus-smallrye-metrics and is used to expose metrics based on the MicroProfile specifications.
Starting with Quarkus v1.9, it’s not recommended to use SmallRye metrics. Quarkus officially adopted Micrometer as the new standard for its metrics. This adoption is based on cloud market trends and needs.
![]() To learn more about the transition from MicroProfile metrics to Micrometer metrics, see https://quarkus.io/blog/micrometer-metrics/.
To learn more about the transition from MicroProfile metrics to Micrometer metrics, see https://quarkus.io/blog/micrometer-metrics/.
Counter: Counters are used to measure values that only increase. For example, to measure how many times a REST API was called.
Gauge: An indicator that shows a current value, like the number of created objects or threads.
Timer: Used to measure short-duration latencies and their frequencies.
Distribution Summary: Used to track the distribution of events. It is similar to a timer structurally, but records values that do not represent units of time. For example, a distribution summary could be used to measure the payload sizes of requests hitting a server.
These metrics are generated by Micrometer and are compatible with Prometheus. You can try to import them in a standalone Prometheus instance.
First, download Prometheus from https://prometheus.io/download/:

Choose a suitable edition for your machine/OS and download it. It’s darwin-amd64 in my case.
Change the last line, which defines the targeted /metrics API host location, from localhost:9090 to localhost:8080. This is the application URL.
You can access it from http://localhost:9090/:

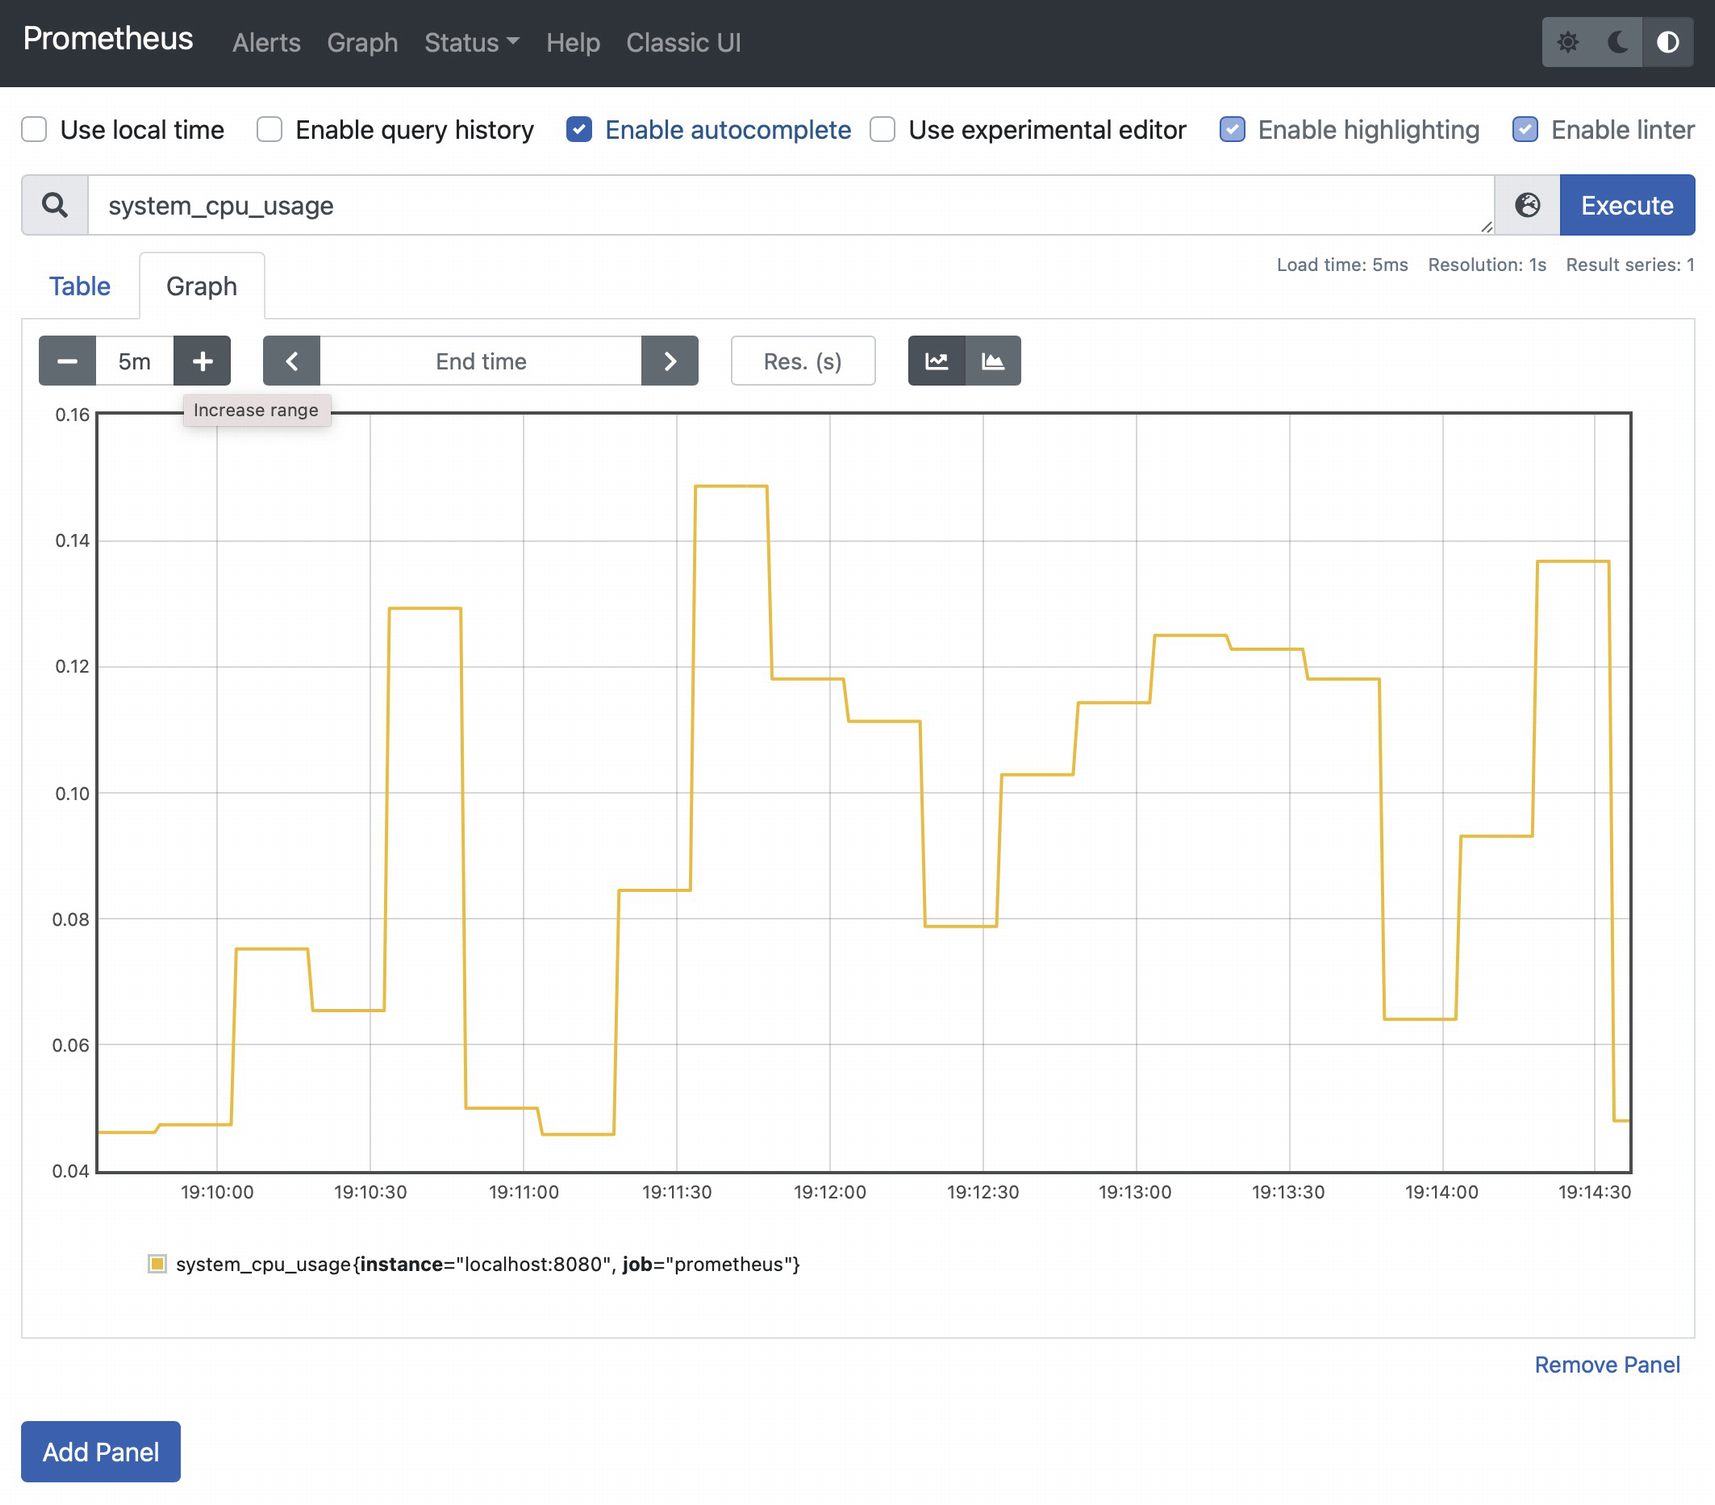
In the Expression input, enter system_cpu_usage and click Execute. Then click the Graph tab:
① Create a timer called tokensRequestsTimer for the duration of executing the getAccessToken() method.
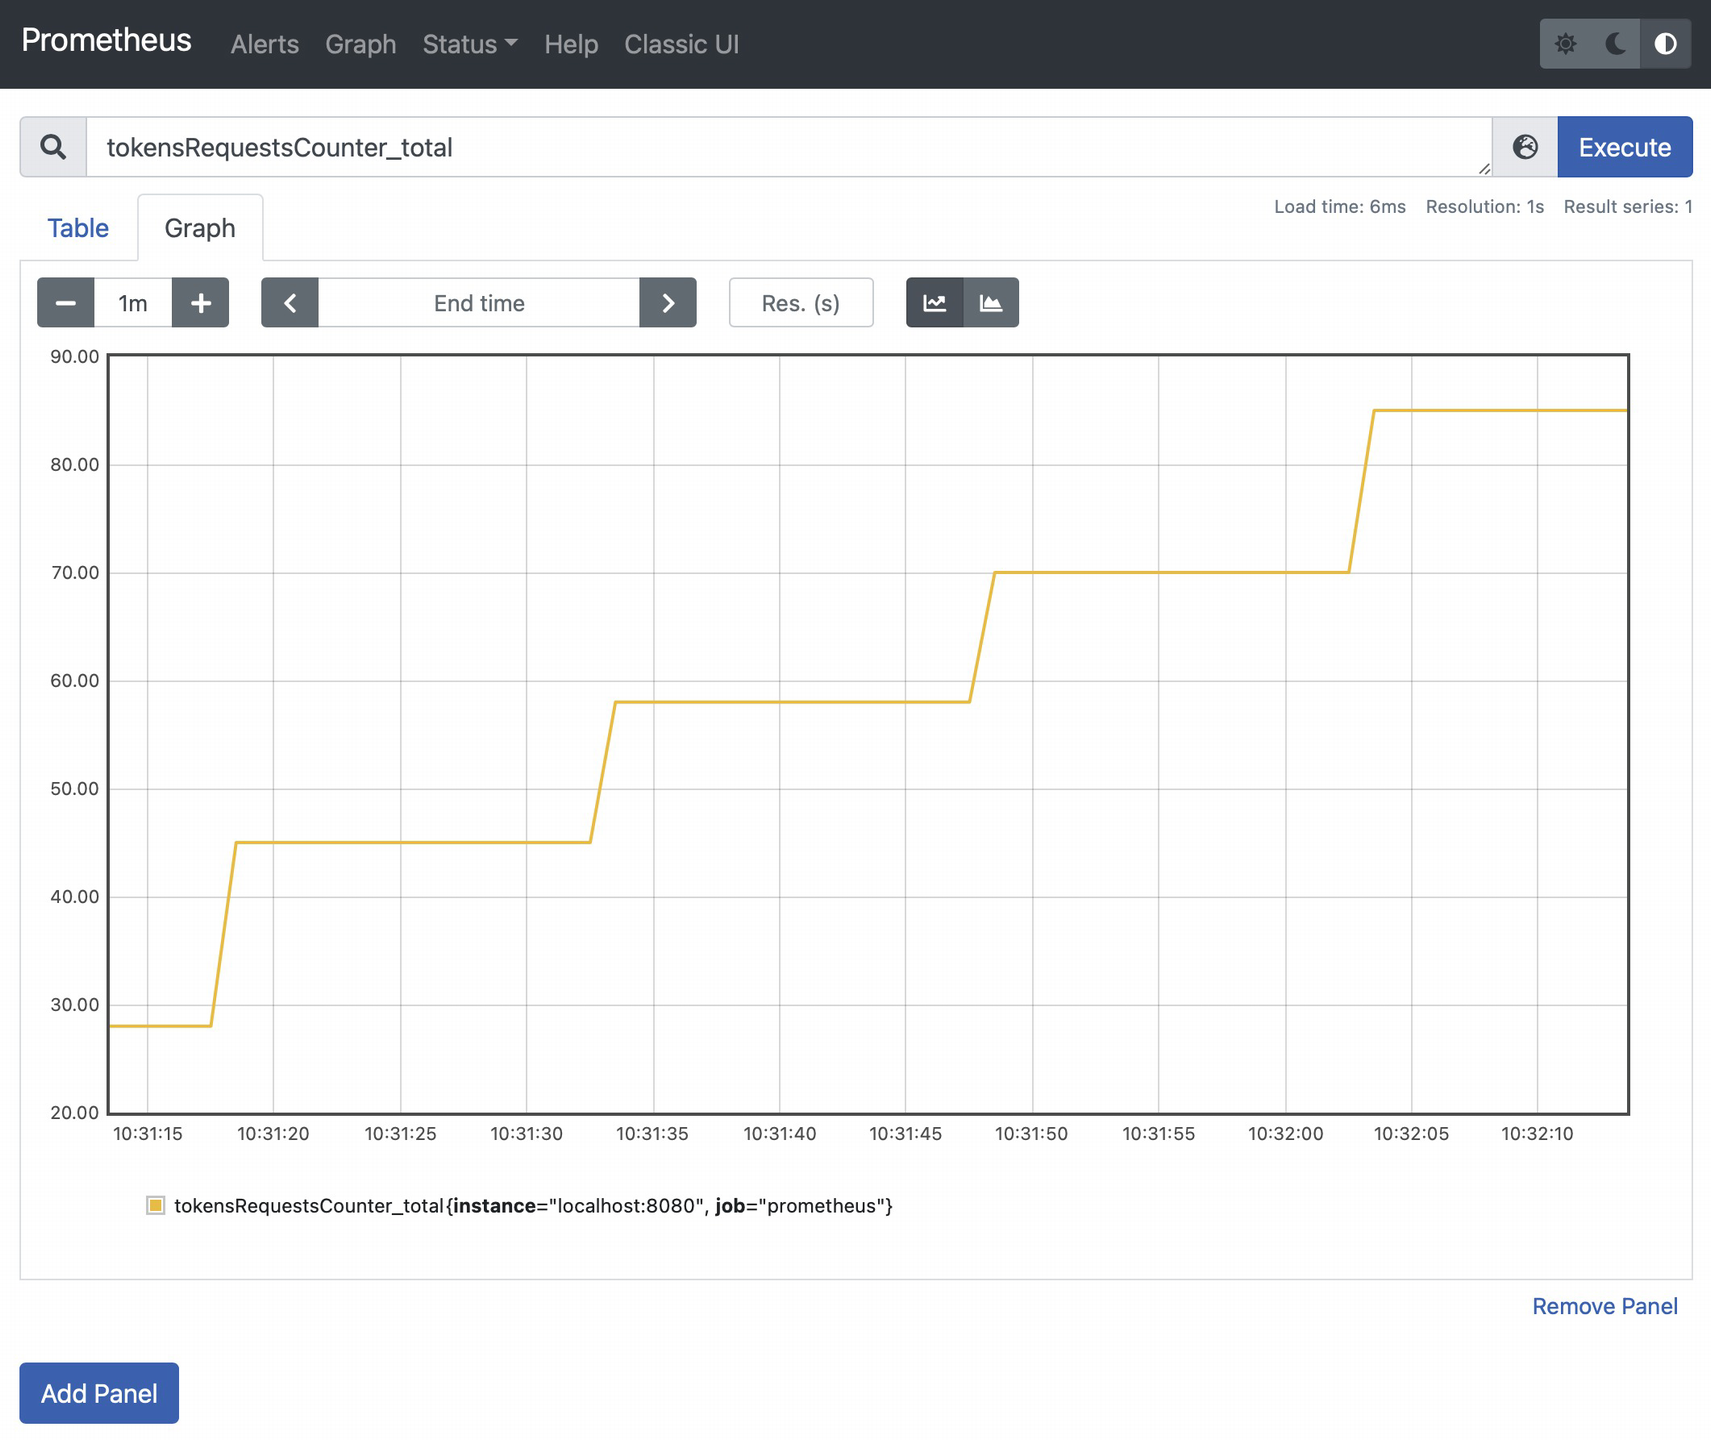
② Create a counter called tokensRequestsCounter, which will increment each time the getAccessToken() method is invoked.
Go to the Swagger UI and request an access_token many times to generate some metrics. Then go back to the Prometheus UI to check the new metrics:

Take a look at the value reached by the tokensRequestsCounter, based on the previous screenshot. Its Prometheus expression is:
You can check the Max value for the tokensRequests timer, which matches the tokensRequestsTimer_seconds_max expression in Prometheus:

Great! ![]() You have now the basic health check and monitoring components that ensure your application is healthy and has all the required resources.
You have now the basic health check and monitoring components that ensure your application is healthy and has all the required resources.
Conclusion
I consider security and monitoring to be anti-disaster layers, but even with the application of these components, the application still faces many risks. One of them is high availability.