
C H A P T E R 4
Using URL Routing
In this chapter, I will show you how to add another server-side concept to your web app: URL routing. The idea behind URL routing is very simple: we associate JavaScript functions with internal URLs. An internal URL is one that is relative to the current document and contains a hash fragment. In fact, they are usually expressed as just the hash fragment on its own, such as #summary.
Under normal circumstances, when the user clicks a link that points to an internal URL, the browser will see whether there is an element in the document that has an id attribute value that matches the fragment and, if there is, scroll to make that element visible.
When we use URL routing, we respond to these navigation changes by executing JavaScript functions. These functions can show and hide elements, change the view model, or perform other tasks you might need in your application. Using this approach, we can provide the user with a mechanism to navigate through our application.
We could, of course, use events. The problem is, once again, scale. Handling events triggered by elements is a perfectly workable and acceptable approach for small and simple web applications. For larger and more complex apps, we need something better, and URL routing provides a nice approach that is simple, is elegant, and scales well. Adding new functional areas to the web app, and providing users with the means to use them, becomes incredibly simple and robust when we use URLs as the navigation mechanism.
Building a Simple Routed Web Application
The best way to explain URL routing is with a simple example. Listing 4-1 shows a basic web application that relies on routing.
Listing 4-1. A Simple Routed Web Application
<!DOCTYPE html>

<html>

<head>

    <title>Routing Example</title>

    <link rel="stylesheet" type="text/css" href="jquery-ui-1.8.16.custom.css"/>

    <link rel="stylesheet" type="text/css" href="styles.css"/>

    <script src="jquery-1.7.1.js" type="text/javascript"></script>

    <script src="jquery-ui-1.8.16.custom.js" type="text/javascript"></script>

    <script src='knockout-2.0.0.js' type='text/javascript'></script>

    <script src='utils.js' type='text/javascript'></script>
    <script src='signals.js' type='text/javascript'></script>

    <script src='crossroads.js' type='text/javascript'></script>

    <script src='hasher.js' type='text/javascript'></script>

    <script>

        var viewModel = {

            items: ["Apple", "Orange", "Banana"],

            selectedItem: ko.observable("Apple")

        };


        $(document).ready(function() {

            ko.applyBindings(viewModel);


            $('div.catSelectors').buttonset();


             hasher.initialized.add(crossroads.parse, crossroads);

             hasher.changed.add(crossroads.parse, crossroads);

             hasher.init();


            crossroads.addRoute("select/Apple", function() {

                 viewModel.selectedItem("Apple");

             });

            crossroads.addRoute("select/Orange", function() {

                 viewModel.selectedItem("Orange");

             });

            crossroads.addRoute("select/Banana", function() {

                 viewModel.selectedItem("Banana");

             });

        });

    </script>

</head>

<body>

    <div class="catSelectors" data-bind="foreach: items">

        <a data-bind="formatAttr: {attr: 'href', prefix: '#select/', value: $data},

            css: {selectedItem: ($data == viewModel.selectedItem())}">

            <span data-bind="text: $data"></span>

        </a>

    </div>

    <div data-bind="foreach: items">

        <div class="item" data-bind="fadeVisible: $data == viewModel.selectedItem()">

            The selected item is: <span data-bind="text: $data"></span>

        </div>

    </div>

</body>

</html>
This is a relatively short listing, but there is a lot going on, so I’ll break things down and explain the moving parts in the sections that follow.
Adding the Routing Library
Once again, I am going to use a publically available library to get the effect I require. There are a few URL routing libraries around, but the one that I like is called Crossroads. It is simple, reliable, and easy to use. It has one drawback, which is that it depends on two other libraries by the same author. I like to see dependencies rolled into a single library, but this is not a universally held preference, and it just means that we have to download a couple of extra files. Table 4-1 lists the projects and the JavaScript files that we require from the download archives, which should be copied into the Node.js server content directory. (All three files are part of the source code download for this book if you don’t want to download these files individually. The download is freely available at Apress.com.)
I added Crossroads, its supporting libraries, and my new cheeseutils.js file into the HTML document using script elements:
...

<script src="jquery-1.7.1.js" type="text/javascript"></script>

<script src="jquery-ui-1.8.16.custom.js" type="text/javascript"></script>

<script src='knockout-2.0.0.js' type='text/javascript'></script>

<script src='utils.js' type='text/javascript'></script>

<script src='signals.js' type='text/javascript'></script>

<script src='crossroads.js' type='text/javascript'></script>

<script src='hasher.js' type='text/javascript'></script>

<script>

...
Adding the View Model and Content Markup
URL routing works extremely well when combined with a view model in a web application. For this initial application, I have created a very simple view model, as follows:
var viewModel = {

    items: ["Apple", "Orange", "Banana"],

    selectedItem: ko.observable("Apple")

};
There are two properties in the view model. The items property refers to an array of three strings. The selectedItem property is an observable data item that keeps track of which item is presently selected. I use these values with data bindings to generate the content in the document, like this:
...

<div data-bind="foreach: items">

    <div class="item" data-bind="fadeVisible: $data == viewModel.selectedItem()">

        The selected item is: <span data-bind="text: $data"></span>

    </div>

</div>

...
The bindings that KO supports by default are pretty basic, but it is easy to create custom ones, which is exactly what I have done for the fadeVisible binding referred to in the listing. Listing 4-2 shows the definition of this binding, which I have placed in a file called utils.js (which you can see imported in a script element in Listing 4-1). There is no requirement to use an external file; I have used one because I intend to employ this binding again when I add routing to the CheeseLux example later in the chapter.
Listing 4-2. Defining a Custom Binding
ko.bindingHandlers.fadeVisible = {


    init: function(element, accessor) {

        $(element)[accessor() ? "show" : "hide"]();

    },


    update: function(element, accessor) {

        if (accessor() && $(element).is(":hidden")) {

            var siblings = $(element).siblings(":visible");

            if (siblings.length) {

                siblings.fadeOut("fast", function() {

                    $(element).fadeIn("fast");

                })

            } else {

                $(element).fadeIn("fast");

            }

        }

    }

}
Creating a custom binding is as simple as adding a new property to the ko.bindinghandlers object; the name of the property will be the name of the new binding. The value of the property is an object with two methods: init and update. The init method is called when ko.applyBindings is called, and the update method is called when observable data items that the binding depends on change.
The arguments to both methods are the element to which the binding has been applied to and an accessor object that provides access to the binding argument. The binding argument is whatever follows the binding name:
data-bind="fadeVisible: $data == viewModel.selectedItem()"
I have used $data in my binding argument. When using a foreach binding, $data refers to the current item in the array. I check this value against the selectedItem observable data item in the view model. I have to refer to the observable through the global variable because it is not within the context of the foreach binding, and this means I need to treat the observable like a function to get the value. When KO calls the init or update method of my custom binding, the expression in the binding argument is resolved, and the result of calling accessor() is true.
In my custom binding, the init method uses jQuery to show or hide the element to which the binding has been applied based on the accessor value. This means that only the elements that correspond to the selectedItem observable are displayed.
The update method works differently. I use jQuery effects to animate the transition from one set of elements to another. If the update method is being called for the elements that should be displayed, I select the elements that are presently visible and call the fadeOut method. This causes the elements to gradually become transparent and then invisible; once this has happened, I then use fadeIn to make the required elements visible. The result is a smooth transition from one set of elements to another.
Adding the Navigation Markup
I generate a set of a elements to provide the user with the means to select different items; in my simple application, these form the navigation markup. Here is the markup:
<div class="catSelectors" data-bind="foreach: items">

    <a data-bind="formatAttr: {attr: 'href', prefix: '#select/', value: $data},

        css: {selectedItem: ($data == viewModel.selectedItem())}">

            <span data-bind="text: $data">

    </a>

</div>
As I mentioned in Chapter 3, the built-in KO bindings simply insert values into the markup. Most of the time, this can be worked around by adding span or div elements to provide structure to which bindings can be attached. This approach doesn’t work when it comes to attribute values, which is a problem when using URL routing. What I want is a series of a elements whose href attribute contains a value from the view model, like this:
<a href="#/select/Apple">Apple</a>
I can’t get the result I want from the standard attr binding, so I have created another custom one. Listing 4-3 shows the definition of the formatAttr binding. I’ll be using this binding later, so I have defined it in the util.js file, alongside the fadeVisible binding.
Listing 4-3. Defining the formatAttr Custom Binding
function composeString(bindingConfig ) {

    var result = bindingConfig.value;

    if (bindingConfig.prefix) { result = bindingConfig.prefix + result; }

    if (bindingConfig.suffix) { result += bindingConfig.suffix;}

    return result;

}


ko.bindingHandlers.formatAttr = {

    init: function(element, accessor) {

        $(element).attr(accessor().attr, composeString(accessor()));

    },

    update: function(element, accessor) {

        $(element).attr(accessor().attr, composeString(accessor()));

    }

}
The functionality of this binding comes through the accessor. The binding argument I have used on the element is a JavaScript object, which becomes obvious with some judicious reformatting:
formatAttr:

    {attr: 'href',

     prefix: '#select/',

     value: $data

    },

css: {selectedItem: ($data == viewModel.selectedItem())}
KO resolves the data values before passing this object to my init or update methods, giving me something like this:
{attr: 'href',

 prefix: '#select/',

 value: Apple}
I use the properties of this object to create the formatted string (using the composeString function I defined alongside the custom binding) to combine the content of value property with the value of the prefix and suffix properties if they are defined.
There are two other bindings. The css binding applies and removes a CSS class; I use this binding to apply the selectedItem class. This creates a simple toggle button, showing the user which button is clicked. The text binding is applied to a child span element. This is to work around a problem where jQuery UI and KO both assume control over the contents of the a element; applying the text attribute to a nested element avoids this conflict. I need this workaround because I use jQuery UI to create button widgets from the navigation elements, like this:
<script>

    var viewModel = {

        items: ["Apple", "Orange", "Banana"],

        selectedItem: ko.observable("Apple")

    };


    $(document).ready(function() {

        ko.applyBindings(viewModel);


        $('div.catSelectors').buttonset();


        ... other statements removed for brevity...

    });

</script>
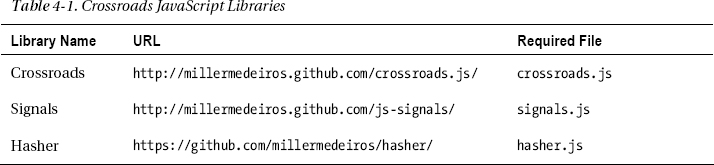
By applying the buttonset method to a container element, I am able to create a set of buttons from the child a elements. I have used buttonset, rather than button, so that jQuery UI will style the elements in a contiguous block. You can see the effect that this creates in Figure 4-1.
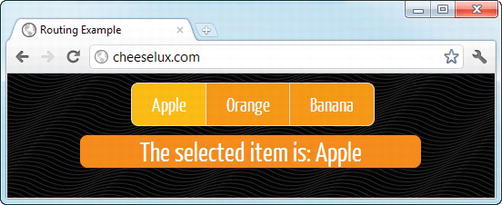
Figure 4-1. The basic application to which routing is applied
There is no space between buttons created by the buttonset method, and the outer edges of the set are nicely rounded. You can also see one of the content elements in the figure. The idea is that clicking one of the buttons will allow the user to display the corresponding content item.
Applying URL Routing
I have almost everything in place: a set of navigational controls and a set of content elements. I now need to tie them together, which I do by applying the URL routing:
<script>

    var viewModel = {

        items: ["Apple", "Orange", "Banana"],

        selectedItem: ko.observable("Apple")

    };


    $(document).ready(function() {

        ko.applyBindings(viewModel);


        $('div.catSelectors').buttonset();


         hasher.initialized.add(crossroads.parse, crossroads);

         hasher.changed.add(crossroads.parse, crossroads);

         hasher.init();


        crossroads.addRoute("select/Apple", function() {

             viewModel.selectedItem("Apple");

         });

        crossroads.addRoute("select/Orange", function() {

             viewModel.selectedItem("Orange");

         });

        crossroads.addRoute("select/Banana", function() {

             viewModel.selectedItem("Banana");

         });

    });

</script>
The first three of the highlighted statements set up the Hasher library so that it works with Crossroads. Hasher responds to the internal URL change through the location.hash browser object and notifies Crossroads when there is a change.
Crossroads examines the new URL and compares it to each of the routes it has been given. Routes are defined using the addRoute method. The first argument to this method is the URL we are interested in, and the second argument is a function to execute if the user has navigated to that URL. So, for example, if the user navigates to #select/Apple, then the function that sets the selectedItem observable in the view model to Apple will be executed.
![]() Tip We don’t have to specify the
Tip We don’t have to specify the # character when using the addRoute method because Hasher removes it before notifying Crossroads of a change.
In the example, I have defined three routes, each of which corresponds to one of the URLs that I created using the formatAttr binding on the a elements.
This is at the heart of URL routing. You create a set of URL routes that drive the behavior of the web app and then create elements in the document that navigate to those URLs. Figure 4-2 shows the effect of such navigation in the example.
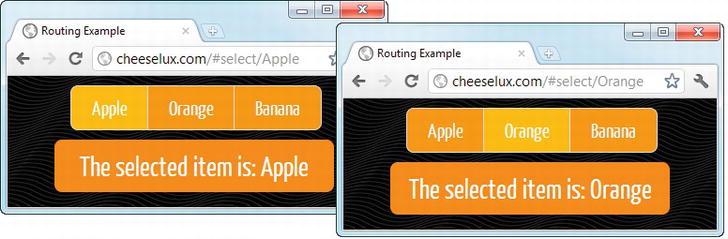
Figure 4-2. Navigating through the example web app
When the user clicks a button, the browser navigates to the URL specified by the href attribute of the underlying a element. This navigation change is detected by the routing system, which triggers the function that corresponds to the URL. The function changes the value of an observable item in the view model, and that causes the elements that represent the selected item to be displayed by the user.
The important point to understand is that we are working with the browser’s navigation mechanism. When the user clicks one of the navigation elements, the browser moves to the target URL; although the URL is within the same document, the browser’s history and URL bar are updated, as you can see in the figure.
This confers two benefits on a web application. The first is that the Back button works the way that most users expect it to work. The second is that the user can enter a URL manually and navigate to a specific part of the application. To see both of these behaviors in action, follow these steps:
When you clicked the Orange button, the Orange item was selected, and the button was highlighted. Something similar happens for the Banana item when you entered the URL. This is because the navigation mechanism for the application is now mediated by the browser, and this is how we are able to use URL routing to decouple another aspect of the application.
The first benefit is, to my mind, the most useful. When the user clicks the Back button, the browser navigates back to the last visited URL. This is a navigation change, and if the previous URL is within our document, the new URL is matched against the set of routes defined by the application. This is an opportunity to unwind the application state to the previous step, which in the case of the sample application displays the Orange button. This is a much more natural way of working for a user, especially compared to using regular events, where clicking the Back button tends to navigate to the site the user visited before our application.
Consolidating Routes
In the previous example, I defined each route and the function it executed separately. If this were the only way to define routes, a complex web app would end up with a morass of routes and functions, and there would be no advantage over regular event handling. Fortunately, URLs routing is very flexible, and we can consolidate our routes with ease. I describe the techniques available for this in the sections that follow.
Using Variable Segments
Listing 4-4 shows how easy it is to consolidate the three routes from the earlier demonstration into a single route.
Listing 4-4. Consolidating Routes
<script>

    var viewModel = {

        items: ["Apple", "Orange", "Banana"],

        selectedItem: ko.observable("Apple")

    };


    $(document).ready(function() {

        ko.applyBindings(viewModel);


        $('div.catSelectors').buttonset();


         hasher.initialized.add(crossroads.parse, crossroads);

         hasher.changed.add(crossroads.parse, crossroads);

         hasher.init();
         crossroads.addRoute("select/{item}", function(item) {

             viewModel.selectedItem(item);

         });

    });

</script>
The path section of a URL is made up of segments. For example, the URL path select/Apple has two segments, which are select and Apple. When I specify a route, like this:
/select/Apple
the route will match a URL only if both segments match exactly. In the listing, I have been able to consolidate my routes by adding a variable segment. A variable segment allows a route to match a URL that has any value for the corresponding segment. So, to be clear, all of the navigation URLs in the simple web app will match my new route:
select/Apple

select/Orange

select/Banana
The first segment is still static, meaning that only URLs whose first segment is select will match, but I have essentially added a wildcard for the second segment.
So that I can respond appropriately to the URL, the content of the variable segment is passed to my function as an argument. I use this argument to change the value of the selectedItem observable in the view model, meaning that a URL of /select/Apple results in a call like this:
viewModel.selectedItem('Apple'),
and a URL of select/Cherry will result in a call like this:
viewModel.selectedItem('Cherry'),
Dealing with Unexpected Segment Values
That last URL is a problem. There isn’t an item called Cherry in my web app, and setting the view model observable to this value will create an odd effect for the user, as shown in Figure 4-3.
Figure 4-3. The result of an unexpected variable segment value
The flexibility that comes with URL routing can also be a problem. Being able to navigate to a specific part of the application is a useful tool for the user, but, as with all opportunities for the user to provide input, we have to guard against unexpected values. For my example application, the simplest way to validate variable segment values is to check the contents of the array in the view model, as shown in Listing 4-5.
Listing 4-5. Ignoring Unexpected Segment Values
...

crossroads.addRoute("select/{item}", function(item) {

    if (viewModel.items.indexOf(item) > -1) {

        viewModel.selectedItem(item);

    }

});

...
In this listing, I have taken the path of least resistance, which is to simply ignore unexpected values. There are lots of alternative approaches. I could have displayed an error message or, as Listing 4-6 shows, embraced the unexpected value and added it to the view model.
Listing 4-6. Dealing with Unexpected Values by Adding Them to the View Model
<script>

    var viewModel = {

        items: ko.observableArray(["Apple", "Orange", "Banana"]),

        selectedItem: ko.observable("Apple")

    };


    $(document).ready(function() {

        ko.applyBindings(viewModel);


        $('div.catSelectors').buttonset();


        hasher.initialized.add(crossroads.parse, crossroads);

        hasher.changed.add(crossroads.parse, crossroads);

        hasher.init();


        crossroads.addRoute("select/{item}", function(item) {

            if (viewModel.items.indexOf(item)== -1) {

                viewModel.items.push(item);

                $('div.catSelectors').buttonset();

            }

            viewModel.selectedItem(item);

        });

    });

</script>
If the value of the variable segment isn’t one of the values in the items array in the view model, then I use the push method to add the new value. I changed the view model so that the items array is an observable item using the ko.observableArray method. An observable array is like a regular observable data item, except that bindings such as foreach are updated when the content of the array changes. Using an observable array means that adding an item causes Knockout to generate content and navigation elements in the document.
The last step in this process is to call the jQuery UI buttonset method again. KO has no knowledge of the jQuery UI styles that are applied to an a element to create a button, and this method has to be reapplied to get the right effect. You can see the result of navigating to #select/Cherry in Figure 4-4.
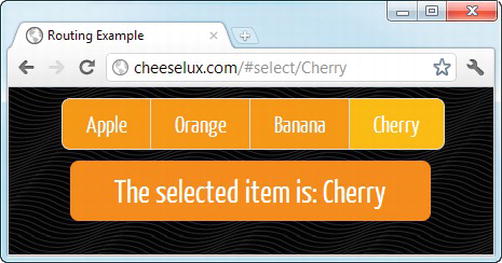
Figure 4-4. Incorporating unexpected segment values into the application state
Using Optional Segments
The limitation of variable segments is that the URL must contain a segment value to match a route. For example, the route select/{item} will match any two-segment URL where the first segment is select, but it won’t match select/Apple/Red (because there are too many segments) or select (because there are too few segments).
We can use optional segments to increase the flexibility of our routes. Listing 4-7 shows the application on an optional segment to the example.
Listing 4-7. Using an Optional Segment in a Route
...

crossroads.addRoute("select/:item:", function(item) {

    if (!item) {

        item = "Apple";

    } else  if (viewModel.items.indexOf(item)== -1) {

        viewModel.items.push(item);

        $('div.catSelectors').buttonset();

    }

    viewModel.selectedItem(item);

});

...
To create an optional segment, I simply replace the brace characters with colons so that {item} becomes :item:. With this change, the route will match URLs that have one or two segments and where the first segment is select. If there is no second segment, then the argument passed to the function will be null. In my listing, I default to the Apple value if this is the case. A route can contain as many static, variable, and optional segments as you require. I will keep my routes simple in this example, but you can create pretty much any combination you require.
Adding a Default Route
With the introduction of the optional segment, my route will match one- and two-segment URLs. The final route I want to add is a default route, which is one that will be invoked when there are no segments in the URL at all. This is required to complete the support for the Back button. To see the problem I am solving, load the listing into the browser, click one of the navigation elements, and then hit the Back button. You can see the effect—or, rather, the lack of an effect—in Figure 4-5.
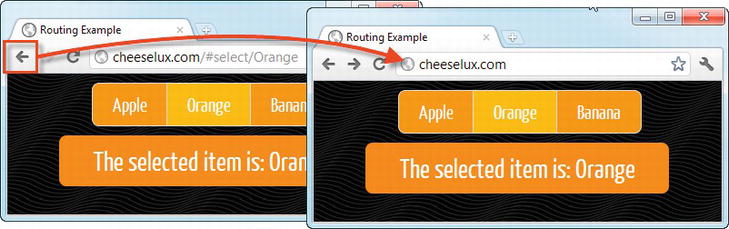
Figure 4-5. Navigating back to the application starting point
The application doesn’t reset to its original state when the Back button is clicked. This happens only when clicking the Back button takes the browser back to the base URL for the web app (which is http://cheeselux.com in my case). Nothing happens because the base URL doesn’t match the routes that the application defines. Listing 4-8 shows the addition of a new route to fix this problem.
Listing 4-8. Adding a Route for the Base URL
...

<script>

    var viewModel = {

        items: ko.observableArray(["Apple", "Orange", "Banana"]),

        selectedItem: ko.observable("Apple")

    };


    $(document).ready(function() {

        ko.applyBindings(viewModel);


        $('div.catSelectors').buttonset();


        hasher.initialized.add(crossroads.parse, crossroads);

        hasher.changed.add(crossroads.parse, crossroads);

        hasher.init();
        crossroads.addRoute("select/:item:", function(item) {

            if (!item) {

                item = "Apple";

            } else  if (viewModel.items.indexOf(item)== -1) {

                viewModel.items.push(item);

                $('div.catSelectors').buttonset();

            }

            viewModel.selectedItem(item);

        });


        crossroads.addRoute("", function() {

            viewModel.selectedItem("Apple");

        })


    });

</script>

...
This route contains no segments of any kind and will match only the base URL. Clicking the Back button until the base URL is reached now causes the application to return to its initial state. (Well, it returns sort of back to its original state; later in this chapter I’ll explain a wrinkle in this approach and show you how to improve upon it.)
Adapting Event-Driven Controls to Navigation
It is not always possible to limit the elements in a document so that all navigation can be handled through a elements. When adding JavaScript events to a routed application, I follow a simple pattern that bridges between URL routing and conventional events and that gives me a lot of the benefits of routing and lets me use other kinds of elements as well. Listing 4-9 shows this pattern applied to some other element types.
Listing 4-9. Bridging Between URL Routing and JavaScript Events
...

<script>

    var viewModel = {

        items: ko.observableArray(["Apple", "Orange", "Banana"]),

        selectedItem: ko.observable("Apple")

    };


    $(document).ready(function() {

        ko.applyBindings(viewModel);


        $('div.catSelectors').buttonset();


        hasher.initialized.add(crossroads.parse, crossroads);

        hasher.changed.add(crossroads.parse, crossroads);

        hasher.init();
        crossroads.addRoute("select/:item:", function(item) {

            if (!item) {

                item = "Apple";

            } else  if (viewModel.items.indexOf(item)== -1) {

                viewModel.items.push(item);

                $('div.catSelectors').buttonset();

            }

            if (viewModel.selectedItem() != item) {

                viewModel.selectedItem(item);

            }

        });


        crossroads.addRoute("", function() {

            viewModel.selectedItem("Apple");

        })


        $('[data-url]').live("change click", function(e) {

            var target = $(e.target).attr("data-url");

            if (e.target.tagName == 'SELECT') {

                target += $(e.target).children("[selected]").val();

            }

            if (location.hash != target) {

                location.replace(target);

            }

        })

    });

</script>

...
The technique here is to add a data-url attribute to the elements whose events should result in a navigation change. I use jQuery to handle the change and click events for elements that have the data-url attribute. Handling both events allows me to cater for the different kinds of input elements. I use the live method, which is a neat jQuery feature that relies on event propagation to ensure that events are handled for elements that are added to the document after the script has executed; this is essential when the set of elements in the document can be altered in response to view model changes. This approach allows me to use elements like this:
...

<div class="eventElemContainer" data-bind="foreach: items">

    <label data-bind="attr: {for: $data}">

        <span data-bind="text: $data"></span>

        <input type="radio" name="item" data-bind="attr: {id: $data},

            formatAttr: {attr: 'data-url', prefix: '#select/', value: $data}">

    </label>

</div>

...
This markup generates a set of radio buttons for each element in the view model items array. I create the value for the data-url attribute with my custom formatAttr data binding, which I described earlier. The select element requires some special handling because while the select element triggers the change event, the information about which value has been selected is derived from the child option elements. Here is some markup that creates a select element that works with this pattern:
...

<div class="eventElemContainer">

    <select name="eventItemSelect" data-bind="foreach: items,

            attr: {'data-url': '#select/'}">

        <option data-bind="value: $data, text: $data,

            selected: $data == viewModel.selectedItem()">

        </option>

    </select>

</div>

...
Part of the target URL is in the data-url attribute of the select element, and the rest is taken from the value attribute of the option elements. Some elements, including select, trigger both the click and change events, so I check to see that the target URL differs from the current URL before using location.replace to trigger a navigation change. Listing 4-10 shows how this technique can be applied to select elements, buttons, radio buttons, and check boxes.
Listing 4-10. Bridging Between Events and Routing for Different Kinds of Elements
<!DOCTYPE html>

<html>

<head>

    <title>Routing Example</title>

    <link rel="stylesheet" type="text/css" href="jquery-ui-1.8.16.custom.css"/>

    <link rel="stylesheet" type="text/css" href="styles.css"/>

    <script src="jquery-1.7.1.js" type="text/javascript"></script>

    <script src="jquery-ui-1.8.16.custom.js" type="text/javascript"></script>

    <script src='knockout-2.0.0.js' type='text/javascript'></script>

    <script src='utils.js' type='text/javascript'></script>

    <script src='signals.js' type='text/javascript'></script>

    <script src='crossroads.js' type='text/javascript'></script>

    <script src='hasher.js' type='text/javascript'></script>

    <script>

        var viewModel = {

            items: ko.observableArray(["Apple", "Orange", "Banana"]),

            selectedItem: ko.observable("Apple")

        };


        $(document).ready(function() {

            ko.applyBindings(viewModel);


            $('div.catSelectors').buttonset();


            hasher.initialized.add(crossroads.parse, crossroads);

            hasher.changed.add(crossroads.parse, crossroads);

            hasher.init();


            crossroads.addRoute("select/:item:", function(item) {

                if (!item) {

                    item = "Apple";

                } else  if (viewModel.items.indexOf(item)== -1) {

                    viewModel.items.push(item);
                    $('div.catSelectors').buttonset();

                }

                if (viewModel.selectedItem() != item) {

                    viewModel.selectedItem(item);

                }

            });


            crossroads.addRoute("", function() {

                viewModel.selectedItem("Apple");

            })


            $('[data-url]').live("change click", function(e) {

                var target = $(e.target).attr("data-url");

                if (e.target.tagName == 'SELECT') {

                    target += $(e.target).children("[selected]").val();

                }

                if (location.hash != target) {

                    location.replace(target);

                }

            })

        });

    </script>

</head>

<body>

    <div class="catSelectors" data-bind="foreach: items">

        <a data-bind="formatAttr: {attr: 'href', prefix: '#select/', value: $data},

            css: {selectedItem: ($data == viewModel.selectedItem())}">

            <span data-bind="text: $data"></span>

        </a>

    </div>

    <div data-bind="foreach: items">

        <div class="item" data-bind="fadeVisible: $data == viewModel.selectedItem()">

            The selected item is: <span data-bind="text: $data"></span>

        </div>

    </div>


    <div class="eventElemContainer">

        <select name="eventItemSelect" data-bind="foreach: items,

                attr: {'data-url': '#select/'}">

            <option data-bind="value: $data, text: $data,

                selected: $data == viewModel.selectedItem()">

            </option>

        </select>

    </div>


    <div class="eventElemContainer" data-bind="foreach: items">
        <input type="button" data-bind="value: $data,

            formatAttr: {attr: 'data-url', prefix: '#select/', value: $data}" />

    </div>


    <div class="eventElemContainer" data-bind="foreach: items">

        <label data-bind="attr: {for: $data}">

            <span data-bind="text: $data"></span>

            <input type="checkbox" data-bind="attr: {id: $data},

                formatAttr: {attr: 'data-url', prefix: '#select/', value: $data}">

        </label>

    </div>


    <div class="eventElemContainer" data-bind="foreach: items">

        <label data-bind="attr: {for: $data}">

            <span data-bind="text: $data"></span>

            <input type="radio" name="item" data-bind="attr: {id: $data},

                formatAttr: {attr: 'data-url', prefix: '#select/', value: $data}">

        </label>

    </div>

</body>

</html>
I have defined another custom binding to correctly set the selected attribute on the appropriate option element. I called this binding selected (obviously enough), and it is defined, as shown in Listing 4-11, in the utils.js file.
Listing 4-11. The Selected Data Binding
ko.bindingHandlers.selected = {

    init: function(element, accessor) {

        if (accessor()) {

            $(element).siblings("[selected]").removeAttr("selected");

            $(element).attr("selected", "selected");

        }

    },

    update: function(element, accessor) {

        if (accessor()) {

            $(element).siblings("[selected]").removeAttr("selected");

            $(element).attr("selected", "selected");

        }

    }

}
You might be tempted to simply handle events and trigger the application changes directly. This works, but you will have just added to the complexity of your application by taking on the overhead or creating and managing routes and keeping track of which events from which elements trigger difference state changes. My recommendation is to focus on URL routing and use bridging, as described here, to funnel events from elements into the routing system.
Using the HTML5 History API
The Crossroads library I have been using so far in this chapter depends on the Hasher library from the same author to receive notifications when the URL changes. The Hasher library monitors the URL and tells Crossroads when it changes, triggering the routing behavior.
There is a weakness in this approach, which is that the state of the application isn’t preserved as part of the browser history. Here are some steps to demonstrate the issue:
- Load the listing into the browser.
- Click the Orange button.
- Navigate directly to
#select/Cherry.- Click the Banana button.
- Click the Back button twice.
Everything starts off well enough. When you navigated to the #select/Cherry URL, the new item was added to the view model and selected properly. When you clicked the Back button the first time, the Cherry item was correctly selected again. The problem arises when you clicked the Back button for the second time. The selected item was correctly wound back to Orange, but the Cherry item remained on the list. The application is able to use the URL to select the correct item, but when the Orange item was selected originally, there was no Cherry item in the view model, and yet it is still displayed to the user.
For some web applications, this won’t be a big deal, and it isn’t for this simple example, either. After all, it doesn’t really matter if the user can select an item that they explicitly added in the first place. But for other web apps, this is a critical issue, and making sure that the view model is correctly preserved in the browser history is essential. We can address this using the HTML5 History API, which gives us more access to the browser history than web programmers have previously enjoyed. We access the History API through the windows.history or global history object. There are two aspects of the History API that I am interested in for this situation.
![]() Note I am not going to cover the HTML5 API beyond what is needed to maintain application state. I provide full details in The Definitive Guide to HTML5, also published by Apress. You can read the W3C specification at
Note I am not going to cover the HTML5 API beyond what is needed to maintain application state. I provide full details in The Definitive Guide to HTML5, also published by Apress. You can read the W3C specification at http://dev.w3.org/html5/spec (the information on the History API is in section 5.4, but this may change since the HTML5 specification is still in draft).
The history.replaceState method lets you associate a state object with the entry in the browser’s history for the current document. There are three arguments to this method; the first is the state object, the second argument is the title to use in the history, and the third is the URL for the document. The second argument isn’t used by the current generation of browsers, but the URL argument allows you to effectively replace the URL in the history that is associated with the current document. The part I am interested in for this chapter is the first argument, which I will use to store the contents of the viewModel.items array in the history so that I can properly maintain the state when the user clicks the Back and Forward buttons.
![]() Tip You can also insert new items into the history using the
Tip You can also insert new items into the history using the history.pushState method. This method takes the same arguments as replaceState and can be useful for inserting additional state information.
The window browser object triggers a popstate event whenever the active history entry changes. If the entry has state information associated with it (because the replaceState or pushState method was used), then you can retrieve the state object through the history.state property.
Adding History State to the Example Application
Things aren’t quite as simple as you might like when it comes to using the History API; it suffers from two problems that are common to most of the HTML5 APIs. The first problem is that not all browsers support the History API. Obviously, pre-HTML5 browsers don’t know about the History API, but even some browser versions that support other HTML5 features do not implement the History API.
The second problem is that those browsers that do implement the HTML5 API introduce inconsistencies, which requires some careful testing. So, even as the History API helps us solve one problem, we are faced with others. Even so, the History API is worth using, as long as you accept that it isn’t universally supported and that a fallback is required. Listing 4-12 shows the addition of the History API to the simple example web app.
Listing 4-12. Using the HTML5 History API to Preserve View Model State
<!DOCTYPE html>

<html>

<head>

    <title>Routing Example</title>

    <link rel="stylesheet" type="text/css" href="jquery-ui-1.8.16.custom.css"/>

    <link rel="stylesheet" type="text/css" href="styles.css"/>

    <script src="jquery-1.7.1.js" type="text/javascript"></script>

    <script src="jquery-ui-1.8.16.custom.js" type="text/javascript"></script>

    <script src="modernizr-2.0.6.js" type="text/javascript"></script>

    <script src='knockout-2.0.0.js' type='text/javascript'></script>

    <script src='utils.js' type='text/javascript'></script>

    <script src='signals.js' type='text/javascript'></script>

    <script src='crossroads.js' type='text/javascript'></script>

    <script src='hasher.js' type='text/javascript'></script>

    <script>

       var viewModel = {

           items: ko.observableArray(["Apple", "Orange", "Banana"]),

           selectedItem: ko.observable("Apple")

       };


       $(document).ready(function() {

           ko.applyBindings(viewModel);


           $('div.catSelectors').buttonset();


           crossroads.addRoute("select/:item:", function(item) {

               if (!item) {

                   item = "Apple";

               } else  if (viewModel.items.indexOf(item)== -1) {

                   viewModel.items.push(item);
               }


               if (viewModel.selectedItem() != item) {

                   viewModel.selectedItem(item);

               }


               $('div.catSelectors').buttonset();

               if (Modernizr.history) {

                   history.replaceState(viewModel.items(), document.title, location);

               }

           });


           crossroads.addRoute("", function() {

               viewModel.selectedItem("Apple");

           })


           if (Modernizr.history) {

               $(window).bind("popstate", function(event) {

                   var state = history.state ? history.state

                       : event.originalEvent.state;

                   if (state) {

                       viewModel.items.removeAll();

                       $.each(state, function(index, item) {

                           viewModel.items.push(item);

                       });

                   }

                   crossroads.parse(location.hash.slice(1));

               });

           } else {

               hasher.initialized.add(crossroads.parse, crossroads);

               hasher.changed.add(crossroads.parse, crossroads);

               hasher.init();

           }


       });

   </script>

</head>

<body>

    <div class="catSelectors" data-bind="foreach: items">

        <a data-bind="formatAttr: {attr: 'href', prefix: '#select/', value: $data},

            css: {selectedItem: ($data == viewModel.selectedItem())}">

            <span data-bind="text: $data"></span>

        </a>

    </div>

    <div data-bind="foreach: items">

        <div class="item" data-bind="fadeVisible: $data == viewModel.selectedItem()">

            The selected item is: <span data-bind="text: $data"></span>

        </div>

    </div>

</body>

</html>
Storing the Application State
The first set of changes in the listing stores the application state when the main application route matches a URL. By responding to the URL change, I am able to preserve the state whenever the user clicks one of the navigation elements or enters a URL directly. Here is the code that stores the state:
...

<script src="modernizr-2.0.6.js" type="text/javascript"></script>

...

crossroads.addRoute("select/:item:", function(item) {

    if (!item) {

        item = "Apple";

    } else  if (viewModel.items.indexOf(item)== -1) {

        viewModel.items.push(item);

    }


    if (viewModel.selectedItem() != item) {

        viewModel.selectedItem(item);

    }


    $('div.catSelectors').buttonset();

    if (Modernizr.history) {

        history.replaceState(viewModel.items(), document.title, location);

    }

});

...
The new script element in the listing adds the Modernizr library to the web app. Modernizr is a feature-detection library that contains checks to determine whether numerous HTML5 and CSS3 features are supported by the browser. You can download Modernizr and get full details of the features it can detect at http://modernizr.com.
I don’t want to call the methods of the History API unless I am sure that the browser implements it, so I check the value of the Modernizr.history property. A value of true means that the History API has been detected, and a value of false means the API isn’t present.
You could write your own feature-detection tests if you prefer. As an example, here is the code behind the Modernizr.history test:
tests['history'] = function() {

    return !!(window.history && history.pushState);

};
Modernizr simply checks to see whether history.pushState is defined by the browser. I prefer to use a library like Modernizr because the tests it performs are well-validated and updated as needed and, further, because not all of the tests are quite so simple.
![]() Tip Feature-detection libraries such as Modernizr don’t make any assessment of how well a feature has been implemented. The presence of the
Tip Feature-detection libraries such as Modernizr don’t make any assessment of how well a feature has been implemented. The presence of the history.pushState method indicates that the History API is present, but it doesn’t provide any insights into quirks or oddities that may have to be reckoned with. In short, a feature-detection library is no substitute for thoroughly testing your code on a range of browsers.
If the History API is present, then I call the replaceState method to associate the value of the view model items array with the current URL. I can perform no action if the History API isn’t available because there isn’t an alternative mechanism for storing state in the browser (although I could have used a polyfill; see the sidebar for details).
USING A HISTORY POLYFILL
Restoring the Application State
Of course, storing the application state isn’t enough. I also have to be able to restore it, and that means responding to the popstate event when it is triggered by a URL change. Here is the code:
...

crossroads.addRoute("select/:item:", function(item) {


    ...other statements removed for brevity...


    if (Modernizr.history) {

        $(window).bind("popstate", function(event) {

            var state = history.state ? history.state

                : event.originalEvent.state;
            if (state) {

                viewModel.items.removeAll();

                $.each(state, function(index, item) {

                    viewModel.items.push(item);

                });

            }

            crossroads.parse(location.hash.slice(1));

        });

    } else {

        hasher.initialized.add(crossroads.parse, crossroads);

        hasher.changed.add(crossroads.parse, crossroads);

        hasher.init();

    }

});

...
I have used Modernizr.history to check for the API before I use the bind method to register a handler function for the popstate event. This isn’t strictly necessary since the event simply won’t be triggered if the API isn’t present, but I like to make it obvious that this block of code is related to the History API.
You can see an example of catering to a browser oddity in the function that handles the popstate event. The history.state property should return the state object associated with the current URL, but Google Chrome doesn’t support this, and the value must be obtained from the state property of the Event object instead. jQuery normalizes Event objects, which means that I have to use the originalEvent property to get to the underlying event object that the browser generated, like this:
var state = history.state ? history.state: event.originalEvent.state;
With this approach I can get the state data from history.state if it is available and the event if it is not. Sadly, using the HTML5 APIs often requires this kind of workaround, although I expect the consistency of the various implementations will improve over time.
I can’t rely on there being a state object every time the popstate event is triggered because not all entries in the browser history will have state associated with them.
When there is state data, I use the removeAll method to clear the items array in the view model and then populate it with the items obtained from the state data using the jQuery each function:
if (state) {

    viewModel.items.removeAll();

    $.each(state, function(index, item) {

        viewModel.items.push(item);

    });

}
Once the content of the view model has been set, I notify Crossroads that there has been a change in URL by calling the parse method. This was the function previously handled by the Hasher library, which removed the leading # character from URLs before passing them to Crossroads. I do the same to maintain compatibility with the routes I defined earlier:
crossroads.parse(location.hash.slice(1));
I want to preserve compatibility because I don’t want to assume that the user has an HTML5 browser that supports the History API. To that end, if the Modernizr.history property is false, I fall back to using Hasher so that the basic functionality of the web app still works, even if I can’t provide the state management feature:
if (Modernizr.history) {

    ...History API code...

} else {

    hasher.initialized.add(crossroads.parse, crossroads);

    hasher.changed.add(crossroads.parse, crossroads);

    hasher.init();

}
With these changes, I am able to use the History API when it is available to manage the state of the application and unwind it when the user uses the Back button. Figure 4-6 shows the key step from the sequence of tasks I had you perform at the start of this section. As the user moves back through the history, the Cherry item disappears.
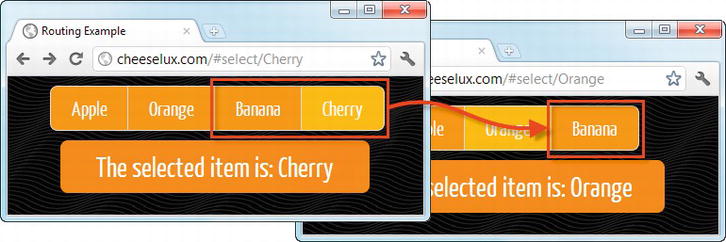
Figure 4-6. Using the History API to manage changes in application state
As an aside, I chose to store the application state every time the URL changed because it allows me to support the Forward button as well as the Back button. From the state shown in the figure, clicking the Forward button restores the Cherry item to the view model, demonstrating that the application state is properly preserved and restored in both directions.
Adding URL Routing to the CheeseLux Web App
I switched to a simple example in this chapter because I didn’t want to overwhelm the routing code (which is pretty sparse) with the markup and data bindings (which can be verbose). But now that I have explained how URL routing works, it is time to introduce it to the CheeseLux demo, as shown in Listing 4-13.
Listing 4-13. Adding Routing to the CheeseLux Example
<!DOCTYPE html>

<html>

<head>
    <title>CheeseLux</title>

    <link rel="stylesheet" type="text/css" href="styles.css"/>

    <script src="jquery-1.7.1.js" type="text/javascript"></script>

    <script src="jquery-ui-1.8.16.custom.js" type="text/javascript"></script>

    <script src='knockout-2.0.0.js' type='text/javascript'></script>

    <script src='utils.js' type='text/javascript'></script>

    <script src='signals.js' type='text/javascript'></script>

    <script src='crossroads.js' type='text/javascript'></script>

    <link rel="stylesheet" type="text/css" href="jquery-ui-1.8.16.custom.css"/>

    <noscript>

        <meta http-equiv="refresh" content="0; noscript.html"/>

    </noscript>

    <script>

        var cheeseModel = {

            products: [

                {category: "British Cheese", items : [

                    {id: "stilton", name: "Stilton", price: 9},

                    {id: "stinkingbishop", name: "Stinking Bishop", price: 17},

                    {id: "cheddar", name: "Cheddar", price: 17}]},

                {category: "French Cheese", items: [

                    {id: "camembert", name: "Camembert", price: 18},

                    {id: "tomme", name: "Tomme de Savoie", price: 19},

                    {id: "morbier", name: "Morbier", price: 9}]},

                {category: "Italian Cheese", items: [

                    {id: "gorgonzola", name: "Gorgonzola", price: 8},

                    {id: "fontina", name: "Fontina", price: 11},

                    {id: "parmesan", name: "Parmesan", price: 16}]}]

        };


        $(document).ready(function() {

            $('#buttonDiv input:submit').button().css("font-family", "Yanone");


            cheeseModel.selectedCategory =

                ko.observable(cheeseModel.products[0].category);


            mapProducts(function(item) {

                item.quantity = ko.observable(0);

                item.subtotal = ko.computed(function() {

                    return this.quantity() * this.price;

                }, item);

                item.quantity.subscribe(function() {

                    updateState();

                });

            }, cheeseModel.products, "items");


            cheeseModel.total = ko.computed(function() {

                var total = 0;

                mapProducts(function(elem) {

                    total += elem.subtotal();

                }, cheeseModel.products, "items");

                return total;

            });
            $('div.cheesegroup').not("#basket").css("width", "50%");

            $('div.navSelectors').buttonset();


            ko.applyBindings(cheeseModel);


            $(window).bind("popstate", function(event) {

                var state = history.state ? history.state : event.originalEvent.state;

                restoreState(state);

                crossroads.parse(location.hash.slice(1));

            });


            crossroads.addRoute("category/:newCat:", function(newCat) {

                cheeseModel.selectedCategory(newCat ?

                    newCat : cheeseModel.products[0].category);

                updateState();

            });


            crossroads.addRoute("remove/{id}", function(id) {

                mapProducts(function(item) {

                    if (item.id == id) {

                        item.quantity(0);

                    }

                }, cheeseModel.products, "items");

            });


            $('#basketTable a')

                .button({icons: {primary: "ui-icon-closethick"},text: false});


            function updateState() {

                var state = {

                    category: cheeseModel.selectedCategory()

                };

                mapProducts(function(item) {

                    if (item.quantity() > 0) {

                        state[item.id] = item.quantity();

                    }

                }, cheeseModel.products, "items");

                history.replaceState(state, "",

                    "#select/" + cheeseModel.selectedCategory());

            }


            function restoreState(state) {

                if (state) {

                    mapProducts(function(item) {

                        item.quantity(state[item.id] ? state[item.id] : 0);

                    }, cheeseModel.products, "items");

                    cheeseModel.selectedCategory(state.category);

                }

            }

        });

    </script>
</head>

<body>

    <div id="logobar">

        <img src="cheeselux.png">

        <span id="tagline">Gourmet European Cheese</span>

    </div>


    <div class="cheesegroup">

        <div class="navSelectors" data-bind="foreach: products">

            <a data-bind="formatAttr: {attr: 'href', prefix: '#category/',

               value: category},

            css: {selectedItem: (category == cheeseModel.selectedCategory())}">

                <span data-bind="text: category">

            </a>

        </div>

    </div>


    <div id="basket" class="cheesegroup basket">

        <div class="grouptitle">Basket</div>

        <div class="groupcontent">


            <div class="description" data-bind="ifnot: total">

                No products selected

            </div>


            <table id="basketTable" data-bind="visible: total">

                <thead><tr><th>Cheese</th><th>Subtotal</th><th></th></tr></thead>

                <tbody data-bind="foreach: products">

                    <!-- ko foreach: items -->

                        <tr data-bind="visible: quantity, attr: {'data-prodId': id}">

                            <td data-bind="text: name"></td>

                            <td>$<span data-bind="text: subtotal"></span></td>

                            <td>

                                <a data-bind="formatAttr: {attr: 'href',

                                    prefix: '#remove/', value: id}"></a>

                            </td>

                        </tr>

                    <!-- /ko -->

                </tbody>

                <tfoot>

                    <tr><td class="sumline" colspan=2></td></tr>

                    <tr>

                        <th>Total:</th><td>$<span data-bind="text: total"></span></td>

                    </tr>

                </tfoot>

            </table>

        </div>

        <div class="cornerplaceholder"></div>


        <div id="buttonDiv">

            <input type="submit" value="Submit Order"/>

        </div>
    </div>


    <form action="/shipping" method="post">

        <!-- ko foreach: products -->

        <div class="cheesegroup"

             data-bind="fadeVisible: category == cheeseModel.selectedCategory()">

            <div class="grouptitle" data-bind="text: category"></div>

            <div data-bind="foreach: items">

                <div class="groupcontent">

                    <label data-bind="attr: {for: id}" class="cheesename">

                        <span data-bind="text: name">

                        </span> $(<span data-bind="text:price"></span>)</label>

                    <input data-bind="attr: {name: id}, value: quantity"/>

                    <span data-bind="visible: subtotal" class="subtotal">

                        ($<span data-bind="text: subtotal"></span>)

                    </span>

                </div>

            </div>

        </div>

        <!-- /ko -->

    </form>

</body>

</html>
I am not going to break this listing down line by line because much of functionality is similar to previous examples. There are, however, a couple of techniques that are worth learning and some changes that I need to explain, all of which I’ll cover in the sections that follow. Figure 4-7 shows how the web app appears in the browser.
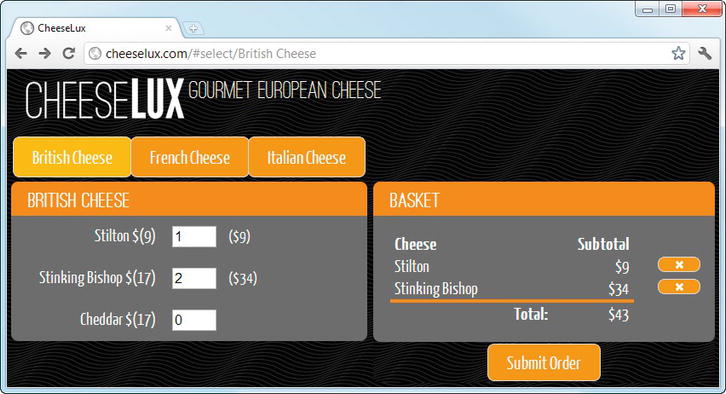
Figure 4-7. Adding routing to the CheeseLux example
Moving the mapProducts Function
The first change, and the most basic, is that I have moved the mapProducts function into the util.js file. In Chapter 9, I am going to show you how to package up this kind of function more usefully, and I don’t want to keep recycling the same code in the listings. As I moved the function, I rewrote it so that it can work on any set of nested arrays. Listing 4-14 shows the new version of this function.
Listing 4-14. The Revised mapProducts Function
function mapProducts(func, data, indexer) {

    $.each(data, function(outerIndex, outerItem) {

        $.each(outerItem[indexer], function(itemIndex, innerItem) {

            func(innerItem, outerItem);

        });

    });

}
The two new arguments to the function are the outer nested array and the property name of the inner array. You can see how I have used this in the main listing so that the arguments are cheeseModel.products and items, respectively.
Enhancing the View Model
I made two changes to the view model. The first was to define an observable data item to capture the selected cheese category:
cheeseModel.selectedCategory = ko.observable(cheeseModel.products[0].category);
The second is much more interesting. Data bindings are not the means by which view model changes are propagated into the web app. You can also subscribe to an observable data item and specify a function that will be executed when the value changes. Here is the subscription I created:
mapProducts(function(item) {

    item.quantity = ko.observable(0);

    item.subtotal = ko.computed(function() {

        return this.quantity() * this.price;

    }, item);

    item.quantity.subscribe(function() {

        updateState();

    });

}, cheeseModel.products, "items");
I subscribed to the quantity observable on each cheese product. When the value changes, the updateState function will be executed. I’ll describe this function shortly. Subscriptions are rather like events for the view model; they can be useful in any number of situations, and I often find myself using them when I want some task performed automatically.
Managing Application State
I want to preserve two kinds of state in this web app. The first is the selected product category, and the second is the contents of the basket. I store state information in the browser’s history in the updateState function, which is executed whenever my quantity subscription is triggered or the selected category changes.
![]() Tip The technique that I demonstrate here is a little odd when applied to a shopping basket, because web sites will usually go to great lengths to preserve your product selections. Ignore this, if you will, and focus on the state management technique, which is the real purpose of this section.
Tip The technique that I demonstrate here is a little odd when applied to a shopping basket, because web sites will usually go to great lengths to preserve your product selections. Ignore this, if you will, and focus on the state management technique, which is the real purpose of this section.
function updateState() {

    var state = {

        category: cheeseModel.selectedCategory()

    };

    mapProducts(function(item) {

        if (item.quantity() > 0) {

            state[item.id] = item.quantity();

        }

    }, cheeseModel.products, "items");

    history.replaceState(state, "", "#select/" + cheeseModel.selectedCategory());

}
![]() Tip This listing requires the HTML5 History API, and unlike the earlier examples in this chapter, there is no fallback to the HTML4-compatible approach taken by the Hasher library.
Tip This listing requires the HTML5 History API, and unlike the earlier examples in this chapter, there is no fallback to the HTML4-compatible approach taken by the Hasher library.
I create an object that has a category property that contains the name of the selected category and one property for each individual cheese that has a nonzero quantity value. I write this to the browser history using the replaceState method, which I have highlighted in the listing.
Something clever is happening here. To explain what I am doing—and why—we have to start with the markup for the navigation elements that remove products from the basket. Here is the relevant HTML:
<a data-bind="formatAttr: {attr: 'href', prefix: '#remove/', value: id}"></a>
When the data bindings are applied, I end up with an element like this:
<a href="#/remove/stilton"></a>
In Chapter 3, I removed items from the basket by handling the click event from these elements. Now that I am using URL routing, I have to define a route, which I do like this:
crossroads.addRoute("remove/{id}", function(id) {

    mapProducts(function(item) {

        if (item.id == id) {

            item.quantity(0);

        }

    }, cheeseModel.products, "items");

});
My route matches any two-segment URL where the first segment is remove. I use the second segment to find the right item in the view model and change the value of the quantity property to zero.
At this point, I have a problem. I have navigated to a URL that I don’t want the user to be able to navigate back to because it will match the route that just removes items from the basket, and that doesn’t help me.
The solution is in the call to the history.replaceState method. When the quantity value is changed, my subscription causes the updateState function to be called, which in turn calls history.replaceState. The third argument is the important one:
history.replaceState(state, "", "#select/" + cheeseModel.selectedCategory());
The URL specified by this argument is used to replace the URL that the user navigated to. The browser doesn’t navigate to the URL when it is changed, but when the user moves back through the browser history, it is the replacement URL that will be used by the browser. Irrespective of which route matches the URL, the history will always contain one that starts with #select/. In this way, I can use URL routing without exposing the inner workings of my web app to the user.
Summary
In this chapter, I have shown you how to add URL routing to your web applications. This is a powerful and flexible technique that separates application navigation from HTML elements, allowing for a more concise and expressive way of handling navigation and a more testable and maintainable code base. It can take a while to get used to using routing at the client, but it is well worth the investment of time and energy, especially for large and complex projects.