
Until now, we only saw static components, that is, components that did not change. To make components that respond to user input and other events, React uses a data structure called state in the component. In this chapter, we will explore how to use React State and how it can be manipulated to change how the component looks and what it shows on screen.
The state essentially holds the data, something that can change, as opposed to the immutable properties in the form of props that you saw earlier. This state needs to be used in the render() method to build the view. It is only the change of state that can change the view. When data or the state changes, React automatically rerenders the view to show the new changed data.
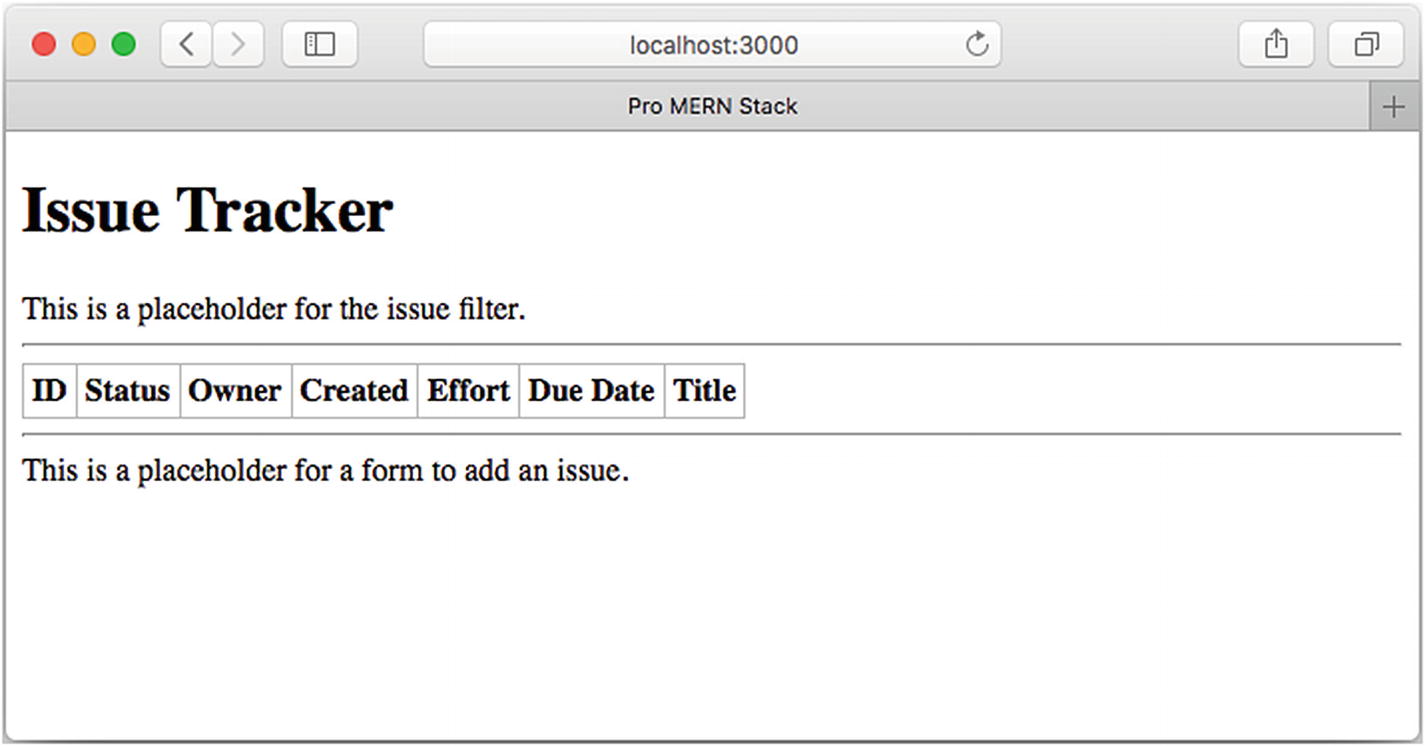
For this chapter, the goal is to add a button and append a row to the initial list of issues on click of that button. We’ll add this button in place of the placeholder text in the IssueAdd component. By doing that, you’ll learn about a component’s state, how to manipulate it, how to handle events, and how to communicate between components.
We’ll start by appending a row without user interaction. We’ll do this using a timer rather than a button so that we focus on the state and modifications and not deal with things like user input. Toward the end of the chapter, we will replace the timer with an actual button and a form for user input.
Initial State
The state of a component is captured in a variable called this.state in the component’s class, which should be an object consisting of one or more key-value pairs, where each key is a state variable name and the value is the current value of that variable. React does not specify what needs to go into the state, but it is useful to store in the state anything that affects the rendered view and can change due to any event. These are typically events generated due to user interaction.
For the IssueTable component, the list of issues being displayed is definitely one such piece of data that both affects the rendered view and can also change when an issue is added, edited, or deleted. The array of issues is therefore an ideal state variable.
Other things, such as the size of the window, also can change, but this is not something that affects the DOM. Even though the display changes (for example, a line may wrap because the window is narrower), the change is handled by the browser directly based on the same DOM. So, we don’t need to capture this in the state of the component. There may be cases where it does affect the DOM; for example, if the height of the window determines how many issues we display, we may store the height of the window in a state variable and restrict the number of IssueRow components being constructed. In those cases, the height of the window, or a derived value, for example, the number of issues being shown, could also be stored in the state.
Things that don’t change, for example, the border style of the table, also don’t need to go into the state. That’s because user interaction or other events do not affect the style of borders.
Note that we used only one state variable called issues. We can have other state variables, for instance if we were showing the issue list in multiple pages, and we wanted to also keep the page number currently being shown as another state variable, we could have done that by adding another key to the object like page: 0.
App.jsx: Initializing and Using State
Running and testing this piece of code should show no change in the application; you will still see a table containing two rows of issues, just as before.
Exercise: Initial State
- 1.
If you needed to display each row in a different background color based on the status of the issue, how would you go about it? Would you have a list of colors corresponding to each issue also stored in the state? Why or why not?
Answers are available at the end of the chapter.
Async State Initialization
Although we set the initial state in the constructor, it is highly unlikely that regular SPA components will have the initial state available to them statically. These will typically be fetched from the server. In the case of the Issue Tracker application, even the initial list issues to be displayed would have to be fetched via an API call.
If there were additional state variables, setting only one variable (issues) will cause it to get merged with the existing state. For example, if we had stored the current page as another state variable, the new value of the state variable issues will be merged into the state, keeping the value of the current page unchanged.
The timeout value of 500 milliseconds is somewhat arbitrary: it’s reasonable to expect a real API call to fetch the initial list of issues within this time.
Now, it is very tempting to call loadData() within the constructor of IssueTable. It may even seem to work, but the fact is that the constructor only constructs the component (i.e., does all the initialization of the object in memory) and does not render the UI. The rendering happens later, when the component needs to be shown on the screen. If this.setState() gets called before the component is ready to be rendered, things will go awry. You may not see this happening in simple pages, but if the initial page is complex and takes time to render, and if the Ajax call returns before rendering is finished, you will get an error.
componentDidMount() : This method is called as soon as the component’s representation has been converted and inserted into the DOM. A setState() can be called within this method.
componentDidUpdate() : This method is invoked immediately after an update occurs, but it is not called for the initial render. this.setState() can be called within this method. The method is also supplied the previous props and previous state as arguments, so that the function has a chance to check the differences between the previous props and state and the current props and state before taking an action.
componentWillUnmount() : This method is useful for cleanup such as cancelling timers and pending network requests.
shouldComponentUpdate() : This method can be used to optimize and prevent a rerender in case there is a change in the props or state that really doesn’t affect the output or the view. This method is rarely used because, when the state and props are designed well, there will rarely be a case when the state or props change but an update is not required for the view.
App.jsx, IssueTable: Loading State Asynchronously
Empty table shown for a fraction of a second
It gets filled soon after, but still, there is a flicker. When we explore server-side rendering in later chapters, we will get rid of this ungainly flicker. For the moment, let’s live with this minor UI unpleasantness.
Updating State
In the previous sections, you saw how to set the initial state, using a direct assignment in the constructor as well as setting a value in other lifecycle methods using this.setState(). In this section, let’s make a minor change to the state rather than set a completely new value to it. Let’s add a new issue and thus change, not the complete state, but only a portion of it.
It may seem to work, but it will have unexpected consequences in some of the lifecycle methods within this as well as descendent components. Especially in those methods that compare the old and new properties, the difference between the old state and the new one will not be detected.
What is needed in the setState() call is a fresh array of issues, say a copy of the state variable. If any existing array element, say an issue itself, is changing, not only is the copy of the array needed, but also the copy of the object that is being changed is needed. There are libraries called immutability helpers, such as immutable.js ( http://facebook.github.io/immutable-js/ ), which can be used to construct the new state object. When a property of the object is modified, the library creates a copy optimally.
But we will only append an issue, and not change an existing issue. It’s fairly straightforward to make a shallow copy of the array, and this will suffice for the moment. So, we won’t be using the library—there isn’t much extra code we need to write to handle it. If, in your application, you find that you have to make lots of copies because of deep nesting of objects in the state, you could consider using immutable.js.
App.jsx: Appending an Issue on a Timer

Appended row to initial set of issues
Note that we did not explicitly call a setState() on the IssueRow components. React automatically propagates any changes to child components that depend on the parent component’s state. Further, we did not have to write any code for inserting a row into the DOM. React calculated the changes to the virtual DOM and inserted a new row.
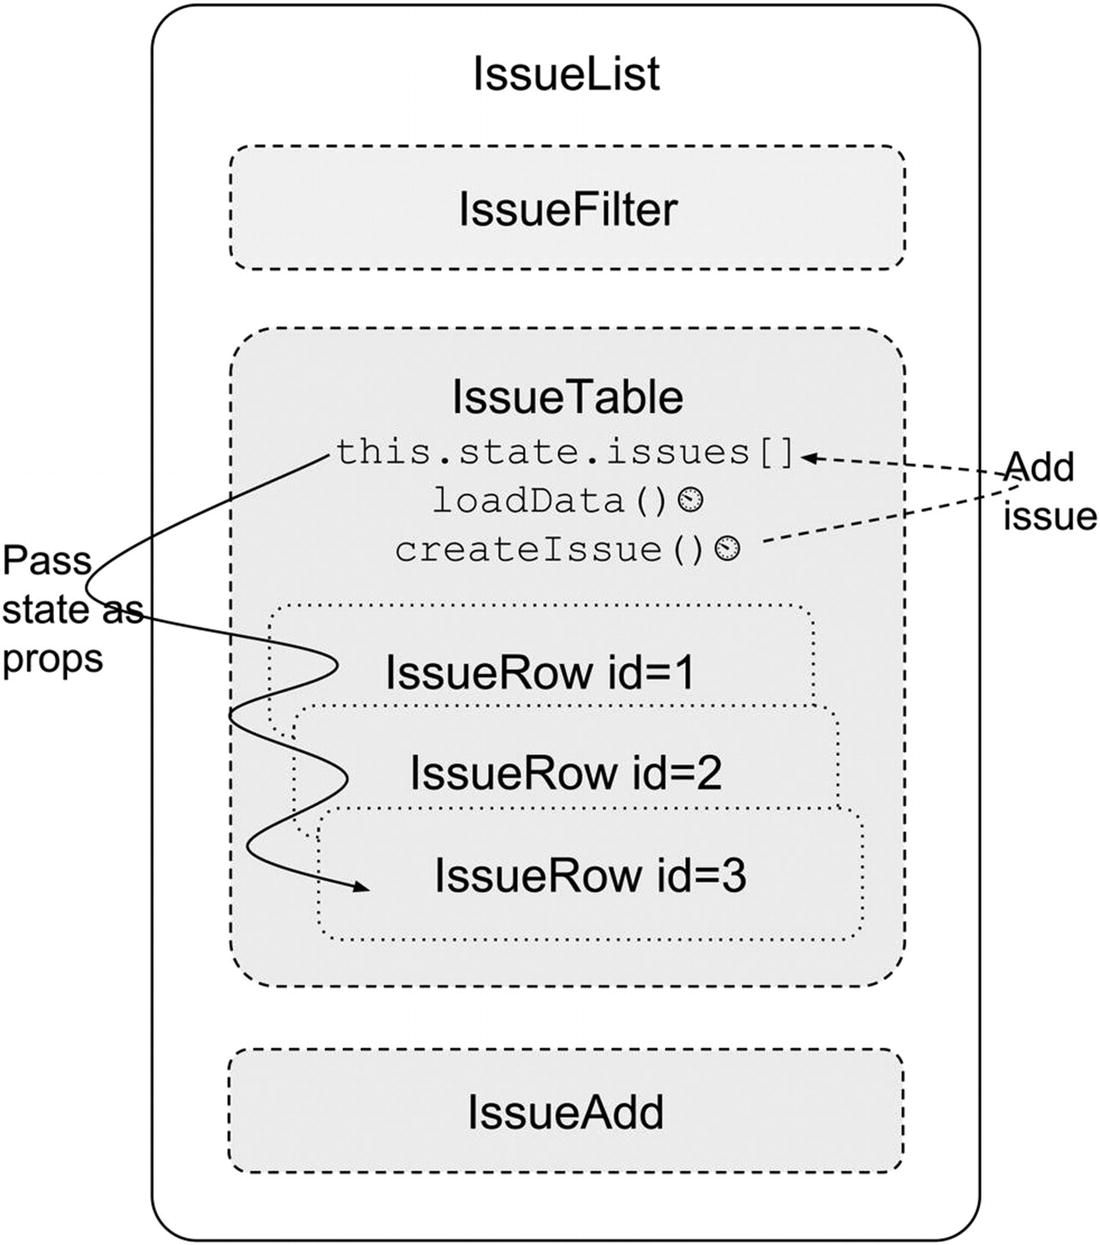
Setting state and passing data as props
Exercise: Updating State
- 1.
Set up another timer at say, three seconds, right after the first timer to add yet another issue based on sampleIssue. Do you notice something going wrong when the second new issue is added? Hint: Look at the ID of the first new issue. Why do you think this is happening? How can you correct it?
- 2.
Add a console.log in the IssueRow’s render() method. How many times do you expect render() to be called? How many console logs do you see? (Make sure you undo the changes you did in the previous exercise!)
Answers are available at the end of the chapter.
Lifting State Up
Before we add user interface elements to create new issues, let’s move the initiation of the creation to where it really belongs: in the IssueAdd component. This will allow us to deal with the changes one step at a time, because moving the timer for adding a new issue from the IssueTable component to the IssueAdd component is not as trivial as it first appears.
If you do try to move it, you will immediately realize that the createIssue() method will also have to move, or we need to have a variant within IssueAdd that can communicate back to IssueTable and call the createIssue() method, which continues to remain there. But there is no straightforward way to communicate between siblings in React. Only parents can pass information down to children; horizontal communication seems hard, if not impossible.
The way around this is to have the common parent contain the state and all the methods that deal with this state. By lifting the state up on level to IssueList, information can be propagated down to IssueAdd as well as to IssueTable.
We still have to take care of one more thing before we can say we are done with this set of changes. All this while, we have been using the arrow function syntax to set up timers. In ES2015, the arrow function has the effect of setting the context (the value of this) to the lexical scope. This means that this within the callback will refer to whatever this was in the lexical scope, that is, outside of the anonymous function, where the code is present.
That worked as long as the called function was within the same class as the timer callback. It still works, in the loadData() method, because this refers to the IssueList component where the timer was fired, and therefore, this.state refers to the state within IssueList itself.
But, when createIssue is called from a timer within IssueAdd, this will refer to the IssueAdd component. But what we really want is for createIssue to be always called with this referring to the IssueList component. Otherwise, this.state.issues will be undefined.
But then, if we need to ever refer to the same method again and pass it to some other child component, we’d have to repeat this code. Also, there is never going to be a case where we will need the method to be not bound, so it is best to replace the definition of createIssue with a bound version of itself. The recommended way to do this is in the constructor of the class where this method is implemented.
App.jsx: New IssueTable Class
App.jsx, IssueAdd: New IssueAdd Class
App.jsx, IssueList: New IssueList Class
The effect of these changes will not be seen in the user interface. The application will behave as it used to. On refreshing the browser, you will see an empty table to start with, which will soon be populated with two issues and after two seconds, another issue will be added.
But this sets us up nicely for the change where we can replace the timer in IssueAdd with a button that the user can click to add a new issue.
Exercise: Lifting State Up
- 1.
Remove the binding of the method createIssue(). What error do you see in the console? What does it tell you?
Answers are available at the end of the chapter.
Event Handling
Let’s now add an issue interactively, on the click of a button rather than use a timer to do this. We’ll create a form with two text inputs and use the values that the user enters in them to add a new issue. An Add button will trigger the addition.
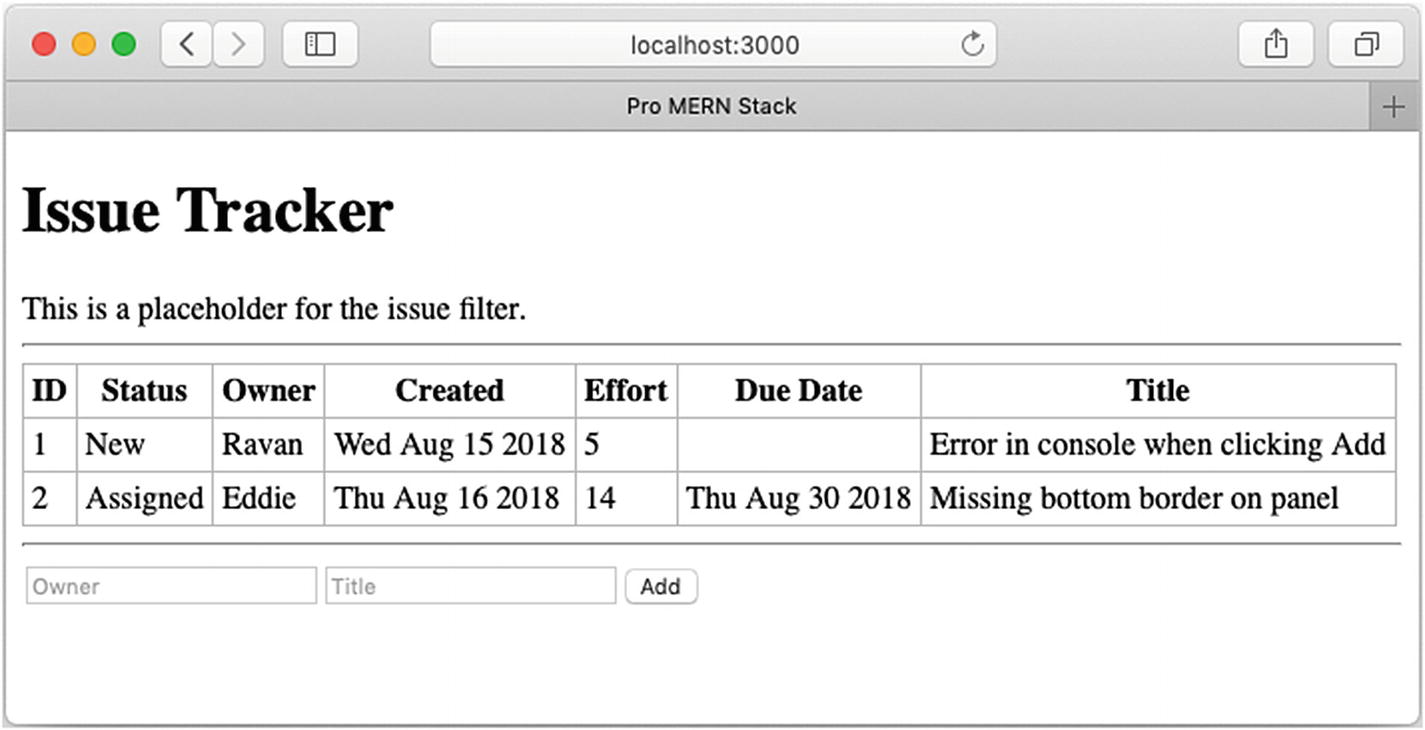
IssueAdd placeholder replaced with a form
At this point, clicking Add will submit the form and fetch the same screen again. That’s not what we want. Firstly, we want it to call createIssue() using the values in the owner and title fields. Secondly, we want to prevent the form from being submitted because we will handle the event ourselves.
To handle events such as onclick and onsubmit, the properties that we need to supply to the elements are, simply, onClick and onSubmit. As in plain HTML and JavaScript, these properties take functions as values. We’ll create a class method called handleSubmit() to receive the submit event from the form when the Add button is clicked. Within this method, we’ll need a handle to the form, so as in regular HTML, let’s give the form a name, say, issueAdd which can then be referred to in JavaScript using document.forms.issueAdd.
Note
At this point, we are using the conventional way of taking user input, using named inputs and getting their value using the value property of the DOM element. React has another way of dealing with user input by way of controlled components, where the value of the input is tied to a state variable. We’ll explore this in later chapters.
App.jsx, IssueList: New IssueAdd Class
App.jsx, Removal of sampleIssue
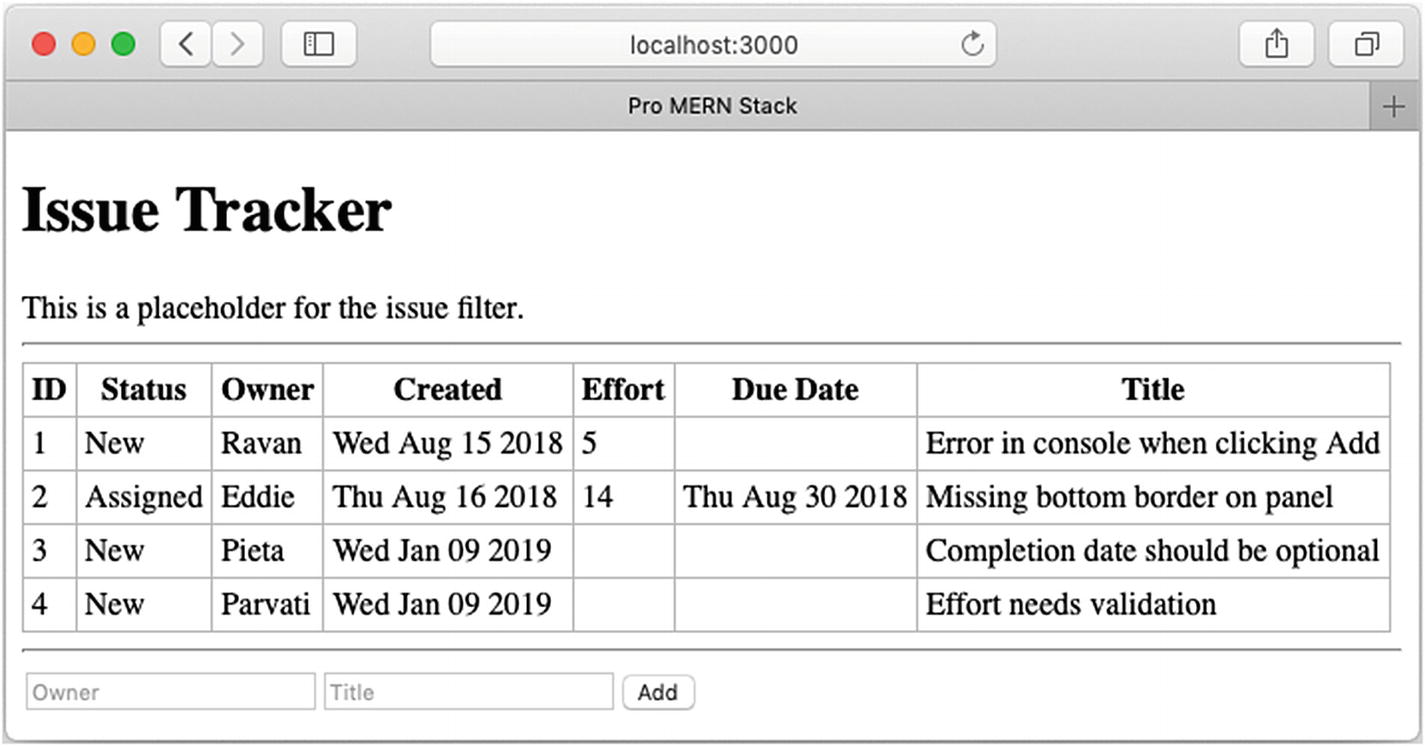
Adding new issues using the IssueAdd form
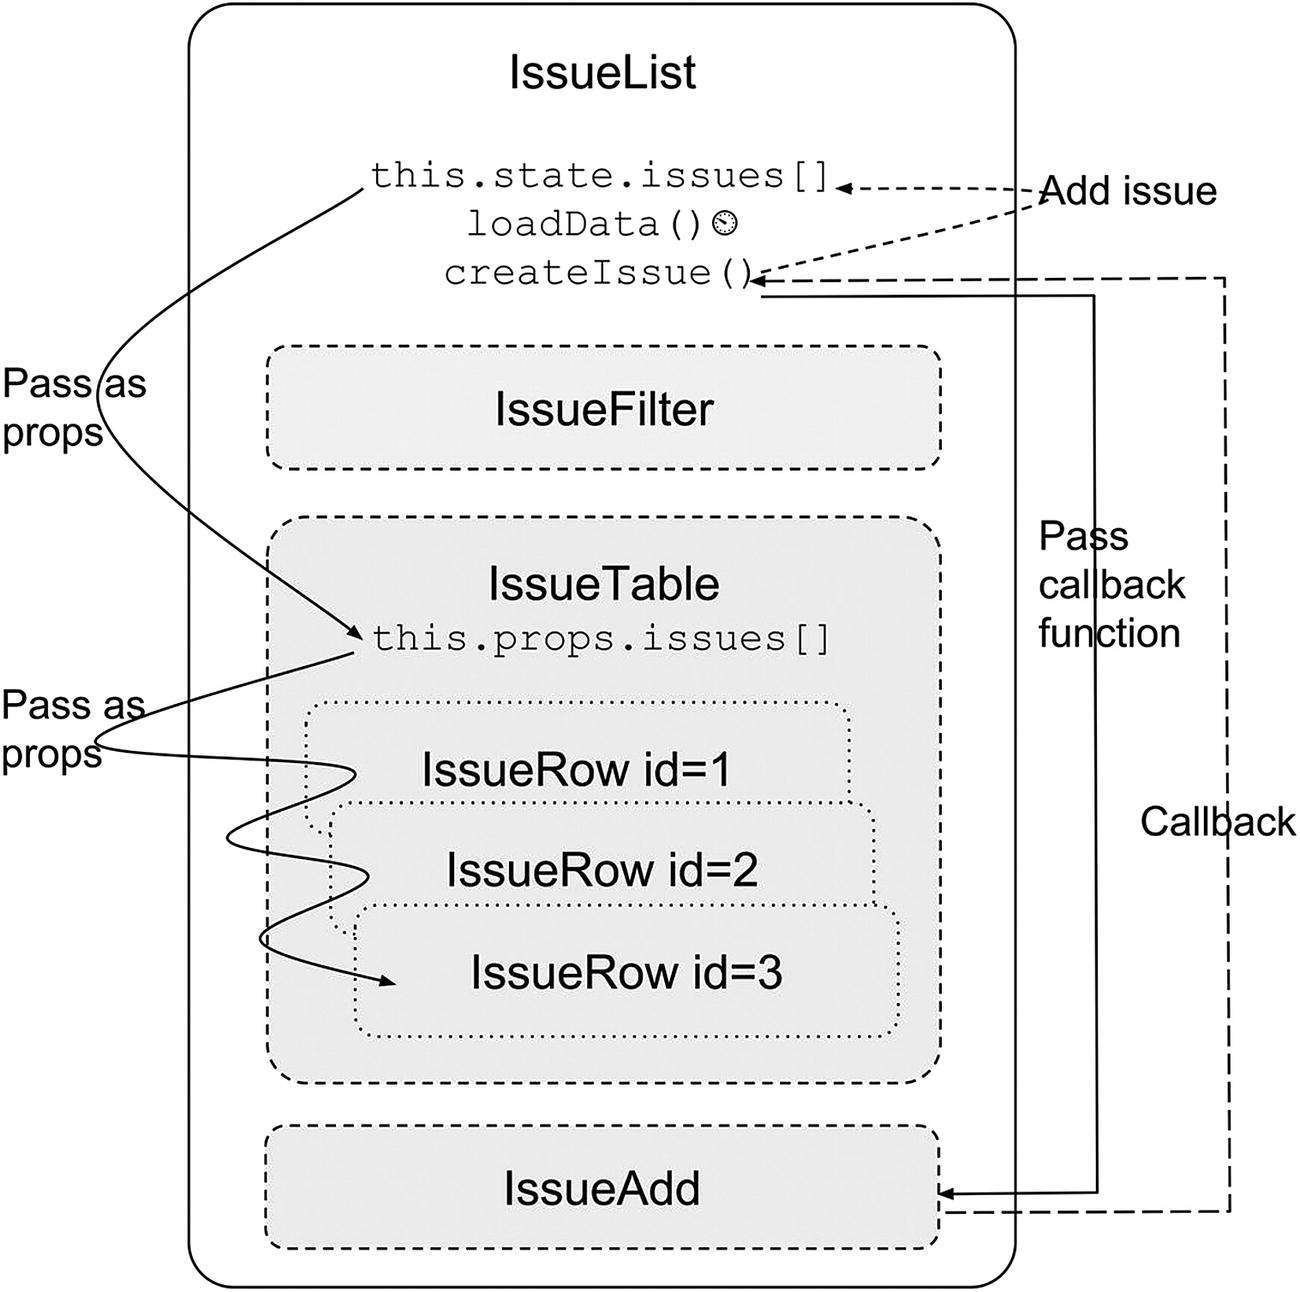
Component hierarchy and data flow after lifting state up
Exercise: Event Handling
- 1.
Refresh the browser; you’ll see that the added issues are gone. How does one persist the changes?
- 2.
Remove e.preventDefault(). Click the Add button with some values for owner and title. What happens? What do you see in the URL bar? Can you explain this?
- 3.
Use the developer console to inspect the table and add a breakpoint on the <tbody> element as “break on subtree modification”. Now, add a new issue. How many times is the subtree being modified? Compare this with exercise #2 in “Updating State,” where you traced the number of render() calls in a IssueRow.
Answers are available at the end of the chapter.
Stateless Components
We have three functioning React components (IssueAdd, IssueRow and IssueTable) composed hierarchically into IssueList (another one, the IssueFilter, is still a placeholder). But there is a difference among these functioning component classes.
IssueList has lots of methods, a state, initialization of the state, and functions that modify the state. In comparison, IssueAdd has some interactivity, but no state1. But, if you notice, IssueRow and IssueTable have nothing but a render() method. For performance reasons and for clarity of code, it is recommended that such components are written as functions rather than classes: a function that takes in props and just renders based on it. It’s as if the component’s view is a pure function of its props, and it is stateless. The render() function itself can be the component.
App.jsx, IssueRow as a Stateless Component
App.jsx, IssueTable as a Stateless Component
Designing Components
Most beginners will have a bit of confusion between state and props, when to use which, what granularity of components should one choose, and how to go about it all. This section is devoted to discussing some principles and best practices.
State vs. Props
Both state and props hold model information, but they are different. The props are immutable, whereas state is not. Typically, state variables are passed down to child components as props because the children don’t maintain or modify them. They take in a read-only copy and use it only to render the view of the component. If any event in the child affects the parent’s state, the child calls a method defined in the parent. Access to this method should have been explicitly given by passing it as a callback via props.
Anything that can change due to an event anywhere in the component hierarchy qualifies as being part of the state. Avoid keeping computed values in the state; instead, simply compute them when needed, typically inside the render() method.
Do not copy props into state, just because props are immutable. If you feel the need to do this, think of modifying the original state from which these props were derived. One exception is when props are used as initial values to the state, and the state is truly disjointed from the original state after the initialization.
State vs. Props
Attribute | State | Props |
|---|---|---|
Mutability | Can be changed using this.setState() | Cannot be changed |
Ownership | Belongs to the component | Belongs to an ancestor, the component gets a read-only copy |
Information | Model information | Model information |
Affects | Rendering of the component | Rendering of the component |
Component Hierarchy
Split the application into components and subcomponents. Typically, this will reflect the data model itself. For example, in the Issue Tracker, the issues array was represented by the IssueTable component, and each issue was represented by the IssueRow component.
Decide on the granularity just as you would for splitting functions and objects. The component should be self-contained with minimal and logical interfaces to the parent. If you find it doing too many things, just like in functions, it should probably be split into multiple components, so that it follows the Single Responsibility principle (that is, every component should be responsible for one and only one thing). If you are passing in too many props to a component, it is an indication that either the component needs to be split, or it need not exist: the parent itself could do the job.
Communication
Communication between components depends on the direction. Parents communicate to children via props; when state changes, the props automatically change. Children communicate to parents via callbacks.
Siblings and cousins can’t communicate with each other, so if there is a need, the information has to go up the hierarchy and then back down. This is called lifting the state up. This is what we did when we dealt with adding a new issue. The IssueAdd component had to insert a row in IssueTable. It was achieved by keeping the state in the least common ancestor, IssueList. The addition was initiated by IssueAdd and a new array element added in IssueList’s state via a callback. The result was seen in IssueTable by passing the issues array down as props from IssueList.
If there is a need to know the state of a child in a parent, you’re probably doing it wrong. Although React does offer a way using refs, you shouldn’t feel the need if you follow the one-way data flow strictly: state flows as props into children, events cause state changes, which flows back as props.
Stateless Components
In a well-designed application, most components would be stateless functions of their properties. All states would be captured in a few components at the top of the hierarchy, from where the props of all the descendants are derived.
We did just that with the IssueList, where we kept the state. We converted all descendent components to stateless components, relying only on props passed down the hierarchy to render themselves. We kept the state in IssueList because that was the least common component above all the descendants that depended on that state. Sometimes, you may find that there is no logical common ancestor. In such cases, you may have to invent a new component just to hold the state, even though visually the component has nothing.
Summary
In this chapter, you learned how to use state and make changes to it on user interactions or other events. The more interesting aspect was how state values are propagated down the component hierarchy as props. You also had a glimpse of user interaction: the click of a button to add a new issue, and how that causes the state to change, and in turn, how the props in the descendant components changed, causing them to rerender as well. Further, you learned how a child can communicate with its parent via callbacks.
We used simulated asynchronous calls and data local to the browser to achieve all this. In the next chapter, instead of using local data, we’ll fetch the data from the server. When an issue is added, we’ll send the data to the server to persist it.
Answers to Exercises
Exercise: Initial State
- 1.
You could store the background color of each row as part of the state, but then, the values will have to be calculated at some point in time. When is a good time to do this? Just before setting the state? How about when setting the initial state?
Since this is a derived value, it is better and more efficient to just calculate these values within the render() method and use them then and there rather than save them in the state.
Exercise: Updating State
- 1.
When the second timer fires and another issue is added, you will find that it gets an ID of 4 but the ID of the third row also changes to 4. Further, in the console, you will see an error to the effect that two children with the same key were found.
This happens because we are using the same object as the first to create the second issue, and setting the ID to 4 sets it in the one and only object: sampleIssue. To avoid this, you have to create a copy of the object before using it to create a new issue, say, using Object.assign().
- 2.
Each row is rendered once when initialized (two renders, one for each row). After the new row is inserted, each row is rendered once again (three renders, one for each row). Although a render is called, this does not mean that the DOM is updated. Only the virtual DOM is recreated on each render. Real DOM update happens only where there are differences.
Exercise: Lifting State Up
- 1.
On removing the bind() call, you’ll see an error that says undefined is not an object, while evaluating this.state.issues. This should tell you that this.state is undefined, and lead you to think about whether this is the correct this in this call sequence.
In future, if you see a similar error, it should trigger off a thought that maybe a bind() call is missing somewhere.
Exercise: Event Handling
- 1.
To persist the changes, we could either save the issues in local storage on the browser, or save it in the server. Modifying the global initialIssues variable will not work because when the page is refreshed, this variable is recreated.
- 2.
The page is refreshed as if a new request to / has been made. In the URL bar, you can see URL query parameters for owner and title like ?owner=&title=. This is because the default action of a form is a GET HTTP request with the values of the form, and what you see in the URL bar is just the result of this call. (The values in the URL parameters are blank because they were assigned to empty strings in handleSubmit()).
- 3.
You will see that the subtree under <tbody> is being modified only once. In the details of the modification, you can see that a child is being added, but none of the other existing children are being modified. If you compare it with the number of render() method calls, you will find that even though render() was being called for each row, only the new row is being added to the DOM.