
So far you've experienced the benefits of building Spring applications using the Spring-DM framework, taking advantage of things like versioningand cleaner tier separation between the components that make up an application.
The adaptation process for using Spring-DM has required you to incorporate new design techniques for enterprise applications. This process is probably something you've become accustomed to, since continuous design enhancements are normal in the software industry. However, there is one aspect to using Spring-DM that, whatever your individual design efforts, falls outside your control: deployment.
Though an OSGi'fied servlet container has served as a deployment solution up to this point, using such an environment can be problematic. The first and foremost difficulty with an OSGi'fied application server/container is that you need to put it together, unlike Java EE servlet containers thatcan be installed in a few clicks.
Since an OSGi'fied servlet container works in coordination with an OSGi environment, this requires additional steps beyond those needed to install each part--steps you took in the Spring-DM Hello World application presented in Chapter 3.
Even assuming you achieved dexterity in putting together an OSGi'fiedservlet container, it still leaves other issues you have to contend with, such as the following: What happens to all those old WAR files? Do you OSGi'fy them just to run on a new environment? Or do you run a parallel Java EE servlet container just for this purpose?
We pondered a few of these questions in Spring-DM's integration layers back in Chapter 3. It's time to further explore the answers to these questions, familiarizing yourself with the mostversatile option for deploying Spring-DM applications: the SpringSource dm Server.
Created by the company behind the Spring Framework, the SpringSource dm Server makes Spring-DM work in a more streamlined fashion with the established practices used in Java EE application servers/containers and OSGi technology. This includes integrated deployment and monitoring for Java applications using OSGi, backward compatibility for applications using the standard WAR servlet container format, and a company to support the formal development of a joint Java/OSGi platform, among other things.
Still, with products driven by standards like Java EE and OSGi, it can be hard to make a switch to a new product, since many products are rightfully marketed as Java EE compatible servlet containersor OSGi v.4.0 compatible. So what are the benefits of using the SpringSource dm Server? Let's explore them one by one.
OSGi technology presents new challenges to the way Java EE applications are deployed. Simply using bundles as a deployment format is the beginning of a long road that needs to be traveled to give OSGi applications the same feature set offered in Java EE applications.
You will recall that OSGi environments are used to underpin things assmall as a smartphone, IDE, or some other Java application. This creates a void for a particular set of features that have become the norm in Java EE applications and which the SpringSource dm Server addresses:
Shared repository: Java EE applications mostly depend on the same set of staple JARs, with application servers/containers providing a location in which these JARs can be shared across applications. The SpringSource dm Server offers a similar approach for OSGi bundles, providing a shared repository visible to all bundles running in a system, allowing these same shared bundles to fulfill JAR dependencies present in WAR files. Additionally, the SpringSource dm Server's shared repository also reduces the need to manually install every single bundle in a system, since each repository bundle is automatically installed at startup and activated once another bundle requires it for dependency fulfillment.
OSGi library definitions: Java EE application libraries tend to be made up of various JAR files—think web frameworks or ORMs made up of five to ten JAR files. However, when these JAR files undergo OSGi'fication, their use requires a bundle to import library packages or bundles individually. The SpringSource dm Serversupports a special bundle library statement, simplifying the way libraries are imported into consuming OSGi bundles. So instead of importing packages or bundles through multiple
Import-PackageorRequire-Bundleheaders, the same results can be achieved using a single library import statement supported by the SpringSource dm Server.OSGi application packaging and service scoping: OSGi's bundle and class loader approach may seem like it can do no wrong, but it can become unmanageable under certain circumstances. Java EE's application deployment units—Enterprise Archives (EARs) or Web Archives (WARs)—provide good cues for what can become unmanageable in OSGi as explained next.
EAR and WAR files package entire applications, making each of them a single-step deployment unit. OSGi applications, on the other hand, are made up of numerous bundles, each one requiring individual deployment. This lack of aggregation format in OSGi can make the managementof more than one application difficult, requiring all bundles to be processed one by one, for either installing, uninstalling, or updating an application.
Similarly, EAR and WAR files provide class isolation for running multiple applications on the same application server/container. While it's truethat OSGi's class-loading approach supersedes the need for this type of isolation, OSGi introduces its own isolation problem with services.
Since a majority of OSGi bundles either publish or use services, there is potential for service conflicts when more than one application is deployed on the same OSGi environment. If Application A uses a service named UserName, and Application B uses its own service named UserName, what happensthen? If service scoping is not used, Application A can end up using Application B's service, or vice versa.
To solve these packaging and service scoping problems, the SpringSource dm Server defines a logical application unit named Platform Archive (PAR).
Next, we come to another set of benefits conferred by the SpringSource dm Server. These have to do with the integration issues related to Spring, OSGi, and Java.
The Spring Framework in combination with some of Java EE's parts requires certain integration support that doesn't sort well with OSGi environments in their out-of-the-box state. This makes the SpringSource dm Server a good provider for resolving such integration issues.[15]
Weaving is widely used with the Spring Framework and Java EE. In the introductory Spring application presented in Chapter 2, there were a few instances in which weaving classes were used to support the Java Persistence API and Apache Tomcat.
The problem with weaving in an environment like OSGi is that it tendsto occur in groups of classes, especially in cases like those using JPA, which is common in enterprise applications. This creates a problem since it can't be guaranteed that every class requiring weaving is placed in the samebundle. If classes requiring weaving are placed in different bundles, cross-bundle weaving, as well as update propagation, is troublesome since each bundle has its own class loader.
Weaving modifies all classes that match a given pointcut. In a non-OSGi environment this has no major consequences, since applications use a single class loader. But what happens in OSGi, where applications are partitioned into bundles, each having its own class loader?
In such cases, weaving cannot be applied easily, requiring OSGi's default class loader to be equipped to handle this type ofcross-bundle weaving.
The SpringSource dm Server takes care of these weaving issues, guaranteeing that a refresh performed on a bundle that contains an aspect is propagated to all those bundles needing weaving (e.g., if more than one bundle makes up a design using JPA, which requires weaving, propagation is taken care of by the SpringSource dm Server). The SpringSource dm Server also comes preconfigured with an OSGi environment supporting weaving.
Another problem with out-of-the-box OSGi environments is their lack of support for certain resource protocols common in Java EE applications. A resource protocol is the prefix added to a configuration file or Java class, qualifying a resource of a certain type.
Resource protocols like file: or jar: are not detected in OSGi environments by default. This makes applications, JARs, or classes relying on such conventions inoperable in OSGi. TheSpringSource dm Server uses a special adapter that makes an OSGi environment's classpath aware of such resources.
Another thing that gives problems in OSGi is Java's thread-context class loader. Many Java EE applications rely on Java's thread-context class loader to inspect class types or resources. In OSGi, this scenario can create a problem due to how Java's context class loader operates.
Java's context class loader is always associated with a thread; therefore, a context class loader might fail to load classes from packages that are not directly imported into a calling bundle. This is a very subtle problem that tends to occur when any bundle class uses a construct like Class.forName() that employs Java's context class loader for localization.
As a consequence, if a bundle attempts to locate class types or resources via Java's thread-context class loader, it will only be able to do so in the bundle itself. The SpringSource dm Server addresses this by creatinga special thread-context class loader that imports all packages used in an application, and then replacing it with the original thread-context loader.This process makes all class types and resources visible—whether located in the bundle itself or in other bundles that form part of an application's PAR file.
Note
Note In addition to the SpringSource dm Server addressing this context class loader issue in OSGi, the Eclipse foundation—producers of the Equinox OSGi framework—also offer a solution to this process via buddy class loading. However, it should be mentioned that this is a custom-made solution usable only in Eclipse Equinox. More information on buddy class loading can be found at http://wiki.eclipse.org/index.php/Context_Class_Loader_Enhancements
Other features supported in the SpringSource dm Server to make the integration of Spring, OSGi, and Java easier include JavaServer Pages (JSP) support, Tag Library Descriptor (TLD) scanning, which is used in the JSP Standard Tag Library (JSTL), annotation matching, and resource lookups.
Next, we will take a look at another SpringSourcedm Server benefit, this one related to legacy Java EE applications.
The SpringSource dm Server offers native WAR support, just like any other Java EE server/container. This backward compatibility with older WAR files is beneficial since it allows preexisting Java EE applications to coexist with OSGi applications.
For example, the standard WAR file containing a Spring application, presented in Chapter 2, can simply be executed on the SpringSource dm Server and be accessible instantly. There is no need to incorporate OSGi or Spring-DM, or make any other changes. All details are taken care of by the SpringSource dm Server, including Spring's load-time weaving support, which is a requirement for Java EE native WAR files.
Getting a little closer to the full advantages of OSGi technology, the SpringSource dm Server also supports Shared Library WARs. A Shared Library WAR allows the SpringSource dm Server to use its shared bundle repository to fulfill a WAR's dependencies.
Instead of a WAR loading its library dependencies (JARs) from the standard /WEB-INF/lib directory, libraries are taken from the SpringSource dm Server shared bundle repository. This makes a WAR file not only smaller in size, but also a contributor to reducing overall memory usage, since a WAR uses Shared Library instances.
There is one other small variation to a Shared Library WAR, as well as another web packaging format exclusive to the SpringSource dm Server. These subjects, including a more detailed look at WARs in the SpringSource dm Server, will be discussed in the "Deployment Units" section of the chapter.
Next, we will explore the last group of benefits offered by the SpringSource dm Server.
Creating OSGi bundles in a simple text editor can be tedious. Tracking dependencies needed by various bundles in a similar environment can be downright complicated. Add to this the constant back-and-forth process of writing, testing, and then deploying bundles onto an OSGi'fied servlet container, and you're looking at a very time-consuming process. All these steps can be speeded up using the right tools.
The SpringSource dm Server can be integrated through a set of plug-ins with the Eclipse IDE. This not only supports the development of bundles due to the fact that classpath dependencies are resolved based on the manifest entries, but also automates the deployment of bundles into an OSGi'fied servlet container to a few simple clicks in applications undergoing development, allowing developers to stay within their tool of choice.
All Java EE application servers/containers have a central location where you can install and monitor the state of applications. The SpringSourcedm Server provides a similar solution focused on applications using OSGi.
The SpringSource dm Server's administrative interface offers a central location in which to manage all deployed bundles, WARs, Shared Library WARs, Web Modules, and PARs. Additionally, it includes support for managing diagnostic information generated by applications, including logging, trace, and dump files.
Having covered the benefits of the SpringSource dm Server, let's movea little deeper into the subject and discuss the main concepts you will encounter in the platform, as well as its overall architecture.
The first thing you need to realize about the SpringSource dm Server is that it's not an entirely new product written from scratch. The SpringSource dm Server is a stack made up of parts that would otherwise be present in many Spring, Java EE, and OSGi projects. These parts are presented in Table 5-1.
Table 5-1. SpringSource Application Platform Parts
Software | Function |
|---|---|
Spring | Provides the Spring Framework's core functionality |
Apache Tomcat | Serves as the Java servlet container |
OSGi (Eclipse Equinox) | Serves as the OSGi environment |
Spring-DM | Provides the capabilities to use Spring with OSGi features |
SpringSource Tool Suite | Provides an Eclipse (as in the IDE) powered development environment for the platform |
SpringSource Application Management Suite | Provides a centralized location to manage and monitor all applications running on the platform |
With the exception of the last two entries in Table 5-1, all the parts that make up the SpringSource dm Server are components used in either Spring, OSGi, or Java EE applications. So what makes the SpringSource dm Server special if it's just a collection of parts? That can be answered by looking at Figure 5-1.
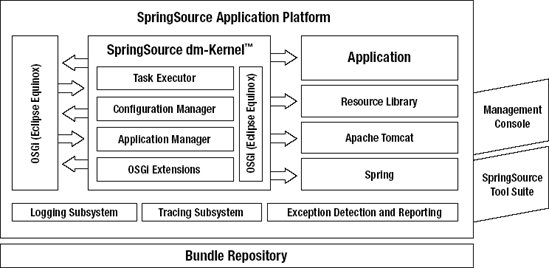
In this figure, notice how the same parts mentioned in Table 5-1 are present; however, also notice thoseadditional features, under the SpringSource dm-Kernel, that lie between theparts enumerated in the table. These squares are specially designed pieces that make the SpringSource dm Server deliver on all the benefits presented at the start of the chapter, and this is what makes the platform convenientcompared to putting in these same parts yourself.
As a user of the SpringSource dm Server, you willnever have to deal directly with any of the individual parts that make up the platform, much less any of these features that hold the platform together. Nevertheless, it's important to know how the SpringSource dm Server is composed prior to performing actions from its administrative console.
In fact, that's all you will do upon using the SpringSource dm Server: deploy and manage everything through web-based interfaces—or through a command-line interface.
But let's not get ahead of ourselves; you will see and use these interfaces in the Hello World application presented later in the chapter. Right now, it's important for you to understand the terminology used in the SpringSource dm Server, so let's start by expanding the deployment unit concepts used in the SpringSource dm Server.
The SpringSource dm Server supports four major deployment unit formats. They range from the minimum common denominator OSGi bundle, capable of being deployed on any stand-alone OSGi environment, to the PAR format, which takes full advantage of the SpringSource dm Server's architecture.
OSGi Bundle
An OSGi bundle is the same deployment unit used in any standard OSGi environment. It's nothing more or less than a group of Java class files accompanied by a MANIFEST.MF file including OSGi headers.
Though the smallest of all deployment units, this format is not encouraged in the SpringSource dm Server. A recommended practice is to group OSGi bundles into an aggregated deployment format to simplify management.
The only circumstance in which deploying an OSGi bundle as an individual unit is recommended is when a bundle provides an OSGi service or Java package for the benefit of numerous applications running on the SpringSourcedm Server.
Otherwise, it's best to use an alternative deployment format that takes advantage of the SpringSource dm Server's application management and service scoping.
Java EE WAR
Java EE's WAR format is supported in two different forms in the SpringSource dm Server: a completely backward-compatible Java EE version and a more OSGi-friendly version.
Standard Java EE WAR
This deployment unit is completely backward compatible with Java EE servlets/containers. This means the SpringSource dm Server creates a space consisting of a separate application class loader, loading classes from a WAR's /WEB-INF/lib and /WEB-INF/classes/ directories, and performing all the other bootstrapping tasks undergone by application servers/containers.
Support for this format is good since it allows you to keep deploying Java EE and Spring applications the way you always have. However, this format makes you lose out on all the benefits offered by OSGi, since this type of unit is deployed in its own sandbox, isolated from every other class running in the system.
Using WARs in such a way should be strictly reserved for cases in which it's not possible to migrate applications to the more OSGi-friendly WAR format illustrated next.
Shared Library/Services WAR
Easing the transition to a more OSGi-friendly WAR format is the Shared Library/Services WAR. This deployment unit is identical to the WAR formatused in Chapter 3 to illustrate the use of Spring-DM.
By "shared," I mean that this type of WAR is capable of leveraging both OSGi bundles and services. Not only does this reduce the size and memoryfootprint of a standard WAR, it also grants a WAR's classes access to services present in an OSGi environment.
The first difference from a standard WAR is that this deployment unithas a MANIFEST.MF file with OSGi directives. This allowsit to import packages from other OSGi bundles using the Import-Package manifest header, thus ceasing to use isolated classes located in the standard /WEB-INF/lib and /WEB-INF/ classes directories inside WARs.
The second functionality offered by this deployment unit is its ability to access OSGi services via Spring-DM. This eliminates the sandbox in which standard WARs operate, allowing the contents of a WAR to access logic outside of its packaging confines.
This deployment unit is no doubt a step forward toward OSGi. However, it still contains remnants used in WAR files, which is why the SpringSource dm Server also defines its own Web Module deployment format.
A Web Module is the recommended approach for deploying web-enabled units in the SpringSource dm Server. For all practical purposes, a Web Moduleis the next best thing to a Shared Library WAR, just as a Shared Library WAR is better than a standard Java EE WAR.
Even in a Shared Library/Services WAR, there are certain configuration aspects like servlet mappings, JSTL libraries, context paths, filters, and Spring Model-View-Controller (MVC) values that need to be placed in the descriptors like web.xml and *-servlet.xml used in WARs.
A Web Module is the SpringSource dm Server's answer to configuring a web-bound unit entirely through a MANIFEST.MF file with OSGi directives. This eliminates the last trace of a WAR structure in the form of XML configuration files.
Therefore, in a SpringSource dm Server Web Module you can expect to see the same configuration values used in configuration files like web.xml, *-servlet.xml, or others placed in a WAR's /WEB-INF/ directory, directly supported inside a bundle's manifest.
Next, I will describe the last deployment unit in the SpringSource dm Server: Platform Archive.
Platform Archive
Platform Archive serves as the building block for deploying entire applications in the SpringSource dm Server. A PAR not only facilitates the grouping of bundles to streamline application installation, but also offers application isolation. Application isolation is critical for various cases outlined earlier, such as service name clashes, weaving, bundle refreshes, and Java's thread-context class loader.
A PAR scopes OSGi services, making them visible only in the same deployment unit. This eliminates any possibility of name clashes, if more than two applications using the same service name, but different logic, are deployed on the platform.
A PAR also forms a boundary, applying load-time weaving and bundle refreshes to all bundles contained in the deployment unit. This guarantees that weaving and refreshes aren't performed indiscriminately to all bundles running a system.
Additionally, all bundles contained in a PAR have their exported packages assigned to a synthetic bundle, which is used for thread-context classloading. This ensures that any lookup for class types or resources—for example, Class.forName()—is found across any bundles belonging to an application.
The composition of a PAR is made of bundles—referred to as modules in the platform—and a special MANIFEST.MF file that includes OSGi headers just like the ones presented in Listing 5-1.
Example 5-1. Platform Archive MANIFEST.MF File
Manifest-Version: 1.0
Application-SymbolicName: com.apress.springosgi.ch5.HelloWorld
Application-Version: 1.0
Application-Name: HelloWorld SpringSource dm Server
Application-Description: A Hello World Platform Archive for Pro-Spring OSGi
The use of this OSGi manifest allows a PAR to have its own identity, both in terms of versioning and naming, similar to all OSGi bundles. The directory structure of a PAR will be explored in the Hello World application presented later in the chapter.
Next, we will take a look at another feature offered by the SpringSource dm Server: libraries.
A library is a common concept in Java EE applications, but in a non-OSGi environment, using libraries is never given much thought. All JARs that make up a library are declared in Java's CLASSPATH variable, and any class needing the library automatically has access to it.
In an OSGi application these same JARs belonging to a library need toundergo OSGi'fication—adding a MANIFEST.MF file with OSGi headers—thereby splitting up a library tobenefit from OSGi's dynamic loading. This process unfortunately creates overhead for classes needing libraries.
For a class contained in an OSGi bundle to use a library, it needs toimport its packages to bundles individually via OSGi's Import-Package or Require-Bundle manifest header. While this import granularity is beneficial in some circumstances, it can become overwhelming if a bundle requires multiple libraries. Listing 5-2 shows a bundle manifest importing part of the Spring Framework library.
Example 5-2. OSGi Manifest Using Import-Package to Import a Library
Import-Package: org.springframework.util,org.springframework.beans.factory.xml,
org.springframework.aop,org.springframework.aop.framework,org.aopalliance.aop
Note that this manifest is only part of the Spring Framework library. Extrapolate this to a bundle requiring the entire Spring Framework library, an Object-Relational Mapping (ORM) library, or some other library, and you have a very long and error-prone process given the sheer number of values.
The SpringSource dm Server optimizes this process by supporting a special library manifest header in an OSGi environment. Therefore, a bundle—or module as it is referred to in the SpringSource dm Server—would only require a one-line statement as illustrated in Listing 5-3.
Example 5-3. OSGi Manifest Using the Import-Library Header Interpreted by the SpringSource Application Platform
Import-Library: org.springframework.spring
Isn't this easier than using OSGi's Import-Package or Require-Bundle manifest? A library in the SpringSource dm Server is a logical grouping of bundles, so it's not something that you need to package separately. A library takes its contents from OSGi'fied JARs deployed as stand-alone bundles.
The way to define a SpringSource dm Server library is through a simple text file with a .libd extension, using OSGi type headers. Listing 5-4 shows a SpringSource dm Server library definition.
Example 5-4. SpringSource Application Platform Library Definition
Library-SymbolicName: org.springframework.spring
Library-Version: 2.5.4
Library-Name: Spring Framework
Import-Bundle: org.springframework.core;version="[2.5.4,2.5.5)",
 org.springframework.beans;version="[2.5.4,2.5.5)",
 org.springframework.context;version="[2.5.4,2.5.5)",
 org.springframework.aop;version="[2.5.4,2.5.5)",
 org.springframework.web;version="[2.5.4,2.5.5)",
 org.springframework.web.servlet;version="[2.5.4,2.5.5)",
org.springframework.jdbc;version="[2.5.4,2.5.5)",
 org.springframework.orm;version="[2.5.4,2.5.5)",
 org.springframework.transaction;version="[2.5.4,2.5.5)",
 org.springframework.context.support;version="[2.5.4,2.5.5)",
 org.springframework.aspects;version="[2.5.4,2.5.5)",
 com.springsource.org.aopalliance;version="1.0"
Notice how Library-Symbolic-Name is employed to assign the key identifier for other bundles using the Import-Library header. Additionally, notice how a library has its own versioning header, as well as a common name used as a more friendly identifier.
Note as well the special Import-Bundle manifest header—also unique to the SpringSource dm Server—which is used todeclare bundles that make up a library. In this case, all the bundles declared in Listing 5-4 correspond to the Spring Framework library, with each part deployed as an individual bundle.
Next, the discussion will turn toward the last conceptual subject on the SpringSource dm Server, its directory structure.
The layout for the SpringSource dm Server consists of various subdirectories, each with a specific purpose as outlined in the following list:
bin: Contains the SpringSource dm Server's scripts to start and stop the platform on Unix and Windows environments, as well as set the system's JavaCLASSPATH.config: Contains all the configuration files affecting the SpringSource dm Server, which include those for Apache'sTomcat container, Eclipse's OSGi Equinox environment, and the SpringSource dm Server itself.docs: Contains both a users and programmers guide for using the SpringSource dm Server.lib: Contains Java libraries required to bootstrap the SpringSource dm Server.licenses: Contains the various licenses applicable to components used in the SpringSource dm Server.pickup: Is used as a "hot" location in which to place WARs, Shared Library WARs, Web Modules, or PARs, and have the SpringSource dm Server automatically deploy each unit at startup.serviceability: Contains diagnostic information generated by the SpringSource dm Server, which is further collocated in the following directories:dump: Contains data snapshots occurring when a failure in SpringSource dm Server code or thread deadlock is detected. Note: This information is not intended for end-user consumption but for SpringSource dm Server service personnel.logs: Contains low-volume logs of important events in the SpringSource dm Server—like startup, shutdown, and application deployment—as well as the application visitor logs generated by Apache Tomcat inside theaccesssubdirectory.trace: Contains application-generated output. This includes output generated by logging and tracing APIs, as well as output generated by calls to Java'sSystem.outandSystem.err.
work: Is used by theSpringSource dm Server to place its running application classes and configuration file snapshots. The naming convention and purpose is identical to the directory by the same name used in stand-alone Apache Tomcat installations and is not intended to be modified by end users.repository: Contains the various bundlesand libraries used by the SpringSource dm Server, providing a complementaryrole to the top-levelpickupandlibdirectories. Therepositorydirectory is further split toaccommodate resources into either thebundles,libraries, orinstalleddirectories, which in themselves are subdivided according to the following list:repository/bundles/ext: Contains OSGi bundles provided by the SpringSource dm Server, which include the Spring Framework, Spring-DM, and other Java EE utilitiesrepository/bundles/subsystems: Contains OSGi bundles used internally by the SpringSource dm Serverrepository/bundles/usr: Contains OSGi bundles provided by the user, either tailor-made or obtained from the SpringSource Enterprise Bundle Repository[16]repository/libraries/ext: Contains libraries provided by the SpringSource dm Server, which include the Spring Framework and Spring Web Flowrepository/libraries/usr: Contains libraries provided by the userrepository/installed: Used at runtime by the SpringSource dm Server and should not contain either bundles or libraries
This concludes coverage of the directory structure that makes up the SpringSource dm Server, and with it the concepts you need to embark on yourfirst application using the SpringSource dm Server.
The Hello World application you are about to start will take you through the SpringSource dm Server's most basic steps, such as accessing its administrative interface, to more advanced topics like harnessing an RDBMS, creating an application's bundles to make a PAR, and deploying PARs onto the platform.
If you've been following along chapter by chapter, the application here is ported from the Hello World application presentedin Chapter 2, which demonstrated Spring's stand-alone framework. Given this fact, the example will also help you graspthe steps needed to migrate stand-alone Spring applications to use Spring-DM and run on the SpringSource dm Server.
Finally, it should also be noted the following application is not a complete port from the one in Chapter 2. In order to simplify deployment, this chapter's application forgoes the use ofApache Tiles and Spring's AJAX support. Figure 5-2 illustrates the bundles that will make up the application and the relationship between each one.
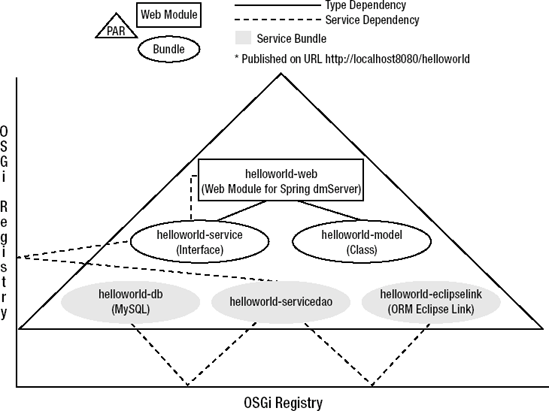
Note that Figure 5-2 only illustrates the bundles you will create that form part of the actual application. Additional bundle dependencies required by the application that are either included by default in the SpringSource dm Server or need to be installedin the server's repository are not illustrated.
Table 5-2 contains the software you will need to download and install prior to embarking on your first SpringSource dm Server project.
Table 5-2. SpringSource dm Server Hello World Prerequisites and Downloads
[a]Software | Function | Download Site |
|---|---|---|
| [a] | ||
Java SE 5 or higher | Java's runtime environment |
|
MySQL Community Server 5.0 | An open source RDBMS |
|
MySQL Connector/J Driver 5.1.6 | OSGi'fied MySQL-Java driver | http://www.springsource.com/repository/app/ bundle/version/detail?name=com.springsource. com.mysql.jdbc&version=5.1.6 |
Apache Commons Pool 1.4.0 | OSGi'fied Apache Commons Pool | http://www.springsource.com/repository/app/ bundle/version/detail?name=com.springsource. org.apache.commons.pool&version=1.4.0 |
Apache Commons DBCP 1.2.2 | OSGi'fied Apache Commons DBCP | http://www.springsource.com/repository/app/ bundle/version/detail?name=com.springsource. org.apache.commons.dbcp&version=1.2.2.osgi |
Eclipse Link Core 1.0.0 | OSGi'fied Eclipse Link Core (ORM) | http://www.springsource.com/repository/app/ bundle/version/detail?name=com.springsource. org.eclipse.persistence&version=1.0.0 |
Eclipse Link JPA 1.0.0 | OSGi'fied Eclipse Link JPA (ORM) | http://www.springsource.com/repository/app/ bundle/version/detail?name=com.springsource. org.eclipse.persistence.jpa&version=1.0.0 |
Eclipse Link ANTLR 1.0.0 | OSGi'fied Eclipse Link ANTLR | http://www.springsource.com/repository/app/ bundle/version/detail?name=com.springsource. org.eclipse.persistence.antlr&version=1.0.0 |
Eclipse Link ASM 1.0.0 | OSGi'fied Eclipse Link ASM | http://www.springsource.com/repository/app/ bundle/version/detail?name=com.springsource. org.eclipse.persistence.asm&version=1.0.0 |
SpringSource dm Server 1.0 | Provider of an OSGi environment, OSGi'fied servlet container, monitoring interfaces, and other resources | http://www.springsource.com/products/suite/ applicationplatform |
It's very likely you may have some of this software already installedon your workstation. If so, just ensure that you have the suggested versions, as minor version variations may hold you back in getting through the outlined steps.
Additionally, since some of this software was already used in earlier chapters, installation instructions for those packageswill not be presented here, so please refer to the earlier chapters for detailed installation instructions.
Finally (unlike many other downloads presented in the book), the SpringSource dm Server download requires you to fill a registration form with personal information and a few questions regarding the technical environment you currently use. This process should not take you more than 5 minutes.
Installing the SpringSource dm Server
The process for installing the SpringSource dm Server consists of just one step: unzipping the downloaded file into a directory of your choice. Next, descend into the bin subdirectory of the SpringSource dm Server, and, depending on your operating system, execute startup.sh on Unix or startup.bat on Windows.
Upon executing one of these scripts, you will see the startup sequence for the SpringSource dm Server, starting the platform on port 8080. Next, open a browser and attempt to access the address http://localhost:8080/. You should see the SpringSource dm Server's Welcome page. In case this test fails, verify that port 8080 is not busy: check that no other application is running on the same default port (8080).
In this Welcome page, in the top-left corner you will see an Admin Console icon that will take you to the address http://localhost:8080/admin/. Click this last icon or paste the address into a browser.
You will then be prompted for an ID and password. Give the platform's default values, which are ID admin and password springsource. Once verified, you will see the main administrative interface for the SpringSource dm Server, as illustrated in Figure 5-3.

The Admin Console is the platform's main interface for managing applications; it is here that you will deploy the application created in the remainder of the chapter.
Setting Up the Hello World "Playground" Directory Structure
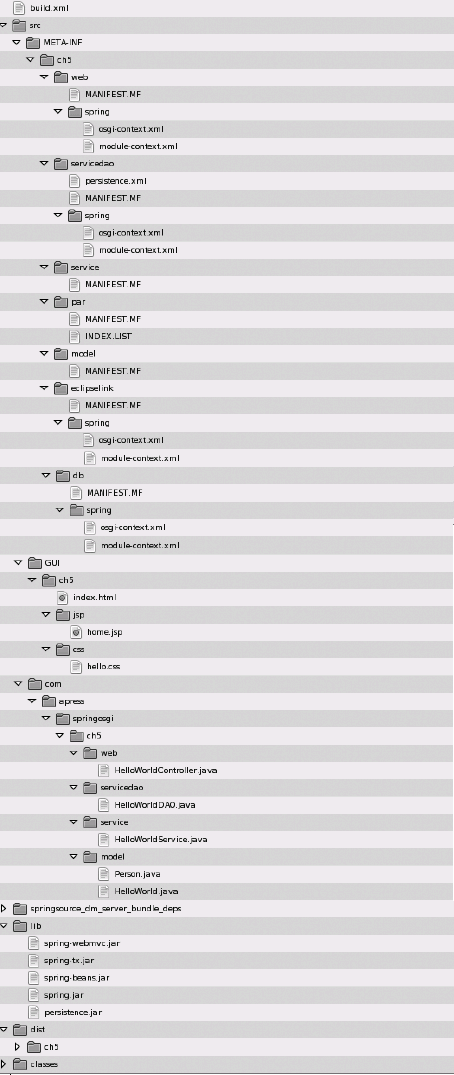
You've now got the tools working, so it's time to create the proper workspace in which to maneuver, a directory structure like the one illustrated in Figure 5-4.
The directory structure functions as follows:
build.xml: This is the main Apache Ant configuration file containing the necessary tasks to build the application.classes: All compiled Java classes are placed in this directory.dist: All built bundles are placed in this directory.lib: All JARs or OSGi bundles needed to compile Java sources are placed in this directory.src: All Java sources files composing the application are placed accordingly in subdirectories inside this directory, including the corresponding OSGi manifests for each bundle placed insideMETA-INF/ch5/<bundle_type>and the web interface used by the application inGUI/ch5/.
Since application packaging is central to understanding the benefits of the SpringSource dm Server, I will divide the exploration of classes that make up the application and the packaging of bundles into separate sections. This will be in contrast to the Spring-DM introductory application in Chapter 3, which first presented applicationclasses followed immediately after by the packaging of classes into bundles.
The SpringSource dm Server Hello World application will follow the same design principles as the examples presented in earlier chapters. It will have classes pertaining to a domain layer, service layer, and web layer.
Let's start things off by looking at the application's domain classesthat will aid in persisting its objects to an RDBMS. Listings 5-5 and 5-6 illustrate the HelloWorld and Person classes used by the application.
Example 5-5. HelloWorld.java POJO with JPA Annotations
package com.apress.springosgi.ch5.model;

import java.util.Date;

import javax.persistence.CascadeType;
import javax.persistence.Column;
import javax.persistence.Entity;
import javax.persistence.Table;
import javax.persistence.GeneratedValue;
import javax.persistence.Id;
import javax.persistence.OneToOne;
import javax.persistence.Temporal;
import javax.persistence.TemporalType;

@Entity
@Table(name="HelloWorld")
public class HelloWorld {

    @Id
    @GeneratedValue
    private long id;
    @Column
    private String language;
    @Column
    private String message;
    @Temporal(TemporalType.DATE)
    private Date transdate;
    @OneToOne(cascade = CascadeType.ALL)
    private Person translator;
    public void setId(long id) {
        this.id = id;
    }
public long getId() {
return id;
}
public void setLanguage(String language) {
this.language = language;
}
public String getLanguage() {
return language;
}
public void setMessage(String message) {
this.message = message;
}
public String getMessage() {
return message;
}
public void setTransdate(Date transdate) {
this.transdate = transdate;
}
public Date getTransdate() {
return transdate;
}
public Person getTranslator() {
return translator;
}
public void setTranslator(Person translator) {
this.translator = translator;
}
public HelloWorld(String language, String message, Date transdate, Person translator) {
this.language = language;
this.message = message;
this.transdate = transdate;
this.translator = translator;
}
Person translator) {
this.language = language;
this.message = message;
this.transdate = transdate;
this.translator = translator;
}public HelloWorld() {
}
}Example 5-6. Person.java POJO with JPA Annotations
package com.apress.springosgi.ch5.model;

import javax.persistence.Column;
import javax.persistence.Entity;
import javax.persistence.Table;
import javax.persistence.GeneratedValue;
import javax.persistence.GenerationType;
import javax.persistence.Id;

@Entity
@Table(name="Person")
public class Person {

    @Id
    @GeneratedValue
    private long id;
    @Column(name = "FNAME")
    private String firstName;
    @Column(name = "LNAME")
    private String lastName;
    @Column(precision=4, scale=2)
    private double hourlyRate;

    public double getHourlyRate() {
        return hourlyRate;
    }

    public void setHourlyRate(double hourlyRate) {
        this.hourlyRate = hourlyRate;
    }
    public String getLastName() {
        return lastName;
    }
public void setLastName(String lastName) {
this.lastName = lastName;
}
public String getFirstName() {
return firstName;
}
public void setFirstName(String firstName) {
this.firstName = firstName;
}
public void setId(long id) {
this.id = id;
}
public long getId() {
return id;
}
public Person(String firstName, String lastName, double hourlyRate) {
this.firstName = firstName;
this.lastName = lastName;
this.hourlyRate = hourlyRate;
}
public Person() {
}
}Both of the application's model classes make use of JPA annotations in order to define a persistence strategy for each domain class. If you're unfamiliar with JPA, Chapter 2 contains a detailed description on the origins of JPA and the meaning of these JPA annotations.
The classes in Listings 5-5 and 5-6 are identical to those presented in Listings 2-6 and 2-7 back in Chapter 2, with the exception of the @Table annotation. Here it's important to note that this minor difference is not due to the use of the SpringSource dm Server, but rather because the application will use a different JPA provider, Eclipse Link, than the one used in Chapter 2, which was OpenJPA.
If this application were to have used OpenJPA as its JPA provider, the domain classes could have remained the same. However, by using Eclipse Link, the default RDBMS table mapping strategy differs. Eclipse Link attempts to map a class by the convention <database_name>.<class_name>, compared to OpenJPA's default mapping strategy of <class_name>.
Therefore, by using the JPA annotation @Table, Eclipse Link will attempt to map a class to a specific table name in accordance with the same RDBMS schema created back in Chapter 2 by OpenJPA. As a consequence, this will allow you to reuse the same database. See the sidebar "JPA Providers and OSGi" for the reasons behind this JPA provider switch.
Moving along, we come to the service interface that will perform operations against an application's domain classes. Listing 5-7 shows the application's service interface.
Example 5-7. HelloWorldService.java Interface
package com.apress.springosgi.ch5.service;

import com.apress.springosgi.ch5.model.HelloWorld;

import java.util.List;

public interface HelloWorldService {

    public HelloWorld findById(long id);

    public List<HelloWorld> findAll();

    public HelloWorld update(HelloWorld hw);
public void save(HelloWorld hw);
public void delete(HelloWorld hw);
public void deleteMessage(long id);
public List<HelloWorld> findByTranslatorFirstName(String firstName);
public List<HelloWorld> findByTranslatorLastName(String lastName);
public List<HelloWorld> findByTranslatorHourlyRateOver(double hourlyRate);
public List<HelloWorld> findByLanguage(String language);
public List<HelloWorld> findByMessage(String message);
}This service interface is identical to the one used in Chapter 2 (Listing 2-5) and provides the various signatures needed to update, save, and delete objects corresponding to the domain model, as well as perform searches on these same objects using criteria likelanguage, message, and translator.
However, this interface by itself doesn't do much. To perform persistence operations against objects, a DAO using JPA is needed. Listing 5-8 illustrates the DAO used by the SpringSource dm Server Hello World application.
Example 5-8. HelloWorldDAO.java DAO Class
package com.apress.springosgi.ch5.servicedao;

import java.util.List;

import com.apress.springosgi.ch5.service.HelloWorldService;
import com.apress.springosgi.ch5.model.HelloWorld;

import org.springframework.transaction.annotation.Propagation;
import org.springframework.transaction.annotation.Transactional;
import org.springframework.stereotype.Repository;

import javax.persistence.EntityManager;
import javax.persistence.PersistenceContext;
import javax.persistence.Query;
@Repository@Transactionalpublic class HelloWorldDAO implements HelloWorldService {@PersistenceContextprivate EntityManager em; public HelloWorld findById(long id) { return this.em.find(HelloWorld.class, id); } public List<HelloWorld> findAll() { return this.em.createQuery("select e from HelloWorld e").getResultList(); } public HelloWorld update(HelloWorld hw) { return this.em.merge(hw); } public void save(HelloWorld hw) { this.em.persist(hw); } public void delete(HelloWorld hw) { this.em.remove(hw); } public List<HelloWorld> findByTranslatorFirstName(String firstName) { Query query = this.em.createQuery("select e from HelloWorld e wheree.translator.firstName like :firstName"); query.setParameter("firstName", firstName + "%"); return query.getResultList(); } public List<HelloWorld> findByTranslatorLastName(String lastName) { Query query = this.em.createQuery("select e from HelloWorld e wheree.translator.lastName like :firstName"); query.setParameter("lastName", lastName + "%"); return query.getResultList(); }
public List<HelloWorld> findByTranslatorHourlyRateOver(double hourlyRate) {
        Query query = this.em.createQuery("select e from HelloWorld e where
e.translator.hourlyRate > :hourlyRate");
        query.setParameter("hourlyRate", hourlyRate + "%");
        return query.getResultList();
    }

    public List<HelloWorld> findByLanguage(String language) {
        Query query = this.em.createQuery("select e from HelloWorld e where
e.language like :language");
        query.setParameter("language", language + "%");
        return query.getResultList();
    }
  public List<HelloWorld> findByMessage(String message) {
        Query query = this.em.createQuery("select e from HelloWorld e where
e.message like :message");
        query.setParameter("message", message + "%");
        return query.getResultList();
    }

    @Transactional(propagation = Propagation.REQUIRED)
    public void deleteMessage(long id) {
        HelloWorld hw = this.em.find(HelloWorld.class, id);
        this.em.remove(hw);
    }

}
If you look closely at this last listing, you will once again find similarities to the HelloWorldDAO class used in Chapter 2 (Listing 2-8). Yet, there is one glaring difference between the cited reference and the class presented here: this chapter's class does not use inheritance to support a JPA DAO.
By forgoing the inheritance of the Spring Framework's support class org.springframework.orm.jpa.support.JpaDaoSupport, this chapter's DAO class must incorporate equivalent JPA behaviors by other means.
So it is that in this last DAO class, you will notice the explicit presence of JPA's EntityManager—which is injected bythe JPA annotation @PersistenceContext—used insideeach of the DAO's service methods to get hold of JPA's EntityManager and perform the corresponding queries against an RDBMS. Additionally, the DAO class is decorated with the @Repository and @Transactional annotations, which stipulate that persistence exceptions should be autotranslated and that a DAO's methods should be transactional.
For all intents and purposes, the logic in the HelloWorldDAO class presented in Listing 5-9 is identical to that in Listing 2-8 of Chapter 2; their differences have nothing to do with the SpringSource dm Server, but are rather different styles of implementing the same thing. The only difference is that one uses annotations and makes explicit use of JPA's EntityManager, while the otherinherits its JPA DAO behavior from the Spring Framework support class org.springframework.orm.jpa.support.JpaDaoSupport.
Continuing with the classes that make up the application, we come to the controller that will broker incoming web requests to the application's service layer. Listing 5-9 illustrates the HelloWorldController class.
Example 5-9. HelloWorldController.java
package com.apress.springosgi.ch5.web;

import java.util.List;
import java.util.Date;

import org.springframework.beans.factory.annotation.Autowired;
import org.springframework.stereotype.Controller;
import org.springframework.web.bind.annotation.RequestMapping;
import org.springframework.web.bind.annotation.RequestMethod;
import org.springframework.web.bind.annotation.RequestParam;
import org.springframework.web.bind.annotation.ModelAttribute;
import org.springframework.ui.ModelMap;

import com.apress.springosgi.ch5.model.HelloWorld;
import com.apress.springosgi.ch5.model.Person;
import com.apress.springosgi.ch5.service.HelloWorldService;

@Controller
public class HelloWorldController {

     private HelloWorldService helloWorldService;

    public void setHelloWorldService(HelloWorldService helloWorldService) {
          this.helloWorldService = helloWorldService;
    }
public HelloWorldService getHelloWorldService() {return helloWorldService;} @RequestMapping(method = RequestMethod.GET) @ModelAttribute("helloworlds") public List<HelloWorld> home() { return this.helloWorldService.findAll(); } @RequestMapping(method = RequestMethod.GET) public String translator(@RequestParam("id") Long id, ModelMap model) { Person translator = helloWorldService.findById(id).getTranslator(); List<HelloWorld> hws = helloWorldService.findAll(); model.addAttribute("helloworlds",hws); model.addAttribute("translator",translator); return "home"; } @RequestMapping(method = RequestMethod.GET) public String deleteMessage(@RequestParam("id") Long id) { helloWorldService.deleteMessage(id); return "redirect:home"; } }
Once again, by way of comparison, this last controller has one minor difference from the one used in the stand-alone Spring application in Listing 2-15. The helloWorldService value is not injected using the @Autowired annotation that facilitates the injection of Spring beans into a class. Instead, the controller in Listing 5-9 uses a setter/getter approach in which the injection takes place at the time a bean is instantiated in a Spring descriptor.
In this scenario, the @Autowired annotation was not used because the application's helloWorldService is not available as a Spring bean initially, but rather as an OSGi service. Thisrequires that the bundle containing this controller first look up a service's reference in OSGi's registry—using Spring-DM statements—and then inject the value through Spring descriptors when the controller is instantiated. See the sidebar "Injecting OSGi Services Using Annotations" for more on this process.
Next, we come to the application's GUI and the JSP that will be presented to end users. Listing 5-10 illustrates the application's main page.
Example 5-10. Home Page (home.jsp)
<!DOCTYPE HTML PUBLIC "-//W3C//DTD HTML 4.01//EN"
        "http://www.w3.org/TR/html4/strict.dtd">
<%@ taglib prefix="c" uri="http://java.sun.com/jsp/jstl/core" %>
<%@ taglib prefix="fmt" uri="http://java.sun.com/jsp/jstl/fmt" %>
<html>
<head>
        <title>SpringSource Application Platform - Pro Spring-OSGi </title>
        <link href="../css/hello.css" rel="stylesheet" type="text/css">
</head>
<body>
<div id="wrap">
         <div id="header">
         <h1>SpringSource Application Platform - Pro Spring-OSGi</h1>
         </div>

         <div id="content">
           <div id="main">
                <h2>Hello World Messages </h2>
<div id="helloMessages">
 <c:forEach var="hello" items="${helloworlds}">
<div style="border:red 2px dashed;margin:10px;padding:5px">
<b><c:out value="${hello.language}"/></b>
<c:out value="${hello.message}"/> - Translated on: <fmt:formatDate
value="${hello.transdate}" dateStyle="long" /> <br/>
<a id="deleteMessage_${hello.id}" href="deleteMessage?id=${hello.id}">
Delete Message </a>
<br/>
</div>
</c:forEach>
</div>
</div>
<div id="sidebar">
<h2>Translators </h2>
<div id="helloTranslators">
<ul>
<c:forEach var="hello" items="${helloworlds}">
<li><c:out value="${hello.language}"/>
<a id="showTranslator_${hello.id}" href="translator?id=${hello.id}">
Translator Details </a>
</c:forEach>
</ul>
</div>
<div id="person">
<div style="border:red 2px dashed;margin:10px;padding:5px;">
<b>Name</b> :<c:out value="${translator.firstName}"/>
<c:out value="${translator.lastName}"/><br/>
<b>Hourly Rate</b> : $<c:out value="${translator.hourlyRate}"/><br/>
</div>
</div>
</div>
</div>
<div id="footer">
<h3>Pro SpringOSGi by Daniel Rubio - Published by Apress</h3>
</div>
</div>
</body>
</html>Building off the GUI used in Chapter 2, Listing 5-10 is a composition of the JSP files used in that earlier chapter. The difference is that Apache Tiles and Spring's AJAX support are omitted in order to simplify the application. The only side effect to this change is that actions taken by a user will require complete screen refreshes, unlike in Chapter 2's example, which used AJAX updates backed by the use of Apache Tiles.
With all the application's classes and GUI code illustrated, place each of these listings in the corresponding folders inside the Hello World "playground":
Place the application's classes inside the appropriate
src/com/apress/springosgi/ch5/subfolder, according to each class'spackagestatement.Copy the JSP presented in Listing 5-10 to the directory
src/GUI/ch5/jsp/.Copy the
index.htmlpage presented in Chapter 2's Listing 2-24 to the directorysrc/GUI/ch5/.Copy the CSS file presented in Chapter 2's Listing 2-25 to the directory
src/GUI/ch5/css/.
Now that the application's code is staged and ready to be packaged, let's move on to the more interesting subject of creating the application's bundles, the OSGi manifests that will accompany each bundle, and the Spring-DM and Spring descriptors used in each bundle.
The SpringSource dm Server Hello World application will be partitioned into six bundles—yes that's right, six! The reason behind this design for a typical three-tier application will become more apparent once you see what each bundle accomplishes. The following list contains a brief description of the functionality offered by each bundle:
db: Contains the service for the data source connecting to the RDBMSeclipselink: Contains the service for the JPA provider Eclipse Linkmodel: Contains the application's model classesservice: Contains the service interface to access the application's DAO classservicedao-jpa: Contains the DAO class using JPA (Eclipse Link) to access the application's model classesweb: Contains the web component to access the application's DAO servicepar: Contains all the previous bundles packaged into the SpringSource dm Server's recommended deployment unit
Knowing the various bundles needed by the application, let's tackle the first one, which is charged with connecting to the application's data source.
Database Bundle
The database bundle will be somewhat different from the bundles you've created so far in the book, in the sense that it will have no Java classes. The contents of this bundle will consist of a MANIFEST.MF file and Spring descriptors processed from a bundle's default Spring-DM extender directory /spring/.
The purpose of the database bundle is to offer other bundles access to a data source via an OSGi service. Therefore, this bundle will contain all the necessary logic needed to connect to an RDBMS, including data connection strategies like pooling, as well as specific parameters needed to connect from Java to a particular brand of RDBMS.
Listing 5-11 illustrates the database bundle's MANIFEST.MF file.
Example 5-11. Database Bundle MANIFEST.MF File
Manifest-Version: 1.0 Bundle-ManifestVersion: 2 Bundle-SymbolicName: com.apress.springosgi.ch5.db Bundle-Version: 1.0.0 Bundle-Name: HelloWorld SpringSource dm Server Database Bundle-Vendor: Pro Spring-OSGi Import-Library: org.springframework.spring;version="[2.5,2.6)" Import-Bundle: com.springsource.org.apache.commons.dbcp;version="[1.2.2.osgi,1.2.2.osgi]", com.springsource.com.mysql.jdbc;version="[5.1.6,5.1.6]" Import-Package: javax.sql
Among the most noteworthy OSGi directives in the last MANIFEST.MF file you will find
Import-Library: Grants the bundle access to the entire Spring Framework library, which is available by default in the SpringSource dm ServerImport-Bundle: Grants the bundle access to the Apache Commons DBCP bundle used as the database pooling library, as well as MySQL's Java driver bundle used to connect to a MySQL RDBMSImport-Package: Grants the bundle accessto Java's standardjavax.sqlpackage, used in RDBMS connectivity
Note
The bracketed numbers appearing next to the version value are version ranges, specifying the particular range needed by either library, bundle, or package. Chapter 6 explores the use of versioning and this particular syntax.
Like any other MANIFEST.MF file containing OSGi directives, these values only indicate the Java packages—bundles or libraries—that will be accessible in a bundle. The next important question is how an RDBMS connection is bootstrapped inside this bundle. Listing 5-12 illustrates the module-context.xml file used for this purpose.
Example 5-12. module-context.xml for the Database Bundle
<?xml version="1.0" encoding="UTF-8"?>
<beans xmlns="http://www.springframework.org/schema/beans"
        xmlns:xsi="http://www.w3.org/2001/XMLSchema-instance"
        xmlns:context="http://www.springframework.org/schema/context"
        xmlns:p="http://www.springframework.org/schema/p"
        xsi:schemaLocation="
                        http://www.springframework.org/schema/beans
http://www.springframework.org/schema/beans/spring-beans-2.5.xsd
                        http://www.springframework.org/schema/context
http://www.springframework.org/schema/context/spring-context-2.5.xsd">
        <bean id="dataSource"
              class="org.apache.commons.dbcp.BasicDataSource"
              p:url="jdbc:mysql://localhost:3306/springosgi"
              p:username="hello"
              p:password="world"
              p:driverClassName="com.mysql.jdbc.Driver"
              init-method="createDataSource"
              destroy-method="close"/>
</beans>
Note
The loading of the JDBC driver is one case where classes are loaded using the thread-context class loader.
This last module-context.xml file is nothing more than a standard Spring descriptor. It's used to instantiate a Spring bean with the RDBMS parameters to establish a connection to MySQL using the Apache Commons DBCP library.
In fact, this descriptor is strikingly similar toChapter 2's Listings 2-13 and 2-27, which created Spring beans for accessing MySQL and HSQLDB data sources. Thetwist in this chapter, however, is that the dataSource bean will be published as an OSGi service. Listing 5-13 illustrates the osgi-context.xml file used to publish the dataSource bean as a service.
Example 5-13. osgi-context.xml for the Database Bundle
<?xml version="1.0" encoding="UTF-8"?>
<beans:beans
   xmlns="http://www.springframework.org/schema/osgi"
   xmlns:xsi="http://www.w3.org/2001/XMLSchema-instance"
   xmlns:beans="http://www.springframework.org/schema/beans"
   xsi:schemaLocation="http://www.springframework.org/schema/osgi
       http://www.springframework.org/schema/osgi/spring-osgi.xsd
       http://www.springframework.org/schema/beans
       http://www.springframework.org/schema/beans/spring-beans.xsd">

    <service ref="dataSource" interface="javax.sql.DataSource"/>
</beans:beans>
This last listing makes use of the Spring-DM element <service> to register the dataSource bean and expose it using Java's standard database interface javax.sql.DataSource.
In order for this dataSource bean creation and service registration to take place, you will need to place both the osgi-context.xml and module-context.xml files inside a bundle's /spring/ directory so Spring-DM may process these descriptors once a bundle is activated.
We will leave the building of the database bundle for the "Building and Deploying the Application" section of this chapter. For now, copy each of the bundle's files to the following Hello World "playground" directories:the MANIFEST.MF file in Listing 5-11 to the subdirectory /src/META-INF/ch5/db/, and the descriptors in Listings 5-12 and 5-13 to the subdirectory /src/META-INF/ch5/db/spring/.
Next, we will tackle a close companion to the database bundle, the one containing the JPA provider Eclipse Link.
Eclipse Link Bundle
The Eclipse Link bundle follows a similar strategy to the database bundle, since it will only be composed of a MANIFEST.MF file and Spring descriptors. As far as the purpose of the Eclipse Link bundleis concerned, it's simply to offer other application bundles access to Eclipse Link's JPA adapter via an OSGi service.
Listing 5-14 shows the Eclipse Link's bundle MANIFEST.MF file.
Example 5-14. Eclipse Link Bundle MANIFEST.MF File
Manifest-Version: 1.0 Bundle-ManifestVersion: 2 Bundle-SymbolicName: com.apress.springosgi.ch5.eclipselink Bundle-Version: 1.0.0 Bundle-Name: HelloWorld SpringSource dm Server EclipseLink Bundle-Vendor: Pro Spring-OSGi Import-Library: org.springframework.spring;version="[2.5,2.6)" Import-Bundle: com.springsource.org.eclipse.persistence;version="1.0.0";import-scope:=application
This last manifest makes use of the Import-Library header to grant the bundle access to the Spring Framework's library, as well as the Import-Bundle directive to give the bundle access to Eclipse Link's distribution bundle.
Note
By "Eclipse Link's distribution bundle," I mean the one you downloaded from the link presented in Table 5-2. "Eclipse Link bundle" refers to the Hello World application's bundle providing Eclipse Link's OSGi service.
One important aspect of the Import-Bundle directive is the use of the import-scope:= application property, which is a special feature of the SpringSource dm Server. By adding this property to the Import-Bundle directive, the imported bundle is dynamically added—imported—to all bundles (a.k.a. modules) comprising an application.
This last process is critical when applied to something like persistence. Let me take a brief sidestep and elaborate why. When another application bundle requires using the JPA adapter service provided by the Eclipse Link bundle, accessing the service is only part of the issue, for using a service like Eclipse Link entails weaving and introducingnew dependencies into the bundle consuming the service.
For example, take the application's model bundle—introduced next—that will contain the Person and HelloWorld classes and will require using Eclipse Link's JPA service to persist these objects to an RDBMS. Upon using this service, Eclipse Link will attempt to weave both the Person and HelloWorld classes, therefore requiring access to the Eclipse Link distribution bundle. The interesting question is, how willthe model bundle get this access?
The simple answer would be by importing the Eclipse Link distribution bundle into the model bundle itself; however, this isnot advisable because it breaks the application's modularity and introducesa hard dependency on the consuming bundle.
Why shouldn't the model bundle use some non-JPA persistence strategy or some other JPA provider? The issue is that using an OSGi service doesn't necessarily mean the consuming bundle will automatically have access to the class dependencies needed to run a service. And persistence fits this special case, since it introduces dependencies required for weaving classes on consuming bundles.
So using the import-scope:=application property on the Import-Bundle value for the Eclipse Link distribution bundle will make Eclipse Link's distribution classes available dynamically to all bundles that make up an application. This allows any bundle to use Eclipse Link's JPA service, without introducing hard import dependencies on consuming bundles.
Having elaborated on the use of the import-scope:=application property, I will now continue describing the Spring-DM and Spring descriptors needed by the Eclipse Link bundle. Listing 5-15 illustrates the module-context.xml used by the Eclipse Link bundle.
Example 5-15. module-context.xml for the Eclipse LinkBundle
<?xml version="1.0" encoding="UTF-8"?> <beans xmlns="http://www.springframework.org/schema/beans"xmlns:xsi="http://www.w3.org/2001/XMLSchema-instance" xmlns:p="http://www.springframework.org/schema/p"xmlns:aop="http://www.springframework.org/schema/aop" xmlns:context="http://www.springframework.org/schema/context"xmlns:jee="http://www.springframework.org/schema/jee" xmlns:tx="http://www.springframework.org/schema/tx" xsi:schemaLocation=" http://www.springframework.org/schema/aophttp://www.springframework.org/schema/aop/spring-aop-2.5.xsd http://www.springframework.org/schema/beanshttp://www.springframework.org/schema/beans/spring-beans-2.5.xsd http://www.springframework.org/schema/contexthttp://www.springframework.org/schema/context/spring-context-2.5.xsd http://www.springframework.org/schema/jeehttp://www.springframework.org/schema/jee/spring-jee-2.5.xsdhttp://www.springframework.org/schema/txhttp://www.springframework.org/schema/tx/spring-tx-2.5.xsd"> <bean id="jpaVendorAdapter"class="org.springframework.orm.jpa.vendor.EclipseLinkJpaVendorAdapter" p:databasePlatform="org.eclipse.persistence.platform.database.MySQLPlatform" p:showSql="true"/> </beans>
This last module-context.xml file contains EclipseLink's target JPA mapping strategy pegged to the MySQL RDBMS via the class org.eclipse.persistence.platform.database.MySQLPlatform,as well as the JPA property showSql="true".
Here again, a look back at Listing 2-27 in Chapter 2 will confirm that a similar Spring beanwas used to instantiate a jpaVendorAdapter bean to access a MySQL RDBMS using the OpenJPA JPA adapter.
As with this chapter's database bundle, however, the jpaVendorAdapter bean must be published as an OSGi service. Listing 5-16illustrates the osgi-context.xml file used for just this task.
Example 5-16. osgi-context.xml for the Database Bundle
<?xml version="1.0" encoding="UTF-8"?>
<beans:beans
   xmlns="http://www.springframework.org/schema/osgi"
   xmlns:xsi="http://www.w3.org/2001/XMLSchema-instance"
   xmlns:beans="http://www.springframework.org/schema/beans"
   xsi:schemaLocation="http://www.springframework.org/schema/osgi
       http://www.springframework.org/schema/osgi/spring-osgi.xsd
       http://www.springframework.org/schema/beans
       http://www.springframework.org/schema/beans/spring-beans.xsd">

    <service ref="jpaVendorAdapter"
interface="org.springframework.orm.jpa.JpaVendorAdapter"/>
</beans:beans>
This last listing makes use of the Spring-DM element <service> to register the jpaVendorAdapter beanand expose it using Spring's JPA vendor adapter interface org.springframework.orm.jpa.JpaVendorAdapter.
In order for this jpaVendorAdapter bean creation and service registration to take place, you will need to place both the osgi-context.xml and module-context.xml files inside a bundle's /spring/ directory, so that Spring-DM can process these descriptors once a bundle is activated.
We will leave the building of the Eclipse Link bundle for the "Building and Deploying the Application" section of this chapter. For now, copy each of the bundle's files to the following Hello World "playground" directories: the MANIFEST.MF file in Listing 5-14 to the subdirectory /src/META-INF/ch5/eclipselink/, and the descriptors in Listings 5-15 and 5-16 to the subdirectory /src/META-INF/ch5/eclipselink/spring/.
Next, we will explore the third bundle for the application, the firstone that will contain a set of application classes created earlier.
Model Bundle
The model bundle will contain the JPA annotated model classes createdearlier, as well as a MANIFEST.MF file. This bundle, however, will not contain any Spring-DM or Spring descriptor used to look up or register services.
Listing 5-17 shows the model bundle MANIFEST.MF file.
Example 5-17. Model Bundle MANIFEST.MF File
Manifest-Version: 1.0
Bundle-ManifestVersion: 2
Bundle-SymbolicName: com.apress.springosgi.ch5.model
Bundle-Version: 1.0.0
Bundle-Name: HelloWorld SpringSource dm Server Model
Bundle-Vendor: Pro Spring-OSGi
Import-Library: org.springframework.spring;version="[2.5,2.6)"
Import-Bundle: com.springsource.javax.persistence;version="[1.0.0,1.0.0]"
Export-Package: com.apress.springosgi.ch5.model;version="1.0.0"
This last manifest makes use of the Import-Library header to grant the bundle access to the Spring Framework's library, as well as the Import-Bundle directive to give the bundle access to Java's persistence javax.persistence classes used in the model classes. Additionally, the manifest uses Export-Package to make the bundle's model classes available to other bundles.
Having described the model bundle's MANIFEST.MF file, there is not much more to say. We will leave the building of the model bundle for an upcoming section. For now, just copy the bundle's MANIFEST.MF file in Listing 5-17 to the subdirectory /src/META-INF/ch5/model/ of the Hello World "playground."
Next, we will explore the bundles pertaining to the service layer of the application, which are the most extensive but equally the most interesting ones.
Service Bundles
Following the same bundle partitioning strategy as in Chapter 3, the service layer will be split into two bundles: one bundle designed to contain the application's DAO class using JPA, in which actions are performed against the application's model classes, and the other containing the necessary interface to access this service. These service operations include querying and updating model objects from an RDBMS, as well as offering these same operations as a service to other bundles in the application.
All this functionality makes the service implementation (DAO-JPA) bundle more extensive, since it will use JPA, perform weaving on application classes, access services from other bundles, and publish its own service forother bundles.
Let's start things off by looking at the two service bundles' MANIFEST.MF files. Listing 5-18 contains the MANIFEST.MF file for the service interface bundle and Listing 5-19 the MANIFEST.MF file for the service implementation (DAO-JPA) bundle.
Example 5-18. Service Interface Bundle MANIFEST.MF File
Manifest-Version: 1.0]

Bundle-ManifestVersion: 2

Bundle-SymbolicName: com.apress.springosgi.ch5.service

Bundle-Version: 1.0.0

Bundle-Name: HelloWorld SpringSource dm Server Service Interface

Bundle-Vendor: Pro Spring-OSGi

Import-Package: com.apress.springosgi.ch5.model;version="1.0.0"

Export-Package: com.apress.springosgi.ch5.service;version="1.0.0"
Example 5-19. Service Implementation (DAO-JPA) Bundle MANIFEST.MF File
Manifest-Version: 1.0
Bundle-ManifestVersion: 2
Bundle-SymbolicName: com.apress.springosgi.ch5.servicedao
Bundle-Version: 1.0.0
Bundle-Name: HelloWorld SpringSource dm Server JPA Backed DAO Service
Bundle-Vendor: Pro Spring-OSGi
Import-Library: org.springframework.spring;version="[2.5,2.6)"
Import-Bundle: com.springsource.javax.persistence;version="[1.0.0,1.0.0]",
 com.springsource.org.aspectj.runtime;version="1.6.0",
 com.springsource.org.aspectj.weaver;version="1.6.0"
Import-Package: com.apress.springosgi.ch5.model="1.0.0",
 com.apress.springosgi.ch5.service;version="1.0.0",
 javax.sql
The MANIFEST.MF file in Listing 5-18 is very straightforward; it simply imports the application's model package and exports the application interface package granting external access to the bundle's com.apress.springosgi.ch5.service package, which containsthe DAO's service interface
Listing 5-19, as with the other bundle's MANIFEST.MF files, starts off by importing Spring's library into the bundle using the Import-Library directive. Then it declares three values in the manifest's Import-Bundle directive, Java's persistence javax.persistence classes used in the DAO class, as well as AspectJ's runtime and weaver bundle, which will aid in weaving the application's persistence classes.
Additionally, the Import-Package directive is used to bring in the application's model package com.apress.springosgi.ch5.model and service package com.apress.springosgi.ch5.service into the scope of the bundle—since the DAO persists against classes in this package and also requires theservice interface. The Import-Package directive also imports Java's javax.sql package, used in RDBMS operations.
Listing 5-19 is a more extensive MANIFEST.MF file than the other bundles given the operations it will perform, but notice that even though persistence and weaving bundles are imported, there is no sign of importing a JPA provider to support the persistence process. So what'shappening? Where is the service bundle gaining access to a JPA's classes?
For starters, the service implementation (DAO-JPA) bundle will gain access to a JPA provider by accessing the jpaVendorAdapter service published by another bundle. However, the service alone is not enough. Since classes in the service bundle need to be weaved with the aid ofa particular JPA distribution, the service bundle alsomust import such a JPA distribution.
As outlined earlier, it is considered bad practice to import a package or bundle into a consuming bundle that is not known to be used until runtime. Therefore, the service bundle abstains from importing a particular JPAdistribution and instead relies on dynamic import support provided by the SpringSource dm Server.
The reason the service implementation (DAO-JPA) bundle will be able to weave classes using a JPA provider is because the JPA provider used in the application (as a whole) is imported through the import-scope:=application property. This allows the SpringSource dm Server to dynamically propagate the import scope of the JPA provider to all bundles contained in the application, the PAR file, allowing the service bundle to access the same JPA distribution bundle used by the application.
On the same subject of persistence, the service implementation (DAO-JPA) bundle will also need to include the standard persistence.xml file used in JPA applications. However, unlike the file used in Chapter 2 (Listing 2-9), this application's persistence.xml file will differ as can be observed in Listing 5-20.
Example 5-20. persistence.xml File Used in the Service Implementation (DAO-JPA) Bundle
<persistence xmlns="http://java.sun.com/xml/ns/persistence"
                xmlns:xsi="http://www.w3.org/2001/XMLSchema-instance"
                xsi:schemaLocation="http://java.sun.com/xml/ns/persistence
http://java.sun.com/xml/ns/persistence/persistence_1_0.xsd"
                version="1.0">
        <persistence-unit name="proSpringOSGiJpaSpringSourceAppPlatform"
transaction-type="RESOURCE_LOCAL">

               <class>com.apress.springosgi.ch5.model.HelloWorld</class>
               <class>com.apress.springosgi.ch5.model.Person</class>
<exclude-unlisted-classes>true</exclude-unlisted-classes>
</persistence-unit>
</persistence>The difference in this last persistence.xml file is that it explicitly states which classes are JPA entities. Unlike in Chapter 2, where we used the Spring Framework to automatically scan JPA entities, classpath scanning for annotated JPA entities is not supported in the SpringSource dm Server, so it is necessary to explicitly declare JPA entities.
Next, let's take a look at the service implementation (DAO-JPA) bundle descriptor containing standard Spring artifacts. Listing 5-21 illustratesthe service implementation (DAO-JPA) bundle's module-context.xml file.
Example 5-21. module-context.xml for the Service Implementation (DAO-JPA) Bundle
<?xml version="1.0" encoding="UTF-8"?> <beans xmlns="http://www.springframework.org/schema/beans"xmlns:xsi="http://www.w3.org/2001/XMLSchema-instance" xmlns:p="http://www.springframework.org/schema/p"xmlns:aop="http://www.springframework.org/schema/aop" xmlns:context="http://www.springframework.org/schema/context"xmlns:jee="http://www.springframework.org/schema/jee" xmlns:tx="http://www.springframework.org/schema/tx" xmlns:osgi="http://www.springframework.org/schema/osgi" xsi:schemaLocation=" http://www.springframework.org/schema/aophttp://www.springframework.org/schema/aop/spring-aop-2.5.xsd http://www.springframework.org/schema/beanshttp://www.springframework.org/schema/beans/spring-beans-2.5.xsd http://www.springframework.org/schema/contexthttp://www.springframework.org/schema/context/spring-context-2.5.xsd http://www.springframework.org/schema/jeehttp://www.springframework.org/schema/jee/spring-jee-2.5.xsd http://www.springframework.org/schema/txhttp://www.springframework.org/schema/tx/spring-tx-2.5.xsd http://www.springframework.org/schema/osgihttp://www.springframework.org/schema/osgi/spring-osgi.xsd"> <context:load-time-weaver aspectj-weaving="on"/>
<bean id="entityManagerFactory"class="org.springframework.orm.jpa.LocalContainerEntityManagerFactoryBean" p:dataSource-ref="dataSource"> <property name="jpaVendorAdapter" ref="jpaVendorAdapter"/> </bean> <bean id="transactionManager"class="org.springframework.orm.jpa.JpaTransactionManager" p:entityManagerFactory-ref="entityManagerFactory"/> <context:annotation-config/> <tx:annotation-driven mode="aspectj"/> <bean class="org.springframework.dao.annotation.PersistenceExceptionTranslationPostProcessor"/> <bean id="helloWorldServiceBean"class="com.apress.springosgi.ch5.servicedao.HelloWorldDAO"/> </beans>
Note
If you are curious to see how this Spring descriptor differs from the one used in the stand-alone Spring application in Chapter 2, consult Listing 2-27. The bean names and injection valuesare strikingly similar.
This listing's first statement activates AspectJ's load-time weaver on the bundle. The next statement instantiates the entityManagerFactory bean, injecting it with both a dataSource and jpaVendorAdapter bean. Further note that both thesebeans are backed by OSGi services in other bundles—services that are looked up using Spring-DM's <reference> element in the bundle's osgi-context.xml file, presented next.
Continuing with the module-context.xml file, though, you will find the creation of the transactionManager bean, which is itself injected with the entityManagerFactory bean. Next is the <context:annotation-config/> statement, used to activate the inspection of annotations like @PersistenceContext, employed in the bundle's DAO class.
Next, the statement <tx:annotation-driven mode="aspectj"/> instructs Spring to automatically perform declarative transaction management on annotated classes, such as the bundle's DAO class. Immediately after is the PersistenceExceptionTranslationPostProcessor bean, used for performing exception translation on classes annotated with @Repository, like the bundle's DAO class.
Finally, you can find the instantiation of the helloWorldServiceBean that will be published as an OSGi service for consumption by other application bundles. The publication of this last service is delegated to Spring-DM elements, which by default are placed in a bundle's osgi-context.xml file. Listing 5-22 illustrates the service's bundle osgi-context.xml file.
Example 5-22. osgi-context.xml for the Database Bundle
<?xml version="1.0" encoding="UTF-8"?>
<beans:beans
   xmlns="http://www.springframework.org/schema/osgi"
   xmlns:xsi="http://www.w3.org/2001/XMLSchema-instance"
   xmlns:beans="http://www.springframework.org/schema/beans"
   xsi:schemaLocation="http://www.springframework.org/schema/osgi
       http://www.springframework.org/schema/osgi/spring-osgi.xsd
       http://www.springframework.org/schema/beans
       http://www.springframework.org/schema/beans/spring-beans.xsd">
    <service id="helloWorldService"
             ref="helloWorldServiceBean"
             interface="com.apress.springosgi.ch5.service.HelloWorldService" />
    <reference id="dataSource" interface="javax.sql.DataSource"/>
    <reference id="jpaVendorAdapter"
interface="org.springframework.orm.jpa.JpaVendorAdapter"/>
</beans:beans>
This last listing makes use of Spring-DM's <service> and <reference> elements. The <service> declaration registers the helloWorldServiceBean as an OSGi service under the name helloWorldService using the service bundle's interface com.apress.springosgi.ch5.service.HelloWorldService.
On the other hand, the <reference> statements are used to look up services by the interfaces javax.sql.DataSource and org.springframework.orm.jpa.JpaVendorAdapter, assigning them to the identifiers dataSource and jpaVendorAdapter. Note that these last identifiers are injected into the beans declared in the bundle's module-context.xml file (Listing 5-21).
Now that you are familiar with both the service interface bundle and service implementation (DAO-JPA) bundle configuration files, copy each of the earlier files to the following locations in the Hello World "playground": the service bundle's MANIFEST.MF file in Listing 5-18 to the subdirectory /src/META-INF/ch5/service/, the service implementation (DAO-JPA) MANIFEST.MF file in Listing 5-19 and persistence.xml file in Listing 5-20 to the subdirectory /src/META-INF/ch5/servicedao/, and the descriptors in Listings 5-21 and 5-22 to the subdirectory /src/META-INF/ch5/servicedao/spring/.
Next, we will explore the last bundle belonging to the application, which is bound to the Web.
Web Bundle
The web bundle will contain the user interface for the application inthe form of a JSP (Listing 5-10), as well as a Spring MVC controller (Listing 5-9) to broker requests onto the application's service DAO class and obtain data to populate the user interface.
This web bundle, though, will differ from the other web deployment units you've used so far in this book. In Chapter 2 you created a standard WAR file, and in Chapter 3 you created a shared services WAR. Here you will make use of the SpringSource dm Server's deployment unit dubbed a Web Module.
As outlined in the "Deployment Units" section of this chapter, a Web Module is completely devoid of any configuration file present in Java EE's standard WAR format and is configured entirely in a bundle's MANIFEST.MF file. Given this file's importance, let's take a look at it in Listing 5-23.
Example 5-23. The Web Bundle (Module) MANIFEST.MF file
Manifest-Version: 1.0 Bundle-ManifestVersion: 2 Bundle-SymbolicName: com.apress.springosgi.ch5.web Bundle-Version: 1.0 Bundle-Name: HelloWorld SpringSource Application Platform Web Module Bundle-Vendor: Pro Spring-OSGi Import-Library: org.springframework.spring;version="[2.5,2.6)" Import-Bundle: com.springsource.org.apache.taglibs.standard;version="[1.1.2,1.1.2]" Import-Package: com.apress.springosgi.ch5.model;version="1.0.0",com.apress.springosgi.ch5.service;version="1.0.0"Module-Type: WebWeb-ContextPath: helloworldWeb-DispatcherServletUrlPatterns: /spring/*
Like the other application MANIFEST.MF files, thisfile makes use of the Import-Library, Import-Bundle, and Import-Package directives. Among theimports you will find the Spring Framework library, the Apache Taglibs library, which is used to compile the user interface JSP, and the application packages included in the model and service bundles.
However, the last three directives in this MANIFEST.MF file deserve special attention. The Module-Type: Web directive is used to mark the bundle as a Web Module, telling the SpringSource dm Server to take the necessary steps to deploy the bundle's logic onto the OSGi'fied Apache Tomcat container. Given that this bundle will be deployed as a web application, it's necessary to further specify some standard properties used by this type of application.
In a standard WAR or shared service WAR like those you created in Chapters 2 and 3, the web.xml file serves to specify things like servlet mappings and filter mappings, as well as context paths that serve to indicate an application's deployment URL. In a Web Module this file does not exist; taking its place are directives like Web-ContextPath and Web-DispatcherServletUrlPatterns.
The Web-ContextPath: helloworld Spring-DM header indicates that the web bundle should be deployed under theURL <hostname>/helloworld/, while the Web-DispatcherServletUrlPatterns: /spring/* directive indicates thatall requests matching the URL pattern <hostname>/helloworld/spring/ be processed by the bundle's Dispatcher servlet (Listing 5-9). As a further point of comparison with Chapter 2's application, you can look at Listing 2-26 and see the similarities between a web.xml file and these last two directives.
Moving along we come to the web bundle's module-context.xml file, which contains the standard Spring artifacts. Listing 5-24 shows this file.
Example 5-24. module-context.xml for the Web Bundle (Module)
<?xml version="1.0" encoding="UTF-8"?> <beans xmlns="http://www.springframework.org/schema/beans"xmlns:xsi="http://www.w3.org/2001/XMLSchema-instance" xmlns:context="http://www.springframework.org/schema/context"xmlns:jee="http://www.springframework.org/schema/jee" xmlns:tx="http://www.springframework.org/schema/tx" xsi:schemaLocation=" http://www.springframework.org/schema/beanshttp://www.springframework.org/schema/beans/spring-beans-2.5.xsd http://www.springframework.org/schema/contexthttp://www.springframework.org/schema/context/spring-context-2.5.xsd http://www.springframework.org/schema/jeehttp://www.springframework.org/schema/jee/spring-jee-2.5.xsd http://www.springframework.org/schema/txhttp://www.springframework.org/schema/tx/spring-tx-2.5.xsd"> <context:component-scan base-package="com.apress.springosgi.ch5.web"/> <bean id="helloWorldController"class="com.apress.springosgi.ch5.web.HelloWorldController"> <property name="helloWorldService" ref="helloWorldServiceBean"/> </bean> <bean id="urlMapper"class="org.springframework.web.servlet.handler.SimpleUrlHandlerMapping"> <property name="mappings"> <props> <prop key="/**">helloWorldController</prop> </props> </property> </bean> <bean id="jspViewResolver"class="org.springframework.web.servlet.view.InternalResourceViewResolver"> <property name="viewClass"value="org.springframework.web.servlet.view.JstlView"/> <property name="prefix" value="/jsp/"/> <property name="suffix" value=".jsp"/> </bean> </beans>
This last module-context.xml file starts off with the <context:component-scan> element, used to trigger the scanning of the package containing the bundle'sservlet mapping annotations. The next statement is used to instantiate the helloWorldController bean, which in itself is injected with the helloWorldService bean, which is backed by an OSGi service that is looked up in this same bundle's osgi-context.xml file (illustrated next).
Continuing with the module-context.xml file, note the instantiation of the urlMapper bean, which indicatesthat all requests (pkey="**") should be processed by the helloWorldController bean. And finally, you will encounter the jspViewResolver bean, which indicates that Spring's InternalResourceViewResolver class will be used for rendering the application's view, and that it attempts to locate the corresponding view files under the /jsp/ directory (<property name="prefix") with a .jsp extension (<property name="suffix").
You can compare this last listing to the one used in Chapter 2's stand-alone Spring application by consulting Listing 2-28. The differences you will find arise because the descriptor in Listing 5-24 does not use Apache Tiles or Spring's AJAX support.
Next, we come to the web bundle's descriptor containing Spring-DM artifacts. Listing 5-25 shows this descriptor, osgi-context.xml.
Example 5-25. osgi-context.xml for the Web Bundle (Module)
<?xml version="1.0" encoding="UTF-8"?>
<beans:beans
   xmlns="http://www.springframework.org/schema/osgi"
   xmlns:xsi="http://www.w3.org/2001/XMLSchema-instance"
   xmlns:beans="http://www.springframework.org/schema/beans"
   xsi:schemaLocation="http://www.springframework.org/schema/osgi
       http://www.springframework.org/schema/osgi/spring-osgi.xsd
       http://www.springframework.org/schema/beans
       http://www.springframework.org/schema/beans/spring-beans.xsd">

<reference id="helloWorldServiceBean"
interface="com.apress.springosgi.ch5.service.HelloWorldService"/>
</beans:beans>
This last descriptor has only one statement, the Spring-DM <reference> element used to look up a service with the HelloWorldService interface—the one provided by the service bundle—which is injected into the controller bean declared in the bundle's osgi-context.xml file.
This concludes the description of the application's Web Module. Copy the MANIFEST.MF file in Listing 5-23to the subdirectory /src/META-INF/ch5/web/ of the Hello World "playground" and the descriptors in Listings 5-24 and 5-25 to the subdirectory /src/META-INF/ch5/service/web/ in the same Hello World "playground."
Next, I will describe the last application bundle you will need to create for the Hello World application, which targets the SpringSource dm Server.
Platform Archive
The PAR will provide the Hello World application with supporting functionality like service scoping and dynamic import propagation, features that were assumed when designing the application and are among the most important offerings in the SpringSource dm Server.
Important as the PAR format is to harnessing the power of the SpringSource dm Server, it only requires the inclusion of a MANIFEST.MF file, as well as the packaged bundles that will make up an application.
Listing 5-26 illustrates the Hello World application's PAR MANIFEST.MF file.
Example 5-26. Platform Archive MANIFEST.MF File
Manifest-Version: 1.0
Application-SymbolicName: com.apress.springosgi.ch5.HelloWorld
Application-Version: 1.0
Application-Name: HelloWorld SpringSource dm Server
Application-Description: A Hello World Platform Archive for Pro-Spring OSGi
This last MANIFEST.MF file does not contain the typical directives used by all bundles. With the exception of the Manifest-Version: 1.0 directive, the remaining directives are exclusive to the SpringSource dm Server. However, the naming conventions should be sufficient to clarify their purpose, giving a PAR a symbolic name, version, name, and description.
Copy the MANIFEST.MF file in Listing 5-26 to the src/META-INF/ch5/service/par/ subdirectory of the Hello World "playground."
Next, we will finish the application by building and deploying it.
Using the same tools as other chapters in the book, the build process for the SpringSource dm Server application will use Apache Ant. To start the build process for the SpringSource dm Server Hello World application, place yourself in the Hello World "playground" root directory and modify the build.xml file to include the Apache Ant task illustrated Listing 5-27.
Note
If you skipped the example presented in Chapter 1, you will not have a preexisting build.xml file to modify. In that case, you will need to copy the build.xml file presented in Listing 1-6, which is the base Apache Ant file needed by Listing 5-27.
Example 5-27. Apache Ant Task for Building the SpringSource dm Server Hello World Application
<target name="ch5" depends="compile"description="Build Chapter 5 Spring-OSGi Application"> <echo message="-------------- Building Chapter 5 Spring-OSGi Application forPro Spring-OSGi ------------—"/> <property name="ch5.dir" value="${dist.dir}/ch5/"/> <mkdir dir="${ch5.dir}"/> <jar destfile="${ch5.dir}/helloworld-db.jar"manifest="${src.dir}/META-INF/ch5/db/MANIFEST.MF"> <fileset dir="${build.dir}"> <include name="com/apress/springosgi/ch5/db/*"/> </fileset> <metainf dir="${src.dir}/META-INF/ch5/db/"/> </jar> <jar destfile="${ch5.dir}/helloworld-model.jar"manifest="${src.dir}/META-INF/ch5/model/MANIFEST.MF"> <fileset dir="${build.dir}"> <include name="com/apress/springosgi/ch5/model/*"/> </fileset> <metainf dir="${src.dir}/META-INF/ch5/model/"/> </jar> <jar destfile="${ch5.dir}/helloworld-eclipselink.jar"manifest="${src.dir}/META-INF/ch5/eclipselink/MANIFEST.MF"> <metainf dir="${src.dir}/META-INF/ch5/eclipselink/"/> </jar> <jar destfile="${ch5.dir}/helloworld-service.jar"manifest="${src.dir}/META-INF/ch5/service/MANIFEST.MF"> <fileset dir="${build.dir}"> <include name="com/apress/springosgi/ch5/service/*"/>
</fileset>
        <metainf dir="${src.dir}/META-INF/ch5/service/"/>
   </jar>
     <jar destfile="${ch5.dir}/helloworld-servicedao-jpa.jar"
manifest="${src.dir}/META-INF/ch5/servicedao/MANIFEST.MF">

         <fileset  dir="${build.dir}">

           <include name="com/apress/springosgi/ch5/servicedao/*"/>

         </fileset>

         <metainf dir="${src.dir}/META-INF/ch5/servicedao/"/>

      </jar>

    <jar destfile="${ch5.dir}/helloworld-web.jar"
manifest="${src.dir}/META-INF/ch5/web/MANIFEST.MF">
         <fileset  dir="${build.dir}">
           <include name="com/apress/springosgi/ch5/web/*"/>
         </fileset>
        <metainf dir="${src.dir}/META-INF/ch5/web/"/>
        <zipfileset dir="${src.dir}/GUI/ch5/" prefix="MODULE-INF"/>
     </jar>

    <jar destfile="${ch5.dir}/helloworld.par"
manifest="${src.dir}/META-INF/ch5/par/MANIFEST.MF">
         <fileset  dir="${ch5.dir}">
           <include name="helloworld-db.jar"/>
           <include name="helloworld-model.jar"/>
           <include name="helloworld-eclipselink.jar"/>
           <include name="helloworld-service.jar"/>
           <include name="helloworld-servicedao-jpa.jar"/>

          <include name="helloworld-web.jar"/>
        </fileset>

    </jar>

</target>
Warning
You need to ensure all compile dependencies for the application areplaced in the lib directory of your Hello World "playground." If you skipped the previous chapters, you will need to copy thefollowing JARs to the lib directory of your Hello World"playground."
persistence.jar: Located in the lib/j2ee directory of the Spring Framework with dependencies download
spring-beans.jar: Located in the dist/modules directory of the Spring Framework with dependencies download
spring-tx.jar: Located in the dist/modules directory of the Spring Framework with dependencies download
spring-webmvc.jar: Located in the dist/modules directory of the Spring Framework with dependencies download
spring.jar: Located in the dist directory of the Spring Framework with dependencies download
This Ant task starts by defining a dependency on the compile target, ensuring that all application classes are compiled prior to being packaged. Immediately after, a build directory is created in which the application's bundles are placed. The remaining statements perform the packaging of the application's bundles.
The first five bundle creation statements follow an identical approach, taking the appropriate MANIFEST.MF file from a bundle's designated Hello World "playground" directory and packaging it with the corresponding compiled classes for each bundle.
The next-to-last statement is used to create the web bundle. This statement, though, differs slightly from the previous ones in that it has a SpringSource-AP Web Module format. This requires placing an application's GUI files—JSP, HTML, and CSS—inside a special bundle directory named MODULE-INF, hence the use of the additional declaration <zipfileset dir="${src.dir}/GUI/ch5/" prefix="MODULE-INF"/>.
Finally, you can observe the last statement used to create the application's PAR file. This sequence simply takes the PAR MANIFEST.MF file located in the subdirectory src/META-INF/ch5/par/MANIFEST.MF and groups it with all the application's bundles.
With this entire Ant task placed inside the build.xml file of the "playground," execute the command ant ch5. On completion, you will have the following bundles under the src/dist/ch5/ directory: helloworld-db.jar, helloworld-model.jar, helloworld-eclipselink.jar, helloworld-service.jar, helloworld-servicedao-jpa.jar, helloworld-web.jar, and helloworld.par.
The helloworld.par file is the only one required for deploying the application in the SpringSource dm Server. Having the application's PAR file, the next step is to ensure that the application and the SpringSource dm Server have all of their external dependencies in check.
Having a running MySQL RDBMS is the first prerequisite before PAR deployment. Recall, however, that this application is based on the same database schema used in Chapter 2, so if you followed along, you will already be set.
If you skipped Chapter 2, you can find instructions on setting up MySQL in that chapter, as well as instructions on creating the database schema and prepopulating the application with data in Listing 2-31.
Even though the SpringSource dm Server comes with many built-in bundles, you will need to copy the bundles you downloaded in Table 5-2 to the SpringSource dm Server's repository. So with MySQL up and running, the next step is copying the application's external bundle dependencies to the SpringSource dm Server's /repository/bundles/usr/ directory.
The bundles' names, which are shown earlier in Table 5-2, are
com.springsource.com.mysql.jdbc-5.1.6.jar
com.springsource.org.eclipse.persistence.antlr-1.0.0.jar
com.springsource.org.apache.commons.dbcp-1.2.2.osgi.jar
com.springsource.org.eclipse.persistence.asm-1.0.0.jar
com.springsource.org.apache.commons.pool-1.4.0.jar
com.springsource.org.eclipse.persistence.jpa-1.0.0.jar
com.springsource.org.eclipse.persistence-1.0.0.jar
With the application's PAR file in hand, MySQL running, and the application's external bundle dependencies installed, log in to the SpringSource dm Server Admin Console as outlined at the start of the example and illustrated in Figure 5-2.
Once there, navigate to the Deploy an Application section and click the Browse button to search for the application's PAR file. A typical location would be <playground_home>/dist/ch5/helloworld.par. Next, click Upload.
Upon processing you should see a screen like the one in Figure 5-5.
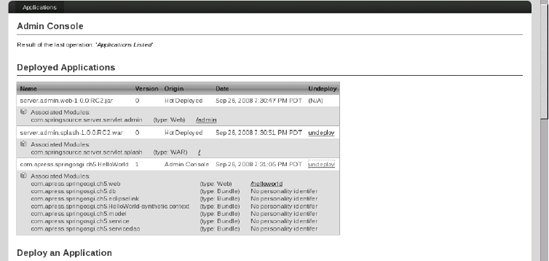
Figure 5-5. SpringSource dm Server administrative interface with the deployed Hello World application
Congratulations! You've just deployed your first application in the SpringSource dm Server. If you click the /helloworld link or point your browser to the URL http://localhost:8080/helloworld/, you will be able to see the application's main page.
You're done, but before moving on to the next chapter, there is an interesting thing to note about the deployment information presented in Figure 5-5. Look at the Associated Modules summary of Hello World PAR. Besides the bundles you created, there is another bundle by the name com.apress.springosgi.ch5.HelloWorld-synthetic.context.
This last bundle, generated by the SpringSource dm Server upon deployment of the PAR, is what makes the property import-scope:=application function. As you will recall, it's precisely this property that allows a bundle to share a package—or bundle—with all of the application's bundles via a shared thread-context class loader.
It may seem inconsequential, but its value is a critical factor in easing the use of techniques like persistence in the context of Spring-DM and OSGi.
In this chapter you learned how the SpringSource Application Platform(SpringSource dm Server) helps to deploy OSGi applications in enterprise settings. You saw that a stand-alone OSGi environment lacks many of the facilities associated with Enterprise Java applications. It turns out that SpringSource dm Server supports such features—for instance, native Java EE web applications, weaving, and monitoring support in the context of OSGi.
You then learned about the SpringSource dm Server's architecture, andhow it's built on the foundations of Apache Tomcat as its Java OSGi'fied container and Eclipse Equinox as its OSGi environment. Additionally, you saw the various deployment unit formats supported by the SpringSource dm Server: standard OSGi bundles, standard WARs, Shared Library/Services WARs, Web Modules, and PARs.
Next, you discovered the SpringSource dm Server's library format, which allows packages to be logically grouped, facilitating the import processfor consuming bundles to more simpler statements. Later you learned about the SpringSource dm Server's directory structure, and how it possesses numerous directories that are used for things like "hot" deployment, log files, bundle repositories, and configuration files.
You went on to design an application targeting the SpringSource dm Server platform that consisted of five separate bundles giving access to an RDBMS, a JPA provider, a model layer, a service layer, and web layer. In the process, we peeked inside the different MANIFEST.MF files, and Spring and Spring-DM descriptors needed by each bundle.
Finally, you found out how to package an application's bundles using the SpringSource dm Server's PAR format and deploy this unit through the platform's administrative interface. The final result is a live end-to-end OSGi application running on the SpringSource dm Server, using Eclipse Link as the JPA provider, Spring's MVC, and MySQL as the RDBMS.