
OSGi—originally an acronym for Open Services Gateway Initiative—emerged in 1999 to address the needs of the embedded device market. Close to 30 companies, many of which were already invested in the language of the time, Java, worked to develop this initiative, designed to use that language to target the embedded device market for the home.[1]
1999 was a crazy year in the technology sector, with everything under the sun showing some type of promise in the whirlwind dot-com mania that ensued. It was a time to dream big, be ambitious, and think outside the box more than ever, and the architects behind OSGi did just that, envisioning a set of features missing in the Java platform at the time.
Chaotic though its time of inception was, OSGi's design has proved resilient and has helped it to expand into many markets that employ Java software. Let's take a 100,000-foot view of OSGi's primary feature set before we zoom in on the details of its working parts.
Hot-pluggability was one feature envisioned by the OSGi expert group, a technical term referring to a system capable of being altered without interrupting its ongoing operation.
Today high-end disk arrays are perhaps the most common hot-pluggable item in the IT sector, allowing any disk failure to be corrected without the need for a system to be shut down, thus guaranteeing 24-hour availability.
In the embedded device for the home circa 1999, hot-pluggability was not common. So you need only imagine the ripple effect a device failure could have on a networked home or the angst of rebooting this type of system if any one device needed to be repaired or reinstalled.
Another target pursued by OSGi members was that of autodiscovery, whereby one device is capable of reusing software present in another device. Here again, in retrospect to the year 1999, embedded devices were severely limited in terms of memory and storage resources, so that a device autodiscovering and reusing software present in another device was a highly desirable trait.
If you were to draw OSGi's focus areas in terms of bull's-eyes, hot-pluggability and autodiscovery would likely be the most visible features from 100,000 feet, with a common pattern of dynamic behavior emerging between the two.
When a damaged disk is replaced on a hot-pluggable disk array, it is said to have been dynamically configured, since no system shutdown ever takes places. Similarly, an autodiscovery process by its very definition is something that takes place dynamically; since no intervention takes places, dependencies are simply autodiscovered.
So if you attempted to summarize the essence behind hot-pluggability and autodiscoverability, you would likely agree that all this entails dynamic behavior, which is why OSGi defines itself as a dynamic module system for Java.[2]
So it is that today you can see OSGi's feature set influencing the Java ecosystem, arising from its origins in the embedded market and spreading to the automotive sector, smart phones, development tools, and more recently, Java's de facto standard for server-side platforms, Java Enterprise Edition (EE).
Armed with this brief overview, let's dig deeper into where these concepts are applied in the architecture of a Java application, and what new concepts you need to familiarize yourself with in order to put OSGi's feature set to work.
Let's begin the same way most maps illustrating travel routes start out, using a "you are here" point of reference to illustrate how a non-OSGi Java application evolves into one using OSGi.
Class files made up of bytecode—it doesn't get any more basic than that for a Java application, no matter what operating system you are targeting or whether you're using 32 bits or 64 bits, have 64KB or 4GB of memory, or are using the oldest or latest Java version. The architecture imposed by Java itself forces any application to use class files made up of bytecode to deliver on Java's mantra, "write once, run everywhere," via the Java Virtual Machine (JVM).
Well, this is excellent for all the benefits of using the JVM, but let's examine how it is these class files made up of bytecode interact with the JVM. I will start by mentioning that a JVM requires precise instructions on where to locate class files needed by the applications running on it, a process that is achieved using the CLASSPATH variable.
The CLASSPATH variable is a colon- or semicolon-separated list—the former for Unix, the latter for Windows—containing the location of each class file needed to properly execute an application running on a JVM. Though individually declaring class files inside the CLASSPATH variable is possible, declaring groups of classes as a unit is far more typical.
The unit format used for the purpose of grouping Java classes is the JAR format, or Java Archive, which is nothing more than a zipped file containing associated class files.
So it is that once a JVM is started, its bootstrapping classes go on to form part of the JVM's memory footprint, with the remaining classes declared in the CLASSPATH variable being loaded into memory as they are needed by applications.
The mechanism is simple, so simple in fact, that besides the special flag1—Xbootclasspath, which allows the JVM to load certain class files or JAR files before the core Java classes (a.k.a. bootstrapping classes)—there is no way to add more sophisticated behaviors to the way the CLASSPATH variable and Java classes interact. In this case, simplicity gives the following characteristics to your JVM and the applications executing on it:
One class name and version per class loader (a JVM uses one class loader by default): Classes are accessible on a last declared-last loaded basis. This means that if for some reason the same class or multiple JARs containing the same class are declared, it will be the bytecode contained in the last declared class that is considered valid for that particular JVM instance. This can have the most serious repercussions when deploying multiple classes or JAR files, each dependent on different versions of the same class, as only one class by name can form part of a JVM instance. Class loaders are an exception to this rule; see the sidebar "Class Loaders: Custom Class Loading in a JVM" for more background on this concept.
No dependency awareness between JARs: There is no awareness outside the internal packaging namespace used in the Java classes themselves and whatever caution is exerted by the creator of each JAR as to which classes depend on one another. At best, this can cause the tiresome burden of hunting down unmet class dependencies in an application, or at worst, the versioning clashes already mentioned.
No modifications to a running JVM: Unless a JVM instance is completely stopped and restarted again, no upgrade can be performed on either classes or JARs.
CLASS LOADERS: CUSTOM CLASS LOADING IN A JVM
A JVM can support multiple classes by the same name and different version but only using custom class loaders.
By default a JVM has two class loaders, a bootstrap class loader for JVM classes and a system class loader for classes declared in the CLASSPATH variable. Additional class loaders can provide isolation for multiple classes by the same name and different version. The following diagram illustrates this class loader hierarchy.
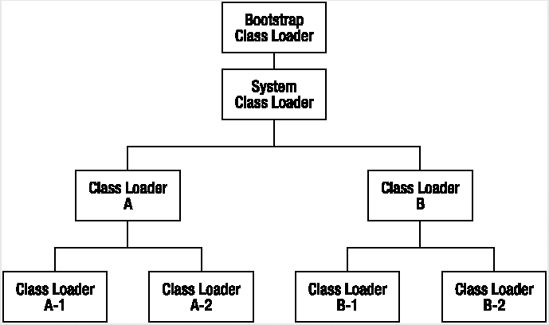
However, adding more class loaders requires using Java APIs, making class loaders an integral part of an application's design that have to be contemplated from the outset. For this reason, most applications rely on the single-system class loader provided by the JVM, complicating the use of multiple classes by the same name and different version.
Java EE application servers are the perfect example of class loader use, providing an environment running on a JVM in which multiple Java applications are deployed. In such cases, class loaders are fundamental to avoid conflicts between applications running on a server. The subject of class loaders and Java EE application servers is expanded in Chapter 3.
At first sight, these characteristics may seem minor or even be seen as unreasonable criticism by someone who is just looking for drawbacks in Java's CLASSPATH variable and class file loading. But if thoroughly analyzed, you can conclude they contribute heavily to some errors and undesired behaviors that are all too common in Java applications.
One such error is that of class-loading conflicts, on occasion referred to as "JAR Hell" or simply observed as java.lang.IncompatibleClassChangeError. This type of error is increasingly common in JVMs used for deploying enterprise applications, given the size of these applications and their often intertwined relationships.
If a sufficiently large application of this kind is deployed on a JVM, it can be extremely difficult to debug and correct. That can happen, for example, if an application relies on both library A and library B, and each of these libraries in turn relies on different versions of the same XML parser or application logger.
Similarly, another error that can be attributed to the characteristics of the CLASSPATH variable is java.lang.OutOfMemoryException, which is thrown when a JVM cannot allocate more memory to fulfill its operations. This error is often associated with memory leaks, due to circular references or unallocated objects in the life cycle of an application.
Last but not least, let's not forget java.lang.ClassNotFound, which indicates an application is missing one particular class in the classpath in order to fulfill its intended purpose. Since each JAR file does not explicitly indicate what classes it needs or what it can offer the outside world, solving a java.lang.ClassNotFoundException error can become a pretty expensive trial-and-error process of adding and removing classes to the CLASSPATH variable, with the potential of introducing versioning conflicts.
The characteristics of the JVM and CLASSPATH also make it awkward, and perhaps risky, to make changes to a running Java application. When an application is running on a stand-alone workstation or PC, it may seem trivial to stop and restart it. But as uptime requirements get more demanding, and availability more essential, it becomes steadily less acceptable to stop a JVM for class upgrades.
As you've probably realized, most of the JVM and CLASSPATH issues presented in the preceding text exist because they are overlooked by the current JVM technology curve. So let's now shift our attention to OSGi's feature set, which solves many of these issues, and get moving toward an OSGi-based architecture.
If there is a central theme to OSGi, it is that of a bundle. A bundle is a group of Java classes and additional resources equipped with a detailed manifest on all its contents, as well as additional services needed to give the included group of Java classes more sophisticated behaviors, to the extent of deeming the entire aggregate a component.[3]
The first thing you need to realize is that an OSGi bundle is a JAR file. This statement has one very important consequence: OSGi's primary building block is not a radical departure from the packaging model used throughout the Java world; it's simply a richer type of JAR file.
Still, you may question why the need to reinvent a proven format like a JAR. As it turns out, a JAR file's contents are isolated from every other surrounding Java class and action that occurs inside the JVM, so how do you make a JAR file aware of its surroundings?
This is actually quite easy. State what a JAR file needs to be informed about, what it requires from the outside world, and what it can offer outsiders. How? By adding OSGi headers to the MANIFEST.MF file already included in a JAR.[4]
A MANIFEST.MF file is a simple text file attached to an underlying JAR structure—inside the META-INF directory—that contains information about its contents. In the case of OSGi headers, these values express numerous behaviors that allow its contents to reap the benefits of dynamic loading and all the virtues this entails. Listing 1-1 illustrates a basic MANIFEST.MF file with OSGi headers.
Example 1-1. MANIFEST.MF File with OSGi Headers
Bundle-Name: Hello World
Bundle-Description: A Hello World bundle for Pro-Spring OSGi
Bundle-Version: 1.0.0
Bundle-Activator: com.apress.springosgi.ch1.Activator
Export-Package: com.apress.springosgi.ch1;version="1.0.0"
Import-Package: org.osgi.framework;version="1.3.0"
The meaning of the contents in Listing 1-1 is as follows:
Bundle-Name: Simply assigns a short name to the bundleBundle-Description: Expresses a lengthier description for what the bundle will doBundle-Version: Designates a version number to the bundleBundle-Activator: Indicates the class name to be invoked once a bundle is activatedExport-Package: Expresses what Java packages contained in a bundle will be made available to the outside worldImport-Package: Indicates what Java packages will be required from the outside world, in order to fulfill the dependencies needed in a bundle
OSGi's dynamic behavior can best be understood by first looking at the use of Export-Package and Import-Package, given that these values set the stage for a leaner and smarter packaging format than that offered by JAR files.
By explicitly declaring these values, a JAR file transformed into an OSGi bundle can effectively avoid including all but its utmost essential packages and also expose its core packages to the benefit of other bundles running in the same system. Notice how Listing 1-1 assigns Java package values to the manifest headers Import-Package and Export-Package. This allows OSGi to dynamically import packages from other bundles, as well as export packages so they can be dynamically discovered by other bundles. This makes an application's JARs smaller and smarter in terms of the classes it uses.
Also notice how the imported and exported packages in Listing 1-1 are appended with version values. This further classifies the package version needed by a bundle, as well as the hosted package version available to other bundles. Note that if version values are omitted, packages are assumed to be unique.
CLASS LOADERS REVISITED: THE OSGI WAY
A benefit to using OSGi's bundle format is that an OSGi environment assigns a class loader to each bundle. This design is the basis on which the OSGi headers Export-Package and Import-Package function, with each class loader working as a gateway exposing and accessing only those packages explicitly declared in a manifest.
However, these class loaders are not the same as those created via Java APIs and added to a JVM's system class loader; these are OSGi-administered class loaders. The difference could not be more critical, because instead of designing a class loader hierarchy yourself, OSGi automatically creates one for you based on bundles. The following diagram illustrates this class loader hierarchy:
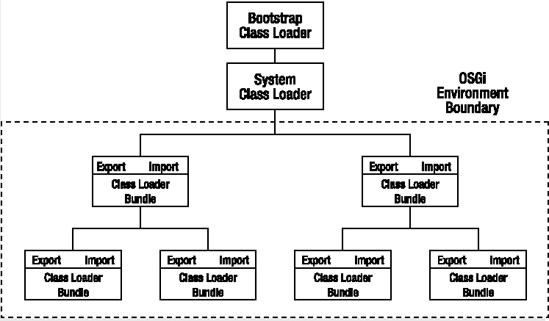
So where does this leave the CLASSPATH variable and a JVM's default class loaders? In the same place, everything keeps running under the system class loader. It only means an OSGi environment manages a separate class loader hierarchy, which is in contact with the parent system class loader.
Still, another important piece that has dynamic implications in this OSGi manifest is the value pertaining to Bundle-Activator. Whereas Export-Package and Import-Package simply contain values to packages that would otherwise form part of a standard JAR file, the value for Bundle-Activator—which is a Java class in itself—contains logic that implements OSGi services.
OSGi services are a critical step to understanding OSGi's "big picture," so with a keen eye read and reread the following paragraphs if necessary until you firmly grasp the concept. Loosely speaking, an OSGi bundle can have three types of services:
Management services that are completely agnostic to the business logic contained in the Java packages that make up the bundle
Infrastructure services that support the business logic contained in the packages that make up the bundle
Business services that expose actual business logic contained in the Java packages that make up bundle
Referring back to the OSGi manifest you just saw, the class assigned to Bundle-Activator contains services related to the life cycle of a bundle—what actions to take once a bundle is loaded into memory—and hence can be considered a management service.
Though not explicitly shown in this OSGi manifest, other types of classes can be associated with a bundle containing infrastructure services. When I use the term "infrastructure services," it's to exert the idea of a supporting role for the business logic contained in an application: services like logging, I/O, HTTP (the Web's protocol), and XML parsing are generally considered supportive of the business logic.
In this case, whatever business logic is packed inside an OSGi bundle can make use of these services in the same dynamic context offered by OSGi. At this juncture, it might not be entirely clear what you gain by using OSGi services for application logging or XML parsing, but every bit of infrastructure service reuse is that much code you don't have to rewrite.
Finally comes the business service, which is perhaps the type of service you may already be familiar with, providing results on everything from a basic computation to something as sophisticated as a data query.
The use of all these services is one reason why OSGi bundles are often referred to as components, since they give that additional behavior generally associated with components to the core business logic contained in a bundle. Additionally, these services have also influenced the tagging of OSGi as a technology for enabling service-oriented architecture (SOA).
The OSGi specification sets forth a series of predefined services, so up next the discussion will focus on this subset of OSGi services as you familiarize yourself with the actual OSGi framework.
Note
The OSGi specification makes no distinction between services as it's expressed in this last section. In order to help explain the concept of a bundle, this division of management, infrastructure, and business services was made to let you know some of OSGi's services are there to serve the bundle itself, others to support the business logic contained in a bundle, and others to expose business logic. In the remainder of the book, you will see the term "service" used universally no matter what purpose it serves for a bundle.
You're now aware of a few benefits that OSGi's bundle architecture can bring to your applications, such as the Import and Export package mechanisms that lay the foundations for sharing classes, but what about those OSGi services than can also be integrated into bundles? What are they all about? Figure 1-1 illustrates the various layers that make up the OSGi framework, many of which map to the different types of services.
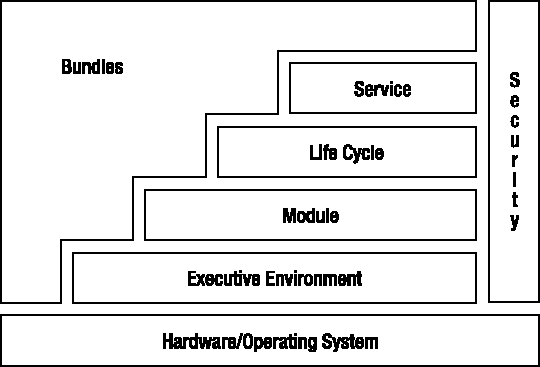
Most of these OSGi layers possess a comprehensive API—like you would expect in any other Java framework—with which it's possible to dictate the required service behaviors for each bundle through Java classes, which are associated to the bundle through its corresponding manifest.
For now, I won't bog down this introductory discussion on the OSGi framework with the dense subject of API classes and methods, but rather state what each of these layers brings to the table and the capabilities it offers OSGi bundles.
The Security Layer
This subset of the OSGi framework refers to everything related to the security rights of a bundle. Based on the Java 2 security architecture, it defines how a bundle can be digitally signed and how security checks can be enforced in the context of the framework.
As OSGi security is based on the Java 2 security model, there is no OSGi security service API. Instead the framework relies on the presence of this former API to provide security functionality to a bundle.
As far as the actual security checks are concerned, these are integrated with the OSGi service APIs pertaining to the life-cycle layer, which is described in the upcoming paragraphs.
The Module Layer
Much like the security layer, the module layer doesn't have any specific service API, but rather defines the modularization characteristics needed by the framework itself.
In this sense, the module layer defines the anatomy of a bundle, the corresponding manifest values it needs to support (which you can find in the Appendix), and how the class-loading architecture should function, the latter of which would primarily be of interest to those creating an OSGi framework implementation and not necessarily those using it.
So let's move on to an OSGi layer with a little more depth: the life-cycle layer.
The Life-Cycle Layer
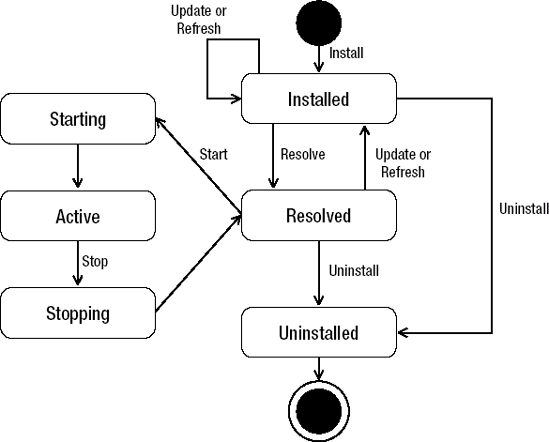
The life-cycle layer defines and manages the various states an OSGi bundle can find itself in at any time, which include the following:
Active state: Indicates a bundle has been loaded into the actual JVM footprint
Uninstalled state: Indicates a bundle is effectively uninstalled, meaning no verification process has taken place
Installed state: Indicates a bundle has been validated and is prepared to be activated
Resolved state: Indicates all dependencies declared for a bundle have been resolved
Starting state: Indicates a bundle is in the process of transitioning to an active state
Stopping state: Indicates a bundle is in the process of being stopped
The transition of a bundle from each of these states is caused by either an administrative console in which a user inputs some of these changes or the framework performing dynamically based on what other actions are taking place in dependent bundles. Figure 1-2 illustrates the life cycle of an OSGi bundle.
Events are another subject inevitably related to life cycles and state changes. In OSGi's case, each state transition in the life cycle of a bundle is associated to an event—such as on install, on update, or on start—which in turn corresponds to an API listener method that can be used to invoke other services at the time each event presents itself.
If you look back at the OSGi manifest in Figure 1-1, you'll realize you're already familiar with the concept. The Java class assigned to Bundle-Activator is precisely a class containing OSGi API methods like start() and stop() that are listening for a bundle to enter and exit its active state, respectively. As for the logic executed inside these methods, it can be pretty much open-ended like any other Java class, though it's more likely to contain logic related to other OSGi services.
Another aspect related to the life cycle of a bundle is its context. If you are familiar with developing server-side Java with servlets, a context in OSGi works in the same way. It simply serves as a proxy for the underlying component in the process of executing operations, such as the following:
Installing new bundles into an OSGi environment
Interrogating other bundles installed in an OSGi environment
Obtaining a persistent storage area
Retrieving service objects of registered services
Subscribing or unsubscribing to events broadcast by an OSGi environment
Each bundle upon starting is assigned a context, which is constantly accessed to perform these operations and is destroyed once a bundle is stopped.
With this I've covered the bulk of available services in the OSGi life-cycle layer, though other operations you may encounter in this layer include update methods for a bundle, the capability to retrieve manifest headers, querying security permissions, and accessing resources.
Next, you will learn about a closely knit companion to the life cycle that comprises the last and most extensive layer of the OSGi framework: the service layer.
The Service Layer
Let's start by clearing up what exactly is implied by the term "service" in this layer, since in today's software world the term often has different connotations. A service in OSGi is a Java object inside a bundle, which is listed in an OSGi service registry for the benefit of other bundles running in the same JVM.
Based on this, a bundle only has a few courses of action with a service. It can register a service, it can search for a service, or it can opt to receive notifications when a service changes.
The actual composition of a Java object functioning as a service is a little more comprehensive, since as mentioned earlier it can fulfill many duties. The recommended practice for OSGi services, though, is that they be composed of a Java interface accompanied by an implementing Java class. This decoupling favors changes to a Java object, without disturbing the interface on which services are published.
Next, let's investigate the service interfaces that OSGi provides out of the box—those that form part of every OSGi distribution. Table 1-1 shows a description of all the OSGi service interfaces as of OSGi v.4.1
Table 1-1. OSGi Service Interfaces
Depending on the nature of your OSGi-based design, these service interfaces can either form the backbone of your entire application or simply be reserved for a later phase when your requirements indicate a need for such services.
Now let's move forward and explore another type of service you may encounter in an OSGi bundle: a business service. Listing 1-2 presents a Java interface and implementing Java class that show how a custom service would look like as an OSGi service.
Example 1-2. Java Interface and Java Class Used As an OSGi Service
public interface Calculator {

 public double sum(double a, double b);

 public double substract(double a, double b);

}

public class CalculatorImpl implements Calculator {

 public double sum(double a, double b) {
  return a+b;
 }
 public double substract(double a, double b) {
  return a-b;
 }
}
You don't need to be very familiar with OSGi to understand this last code snippet. It is simply a run-of-the-mill Java interface with an accompanying Java class implementing some business logic. So what gives? What's so special about it that it can be called an OSGi calculator service? Well, the code in itself is nothing special, but the way it can interact with other services and the way it's deployed is what makes it special.
But let's explore in a little more detail how this microcosm of services actually works. Each OSGi service (whether derived from the framework itself or a business service like the one just illustrated) needs to be registered to be discovered by other classes in the JVM.
The service registration process is reliant on the state of a bundle. When a bundle enters its active state, it becomes an ideal state in which to perform the registration of services a bundle has to offer. Similarly, a bundle's transition into an active state also becomes a perfect time to search for services a bundle depends on, services that were registered by other bundles.
Since there is a correlation between a bundle's state and services, every other state change in a bundle has influence over the services it provides or accesses. Depending on an application's overall design, business services can rely on the framework's listener methods—those listening for bundle transitions—in order to activate, search, or update services explicitly.
In essence, what you will have is an array of services dynamically coordinated among each other, contained in bundles and managed by the OSGi service registry.
Conceptually speaking, you now know exactly what is needed to navigate OSGi waters, so it's time for you to write your first OSGi application.
The Hello World application you are about to write will take you through OSGi's most basic steps, such as setting up the framework with a JVM and creating your first bundle, to more advanced topics like leveraging third-party bundles and making OSGi services accessible through the Web. Figure 1-3 illustrates the bundles that will make up the application and the relationship between each one.
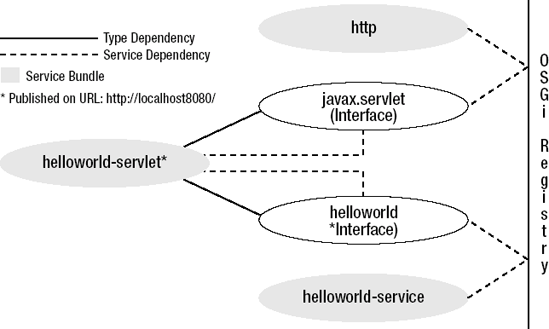
Table 1-2 lists the software you will need to download and install before embarking on your first OSGi project.
Table 1-2. OSGi Hello World Prerequisites and Downloads
Software | Function | Download site |
|---|---|---|
Java's runtime environment | ||
Apache Ant 1.6 or higher | Popular Java build project, used for easing the compilation and creation of OSGi bundles |
|
Apache Felix 1.2.0 | OSGi 4.0 reference implementation developed by the Apache Software Foundation |
|
OSGi 1.0.1 compendium API bundle | The necessary interfaces for OSGi services |
|
Classes for deploying servlets with OSGi's Http Service |
| |
|
It's very likely you may have some of this software already installed on your workstation. If so, just ensure that you have the suggested versions, as minor version variations may hold you back in getting through the outlined steps.
Installing Java SE
Installing Java SE should be straightforward: simply executing the downloaded file and following its short instructions should set it up.
Perform the following test to ensure Java SE's correct operation: place yourself on any system directory and execute java -version; this will display Java SE's version and ensure Java is accessible from any working directory in the system. In case this test fails, do the following:
Verify the
JAVA_HOMEvariable: Check that the variableJAVA_HOMEis defined on your system and is pointing to Java SE's root directory.Verify the
PATHvariable: Check that your system'sPATHvariable contains a value pointing to Java SE'sbindirectory.
Installing Apache Ant
The process for installing Apache Ant consists of the following steps:
Unzip the downloaded Apache Ant file into a directory of your choice.
Define the system variable
ANT_HOMEwith a value equivalent to the unzipped directory generated in the previous step.Modify your system's
PATHvariable to include thebinsubdirectory directly under theANT_HOMEvalue.
Perform the following test to ensure Apache Ant is operating correctly: place yourself on any system directory and execute ant -version; this will display Apache Ant's version and ensure Apache Ant is accessible from any working directory in the system. In case this test fails, do the following:
Verify the
ANT_HOMEvariable: Check that the variableANT_HOMEis defined on your system, and its value is pointing toward Apache Ant's root directory.Verify the
PATHvariable: Check that your system'sPATHvariable contains a value pointing to Apache Ant'sbindirectory.
Installing Apache Felix
The process for installing Apache Felix consists of just one step: unzipping the downloaded file into a directory of your choice. Perform the following test to ensure Apache Felix's correct operation:
Place yourself in Apache Felix's root directory and execute
java -jar bin/felix.jarto start an OSGi session.You will then be prompted to enter a profile name. Introduce
HelloWorld.A profile name is used to keep track of OSGi deployments—think of it as a project name. Apache Felix will automatically create a subdirectory by this name under a user's home directory (
~/.felix/HelloWorldon Unix), and inside, it will keep track of things like bundle versions, locations, IDs, and states, among other things.Note
You should not attempt to modify this structure directly.
At this point, you will be placed inside an OSGi shell. You can type help to see the available options.
Don't worry if the options don't make much sense now; we will get to them in a little while. Press Ctrl+C to quit the shell.
Installing Remaining Downloads
The remaining downloads are simply OSGi bundles that will aid you in the creation of the Hello World application. Just take note of their location; we will move them around when the need arises.
Setting Up the Hello World "Playground" Directory Structure
Now that you've got the tools working, it's time to create the proper workspace in which to maneuver. It's nothing too elaborate, though, just a directory structure like the one illustrated in Figure 1-4.
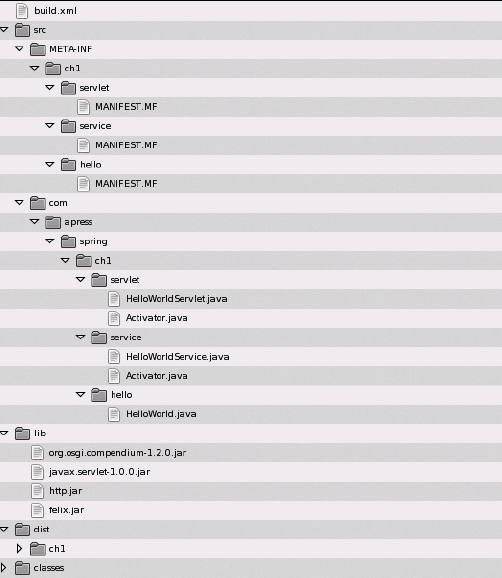
The directory structure functions as follows:
build.xml: This is the main Apache Ant configuration file containing the necessary tasks to build the application.classes: All compiled Java classes are placed in this directory.dist: All built bundles are placed in this directory.lib: All JARs and OSGi bundles needed to compile Java sources are placed in this directory.src: All Java sources files composing the application are placed accordingly in subdirectories inside this directory, including bundle manifests insideMETA-INF.
Your first bundles will consist of creating a service charged with answering "Hello World" to all incoming queries. Accompanying each bundle will be an OSGi manifest that, once packaged as a unit, can be deployed to an OSGi environment. The reason the service will consist of two separate bundles will become clear upon deployment.
Let's kick things off by defining the underlying Java class and interface that make up the HelloWorld service. Listing 1-3 illustrates the HelloWorld interface and Listing 1-4 the corresponding service implementation.
Example 1-3. HelloWorld Service Interface
package com.apress.springosgi.ch1.hello;

public interface HelloWorld
{
 public String hello();

}
Example 1-4. HelloWorldService Service Implementation
package com.apress.springosgi.ch1.service;

import com.apress.springosgi.ch1.hello.HelloWorld;

public class HelloWorldService implements HelloWorld
{
 public String hello() {
  return "Hello World 1.0";
      }

}
That's all the business logic for our simple service; now let's take a look at what is needed to register this HelloWorld service as an OSGi service. Listing 1-5 illustrates the Activator class used for this purpose.
Example 1-5. Activator Class for the HelloWorld Service
package com.apress.springosgi.ch1.service;

import com.apress.springosgi.ch1.hello.HelloWorld;

import java.util.Properties;
import org.osgi.framework.BundleActivator;
import org.osgi.framework.BundleContext;

public class Activator implements BundleActivator
{
 public void start(BundleContext context)
 {
  Properties props = new Properties();
  context.registerService(
   HelloWorld.class.getName(), new HelloWorldService(),props);
 }

 public void stop(BundleContext context)
 {
  //Note: The service is automatically unregistered
 }
}
The Activator class implements BundleActivator—which forms part of the OSGi framework—providing the necessary wiring to execute logic at the time a bundle is started and stopped, which is done inside the start() and stop() methods, respectively.
The start() method consists of two declarations, a Properties object used to associate values with a service and the actual registration performed via the registerService() method of a bundle's context. In this case, the Properties object is left empty, but it can contain values to further characterize a service. On the other hand, the registerService() method receives three input parameters: the service type, HelloWorld.class.getName(); an object instance of the service itself, new HelloWorldService(); and a Properties object associated to the service.
The stop() method for our BundleActivator contains no code, because the service is automatically unregistered once a bundle is deactivated. The only circumstances under which the stop() method would contain logic would be to deallocate nonservice resources assigned during the start of a bundle, which is not the case for this scenario.
It should be noted that this is all it takes for a service to be accessible from other OSGi bundles in a JVM, and consequently the service registration is identical for any OSGi-bound service, whether it's performed once a bundle is activated, stopped, or executed on account of another system event.
This concludes creating the classes needed to make up your first OSGi bundles. Now let's put together the bundles—one for the service and another for its accompanying interface
To start building the bundles, move over to the Hello World "playground" directory structure you created earlier, and follow these steps:
Place the bundles' source files—those created in the earlier section—into the subdirectory
src/com/apress/springosgi/ch1/hello/andsrc/com/apress/springosgi/ch1/service/. based on the listing's package value.Copy the
felix.jarbundle—included in thebindirectory of the Apache Felix distribution—to thelibdirectory of the "playground."Copy the
javax.servlet-1.0.0.jarbundle to thelibdirectory of the "playground."Copy the
org.osgi.compendium-1.2.0.jarbundle to thelibdirectory of the "playground."
The previous steps set up the bundles' source files for compilation, with the movement of prebuilt bundles (JARs) serving to fulfill dependencies at compile time. The actual compilation process you will now embark on will be carried out using Apache Ant.
Apache Ant relies on an XML-based file to define its tasks. Listing 1-6shows the first iteration of this file used to build your first OSGi bundles.
Example 1-6. Apache Ant build.xml File for Compiling Classes
<?xml version="1.0"?>

<project default="init" basedir=".">

  <target name="init" description="Apress - Pro Spring-OSGi">
  <tstamp/>
  <property name="projectname" value="Pro Spring-OSGi"/>

  <echo message="-------${projectname}------"/>

  <property name="debug" value="on"/>
  <property name="optimize" value="off"/>
  <property name="deprecation" value="off"/>
  <property name="build.compiler" value="modern"/>
  <property name="target.vm" value="1.5"/>
  <property name="build.dir" value="classes"/>
  <property name="dist.dir" value="dist"/>
  <property name="src.dir" value="src"/>
  <property name="lib.dir" value="lib"/>
<!-- Load JARs onto the classpath, taken from lib sub-dir -->
<path id="classpath">
<fileset dir="${lib.dir}">
<include name="*.jar"/>
</fileset>
<pathelement location="${build.dir}"/>
</path>
</target>
<target name="compile" depends="init" description="Compile code">
<echo message="-------Compiling code for Pro-Spring OSGi------"/>
<mkdir dir="${build.dir}"/>
<mkdir dir="${dist.dir}"/>
<javac srcdir="${src.dir}"
destdir="${build.dir}"
debug="${debug}"
optimize="${optimize}"
deprecation="${deprecation}"
target="${target.vm}">
<classpath refid="classpath"/>
</javac>
<copy todir="${build.dir}">
<fileset dir="${src.dir}">
<!-- Some of the following statements are relevant to Ch2 -->
<!-- They are present here because the same compile task is used -->
<include name="**/*.properties"/>
<include name="**/*.xml"/>
<exclude name="**/*.java"/>
<exclude name="META-INF/**"/>
<exclude name="WEB-INF/**"/>
<exclude name="GUI/**"/>
</fileset>
</copy>
</target>
</project>In summary, this build.xml file defines the numerous flags used in the Java compilation process, indicates where the bundles' source files are located, defines where the compiled classes are to be placed, copies property files from the source directory to the compiled class directory, and modifies the default CLASSPATH value to include additional JAR files and the compiled class directory.
With this build.xml file in hand and placed under the root directory of your Hello World "playground," execute the command ant compile; this step will compile the bundles' classes and place them under the classes subdirectory.
OK, you now have the bundles' classes compiled, but what's missing before packaging? The OSGi manifests. Listing 1-7and Listing 1-8contain the OSGi manifests that need to accompany the compiled classes, which you need to copy into the /src/META-INF/ch1/hello/ and /src/META-INF/ch1/service/ directories, respectively, of your Hello World "playground."
Example 1-7. OSGi Manifest for HelloWorld Interface Bundle
Bundle-Name: Hello World
Bundle-Description: H.W Pro-Spring OSGi
Bundle-Version: 1.0.0
Export-Package: com.apress.springosgi.ch1.hello
Example 1-8. OSGi Manifest for HelloWorld Service Bundle
Bundle-Name: Hello World Service
Bundle-Description: H.W Service Pro-Spring OSGi
Bundle-Version: 1.0.0
Bundle-Activator: com.apress.springosgi.ch1.service.Activator

Import-Package: org.osgi.framework,
 com.apress.springosgi.ch1.hello
Earlier in Listing 1-1 you got a glimpse of an OSGi manifest, but to recap, Bundle-Name and Bundle-Description are there to provide friendly naming values to the bundle, whereas the Bundle-Version value is used to keep track of bundle releases. The remaining values in both manifests differ, so let's tackle each one separately.
Listing 1-7 makes use of Export-Package, indicating that the respective package value, which contains the service interface in Listing 1-3, will be made available to the other bundles' class loaders running in the system.
Listing 1-8 starts off with the Bundle-Activator statement, indicating what class to execute once a bundle is activated. Import-Package is used to indicate what Java packages a bundle requires from the outside and need to be loaded onto a bundle's class loader.
Copy the MANIFEST.MF file in Listing 1-7 to the /src/META-INF/ch1/hello/ directory of the Hello World "playground" and the MANIFEST.MF file in Listing 1-8 to the directory /src/META-INF/ch1/service/ of the same "playground."
Knowing what the manifests need to contain, let's switch back over to Apache Ant and define a task for creating the bundles in a more automated fashion. Listing 1-9 contains the Apache Ant task needed to create the OSGi HelloWorld service and interface bundles.
Example 1-9. Apache Ant Target for Building OSGi HelloWorld Service and Interface Bundles
<target name="ch1" depends="compile" description="Build Chapter 1 Bundles">
  <echo message="-Building Chapter 1 bundles for Pro-Spring OSGi-"/>

  <property name="ch1.dir"           value="${dist.dir}/ch1/"/>
  <mkdir dir="${ch1.dir}"/>

  <jar destfile="${ch1.dir}/helloworld.jar" manifest="${src.dir}/META-INF/ch1/
hello/MANIFEST.MF">
   <fileset dir="${build.dir}" includes="com/apress/springosigi/ch1/hello/**"/>

  </jar>
  <jar destfile="${ch1.dir}/helloworld-service.jar" manifest="${src.dir}/
META-INF/ch1/service/MANIFEST.MF">

   <fileset dir="${build.dir}" includes="com/apress/springosgi/ch1/service/**"/>

  </jar>

 </target>
hello/MANIFEST.MF">
<fileset dir="${build.dir}" includes="com/apress/springosigi/ch1/hello/**"/>
</jar>
<jar destfile="${ch1.dir}/helloworld-service.jar" manifest="${src.dir}/
META-INF/ch1/service/MANIFEST.MF">
<fileset dir="${build.dir}" includes="com/apress/springosgi/ch1/service/**"/>
</jar>
</target>If you edit your build.xml file to include this last Ant definition and under the root directory of your Hello World "playground" execute ant ch1, bundles helloworld.jar and helloworld-service.jar will be generated inside the dist/ch1 subdirectory.
That's it! You now have your first OSGi bundles packaged and ready for the final step: deployment.
The first thing you will need to do in order to deploy an OSGi bundle is start an OSGi session, so go straight to the directory where you unzipped Apache Felix and execute java -jar bin/felix.jar to do so.
You will then be prompted for a profile name; enter HelloWorld. At this juncture, your OSGi session is active and awaiting further instructions. Enter the command ps to search for the current bundles in the session. You should see the system bundle and three more bundles pertaining to Felix itself. Listing 1-10 contains the screen output for the series of steps just outlined.
Example 1-10. Apache Felix Session Start
$ java -jar bin/felix.jar

Welcome to Felix.
=================

Enter profile name: HelloWorld

DEBUG: WIRE: 1.0 -> org.osgi.service.packageadmin -> 0
DEBUG: WIRE: 1.0 -> org.osgi.service.startlevel -> 0
DEBUG: WIRE: 1.0 -> org.ungoverned.osgi.service.shell -> 1.0
DEBUG: WIRE: 1.0 -> org.osgi.framework -> 0
DEBUG: WIRE: 1.0 -> org.apache.felix.shell -> 1.0
DEBUG: WIRE: 2.0 -> org.osgi.framework -> 0
DEBUG: WIRE: 2.0 -> org.apache.felix.shell -> 1.0
DEBUG: WIRE: 3.0 -> org.osgi.service.obr -> 3.0
DEBUG: WIRE: 3.0 -> org.osgi.framework -> 0
DEBUG: WIRE: 3.0 -> org.apache.felix.shell -> 1.0
-> ps
START LEVEL 1
   ID   State            Level  Name
[   0] [Active       ] [     0] System Bundle (1.2.0)
[   1] [Active       ] [     1] Apache Felix Shell Service (1.0.2)
[   2] [Active       ] [     1] Apache Felix Shell TUI (1.0.2)
[   3] [Active       ] [     1] Apache Felix Bundle Repository (1.2.0)
->
Next, you will need to install the helloworld.jar and helloworld-service.jar bundles, executing the following instruction from this same OSGi session shell: install file:/<playground_root_directory>/dist/ch1/helloworld.jar and file:/<playground_root_directory>/dist/ch1/helloworld-service.jar. This last step will incorporate the HelloWorld OSGi bundle into the OSGi session. Enter the ps command once again, and you will see the bundle listed as shown in Listing 1-11.
Example 1-11. Apache Felix HelloWorld Bundle Installed
-> install file:/<playground_root_directory>/dist/ch1/helloworld.jar Bundle ID: 4 -> install file:/<playground_root_directory>/dist/ch1/helloworld-service.jar Bundle ID: 5 -> ps START LEVEL 1 ID State Level Name [ 0] [Active ] [ 0] System Bundle (1.2.0) [ 1] [Active ] [ 1] Apache Felix Shell Service (1.0.21) [ 2] [Active ] [ 1] Apache Felix Shell TUI (1.0.21) [ 3] [Active ] [ 1] Apache Felix Bundle Repository (1.2.0)[ 4] [Installed ] [ 1] Hello World (1.0.0)[ 5] [Installed ] [ 1] Hello World Service (1.0.0)
If you look closely at the bundle state listings at this point, you will notice that both bundles have an Installed state. Let's change the state of the bundle using the start command. Execute start 5, where 5 indicates the ID assigned to the HelloWorld service bundle.
If you enter ps again to observe the session bundles, you will note the HelloWorld service bundle now has an Active state and the HelloWorld interface bundle has a Resolved state. Even though you took no action on the HelloWorld interface bundle (ID 4), its state changed to Resolved because the service bundle (ID 5) that you did activate requires importing a package from this bundle (ID 4) per the manifest values presented in Listing 1-8. The Active state on the service bundle further implies the bundle's services have been registered into the environment on account of the bundle's Activator class. Additionally, if you enter the command services, you will see the HelloWorld service bundle provides a service by the same name. Listing 1-12 illustrates these last steps.
Example 1-12. Apache Felix HelloWorld Bundle Activated
-> start 5
DEBUG: WIRE: 54.0 -> com.apress.springosgi.ch1.hello -> 4.0
DEBUG: WIRE: 54.0 -> org.osgi.framework -> 0
DEBUG: WIRE: 4.0 -> com.apress.springosgi.ch1.hello -> 4.0

-> ps
START LEVEL 1
   ID   State            Level  Name
[   0] [Active       ] [     0] System Bundle (1.2.0.4)
[   1] [Active       ] [     1] Apache Felix Shell Service (1.0.2)
[   2] [Active       ] [     1] Apache Felix Shell TUI (1.0.2)
[   3] [Active       ] [     1] Apache Felix Bundle Repository (1.2.0)
[ 4] [Resolved ] [ 1] Hello World (1.0.0)[ 5] [Active ] [ 1] Hello World Service (1.0.0)-> services System Bundle (0) provides: --------------------------- org.osgi.service.startlevel.StartLevel org.osgi.service.packageadmin.PackageAdmin Apache Felix Shell Service (1) provides: ---------------------------------------- org.apache.felix.shell.ShellService, org.ungoverned.osgi.service.shell.ShellService Apache Felix Bundle Repository (3) provides: -------------------------------------------- org.osgi.service.obr.RepositoryAdminHello World (5) provides:-------------------------com.apress.springosgi.ch1.hello.HelloWorld->
Your HelloWorld service and interface bundles including the accompanying application service are now deployed, but before we move on to doing more things with your first OSGi bundle, close the OSGi session by pressing Ctrl+C.
This last step exits the OSGi shell and kills the Java process containing the installation sequence and bundle state modification you just did. What would you expect to see if you started another OSGi session? Well, if you invoke java -jar bin/felix.jar once again and introduce the profile name HelloWorld, you might be surprised to see that the list of bundles—including their state—is just as it was before you closed the first session.
The reason for this is that Apache Felix keeps track of all changes made to bundles, copying each installed bundle to a separate location and maintaining whatever changes are propagated to the bundle. This tracking and location mechanism is based on the profile name you enter upon starting a session. In this case, Apache Felix creates a directory by the name <User_Home>/.felix/HelloWorld/— where <User_Home> is the process owner for Apache Felix—in which all bundles and their state are persisted for future sessions initiated under the same profile name.
Congratulations! You have now implemented and deployed your HelloWorld OSGi service, so this would be a perfect time to deepen your knowledge of other OSGi services, especially those mentioned earlier that form part of the OSGi framework.
Unlike the HelloWorld service that you just created from scratch, the OSGi framework sets forth a series of contracts that certain services need to adhere to, contracts that were mentioned in Table 1-1.
By far the most notable of this group of OSGi services—or at least more widely known by its backing function—is the Http Service, a service that supports the same backing protocol for operations on the Web. Listing 1-13 illustrates the interface defined by OSGi for the Http Service.
Example 1-13. OSGi Http Service Interface
public interface HttpService
{

      public HttpContext createDefaultHttpContext();

      public void registerServlet(
        String alias, Servlet servlet, Dictionary params, HttpContext context)
        throws ServletException, NamespaceException;
public void registerResources(
String alias, String name, HttpContext context)
throws NamespaceException;
public void unregister(String alias);
}The interface for the Http Service defines methods for tasks typically associated with Java web applications, such as registering servlets, which form the building blocks for most Java web applications; registering resources, which are ancillary pieces to a web application like images, CSS files, or JavaScript files; and creating an HttpContext, which serves to manipulate servlets and resources.
Fortunately, there are already freely available Http Service implementations, avoiding the need to reinvent the wheel.
You've already downloaded an OSGi bundle containing such a service, one based on the Jetty Java web server, so let's get on with the task of deploying this bundle and its accompanying service.
In order to deploy the Http Service OSGi bundle, start an Apache Felix session executing java -jar bin/felix.jar and enter the profile name HelloWorld. Once inside Felix's shell, perform the following steps:
Install
javax.servlet-1.0.0.jar, which is a required bundle dependency for the Http Service bundle.Install
http.jar, which is the actual Http Service OSGi bundle.Start
http.jar. This will activate the Http Service, along with its underlying web server.
Listing 1-14 contains the screen output for these steps.
Example 1-14. Apache Felix Http Service Activation
START LEVEL 1
   ID   State            Level  Name
[   0] [Active       ] [     0] System Bundle (1.2.0)
[   1] [Active       ] [     1] Apache Felix Shell Service (1.0.2)
[   2] [Active       ] [     1] Apache Felix Shell TUI (1.0.2)
[   3] [Active       ] [     1] Apache Felix Bundle Repository (1.2.0)
[   4] [Active       ] [     1] Hello World (1.0.0)
[   5] [Active       ] [     1] Hello World Service (1.0.0)
-> install file:bundle/javax.servlet-1.0.0.jar
Bundle ID: 6
-> install file:bundle/http.jar
Bundle ID: 7
-> start 7
DEBUG: WIRE: 7.0 -> javax.servlet.http -> 6.0
DEBUG: WIRE: 7.0 -> javax.servlet -> 6.0
DEBUG: WIRE: 7.0 -> org.osgi.service.http -> 7.0
DEBUG: WIRE: 7.0 -> org.osgi.framework -> 0
11:21:06.171 EVENT  Starting Jetty/4.2.x
11:21:06.397 EVENT  Started SocketListener on 0.0.0.0:8080
11:21:06.419 EVENT  Started org.mortbay.http.HttpServer@110b053
If you look at the output for this last sequence, you will notice that near the end there is a line that reads Starter SocketListener on 0.0.0.0:8080, which indicates a web server has started on the localhost under port 8080.
So go ahead and open a browser pointing to the address http://localhost:8080/. You should get a 404 Not Found page. The reason for this is that even though you've deployed two bundles with accompanying services, neither of these bundles is designed to expose data on the Web.
If you've done web development in Java, you should be familiar with the default component used for exposing business logic on the Web: the servlet. A servlet provides the underlying structure to manage the stateless nature of the Web and is an important building block to many of the Java frameworks and applications built around Java EE.
Given this background, using a servlet would also be a natural choice for creating a web interface for the OSGi Hello World application, so next you will learn how to integrate a servlet into an OSGi bundle.
Since servlets are broadly used, they come in many shapes and forms; some work as facades for other components, some access the data tier directly, while some may be stacked against each other to achieve a goal set by a particular web framework. The servlet you are about to create, however, has one particularity you've probably never seen: it will be built and supported by OSGi services.
Listing 1-15 illustrates the HelloWorldServlet class that makes use of the HelloWorld service created earlier.
Example 1-15. HelloWorldServlet Class
package com.apress.springosgi.ch1.servlet;

import com.apress.springosgi.ch1.hello.HelloWorld;

import java.io.IOException;

import javax.servlet.ServletException;

import javax.servlet.ServletOutputStream;

import javax.servlet.http.HttpServlet;

import javax.servlet.http.HttpServletResponse;

import org.osgi.util.tracker.ServiceTracker;

public class HelloWorldServlet extends HttpServlet {

    private static final long serialVersionUID = 42L;

        private ServiceTracker serviceTracker;

        public HelloWorldServlet(ServiceTracker serviceTracker) {

                this.serviceTracker = serviceTracker;

        }
        protected void doGet(HttpServletRequest httpServletRequest,

                        HttpServletResponse httpServletResponse) throws
ServletException,

                        IOException {

                httpServletResponse.setContentType("text/html");

                ServletOutputStream out = httpServletResponse.getOutputStream();

                out.println("<html><body>");
HelloWorld service = (HelloWorld) serviceTracker
.getService();
if (service != null) {
out.println(service.hello());
}
out.println("</body>>/html<");
out.close();
}
}The servlet creates an HTML response with the value returned by the hello() method belonging to a HelloWorld interface—which is backing the service object itself—looked up via OSGi's ServiceTracker; other than this, the servlet's structure is pretty much standard, with its doGet() method and piping out a ServletOutputStream value to the browser. So the question now is how does this servlet get ahold of the OSGi HelloWorld service? And more importantly, how does it get published to the web server you started a while ago?
Well, let's address the publishing issue of the servlet first. As it turns out, the OSGi Http Service possesses a method named registerServlet() that does exactly this; it takes a servlet object and wires it up for external access. This means that the servlet in one way or another needs to enter in contact with both OSGi services, with the question now turning from how to where. What better place to do so than in the bundle's Activator class, which is an integral part of a bundle and where instructions are always executed at the outset. Listing 1-16 shows the Activator class that would accompany the bundle containing the HelloWorldServlet.
Example 1-16. Activator Class for HelloWorldServlet
package com.apress.springosgi.ch1.servlet;

import com.apress.springosgi.ch1.hello.HelloWorld;

import org.osgi.framework.BundleActivator;

import org.osgi.framework.BundleContext;
import org.osgi.framework.ServiceReference;

import org.osgi.service.http.HttpService;

import org.osgi.util.tracker.ServiceTracker;

public class Activator implements BundleActivator
{

     private ServiceTracker httpServiceTracker;

        private ServiceTracker helloWorldServiceTracker;

        public void start(BundleContext context) throws Exception {

                // create new ServiceTracker for HelloWorldService via
HelloWorld interface

                helloWorldServiceTracker = new ServiceTracker(context,

                                HelloWorld.class.getName(), null);

                // create new ServiceTracker for HttpService

                httpServiceTracker = new ServiceTracker(context, HttpService.class

                                .getName(), null) {

                        public Object addingService(ServiceReference reference) {

                                HttpService httpService = (HttpService) super

                                                .addingService(reference);

                                try {

                                        httpService.registerServlet("/",
new HelloWorldServlet(helloWorldServiceTracker),

                                                        null, null);
} catch (Exception e) {
e.printStackTrace();
}
return httpService;
}
public void removedService(ServiceReference reference,
Object service) {
((HttpService) service).unregister("/");
super.removedService(reference, service);
}
};
// open service tracker to start tracking
helloWorldServiceTracker.open();
httpServiceTracker.open();
}
public void stop(BundleContext context) throws Exception {
// open service tracker to stop tracking
httpServiceTracker.close();
helloWorldServiceTracker.close();
}
}The first thing to note about this Activator class is its ample use of OSGi's Service Tracker. As its name implies, the ServiceTracker class allows a bundle to keep track of an OSGi environment's registered services in case these are upgraded or uninstalled. In Listing 1-16, the first actions performed in the start() method of the Activator class are to keep track of the services you've already deployed, the HelloWorld service, as well as the Http Service (for the web server).
Once these preexisting services are associated with OSGi's Service Tracker, the services are then bound using the addingService method. Inside this last method, you will find the statement httpService.registerServlet("/",newHelloWorldServlet(helloWorldServiceTracker),null,null). This statement executes the registerServlet() method—part of the Http Service—taking as input an instance of the HelloWorldServlet, which in itself receives a reference to the Service Tracker HelloWorld service, as well as the / value, indicating the servlet is to be deployed in the root directory of the underlying Http Service.
Then you can find the removedService method, which performs exactly the opposite instructions as its counterpart addingService method, in this case using the unregister method to eliminate the servlet from the root directory / of the underlying Http Service. Capping off the Activator start() method, you will find both Service Tracker references declared in the class invoking the open() method in order to initiate the tracking services. Though of lesser importance, finally there is the stop()) method for the Activator class, called when a bundle is stopped and which in this case simply invokes the close() method on the Service Tracker references to halt the tracking of services.
So there you have it, a servlet ready to make use of OSGi services. Let's take the next step, linking it to its Activator class by building a bundle.
You're already familiar with the process of building a bundle with Apache Ant, so let's cut to the chase. Listing 1-17 shows this bundle's manifest file, while Listing 1-18 contains the additional instructions you will need to add to your build.xml— into the existing ch1 target— in order to build the helloworld-servlet.jar bundle.
Example 1-17. OSGi HelloWorldServlet Bundle Manifest
Bundle-Name: Servlet for Hello World
Bundle-Description: Servlet for Hello World Pro Spring-OSGi
Bundle-Version: 1.0.0
Bundle-Activator: com.apress.springosgi.ch1.servlet.Activator
Import-Package:     org.osgi.framework,
 org.osgi.util.tracker,
 javax.servlet,
 javax.servlet.http,
 org.osgi.service.http,
 com.apress.springosgi.ch1.hello
Example 1-18. Apache Ant Target for Building OSGi HelloWorldServlet Bundle
<target name="ch1" depends="compile" description="Build Chapter 1 Bundles">
  <echo message="-Building Chapter 1 bundles for Pro Spring-OSGi"/>

  <property name="ch1.dir"           value="${dist.dir}/ch1/"/>
  <mkdir dir="${ch1.dir}"/>

   <jar destfile="${ch1.dir}/helloworld.jar" manifest="${src.dir}/META-INF/ch1/
hello/MANIFEST.MF">
   <fileset dir="${build.dir}" includes="com/apress/springosgi/ch1/hello/**"/>

  </jar>
<jar destfile="${ch1.dir}/helloworld-service.jar" manifest="${src.dir}/META-INF/
ch1/service/MANIFEST.MF">

   <fileset dir="${build.dir}" includes="com/apress/springosgi/ch1/service/**"/>

  </jar>


  <jar destfile="${ch1.dir}/helloworld-servlet.jar" manifest="${src.dir}/
META-INF/ch1/servlet/MANIFEST.MF">
            <fileset     dir="${build.dir}" includes="com/apress/springosgi/ch1/
servlet/**"/>


        </jar>
 </target>
Things to note about this particular bundle's build process include the following: its specific manifest headers, which now include the javax.servlet and javax.servlets.http packages, and of course that its class files include only those in the com.apress.springosgi.ch1.servlet package, which are the HelloWorldJava.class and its corresponding Activator.class.
Now on to the final step for your servlet bundle: deployment.
Once again, start an Apache Felix session executing java -jar bin/felix.jar and enter the profile name HelloWorld. From there you will need to install and later start the helloworld-servlet.jar bundle. Listing 1-19 shows the sequence of events.
Example 1-19. Apache Felix HelloWorldServlet Activation
START LEVEL 1
   ID   State            Level  Name
[   0] [Active       ] [     0] System Bundle (1.0.3)
[   1] [Active       ] [     1] Apache Felix Shell Service (1.0.0)
[   2] [Active       ] [     1] Apache Felix Shell TUI (1.0.0)
[   3] [Active       ] [     1] Apache Felix Bundle Repository (1.0.2)
[   4] [Resolved     ] [     1] Hello World (1.0.0)
[   5] [Active       ] [     1] Hello World Service (1.0.0)
[   6] [Resolved     ] [     1] Servlet 2.1 API (1.0.0)
[   7] [Active       ] [     1] HTTP Service (1.1.2)
-> install file:bundle/helloworld-servlet.jar
Bundle ID: 8
-> start 8
DEBUG: WIRE: 8.0 -> javax.servlet.http -> 6.0
DEBUG: WIRE: 8.0 -> javax.servlet -> 6.0
DEBUG: WIRE: 8.0 -> com.apress.springosgi.ch1.hello -> 4.0
DEBUG: WIRE: 8.0 -> org.osgi.service.http -> 7.0
DEBUG: WIRE: 8.0 -> org.osgi.framework -> 0


11:25:53.232 EVENT    Started ServletHttpContext[/]
Once you start the helloworldservlet.jar bundle, open up a browser and point it to the address http://localhost:8080/. You will then be able to see the "Hello World 1.0" message on your screen, and with it successfully conclude the deployment of a web-based application based on an OSGi architecture.
But before you close everything up, there is one more aspect worth exploring in your first OSGi application: the update mechanism available in OSGi.
Requirement changes are practically ingrained in the life cycle of a software application, so let's see how our OSGi-based application can cope with a few updates.
Go to the Hello World "playground" and modify the source file HelloWorldService.java (Listing 1-4) to return a new string that reads "Hello World 2.0." Once you do this, rebuild the helloworld-service.jar bundle, executing Apache Ant's task, ant ch1; a new bundle reflecting this change will be created under the dist/ch1 subdirectory.
Since you should already have an installed helloworld-service.jar bundle under your HelloWorld profile, what you need to do next is perform an update process from inside an Apache Felix session. To perform this update, execute the instruction update 5, where 5 is the ID assigned to the initial helloworld-service.jar bundle.
Now open up a browser and point it to http://localhost:8080/. You should see "Hello World 2.0." The interesting part about this whole update sequence is that the underlying Java process was never stopped; the changes were simply propagated and automatically incorporated into the bundles that relied on the updated service.
Having performed this update, the bundle-partitioning scheme for the application illustrated in Figure 1-3 can be explained more easily. The helloworld-servlet has two type and two service dependencies, with the type dependency bundles providing the necessary interfaces to access the backing service bundles. So why are there four bundles? Couldn't an interface and its service be packaged in the same bundle, reducing the number to two instead of four?
The problem with type dependencies is that they are tightly coupled to the bundles using them. This means that updating bundles with type dependencies requires OSGi to refresh—uninstall and reinstall—all bundles in the dependency hierarchy.
In this case, if the helloworld service were to have been packaged in the same bundle as the helloworld interface, an update to the helloworld service would have required OSGi to refresh—uninstall and reinstall—all bundles tied to the type dependency hierarchy. A service might be the only thing being updated, but if other bundles have type dependencies on this same updated bundle, OSGi ensures changes are propagated to all dependent bundles by uninstalling and reinstalling each one.
This is not the case with services, since services are always consulted via OSGi's registry. If a bundle only contains services and is updated, there is no need to propagate updates to bundles using this service; the OSGi registry will ensure all consuming bundles obtain a reference to the updated service the next time it is accessed.
In this case, by having the helloworld service decoupled from its interface, the service bundle can be updated without incurring the overhead of refreshing additional bundles. Therefore, it's often advised to package OSGi services and their corresponding interfaces in different bundles.
Hello World applications are meant to be bare-bones examples illustrating the capabilities behind a technology, but often in this simplicity, important lessons are overlooked. So here are a few takeaway points on the OSGi Hello World application you just made:
Everything is a service: OSGi bundles rely on a wide gamut of services. In this application you worked with two services, but the basis for every OSGi application no matter its size is always the same: publishing and reusing services.
No WAR files: Even though you deployed a Java web application, notice there is no trace of Web Archive (WAR) files, which are the norm for deploying this kind of application.
Bundles are a generic packaging format: With services forming the cornerstone to OSGi, a bundle's structure can package or use services destined for many purposes. This application demonstrated how a bundle can be used to package a servlet and make it accessible to a browser.
Hot-pluggability: When a bundle is updated, changes are propagated immediately to dependent bundles with no interruptions in the system. This application showed that upon updating the Hello World service's logic, changes are reflected instantly up to the browser interface without interrupting the Http Service.
Though you may still have some looming questions on this web-enabled OSGi Hello World application, such as the access to a Relational Database Management System (RDBMS) or a more sophisticated interface design, OSGi services by themselves are not well suited for so many tasks, so the next chapter will introduce a framework that has gained tremendous traction as an end-to-end solution for building web-enabled applications in the enterprise: the Spring Framework.
In this chapter you learned how OSGi brings a wealth of versatility to the already robust and popular Java platform, enhancing the way Java class loading operates and augmenting its capabilities to support dynamic behaviors in this same context, supporting features like hot-pluggability and autodiscovery of classes.
To support these features, you also learned how OSGi relies on its own packaging model of a bundle, which is identical to a JAR except in having an OSGi manifest.
Additionally, you explored the inner workings of OSGi bundles and how these rely on the use of services, either registering services for the use of other bundles in a system or consuming services from other bundles in the same system, as well as relying on services offered by the framework itself or creating custom services for fulfilling business logic, and last but not least, how this service management is achieved through an OSGi registry.
You also saw how to create numerous bundles in different capacities: one bundle used to register a HelloWorld service, a second using an Http Service to offer web access to other OSGi bundles, and a third leveraging both the HelloWorld and Http Service to publish a Java servlet and access it through the Web.
Finally, you learned how an OSGi bundle is a universal packaging format, perfectly capable of supplanting other packaging formats like WARs, which are typically used for deploying Java web application, and how the Java SE is already in the process of incorporating OSGi's features into its building blocks through JSR-291.
[1] Peter Kriens, "How OSGi Changed My Life," ACM Queue Vol. 5, No. 8 (January/February 2008)
[2] OSGi Alliance, "OSGi Technology—The Solution,"http://www.osgi.org/About/Technology#Solution
[3] OSGi Alliance, "OSGi Technology—Conclusion," http://www.osgi.org/About/Technology#Conclusion
[4] Sun Microsystems, "Java Archive (JAR) files," http://java.sun.com/j2se/1.5.0/docs/guide/jar/index.html