
![]()
Unit Testing
In the history of software development, there has always been one adversary that has plagued the intrepid software developer. I’m talking about the archenemy known as the software bug. The bug has wreaked havoc in the careers of every programmer since software was developed on paper punch cards. They strike without warning. They feed on the time and budget of every project. They compromise the integrity of your data. They inspire angry support calls. These elusive creatures can pop up at any moment. Just as fast as they appear, they have the ability to hide deep within your source code, as if they never existed.
Have you ever heard anyone say, “It worked on my machine?” If not, you are lucky. We too have uttered these damning words. This is the phrase spoken by unfortunate developers and software testers when trying to reproduce a defect submitted by a customer. It’s a difficult task to explain to a paying customer that you are unable to lure these horrific beasts out of hiding when you perform the exact steps that they’ve submitted in an angry e-mail or described in a support call.
Indeed, the software bug can vary in scope from an annoying session timeout straight through to a data trashing disaster. “But how can I defeat such a cunning and clever pest?” you ask. Just as in the real world, there is no silver bullet when it comes to debugging software.
![]() Note Admiral Grace Hopper made the term debugging popular in the 1940s at Harvard University. The story goes that a moth had been trapped inside a relay in a Mark II computer, which caused problems in its operation. When the moth was removed from the computer, she suggested that they “debugged” the system.
Note Admiral Grace Hopper made the term debugging popular in the 1940s at Harvard University. The story goes that a moth had been trapped inside a relay in a Mark II computer, which caused problems in its operation. When the moth was removed from the computer, she suggested that they “debugged” the system.
Debugging Strategies
The main strategies that have been used throughout the years to discover and destroy bugs in a software system are covered in the following sections.
Defensive Programming
Defensive programming should be part of every developers skill set. The following are some defensive programming basics:
- Defensive programming is the practice of designing all of the methods you create to try to anticipate all possible points of error and then writing code to handle such errors gracefully so that they don’t cause problems for the end users of the application. This includes identifying all valid input argument values and writing code to test all of the inputs to handle any invalid values.
- In data entry applications, it’s important to identify all sources of data that enter the system and to write code to protect the data at all costs. After all, you’ve probably heard the old saying, “Garbage in, garbage out.”
- It’s important to keep in mind that sources of data are not limited solely to human data entry. Many enterprise software applications communicate with other programs to send and receive data. These sources include systems such as web servers, imaging scanners, message queues, and one of the most common sources, database systems. You can write as much defensive code as you like; however, if your system shares a database with another application, you don’t have control over the quality of data that is produced by these external systems. This is why it’s imperative that you check all data, regardless of its origin, for potential issues.
- Bad data will find its way into your application; however, you can handle the error in such a way that the user experience won’t be interrupted unless necessary. For instance, a well-designed application will handle the error and write a detailed description of the problem to a database, log file, or event log.
- It’s also handy to include code that sends an e-mail to your support team to alert them of the issue. If you write code with the user in mind, errors that can be handled by the system should be invisible to the end user. Users panic when they encounter a cryptic, unhandled exception web page or message box. As a rule of thumb, try not to interrupt the user’s workflow if at all possible.
- In the event that your application cannot recover from a “fatal” error, it’s best to notify users with an apologetic, aesthetically pleasing, human-readable message to let them know that a problem was encountered. Always be sure to provide instructions to users as to what they should do next. If at all possible, try to restart the application after all of the relevant error details have been logged for later investigation.
System Testing
System testing is the practice of testing an application in its entirety. This is often the job of a quality assurance team. If your company is small and you don’t have a QA team, however, this responsibility then falls on you, the developer.
It’s best to create a collection of test cases so that testing is consistent from build to build. This approach, however, involves testing the same steps each time. Considering this drawback, it’s good practice also to incorporate what we like to call Break Challenge Testing. What is Break Challenge Testing, you ask? It’s when the tester of an application is challenged to break the system by any means necessary. (Of course, we mean by using absurd data inputs or clicking multiple toolbar buttons or menu items—not by beating the computer with a blunt object.)
It’s important to think like a user. Oftentimes, as developers and testers, we know where the quirks exist, and we know how to avoid them. An enterprise system shouldn’t allow you to compromise the data’s integrity or crash the application.
Regression Testing
Regression testing involves testing a bug fix to make sure that the bug was eradicated and to make sure that no new bugs were created as a result of the code changes used to resolve the original bug. As you can imagine, this form of testing can be tricky because it’s nearly impossible for you to keep up with all of the instances in which a unit of code could possibly affect another part of the system.
User Acceptance Testing
User acceptance testing is a critical point in any software development schedule. From iterative release schedules in which you deploy a build at the end of each iteration to legacy software development paradigms where the end user doesn’t see the application until construction has been completed, you always need to let the client test the system in order to verify that the solution you’ve delivered serves its purpose. This is referred to as user acceptance testing.
The details of how acceptance testing is performed can vary from project to project. In some instances, the team will work closely with the client to establish a series of test cases. A test case is a series of steps performed by the client in order to verify that a particular feature works as expected. There are less formal acceptance testing practices, such as simply deploying the application and waiting for the client to report problems. Obviously, this method is far from optimal; however, it does occur in the field.
Unit Tests to the Rescue
Don’t get me wrong; all of the methods that I’ve mentioned up to this point are important weapons in the fight against buggy software. Unit testing, when done correctly, can greatly improve the quality of the software solutions that you develop.
Unit testing is a time-tested paradigm founded in the 1970s by Kent Beck. If you are unfamiliar with this name, we suggest you search for it and educate yourself. Mr. Beck was coding in SmallTalk when he coined the term unit testing. The rest of this chapter explains what makes a good unit test as well as a few third-party products that will help you make the most of your unit testing efforts. We will also cover Test Driven Development (TDD), including the pros and cons of using this design methodology. Let’s begin, shall we?
![]() Caution It’s important to understand that in order to utilize unit testing effectively, you need to invest a significant amount of time practicing if you want to take advantage of the benefits that this process offers. Furthermore, unit testing will add time to your project schedule. It’s no easy task to convince management that unit testing is worth the investment; however, when implemented correctly, unit testing can easily pay for itself in maintenance cost alone.
Caution It’s important to understand that in order to utilize unit testing effectively, you need to invest a significant amount of time practicing if you want to take advantage of the benefits that this process offers. Furthermore, unit testing will add time to your project schedule. It’s no easy task to convince management that unit testing is worth the investment; however, when implemented correctly, unit testing can easily pay for itself in maintenance cost alone.
It’s important to understand that unit testing can cause more harm than good if you don’t fully grasp the concepts and practices required. If you put in the time and effort to learn about unit testing, your code will benefit in terms of fewer bugs, instant bug detection, code that is easier to read, and loosely coupled components that can be reused across multiple applications. You will also gain confidence in deploying an application to a production environment, and you will feel safe when it comes time to make a change to your source code.
Test-Driven Development (TDD) is a software development method that allows you to drive your code’s design by starting with unit tests to define the way that your classes will be used. If you are concerned only with the unit test, you don’t have to think about the implementation of the methods that you are testing. You can concentrate on designing well-defined class interfaces first. When you add TDD to the mix, your class interfaces will improve, and you will actually reduce the amount of time you spend designing your classes and routines. TDD also helps increase the percentage of your code’s test coverage as well as improve the quality of your source code because refactoring is a required step in the TDD process. Finally, TDD will help prevent gold plating; that is, when implemented correctly, you can rest assured that your class methods will have one single responsibility. Any code that doesn’t support that single responsibility will be refactored out into its own class.
We firmly believe in the benefits of unit testing and TDD; however, we think that it would be irresponsible not to give you the whole story. So read on and try the examples to learn enough to make an educated decision about whether unit testing and TDD are the right solution for your project.
Unit Testing Basics
Enough with the disclaimers, let’s learn about unit testing! A unit test is source code that is used to test a logical unit of code. A logical unit of code is any method or routine that contains logic instructions (if/else, switch statements, loops, and so forth) that are used to control the behavior of the system by setting the return value of a method or property. This type of testing allows you to test your source code at a much lower level than system or regression testing.
As long as you run your unit tests often, you will know exactly when a bug is introduced into the system, assuming that all of your classes and methods have proper test coverage. The moment that a unit test fails, you know that a bug has been discovered, and you also know which class and method are involved and why the test failed. No other type of software testing provides this level of contextual information regarding new bugs. These are just a few of the benefits to be gained when you consistently implement proper unit tests in your software solutions.
Characteristics of a Great Unit Test
As we stated in the disclaimer at the beginning of this chapter, improper unit tests can result in more harm than good. So, you might be asking, “Well then, Buddy, what makes a great unit test?”
Ask and you shall receive. The following sections are a checklist that you can use to assess the quality of your unit tests.
Automated Unit Test Execution
Can you automate the execution of your unit tests? If your tests must be executed manually by a mere mortal, there is a good chance that sooner or later you or someone on your team will be so busy working to meet a deadline that you just might hear that little voice in your head whispering, “You don’t have to execute these tests with every little change; after all, it’s nearly 5 p.m.” Or “I’ll run the tests after I complete just these two remaining features.” From here on out, it’s a slippery slope and, before you know it, you will lose the benefit of early bug detection, which will then make you question the effectiveness of the unit tests. What is the end result? Some team members will write unit tests, while others will abandon the practice.
The tests will become stale, and when you do decide to execute the unit tests, you can’t be sure which changes to the system caused the bug that resulted in the failed unit test. This is why it’s important to automate the execution of all unit tests after any code modification. Prime candidates include having the unit tests execute with each and every build or with every check-in to your source control system.
There are several options out there for source control systems that integrate with Visual Studio. My personal favorite is TFS 2013. All references to source control from this point forward will target Team Foundation Server. Nevertheless, the concepts are similar for most source control systems.
Unit Test Execution Speed
Continuous integration (CI) is a set of principles that pertain to the deployment of builds during the entire construction phase of a software development project. Continuous integration is most often implemented as a supplement to other agile methodologies. This is because of the iterative nature of agile development as well as the frequent build deployments of working software.
In agile development, teams implement features that add business value during every iteration throughout the entire project. Furthermore, the source code that contains the new features from the last iteration is compiled and deployed to the client’s production environment.
This approach has several benefits. For instance, if you deliver a build that contains at least one complete feature that adds business value, then the client experiences the benefits of the product that they requested after the first iteration. This gives users the ability to provide constructive feedback, which will guarantee that the end result will be exactly what the client requested.
Deploying a build can go off without a hitch; however, problems are often discovered during deployment that no one knew existed prior to the deployment attempt. This is where CI and unit tests work together to make sure that deployments go smoothly. If problems still occur, then the developers shouldn’t have any problem reverting to a previous build.
Here’s an example of how you utilize CI, unit tests, and TFS source control. You use TFS to handle project planning, source control, issue tracking, automated builds, and automated unit test execution. You also use TDD so that you have plenty of unit tests. When you implement a new feature, you must make sure that all unit tests pass before you check any source files into source control. Otherwise, it’s possible that you may have introduced a new bug into the system as a side effect of the changes that you made while resolving the original bug or implementing a new feature.
Obviously, you should only check in code that is bug free. Thanks to the tight integration between Visual Studio and TFS, you have the ability to create an automated build definition from within Visual Studio. Figure 5-1 illustrates the Builds option in Visual Studio’s Team Explorer window.

Figure 5-1. Visual Studio 2012 TFS Team Explorer
The Builds menu option allows users with proper permissions to create build definitions. There are several types of build definitions. However, the one in which you are interested is known as the Gated Check-in build definition type. The Gated Check-in build definition will first attempt to build your solution using the source code that you are trying to check into source control. If the build fails, the check-in is rejected, the user is notified, and a bug work item is created in TFS so that the issue is recorded and tracked. If the build succeeds, the automated build will then execute all unit tests.
If the build succeeds and all unit tests pass, then the source code is checked into source control. You can even configure the build definition to deploy the project’s assemblies to a local folder or a network share. As you can imagine, this will greatly cut down on any deployment surprises. Depending on your needs, you can even configure Visual Studio to trigger unit test execution on every build attempt from every user. This way, you never have to worry about forgetting to run your unit tests.
Figure 5-2 shows how to configure a TFS build definition in Team Explorer. Here you can set up a Gated Check-in trigger to specify that check-ins should only be accepted if the submitted code changes build successfully.

Figure 5-2. Visual Studio TFS Build Definition Triggers
Figure 5-3 shows how to configure automated unit test execution in a TFS build definition. The relevant settings can be found under the Build Process tab.

Figure 5-3. Visual Studio TFS Build Process Parameters
As you can imagine, if all of your unit tests are to be executed automatically on check-ins or even builds, it’s imperative that the execution speed of the unit tests must be as fast as possible without compromising the quality of the tests.
K.I.S.S. Your Unit Tests
K.I.S.S is an infamous acronym that stands for “Keep It Simple, Stupid.” Much like the design of your class interfaces and method implementations, it’s important that you design your unit tests with simplicity in mind. This helps to keep the execution speed down while promoting unit tests that can easily be understood and modified by any member of your development team. If your unit tests don’t execute quickly, you are less likely to run them, which defeats the purpose. If a team member has to ask questions of the author of a unit test in order to understand the implementation, you may need to refactor the unit test.
Finally, a clean and simple unit test makes it easier for a developer to see the interface of the class being tested or class under test (CUT) as well as to understand its intended use. A good unit test clearly demonstrates the use of the CUT as well as the expected result of the test.
All Team Members Should Be Able to Execute Unit Tests
It’s not practical to rely on one team member to be in charge of unit tests or any other development process for that matter. Software developers often change jobs, so it’s extremely important that all of the knowledge associated with a project be shared among all team members.
A good unit test should be easy to execute for all developers on the team. If at all possible, any member of the team should be able to execute all unit tests with a single click of the mouse.
Great Unit Tests Survive the Test of Time
A unit test should produce the same results two years after it was first written. This has just as much to do with the quality of the test that was written as maintaining each and every unit test to make sure that any changes to the software, which cause a unit test to fail, are also addressed in the unit test. If unit tests don’t change along with major software design changes, then that clearly means the unit tests are not executed, and thus they become stale and useless. As long as a project builds, all of the associated unit tests should pass.
Unit Test Fixtures
A unit test fixture is a class in which the methods are unit tests or are helper methods that are used to prepare the unit tests. A test fixture should contain unit tests that are designed to test related features, often tests that reside in the same class or class library. One popular naming convention for a test fixture is the CUT name with TestFixture as a suffix. For example, if you were writing a test fixture class full of unit tests for a class called Calculator, you name the test fixture class CalculatorTestFixture.
Unit Testing Frameworks
There are several unit-testing frameworks for .NET. We will introduce you to two of them in this chapter. We will review the NUnit framework as well as the native Visual Studio unit testing project template.
NUnit
NUnit is an open source unit-testing framework that is based on Junit, which is a unit-testing framework for the Java programming language. NUnit is popular with open source advocates. The framework is a complete unit-testing tool, which includes the following:
- Easy installation via NuGet.
- Integration with Visual Studio.
- A command-line interface that you can use to execute your unit tests. This makes automated test execution when building your solution from the command line a breeze.
- A GUI interface that provides visual cues regarding the status of your testing efforts such as which test is executing, which tests have passed or failed, and which tests have yet to be run.
- Several test method attributes used to mark special test methods for purposes such as test setup, teardown, expected exceptions, and more. You can find a comprehensive list of attributes at http://nunit.org/index.php?p=documentation.
- The [TestFixture] attribute identifies a class whose purpose is to provide all unit test methods. The unit test methods are marked with the [Test] attribute.
- When writing unit tests, oftentimes you must write boilerplate code that is used to prepare dependencies and other related objects, which are used in multiple unit test methods. In honor of the DRY principle (“don’t repeat yourself”), NUnit offers the [Setup] attribute that indicates that the specified method should be run before each test is executed. This allows you to initialize all of the related variables to a predefined state before running each test. This is a perfect place to create stubs and mock objects to be used in your unit tests.
- Much like the [Setup] attribute, the [TearDown] attribute designates a method to be used in disposing of any unmanaged resources that aren’t handled by the .NET CLR garbage collector. A few examples of such resources include database connections, web service references, file system objects, and so on. This is also a prime candidate for setting all object references to null and deleting any files created as part of your unit tests. If your test creates any objects in memory or any other type of resource that should be disposed, this is the attribute to use.
- A plethora of methods that allow you to assert that your code is executing as expected. You can find all of the assertion methods in the official NUnit documentation at http://nunit.org/index.php?p=documentation.
As you can see in Figure 5-4, the NUnit framework can be installed using the NuGet package manager in Visual Studio.

Figure 5-4. NUnit installed from the NuGet package manager
By installing NUnit from the NuGet package manager in Visual Studio, the nunit.framework reference will be added to your project’s references automatically. Observe the project references in Figure 5-5.

Figure 5-5. A project that references the NUnit framework assembly
NUnit is more than a unit-testing library. NUnit provides command line support for executing your unit tests. This is useful for automated test execution. If you’d like to see the results of your tests, you can use the NUnit test runner GUI, as shown in Figure 5-6.
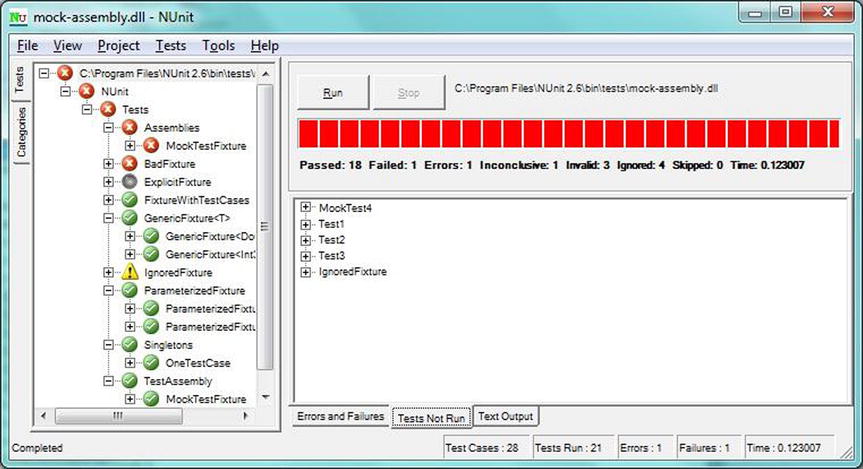
Figure 5-6. NUnit Test Runner GUI
As you can see, the NUnit unit-testing framework is a comprehensive testing suite, and best of all, it is open source (and free). Now that we’ve covered NUnit, I’ll provide an example of a unit test and the class under test. Listing 5-1 shows an interface for a calculator class. There are methods for Add, Subtract, Divide, and Multiply.
Listing 5-2 shows the implementation of the Calculator class. The Calculator class implements the ICalculator interface.
Listing 5-3 shows a unit test fixture class called CalculatorTestFixture. As you can see, the class is decorated with the TestFixture attribute. This marks the class as a unit test class. We use the Setup attribute on Initialize_Test to specify the method that should be executed before any tests are run. This can be used to initialize your test class and its dependencies. The TearDown attribute is used to specify a method to be executed after all tests have run. This method can be used to release any references that you may have to external resources. In this example, I implemented the IDisposable interface in the Calculator class. We use the TearDown_Test method to dispose of the class under test. Finally, we have four methods marked with the Test attribute. These are our unit tests.
Microsoft Unit Testing Project Template
Don’t get us wrong, we think NUnit is a great product; however, our unit-testing framework of choice is Microsoft Unit Testing Project Template. It is a unit-testing framework with native support built in to Visual Studio. To create a new Microsoft unit test project, simply right-click in your Solution Explorer and select Add New. Next, choose the Test category and select Unit Test Project. Figure 5-7 shows how to add a new Unit Test Project in Visual Studio.

Figure 5-7. New Unit Test Project template in Visual Studio
Visual Studio’s Test Explorer window makes it easy to execute one or all unit tests with a single click of the mouse. The Test Explorer window is also used to view the status of the execution of your unit tests (see Figure 5-8).
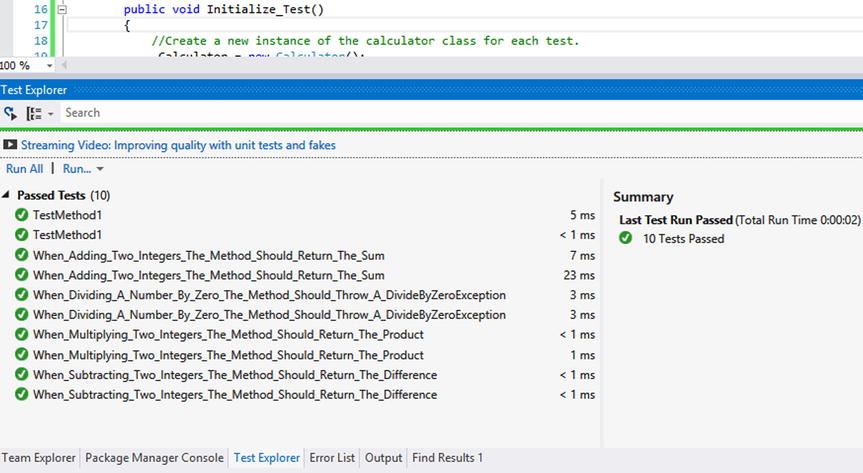
Figure 5-8. Visual Studio’s Test Explorer window showing a successful test run of all unit tests
Microsoft Unit Testing Project Template has attributes that give your test methods specific responsibilities in the same way that you saw in the coverage of NUnit. There are various attributes that you can use to decorate your test methods. Such attributes include test setup and teardown methods, and, of course, there is an attribute that identifies a method as a unit test as well.
To illustrate the subtle differences between the two frameworks, I’ve included the previous calculator unit test fixture class, ported to use the Microsoft unit test project type, as shown in Listing 5-4.
As you can see in Listing 5-4, the code is nearly identical to the NUnit example shown in Listing 5-1. This proves that your choice in a unit-testing framework is purely a personal preference. We like the Microsoft framework for the simple fact that you don’t have to download any packages or assemblies. Everything that you need to unit test your code can be achieved using the same workflow as any other project created within Visual Studio.
Summary
In this chapter, we covered the basics of using various testing methods and programming techniques to minimize the time and money wasted on finding, fixing, and retesting software as a result of bugs. When implemented properly, automated unit tests can dramatically reduce the amount of bugs as well as the impact of finding and fixing them. We gave you the “whole story” regarding unit tests as well as the damage that they can produce if implemented incorrectly.
It’s important that your class interface designs promote the creation of objects that are easy to read, understand, modify, and maintain. TDD, when implemented correctly, can help you do just that, and, at the same time, it will improve your code’s test coverage because you don’t write any code without writing a test for it first.
We provided a list of criteria that you can use to assess the quality of your unit tests. We also discussed the importance of automating the execution of unit tests so that you will know about any bugs introduced into your source code at the moment that a unit test fails. The CUT in the test fixture that contains the failing unit test will eliminates the guessing game associated with finding the source of the bug that caused your test to fail.
We introduced you to two popular unit-testing frameworks: NUnit and Microsoft’s Unit Test Project template. We also provided a simple example of how to write a basic test fixture class using each framework.
In Chapter 6, we will explore some of the advanced aspects of unit testing such as stubs, fakes, and mock objects. We will also cover Test-Driven Development, which is a software design methodology that allows you to design your classes and methods by writing tests for your code before the code is written. This introduces a layer of abstraction that helps you to ignore the implementation details of each method and allows you to design your class interfaces based on how you intend to use the class.