
![]()
Exception Handling and Logging
In a perfect world, we would all develop quality, bug-free applications that are worthy of high honors, praise, and accolades. Unfortunately, we don’t live in a perfect world, and sometimes, bad things happen to good people. Make sure that your application is not one of those bad things. You need to design your application to handle all situations that it may encounter through user interaction—the good, the bad, and the ugly.
Exception handling is a necessity in any application to ensure application stability and to prevent users from experiencing an unexpected crash. You also need to thwart exceptions that will display cryptic error messages containing stack traces and sensitive information, which in turn may expose weaknesses in your application. For example, an unhandled database exception may display an error message to the user containing the full, uncensored details of your application, including sensitive data such as database connection strings, stored procedure calls, and SQL queries. That’s an open invitation for hackers to exploit these weaknesses for their own benefit.
Along with ensuring that your application handles errors gracefully, you need a way to trace, troubleshoot, and resolve any issues that arise when the application is in production. Application logging allows you to monitor and track issues in real time by writing information to a file, to a database, or to the cloud.
Let’s take a look at some of the options available for exception handling and logging when developing WPF, Windows Store, and Windows Phone applications.
Enterprise Library Exception Handling Application Block
How often have you seen empty try/catch blocks within application code? Better yet, how often were you the one who authored that empty try/catch block? We’ve all been there, no doubt. Writing exception handling logic is repetitive and frankly boring. That’s likely why so many developers include it sparingly within their code. At some point, I’m sure you’ve thought to yourself, “There must be a better way.” Well, there is! It’s called the Enterprise Library Exception Handling Application Block.
The Enterprise Library Exception Handling Application Block is available for use within Windows Desktop applications, web applications, and WCF services. It is not supported in Windows Phone or Windows Store applications. We will cover alternatives to exception handling and logging for Windows Phone and Windows Store applications in the section “Logging Options for Windows Device Apps” later in this chapter.
This Application Block encapsulates exception handling logic within a separate library and makes it possible for you to design the approach that your application will take when handling exceptions.
The Enterprise Library Exception Handling Application Block allows you to include error handling easily within your application without the need to pollute your code with try/catch blocks. It allows you to do the following:
- Define one or more policies for handling exceptions
- Decide on one or more exception types that will be managed by each policy
- Configure the action that will occur when exceptions of a specific type are caught or whether the same action will apply to all exception types
The exception handling approach that you define is stored within the application’s configuration file. Therefore, you can change its behavior at any time without having to recompile the application for the changes to take effect.
An additional helper library, the Enterprise Library Exception Handling Logging Handler, is available. It allows you easily to incorporate logging within your application.
Now let’s walk through the steps that you need to take to include the Exception Handling Application Block and its respective Logging Handler in a WPF application.
Installing the Exception Handling Application Block
Launch Visual Studio and create a new WPF application. Once the application is loaded, you will need to include the Exception Handling Application Block and its respective logging handler in the application. This is accomplished through Nuget Package Manager.
Launch Nuget Package Manager and select Online ![]() nuget.org in the left pane. In the Search field, enter the term exception handling and press Enter, as shown in Figure 7-1.
nuget.org in the left pane. In the Search field, enter the term exception handling and press Enter, as shown in Figure 7-1.

Figure 7-1. Installing Exception Handling Application Block using Nuget
Select the Enterprise Library - Exception Handling Application Block Logging Handler, and click Install to add it to the application.
![]() Tip By installing the Exception Handling Application Block Logging Handler first, the Exception Handling Application Block is installed automatically since the Logging Handler has a dependency on that library.
Tip By installing the Exception Handling Application Block Logging Handler first, the Exception Handling Application Block is installed automatically since the Logging Handler has a dependency on that library.
With the necessary libraries installed, you can now define how your application will manage exceptions and which exceptions will be logged. As mentioned earlier, the configuration is defined within the application’s configuration file. There are two ways to modify this file to include your exception handling and logging configuration: manually or through the Enterprise Configuration Console.
Manual modification is error prone, and it requires in-depth knowledge of the XML elements, attributes, and values that are needed to define your exception handling policies, types, and handlers. It is our opinion that this is worse than writing repetitive exception handling code within the application—thanks, but no thanks.
The Enterprise Configuration Console provides a nice user interface that makes it easy for you to configure the Enterprise Library Application Blocks to suit the needs of your application. It then generates the XML configuration automatically. Perhaps you have a different perspective, but we would rather not spend a lot of time handwriting XML for the fun of it. Let’s go with the second approach.
Installing the Enterprise Configuration Console
The Enterprise Configuration Console is available as an extension for Visual Studio 2010 and Visual Studio 2012. It isn’t available for Visual Studio 2013, but it is easy enough to tweak the original extension so that it can be installed in Visual Studio 2013 and Visual Studio 2015. The steps to accomplish this are as follows:
- Download the Enterprise Library 6 Configuration Console extension from the Microsoft Downloads page.
- Navigate to the Microsoft site, http://microsoft.com, and then click the Downloads link.
- Search for Microsoft Enterprise Library 6.
- Select the option Download Enterprise Library 6 and then click the Download button.
- Select the Microsoft.Practices.EnterpriseLibrary.ConfigConsoleV6.vsix entry from the list and click Next to download.
- Open Windows File Explorer to the directory where you downloaded the extension. Rename the file, changing the .vsix file extension to .zip. When prompted with a warning about changing the extension, confirm the action and continue.
- Right-click the .zip file in Windows File Explorer and select the option to extract the file contents to a folder.
- Open the extension.vsixmanifest file in a text editor, such as Notepad.
- Replace the SupportedProducts XML element with the following:
<SupportedProducts>
  <VisualStudio Version="11.0">
    <Edition>Ultimate</Edition>
    <Edition>Premium</Edition>
    <Edition>Pro</Edition>
  </VisualStudio>
  <VisualStudio Version="12.0"> <!-- VS2013 -->
    <Edition>Ultimate</Edition>
    <Edition>Premium</Edition>
    <Edition>Pro</Edition>
  </VisualStudio>
  <VisualStudio Version="14.0"> <!-- VS2015 -->
    <Edition>Ultimate</Edition>
    <Edition>Premium</Edition>
    <Edition>Pro</Edition>
  </VisualStudio>
</SupportedProducts> - Save the file and close the text editor.
Right-click the Microsoft.Practices.EnterpriseLibrary.ConfigConsoleV6 folder containing the modified file and select Send to
 Compressed (zipped) folder.
 - Rename the file to use its original name with the .vsix extension.
Make sure that all instances of Visual Studio are closed and then double-click the modified .vsix file to install the Enterprise Library Configuration Console Extension.
Configuring Policies, Exception Types, and Handlers
Now it’s time to edit the App.config file to include exception handling and logging within the application. Right-click the App.config file in Solution Explorer and select “Edit configuration file v6,” as shown in Figure 7-2, to open the Configuration Console.

Figure 7-2. Opening the Enterprise Library Configuration Console Extension
In the Console menu, select Blocks ![]() Add Exception Handling Settings, as shown in Figure 7-3.
Add Exception Handling Settings, as shown in Figure 7-3.

Figure 7-3. Adding exception handling settings to App.config
This action adds an Exception Handling Settings section within the console, which creates a policy and an associated exception type by default. These can be thought of as two of the many available building blocks for creating an exception handling solution for your application.
Policy
A policy allows you to configure the manner in which one or more exception types will be handled within your application.
You can define one or more policies, provide unique names for policies, delete existing policies, and change the ordering of policies in your configuration file.
To add policies to your exception handling settings, simply click the + button at the top-right corner of the Policies section; then select Add Policy from the menu, as shown in Figure 7-4.

Figure 7-4. Adding multiple exception handling policies
To rename a policy, simply expand the policy by clicking the arrow to the left of the policy name to reveal the Name field, as shown in Figure 7-5. You can provide a name that describes this policy’s configuration so that you can refer to it in your code later. Providing an intuitive name will make it easy to identify the purpose of the policy when you or another developer revisits your code at a later time. Rename the default policy to FilePolicy.

Figure 7-5. Renaming a policy
To manage an existing policy, simply click the bottom-left corner of the defined policy block. As illustrated in Figure 7-6, a menu will display providing you with options to delete the policy, toggle its properties, validate the policy, add an exception type, and change the order that the policy appears in the list if there is more than one defined policy.

Figure 7-6. Managing policies and adding exception types
A policy isn’t useful on its own. It simply is a named grouping where you will define the application’s exception handling logic for one or more exception types. Even though you have an exception type that was created by default, let’s create one that references a single, specific exception type. Go ahead and select the Add Exception Type option for this policy.
You will be presented with a dialog that lists all of the loaded assemblies, which contain objects that are derived from exceptions within your application, similar to what is shown in Figure 7-7.

Figure 7-7. Selecting an exception type
Within this dialog, you can do the following:
- Filter the list by entering part of an exception type name in the field provided at the top of the dialog
- Drill down through the list of assemblies and their namespaces to find the desired exception type
- Add an assembly from the GAC, or file system, to the list so that you can drill down to select an exception type
For this example, select the FileNotFoundException type from the System.IO namespace within mscorlib, as shown in Figure 7-8, and then click OK.

Figure 7-8. FileNotFoundException type added to FilePolicy
Now that you have added an exception type to FilePolicy, you will need to make some changes to ensure it is set up properly and that it will be processed when that exception type is raised within the application.
Exception Type
An exception type within a policy represents the exception that will be processed by the exception handling block.
As mentioned earlier, an exception type of All Exceptions is added when a policy is created by default. You can add multiple exception types per policy and order them in the console. The ordering of exception types is important in the configuration file because the exception handling settings are processed in the order that they appear. Also, when the exception type of All Exceptions is processed, any other exception types that follow will not be processed. Therefore, if you are including that exception type, you want to be sure that it appears last in the list.
Click the bottom-right corner of the FileNotException section and select Move Up in the pop-up menu, as shown in Figure 7-9.
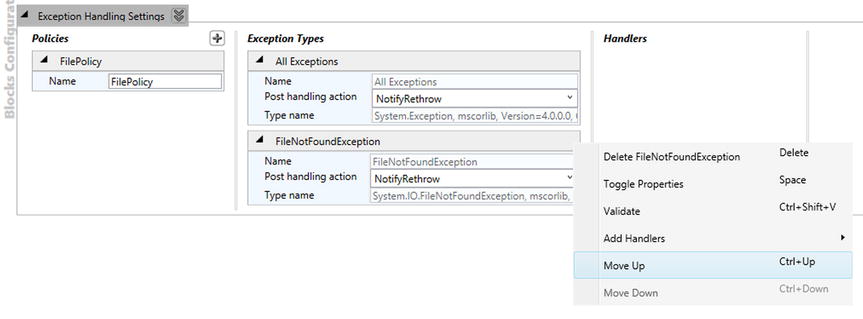
Figure 7-9. Reordering exception types
When an exception occurs, you must specify the policy name that will be used to handle the exception. This will then match the handling and logging behavior based on the first matching exception type in the list. This means that if the All Exceptions type was listed first and any other configured exception types appeared below it in the list, the exception handling block would process only the All Exceptions type since it is all-encompassing.
Also shown in Figure 7-9 are the other options available for managing an exception type, aside from reordering. Most notably, you can delete the exception type and add one or more handlers to each exception type.
The only other thing left to configure for an exception type is the post-handling action. This is the action that will occur once the exception type’s defined handlers have completed processing the exception. Table 7-1 describes the available actions.
Table 7-1. Post-Handling Actions
|
Action |
Description |
|---|---|
|
None |
Once the handler has processed the exception, no other action will be taken. |
|
NotifyRethrow |
This signals the exception handling method to rethrow the exception. |
|
ThrowNewException |
This allows you to wrap the current exception within a new exception or replace it with a new exception. This exception is thrown after the handler has completed processing exceptions. |
Handler
A handler encapsulates the necessary logic for processing an exception. This could include actions such as logging, sending e-mail notifications, or posting exceptions to a web service so that they can be logged on a remote server. Those are just a few examples of the most common ways that exceptions are handled.
To add a handler to an exception type, click the bottom-right corner of a specific exception type and then select Add Handlers from the menu, as shown in Figure 7-10.

Figure 7-10. Adding handlers
You can define your own custom implementation of an exception handler, or you can use one of the readily available implementations included in the Enterprise Library Exception Handling Application Block. Table 7-2 lists the exception handlers that you can use when configuring your exception handling policy, along with a brief explanation on when to make use of them.
Table 7-2. Exception Handlers Usage
|
Handler |
When to Use This Handler |
|---|---|
|
Custom exception |
Use this handler when a custom exception handler implementation will be used to process the exception that was thrown. |
|
Logging exception |
Use this handler when it is desirable to add entries to the application log whenever the particular exception type has been thrown in the application. Log entries may include details about the exception as well as information about the current machine, app domain, process, and thread information. |
|
Replace |
Use this handler when you want to replace the exception type with a new exception and do not want to preserve information from the original exception. |
|
Wrap |
Use this handler when you want to raise a new exception, but you also want to preserve information from the original exception. The original exception will then be contained in the InnerException of the new exception. |
You can associate multiple handlers with an exception type and configure the order in which the exception types are processed. For example, if you choose to add a replace exception handler and then a logging exception handler, in that order, the following actions will occur:
- The original exception will be replaced with a new exception. Details from the original exception will be lost.
- The new exception will be logged to the application log.
In looking at the order of operations here, would it make more sense to log the original exception and then replace it with a new exception? It depends. Each application is different, and the way in which you manage application exceptions is completely configurable. You may want to leave the order as is, and that’s perfectly fine. The point is that it is important to understand when and how the exception is processed and that ultimately the exception handling and logging behavior that you configure works as expected.
Wrap Handler
Now that you know how to add a handler to an exception type, go ahead and add a wrap handler to the FileNotFound exception type. Set the “Post handling action” setting in the FileNotFound exception type to ThrowNewException. In the Exception Message field within the wrap handler, enter some text so that you can identify which handler is being processed from within the application, as illustrated in Figure 7-11. For example, enter Original exception wrapped. Check inner exception.

Figure 7-11. Adding a wrap handler to the FileNotFound exception type
Replace Handler
Next, add a replace handler to the All Exceptions exception type and set its message to something unique as well, as shown in Figure 7-12. For example, enter Original exception replaced. Set the “Post handling action” field within the All Exceptions exception type to ThrowNewException as well.

Figure 7-12. Replacing the handler added to AllExceptions exception type
Custom Exception Handler
For the most part, you should be able to leverage the logging exception, wrap, and replace handlers to cover the most common scenarios in your exception handling approach. However, there may be instances where you will need to write your own custom exception handler.
To achieve this, you must create a class that implements the IExceptionHandler interface. You must in turn implement the interface method HandleException(Exception exception, Guid handlingInstanceId). This method will contain your custom processing logic and the exception you want to return to the exception handling block, which will pass it along to any other configured handlers in the exception handling chain for processing. Finally, you must mark up your class to denote that it is a custom exception handler using the attribute ConfigurationElementType passing in the type CustomHandlerData. Note that this requires you to add the System.Configuration library as a reference in your project. Listing 7-1 depicts an example of a custom exception handler class.
You can learn more about custom exception handlers, as well as the multitude of ways that you can configure the Exception Handling Application Block, from the MSDN site. Navigate to https://msdn.microsoft.com and search for Enterprise Library 6. Within the results list, click the link Enterprise Library 6 – April 2013. Next, within the left treeview pane, select the link 3 - Error Management Made Exceptionally Easy: Using the Exception Handling Application Block. Alternatively, you can use this short URL to access the article directly: http://bitly.com/EL6ExceptionBlock.
Modifying the Code
Once you have completed adding both handlers within the console, select File ![]() Save from the menu. You can leave the console open to use as a reference as you are working within your app.
Save from the menu. You can leave the console open to use as a reference as you are working within your app.
Within Visual Studio, in your WPF demo project, open the MainWindow.xaml file. Add two buttons and a text box to the page. The first button will inevitably launch a FileNotFoundException in code. The second button will launch a NullReferenceException. You can do this by dragging and dropping WPF controls from the toolbox to the designer or by modifying the markup. Listing 7-2 shows the resulting XAML markup.
We will explore the XAML elements depicted within Listing 7-2 in Chapter 8. One thing to point out here is that the markup also illustrates the button’s Click events being wired up. You will add these events to the code behind them as you progress through the remainder of this walkthrough.
For now, you need to modify the code to ensure that the application leverages the exception handling configuration settings that you created. Open the MainWindow code behind MainWindow.xaml.cs and add the following using directives:
using System.IO;
using Microsoft.Practices.EnterpriseLibrary.ExceptionHandling;
Next you will make sure that the application loads the exception handling configuration provided in the App.config file. The Enterprise Library Exception Handling Application Block makes it easy for you to do this by using its ExceptionPolicyFactory.
The ExceptionPolicyFactory is an object that will create an instance of an ExceptionManager object, loaded with all of the current policies, exception types, and handlers that are defined in the App.config file. When the ExceptionManager object is required to process an exception using a named policy, it will search for a matching policy name in its list of loaded policies. If it finds a matching policy, it will handle the exception according to the policy’s configuration.
To initialize the ExceptionManager object when the MainWindow is created, add the code shown in Listing 7-3 within the MainWindow partial class in the code-behind file.
The next steps will be to create a couple of methods that will be called when the buttons are clicked in the MainWindow, as shown in Listing 7-4. The OpenFile method will simply try to open a file that doesn’t exist. The GetFileByte method will attempt to read from a FileStream that has not been created.
In both cases, the ExceptionManager will be responsible for handling any exceptions.
Next, add the two-button Click event handlers that will call their respective method, as shown in Listing 7-5.
At this point, you might be thinking, “Why are there try/catch blocks here? I thought you said I wouldn’t need to riddle the code with try/catch blocks.” Those are good questions. Now let’s explore what this means.
Take a moment to refer to Table 7-1 in the “Exception Type” section. Recall that there are three post-handling actions that can be set: None, NotifyRethrow, and ThrowNewException. If the post-handling action on the exception types is configured to None, the ExceptionManager will process the exception, and the application will continue as normal. However, because you configured the post-handling action on both the FileNotFound and AllExceptions exception types to ThrowNewException, you will need to account for handling that exception in some way. For this example, you will handle it with a try/catch block and display the error message within the text box.
Now that the code is in place, you can build and run the application to test it. Click each of the buttons. What do you notice about the output?
![]() Tip When the ExceptionManager.Process method experiences an error while running in Debug mode, execution will halt indicating that the application experienced an unhandled error. Simply click F5 to continue processing. If you’re not interested in stepping through the code, you can use the key combination Ctrl+F5 to launch the application without debugging in order to focus on the application’s behavior and output.
Tip When the ExceptionManager.Process method experiences an error while running in Debug mode, execution will halt indicating that the application experienced an unhandled error. Simply click F5 to continue processing. If you’re not interested in stepping through the code, you can use the key combination Ctrl+F5 to launch the application without debugging in order to focus on the application’s behavior and output.
Experiment with changing the post-handling actions for each exception type, saving the file, and launching the application. What do you notice when the post-handling action is set to None or NotifyRethrow?
Configuring the Logging Exception Handler
Select Add Logging Exception Handler from the submenu that appears within the Add Handlers menu option. Look at Figure 7-13. What do you notice?
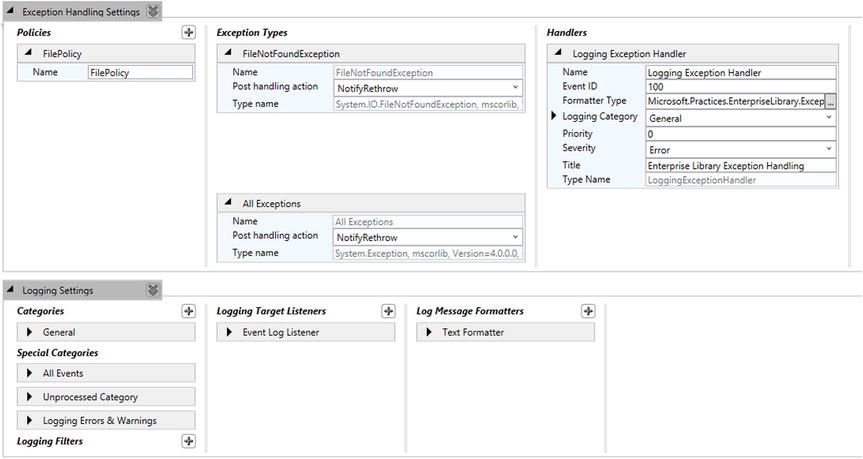
Figure 7-13. Configuring the logging exception handler
You added the logging exception handler, and the Logging Settings Application Block was automatically added along with it, as shown in Figure 7-14.
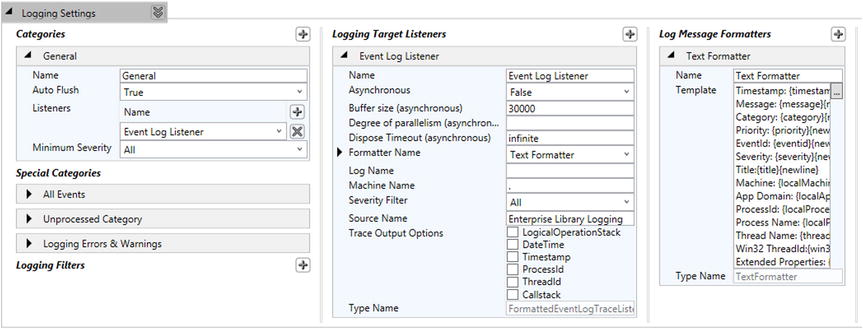
Figure 7-14. Configuring the logging settings
The logging exception handler will use the General category logging configuration to log any messages. Let’s take a look what is included in the Logging Application Block to make sure that it is set up according to your application’s needs.
Categories
A category defines how log messages will be handled. You can specify a unique category name, whether or not the configured listeners will flush messages to the target as soon as they are received, which listeners will process the message, and the minimum severity level that must be met for the message to be logged. Multiple categories can be added and ordered in the list. Categories can also be deleted.
Special Categories
Special categories are ones that cannot be deleted or reordered in the list.
Logging Filters
A logging filter can be used to determine which action to take against log messages and potentially filter which log messages can be passed to the configured logging target listeners. You can provide a custom filtering implementation, or you can use one of the following filters provided with the Logging Application Block:
- Category: Defines which action to take against log messages based on each message’s associated category. It will allow or prevent log messages from being passed to the configured logging target listeners based on its Filter Mode value.
- Logging Enabled: Turns logging actions on or off through a single setting.
- Priority: Allows or prevents log messages from being passed to the configured logging target listeners based on the priority specified in the log message.
Logging Target Listeners
A logging target listener encapsulates the logic that processes the log message and flushes it to a specified target. You may provide a custom logging target listener, or you can use one of the following listeners provided with the Logging Application Block:
- Email Trace Listener
- Event Log Trace Listener
- Flat File Trace Listener
- Message Queuing Trace Listener
- Rolling Flat File Trace Listener
- System Diagnostics Trace Listener
- XML Trace Listener
Logging Message Formatters
A logging message formatter allows you to configure the format of the log message before it is sent to a target, such as an e-mail message, flat-file log, or Windows Event Log. You can provide a custom log message formatter, or you can use one of the following formatters provided with the Logging Application Block:
- Binary: Generates log message in binary format. Use this formatter with the Message Queuing trace listener.
- JSON: Generates the log message in JSON format. Use this formatter with a file-based trace listener or a custom trace listener that submits the output to a web service for logging on a server.
- Text: Generates the log message in a text format. Use this formatter with a Flat File Trace Listener, an Email Trace Listener, or an Event Log Trace Listener.
For this demo, add a basic Flat File Trace Listener and have it use the default Text Formatter that is already created. Add the Flat File Trace Listener to the General category. Figure 7-15 illustrates this configuration.

Figure 7-15. Logging to a flat file
Once you have the configuration defined for the Logging Application Block, save your changes. The Logging Application Block will request its LogWriter to be initialized before attempting to instantiate the ExceptionManager.
Go back into the MainWindow.xaml.cs file and add the following using directive:
using Microsoft.Practices.EnterpriseLibrary.Logging;
Next modify the InitializeExceptionManager method to initialize the LogWriter for the Logging Application Block prior to creating a new instance of the ExceptionManager, as shown in Listing 7-6. Failing to do so will result in an InvalidOperationException at runtime when the call to the CreateManager() method is executed.
Build and run the application. Click each button. Now let’s take a look to see whether the log was created. Go to your binDebug directory in Windows File Explorer and look for a trace.log file. Open the file and review the contents. Again, we recommend experimenting with changing the exception type post-handling actions as well as the order that the exception types and handlers appear in the configuration file. With each change, revisit the trace.log and take note of any differences as a result of each change.
Last but not least, open the App.config file in Visual Studio and look at the markup that was generated by the Enterprise Configuration Console. Figure 7-16 illustrates how the App.config file looks now based on the Application Block configurations that were made.

Figure 7-16. App.config exception handling and logging configuration markup
As you scroll through the App.config file to view all of the markup that was added by the Enterprise Configuration Console, think about how tedious and error prone the process would have been if you had to write this XML from scratch!
Logging Options for Windows Device Apps
As we mentioned in the first section within this chapter, the Enterprise Library Application Blocks are available for a variety of .NET applications. Unfortunately, Windows Store and Windows Phone apps are not among them. So, you will need to devise an exception handling approach that works for your application, which means handling it the old-fashioned way. And by this we mean putting in those try/catch blocks that you’ve been desperately attempting to avoid at all costs.
The following are some options that you can use to handle logging within Windows Store and Windows Phone applications:
- Custom logging library: Create your own portable class library to write messages to a log file, SQLite database, or Azure SQL database, or to your own web service endpoint.
- MetroLog: This is an open source project available on GitHub, https://github.com/mbrit/MetroLog, which allows you easily to implement logging based on NLog.
- Visual Studio Application Insights: This is a client library for an Azure service that allows you easily to incorporate tracing, logging, and analytics within your Windows Phone and Windows Store applications.
Visual Studio Application Insights
Application Insights requires that you have a Microsoft Azure account. If you do not have one, visit http://azure.microsoft.com/en-us/ to create a free trial for the purpose of this example. At the time of this writing, Application Insights is in preview, so it is free to use.
In Visual Studio, initiate the process to create a new Windows Store app. In the New Project dialog, select the Blank App template and then select the Add Application Insights to Project checkbox, as shown in Figure 7-17.

Figure 7-17. Adding Application Insights to Windows Store app
At this point, you will be prompted to log in with your Azure account credentials using your Microsoft Live ID. Once you have been authenticated, your Azure account information will display, including your avatar, Microsoft Live e-mail address, and subscription type.
Leave the “Send telemetry to” drop-down value set to New Application Insights resource. This will create a new Application Insights resource in Azure for the current application. Click OK to create the project and load it in Visual Studio.
Drill down into the MainPage code behind MainPage.xaml.cs and add the following using directives:
using Microsoft.ApplicationInsights;
using Microsoft.ApplicationInsights.Extensibility;
Next you will need to initialize a custom TelemetryClient. The TelemetryClient object provides multiple methods to enable logging custom messages to Application Insights. Table 7-3 lists the methods available.
Table 7-3. Application Insights Telemetry Client Methods
|
Method |
Description |
Parameters |
|---|---|---|
|
TrackEvent |
Logs custom events or user actions |
Event name or EventTelemetry object |
|
TrackException |
Logs exceptions |
Exception object or ExceptionTelemetry object |
|
TrackMetric |
Logs custom metrics |
MetricTelemetry object or name and value |
|
TrackPageView |
Logs page, screen, or blade views |
Name of item viewed or PageViewTelemetry object |
|
TrackRequest |
Logs the frequency and duration of server requests for performance analysis |
RequestTelemetry object or name, timestamp, duration, response code, and success flag |
|
TrackTrace |
Logs diagnostic messages |
TraceTelemetry object or message name and/or severity level or message name and/or properties dictionary |
To initialize the TelemetryClient, simply add the following variable:
private TelemetryClient client = new TelemetryClient();
The TelemetryClient is initialized and associated with your Application Insights account using the InstrumentationKey value within the ApplicationInsights.config file.
Next add the code shown in Listing 7-7, which will use the TelemetryClient to log a basic event when the application launches, force an exception to be thrown, and log the exception.
Now it’s time to test it! When creating a Windows Store app in Visual Studio, you have the option to run the application on your local machine or within the simulator, which replicates the application running on a Windows desktop while allowing you to remain in Desktop mode. The simulator also provides options to configure the screen size and resolution to use when testing the applications as well as simulate custom touch and rotation events, geolocation coordinates, and network connection properties. For this reason, we recommend testing the application in the simulator.
Build and run the application to see how Application Insights is used to track and log user actions. Once the code to log Application Insights is executed for the first time, you will notice a notification popup, as shown in Figure 7-18.

Figure 7-18. Application Insights Events notification
Click the Open Application Insights link, which will take you to your Application Insights resource in the Azure portal. The first thing you will notice is the Application Health section, which displays details on the number of users, sessions, page views, and crashes, as shown in Figure 7-19.

Figure 7-19. Custom event logged to Application Insights on Azure
Notice that the Usage section shows your custom event along with the number of times it was called. Run the application a few more times and then refresh the Azure Portal to see this number increase.
Scroll down in the Azure portal and select the Diagnostic search tile, as shown in Figure 7-20.

Figure 7-20. Application Insights diagnostics
Here you can view more details about the information the application has logged, including traces, requests, page views, and exceptions.
Although this example is simple, you can easily see the power behind using Application Insights to monitor your applications in real time. Although we demonstrated using Application Insights within a Windows Store application, you can follow the same steps to include it within a Windows Phone application.
Summary
Devising a strategy for exception handling and logging within your application is an important requirement that should never be overlooked. Regardless of the approach you take, it is your responsibility to ensure that your application does not crash unexpectedly and that it does not expose sensitive information through unhandled error messages that may inadvertently be displayed to your end users.
Remember that logging is in place to enable members of your Development or DevOps team to track down and troubleshoot issues. However, there is a fine line between what information is appropriate to include in the log messages and what information must be excluded. As a basic rule of thumb, never store sensitive information in the application’s logs, such as a user’s credentials, credit card numbers, personal information, or anything else that puts your end users at risk.
For continued maintenance of your application, a proper logging strategy will make all the difference in helping your team track down and resolve issues that arise.
Now that you have a solid understanding of how to implement exception handling and logging within your application to ensure that your application functions as expected, we will switch gears in the next chapter to focus on designing the Windows Presentation Foundation user interface.