
![]()
Deploying and Maintaining Your Application
Now that you are equipped with all the skills needed to develop high-quality XAML applications, the next step is to explore your options for using a version control system to protect your codebase. In addition, we will discuss the need for setting up a build server with continuous integration so that you can continue to enhance your application, all while providing iterative releases and ensuring that the code you check in remains clean and functional. Finally, we will cover how you can deploy your Windows 8.1 and Windows Phone 8.1 applications to the Windows Store.
An important aspect of application development is the use of version control to provide a safe repository for your application’s source code, allow development teams to merge changes to a central location, and track the history of changes that the application has undergone.
The Basics
Let’s start with a brief discussion of the main components and features that you need to understand as they relate to current version control systems.
- Repository: The central location into which all code changes eventually make their way. A version control system should have a dedicated server, which is the central repository consisting of the files that need to be tracked. The central repository will also maintain a history of the changes made to each file, along with any comments related to those changes.
- Master/trunk: The originating branch that serves as the baseline for a project on which development progresses.
- Branch: A copy of the master branch or another child branch to a separate location so that any changes made to the files do not affect its parent. A developer or development team will utilize a branch to implement a new feature or perform bug fixes, without working directly off the master. You can call these features branches since they should be short-lived in nature and exist only when working on a single task. Feature branches should be disposed of once the changes have been merged back into the parent branch.
- Merge: The action taken to integrate changes made within one branch to another. Best practices recommend using branching to make code changes and then merging to the master once the feature is complete and has gone through the proper checks and balances to ensure that it is stable for release.
- Merge conflict: Occurs when changes to a file contradict the version of that file stored on the server. This often occurs as a result of multiple developers modifying the same file and attempting to check in changes subsequently. Usually, the first developer to check in wins. The lucky developer who gets to deal with the merge conflict decides which changes are applied and which changes should be discarded. Or, in the case where all the code changes must be applied, that person decides the order in which those conflicting code blocks appear in the file.
- Resolve: Occurs when the developer who addressed the merge conflict has completed the merge. In this case, the developer will mark the file as resolved so that the version control system knows it’s in good condition to be checked in. The developer resolving any merge conflicts must ensure that the changes checked in prior to this check-in aren’t negatively impacted or completely overwritten.
- Check in: The action that pushes changes made on a local machine to the version control system’s central repository. In Team Foundation Version Control, you will often hear check-ins being referred to as commits. However, in Git, this would be known as a push. We will discuss the additional terminology for this system in the “Git” section later in this chapter.
- Check out: The action of creating a local working copy from the repository. A user may specify a specific revision to check out or obtain the latest revision from the repository. In older version control systems, a file checkout prevented multiple developers from modifying the file at the same time. In current version control systems, this has been vastly improved so that multiple developers can work on the same set of files in parallel, and they can check in their changes separately, ensuring that any conflicts that arise are resolved prior to completing the check-in process.
- Revert/roll back: There are two scenarios at play here. You can revert, or roll back, any pending changes to your working copy that have not yet been checked in to the central repository. In this case, the changes are lost forever, and there is no record of this change on the server. If you want to undo, or roll back a change on the server, you can do so only if you have the necessary privileges to make those changes to the central repository. Make sure that you, or the version control system administrator, performs the rollback using the appropriate commands to ensure that the history of the changeset is not lost as a result of the rollback.
- Changeset: The file, or set of files, bundled within a single check-in.
- Get latest: The action of copying the latest code from the version control system. You can get the latest code from the master, a selected branch, a selected directory within master or branch, or a specific file.
In an ideal environment, your version control process should look a little something like this when working on a new task or bug fix:
- Create a feature branch off the master.
- Pull down the latest code from the server to your local machine.
- Make the necessary code changes, including writing the required unit tests.
- Be a good citizen. That is, test your changes, and ensure that your unit tests pass and the code builds successfully.
- Check in your changes to the server.
- Request a code review. Wait for approval, and ensure that all unit tests and integration tests on the server pass.
- When given the green light, merge your changes to the master. Resolve any merge conflicts that arise.
- Delete your feature branch.
- Lather, rinse, repeat.
As simple as that sounds, things can go wrong even with the best of intentions.
Choosing a Version Control System
Many version control systems are available, such as Team Foundation Version Control, Git, Subversion, and CVS, to name a few. The type of version control system that you will use may be already in place and dictated by the organization or the team. If you’re tasked with choosing which system to use, it is important that you take the time to research a few systems in order to understand which one will serve the team’s needs. Let’s take a look at a couple of the popular version control systems available today.
Team Foundation Version Control
Team Foundation Version Control (TFVC) is a centralized version control system that can be set up on premises or in the cloud through Visual Studio Online. The complete history of the source code changes is maintained on a single server. When users check out files, a snapshot of the files is copied to the local machine. Users make their changes and check in any to the server, which then stores the updated file and logs the change along with the developer’s comments in the version control history.
Team Foundation Version Control enables you to define workspaces, supports branching and merging, and allows you to define permissions all the way down to the file level. TFVC is suitable for projects of all sizes, and it can easily scale up to support millions of files per branch.
TFVC works with Team Foundation Server, a collaboration platform, which includes project process templates such as Agile, Scrum, and CMMI templates. It also provides tools that enable development teams and stakeholders to track and monitor a project’s progress and audit code changes. In addition, TFVC allows you to create custom build scripts and manage your deployment options. To use TFVC, you must set up Team Foundation Server in-house (or in the cloud with Visual Studio Online) to serve as the central location to store source code.
To learn more about how to use TFVC, refer to the online MSDN article “Use Team Foundation Version Control” at http://bitly.com/TFVCSetup.
Git is an open source, distributed version control system that is designed to handle projects of all sizes. When users check out files, they also receive a history of the source code changes. In this way, users can easily work disconnected, being able to view changesets and commit changes locally until they are back online.
A Git server will serve as the central repository into which all code changes and related metadata, such as changesets and developer comments, will eventually make their way. You can set up a Git server in-house, use Team Foundation Server using Git to TFS, or use a service such as GitHub.
Git has some custom terminology with which you will need to become familiar if you are using this version control system within your organization. Table 11-1 defines the more common terms that you will need to learn.
Table 11-1. Common Git Terminology
|
Term |
Description |
|---|---|
|
Clone |
The act of downloading a local copy of a repository on your local machine. |
|
Fork |
A copy of another repository. You can fork off the master or another branch and make changes to it without affecting the original branch. Forks remain attached to the original branch, which enables developers to submit requests to have changes merged into the original branch, with the approval of the original branch’s collaborators. |
|
Commit |
The act of checking in a file or set of files to the local repository. Every time a commit is performed, it creates a unique ID that identifies the changeset details for the commit. Details of the commit are stored including the date/time of the commit, the developer who made the changes, and any developer comments. |
|
Push |
Sending committed changes to the remote repository. The files that were committed, along with the details of the commits, are uploaded to the remote repository. |
|
Pull |
Getting the latest code from the repository and merging them into your local repository. |
|
Fetch |
Getting the latest code from the repository without merging them into your local repository. |
|
Pull request |
Creates a request to have your changes merged to the master or another branch. The designated collaborators may approve or reject the request. |
In a nutshell, Git enables you to work on a branch and commit changes to that branch. The changes, however, are committed to the repository on your local machine. Nothing has gone up to the central repository on the server just yet. When you are ready to move your changes to the server, you must perform a Git push.
Once your changes are on the server, you can then create a pull request to have your changes reviewed. Once the pull request is approved, you can then merge your changes to the master.
This is just the layman’s version of a basic check-in process using Git. Really understanding Git and getting up to speed on all of the available commands requires an entire book. We recommend reading Pro Git by Scott Chacon and Ben Straub (Apress, 2014).
Visual Studio 2013 Integration
Team Foundation Version Control and Git to TFS are integrated within Visual Studio 2013.
To start using TFVC or Git to TFS to manage your application’s code, you must connect to the Team Foundation Server that contains your source code repositories. Select Team ![]() Connect to Team Foundation Server, as shown in Figure 11-1.
Connect to Team Foundation Server, as shown in Figure 11-1.

Figure 11-1. Connecting to Team Foundation Server from Visual Studio 2013
In the Team Explorer pane, click the Select Team Projects link, as shown in Figure 11-2.

Figure 11-2. Select Team Projects link in the Team Explorer pane
You will then be prompted to connect to a Team Foundation Server (TFS), as shown in Figure 11-3. If you have previously configured Team Foundation Server connections, they will be available for selection in the Select A Team Foundation Server drop-down list. However, if this is your first time connecting to TFS, then click the Servers button to configure the connection to an existing Team Foundation Server.

Figure 11-3. Selecting a Team Foundation Server instance and team project with which to work
Once you have connected to a Team Foundation Server instance and selected the team project with which you want to work, click Connect.
Team Foundation Version Control
Within the Team Explorer pane, click the “Configure your workspace” link, as shown in Figure 11-4. A workspace mapping represents the directory location on your local machine, which will contain your working copy of the project.

Figure 11-4. Configuring workspace mappings
Within the Team Explorer pane, click the Map & Get button, illustrated in Figure 11-5, to configure the workspace mapping and retrieve any files that are contained within the workspace path on the server.

Figure 11-5. Configuring your workspace and getting the latest code
At this point, your environment is properly configured. You can make changes to your project’s files on your local machine and check in files to Team Foundation Server as needed. Any changes that you make locally, which are not checked in to the server, will be lost in the event that your machine, or files, become corrupted between check-ins. In this case, we recommend that you check in early and often to avoid losing a day’s or week’s worth of work.
Continuous Integration
Now that you have selected a version control system, the next step requires configuring a build server for continuous integration. At a high level, continuous integration includes one or more of the following checks, based on the configuration on the build server:
- Compile the application code whenever a check-in is performed.
- If the build fails, send out a notification if configured to do so.
- If the build is successful, run automated unit and integration tests.
- If the tests fail, send out a notification, if configured.
Continuous integration (CI) enables you to safeguard your application’s code by catching problems at the time that the check-in occurs. The earlier the issue is caught, the easier it will be to resolve.
How many times have you heard that in your organization? How many times were you the culprit? We’ve all been guilty of it, and there is no greater shame for a developer than to have your team waiting on you to fix your misdeed so that everyone else can check in their changes. You will experience this in organizations that are using older version control systems that do not support branching, meaning everyone is working off the master.
Or, you may be part of a team where a single branch is being accessed by multiple developers. In this scenario, there is the likelihood that you will step on each other’s toes, conflicts will arise more frequently, and builds will get broken. This is why we can’t have nice things.
In all honesty, it’s not the end of the world when a build is broken. But if you’re the developer who caused the failure, then do the right thing.
- Notify the team. It’s never fair to leave your team wondering whether you are aware that the build is in a sad, sorry state as a result of your last check-in. Nobody wants to be the one to point the finger at you and tell you that you did this shameful thing. So, be proactive. Just let everyone know you are aware that the build is broken, and you are working on a resolution.
- Fix it immediately. If it’s 5 p.m. and you planned on leaving the office for the day, then you shouldn’t have checked in your changes at 4:59 p.m. If you’re brazen enough to do that, be courteous enough to stick around and roll back your check-in or fix the offending code. No one likes to see developers working overtime on these kinds of mistakes; so, long story short: don’t wait until the end of the day to check in your changes. A good practice would be to check in regularly throughout the day so on the chance that your machine goes kaput overnight, the scope of changes lost will be minimal at best.
- Notify the team. Let everyone know when the build is stable again.
Configure a CI Build
Team Foundation Server makes it easy to configure continuous integration builds. You must belong to the Build Administrators group within Team Foundation Server to create build definitions.
Within the Team Explorer pane in Visual Studio 2013, click the Builds button. Within the Builds section, click the New Build Definition link, as shown in Figure 11-6.

Figure 11-6. Creating a new build definition from Team Explorer in VS 2013
A New Build Definition pane will load in the Visual Studio IDE, as shown in Figure 11-7. Provide a name that makes it easy to identify the type of build it is; it must be unique, and it may not contain the special character $.

Figure 11-7. Configuring a new build definition from the Visual Studio IDE
Note that the options for the build queue processing are Enabled, Paused, and Disabled. Since you want the builds to be triggered by the system, leave the selection at Enabled for now.
Next, you need to define when the build will run. Select Trigger in the left pane, as shown in Figure 11-8.

Figure 11-8. Defining a build trigger
A build in TFS can be triggered in one of the following ways:
- Manual: The developer must explicitly run the build.
- Continuous Integration: The build is triggered each time a check-in occurs.
- Rolling builds: Limit the number of builds that occur over a time period, in minutes. The valid range for the minutes text box is 0 to 2147483647.
- Gated Check-in: The build will attempt to merge and build the changes. If a failure occurs, the check-in will be rejected. If it succeeds, the check-in will be completed. In this way, no one will be able to check in code that will break the build. This feature is not available when configuring a build definition for a Git repository.
- Schedule: The build runs on a custom schedule. You may specify the days the build will run and the time of day the build will occur. You can additionally opt in to build even if no changes were made since the last build.
Since you want to configure a CI build, select the Continuous Integration option.
The next thing to do is to configure the location of the source code by specifying the Source Control Folder setting, as shown in Figure 11-9.

Figure 11-9. Selecting the repository against which the build will execute
The Build Agent Folder column indicates the directory on the build server that will be used to check out the source code from TFS to compile and build. The value of $(SourceDir) points to the working directory on the build machine. Its value is defined within the Working Directory settings for the build agent on the server.
Next, you will need to specify which build controller to use. A build controller is used to determine the name of the build, create the label in version control, log notes, and report the build status. It also is used to distribute the bulk of the work of the build process to its pool of build agents. If you have more than one configured build controller, select the one that you want to use for the current team project’s build definition in the Build Defaults section, as shown in Figure 11-10.
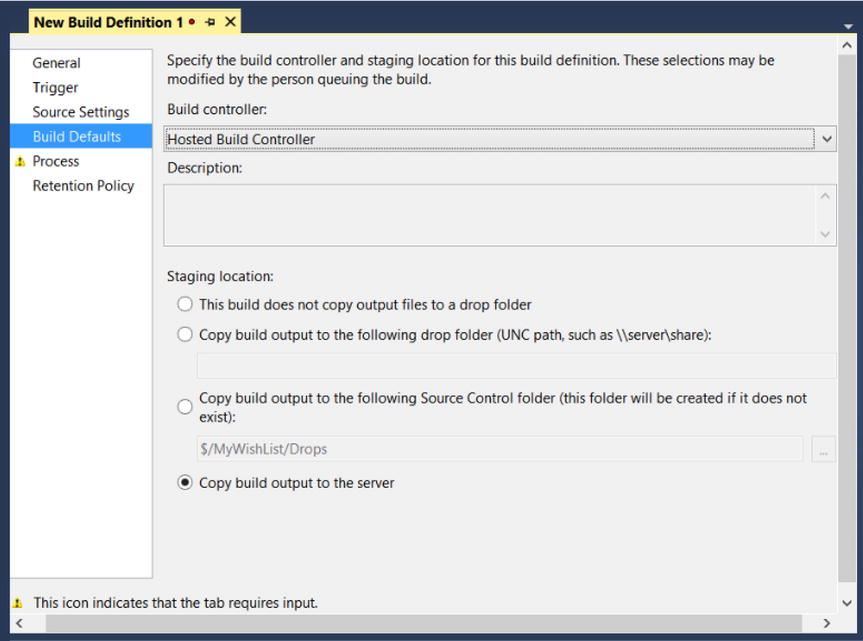
Figure 11-10. Specifying the build controller and staging location for the build output
You will also be able to specify whether the build output files are copied to a staging location. If so, then you can set the staging location to a file share, to a source control folder, or to Team Foundation Server.
Let’s move on to configuring the build process. Click Build Process in the left pane, as shown in Figure 11-11.

Figure 11-11. Defining the build process
There is a list of default templates from which you may choose. Each build process template defines a set of parameters that control how your build is run. You may select one of the default templates provided as a starting point and customize the build process parameters manually, if needed. You may upload your own build process template if you have a defined process in place that you want to apply to the team project’s build definition.
At a minimum, you must define the project or solution files to build in the first build process parameter provided in the list, Items To Build. Set the focus to the value cell for this parameter, and click the ellipses button that appears to load the Items to Build dialog, as shown in Figure 11-12.

Figure 11-12. Selecting the items to build for this build process
Click the Add button and then select the solution or project files to build. Click OK to apply the changes, close the dialogs, and return to the build definition.
Finally, you have the option to configure how long any generated build outputs are kept in the configured staging location, grouped by build type and build state, as shown in Figure 11-13.

Figure 11-13. Configuring the retention policy for build outputs that were generated
For each build state within a grouping, you may select the number of builds to keep from a predefined list or select a custom value. In addition, you must indicate what will be deleted, which could be any one or more of the following:
- Drop: Files and folders output by the build and copied to the drop location
- Test Results: Results of automated tests executed during the build process or results of tests published against the build
- Label: Version control marker associated with specific file versions by the build process
- Symbols: Debugging symbols published to a symbol server during the build
Note that Details, which refers to build information, is always deleted and cannot be unchecked here. Once you are satisfied with the build definition configuration, click Save. Now you will see the build listed within the My Build Definitions group in your Team Explorer pane.
Now that you have your build configured, you can start checking in your changes, knowing that the CI build will kick off automatically.
To manage your build definition or to view the status of build executions, right-click the build definition name in the Team Explorer pane to bring up its context menu, as shown in Figure 11-14.

Figure 11-14. Managing your builds through the right-click context menu in the Team Explorer pane
To verify that your CI build is configured properly, make a small change to your application code and check it in. Go to the Builds tab. Do you see a build in the queue? Figure 11-15 illustrates an example of this.

Figure 11-15. CI build added to the queue as a result of a check-in
![]() Note If you want to trigger a build without checking in code, you can do so by selecting the Queue New Build menu item from the context menu.
Note If you want to trigger a build without checking in code, you can do so by selecting the Queue New Build menu item from the context menu.
Deploying WPF Applications Using ClickOnce
It is easy to deploy a WPF application using ClickOnce, a deployment technology that enables you to create self-updating Windows-based applications that can be installed and run with minimal user interaction.
A quick and easy way to create your deployment package is to load your WPF application in Visual Studio 2013. Select your project in Solution Explorer and then select Build ![]() Publish <applicationName>, as shown in Figure 11-16.
Publish <applicationName>, as shown in Figure 11-16.

Figure 11-16. Creating a deployment package by publishing from within the Visual Studio IDE
Next, you will specify the desired location to publish the application to. This can be a local directory or network share, as shown in Figure 11-17.

Figure 11-17. Specifying the location to publish the application
Now you must determine how the application will be accessible to users, as shown in Figure 11-18. You can choose to make it available from a web site or file share or package it to media such as a DVD. However, nowadays the more common options are a file share or web site URL.

Figure 11-18. Selecting the manner in which the installation will be available
Finally, you must configure whether the application will check for updates (Figure 11-19). Enabling this ensures that whenever the application is run, it will check the installation location for a newer version. If one is available, it will automatically install the new version before launching the application.

Figure 11-19. Configuring whether the installation will automatically check for updates
Publishing Apps to the Windows StoreWindows Dev Center
When you are ready to make your Windows 8.1 and Windows Phone 8.1 applications available for public consumption, you will need to publish them to the Windows Store, which requires a Windows Dev Center account.
Windows Dev Center
Windows Dev Center enables you to publish your apps to the store; view reports on application stats, such as the number of downloads and crashes; and view and respond to user reviews. It also lets you configure push notifications to enable users to receive real-time notifications for your applications. If you want to monetize your applications through paid apps, in-app advertisements, or in-app purchases, the Windows Dev Center is the place to do that as well.
A Windows Developer account requires a one-time fee of $19 USD for individuals or $99 USD for businesses. You must register using a Microsoft Live ID. If you do not have one, then you must obtain one first. To register for a Microsoft Live account, go to http://outlook.com and click “Sign up now.” Follow the steps to create your own Microsoft Live account.
Next, you will need to register for a Windows Developer account. Go to http://dev.windows.com and click the “Get a dev account” link, as shown in Figure 11-20, which will navigate to the “Register as an app developer” page.

Figure 11-20. Registering for a Windows Developer account at Windows Dev Center
The “Register as an app developer” page provides an overview on what you may do with your developer account and the type of services available with that account, as shown in Figure 11-21. Click the “Sign up” button to continue.
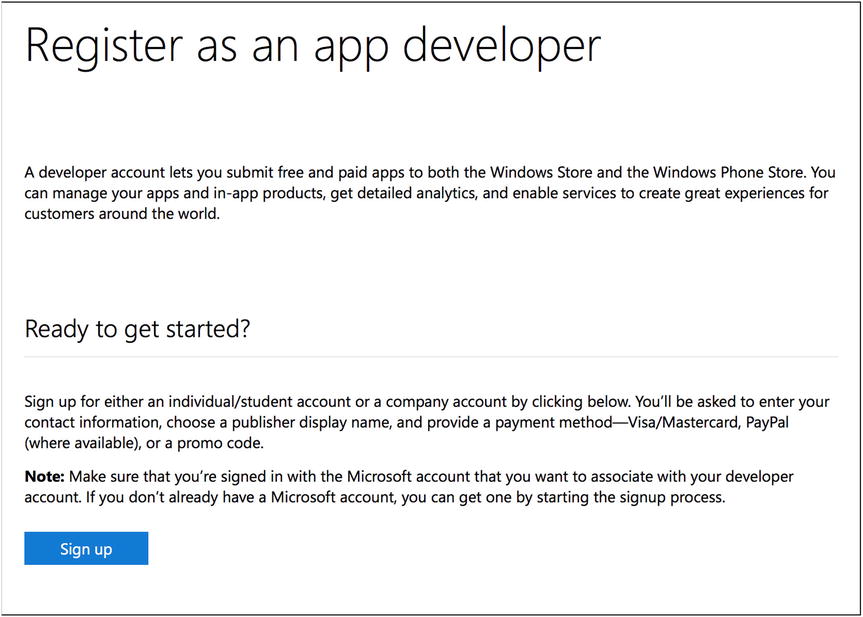
Figure 11-21. Signing up for an individual or company account using a Microsoft Live ID
At this point, you will be prompted to sign in with your Microsoft Live credentials. Once you have signed in with your Microsoft Live account, you will see an information page (yes, once again) with the details on what a developer account means and the type of services that are available with a developer account, as shown in Figure 11-22. Click the Join Now button to proceed.

Figure 11-22. Upon signing in with your Microsoft Live ID credentials, click Join Now to register
Select the country or region in which you live or will be conducting your business. Once you have made your selection, the pricing for each account type will be displayed in the selected location’s currency, as shown in Figure 11-23.

Figure 11-23. Account pricing is displayed in the selected country’s currency
Select the account type you want to set up by clicking its respective “Enroll now” button.
Next, you must enter your account information including name, address, contact number, and so on. In addition to that, you must select a publisher name, which will be displayed in the Windows Store and associated with your apps, as shown in Figure 11-24.

Figure 11-24. Selecting a publisher display name
The publisher name entered must be unique. You can click the “Check availability” link to validate your chosen name before attempting to proceed. If the validation succeeds, select the Next button to continue.
Now it’s time to pay for the account, either by credit card or by token, as shown in Figure 11-25.

Figure 11-25. Selecting a payment option
If you have an MSDN, DreamSpark, or BizSpark account, you will be able to create a free Windows Dev Center account by entering the token that is displayed in your MSDN subscription. Select your payment option and then click the Next button to continue. Complete the payment process in order to create your developer account. Now you are ready to submit your Windows Store and Windows Phone apps to the store!
When you are ready to submit your application, log in to your Windows Dev Center account and click the “Submit your app” link. At the time of this writing, the Windows Store and Windows Phone Store are separate, so you will be prompted to select the store to which you want to navigate, as shown in Figure 11-26.

Figure 11-26. You must select which dashboard to navigate to
Notice that you also have the option to visit the new dashboard, which is a converged store for both Windows Store and Windows Phone applications. However, the new dashboard will not yet be set up for you to submit your applications just yet, as illustrated in Figure 11-27.

Figure 11-27. The new dashboard does not allow app submissions at this time
Windows Store
The Windows Store process for app submission requires some preliminary steps to package and certify that the app is ready for submission.
Packaging Your Windows Store App
Before you can submit your application to the Windows Store, you must associate your app with the store, capture at least one screenshot of the running application, and create the necessary app packages to upload to the store. This can be accomplished through the Visual Studio IDE. Load your Windows 8.1 application in Visual Studio 2013. Right-click your app’s name in Solution Explorer and select the Store menu item, as shown in Figure 11-28.

Figure 11-28. Preparing your Windows 8.1 app for publication to the store from Visual Studio
The first thing you will need to do is to associate your app with the Windows Store. Select the Associate App with the Store menu item, which will launch the dialog displayed in Figure 11-29.

Figure 11-29. You must associate your app with the store before submitting the application
At this point, you will walk through a series of steps to reserve an app name and opt in to create the app’s package to upload to the store. You will also configure the app package’s output location on your machine and select the packages to create, as shown in Figure 11-30.

Figure 11-30. Configuring your app packages
Once you have configured your app packages accordingly, click Create to generate the package. Once the package has been created successfully, you will be able to review the details in the Package Creation Completed screen, as shown in Figure 11-31.

Figure 11-31. Once the package has been created, it must be verified against Windows App Certification Kit
You must also perform validation against the application’s package to verify that it is ready for submission to the store. This will help you to discover any errors that could arise during the certification process, saving you time from going back and forth with the app submission process. In the Package Creation Completed screen, select the device on which to run the app validation, either locally or on a remote machine. Click the Launch Windows App Certification Kit button to launch the certification process.
The Windows App Certification Kit enables you to select which validation tests to perform, as shown in Figure 11-32. It is recommended that you run all tests before submitting your app to the store.

Figure 11-32. Selecting the validation tests to run
Click Next to execute the series of tests. Your app will load and unload a few times during this process. Do not interfere with the app interaction while the tests are being performed.
Once all the tests have executed, you will be notified if the validation process passed or failed, as shown in Figure 11-33.

Figure 11-33. Once the validation process completes, you are notified whether the certification passed or failed
If the validation process failed, click the link to view the results of the tests. Scroll down through the list to find where the failure occurred and correct the issues. Build your application again and repeat the app package creation and app validation process. Once your application has passed validation, you may proceed to submit your app to the Windows Store.
Let’s take a look at what you need to do to submit a Windows Store application. From the Choose Your Dashboard page, select the Windows Store button to navigate to the Windows Store dashboard, as shown in Figure 11-34.

Figure 11-34. Windows Store dashboard
From the dashboard, you can see that there are a number of links available, which may be overwhelming at first. Table 11-2 provides a quick overview on what actions you may perform from here.
Table 11-2. Windows Store Actions
|
Link |
Description |
|---|---|
|
Submit an app |
Initiates a wizardlike walk-through to submit your Windows Store application to the store. We will provide a high-level overview of the steps involved in application submission later in this section. |
|
Explore Store trends |
Takes you to a page with a link to the latest Windows App Builder blog post. This post provides details on recent store trends across categories and markets, as well as details on device adoption. It is important to stay on top of these trends because they may provide you with ideas on what types of apps to build, where to focus your development efforts, and which languages to support. |
|
Financial summary |
Financial reports based on any paid transactions through your application. |
|
Promote your app |
Enables you to create ad campaigns to promote your apps, by creating ads that will appear in other apps in the store. This requires that you create an account in the pubCenter portal, at https://pubcenter.microsoft.com/Dashboard. Within the pubCenter portal, you will be able to design your ad, configure your campaign budget, and track ad impressions and clicks. |
|
Account |
View and modify your account profile information, including your publisher name and your developer information. You can also view your unique publisher ID. |
|
Payout |
Set up your bank information to receive payments from Microsoft, as a result of paid transactions through your apps. If you plan on monetizing your applications by making them paid apps, including in-app purchases or integrating in-app advertisements, then you must set up both your payment and tax information before submitting apps to the store. |
|
Tax |
Fill out tax forms within your developer account to set up paid apps or transactions within your app that will generate revenue. You will not be able to set up your tax profile until you have set up your payment information. |
|
Subscription |
Deprecated. In the past, developer accounts needed to be renewed every year. However, Microsoft has changed this recently so that developer accounts no longer expire. This link simply takes you to an information page that says this same thing. |
|
News links |
Links to Windows blog posts and Windows Store/Windows Phone documentation for detailed information on the link topics. |
|
Windows Phone dashboard |
Quick link to the Windows Phone dashboard. |
Now let’s take a look at how to submit a Windows Store application. Click the “Submit an app” link to start the process, as shown in Figure 11-35.

Figure 11-35. Submitting an app to the Windows Store
Notice that the app submission process provides a wizardlike interface to help walk you through the necessary steps.
App Name
The first, and most important, step is to name your application. This is referred to as reserving the app name, as shown in Figure 11-36. You can start the app submission process simply to reserve the name of your application before you even start developing it.

Figure 11-36. Reserving an app name
The name must be unique—if anyone else has already created an app with that name, you’re out of luck. Pick a new one. Once you reserve an app name, no one else can use that name.
If the application is not submitted to the store under the reserved name within a year’s time, the name will no longer be associated with your account. It will be released to allow someone else to use the name. The reserved name can also be associated with your Windows Phone Store dashboard. In this way, if you decide to publish a Windows Phone version of your app, your users may be able to install it on their phone. This provides two benefits to your users:
- If the app is purchased, the user needs to pay for it only one time.
- Data will roam between both the Windows Store and the Windows Phone app, providing a great user experience.
Once you have successfully reserved an app name, notice that the next four steps become enabled in your app submission page, as shown in Figure 11-37.

Figure 11-37. Reserving an app name enables the next four steps in the app submission process
The next step is to configure whether your app will be published as free or paid, as well as in which markets it will be available. If publishing a paid application, you may additionally configure it to be available as a time-based trial version, as shown in Figure 11-38.
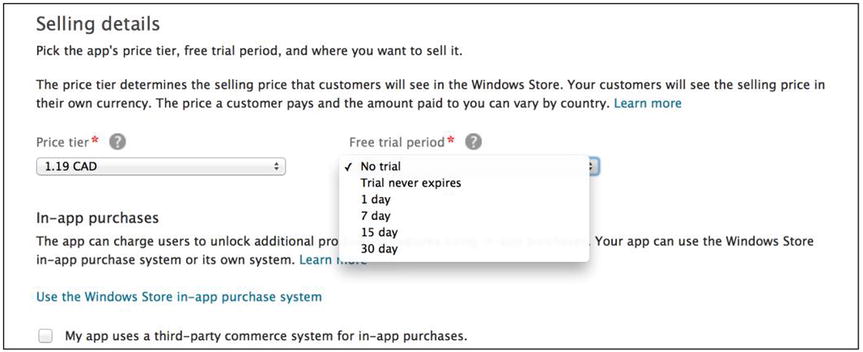
Figure 11-38. Trial versions may be enabled for paid apps
Optionally, you may configure in-app purchases at this time. If you are using the Windows Store in-app purchase system, click the link to navigate directly to the Services step in the app submission process. Otherwise, click the check box to indicate that you are using a third-party commerce system for in-app purchases.
Next, you must also select the markets in which the app will be available. You must select at least one country or region. There is an option to select all markets. However, you must understand that some countries have restrictions on which apps are available in those markets. Refer to the Windows documentation, “Choosing your markets,” at http://bitly.com/WindowsMarketInfo for more details. Also, if your application is available for purchase, you must fill out a valid tax profile for each country in which it will be available for sale.
Next, you must select the category and subcategory under which your app will be grouped in the Windows Store and the date when it will be released. Optionally, you may indicate whether the app requires a touch-screen device or if the device must meet minimum requirements for DirectX and available RAM. Once you have the selling details configured, click the Save button at the bottom of the page to continue.
The next step is to configure any additional services that your application will require, such as cloud services and in-app purchases. These services will require additional code to be included in your application to truly integrate these features. We are simply setting up the server-side infrastructure that is needed to provide the necessary association between your app and the Windows Store for these services.
To configure your app for push notifications, user authentication, or cloud storage, you will need to leverage Azure Mobile Services. Therefore, you will need to sign up for a Microsoft Azure account. A quick link is provided on the Services page to do so. Note that you must sign up using a Microsoft Live account. If you already have a Microsoft Azure account, another quick link is provided to the Azure sign-in page. Azure Mobile Services is beyond the scope of this book. To learn more about how to use Azure Mobile Services to provide advanced cloud services within your app, read the online documentation at http://bitly.com/LearnAzureMobileServices.
If you plan on including in-app purchases within your application, you can configure one or more offers on the Services page, as shown in Figure 11-39.

Figure 11-39. Windows Store makes it easy to include in-app offers within your application
Simply enter a product ID, which represents the offer that your app will recognize, select the price of the offer, when (or if) the offer will expire, and the type of content that will be available through this offer. To include multiple offers, click the “Add another offer” link to configure each offer you want to provide. Once you have configured your services or if you are not providing any of these services within your app, click the Save button to move onto the next step.
Age Rating and Rating Certificates
When submitting Windows Store applications, you must select an age rating since the Store uses age ratings to help your customers find apps that meet their needs. Table 11-3 includes the available age rating groups and associated descriptions, as listed in the Windows Store.
Table 11-3. Windows Store Age Ratings*
|
Age Rating |
Description |
|---|---|
|
3+ Suitable for young children |
These applications are considered appropriate for young children. There may be minimal comic violence in nonrealistic, cartoon form. Characters should not resemble or be associated with real-life characters. There should be no content that could be frightening, and there should be no nudity or references to sexual or criminal activity. Apps with this age rating also cannot enable features that could access content or functionality unsuitable for young children. This includes, but is not limited to, access to online services, collection of personal information, or activating hardware such as microphones or webcams. |
|
7+ Suitable for ages 7 and older |
Apps with this age rating have the same criteria as the 3+ applications, except these apps can include content that might frighten a younger audience and can contain partial nudity, as long as the nudity does not refer to sexual activity. |
|
12+ Suitable for ages 12 and older |
Choose this rating if you are not sure which age rating to select for your app. Apps with this age rating can contain increased nudity of a nonsexual nature, slightly graphic violence toward nonrealistic characters, or nongraphic violence toward realistic human or animal characters. This age rating might also include profanity but not of a sexual nature. Also, apps with this age rating may include access to online services and enable features such as microphones or webcams. |
|
16+ Suitable for ages 16 and older |
Apps with this age rating can depict realistic violence with minimal blood, and they can depict sexual activity. They can also contain drug or tobacco use, criminal activities, and more profanity than would be allowed in a 12+ app, within the limits laid out in section 5 of the certification requirements. |
|
18+ Suitable for adults only |
Apps with this age rating may contain intense, gross, or specific violence, blood, or gore that is appropriate only for an adult audience, in addition to content that is appropriate for a 16+ app. |
*Windows Store Documentation, age ratings and rating boards: http://bitly.com/WindowsStoreAgeRatings
If your app makes use of third-party services, you must choose the strictest age rating to ensure that you comply with those service policies as well. For example, if your app integrates with Facebook, you must select the 16+ age rating since Facebook does not allow users who are younger than 13.
Also, it is important to note that the Windows Store will not publish adult-only apps, unless the app is a game and has been rated by a third-party ratings board. If your app is a game, you will need to provide additional rating information and upload a rating file or a rating certificate, depending on the market in which the game is made available.
Once you have configured the age rating or uploaded any required rating certificates, click Save to continue.
Cryptography
This step simply requires you to indicate whether your app uses cryptography or encryption such as data encryption, uses antivirus protection, or uses a secure communication channel, to name a few. At this point, your only option is to click either Yes or No.
If you clicked Yes, then you will have additional selections to make to gather more details on the type of encryption or cryptography being used. If you clicked No, then you will be prompted to confirm that your app is available for distribution without any restrictions. Click Save to continue.
At this point, the Packages step should be enabled in the app submission process.
Packages
Now it’s time to upload your app package! In this step, you will upload the app package that was created during the packaging process, which we detailed earlier in this chapter. The package can be found in the directory of your Windows 8.1 application, under the AppPackages folder. Drag your .appxupload file from the AppPackages directory to the drop target on the Packages page in the store, as shown in Figure 11-40.

Figure 11-40. Uploading your app package to the store
When the package has been uploaded successfully, click Save to continue to the next step to provide details on your application.
Description
Within the Description page, you must enter information about your application, which will appear in the Windows Store, as shown in Figure 11-41.

Figure 11-41. Filling in the metadata associated with your app, which will be displayed in the store
The metadata provided in this section will be information displayed to potential customers looking to install new apps on their PC or tablet, so be sure to sharpen up your marketing skills and provide a description that will peak their interest. You must also include at least one screenshot of your application, so be sure that it shows off the best features of your application!
You must also include copyright and trademark information, as well as a support e-mail address that will enable users to contact you in the event of any issues. Optionally, you can designate keywords to associate with your app so that users can discover it when searching the store based on those keywords. You can also choose to provide promotional images in the event that your app is featured in the store. If you do not provide these images, then your app will not be eligible to appear as a featured app.
Finally, you have the option to enter notes that will help testers better test your application, as shown in Figure 11-42. You are not required to enter notes here, but if there are obscure features that you would like tested or that require the use of a mobile or Wi-Fi connection, for example, then this is the place to make note of it.

Figure 11-42. Optionally including notes to the testers
Click Save to complete this step.
Submit App
Once all the steps have been completed in the app submission process, you will be able to review and edit your release information or submit your app for certification to the store, as shown in Figure 11-43.

Figure 11-43. Submiting app for certification
Once you submit your app, it will go through the necessary stages for certification. If there are no issues with your application, you will receive an e-mail indicating that it passed certification and it is ready to publish to the store. If you configured it to publish automatically on certification, then your app will appear in the store within 24 hours.
If your app failed certification, you will receive an e-mail indicating this with details on the issues that need to be resolved. This will require you to repeat the packaging and app submission process.
Windows Phone
To submit your Windows Phone 8.1 applicationWindows Store to the Windows Phone Store, you must package your application. The steps involved are similar to the steps described for packaging a Windows Store application, using the Create App Package wizard and Windows App Certification Kit.
Once your application has been packaged and certified, it is ready for submission to the Windows Phone Store. Navigate to your Windows Phone Store dashboard, illustrated in Figure 11-44, through your Windows Dev Center account.

Figure 11-44. Submiting a Windows Phone app through the Windows Phone Store dashboard
Click the Submit App button to start the app submission process. Notice that the interface is similar to the Windows Store experience, with fewer steps involved, as shown in Figure 11-45.

Figure 11-45. Windows Phone App submission process
Step through the process to reserve the app name for your Windows Phone 8.1 app. If this app submission is related to an app that already exists in the Windows Store, you can select the reserved name in the App Info page to associate the phone app with its Windows Store counterpart.
For a detailed walk-through on the remaining steps in the app submission process for Windows Phone, check out Chapter 14 in the book Windows Phone 8 Recipes: A Problem-Solution Approach by Lori Lalonde and David R. Totzke (Apress, 2013).
![]() Note During the summer of 2015, Windows Dev Center publisher accounts will be migrated to use a new dashboard, which will provide a single submission process for apps targeting one or more Windows devices. Although the app submission process may look different in the new dashboard, the main concepts that we discussed in this chapter for store submissions will be the same.
Note During the summer of 2015, Windows Dev Center publisher accounts will be migrated to use a new dashboard, which will provide a single submission process for apps targeting one or more Windows devices. Although the app submission process may look different in the new dashboard, the main concepts that we discussed in this chapter for store submissions will be the same.
Summary
This chapter provided an overview on the importance of version control systems, along with the common terminology used when working with a version control system. We took a quick look at Team Foundation Version Control and Git, two of the most popular version control systems on the market today. We also discussed what continuous integration means and how to configure CI builds on your build server. Finally, you learned how to deploy Windows 8.1 and Windows Phone 8.1 applications to the Windows Store.
Reading this book was just the first step on the road to becoming a XAML and C# expert. It is important to put into practice what you learned here but also to build on what you know through additional online resources. We recommend reading the documentation and downloading the code samples available on the Windows Dev Center at http://dev.windows.com. Also, be sure to register for Microsoft Virtual Academy at www.microsoftvirtualacademy.com/, a free online video library providing courses on the latest Microsoft technologies, including XAML, C#, and the changes coming in Windows 10.
Good luck and happy coding!