
WHAT'S IN THIS CHAPTER?
Introducing workflow in Alfresco
Defining a workflow
Creating a process definition
Creating tasks based on the task model
Customizing the workflow behavior
Configuring the Explorer user interface
This chapter describes how to create and deploy workflows in Alfresco. It discusses core Business Process Management workflow concepts, including process definitions, how the JBoss Business Process Engine (jBPM) interprets processes, and task models. It also shows you how to configure the behavior of the workflow and customize Alfresco Explorer to view and edit tasks. To illustrate the workflow creation and deployment process, this chapter uses a simple Review and Approve workflow example.
Alfresco implements workflow through several modular, loosely coupled components (as shown in Figure 7-1).
The core components of Alfresco workflows are the workflow engine and the workflow service. The workflow engine is the underlying workflow implementation and is responsible for executing workflows, managing tasks, and managing process definitions. The workflow service is responsible for encapsulating the workflow engine, meaning all access to Alfresco workflows is made through the workflow service. This ensures that Alfresco workflows and services that use Alfresco workflows remain agnostic to the underlying implementation. Though the underlying workflow service API is written in Java, a JavaScript API is also available. For further information on the JavaScript Workflow API, see Online Appendix D.
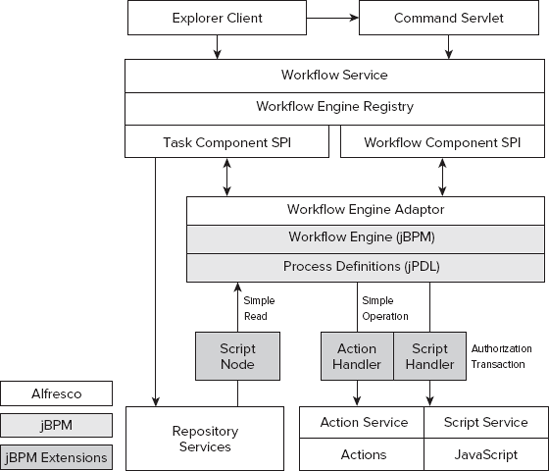
Each implementation of a workflow engine must have a workflow engine adapter specified for it. This adapter effectively maps workflow service calls onto the workflow engine. Out of the box, Alfresco provides a JBoss Business Process Management (jBPM) adapter and supports jBPM as its default workflow engine. Alfresco makes use of many of the extension points provided by jBPM to offer additional functionality, such as enhanced scripting capabilities and custom actions.
The workflow service uses several other components in Alfresco. For example, the repository services are used to create and store metadata associated with tasks, taking advantage of the Alfresco content modeling capabilities. The Explorer Web client is also used to provide an out-of-the-box user interface for creating and managing workflows and tasks.
The JBoss jBPM engine is the default engine used by Alfresco to power its workflow functionality. It is responsible for interpreting the process definitions that are registered with it, and creating and executing instances of those process definitions – the actual processes – when requested. jBPM provides the environment in which processes run and it provides each process with a common set of services that allows the process to do its work.
Each process that runs inside the engine follows a path that is laid out for it by its associated process definition. Each process is related to just one process definition and each process definition describes the steps that are involved in the process: how one step moves on to the next step, what occurs during each step, and so on.
You can find the full user guide for jBPM at http://docs.jboss.com/jbpm/v3.3/userguide, but you can review its core features here.
In jBPM, a process definition comprises a set of nodes joined together with transitions. For the more mathematically minded, a process definition describes a directed graph of nodes with transitions forming the edges of the graph. There are a number of different types of node that can be used in a process definition. It's worth spending a little time here to look at each type.
The first type of node that all process definitions must include is the start-state. As the name suggests, when the jBPM engine starts a new process using a given process definition, the start state of that process definition is the state that the process enters initially. Every executable process definition has precisely one start-state node.
At the other end of each process are one or more end-state nodes. An end-state node indicates to jBPM that the process has finished. Where a process branches (or forks), an end-state node marks the end of each branch.
As hinted at in the previous paragraph, it is possible to cause a process to fork in to two or more branches by using a fork node. This has the effect of spawning a new thread of execution for each branch. Subsequently, a join node can be used to bring different branches back together again. There are many possible uses for this forking and joining functionality. For example, if an organization is producing a new brochure then it may want the design review to be carried out in parallel with the proofreading. Once both tasks are successfully completed, the brochure can be published. Forking the process allows the parallel tasks to happen, and then joining the parallel branches together again ensures that both are complete prior to entering the publishing activity.
It is often desirable to be able to define rules that dictate which path a particular process should follow. For example, one may wish to use a more rigorous review stage if a document has been flagged as "commercially sensitive" or perhaps take a different path depending on the outcome of a design review. In jBPM, these kinds of choices are modeled using decision nodes. A decision node will normally have more than one transition leaving it, and there are two ways in which the process definition can specify which transition is to be taken. The first approach is to define conditions on each of the transitions. In this case, when executing the decision node, jBPM will evaluate the conditions of each transition in turn and will follow the first transition that returns true (or the default transition if none returns true). The second approach is to define an expression on the decision node that returns the name of the transition that should be followed.
The final types of nodes to look at are also the most widely used: state and task-node. When a process enters a state node it simply waits to be told when to move on. This type of node is typically used when the process needs to wait for another system to do some work before continuing. This other system is expected to notify jBPM when it has finished, thus releasing the process to carry on. Nodes of type task-node are similar to state nodes except that they cause a task to be created and assigned to one or more users of the workflow system. For example, the nodes representing the design review and proofreading activities mentioned earlier are likely to be of the type task-node, with the tasks being assigned to the relevant people. In this case, the person to whom the task has been assigned is responsible for telling jBPM when the task has been completed, and jBPM will then continue executing the process.
Figure 7-2 illustrates a process that includes an example of each type of node.
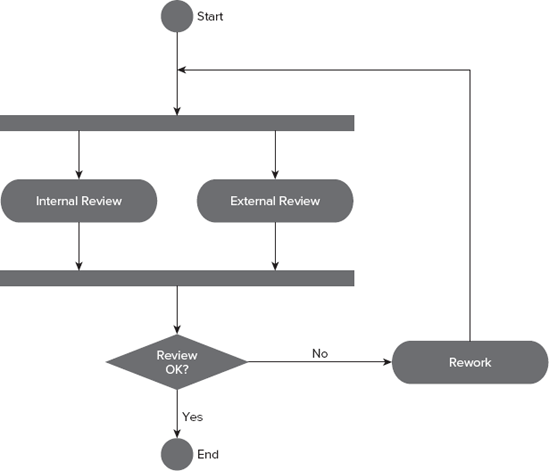
This process starts and then immediately forks into the Internal Review and External Review nodes. The Internal Review node represents a human activity undertaken by a user who is known to the workflow engine and would, therefore, be modeled as a node of type task-node – when this node starts executing, a task is added to the assigned user's task list. Conversely, the activity represented by the External Review node is undertaken by someone unknown to the workflow engine – perhaps an email is sent to that person with the document attached when this node is executed – so this node is modeled as a plain state node.
Once complete, both the Internal Review and External Review nodes transition into a join node that waits for both branches to reach it. Once this happens, the transition that leads to the Check Review node is followed. The Check Review node is responsible for deciding whether the process can complete or whether some rework is required. Unsurprisingly, this task is best modeled with a decision node. Perhaps, in this case, this node expects a couple of Boolean variables to have been defined, such as internalReviewSuccessful and externalReviewSuccessful, and decides which transition to follow by examining their values. Presumably in this particular case, if either the internal review or external review was unsuccessful, then the transition leading to the Rework node is followed. This is most likely to be a task-node node that adds a task to the original author's task list.
The following XML code snippet illustrates how such a process definition may be described using jPDL.
<?xml version="1.0" encoding="UTF-8"?>
<process-definition name="document-review">

  <start-state>
    <transition to="review fork" />
  </start-state>

  <fork name="review fork">
    <transition name="internal" to="internal review" />
    <transition name="external" to="external review" />
  </fork>

  <task-node name="internal review">
    <task name="review task">
      <assignment actor-id="brian" />
    </task>
    <transition to="review join" />
  </task-node>

  <state name="external review">
    <transition to="review join" />
  </state>

  <join name="review join">
    <transition to="review decision" />
  </join>

  <decision name="review decision">
    <transition to="rework"
      condition="#{!internalReviewSuccessful || !externalReviewSuccessful}" />
    <transition to="end" />
  </decision>

  <task-node name="rework">
    <task name="rework task">
      <assignment actor-id="colin" />
    </task>
    <transition to="review fork" />
  </task-node>

  <end-state name="end" />

</process-definition>In jBPM, an action is a piece of code that can be executed when certain events occur in a process. For example, it is possible to specify that a particular action should be executed when a given transition is followed, or when the process enters or leaves a node, or when a task is created. Out of the box, jBPM allows actions to be coded in Java or in a scripting language called BeanShell (see www.beanshell.org). In Alfresco, there is a hybrid option: a Java class named AlfrescoJavaScript that allows you to supply a script written against the Alfresco JavaScript API. That will be discussed in more detail later in this chapter.
In the example introduced in the previous section, you may decide that you'd like to email the document being reviewed to the external reviewer when the External Review node is entered. Of course, there is more than one way of achieving this, but for the sake of this example, there is a class named EmailDocToReviewer that performs the required functionality. To cause jBPM to execute an instance of this class at the appropriate point in the process, you modify the way that the External Review node is defined in the previous process definition to add in the event handler:
<state name="external review">
    <event type="node-enter">
      <action class="com.example.jbpm.EmailDocToReviewer" />
    </event>
    <transition to="review join" />
  </state>
These actions will be discussed in more detail later on in this chapter.
If you look closely at the example process definition, you will see that each of the two task-nodes defines a "task." This tells jBPM to create a new task and to assign it to someone. There are a few ways of indicating to whom the task should be assigned, such as identifying the user by name (as is the case here), writing an expression that resolves the user, or writing a custom assignment handler in Java. Another option is to use is a swimlane.
A swimlane identifies a role in a process. It is particularly useful when a process definition defines a number of tasks that should all be carried out by the same user. All such tasks are placed in the same swimlane and the swimlane determines to which user those tasks are assigned. By default, while running a single process, the person who is assigned the first task in a given swimlane will be assigned any other tasks that are in the same swimlane.
Since the example process definition isn't very complex, there isn't much need for swimlanes but, for completeness, here is how one might modify the process definition to use a swimlane for the reviewer:
<?xml version="1.0" encoding="UTF-8"?> <process-definition name="document-review"><swimlane name="reviewer"><assignment actor-id="brian" /></swimlane><start-state> <transition to="review fork" /> </start-state> ... <task-node name="internal review"><task name="review task" swimlane="reviewer" />
<transition to="review join" />
  </task-node>
  ...
</process-definition>
Timers are another useful feature supported by jBPM. Any number of timers can be placed within any node or task, and each one specifies the time at which it should trigger. In addition, a timer definition may identify a transition that is to be followed, an action to execute, and a repeat interval. All of these optional attributes take effect when the timer first triggers.
For example, if you want to send an email reminder to the internal reviewer every other day until the review is complete, then you could modify the "internal review" task-node in your process definition to look something like this:
<task-node name="internal review">
    <task name="review task" swimlane="reviewer">
      <timer name="internal review timer" duedate="2 business days" repeat="yes">
        <action class="com.example.jbpm.SendReviewReminder" />
      </timer>
    </task>
    <transition to="review join" />
  </task-node>
Note that the previous code snippet assumes that the functionality needed to send out the email reminder has been written as a Java class. This makes the example compact but, in reality, you may choose to use Alfresco's JavaScript API instead. It's also worth pointing out the expression used for the timer's due date: "2 business days." jBPM expects the format of the due date to be [<basedate> +/-] <duration> where the optional basedate can be any expression that resolves to a Date or Calendar object and duration has the form <quantity> [business] <unit> where quantity is a number and unit can be one of second(s), minute(s), hour(s), day(s), week(s), month(s), or year(s). If no base date is provided, then the time starts from the moment the timer is created (when the internal review task starts, in this case). The optional word "business" in the duration causes only business hours to be used when calculating the trigger time.
The final concepts in this overview of jBPM are those of super-states and sub-processes. These are fairly advanced concepts. Though it may well be that you'll never feel the need to use them, it's worth mentioning them for the sake of completeness.
A super-state is used to group a set of nodes together, introducing a hierarchical structure to the process definition. A common usage is to separate the process definition into phases where each phase is composed of more than one task or state. In the example already presented in this section, you may choose to introduce a review phase that encompasses all the nodes that relate to reviewing the document. This is also a good opportunity to take a look at the process definition with all the changes so far:
<?xml version="1.0" encoding="UTF-8"?>
<process-definition name="document-review">

  <swimlane name="reviewer">
    <assignment actor-id="brian" />
  </swimlane>
<start-state>
<transition to="review" />
</start-state>
<super-state name="review">
<fork name="review fork">
<transition name="internal" to="internal review" />
<transition name="external" to="external review" />
</fork>
<task-node name="internal review">
<task name="review task" swimlane="reviewer">
<timer name="internal review timer" duedate="2 business days" repeat="yes">
<action class="com.example.jbpm.SendReviewReminder" />
</timer>
</task>
<transition to="review join" />
</task-node>
<state name="external review">
<event type="node-enter">
<action class="com.example.jbpm.EmailDocToReviewer" />
</event>
<transition to="review join" />
</state>
<join name="review join">
<transition to="../review decision" />
</join>
</super-state>
<decision name="review decision">
<transition to="rework"
condition="#{!internalReviewSuccessful || !externalReviewSuccessful}" />
<transition to="end" />
</decision>
<task-node name="rework">
<task name="rework task">
<assignment actor-id="colin" />
</task>
<transition to="review fork" />
</task-node>
<end-state name="end" />
</process-definition>You have now wrapped the fork, internal review, external review, and join in a super-state named "review." The start state now transitions directly to the new super-state, which causes jBPM to start executing the first node in the super-state (the fork). An alternative to this would have been to transition explicitly to the fork by changing the transition from the start state to be review/review fork. The process definition later emerges from the super-state when transitioning out of "review join." Note the way that this is done: specifying the target node with ../review decision. This is interpreted by jBPM as "transition to the node named 'review decision' that is one level up the state hierarchy."
jBPM allows one process to "spawn" another process with the concept of sub-processes. If, for example, you have a mini-process that is used in the context of a number of other different processes, then this way of composing process definitions may be useful to you. Inserting a node of type "process-state" into your process definition causes jBPM to execute a new instance of the specified process definition when a process reaches that node. In the example, you may want to define a sub-process named "process-document" that is executed before the review occurs. Perhaps this extracts metadata from the document, auto-classifies it, and generates a new rendition of it.
To include this sub-process in the process definition, insert a "process-state" node and adjust the start state so that it transitions to this new node:
<process-definition name="document-review">
  ...
  <start-state>
    <transition to="process" />
  </start-state>

  <process-state name="process">
    <sub-process name="process-document" />
    <transition to="review" />
  </process-state>
  ...
</process-definition>
That's all there is to it. It's also possible to pass variables from the parent process into the sub-process, optionally allowing the sub-process to modify their values such that the new values are returned to the parent process.
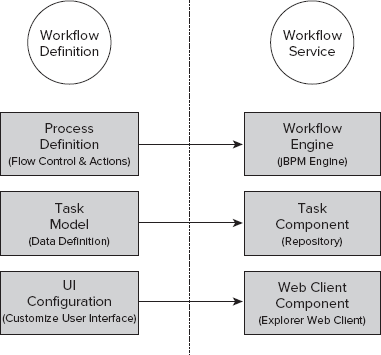
To add a new workflow to Alfresco, you must create and deploy a workflow definition. Figure 7-3 shows how the various components of a workflow definition interact with components in the workflow service.
A workflow definition comprises a process definition, a task model, and some user interface configuration. All three of these components are necessary to build a workflow.
Process definition: Specifies the workflow process, defining what human tasks and automated processes to execute, and flow control.
Task model: Provides a description of each task in a workflow by defining the various attributes associated with that task. A UI component can use this description to automatically generate a user interface suitable for displaying task information, as well as to initialize a newly created task instance.
UI configuration: Allows for customization of the UI component that is used for presenting workflow-related information to the user and taking inputs from the user. The Alfresco Explorer Web client allows customization of the property sheets used to display task information. It also uses resource bundles to customize the text that displays. In particular, resource bundles allow the customization of the language used to display information about a workflow or task.
The following sections describe how to create and deploy a workflow definition. This includes
Creating the process definition
Creating the task model
Customizing the behavior
Configuring the user interface (Explorer Web client)
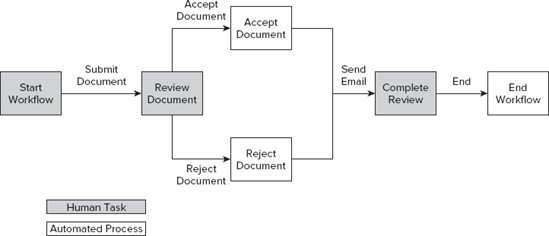
Throughout the chapter, the simple Review and Approve process workflow example shown in Figure 7-4 will be used to illustrate how to create and deploy a workflow.
The key steps in this classic workflow are:
The initiator submits a document and assigns it to a Reviewer in Start Workflow.
The reviewer reviews the document and either approves or rejects it in Review Document.
The initiator is informed of the outcome of the review through an email, which is sent when the workflow reaches Complete Review.
The initiator completes the review process in Complete Review, ending the workflow.
Since Alfresco uses jBPM as its underlying workflow implementation, process definitions must be specified using the jBPM domain-specific language, jPDL.
Note
Although not used in creating this process definition, you can also use the JBoss jBPM Process Designer, which is a graphical tool for developing jPDL process definitions. For full details on defining process definitions using jPDL, see the jBPM jPDL User Guide at http://docs.jboss.com/jbpm/v3.3/userguide/.
The following jPDL process definition describes the Review and Approve workflow example. For now, only an outline or skeleton definition is provided. This definition does not assign the various roles (swimlanes) to users nor does it define any automated behavior, such as sending emails. These elements will be added in the next section.
<?xml version="1.0" encoding="UTF-8"?>

<process-definition xmlns="urn:jbpm.org:jpdl-3.1" name="wf:myReviewAndApprove">

   <swimlane name="initiator" />

   <swimlane name="reviewer" />

   <start-state name="start">
      <task name="wf:mySubmitReviewTask" swimlane="initiator" />
      <transition name="" to="review" />
   </start-state>
<task-node name="review">
<task name="wf:myReviewTask" swimlane="reviewer" />
<transition name="approve" to="approve" />
<transition name="reject" to="reject" />
</task-node>
<node name="approve">
<transition to="completed" />
</node>
<node name="reject">
<transition to="completed" />
</node>
<task-node name="completed">
<task name="wf:myCompleteReviewTask" swimlane="initiator" />
<transition name="" to="end" />
</task-node>
<end-state name="end" />
</process-definition>Code snippet my_outline_review_and_approve_processdefinition.xml
This code snippet is a structured outline for building the example workflow illustrated in Figure 7-4. It defines a process definition with the name wf:myReviewAndApprove. Two <swimlane> tags define the major roles in the workflow: the Initiator and the Reviewer. The <node>, <task-node>, <start-state>, and <end-state> tags define the different states depicted in Figure 7-4. The connection between states is defined by the various <transition> tags.
Note that some of the states include <task> tags. These are states that require human interaction and the <task> tags represent the human actions to be performed. The name attributes on these <task> tags and the <process-definition> tag are used as keys to reference the task and process definition components within Alfresco. This is described in more detail in "The Task Model" section.
To use the process definition, you must first deploy it into jBPM. This can be done either when the Alfresco server starts up (through configuration) or through hot deployment to a running Alfresco server.
The Alfresco server can automatically deploy the workflow on startup when configured to do so. To configure Alfresco to deploy a custom workflow definition, you must include a Spring bean in the Spring configuration to extend workflowDeployer. Consider the following example:
<?xml version="1.0" encoding="UTF-8"?>
<!DOCTYPE beans PUBLIC
'-//SPRING//DTD BEAN//EN' 'http://www.springframework.org/dtd/spring-beans.dtd'>

<beans>

   <bean id="myworkflows.workflowBootstrap" parent="workflowDeployer">
      <property name="workflowDefinitions">
         <list>
            <props>
               <prop key="engineId">jbpm</prop>
               <prop key="location">
alfresco/extension/workflow/my_outline_review_and_approve_processdefinition.xml
               </prop>
               <prop key="mimetype">text/xml</prop>
               <prop key="redeploy">true</prop>
            </props>
         </list>
      </property>
   </bean>
</beans>
Code snippet myWorkflowBootstrap-outline-context.xml
The Spring XML configuration file must be placed in the folder installLocationtomcatsharedclassesalfrescoextension and its name must end with -context.xml (such as myWorkflowBootstrap-context.xml). This allows Alfresco to automatically load this configuration when the server starts.
Each process definition to be deployed must include one <props> element and the following specified properties:
engineId — ID for the workflow engine being used. This will normally be jbpm.
Location — Classpath location of the process definition jPDL file. The standard extension mechanism places this file in the following location. installLocation omcatsharedclassesalfrescoextensionworkflow[my_review_and_approve_processdefinition.xml].
MIME type — Type of the process definition file (for example, a jPDL XML file is text/xml); a process archive file is application/zip.
Redeploy — Boolean value that determines whether the process definition is redeployed on server startup, resulting in a new version being created. When developing new definitions, set this value to true to see modifications on the server. In a production environment, set this value to false.
Using the workflow console, you can deploy a process definition directly onto a running Alfresco server. You do not need to restart the server.
With Administrator credentials, you can access the workflow console through the Explorer Web client at the following URL:
http://localhost:8080/alfresco/faces/jsp/admin/workflow-console.jsp |
On the workflow console, type the following command to deploy a process definition:
deploy <process definition file class path location>
In the Review and Approve example, the process definition file location is installLocationsharedclassesalfrescoworkflowmy_outline_review_and_approve_processdefinition.xml, so the command is:
deploy alfresco/extension/workflow/review_processdefinition.xml
After deploying a process definition either through configuration or using hot deployment, check that the process definition has been successfully deployed to the Alfresco server. To do so, perform the following steps:
Start the Alfresco server.
Connect to the Explorer Web client (on a typical installation, the URL will be
http://localhost:8080/alfresco) and log in.Browse to some content (you may have to add content if none exists).
Click the down arrow next to the content and select Start Advanced Workflow.
You should now see the Start Advanced Workflow Wizard listing all available workflows. If you have successfully deployed your process definition, it will be included in this list. For example, if you have just deployed the example process definition you should see three workflow options (as shown in Figure 7-5).
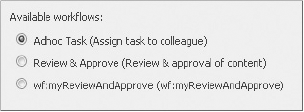
Note that in addition to the example workflow wf:myReviewAndApprove, there is a workflow called Review & Approve. This is Alfresco's built-in workflow for reviewing content and should not be confused with the example. Do not start the workflow at this point, as the workflow is only partially defined and will cause errors.
Try deploying the example process definition now. Use the Spring configuration method to deploy the outline process definition. Call the process definition my_review_and_approve_processdefinition.xml. Then check that the process definition was deployed successfully.
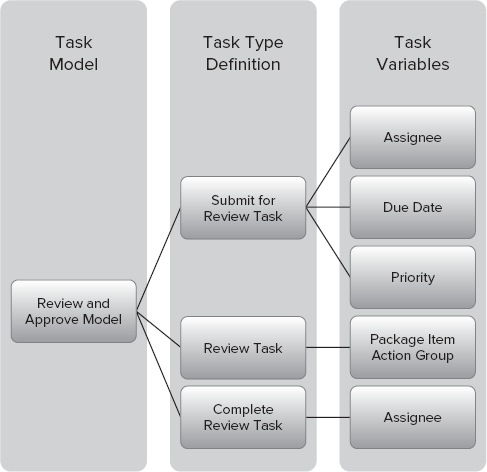
A task model specifies task definitions and associates them with <task> elements defined in process definitions. A task definition describes which attributes (task variables) are associated with a given task. The Explorer Web client uses these task definitions to generate property forms, allowing you to view or edit the task attributes. Figure 7-6 demonstrates the relationship between a task model, its task definitions, and their task variables using the Review and Approve workflow tasks.
The task definition also controls access to the workflow package, a special repository space created when a workflow starts that contains all the content associated with that workflow. The task definition specifies how the task assignee can access the package and the items stored within it.
This section describes how to create a task model and associate task definitions with tasks in a process definition. It also describes the common task model, which defines the base types and aspects used in workflows, including the types upon which all task definitions are based.
A task model is simply a content model and each task definition is a type definition. All the features available in content modeling are also available in task modeling, including property data types, constraints, and default values. For more information on Content Modeling, refer to Chapter 5. If there is commonality across the tasks, you can use subtyping or aspects to encapsulate the shared features. The different attributes of a task are modeled as properties and associations on the task definition.
The task model is defined just like any other content model, using XML. As well as importing the dictionary model, the task model imports the common task model (uri = "http://www.alfresco.org/model/bpm/1.0") containing several useful predefined types and aspects that may be inherited by custom task definitions.
When creating custom task definitions, you must ensure the name of the <type> element for the task definition exactly matches the name of the task specified in the process definition. This is because Alfresco uses these names to link the task definition to the relevant task in the process definition. It is also important to ensure the custom task definition extends either bpm:workflowTask or bpm:startTask. The following code shows the task model for the Review and Approve process workflow example that you have been exploring throughout this chapter.
<?xml version="1.0" encoding="UTF-8"?>

<model name="wf:myReviewAndApproveModel"
xmlns="http://www.alfresco.org/model/dictionary/1.0">

   <description>Example Review And Approve Task Model</description>
   <author>Alfresco</author>
   <version>1.0</version>

   <imports>
      <import uri="http://www.alfresco.org/model/dictionary/1.0" prefix="d" />
      <import uri="http://www.alfresco.org/model/bpm/1.0" prefix="bpm" />
      <import uri="http://www.alfresco.org/model/workflow/1.0" prefix="wf" />
   </imports>

   <types>

      <type name="wf:mySubmitReviewTask">
         <parent>bpm:startTask</parent>
         <mandatory-aspects>
            <aspect>bpm:assignee</aspect>
         </mandatory-aspects>
      </type>

      <type name="wf:myReviewTask">
         <parent>bpm:workflowTask</parent>
         <overrides>
            <property name="bpm:packageItemActionGroup">
               <default>edit_package_item_actions</default>
            </property>
         </overrides>
      </type>

      <type name="wf:myCompleteReviewTask">
         <parent>bpm:workflowTask</parent>
         <mandatory-aspects>
            <aspect>bpm:assignee</aspect>
         </mandatory-aspects>
      </type>

   </types>

</model>
Code snippet myReviewAndApproveModel.xml
Store this example code snippet in installLocation omcatsharedclassesalfrescoextensionworkflow.
The key elements to note in the previous code snippet are the three <type> tags that define task types. The first of these, wf:mySubmitReviewTask, defines the task responsible for starting the workflow, assigning a reviewer, and submitting a document for review. The next type, wf:myReviewTask, defines the task for reviewing the document and deciding to accept or reject it. The final type, wf:myCompleteTask, defines the task that informs the initiator of the outcome of the review and then ends the review workflow.
The common task model is a pre-registered content model that defines the base types and aspects used in workflows. The model is located under WEB-INFclassesalfrescomodel in the file bpmModel.xml.
The two most important types defined in this model are the base workflow task definition (bpm:workflowTask) and the base start task definition (bpm:startTask). All other task definitions must extend one of these types. Furthermore, if no type definition is specified for a task, it is automatically assigned to one of these types. The common task model also defines several aspects that are useful in assigning roles to people or groups.
All task definitions extend the base workflow task definition (bpm:workflowTask). The base workflow task definition has several attributes that are inherited by all other task definitions, as follows:
Table 7.1. Base Task Attributes
NAME | TYPE | MANDATORY | DESCRIPTION |
|---|---|---|---|
bpm:taskId | d:long | Yes | The task identifier |
bpm:description | d:text | No | The task description |
bpm:startDate | d:date | No | The date the task started |
bpm:completionDate | d:date | No | The date the task was completed |
bpm:dueDate | d:date | No | The date the task was due to be completed |
bpm:status | d:text | Yes | Task status (default is "Not Yet Started") |
bpm:priority | d:int | Yes | Task priority (defaults to 2) |
bpm:percentComplete | d:int | Yes | Measure of task completion as a percentage |
bpm:comment | d:text | No | Notes on the task |
bpm:pooledActors | sys.base | No | A list of users who may be assigned to this task |
cm:owner | d:text | No | The task owner (assignee) |
bpm:context | d:noderef | No | The folder or content on which the workflow was started |
bpm:outcome | d:text | No | The outcome of the task (transition ID) |
bpm:completedItems | d:noderef | No | A set of the completed items in the package |
bpm:packageActionGroup | d:text | No | Allowed actions to perform on package |
bpm:packageItemActionGroup | d:text | No | Allowed actions to perform on items within the package |
bpm:package | bpm:workflowPackage | Yes | A container holding content involved in the workflow |
The start task is defined within the <start-state> of a process definition. All start task definitions must inherit from the base start task (bpm:startTask), which in turn inherits from the base workflow task definition. In addition to the attributes inherited from the base workflow task definition, all start task definitions also inherit the following attributes:
Table 7.2. Start Task Attributes
NAME | TYPE | MANDATORY | DESCRIPTION |
|---|---|---|---|
bpm:workflowDescription | d:text | No | A description of the workflow |
bpm:workflowDueDate | d:date | No | The date the workflow is due to be completed |
bpm:workflowPriority | d:int | No | The priority of the workflow (defaults to 2) |
The start task is often used to collect the initializing parameters needed to start a workflow. For instance, the review workflow example uses the start task to specify who will review the article. The start task is automatically assigned to the initiator of the workflow when that workflow starts.
Tasks are frequently used as a way of assigning workflow roles (for example, swimlanes) to participants (people or groups). This is most commonly done through the start task, but such assignments can be made at any point in a workflow. To facilitate these assignments, a set of predefined aspects is provided:
Table 7.3. Assignment Aspects
ASPECT | TYPE OF PARTICIPANT |
|---|---|
bpm:assignee | A single person |
bpm:assignees | One or more people |
bpm:groupAssignee | A single group |
bpm:groupAssignees | One or more groups |
Applying any of these aspects to a task definition as a mandatory aspect automatically adds a component to the task property form on the Explorer Web client. This enables the initiator to easily assign workflow roles to people or groups. Looking at the start task definition for the Review and Approve workflow example, notice that it expects an assignment of a single person to a role (the reviewer in this case).
<type name="wf:mySubmitReviewTask">
         <parent>bpm:startTask</parent>
         <mandatory-aspects>
            <aspect>bpm:assignee</aspect>
         </mandatory-aspects>
</type>Many of the attributes defined in the base workflow task definition relate to a package. A package is a space within the Alfresco repository dedicated to storing content associated with the workflow instance. Not only does the task have a reference to the package; it also has properties that define access rights to the package for that task through the package action group property (bpm: packageActionGroup) and the package item action group property (bpm: packageItemActionGroup).
The Explorer Web client uses action groups to specify access rights to the package and its contents. Several out-of-the-box action groups are defined in the web-client-config-workflow-actions.xml file in WEB-INFclassesalfresco/. These are:
read_package_item_actions
edit_package_item_actions
remove_package_item_actions
edit_and_remove_package_item_actions
add_package_item_actions
start_package_item_actions
Setting the default value of the package item action group to one of these action groups (or a custom action group) alters what actions the Explorer Web client makes available to the user during that task. If the default value is explicitly set to be empty, then no actions are possible.
The base workflow task definition specifies an empty default for the package action group and specifies read_package_item_actions as the default for the package item action group. These defaults are inherited by custom workflow task definitions unless they explicitly override these properties. The base start task overrides these properties, having add_package_item_actions as the default package item action group and start_package_item_actions as the default package action group.
Referring back to the example task model, you can see that the review task definition overrides the package item action groups default and sets it to edit_package_item_actions so that the reviewer can edit the article during the review process.
<type name="wf:myReviewTask">
         <parent>bpm:workflowTask</parent>
         <overrides>
            <property name="bpm:packageItemActionGroup">
               <default>edit_package_item_actions</default>
            </property>
         </overrides>
</type>You can access all the attributes specified on a task definition from within the process definition. The majority of these attributes are exposed as task variables. However, a colon (:) is not a legal character in task variable names. Instead, the namespace prefix is followed by an underscore(_). Thus, the task definition attribute bpm:assignee would be available as the task variable bpm_assignee.
A number of attributes on the base workflow task do not relate to task variables, but instead relate to specific properties on the jBPM task instance object. These are described as follows:
Table 7.4. Special Task Attribute Mappings
TASK ATTRIBUTE | jBPM PROPERTY |
|---|---|
bpm:taskId |
|
bpm:description |
|
bpm:startDate |
|
bpm:dueDate |
|
bpm:completionDate |
|
bpm:priority |
|
bpm:comment |
|
cm:created |
|
cm:owner |
|
As with the process definition, you must deploy the task model onto the Alfresco server before you can use it. To do so, modify the same (or similar) Spring bean used to deploy the process definition (remember that the bean must extend workflowDeployer). Add a new <property> element with the name models as shown in the following code snippet. Inside this element, add a <list> element containing one or more <value> elements. Each of these values should specify the location of a task model file. If correctly configured, the task model will automatically deploy when the Alfresco server starts.
<bean id="myworkflows.workflowBootstrap" parent="workflowDeployer">
   <property name="workflowDefinitions">
      ...
   </property>
   <property name="models">
      <list>
         <!-- Task Model associated with above process definition -->
         <value>alfresco/extension/workflow/myReviewAndApproveModel.xml
         </value>
      </list>
   </property>
</bean>
Deploy the task model file myReviewAndApprove.xml now by adding the models property to your workflowDeployer Spring bean. Once the task model has been deployed, check that the Alfresco server starts and that the workflow is still in the list of available workflows on the Start Advanced Workflow Wizard. At this stage, the workflow definition is still only partially defined, so do not start the workflow.
While the process definition defines the flow of a process, it can also define custom behavior for a process. This might include adding business logic to control the flow of the process, executing some external action (such as sending an email), or assigning a task to a specific user. The jPDL language provides a variety of extension points for implementing custom behavior, including support of BeanShell scripts, ActionHandlers, and AssignmentHandlers. For full details on how to use these extension points, refer to the jBPM jPDL User Guide at http://docs.jboss.com/jbpm/v3.3/userguide/.
Alfresco makes use of these extension points to implement its own AssignmentHandler and several useful ActionHandlers. Using the Review and Approve example to illustrate how these components are used, the initiator must assign a reviewer to review the document. Also, once the review task is complete, an email is automatically sent to the initiator informing him of the outcome of the review. The Review and Approve process definition has been modified to implement this behavior. The updated listing is shown in the following code snippet. The main differences to note are the addition of assignments, events, actions, scripts, and variables. These components will be explained in detail in the following sections.
Deploy the updated process definition now. To do so, delete the old my_review_and_approve_processdefinition.xml file and replace it with the updated listing that follows. Remember that the redeploy property specified on the workflowDeployer Spring bean must be set to true for the new process definition to be deployed. If you deployed the first process definition using hot deployment you will need to either redeploy using the workflow console using the "deploy" command or add your process definition to the workflowDeployer Spring bean.
<?xml version="1.0" encoding="UTF-8"?>
<process-definition xmlns="urn:jbpm.org:jpdl-3.1" name="wf:myReviewAndApprove">

   <swimlane name="initiator" />

   <swimlane name="reviewer">
      <assignment class="org.alfresco.repo.workflow.jbpm.AlfrescoAssignment">
         <actor>#{bpm_assignee}</actor>
      </assignment>
   </swimlane>

   <start-state name="start">
      <task name="wf:mySubmitReviewTask" swimlane="initiator" />
      <transition name="" to="review" />
   </start-state>

   <task-node name="review">
      <task name="wf:myReviewTask" swimlane="reviewer" />
      <transition name="approve" to="approve" />
      <transition name="reject" to="reject" />
   </task-node>

   <node name="approve">
      <event type="node-enter">
         <script>
            <variable name="reviewResult" access="write" />
            <expression>
               reviewResult = "approved";
            </expression>
         </script>
      </event>
      <transition to="completed" />
   </node>

   <node name="reject">
      <event type="node-enter">
         <script>
            <variable name="reviewResult" access="write" />
            <expression>
               reviewResult = "rejected";
            </expression>
         </script>
      </event>
      <transition to="completed" />
   </node>

   <task-node name="completed">
      <event type="node-enter">
         <action class="org.alfresco.repo.workflow.jbpm.AlfrescoJavaScript">
            <script>
var mail = actions.create("mail");
mail.parameters.to =
initiator.properties["cm:email"];
mail.parameters.subject =
"Review Task " + bpm_workflowDescription;
mail.parameters.from
=bpm_assignee.properties["cm:email"];
mail.parameters.text=
"The article has been " + reviewResult + ".";
mail.execute(bpm_package);
</script>
</action>
</event>
<task name="wf:myCompleteReviewTask" swimlane="initiator" />
<transition name="" to="end" />
</task-node>
<end-state name="end" />
</process-definition>Code snippet my_review_and_approve_processdefinition.xml
The jBPM engine keeps track of data associated with a workflow instance as process variables. Process variables are represented as name-value pairs and persisted as part of the process state. jBPM and Alfresco automatically create several process variables, but you can also define your own variables.
By default, these variables effectively have global scope. It is possible, however, to scope a variable to a specific token, making it accessible by only that token. Tokens are how jBPM keeps track of the execution state of an active workflow instance. Every workflow starts with a single root token; however, more child tokens are spawned every time the process forks. When the process reaches a join, these child tokens are merged back into their parent token.
Many process variables have a data type defined by an Alfresco content model. For some of the simpler types this can be directly translated into a BeanShell type (for example, d:text can be represented as a string). Types that are more complex are represented using the ScriptNode class, described in Online Appendix D.
Alfresco provides several out-of-the-box process variables that are always available, as follows:
Table 7.5. Default Process Variables
VARIABLE NAME | TYPE | DESCRIPTION |
|---|---|---|
initiator | cm:person Node | The person who initiated the workflow instance |
Initiatorhome | cm:space Node | The home folder of the initiator |
Companyhome | cm:space Node | The company home folder |
Cancelled | Boolean | Indicates whether or not the workflow has been cancelled |
Once the start-task is complete, several more properties become available:
Table 7.6. Start-Task Process Variables
VARIABLE NAME | TYPE | DESCRIPTION |
|---|---|---|
bpm_workflowDescription | String | A description of the workflow instance |
bpm_workflowDueDate | Date | The date by which the workflow should be completed |
bpm_workflowPriority | int | The priority of the workflow |
bpm_package | bpm:workflowPackage Node | A container holding all the content associated with this workflow |
bpm_context | cm:folder Node | A reference to the folder in which the workflow was initiated |
To demonstrate process variables in action, the following code snippet defines a variable reviewResult and sets it to either accepted or rejected depending on which path the process execution takes. The variable is set using BeanShell scripts.
<node name="approve">
      <event type="node-enter">
         <script>
            <variable name="reviewResult" access="write" />
            <expression>
               reviewResult = "approved";
            </expression>
         </script>
      </event>
      <transition to="completed" />
   </node>

   <node name="reject">
      <event type="node-enter">
         <script>
            <variable name="reviewResult" access="write" />
            <expression>
               reviewResult = "rejected";
            </expression>
         </script>
      </event>
      <transition to="completed" />
</node>You can assign tasks and swimlanes to a user by specifying an <assignment> element inside the task or swimlane to be assigned. In Alfresco workflows, you should use the AlfrescoAssignment class to reference users by user name from the Person service. To do this, add the following attribute and value:
class="org.alfresco.repo.workflow.jbpm.AlfrescoAssignment"
The assignment must contain an <actor> element specifying the user name of the user to be assigned. You can also assign a task or swimlane to a group of actors by simply replacing the <actor> element with a <pooledactors> element, and specifying the list of user names to be assigned.
Note
The initiator swimlane is a special case that does not require an explicit assignment. If no assignment is specified for this swimlane, it is automatically assigned to the user who initiated the workflow instance.
Continuing the review workflow example, the reviewer swimlane is now assigned using the process variable bpm_assignee. This variable is typically used to specify swimlane and task assignments and is usually set by the initiator when the workflow is started.
<swimlane name="reviewer">
<assignment class="org.alfresco.repo.workflow.jbpm.AlfrescoAssignment">
<actor>#{bpm_assignee}</actor>
</assignment>
</swimlane>
The Alfresco JavaScript action lets you embed custom JavaScript into process definitions in much the same way that you can embed BeanShell scripts. To do so, simply add an <action> element with the following attribute:
class="org.alfresco.repo.workflow.jbpm.AlfrescoJavaScript"
Inside the <action> element, include a <script> element that defines the JavaScript to execute. As with the BeanShell script definitions, this <script> element may optionally contain <variable> elements and an <expression> element if you want to limit access to process and task variables.
The Alfresco JavaScript action exposes the full power of the Alfresco JavaScript API, giving access to several useful services and helper classes. The Alfresco JavaScript action also allows you to run the script as a specific user. To do so, include a <runas> element under <action> and specify a user name as the text body of the element, as follows:
<action class="org.alfresco.repo.workflow.jbpm.AlfrescoJavaScript">
   <runas>admin</runas>
   <script> ...some script... </script>
</action>
The Review and Approve workflow example can have behavior added that will send an email to the author once an article is either approved or rejected. The text of the email is dependent upon the process variable example_reviewResult. The ActionService is used to send the email.
<action class="org.alfresco.repo.workflow.jbpm.AlfrescoJavaScript">
   <script>
      var mail = actions.create("mail");
      mail.parameters.to =
         initiator.properties["cm:email"];
      mail.parameters.subject =
"Review Task " + bpm_workflowDescription;
mail.parameters.from = bpm_assignee.properties["cm:email"];
mail.parameters.text =
"The article has been " + example_reviewResult + ".";
mail.execute(bpm_package);
</script>
</action>For some workflow scenarios, it is necessary to support a fork where the number of paths is only known at runtime, as in a parallel review process where the review task is allocated to an arbitrary number of people for review.
A ForEachFork action supports this functionality, whose behavior is similar to a for loop in Java. An array or collection is supplied to the action, creating one subtoken per element in the array or collection and assigning a different process variable to each subtoken representing one element in the array or collection. Each subtoken is then processed in parallel until it reaches a join node or the end-state. Join nodes merge the subtokens back together just as they would for a standard fork node.
The ForEachFork action takes two parameters, both specified as elements directly under the <action> element. The <foreach> parameter specifies the array or collection over which the action iterates. The <var> parameter specifies the name given to the process variable used to hold the individual elements of the array or collection. The action is specified inside a <node>.
The following code snippet demonstrates how you might use the ForEachFork action as part of a parallel review process where each member of a group, named wf_reviewGroup, reviews an article. An array containing each member of wf_reviewGroup is created using the method people.getMembers. This array is then passed to the ForEachFork action as the <foreach> parameter. A task is created for each member of the array with the reviewer variable set to that member. Finally, a join node merges all the subtokens back together once all group members have reviewed the article.
<node name="forEach"> <action class="org.alfresco.repo.workflow.jbpm.ForEachFork"> <foreach>#{people.getMembers(wf_reviewGroup)}</foreach> <var>reviewer</var> </action> <transition name="review"to="review"/> </node> <task-node name="review"> <task name="wf:reviewTask"> <assignment class="org.alfresco.repo.workflow.jbpm.AlfrescoAssignment"> <actor>#{reviewer}</actor> </assignment> </task> <transition name="reject"to="merge"/> <transition name="approve"to="merge"/> </task-node> <join name="merge"> <transition to="completed"/> </join>
The Alfresco Explorer Web client provides a customizable graphical interface that allows you to view and edit the tasks assigned to you. The primary component of this interface is a task property page that displays your task properties and associations and allows you to edit some of them. Customization of the Explorer Web client is achieved through resource bundles and property sheet configuration as described in the following sections.
Resource bundles allow customization of text on the user interface without the need to alter the underlying models, such as the process definition and task model. They are particularly useful for rendering user interfaces in different languages dependent on the locale of the user. A resource bundle is simply a set of name-value pairs where the name is a logical key representing some UI component and the value is the actual label to display.
Alfresco uses standard Java resource bundles to support localization of the workflow user interface. Alfresco supports title and description definitions for all types defined within the task model, as well as four types associated with workflows. These are described in the following sections.
Since the task model is simply a content model, you can specify all the types and properties defined in the task model using the standard Data Dictionary localization keys. The task model itself has the following keys:
<model prefix>_<model name>.title
<model prefix>_<workflow name>.description
<model prefix> refers to the prefix used in the task model name and <model name> is the local name used in the task model name. For example, the review workflow example uses the following task model keys:
wf_myReviewAndApproveModel.title
wf_myReviewAndApproveModel.description
The various elements defined in the task model can also be linked to a resource bundle. These include task types, properties, associations, and aspects. To specify a key for an element within a task model, use the following format:
<model prefix>_<model name>.{<element>.<element prefix>_<element name>}.title
<model prefix>_<model name>.{<element>.<element prefix>_<element name>}.description
Here, <element> refers to the type of element being specified (for example, type, aspect, property, and so on). <element prefix> and <element name> refer to the prefix and local name of the element name. Note that the section in curly braces ({}) can be repeated multiple times to reference elements several layers deep (for example, elements that are not immediate children of the <model> element). A simple example would be the task definition for submitReviewTask:
wf_myReviewAndApproveModel.type.wf_mySubmitReviewTask.title
wf_myReviewAndApproveModel.type.wf_mySubmitReviewTask.description
A more complex example defining the bpm:status property on submitReviewTask would be:
example_reviewModel.type.example_submitReviewTask.property.bpm_status.title
example_reviewModel.type.example_submitReviewTask.property.bpm_status.description
The workflow definition can have a title and a description associated with it. The key for each of these follows the format:
<prefix>_<workflow name>.workflow.title
<prefix>_<workflow name>.workflow.description
<prefix> refers to the prefix used in the process definition name and <workflow name> is the local name used in the process definition name. For example, the review workflow example uses the following keys:
wf_myReviewAndApprove.workflow.title
wf_myReviewAndApprove.workflow.description
Each workflow node can have an associated title and description. The key format is:
<prefix>_<workflow name>.node.<node name>.title
<prefix>_<workflow name>.node.<node name>.description
<node name> refers to the name of the node being described. For example, the keys for the start-state node (called "start") of the review workflow example are:
wf_myReviewAndApprove.node.start.title
wf_myReviewAndApprove.node.start.description
Each workflow transition can have a title and a description. The keys are defined with the following format:
<prefix>_<workflow name>.node.<node name>.transition.<transition name>.title
<prefix>_<workflow name>.node.<node name>.transition.<transition name>.description
<transition name> is the name of the <transition> element in the specified node. The "approve" transition of the "review" node would have the keys:
wf_myReviewAndApprove.node.review.transition.approve.title
wf_myReviewAndApprove.node.review.transition.approve.description
Each task in a workflow can have a title and a description. The keys are defined as follows:
<workflow prefix>_<workflow name>.task.<task prefix>_<task name>.title
<workflow prefix>_<workflow name>.task.<task prefix>_<task name>.description
Here, <workflow prefix> and <workflow name> refer to the process definition name, while <task prefix> and <task name> refer to the task name. The keys for submitReviewTask in the example are:
wf_myReviewAndApprove.task.wf_myCompletedTask.title
wf_myReviewAndApprove.task.wf_myCompletedTask.description
Resource Bundle Example
The following shows the full listing of review-messages.properties, a resource bundle for the review workflow example. Resource bundles are stored in installLocation omcatsharedclassesalfrescomessages.
# Review & Approve Workflow
wf_myReviewAndApprove.workflow.title = My Review & Approve
wf_myReviewAndApprove.workflow.description = Review & approval of an article

# Review & Approve Task Definitions
wf_myReviewAndApproveModel.title = My Review And Approve Model
wf_myReviewAndApproveModel.description =
Model for Review And Approve workflow.
wf_myReviewAndApproveModel.type.wf_mySubmitReviewTask.title =
Submit Article
wf_myReviewAndApproveModel.type.wf_mySubmitReviewTask.description =
Submit article for review.
wf_myReviewAndApproveModel.type.wf_myReviewTask.title = Review Article
wf_myReviewAndApproveModel.type.wf_myReviewTask.description =
Review article and Approve or Reject it.
wf_myReviewAndApproveModel.type.wf_myCompleteReviewTask.title = Review Completed
wf_myReviewAndApproveModel.type.wf_myCompleteReviewTask.description =
The review process is complete.

# Review & Approve Process Definitions
wf_myReviewAndApprove.node.start.title = Start
wf_myReviewAndApprove.node.start.description = Start
wf_myReviewAndApprove.node.review.title=Review
wf_myReviewAndApprove.node.review.description=Review
wf_myReviewAndApprove.node.review.transition.reject.title=Reject
wf_myReviewAndApprove.node.review.transition.reject.description=Reject
wf_myReviewAndApprove.node.review.transition.approve.title=Approve
wf_myReviewAndApprove.node.review.transition.approve.description=Approve
wf_myReviewAndApprove.node.rejected.title=Rejected
wf_myReviewAndApprove.node.rejected.description=Rejected
wf_myReviewAndApprove.node.approved.title=Approved
wf_myReviewAndApprove.node.approved.description=Approved
wf_myReviewAndApprove.node.completed.title=Completed
wf_myReviewAndApprove.node.completed.description=Completed
wf_myReviewAndApprove.task.wf_myCompletedTask.title=Completed
wf_myReviewAndApprove.task.wf_myCompletedTask.description=Completed
wf_myReviewAndApprove.node.end.title=End
wf_myReviewAndApprove.node.end.description=End
Code snippet my_review_and_approve_messages.properties
Store this example code snippet in installLocation omcatsharedclassesalfrescoextension.
A workflowDeployer Spring bean is used to deploy the resource bundles, just as it is used to deploy the process definition and task model. A labels property must be added to the workflowDeployer bean. This property element contains a <list> of <value> elements specifying the location of the resource bundle file on the classpath, as shown in the following code snippet. Note that the file location specified omits the .properties suffix from the resource bundle file name. For example, the following code snippet specifies the path to the file my_review_and_approve_messages.properties. If configured correctly the resource bundle is deployed into the Alfresco server.
<bean id="myworkflows.workflowBootstrap" parent="workflowDeployer">
   <property name="workflowDefinitions">
      ...
   </property>
   <property name="models">
      ...
   </property>
   <property name="labels">
      <list>
         <!-- Resource Bundle associated with above process definition -->
         <value>alfresco/messages/my_review_and_approve_messages</value>
      </list>
   </property>
</bean>
Code snippet myWorkflowBootstrap-final-context.xml
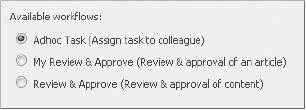
Now try deploying the resource bundle my_review_and_approve_messages.properties by adding a labels property to the workflowDeployer Spring bean. Once deployed, start the Alfresco server and navigate to the Start Advanced Workflow Wizard. If you deployed the resource bundle correctly, the name and description of the workflow will match the text in the bundle. The wizard will appear as in Figure 7-7.
The Explorer Web client can auto-generate a task property page from the metadata defined in the task definition; however, you will normally want to customize this page. To do so, specify a Web client configuration in the file web-client-config-custom.xml in the folder installLocationtomcatsharedclassesalfrescoextension. The following code snippet shows how to configure the tasks in the Review and Approve workflow example.
<config evaluator="node-type" condition="wf:mySubmitReviewTask" replace="true">
   <property-sheet>
      <separator name="sep1" display-label-id="general"
         component-generator="HeaderSeparatorGenerator" />
      <show-property name="bpm:workflowDescription"
         component-generator="TextAreaGenerator" />
      <show-property name="bpm:workflowPriority" />
      <show-property name="bpm:workflowDueDate" />
      <separator name="sep2" display-label-id="users_and_roles"
         component-generator="HeaderSeparatorGenerator" />
      <show-association name="bpm:assignee" />
</property-sheet>
</config>
<config evaluator="node-type" condition="wf:myReviewTask" replace="true">
<property-sheet>
<separator name="sep1" display-label-id="general"
component-generator="HeaderSeparatorGenerator" />
<show-property name="bpm:taskId" />
<show-property name="bpm:description"
component-generator="TextAreaGenerator" read-only="true" />
<show-property name="bpm:dueDate" read-only="true" />
<show-property name="bpm:priority" read-only="true" />
<show-property name="bpm:status" />
</property-sheet></config>Code snippet web-client-config-custom.xml
Note
Add this code snippet to the web-client-config-custom.xml file in the installLocation omcatalfrescoextension folder directly under the root <alfresco-config> element.
Each task property sheet has a defined <config> element under the root <alfresco-config> element. The evaluator and condition attributes link <config> to a specific task. The evaluator must be set to node-type and the condition to the task name (including prefix). <config> should also specify a replace attribute set to true.
Each <config> element contains a <property-sheet> element. This element contains configuration for all the components to be displayed in the task property sheet. The order in which these components are listed in the configuration file determines the order in which they will appear on the screen in the task property sheet (seen in Figure 7-8).
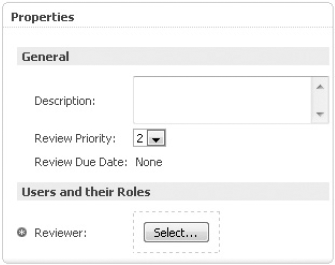
Figure 7-8 shows the property sheet for the task wf:mySubmitReviewTask. Notice that inside the <property-sheet> element there are six elements that match up to the six components on the task property sheet user interface.
The <separator> element is used for adding labels or whitespace to the property sheet. In this case, the separator was used to add two headings. You can set the text in a separator using the display-label-id attribute, while the component-generator attribute determines what kind of separator component is created.
The <show-property> element is used to display attributes on the task definition. The name attribute should match the name of the attribute to be displayed. A read-only flag can be set to true to prevent users from editing the value; by default it is set to false.
The component-generator can be explicitly set to specify the type of component used to display the attribute. If no component generator is specified, the property sheet uses the type definition to deduce a sensible default component type to use. The different assignee properties (bpm:assignee, bpm:groupAssignee, and so on) all have special UI components associated with them to facilitate assigning people and groups to tasks.
Try configuring the task property sheets for the Review and Approve workflow example by adding the preceding code snippet to web-client-config-custom.xml. Once this is done, restart the Alfresco server, then go to the Start Advanced Workflow Wizard and start the My Review And Approve workflow. If the configuration was correct, the Workflow Options page of the wizard should resemble Figure 7-8. If you assign the workflow to yourself, you can then see the task in the My Alfresco dashboard in Alfresco Explorer.