Chapter 4
The MonoCross Pattern
What's In This Chapter?
- Recognizing cross-platform development challenges
- Making your code portable with Mono
- Developing for multiple platforms
- Implementing the Model-View-Controller pattern in MonoCross
- Building shared applications in MonoCross
- Developing platform containers in MonoCross
Now that you've evaluated your architectural options, designed your user experience, and set up your environment, you're ready to begin coding. But before you dive in, it is crucial to understand the problems inherent to cross-platform mobile development and the approach necessary to solve them. By reading this chapter you can achieve a greater understanding of some of the challenges developers face when attempting to write cross-platform mobile applications and explore the MonoCross open-source pattern as a solution to those challenges. You see how MonoCross enables sharing of business logic and data access code across platforms using proven enterprise software patterns, such as the Model-View-Controller (MVC) and Separated Interface patterns. Finally, you learn how MonoCross uses a shared application to define application workflow using URI-based navigation and platform containers to create sophisticated user experiences that can be deployed to multiple platforms and rendered from the shared application.
Understanding the Cross-Platform Problem
With the introduction of so many new smartphone platforms in recent years, more enterprise developers are being asked to develop mobile applications. When the application requirements dictate cross-platform support, many enterprise developers find themselves in unfamiliar territory. Before you begin developing cross-platform mobile applications, you should consider how you might handle several problems to ensure an effective solution.
Understanding Native Platform Differences
Often, the first question an enterprise developer asks is, “What mobile platform should I choose?” Most of the time, the decision is based on the developer's skills. Java developers are drawn to Android, Mac developers to iOS, and .NET developers to Windows Phone because they already possess the basic knowledge of the language and platform needed to succeed. There are new APIs and some mobile-specific concepts, but knowing the language and conventions of a particular technology can significantly shorten and flatten the mobile development learning curve.
For cross-platform development, these technology differences present a problem. Most large enterprise software organizations tend to create homogeneous development environments, which is why most enterprise developers become specialists in a single technology. “One Language, One Platform” has been the mantra of most enterprise development shops because it's easier to manage things that way. They settle on a single technology, hire developers with those technology skills, and build their applications. The organization also dictates the infrastructure needed and the devices that will be supported — but most of these decisions are made after the technology is chosen.
When Apple came along with the iPhone — and Google introduced the Android operating system — enterprises started having their technology decisions made for them. Employees started demanding that IT support their personal devices and give them apps with which to do their work. This consumerization trend has turned corporate IT on its head. The status quo is no longer sufficient. “One Language, One Platform” doesn't work anymore in the rapidly changing world of mobility. Enterprises now face problems they never had before. Supporting multiple, heterogeneous platforms has become a necessity that few organizations have the expertise to address because of the homogeneous platform strategies they followed in the past.
Acknowledging HTML 5 Limitations
Many clients today look to HTML 5 as the answer to their cross-platform mobile problems. Most of the leading mobile browsers support HTML 5, which brings incredible flexibility and power to mobile web applications. Many commercial HTML 5 frameworks, such as Sencha Touch and JQuery Mobile, are designed for mobile form factors, and the apps you can write with these frameworks are truly impressive. But there are just some things a web-based application cannot do. The HTML 5 Cache Manifest standard provides for disconnected capabilities, but it is still difficult to support offline transactions without some intelligence to manage them outside the browser. Access to the device's native features, (GPS, camera, accelerometer, file, and storage), all require interaction via native frameworks such as PhoneGap. Despite the advances in the HTML 5 user experience, it still cannot provide the same richness that the native platforms can.
HTML 5 can provide an elegant, cost-effective solution to many cross-platform problems, and to taking a long, hard look at it should be the first step in any assessment of an enterprise mobile application strategy. Most enterprises already have an army of web developers who can be retrained to develop mobile-optimized web applications. For many of them, developing mobile web applications can often provide a critical first step into the cross-platform mobile world. But as soon as the problem at hand requires disconnected transactions, access to native device functions, or a rich user experience that HTML cannot provide, developers find they must consider native options.
Taking a Hybrid Approach
As mentioned previously, HTML 5 has no specification for access to native mobile device features. These features are only available via native APIs. To access these services, an abstraction layer must be written — usually in JavaScript — that exposes the native functions to the browser. This can be done with commercial frameworks, but enterprise applications often require integration with nonstandard device functions or device peripherals, such as barcode scanners. To support this kind of device integration, developers can use a hybrid approach that integrates both web and native components. But this approach still requires knowledge of and skill with the native language and SDK of multiple platforms and peripherals, raising the same issues of language and platform support mentioned previously using a purely native approach.
In many situations, taking a hybrid approach makes sense, but changing requirements around user interaction or disconnected ability may force developers to refactor HTML and JavaScript features to run natively on the device. This kind of refactoring can be expensive and time-consuming when supporting multiple devices with disparate platform languages and APIs.
Enabling Code Portability with Mono
Fortunately for most organizations who have already made significant investments in C# and .NET, Mono provides a compelling path forward. Developers have been talking about code reuse and portability for decades, but the discussions have been largely theoretical — until now. With the release of MonoTouch and Mono for Android, a new world of possibilities has been opened.
We have been working with C# and .NET for years, and the foundation of our mobile practice has always been Windows Mobile development in CE and .NET Compact Framework. Within a few days of downloading the MonoTouch evaluation, we had ported several client projects from .NET Compact Framework into MonoTouch and actually proved the concept of code portability in a real-world application. For the first time in our careers, we saw true code reuse occurring in heterogeneous platforms — it was exciting! The theoretical discussions around layered architectures and reuse of code became real, and the benefits are apparent in this new world order.
So we began to put together a vision for cross-platform mobile development. With MonoTouch and Mono for Android, we could clearly demonstrate that the millions of dollars our clients had invested in existing applications could be brought to these new platforms, and with the application of a few proven enterprise design patterns, significant modules could be shared across them all.
.NET Developers now had a choice: They could deliver native applications in MonoTouch and Mono for Android, or they could deliver web applications using HTML 5 and ASP.NET — but a new choice was also available. From experience delivering hybrid applications with ASP.NET, a new pattern emerged. Native device integration could be achieved in HTML 5 via JavaScript interface and custom URI schemes. Developers could now build applications across the hybrid spectrum, delivering as much or as little native versus web functionality as their use-case required. Web techniques could be used where they were strongest and native techniques where they excelled. Not only had Mono enabled cross-platform development, but it also enabled cross-architecture development.
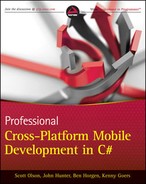
Figure 4.1 illustrates this idea by showing various technologies plotted across two dimensions: device platform and application architecture. On the native application end of the architecture spectrum, you see the native device technologies, Objective-C for iOS, Java for Android, and Silverlight for Windows Phone. These technologies are great for delivering native experiences on each platform individually, but offer no cross-platform benefits. On the web application end of the spectrum, you see HTML 5, with PhoneGap providing some access to the device. These technologies provide cross-platform benefits, but can't deliver the full benefits of a native experience. By combining HTML 5 with C#, .NET, and Mono, you can achieve cross-platform benefits across the entire application architecture spectrum. Only the code-portability of Mono makes this approach possible.
Figure 4.1 Cross-platform and cross-architecture development has been enabled with the convergence of HTML 5 with C#/.NET and Mono.
This code portability model has become the foundation upon which we built the MonoCross pattern. The core principles of code reuse not only across platforms, but also across architectures became our rallying cry. It remains our vision moving forward.
Developing for Multiple Platforms
There are many considerations when developing cross-platform mobile applications. Although Mono provides a unified language and portability of code across platforms, there are still significant architectural problems that remain to be solved.
Defining a Cross-Platform Architecture
The realization of code portability across both the platform and architecture dimensions was exciting, but there were some practical architectural problems that still needed to be solved. Most business and data access code could be ported and shared easily. This was proven in our initial experiments with MonoTouch. But the UI paradigms exposed by the various native SDKs were decidedly different. Beyond that the problem of workflow and navigation needed to be solved. How do you enable cross-architecture development when the fundamental construction of application screens varies so much between web and native implementations? Finally, a mechanism was needed to handle differences in presentation of objects in-play and successfully communicate those differences across the UI and to the shared application.
Separating the User Interface
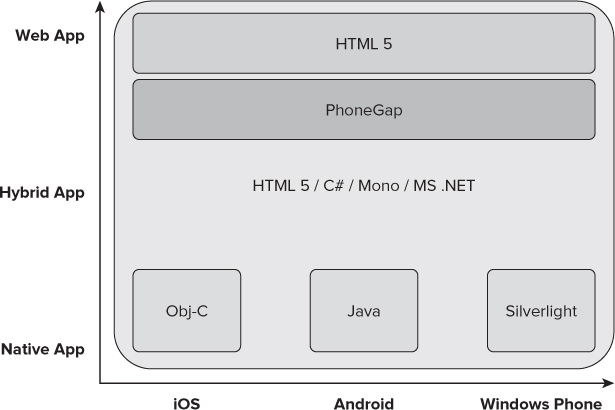
The solution to the mismatch in UI paradigms was obvious. Developers needed fully customized views in the presentation layer, while sharing as much of the other application code as possible. Figure 4.2 illustrates this concept using a layered application architecture in which your application and data layers are shared, but your presentation layer is fully customized.
Figure 4.2 By separating the user interface, you can share business logic and data access code across platforms.
This concept of separated application layers has been used successfully by enterprise developers for years. Following this approach, developers can build a platform-specific user interface and take full advantage of native device controls and capabilities. All business logic and data access code can be written once and referenced by each platform-specific user interface. New devices can be added by simply writing a new presentation layer for that platform, which is just what the separated layer pattern was designed for.
Understanding the MonoCross Solution
To accomplish this separation of business and data logic from the presentation layer we combined two tried-and-true patterns of enterprise development: Model-View-Controller (MVC) and Separated Interface.
Using the Model-View-Controller Pattern
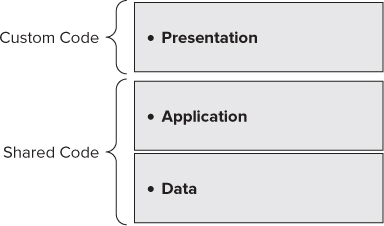
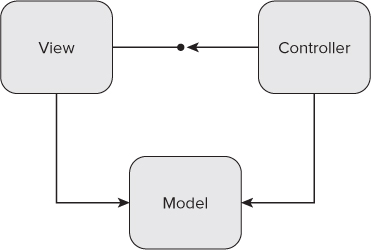
The MonoCross MVC pattern builds upon the traditional MVC pattern, shown in Figure 4.3.
Figure 4.3 The traditional Model-View-Controller pattern is straightforward.
But in the MonoCross implementation, we added a Separated Interface between the view and controller to facilitate the separation of platform-specific presentations from the cross-platform application code. This pattern is illustrated in Figure 4.4.
Figure 4.4 This version of the MonoCross Model-View-Controller pattern includes a separated interface.
This modification of the pattern decouples the platform-specific presentation views from the common code in the shared application. This enables developers to build whatever customized views are required for the platforms they intend to support without regard to how those views will be bound to the model and rendered in the application. As long as the views implement the Separated Interface definition, they will be processed by the controller and appropriately rendered. This concept is illustrated in more detail in the “Building a Platform-Specific View” section of this chapter.
Defining a Simple Model
Now that you understand the fundamental MonoCross MVC pattern, look at an example implementation, starting with the model. The model represents any business objects being acted upon in your application. For example, you may want to represent a customer in a customer management system using the code in Listing 4.1.

Listing 4.1: A simple Customer class
public class Customer
{
  public Customer()
  {
    ID = "0";
    Name = string.Empty;
    Website = string.Empty;
    PrimaryAddress = new Address();
    Addresses = new List<Address>();
    Contacts = new List<Contact>();
    Orders = new List<Order>();
  }

  public string ID { get; set; }
  public string Name { get; set; }
  public string Website { get; set; }
  public string PrimaryPhone { get; set; }
  public Address PrimaryAddress { get; set; }
  public List<Address> Addresses { get; set; }
  public List<Contact> Contacts { get; set; }
  public List<Order> Orders { get; set; }
}
Found in the CustomerManagement.Shared/Model/Customer.cs file of the download
The Customer class contains all the properties necessary to describe a customer in your application. Any methods needed to provide business or processing logic for a customer can be added as needed, but you need only a simple data representation for this example.
Creating a MonoCross Controller
Now that you've defined your model object, you need to create a controller that can load the model from your system-of-record and make any business decisions about processing of the model for presentation in your views. Controllers in a MonoCross application are inherited from the abstract MXController<T> class.
Listing 4.2 shows the IMXController interface definition, and the MXController<T> generic implementation. The controller definition contains methods and properties used by the MonoCross framework to load controllers, process model logic, and render views.
Listing 4.2: The MXController class
using System;
using System.Collections.Generic;

namespace MonoCross.Navigation
{
  public interface IMXController
  {
    Dictionary<string, string> Parameters { get; set; }
    String Uri { get; set; }
    IMXView View { get; set; }
    Type ModelType { get; }
    object GetModel();

    string Load(Dictionary<string, string> parameters);
    void RenderView();
  }

  public abstract class MXController<T> : IMXController
  {
    public string Uri { get; set; }
    public Dictionary<string, string> Parameters { get; set; }
    public T Model { get; set; }
    public Type ModelType { get { return typeof(T); } }

    public virtual IMXView View { get; set; }

    public object GetModel() { return Model; }
    public abstract string Load(Dictionary<string, string> parameters);
    public virtual void RenderView() { if (View != null) View.Render(); }
    }
}
MonoCross.Navigation/MXController.cs
![]() The MXController<T> class implements the IMXController interface, which defines the contract for a MonoCross controller. The interface consists of the properties, methods, and events necessary for the MonoCross framework to manipulate the model and trigger the rendering of platform-specific views.
The MXController<T> class implements the IMXController interface, which defines the contract for a MonoCross controller. The interface consists of the properties, methods, and events necessary for the MonoCross framework to manipulate the model and trigger the rendering of platform-specific views.
Each controller class can handle all the business and data logic for a particular model type. You can create controllers at any level of your model hierarchy, but it is a best practice to create your controllers at the level that makes the most sense for the specific needs of your application and for the use cases described by your application's workflow requirements.
The generic type you specify in your implementation will be the model type that will be acted upon by the controller. So define a controller for your Company class using the code in Listing 4.3.
Listing 4.3: The Customer controller
using System;
using System.Collections.Generic;
using System.IO;
using System.Linq;
using System.Text;
using System.Net;
using System.Xml.Serialization;

using MonoCross.Navigation;

using CustomerManagement.Shared;
using CustomerManagement.Shared.Model;

namespace CustomerManagement.Controllers
{
  public class CustomerController : MXController<Customer>
  {
    public override string Load(Dictionary<string, string> parameters)
    {
      string perspective = ViewPerspective.Default;

      string customerId = null;
      parameters.TryGetValue("CustomerId", out customerId);

      // get the action, assumes
      string action;
      if (!parameters.TryGetValue("Action", out action))  {
        // set default action if none specified
        action = "GET";
        }

      switch (action)
      {
        case "EDIT":
        case "GET":
        // populate the customer model
        if (customerId == null)
          throw new Exception("No Customer Id found");
          if (string.Equals(customerId.ToUpper(), "NEW")) {
            // assign Model a new customer for editing
            Model = new Customer();
            perspective = ViewPerspective.Update;
          } else {
            Model = GetCustomer(customerId);
            if (String.Equals(action, "EDIT"))
              perspective = ViewPerspective.Update;
            else
              perspective = ViewPerspective.Default;
            }
          break;

        case "DELETE":
          if (customerId == null)
            customerId = Model.ID;
            // post delete request to the server
            DeleteCustomer(customerId);

            // return and let redirected controller execute,
            // remaining navigation is ignored
            MXContainer.Instance.Redirect("Customers");
            return ViewPerspective.Delete;

        case "CREATE":
          // process addition of new model
          if(AddNewCustomer(Model))
            MXContainer.Instance.Redirect("Customers");
          break;

        case "UPDATE":
          if(UpdateCustomer(Model))
            MXContainer.Instance.Redirect("Customers");
          break;
      }

      return perspective;
    }

    public static Customer GetCustomer(string customerId)
    {
#if LOCAL_DATA
      return CustomerManagement.Data.XmlDataStore.GetCustomer(customerId);
#else
      string urlCustomers =
        string.Format("http://localhost/MXDemo/customers/{0}.xml", customerId);

      HttpWebRequest request = (HttpWebRequest)HttpWebRequest.Create(urlCustomers);
      XmlSerializer serializer = new XmlSerializer(typeof(Customer));
      using (StreamReader reader = new StreamReader(request.GetResponse()
                                                    .GetResponseStream(), true))
      {
        return (Customer)serializer.Deserialize(reader);
      }
#endif
    }

    public static bool UpdateCustomer(Customer customer)
    {
#if LOCAL_DATA
      CustomerManagement.Data.XmlDataStore.UpdateCustomer(customer);
#else
      string urlCustomers = "http://localhost/MXDemo/customers/customer.xml";

      HttpWebRequest request = (HttpWebRequest)HttpWebRequest.Create(urlCustomers);
      request.Method = "PUT";
      request.ContentType = "application/xml";

      using (Stream dataStream = request.GetRequestStream())
      {
        XmlSerializer serializer = new XmlSerializer(typeof(Customer));
        serializer.Serialize(dataStream, customer);
      }

      request.GetResponse();
#endif
      return true;
    }

    public static bool AddNewCustomer(Customer customer)
    {
#if LOCAL_DATA
      CustomerManagement.Data.XmlDataStore.CreateCustomer(customer);
#else
      string urlCustomers = "http://localhost/MXDemo/customers/customer.xml";

      HttpWebRequest request = (HttpWebRequest)HttpWebRequest.Create(urlCustomers);
      request.Method = "POST";
      request.ContentType = "application/xml";

      using (Stream dataStream = request.GetRequestStream())
      {
        XmlSerializer serializer = new XmlSerializer(typeof(Customer));
        serializer.Serialize(dataStream, customer);
      }

      request.GetResponse();
#endif
      return true;
    }

    public static bool DeleteCustomer(string customerId)
    {
#if LOCAL_DATA
      CustomerManagement.Data.XmlDataStore.DeleteCustomer(customerId);
#else
      string urlCustomers = "http://localhost/MXDemo/customers/" + customerId;

      HttpWebRequest request = (HttpWebRequest)HttpWebRequest.Create(urlCustomers);
      request.Method = "DELETE";
      request.GetResponse();
#endif
      return true;
    }
  }
}
CustomerManagement/CustomerManagement/Controllers/CustomerController.cs
The Load() method of the CustomerController is where you write any logic necessary to initialize and prepare your Company object for presentation. The Load() method receives a dictionary of parameters on the argument that contains any model-specific information passed in the navigation call that loads the controller. In this case, you pass the unique “Customer” identifier for the company you want to load, make a call to the data service to retrieve the company data, and then set the model property of the CustomerController to a new Company object instance.
Building a Platform-Specific View
So now that you defined your company model and created a controller to handle company initialization, you're ready to build a platform-specific view to display that customer's information to the user. As mentioned previously in this chapter, the MonoCross pattern implements a Separated Interface pattern to provide a loose-coupling of the presentation layer to the shared application code. This separation is accomplished through the IMXView interface, as shown in Listing 4.4:
Listing 4.4: The IMXView interface
public interface IMXView
{
  Type ModelType { get; }
  void SetModel(object model);

  void Render();
}
Found in the MonoCross.Navigation/MXView.cs file of the download
![]() The IMXView interface defines the implementation contract for all MonoCross views. The interface consists of the properties, methods, and events necessary for the MonoCross navigation framework to initialize the rendering of a view from a controller in the shared application.
The IMXView interface defines the implementation contract for all MonoCross views. The interface consists of the properties, methods, and events necessary for the MonoCross navigation framework to initialize the rendering of a view from a controller in the shared application.
This approach offers great flexibility in defining views across multiple mobile platforms. You can implement your views using whatever approach is required by the target platform, provided you implement the IMXView interface.
Techniques for implementing platform-specifi c views are covered in Chapter 6, “Building MonoCross Containers.”
The MonoCross MXView<T> abstract generic class provides a base implementation of the IMXView interface, as shown in Listing 4.5.
Listing 4.5: The MXView class
using System;

namespace MonoCross.Navigation
{
  public delegate void ModelEventHandler(object model);
  public interface IMXView
  {
    Type ModelType { get; }
    void SetModel(object model);

    void Render();
  }

  public abstract class MXView<T> : IMXView
  {
    public Type ModelType { get { return typeof(T); } }
    public virtual void SetModel(object model)
    {
      Model = (T)model;
    }

    public virtual void Render() { }
    public virtual T Model { get; set; }
  }
}
MonoCross.Navigation/MXView.cs
Use the MXView<T> class to create a view for your Customer model class. For simplicity in illustrating the concept, the view in Listing 4.6 has been created for the Windows Console target.
Listing 4.6: A simple Customer view
using System;
using System.Collections.Generic;
using System.Linq;
using System.Text;

using MonoCross.Navigation;
using MonoCross.Console;
using CustomerManagement.Shared.Model;

namespace CustomerManagement.Console.Views
{
  class CustomerView : MXConsoleView<Customer>
  {
    public override void Render()
    {
      System.Console.Clear();
      System.Console.WriteLine("Customer Details");
      System.Console.WriteLine();

      System.Console.WriteLine(Model.Name);
      System.Console
        .WriteLine(string
          .Format("{0} {1}",
            Model.PrimaryAddress.Street1,
            Model.PrimaryAddress.Street2));
      System.Console
        .WriteLine(string
          .Format("{0}, {1}  {2}",
            Model.PrimaryAddress.City,
            Model.PrimaryAddress.State,
            Model.PrimaryAddress.Zip));
      System.Console
        .WriteLine("Previous Orders: " + Model.Orders.Count.ToString());
      System.Console
        .WriteLine("Addresses:" + Model.Addresses.Count.ToString());
      System.Console
        .WriteLine("Contacts: " + Model.Contacts.Count.ToString());
      System.Console.WriteLine();
      System.Console.WriteLine("Web: " + Model.Website);
      System.Console.WriteLine("Phone: " + Model.PrimaryPhone);
      System.Console.WriteLine();
      System.Console.WriteLine("Enter to Continue, (D)elete or (E)dit");

      while (true)
      {
        string input = System.Console.ReadLine().Trim();
        if (input.Length == 0)
        {
          this.Back();
          return;
        }
        else if (input.StartsWith("E"))
        {
          this.Navigate("Customers/" + Model.ID + "/EDIT");
        }
        else if (input.StartsWith("D"))
        {
          this.Navigate("Customers/" + Model.ID + "/DELETE");
        }
      }
    }
  }
}
CustomerManagement/CustomerManagement.Console/Views/CustomerView.cs
The Render() method of the CustomerView class is where you define the logic to display your model customer instance to the user. In this case the model property values are simply displayed in the appropriate format using the Console.WriteLine() method.
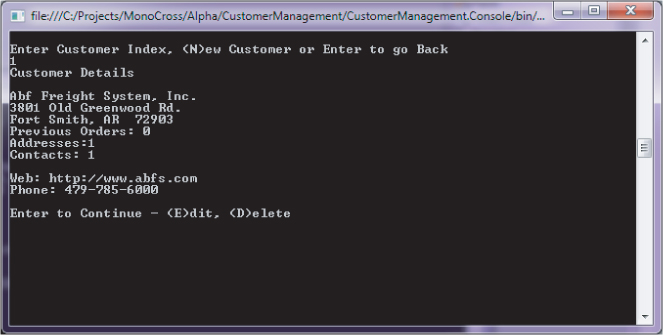
Although this particular view may not be terribly glamorous, it quite nicely illustrates the MonoCross view concept. The model instance you created in your CustomerController.Load() method is made available in the CustomerView.Render() method where it can be displayed and manipulated according to your application requirements. Figure 4.5 shows the rendered console view.
At this point you've defined your company model class, a controller to load a company from your back-end data store, and a view to display the company information in your presentation layer. You can use this approach to define model/controller combinations for every entity in your business domain according to your application requirements and define views for each action required by the presentation layer for the model. These MVC combinations represent discreet modules of application functionality, and can be used and reused in any workflow combinations your application requirements dictate. These workflows will be defined using the MonoCross navigation framework.
Figure 4.5 The rendered console customer view shows customer detail information.
Using URI-Based Navigation
Until now you've learned about the MonoCross MVC pattern you can use to build cross-platform mobile applications, but the core MVC pattern is only part of what's needed to construct and deploy to multiple device platforms. To turn your MVC combinations into a cohesive application, you need a mechanism to bind them together. The MonoCross navigation framework provides that mechanism using a URI-based navigation structure. Each controller in your application is associated with one or more URI endpoints that uniquely identify its place or places in the application workflow. Each action in your application, whether selecting an item from a list or saving a form, is represented as a navigation to one of these controller endpoints. By using this technique, MonoCross enables the definition of any number of complex workflows, while at the same time encapsulating and reusing as much controller business logic as possible. MonoCross navigation also builds upon the loosely coupled MVC pattern described previously with the addition of two important concepts: a shared application and a platform container.
Building the Shared Application
The shared application in MonoCross encapsulates your MVC modules into a logical, cohesive structure. All the business and data access logic for your application will be shared across mobile platform targets, so the basic workflow navigation is defined in this same structure. The abstract MXApplication class in Listing 4.7 defines the base implementation used for your MonoCross shared application.
Listing 4.7: The MXApplication class
using System;
using System.Collections.Generic;
using System.Linq;

namespace MonoCross.Navigation
{
  public abstract class MXApplication
  {
    public string NavigateOnLoad { get; set; }
    public string Title { get; set; }
    public NavigationList NavigationMap = new NavigationList();

    protected MXApplication()
    {
      NavigateOnLoad = string.Empty;
      OnAppLoad();
    }

    public virtual void OnAppLoad() { }
    public virtual void OnAppLoadComplete() { }

    public class NavigationList : List<MXNavigation>
    {
      public void Add(string pattern, IMXController controller)
      {
        this.Add(pattern, controller, new Dictionary<string, string>());
      }

      public IMXController GetControllerForPattern(string pattern)
      {
        return this.Contains(pattern)
          ? this.Where(m => m.Pattern == pattern)
            .First().Controller
          : null;
      }
      public String GetPatternForModelType(Type modelType)
      {
        return this.Where(m => m.Controller.ModelType == modelType)
          .First().Pattern;
      }
      public bool Contains(string pattern)
      {
        return this.Where(m => m.Pattern == pattern).Count() > 0;
      }

      public void Add(string pattern,
                      IMXController controller,
                      Dictionary<string, string> parameters)
      {
#if DROID
        Android.Util.Log.Debug("NavigationList", "Adding: ‘" + pattern + "’");
#endif
        // Enforce uniqueness
        MXNavigation currentMatch = this
          .Where(m => m.Pattern == pattern)
          .FirstOrDefault();
        if (currentMatch != null)
        {
#if DEBUG
          string text = string
           .Format("MapUri "{0}" is already matched to Controller type {1}",
                   pattern, currentMatch.Controller);
          throw new Exception(text);
#else
          return;
#endif
        }

        this.Add(new MXNavigation(pattern, controller, parameters));
      }
    }
  }
}
MonoCross.Navigation/MXApplication.cs
You inherit from the MXApplication class to create your MonoCross application and register your workflow endpoints for navigation. Listing 4.8 shows the shared application for the customer management example.
Listing 4.8: A simple shared application
using System;
using System.Collections.Generic;
using System.Linq;
using System.Text;

using MonoCross.Navigation;

using CustomerManagement.Controllers;

namespace CustomerManagement
{
  public class App : MXApplication
  {
    public override void OnAppLoad()
    {
      // Set the application title
      Title = "Customer Management";

      // Add navigation mappings
      NavigationMap.Add("Customers", new CustomerListController());

      CustomerController customerController = new CustomerController();
      NavigationMap.Add("Customers/{CustomerId}", customerController);
      NavigationMap.Add("Customers/{CustomerId}/{Action}", customerController);

      // Set default navigation URI
      NavigateOnLoad = "Customers";
    }
  }
}
CustomerManagement/CustomerManagement/App.cs
Adding Controllers to the Navigation Map
The MonoCross navigation framework is based on RESTful routing principles. Each unique point in your application workflow is defined by a parameterized URI endpoint that corresponds to a controller associated with one or more views used for presentation of the model. Navigation endpoints are registered in the NavigationMap found in the MXApplication class.
By carefully constructing your NavigationMap to model your application's many workflows, you can support even the most complex use cases using the functionality of your application controllers. Each controller in your application can have multiple endpoints defined in your NavigationMap. These endpoints reflect the workflow for each specific case defined in your application requirements and enable reuse of existing controller functionality wherever possible.
Now consider a scenario in your customer management application. You want to display and manage customers, and you've already created a controller. Now we need to add the controller to your NavigationMap:
CustomerController customerController = new CustomerController();
NavigationMap.Add("Customers/{CustomerId}", customerController);
This establishes the default entry point for an individual order. The URI template shown uses the squiggly bracket syntax ({ }) to indicate a substituted value, (in this case “CustomerId”) in the navigation URI. So a URI of Customers/1234 loads the CustomerController from your NavigationMap. At runtime, the navigation framework extracts the individual customer identifier, and places it in the controller parameters argument passed to the CustomerController.Load() method as a name/value pair, (CustomerId=1234).
Now say you want to add a new customer from your customer list view as a part of a different workflow. You want to reuse the existing CustomerController because it contains all the business and data logic needed for a customer, so you add the following entry to the NavigationMap:
CustomerController customerController = new CustomerController();
…
NavigationMap.Add("Customers/{CustomerId}/{Action}", customerController);
Now when you request the CustomerController, you pass the Action identifier for the action you wish to perform. So a URI of “Customers/0/CREATE” passed to the application loads the same CustomerController as before, but this time you have an additional name-value pair in the CustomerController.Load() parameters argument, (Action=CREATE), which you can then use to create a new customer. Listing 4.9 shows the CustomerController.Load() method.
Listing 4.9: The CustomerController.Load() method
    public override string Load(Dictionary<string, string> parameters)
    {
      string perspective = ViewPerspective.Default;

      string customerId = null;
      parameters.TryGetValue("CustomerId", out customerId);

      // get the action, assumes
      string action;
      if (!parameters.TryGetValue("Action", out action))  {
        // set default action if none specified
        action = "GET";
        }

      switch (action)
      {
        case "EDIT":
        case "GET":
        // populate the customer model
        if (customerId == null)
          throw new Exception("No Customer Id found");
          if (string.Equals(customerId.ToUpper(), "NEW")) {
            // assign Model a new customer for editing
            Model = new Customer();
            perspective = ViewPerspective.Update;
          } else {
            Model = GetCustomer(customerId);
            if (String.Equals(action, "EDIT"))
              perspective = ViewPerspective.Update;
            else
              perspective = ViewPerspective.Default;
            }
          break;

        case "DELETE":
          if (customerId == null)
            customerId = Model.ID;
            // post delete request to the server
            DeleteCustomer(customerId);

            // return and let redirected controller execute,
            // remaining navigation is ignored
            MXContainer.Instance.Redirect("Customers");
            return ViewPerspective.Delete;

        case "CREATE":
          // process addition of new model
          if(AddNewCustomer(Model))
            MXContainer.Instance.Redirect("Customers");
          break;

        case "UPDATE":
          if(UpdateCustomer(Model))
            MXContainer.Instance.Redirect("Customers");
          break;
      }

      return perspective;
    }
CustomerManagement/CustomerManagement/Controllers/CustomerController.cs
Adding a Platform Container
To run your shared application, you must deploy it to a specific platform and write the necessary views to present the application to your users. In MonoCross, you do this by creating a platform container. You can have as many platform containers as you have platforms that you want to support. Inside the container you define your views, and your shared controllers render them as defined in your application workflow.
The abstract MXContainer class provides a default implementation of a platform container. Each supported platform in MonoCross has a concrete implementation that inherits from the MXContainer class and provides platform-specific helper methods and utilities. For the Windows Console example in this chapter, use the ConsoleContainer class to initialize your application and register your views, as shown in Listing 4.10.
Listing 4.10: The ConsoleContainer class
using System;
using System.Collections.Generic;
using System.Linq;
using System.Text;
using System.Text.RegularExpressions;

using MonoCross.Navigation;

namespace MonoCross.Console
{
  public static class MXConsoleNavigationExtensions
  {
    public static void Back(this IMXView view)
    {
      MXConsoleContainer.Back(view);
    }
  }

  public class MXConsoleContainer : MXContainer
  {
    public MXConsoleContainer(MXApplication theApp)
      : base(theApp)
    { }

    private class NavDetail
    {
      public string Path { get; set; }
      public Dictionary<string, string> Parameters { get; set; }

      public NavDetail(string path, Dictionary<string, string> parameters)
      {
        Path = path;
        Parameters = parameters;
      }
    }

    static Stack<NavDetail> NavHistory = new Stack<NavDetail>();

    public static void Initialize(MXApplication theApp)
    {
      MXContainer.InitializeContainer(new MXConsoleContainer(theApp));

      // non-threaded container, not needed as all input is blocking (old-school)
      MXContainer.Instance.ThreadedLoad = false;
    }

    public static void Back(IMXView view)
    {
      // exit if we try to go back too far
      if (!CanGoBack())
      {
        Environment.Exit(0);
      }
      else
      {
        // pop off the current view
        NavHistory.Pop();

        // prepare to re-push the current view
        NavDetail backTo = NavHistory.Pop();

        // re-display the view
        Navigate(view, backTo.Path, backTo.Parameters);
      }
    }

    public static bool CanGoBack()
    {
      if (NavHistory.Count > 1)
        return true;
      else
        return false;
    }

    protected override void OnControllerLoadComplete(
        IMXView fromView,
        IMXController controller,
        MXViewPerspective perspective)
    {
      // store of the stack for later
      NavHistory.Push(new NavDetail(controller.Uri, controller.Parameters));

      // render the view
      MXConsoleContainer.RenderViewFromPerspective(controller, perspective);
    }

    protected override void OnControllerLoadFailed(IMXController controller,
        Exception ex)
    {
      System.Console.WriteLine("Failed to load controller: " + ex.Message);
      System.Console.WriteLine("Stack Dump");
      System.Console.WriteLine(ex.StackTrace.ToString());

      System.Diagnostics.Debug.WriteLine("Failed to load controller: "
                                         + ex.Message);
      System.Diagnostics.Debug.WriteLine("Stack Dump");
      System.Diagnostics.Debug.WriteLine(ex.StackTrace.ToString());
    }

    public override void Redirect(string url)
    {
      Navigate(null, url);
      CancelLoad = true;
    }
  }
}
MonoCross.Console/MXConsoleContainer.cs
Listing 4.11 shows the code for initializing your container. You need to start by providing it an instance of your shared app. You also register the views for your application by calling the AddView() method on the container and passing a new instance of each view to be placed in the view map. In this case, you register two views: The first displays a list of customers in the system and the second displays the details of a single customer, which is an instance of the CustomerView class discussed earlier in this chapter.
Listing 4.11: Initializing your Console container
using System;
using System.Collections.Generic;
using System.Linq;
using System.Text;

using MonoCross.Navigation;
using MonoCross.Console;

using CustomerManagement;
using CustomerManagement.Controllers;

using CustomerManagement.Shared;
using CustomerManagement.Shared.Model;

namespace CustomerManagement.Console
{
  class Program
  {
    static void Main(string[] args)
    {
      // initialize container
      MXConsoleContainer.Initialize(new CustomerManagement.App());

      // customer list view
      MXConsoleContainer.AddView<List<Customer>>(new Views.CustomerListView(),
                                                 ViewPerspective.Default);

      // customer view and customer edit/new
      MXConsoleContainer.AddView<Customer>(new Views.CustomerView(),
                                           ViewPerspective.Default);
      MXConsoleContainer.AddView<Customer>(new Views.CustomerEdit(),
                                           ViewPerspective.Update);

      // navigate to first view
      MXConsoleContainer.Navigate(MXContainer.Instance.App.NavigateOnLoad);
    }
  }
}
CustomerManagement/CustomerManagement/Containers/Console.Container/Program.cs
As you build out your application and create more views, you can add them to this block of initialization code for each presentation case in your requirements.
Working with View Perspectives
An important part of defining your container view structure is indicating the intended purpose of each view. As you build out your workflow, you may have multiple views that correspond to a particular model type, such as a form view for creating an order and another for displaying the order details. To register these views, you need a way to specify the purpose for each view; you can accomplish this in MonoCross using view perspectives.
A view perspective is simply a string that describes the intended purpose of your view. The ViewPerspective class in Listing 4.12 defines five string constants for the most common view perspective values.
Listing 4.12: The ViewPerspective class
public static class ViewPerspective
{
  public const string Default = "";
  public const string Read = "GET";
  public const string Create = "POST";
  public const string Update = "PUT";
  public const string Delete = "DELETE";
}
MonoCross.Navigation/MXViewPerspective.cs
View perspectives are used to uniquely register views in your container and are also used by your controllers to indicate to the container which view to render at a given point in your application.
![]() Although view perspectives provide great flexibility in defining your application presentation layer, you may identify perspectives that are appropriate for some platforms, but not for others. Rendering of your views occurs from the shared controllers, where you must account for view perspectives, across all target platforms.
Although view perspectives provide great flexibility in defining your application presentation layer, you may identify perspectives that are appropriate for some platforms, but not for others. Rendering of your views occurs from the shared controllers, where you must account for view perspectives, across all target platforms.
This is the reason you need to complete a mobile application design, using the steps outlined in Chapter 2, “Designing Your User Experience”, to clearly define your application workflow using a platform-agnostic approach and develop the user experience for each platform to support that workflow.
Your simple console container uses only the ViewPerspective.Default constant because the two views you initially registered are used to simply display customer information. But as you expand the functionality of your application, you will likely add views for additional operations. For example, Listing 4.13 shows the action of adding a new customer included in the CustomerController class:
Listing 4.13: Adding a new customer
    public override string Load(Dictionary<string, string> parameters)
    {
      string perspective = ViewPerspective.Default;

      string customerId = null;
      parameters.TryGetValue("CustomerId", out customerId);

      // get the action, assumes
      string action;
      if (!parameters.TryGetValue("Action", out action))  {
        // set default action if none specified
        action = "GET";
        }

      switch (action)
      {
        case "EDIT":
        case "GET":
        // populate the customer model
        if (customerId == null)
          throw new Exception("No Customer Id found");
          if (string.Equals(customerId.ToUpper(), "NEW")) {
            // assign Model a new customer for editing
            Model = new Customer();
            perspective = ViewPerspective.Update;
          } else {
            Model = GetCustomer(customerId);
            if (String.Equals(action, "EDIT"))
              perspective = ViewPerspective.Update;
            else
              perspective = ViewPerspective.Default;
            }
          break;

        case "DELETE":
          if (customerId == null)
            customerId = Model.ID;
            // post delete request to the server
            DeleteCustomer(customerId);

            // return and let redirected controller execute,
            // remaining navigation is ignored
            MXContainer.Instance.Redirect("Customers");
            return ViewPerspective.Delete;

        case "CREATE":
          // process addition of new model
          if(AddNewCustomer(Model))
            MXContainer.Instance.Redirect("Customers");
          break;

        case "UPDATE":
          if(UpdateCustomer(Model))
            MXContainer.Instance.Redirect("Customers");
          break;
      }

      return perspective;
    }
Found in the CustomerManagement/CustomerManagement/Controllers/CustomerController.cs file of the download
In this case, the CustomerController.Load() method conditionally returns the ViewPerspective.Update value when a new order is created. Now, when the CustomerController is loaded to create a new customer, the EditCustomerView renders to the user, and enables input of customer information.
The view perspective concept is designed for maximum flexibility. You can register your views with whatever string value adequately describes the intended function. When you want to display that view from your controller, simply return the corresponding view perspective value to your container, and the desired view renders.
In this chapter you briefly explored the problems encountered in cross-platform mobile development. You learned about the impact of differences in mobile platforms, the limitations of HTML 5 as a solution, and some of the challenges when using a hybrid approach. You then explored the MonoCross open-source project as a solution to these challenges by using the MVC and Separated Interface patterns. You also learned how to share business and data logic in your shared application and create platform-specific views in C# and .NET.
In the next chapter, you learn more about building a shared application and explore the details of business logic and data access for the customer management application.