
16
DOM Levels 2 and 3
WHAT'S IN THIS CHAPTER?
- Changes to the DOM introduced in Levels 2 and 3
- The DOM API for manipulating styles
- Working with DOM traversal and ranges
The first level of the DOM focuses on defining the underlying structure of HTML and XML documents. DOM Levels 2 and 3 build on this structure to introduce more interactivity and support for more advanced XML features. As a result, DOM Levels 2 and 3 actually consist of several modules that, although related, describe very specific subsets of the DOM. These modules are as follows:
- DOM Core—Builds on the Level 1 core, adding methods and properties to nodes.
- DOM Views—Defines different views for a document based on stylistic information.
- DOM Events—Explains how to tie interactivity to DOM documents using events.
- DOM Style—Defines how to programmatically access and change CSS styling information.
- DOM Traversal and Range—Introduces new interfaces for traversing a DOM document and selecting specific parts of it.
- DOM HTML—Builds on the Level 1 HTML, adding properties, methods, and new interfaces.
- DOM Mutation Observers—Allows for definition of callbacks upon changes to the DOM. Mutation Observers were defined in the DOM4 specification to replace Mutation Events.
This chapter explores each of these modules except for DOM events and DOM mutation observers, which are covered fully in fully in the Document Object Model chapter. DOM Level 3 also contains the XPath module and the Load and Save module. These are discussed in the XML in JavaScript chapter.
DOM CHANGES
The purpose of the DOM Levels 2 and 3 Core is to expand the DOM API to encompass all of the requirements of XML and to provide for better error handling and feature detection. For the most part, this means supporting the concept of XML namespaces. DOM Level 2 Core doesn't introduce any new types; it simply augments the types defined in DOM Level 1 to include new methods and properties. DOM Level 3 Core further augments the existing types and introduces several new ones.
Similarly, DOM Views and HTML augment DOM interfaces, providing new properties and methods. These two modules are fairly small and so are grouped in with the Core to discuss changes to fundamental JavaScript objects.
XML Namespaces
XML namespaces allow elements from different XML-based languages to be mixed together in a single, well-formed document without fear of element name clashes. Technically, XML namespaces are not supported by HTML but supported in XHTML; therefore, the examples in this section are in XHTML.
Namespaces are specified using the xmlns attribute. The namespace for XHTML is http://www.w3.org/1999/xhtml and should be included on the <html> element of any well-formed XHTML page, as shown in the following example:
<html xmlns="http://www.w3.org/1999/xhtml"><head><title>Example XHTML page</title></head><body>Hello world!</body></html>
For this example, all elements are considered to be part of the XHTML namespace by default. You can explicitly create a prefix for an XML namespace using xmlns, followed by a colon, followed by the prefix, as in this example:
<xhtml:html xmlns:xhtml="http://www.w3.org/1999/xhtml"><xhtml:head><xhtml:title>Example XHTML page</xhtml:title></xhtml:head><xhtml:body>Hello world!</xhtml:body></xhtml:html>
Here, the namespace for XHTML is defined with a prefix of xhtml, requiring all XHTML elements to begin with that prefix. Attributes may also be namespaced to avoid confusion between languages, as shown in the following example:
<xhtml:html xmlns:xhtml="http://www.w3.org/1999/xhtml"><xhtml:head><xhtml:title>Example XHTML page</xhtml:title></xhtml:head><xhtml:body xhtml:class="home">Hello world!</xhtml:body></xhtml:html>
The class attribute in this example is prefixed with xhtml. Namespacing isn't really necessary when only one XML-based language is being used in a document; it is, however, very useful when mixing two languages together. Consider the following document containing both XHTML and SVG:
<html xmlns="http://www.w3.org/1999/xhtml"><head><title>Example XHTML page</title></head><body><svg xmlns="http://www.w3.org/2000/svg" version="1.1"viewBox="0 0 100 100" style="width:100%; height:100%"><rect x="0" y="0" width="100" height="100" style="fill:red" /></svg></body></html>
In this example, the <svg> element is indicated as foreign to the containing document by setting its own namespace. All children of the <svg> element, as well as all attributes of the elements, are considered to be in the http://www.w3.org/2000/svg namespace. Even though the document is technically an XHTML document, the SVG code is considered valid because of the use of namespaces.
The interesting problem with a document such as this is what happens when a method is called on the document to interact with nodes in the document. When a new element is created, which namespace does it belong to? When querying for a specific tag name, what namespaces should be included in the results? DOM Level 2 Core answers these questions by providing namespace-specific versions of most DOM Level 1 methods.
Changes to Node
The Node type evolves in DOM Level 2 to include the following namespace-specific properties:
localName—The node name without the namespace prefix.namespaceURI—The namespace URI of the node ornullif not specified.prefix—The namespace prefix ornullif not specified.
When a node uses a namespace prefix, the nodeName is equivalent to prefix + ":" + localName. Consider the following example:
<html xmlns="http://www.w3.org/1999/xhtml"><head><title>Example XHTML page</title></head><body><s:svg xmlns:s="http://www.w3.org/2000/svg" version="1.1"viewBox="0 0 100 100" style="width:100%; height:100%"><s:rect x="0" y="0" width="100" height="100" style="fill:red" /></s:svg></body></html>
For the <html> element, the localName and tagName is "html", the namespaceURI is "http://www.w3.org/1999/xhtml", and the prefix is null. For the <s:svg> element, the localName is "svg", the tagName is "s:svg", the namespaceURI is "http://www.w3.org/2000/svg", and the prefix is "s".
DOM Level 3 goes one step further and introduces the following methods to work with namespaces:
isDefaultNamespace(namespaceURI)—Returnstruewhen the specified namespaceURI is the default namespace for the node.lookupNamespaceURI(prefix)—Returns the namespace URI for the given prefix.lookupPrefix(namespaceURI)—Returns the prefix for the given namespaceURI.
In the previous example, the following code can be executed:
console.log(document.body.isDefaultNamespace("http://www.w3.org/1999/xhtml")); // true// assume svg contains a reference to <s:svg>console.log(svg.lookupPrefix("http://www.w3.org/2000/svg")); // "s"console.log(svg.lookupNamespaceURI("s")); // "http://www.w3.org/2000/svg"
These methods are primarily useful when you have a reference to a node without knowing its relationship to the rest of the document.
Changes to Document
The Document type is changed in DOM Level 2 to include the following namespace-specific methods:
createElementNS(namespaceURI, tagName)—Creates a new element with the giventagNameas part of the namespace indicated bynamespaceURI.createAttributeNS(namespaceURI, attributeName)—Creates a new attribute node as part of the namespace indicated bynamespaceURI.getElementsByTagNameNS(namespaceURI, tagName)—Returns aNodeListof elements with the giventagNamethat are also a part of the namespace indicated bynamespaceURI.
These methods are used by passing in the namespace URI of the namespace to use (not the namespace prefix), as shown in the following example.
// create a new SVG elementlet svg = document.createElementNS("http://www.w3.org/2000/svg", "svg");// create new attribute for a random namespacelet att = document.createAttributeNS("http://www.somewhere.com", "random");// get all XHTML elementslet elems = document.getElementsByTagNameNS("http://www.w3.org/1999/xhtml", "*");
The namespace-specific methods are necessary only when there are two or more namespaces in a given document.
Changes to Element
The changes to Element in DOM Level 2 Core are mostly related to attributes. The following new methods are introduced:
getAttributeNS(namespaceURI, localName)—Gets the attribute from the namespace represented bynamespaceURIand with a name oflocalName.getAttributeNodeNS(namespaceURI, localName)—Gets the attribute node from the namespace represented bynamespaceURIand with a name oflocalName.getElementsByTagNameNS(namespaceURI, tagName)—Returns aNodeListof descendant elements with the giventagNamethat are also a part of the namespace indicated bynamespaceURI.hasAttributeNS(namespaceURI, localName)—Determines if the element has an attribute from the namespace represented bynamespaceURIand with a name oflocalName. Note: DOM Level 2 Core also adds ahasAttribute()method for use without namespaces.removeAttributeNS(namespaceURI, localName)—Removes the attribute from the namespace represented bynamespaceURIand with a name oflocalName.-
setAttributeNS(namespaceURI,qualifiedName,value)—Sets the attribute from the namespace represented bynamespaceURIand with a name ofqualifiedNameequal tovalue. setAttributeNodeNS(attNode)—Sets the attribute node from the namespace represented bynamespaceURI.
These methods behave the same as their DOM Level 1 counterparts with the exception of the first argument, which is always the namespace URI except for setAttributeNodeNS().
Changes to NamedNodeMap
The NamedNodeMap type also introduces the following methods for dealing with namespaces. Because attributes are represented by a NamedNodeMap, these methods mostly apply to attributes.
getNamedItemNS(namespaceURI,localName)—Gets the item from the namespace represented bynamespaceURIand with a name oflocalName.removeNamedItemNS(namespaceURI,localName)—Removes the item from the namespace represented bynamespaceURIand with a name oflocalName.setNamedItemNS(node)—Addsnode, which should have namespace information already applied.
These methods are rarely used because attributes are typically accessed directly from an element.
Other Changes
There are some other minor changes made to various parts of the DOM in DOM Level 2 Core. These changes don't have to do with XML namespaces and are targeted more toward ensuring the robustness and completeness of the API.
Changes to DocumentType
The DocumentType type adds three new properties: publicId, systemId, and internalSubset. The publicId and systemId properties represent data that is readily available in a doctype but were inaccessible using DOM Level 1. Consider the following HTML doctype:
<!DOCTYPE HTML PUBLIC "-// W3C// DTD HTML 4.01// EN""http://www.w3.org/TR/html4/strict.dtd">
In this doctype, the publicId is "-// W3C// DTD HTML 4.01// EN" and the systemId is "http://www.w3.org/TR/html4/strict.dtd". Browsers that support DOM Level 2 should be able to run the following JavaScript code:
console.log(document.doctype.publicId);console.log(document.doctype.systemId);
Accessing this information is rarely, if ever, needed in web pages.
The internalSubset property accesses any additional definitions that are included in the doctype, as shown in the following example:
<!DOCTYPE html PUBLIC "-// W3C// DTD XHTML 1.0 Strict// EN""http://www.w3.org/TR/xhtml1/DTD/xhtml1-strict.dtd"[<!ELEMENT name (#PCDATA)>]>
For this code, document.doctype.internalSubset returns "<!ELEMENT name (#PCDATA)>". Internal subsets are rarely used in HTML and are slightly more common in XML.
Changes to Document
The only new method on Document that is not related to namespaces is importNode(). The purpose of this method is to take a node from a different document and import it into a new document so that it can be added into the document structure. Remember that every node has an ownerDocument property that indicates the document it belongs to. If a method such as appendChild() is called and a node with a different ownerDocument is passed in, an error will occur. Calling importNode() on a node from a different document returns a new version of the node that is owned by the appropriate document.
The importNode() method is similar to the cloneNode() method on an element. It accepts two arguments: the node to clone and a Boolean value indicating if the child nodes should also be copied. The result is a duplicate of the node that is suitable for use in the document. Here is an example:
let newNode = document.importNode(oldNode, true); // import node and all childrendocument.body.appendChild(newNode);
This method isn't used very often with HTML documents; it is used more frequently with XML documents (discussed further in the XML in JavaScript chapter).
DOM Level 2 Views adds a property called defaultView, which is a pointer to the window (or frame) that owns the given document. The Views specification doesn't provide details about when other views may be available, so this is the only property added. The defaultView property is supported in all browsers (except Internet Explorer 8 and earlier). There is an equivalent property called parentWindow that is supported in Internet Explorer 8 and earlier, as well as Opera. Thus, to determine the owning window of a document, you can use the following code:
let parentWindow = document.defaultView || document.parentWindow;Aside from this one method and property, there are a couple of changes to the document.implementation object specified in the DOM Level 2 Core in the form of two new methods: createDocumentType() and createDocument(). The createDocumentType() method is used to create new DocumentType nodes and accepts three arguments: the name of the doctype, the publicId, and the systemId. For example, the following code creates a new HTML 4.01 Strict doctype:
let doctype = document.implementation.createDocumentType("html","-// W3C// DTD HTML 4.01// EN","http://www.w3.org/TR/html4/strict.dtd");
An existing document's doctype cannot be changed, so createDocumentType() is useful only when creating new documents, which can be done with createDocument(). This method accepts three arguments: the namespaceURI for the document element, the tag name of the document element, and the doctype for the new document. A new blank XML document can be created, as shown in the following example:
let doc = document.implementation.createDocument("", "root", null);This code creates a new document with no namespace and a document element of <root> with no doctype specified. To create an XHTML document, you can use the following code:
let doctype = document.implementation.createDocumentType("html","-// W3C// DTD XHTML 1.0 Strict// EN","http://www.w3.org/TR/xhtml1/DTD/xhtml1-strict.dtd");let doc = document.implementation.createDocument("http://www.w3.org/1999/xhtml","html", doctype);
Here, a new XHTML document is created with the appropriate namespace and doctype. The document has only the document element <html>; everything else must be added.
The DOM Level 2 HTML module also adds a method called createHTMLDocument() to document.implementation. The purpose of this method is to create a complete HTML document, including the <html>, <head>, <title>, and <body> elements. This method accepts a single argument, which is the title of the newly created document (the string to go in the <title> element), and returns the new HTML document as follows:
let htmldoc = document.implementation.createHTMLDocument("New Doc");console.log(htmldoc.title); // "New Doc"console.log(typeof htmldoc.body); // "object"
The object created from a call to createHTMLDocument() is an instance of the HTMLDocument type and so contains all of the properties and methods associated with it, including the title and body properties.
Changes to Node
DOM Level 3 introduces two methods to help compare nodes: isSameNode() and isEqualNode(). Both methods accept a single node as an argument and return true if that node is the same as or equal to the reference node. Two nodes are the same when they reference the same object. Two nodes are equal when they are of the same type and have properties that are equal (nodeName, nodeValue, and so on), and their attributes and childNodes properties are equivalent (containing equivalent values in the same positions). Here is an example:
let div1 = document.createElement("div");div1.setAttribute("class", "box");let div2 = document.createElement("div");div2.setAttribute("class", "box");console.log(div1.isSameNode(div1)); // trueconsole.log(div1.isEqualNode(div2)); // trueconsole.log(div1.isSameNode(div2)); // false
Here, two <div> elements are created with the same attributes. The two elements are equivalent to one another but are not the same.
DOM Level 3 also introduces methods for attaching additional data to DOM nodes. The setUserData() method assigns data to a node and accepts three arguments: the key to set, the actual data (which may be of any data type), and a handler function. You can assign data to a node using the following code:
document.body.setUserData("name", "Nicholas", function() {});You can then retrieve the information using getUserData() and passing in the same key, as shown here:
let value = document.body.getUserData("name");The handler function for setUserData() is called whenever the node with the data is cloned, removed, renamed, or imported into another document and gives you the opportunity to determine what should happen to the user data in each of those cases. The handler function accepts five arguments: a number indicating the type of operation (1 for clone, 2 for import, 3 for delete, or 4 for rename), the data key, the data value, the source node, and the destination node. The source node is null when the node is being deleted, and the destination node is null unless the node is being cloned. You can then determine how to store the data. Here is an example:
let div = document.createElement("div");div.setUserData("name", "Nicholas", function(operation, key, value, src, dest) {if (operation == 1) {dest.setUserData(key, value, function() {}); }});let newDiv = div.cloneNode(true);console.log(newDiv.getUserData("name")); // "Nicholas"
Here, a <div> element is created and has some data assigned to it, including some user data. When the element is cloned via cloneNode(), the handler function is called and the data is automatically assigned to the clone. When getUserData() is called on the clone, it returns the same value that was assigned to the original.
Changes to iframes
Iframes, represented by HTMLIFrameElement have a new property in DOM Level 2 HTML called contentDocument. This property contains a pointer to the document object representing the contents of the iframe. This property can be used, as shown in the following example:
let iframe = document.getElementById("myIframe");let iframeDoc = iframe.contentDocument;
The contentDocument property is an instance of Document and can be used just like any other HTML document, including all properties and methods. There is also a property called contentWindow that returns the window object for the frame, which has a document property. The contentDocument and contentWindow properties are available in all modern browsers.
STYLES
Styles are defined in HTML in three ways: including an external style sheet via the <link> element, defining inline styles using the <style> element, and defining element-specific styles using the style attribute. DOM Level 2 Styles provides an API around all three of these styling mechanisms.
Accessing Element Styles
Any HTML element that supports the style attribute also has a style property exposed in JavaScript. The style object is an instance of CSSStyleDeclaration and contains all stylistic information specified by the HTML style attribute but no information about styles that have cascaded from either included or inline style sheets. Any CSS property specified in the style attribute are represented as properties on the style object. Because CSS property names use dash case (using dashes to separate words, such as background-image), the names must be converted into camel case in order to be used in JavaScript. The following table lists some common CSS properties and the equivalent property names on the style object.
| CSS PROPERTY | JAVASCRIPT PROPERTY |
background-image |
style.backgroundImage |
color |
style.color |
display |
style.display |
font-family |
style.fontFamily |
For the most part, property names convert directly simply by changing the format of the property name. The one CSS property that doesn't translate directly is float. Because float is a reserved word in JavaScript, it can't be used as a property name. The DOM Level 2 Style specification states that the corresponding property on the style object should be cssFloat.
Styles can be set using JavaScript at any time as long as a valid DOM element reference is available. Here are some examples:
let myDiv = document.getElementById("myDiv");// set the background colormyDiv.style.backgroundColor = "red";// change the dimensionsmyDiv.style.width = "100px";myDiv.style.height = "200px";// assign a bordermyDiv.style.border = "1px solid black";
When styles are changed in this manner, the display of the element is automatically updated.
Styles specified in the style attribute can also be retrieved using the style object. Consider the following HTML:
<div id="myDiv" style="background-color: blue; width: 10px; height: 25px"></div>The information from this element's style attribute can be retrieved via the following code:
console.log(myDiv.style.backgroundColor); // "blue"console.log(myDiv.style.width); // "10px"console.log(myDiv.style.height); // "25px"
If no style attribute is specified on an element, the style object will contain empty values for all possible CSS properties.
DOM Style Properties and Methods
The DOM Level 2 Style specification also defines several properties and methods on the style object. These properties and methods provide information about the contents of the element's style attribute and enabling changes. They are as follows:
cssText—As described previously,cssTextprovides access to the CSS code of thestyleattribute.length—The number of CSS properties applied to the element.parentRule—TheCSSRuleobject representing the CSS information. TheCSSRuletype is discussed in a later section.getPropertyCSSValue(propertyName)—Returns aCSSValueobject containing the value of the given property.getPropertyPriority(propertyName)—Returns"important"if the given property is set using!important; otherwise, it returns an empty string.getPropertyValue(propertyName)—Returns the string value of the given property.item(index)—Returns the name of the CSS property at the given position.removeProperty(propertyName)—Removes the given property from the style.setProperty(propertyName, value, priority)—Sets the given property to the given value with a priority (either"important"or an empty string).
The cssText property allows access to the CSS code of the style. When used in read mode, cssText returns the browser's internal representation of the CSS code in the style attribute. When used in write mode, the value assigned to cssText overwrites the entire value of the style attribute, meaning that all previous style information specified using the attribute is lost. For instance, if the element has a border specified via the style attribute and you overwrite cssText with rules that don't include the border, it is removed from the element. The cssText property is used as follows:
myDiv.style.cssText = "width: 25px; height: 100px; background-color: green";console.log(myDiv.style.cssText);
Setting the cssText property is the fastest way to make multiple changes to an element's style because all of the changes are applied at once.
The length property is designed for use in conjunction with the item() method for iterating over the CSS properties defined on an element. With these, the style object effectively becomes a collection, and bracket notation can be used in place of item() to retrieve the CSS property name in the given position, as shown in the following example:
for (let i = 0, len = myDiv.style.length; i < len; i++) {console.log(myDiv.style[i]); // alternately, myDiv.style.item(i)}
Using either bracket notation or item(), you can retrieve the CSS property name ("background-color", not "backgroundColor"). This property name can then be used in getPropertyValue() to retrieve the actual value of the property, as shown in the following example:
let prop, value, i, len;for (i = 0, len = myDiv.style.length; i < len; i++) {prop = myDiv.style[i]; // alternately, myDiv.style.item(i)value = myDiv.style.getPropertyValue(prop);console.log('prop: ${value}');}
The getPropertyValue() method always retrieves the string representation of the CSS property value. If you need more information, getPropertyCSSValue() returns a CSSValue object that has two properties: cssText and cssValueType. The cssText property is the same as the value returned from getPropertyValue(). The cssValueType property is a numeric constant indicating the type of value being represented: 0 for an inherited value, 1 for a primitive value, 2 for a list, or 3 for a custom value. The following code outputs the CSS property value and the value type:
let prop, value, i, len;for (i = 0, len = myDiv.style.length; i < len; i++) {prop = myDiv.style[i]; // alternately, myDiv.style.item(i)value = myDiv.style.getPropertyCSSValue(prop);console.log('prop: ${value.cssText} (${value.cssValueType})');}
The removeProperty() method is used to remove a specific CSS property from the element's styling. Removing a property using this method means that any default styling for that property (cascading from other style sheets) will be applied. For instance, to remove a border property that was set in the style attribute, you can use the following code:
myDiv.style.removeProperty("border");This method is helpful when you're not sure what the default value for a given CSS property is. Simply removing the property allows the default value to be used.
Computed Styles
The style object offers information about the style attribute on any element that supports it but contains no information about the styles that have cascaded from style sheets and affect the element. DOM Level 2 Style augments document.defaultView to provide a method called getComputedStyle(). This method accepts two arguments: the element to get the computed style for and a pseudo-element string (such as ":after"). The second argument can be null if no pseudo-element information is necessary. The getComputedStyle() method returns a CSSStyleDeclaration object (the same type as the style property) containing all computed styles for the element. Consider the following HTML page:
<!DOCTYPE html><html><head><title>Computed Styles Example</title><style type="text/css">#myDiv {background-color: blue;width: 100px;height: 200px;}</style></head><body><div id="myDiv" style="background-color: red; border: 1px solid black"></div></body></html>
In this example, the <div> element has styles applied to it both from an inline style sheet (the <style> element) and from the style attribute. The style object has values for backgroundColor and border, but nothing for width and height, which are applied through a style sheet rule. The following code retrieves the computed style for the element:
let myDiv = document.getElementById("myDiv");let computedStyle = document.defaultView.getComputedStyle(myDiv, null);console.log(computedStyle.backgroundColor); // "red"console.log(computedStyle.width); // "100px"console.log(computedStyle.height); // "200px"console.log(computedStyle.border); // "1px solid black" in some browsers
When retrieving the computed style of this element, the background color is reported as "red", the width as "100px", and the height as "200px". Note that the background color is not "blue" because that style is overridden on the element itself. The border property may or may not return the exact border rule from the style sheet. (Opera returns it, but other browsers do not.) This inconsistency is due to the way that browsers interpret rollup properties, such as border, that actually set a number of other properties. When you set border, you're actually setting rules for the border width, color, and style on all four borders (border-left-width, border-top-color, border-bottom-style, and so on). So even though computedStyle.border may not return a value in all browsers, computedStyle.borderLeftWidth does.
The important thing to remember about computed styles in all browsers is that they are read-only; you cannot change CSS properties on a computed style object. Also, the computed style contains styling information that is part of the browser's internal style sheet, so any CSS property that has a default value will be represented in the computed style. For instance, the visibility property always has a default value in all browsers, but this value differs per implementation. Some browsers set the visibility property to "visible" by default, whereas others have it as "inherit". You cannot depend on the default value of a CSS property to be the same across browsers. If you need elements to have a specific default value, you should manually specify it in a style sheet.
Working with Style Sheets
The CSSStyleSheet type represents a CSS style sheet as included using a <link> element or defined in a <style> element. Note that the elements themselves are represented by the HTMLLinkElement and HTMLStyleElement types, respectively. The CSSStyleSheet type is generic enough to represent a style sheet no matter how it is defined in HTML. Furthermore, the element-specific types allow for modification of HTML attributes, whereas a CSSStyleSheet object is, with the exception of one property, a read-only interface.
The CSSStyleSheet type inherits from StyleSheet, which can be used as a base to define non-CSS style sheets. The following properties are inherited from StyleSheet:
disabled—A Boolean value indicating if the style sheet is disabled. This property is read/write, so setting its value totruewill disable a style sheet.href—The URL of the style sheet if it is included using<link>; otherwise, this isnull.media—A collection of media types supported by this style sheet. The collection has alengthproperty anditem()method, as with all DOM collections. Like other DOM collections, you can use bracket notation to access specific items in the collection. An empty list indicates that the style sheet should be used for all media.ownerNode—Pointer to the node that owns the style sheet, which is either a<link>or a<style>element in HTML (it can be a processing instruction in XML). This property isnullif a style sheet is included in another style sheet using@import.parentStyleSheet—When a style sheet is included via@import, this is a pointer to the style sheet that imported it.title—The value of thetitleattribute on theownerNode.type—A string indicating the type of style sheet. For CSS style sheets, this is"text/css".
With the exception of disabled, the rest of these properties are read-only. The CSSStyleSheet type supports all of these properties and the following properties and methods:
cssRules—A collection of rules contained in the style sheet.ownerRule—If the style sheet was included using@import, this is a pointer to the rule representing the import; otherwise, this isnull.deleteRule(index)—Deletes the rule at the given location in thecssRulescollection.insertRule(rule, index)—Inserts the given string rule at the position specified in thecssRulescollection.
The list of style sheets available on the document is represented by the document.styleSheets collection. The number of style sheets on the document can be retrieved using the length property, and each individual style sheet can be accessed using either the item() method or bracket notation. Here is an example:
let sheet = null;for (let i = 0, len = document.styleSheets.length; i < len; i++) {sheet = document.styleSheets[i];console.log(sheet.href);}
This code outputs the href property of each style sheet used in the document (<style> elements have no href).
The style sheets returned in document.styleSheets vary from browser to browser. All browsers include <style> elements and <link> elements with rel set to "stylesheet". Internet Explorer and Opera also include <link> elements where rel is set to "alternate stylesheet".
It's also possible to retrieve the CSSStyleSheet object directly from the <link> or <style> element. The DOM specifies a property called sheet that contains the CSSStyleSheet object.
CSS Rules
A CSSRule object represents each rule in a style sheet. The CSSRule type is actually a base type from which several other types inherit, but the most often used is CSSStyleRule, which represents styling information (other rules include @import, @font-face, @page, and @charset, although these rules rarely need to be accessed from script). The following properties are available on a CSSStyleRule object:
cssText—Returns the text for the entire rule. This text may be different from the actual text in the style sheet because of the way that browsers handle style sheets internally; Safari always converts everything to all lowercase.parentRule—If this rule is imported, this is the import rule; otherwise, this isnull.parentStyleSheet—The style sheet that this rule is a part of.selectorText—Returns the selector text for the rule. This text may be different from the actual text in the style sheet because of the way that browsers handle style sheets internally. This property is read-only in Firefox, Safari, Chrome, and Internet Explorer (where it throws an error). Opera allowsselectorTextto be changed.-
style—ACSSStyleDeclarationobject that allows the setting and getting of specific style values for the rule. type—A constant indicating the type of rule. For style rules, this is always1.
The three most frequently used properties are cssText, selectorText, and style. The cssText property is similar to the style.cssText property but not exactly the same. The former includes the selector text and the braces around the style information; the latter contains only the style information (similar to style.cssText on an element). Also, cssText is read-only, whereas style.cssText may be overwritten.
Most of the time, the style property is all that is required to manipulate style rules. This object can be used just like the one on each element to read or change the style information for a rule. Consider the following CSS rule:
div.box {background-color: blue;width: 100px;height: 200px;}
Assuming that this rule is in the first style sheet on the page and is the only style in that style sheet, the following code can be used to retrieve all of its information:
let sheet = document.styleSheets[0];let rules = sheet.cssRules || sheet.rules; // get rules listlet rule = rules[0]; // get first ruleconsole.log(rule.selectorText); // "div.box"console.log(rule.style.cssText); // complete CSS codeconsole.log(rule.style.backgroundColor); // "blue"console.log(rule.style.width); // "100px"console.log(rule.style.height); // "200px"
Using this technique, it's possible to determine the style information related to a rule in the same way you can determine the inline style information for an element. As with elements, it's also possible to change the style information, as shown in the following example:
let sheet = document.styleSheets[0];let rules = sheet.cssRules || sheet.rules; // get rules listlet rule = rules[0]; // get first rulerule.style.backgroundColor = "red"
Note that changing a rule in this way affects all elements on the page for which the rule applies. If there are two <div> elements that have the box class, they will both be affected by this change.
Creating Rules
The DOM states that new rules are added to existing style sheets using the insertRule() method. This method expects two arguments: the text of the rule and the index at which to insert the rule. Here is an example:
sheet.insertRule("body { background-color: silver }", 0); // DOM methodThis example inserts a rule that changes the document's background color. The rule is inserted as the first rule in the style sheet (position 0)—the order is important in determining how the rule cascades into the document.
Although adding rules in this way is possible, it quickly becomes burdensome when the number of rules to add is large. In that case, it's better to use the dynamic style loading technique discussed in the Document Object Model chapter.
Deleting Rules
The DOM method for deleting rules from a style sheet is deleteRule(), which accepts a single argument: the index of the rule to remove. To remove the first rule in a style sheet, you can use the following code:
sheet.deleteRule(0); // DOM methodAs with adding rules, deleting rules is not a common practice in web development and should be used carefully because the cascading effect of CSS can be affected.
Element Dimensions
The following properties and methods are not part of the DOM Level 2 Style specification but nonetheless related to styles on HTML elements. The DOM stops short of describing ways to determine the actual dimensions of elements on a page. Internet Explorer first introduced several properties to expose dimension information to developers. These properties have now been incorporated into all of the major browsers.
Offset Dimensions
The first set of properties deals with offset dimensions, which incorporate all of the visual space that an element takes up on the screen. An element's visual space on the page is made up of its height and width, including all padding, scrollbars, and borders (but not including margins). The following four properties are used to retrieve offset dimensions:
offsetHeight—The amount of vertical space, in pixels, taken up by the element, including its height, the height of a horizontal scrollbar (if visible), the top border height, and the bottom border height.offsetLeft—The number of pixels between the element's outside left border and the containing element's inside left border.offsetTop—The number of pixels between the element's outside top border and the containing element's inside top border.offsetWidth—The amount of horizontal space taken up by the element, including its width, the width of a vertical scrollbar (if visible), the left border width, and the right border width.
The offsetLeft and offsetTop properties are in relation to the containing element, which is stored in the offsetParent property. The offsetParent may not necessarily be the same as the
parentNode. For example, the offsetParent of a <td> element is the <table> element that it's an ancestor of, because the <table> is the first element in the hierarchy that provides dimensions. Figure 16-1 illustrates the various dimensions these properties represent.

The offset of an element on the page can roughly be determined by taking the offsetLeft and offsetTop properties and adding them to the same properties of the offsetParent, continuing up the hierarchy until you reach the root element. Here is an example:
function getElementLeft(element) {let actualLeft = element.offsetLeft;let current = element.offsetParent;while (current !== null) {actualLeft += current.offsetLeft;current = current.offsetParent;}return actualLeft;}function getElementTop(element) {let actualTop = element.offsetTop;let current = element.offsetParent;while (current !== null) {actualTop += current.offsetTop;current = current.offsetParent;}return actualTop;}
These two functions climb through the DOM hierarchy using the offsetParent property, adding up the offset properties at each level. For simple page layouts using CSS-based layouts, these functions are very accurate. For page layouts using tables and iframes, the values returned are less accurate on a cross-browser basis because of the different ways that these elements are implemented. Generally, all elements that are contained solely within <div> elements have <body> as their offsetParent, so getElementLeft() and getElementTop() will return the same values as offsetLeft and offsetTop.
Client Dimensions
The client dimensions of an element comprise the space occupied by the element's content and its padding. There are only two properties related to client dimensions: clientWidth and clientHeight. The clientWidth property is the width of the content area plus the width of both the left and the right padding. The clientHeight property is the height of the content area plus the height of both the top and the bottom padding. Figure 16-2 illustrates these properties.
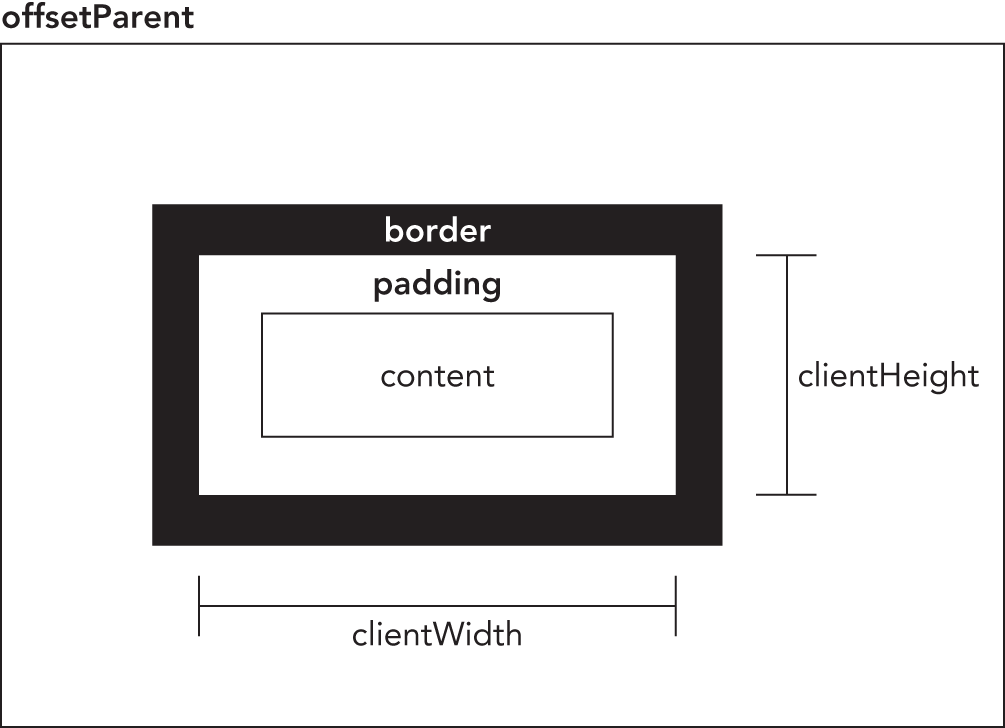
The client dimensions are literally the amount of space inside of the element, so the space taken up by scrollbars is not counted. The most common use of these properties is to determine the browser viewport size. This is done by using the clientWidth and
clientHeight of document.documentElement. These properties represent the dimensions of the viewport (the <html> or <body> elements).
Scroll Dimensions
The last set of dimensions is scroll dimensions, which provide information about an element whose content is scrolling. Some elements, such as the <html> element, scroll automatically without needing any additional code, whereas other elements can be made to scroll by using the CSS overflow property. The four scroll dimension properties are as follows:
scrollHeight—The total height of the content if there were no scrollbars present.scrollLeft—The number of pixels that are hidden to the left of the content area. This property can be set to change the scroll position of the element.scrollTop—The number of pixels that are hidden in the top of the content area. This property can be set to change the scroll position of the element.scrollWidth—The total width of the content if there were no scrollbars present.
Figure 16-3 illustrates these properties.
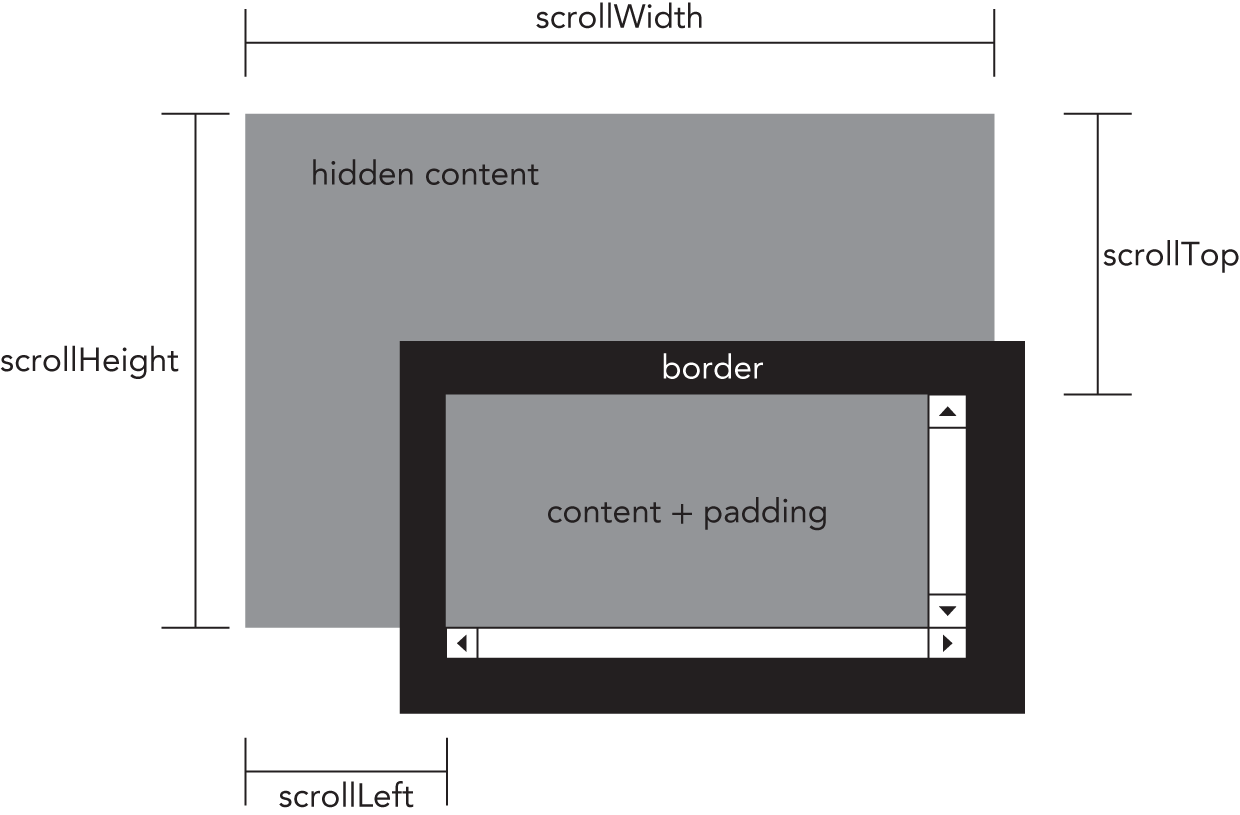
The scrollWidth and scrollHeight properties are useful for determining the actual dimensions of the content in a given element. For example, the <html> element is considered the element that scrolls the viewport in a web browser. Therefore, the height of an entire page that has a vertical scrollbar is document.documentElement.scrollHeight.
The relationship between scrollWidth and scrollHeight to clientWidth and clientHeight is not clear when it comes to documents that do not scroll. Inspecting these properties on document.documentElement leads to inconsistent results across browsers, as described here:
- Firefox keeps the properties equal, but the size is related to the actual size of the document content, not the size of the viewport.
- Opera, Safari, and Chrome keep the properties different, with
scrollWidthandscrollHeightequal to the size of the viewport andclientWidthandclientHeightequal to the document content. - Internet Explorer (in standards mode) keeps the properties different, with
scrollWidthandscrollHeightequal to the size of the document content, andclientWidthandclientHeightequal to the viewport size.
When trying to determine the total height of a document, including the minimum height based on the viewport, you must take the maximum value of scrollWidth/clientWidth and scrollHeight/clientHeight to guarantee accurate results across browsers. Here is an example:
let docHeight = Math.max(document.documentElement.scrollHeight,document.documentElement.clientHeight);let docWidth = Math.max(document.documentElement.scrollWidth,document.documentElement.clientWidth);
The scrollLeft and scrollTop properties can be used either to determine the current scroll settings on an element or to set them. When an element hasn't been scrolled, both properties are equal to 0. If the element has been scrolled vertically, scrollTop is greater than 0, indicating the amount of content that is not visible at the top of the element. If the element has been scrolled horizontally, scrollLeft is greater than 0, indicating the number of pixels that are not visible on the left. Because each property can also be set, you can reset the element's scroll position by setting both scrollLeft and scrollTop to 0. The following function checks to see if the element is at the top, and if not, it scrolls it back to the top:
function scrollToTop(element) {if (element.scrollTop != 0) {element.scrollTop = 0;}}
This function uses scrollTop both for retrieving the value and for setting it.
Determining Element Dimensions
Browsers offer a method called getBoundingClientRect() on each element, which returns a DOMRect object that has six properties: left, top, right, bottom, height, and width. These properties give the location of the element on the page relative to the viewport.
TRAVERSALS
The DOM Level 2 Traversal and Range module defines two types that aid in sequential traversal of a DOM structure. These types, NodeIterator and TreeWalker, perform depth-first traversals of a DOM structure given a certain starting point.
As stated previously, DOM traversals are a depth-first traversal of the DOM structure that allows movement in at least two directions (depending on the type being used). A traversal is rooted at a given node, and it cannot go any further up the DOM tree than that root. Consider the following HTML page:
<!DOCTYPE html><html><head><title>Example</title></head><body><p><b>Hello</b> world!</p></body></html>
This page evaluates to the DOM tree represented in Figure 16-4.
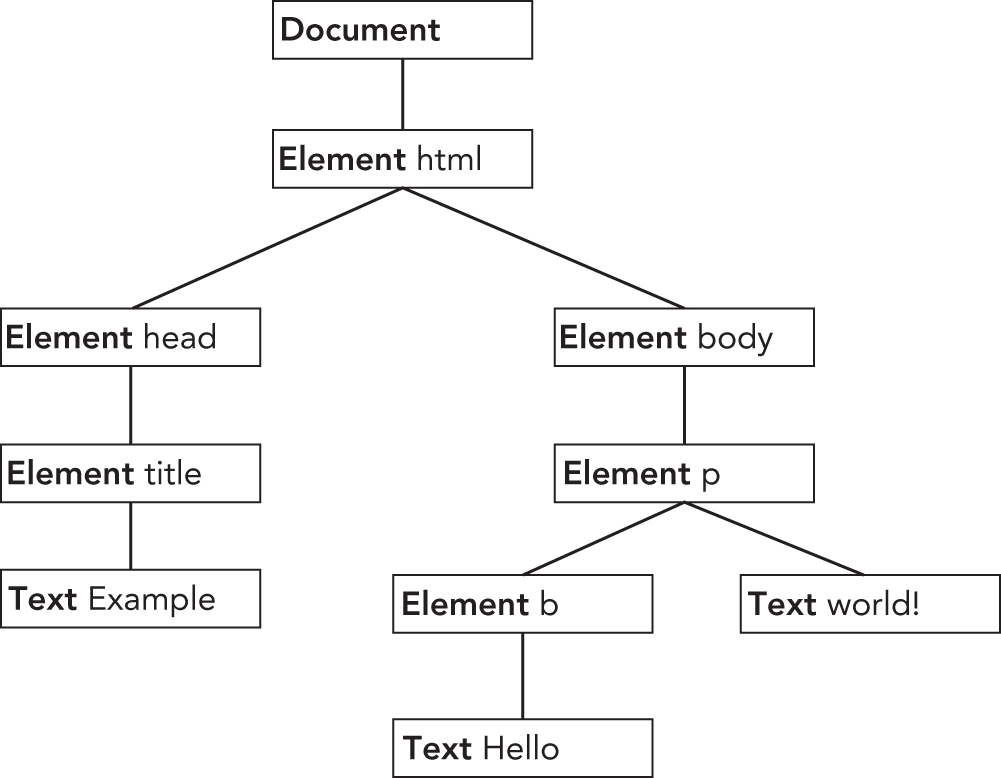
Any node can be the root of the traversals. Suppose, for example, that the <body> element is the traversal root. The traversal can then visit the <p> element, the <b> element, and the two text nodes that are descendants of <body>; however, the traversal can never reach the <html> element, the <head> element, or any other node that isn't in the <body> element's subtree. A traversal that has its root at document, on the other hand, can access all of the nodes in document. Figure 16-5 depicts a depth-first traversal of a DOM tree rooted at document.

Starting at document and moving sequentially, the first node visited is document and the last node visited is the text node containing " world!" From the very last text node at the end of the document, the traversal can be reversed to go back up the tree. In that case, the first node visited is the text node containing " world!" and the last one visited is the document node itself. Both NodeIterator and TreeWalker perform traversals in this manner.
NodeIterator
The NodeIterator type is the simpler of the two, and a new instance can be created using the document.createNodeIterator() method. This method accepts the following four arguments:
root—The node in the tree that you want to start searching from.whatToShow—A numerical code indicating which nodes should be visited.filter—ANodeFilterobject or a function indicating whether a particular node should be accepted or rejected.entityReferenceExpansion—A Boolean value indicating whether entity references should be expanded. This has no effect in HTML pages because entity references are never expanded.
The whatToShow argument is a bitmask that determines which nodes to visit by applying one or more filters. Possible values for this argument are included as constants on the NodeFilter type as follows:
NodeFilter.SHOW_ALL—Show all node types.NodeFilter.SHOW_ELEMENT—Show element nodes.NodeFilter.SHOW_ATTRIBUTE—Show attribute nodes. This can't actually be used because of the DOM structure.NodeFilter.SHOW_TEXT—Show text nodes.NodeFilter.SHOW_CDATA_SECTION—Show CData section nodes. This is not used in HTML pages.NodeFilter.SHOW_ENTITY_REFERENCE—Show entity reference nodes. This is not used in HTML pages.NodeFilter.SHOW_ENTITY—Show entity nodes. This is not used in HTML pages.NodeFilter.SHOW_PROCESSING_INSTRUCTION—Show PI nodes. This is not used in HTML pages.NodeFilter.SHOW_COMMENT—Show comment nodes.NodeFilter.SHOW_DOCUMENT—Show document nodes.NodeFilter.SHOW_DOCUMENT_TYPE—Show document type nodes.NodeFilter.SHOW_DOCUMENT_FRAGMENT—Show document fragment nodes. This is not used in HTML pages.NodeFilter.SHOW_NOTATION—Show notation nodes. This is not used in HTML pages.
With the exception of NodeFilter.SHOW_ALL, you can combine multiple options using the bitwise OR operator, as shown in the following example:
let whatToShow = NodeFilter.SHOW_ELEMENT | NodeFilter.SHOW_TEXT;The filter argument of createNodeIterator() can be used to specify a custom NodeFilter object or a function that acts as a node filter. A NodeFilter object has only one method, acceptNode(), which returns NodeFilter.FILTER_ACCEPT if the given node should be visited or NodeFilter.FILTER_SKIP if the given node should not be visited. Because NodeFilter is an abstract type, it's not possible to create an instance of it. Instead, just create an object with an acceptNode() method and pass the object into createNodeIterator(). The following code accepts only <p> elements:
let filter = {acceptNode(node) {return node.tagName.toLowerCase() == "p" ?NodeFilter.FILTER_ACCEPT :NodeFilter.FILTER_SKIP;}};let iterator = document.createNodeIterator(root, NodeFilter.SHOW_ELEMENT,filter, false);
The third argument can also be a function that takes the form of the acceptNode() method, as shown in this example:
let filter = function(node) {return node.tagName.toLowerCase() == "p" ?NodeFilter.FILTER_ACCEPT :NodeFilter.FILTER_SKIP;};let iterator = document.createNodeIterator(root, NodeFilter.SHOW_ELEMENT,filter, false);
Typically, this is the form that is used in JavaScript because it is simpler and works more like the rest of JavaScript. If no filter is required, the third argument should be set to null.
To create a simple NodeIterator that visits all node types, use the following code:
let iterator = document.createNodeIterator(document, NodeFilter.SHOW_ALL,null, false);
The two primary methods of NodeIterator are nextNode() and previousNode(). The nextNode() method moves one step forward in the depth-first traversal of the DOM subtree, and previousNode() moves one step backward in the traversal. When the NodeIterator is first created, an internal pointer points to the root, so the first call to nextNode() returns the root. When the traversal has reached the last node in the DOM subtree, nextNode() returns null. The previousNode() method works in a similar way. When the traversal has reached the last node in the DOM subtree, after previousNode() has returned the root of the traversal, it will return null.
Consider the following HTML fragment:
<div id="div1"><p><b>Hello</b> world!</p><ul><li>List item 1</li><li>List item 2</li><li>List item 3</li></ul></div>
Suppose that you would like to traverse all elements inside of the <div> element. This can be accomplished using the following code:
let div = document.getElementById("div1");let iterator = document.createNodeIterator(div, NodeFilter.SHOW_ELEMENT,null, false);let node = iterator.nextNode();while (node !== null) {console.log(node.tagName); // output the tag namenode = iterator.nextNode();}
The first call to nextNode() in this example returns the <p> element. Because nextNode() returns null when it has reached the end of the DOM subtree, a while loop checks to see when null has been returned as it calls nextNode() each time through. When this code is executed, logs are displayed with the following tag names:
DIVPBULLILILI
Perhaps this is too much information and you really only want to return the <li> elements that occur in the traversal. This can be accomplished by using a filter, as shown in the following example:
let div = document.getElementById("div1");let filter = function(node) {return node.tagName.toLowerCase() == "li" ?NodeFilter.FILTER_ACCEPT :NodeFilter.FILTER_SKIP;};let iterator = document.createNodeIterator(div, NodeFilter.SHOW_ELEMENT,filter, false);let node = iterator.nextNode();while (node !== null) {console.log(node.tagName); // output the tag namenode = iterator.nextNode();}
In this example, only <li> elements will be returned from the iterator.
The nextNode() and previousNode() methods work with NodeIterator's internal pointer in the DOM structure, so changes to the structure are represented appropriately in the traversal.
TreeWalker
TreeWalker is a more advanced version of NodeIterator. It has the same functionality, including nextNode() and previousNode(), and adds the following methods to traverse a DOM structure in different directions:
parentNode()—Travels to the current node's parent.firstChild()—Travels to the first child of the current node.lastChild()—Travels to the last child of the current node.nextSibling()—Travels to the next sibling of the current node.previousSibling()—Travels to the previous sibling of the current node.
A TreeWalker object is created using the document.createTreeWalker() method, which accepts the same arguments as document.createNodeIterator(): the root to traverse from, which node types to show, a filter, and a Boolean value indicating if entity references should be expanded. Because of these similarities, TreeWalker can always be used in place of NodeIterator, as in this example:
let div = document.getElementById("div1");let filter = function(node) {return node.tagName.toLowerCase() == "li" ?NodeFilter.FILTER_ACCEPT :NodeFilter.FILTER_SKIP;};let walker = document.createTreeWalker(div, NodeFilter.SHOW_ELEMENT,filter, false);let node = iterator.nextNode();while (node !== null) {console.log(node.tagName); // output the tag namenode = iterator.nextNode();}
One difference is in the values that the filter can return. In addition to NodeFilter.FILTER_ACCEPT and NodeFilter.FILTER_SKIP, there is NodeFilter.FILTER_REJECT. When used with a NodeIterator object, NodeFilter.FILTER_SKIP and NodeFilter.FILTER_REJECT do the same thing: they skip over the node. When used with a TreeWalker object, NodeFilter.FILTER_SKIP skips over the node and goes on to the next node in the subtree, whereas NodeFilter.FILTER_REJECT skips over that node and that node's entire subtree. For instance, changing the filter in the previous example to return NodeFilter.FILTER_REJECT instead of NodeFilter.FILTER_SKIP will result in no nodes being visited. This is because the first element returned is <div>, which does not have a tag name of "li", so NodeFilter.FILTER_REJECT is returned, indicating that the entire subtree should be skipped. Because the <div> element is the traversal root, this means that the traversal stops.
Of course, the true power of TreeWalker is its ability to move around the DOM structure. Instead of specifying filter, it's possible to get at the <li> elements by navigating through the DOM tree using TreeWalker, as shown here:
let div = document.getElementById("div1");let walker = document.createTreeWalker(div, NodeFilter.SHOW_ELEMENT, null, false);walker.firstChild(); // go to <p>walker.nextSibling(); // go to <ul>let node = walker.firstChild(); // go to first <li>while (node !== null) {console.log(node.tagName);node = walker.nextSibling();}
Because you know where the <li> elements are located in the document structure, it's possible to navigate there, using firstChild() to get to the <p> element, nextSibling() to get to the <ul> element, and then firstChild() to get to the first <li> element. Keep in mind that TreeWalker is returning only elements (because of the second argument passed in to createTreeWalker()). Then, nextSibling() can be used to visit each <li> until there are no more, at which point the method returns null.
The TreeWalker type also has a property called currentNode that indicates the node that was last returned from the traversal via any of the traversal methods. This property can also be set to change where the traversal continues from when it resumes, as shown in this example:
let node = walker.nextNode();console.log(node === walker.currentNode); // truewalker.currentNode = document.body; // change where to start from
Compared to NodeIterator, the TreeWalker type allows greater flexibility when traversing the DOM.
RANGES
To allow an even greater measure of control over a page, the DOM Level 2 Traversal and Range module defines an interface called a range. A range can be used to select a section of a document regardless of node boundaries. (This selection occurs behind the scenes and cannot be seen by the user.) Ranges are helpful when regular DOM manipulation isn't specific enough to change a document.
Ranges in the DOM
DOM Level 2 defines a method on the Document type called createRange(), which belongs to the document object. A DOM range can be created using createRange(), as shown here:
let range = document.createRange();Similar to nodes, the newly created range is tied directly to the document on which it was created and cannot be used on other documents. This range can then be used to select specific parts of the document behind the scenes. Once a range has been created and its position set, a number of different operations can be performed on the contents of the range, allowing more fine-grained manipulation of the underlying DOM tree.
Each range is represented by an instance of the Range type, which has a number of properties and methods. The following properties provide information about where the range is located in the document:
startContainer—The node within which the range starts (the parent of the first node in the selection).startOffset—The offset within thestartContainerwhere the range starts. IfstartContaineris a text node, comment node, or CData node, thestartOffsetis the number of characters skipped before the range starts; otherwise, the offset is the index of the first child node in the range.endContainer—The node within which the range ends (the parent of the last node in the selection).-
endOffset—The offset within theendContainerwhere the range ends (follows the same rules asstartOffset). commonAncestorContainer—The deepest node in the document that has bothstartContainerandendContaineras descendants.
These properties are filled when the range is placed into a specific position in the document.
Simple Selection in DOM Ranges
The simplest way to select a part of the document using a range is to use either selectNode() or selectNodeContents(). These methods each accept one argument, a DOM node, and fill a range with information from that node. The selectNode() method selects the entire node, including its children, whereas selectNodeContents() selects only the node's children. For example, consider the following HTML:
<!DOCTYPE html><html><body><p id="p1"><b>Hello</b> world!</p></body></html>
This code can be accessed using the following JavaScript:
let range1 = document.createRange(),range2 = document.createRange(),p1 = document.getElementById("p1");range1.selectNode(p1);range2.selectNodeContents(p1);
The two ranges in this example contain different sections of the document: range1 contains the <p> element and all its children, whereas range2 contains the <b> element, the text node "Hello", and the text node "world!", as seen in Figure 16-6.

When selectNode() is called, startContainer, endContainer, and commonAncestorContainer are all equal to the parent node of the node that was passed in; in this example, these would all be equal to document.body. The startOffset property is equal to the index of the given node within the parent's childNodes collection (which is 1 in this example—remember DOM-compliant browsers count white space as text nodes), whereas endOffset is equal to the startOffset plus one (because only one node is selected).
When selectNodeContents() is called, startContainer, endContainer, and commonAncestor Container are equal to the node that was passed in, which is the <p> element in this example.
The startOffset property is always equal to 0, because the range begins with the first child of the given node, whereas endOffset is equal to the number of child nodes (node.childNodes.length), which is 2 in this example.
It's possible to get more fine-grained control over which nodes are included in the selection by using the following range methods:
setStartBefore(refNode)—Sets the starting point of the range to begin beforerefNode, sorefNodeis the first node in the selection. ThestartContainerproperty is set torefNode.parentNode, and thestartOffsetproperty is set to the index ofrefNodewithin its parent'schildNodescollection.setStartAfter(refNode)—Sets the starting point of the range to begin afterrefNode, sorefNodeis not part of the selection; rather, its next sibling is the first node in the selection. ThestartContainerproperty is set torefNode.parentNode, and thestartOffsetproperty is set to the index ofrefNodewithin its parent'schildNodescollection plus one.setEndBefore(refNode)—Sets the ending point of the range to begin beforerefNode, sorefNodeis not part of the selection; its previous sibling is the last node in the selection. TheendContainerproperty is set torefNode.parentNode, and theendOffsetproperty is set to the index ofrefNodewithin its parent'schildNodescollection.setEndAfter(refNode)—Sets the ending point of the range to begin beforerefNode, sorefNodeis the last node in the selection. TheendContainerproperty is set torefNode.parentNode, and theendOffsetproperty is set to the index ofrefNodewithin its parent'schildNodescollection plus one.
When you use any of these methods, all properties are assigned for you. However, it is possible to assign these values directly in order to make complex range selections.
Complex Selection in DOM Ranges
Creating complex ranges requires the use of the setStart() and setEnd() methods. Both methods accept two arguments: a reference node and an offset. For setStart(), the reference node becomes the startContainer, and the offset becomes the startOffset. For setEnd(), the reference node becomes the endContainer, and the offset becomes the endOffset.
With these methods, it is possible to mimic selectNode() and selectNodeContents(). Here is an example:
let range1 = document.createRange(),range2 = document.createRange(),p1 = document.getElementById("p1"),p1Index = -1,i,len;for (i = 0, len = p1.parentNode.childNodes.length; i < len; i++) {if (p1.parentNode.childNodes[i] === p1) {p1Index = i;break;}}range1.setStart(p1.parentNode, p1Index);range1.setEnd(p1.parentNode, p1Index + 1);range2.setStart(p1, 0);range2.setEnd(p1, p1.childNodes.length);
Note that to select the node (using range1), you must first determine the index of the given node (p1) in its parent node's childNodes collection. To select the node contents (using range2), you do not need calculations; setStart() and setEnd() can be set with default values. Although mimicking selectNode() and selectNodeContents() is possible, the real power of setStart() and setEnd() is in the partial selection of nodes.
Suppose that you want to select only from the "llo" in "Hello" to the "o" in "world!" in the previous HTML code. This is quite easy to accomplish. The first step is to get references to all of the relevant nodes, as shown in the following example:
let p1 = document.getElementById("p1"),helloNode = p1.firstChild.firstChild,worldNode = p1.lastChild
The "Hello" text node is actually a grandchild of <p> because it's a child of <b>, so you can use p1.firstChild to get <b> and p1.firstChild.firstChild to get the text node. The "world!" text node is the second (and the last) child of <p>, so you can use p1.lastChild to retrieve it. Next, the range must be created and its boundaries defined, as shown in the following example:
let range = document.createRange();range.setStart(helloNode, 2);range.setEnd(worldNode, 3);
Because the selection should start after the "e" in "Hello", helloNode is passed into setStart() with an offset of 2 (the position after the "e" where "H" is in position 0). To set the end of the selection, pass worldNode into setEnd() with an offset of 3, indicating the first character that should not be selected, which is "r" in position 3 (there is actually a space in position 0). You'll see this illustrated in Figure 16-7.

Because both helloNode and worldNode are text nodes, they become the startContainer and endContainer for the range so that the startOffset and endOffset accurately look at the text contained within each node rather than look for child nodes (which is what happens when an element is passed in). The commonAncestorContainer is the <p> element, which is the first ancestor that contains both nodes.
Of course, just selecting sections of the document isn't very useful unless you can interact with the selection.
Interacting with DOM Range Content
When a range is created, internally it creates a document fragment node onto which all of the nodes in the selection are attached. The range contents must be well formed in order for this process to take place. In the previous example, the range does not represent a well-formed DOM structure because the selection begins inside one text node and ends in another, which cannot be represented in the DOM. Ranges, however, recognize missing opening and closing tags and are, therefore, able to reconstruct a valid DOM structure to operate on.
In the previous example, the range calculates that a <b> start tag is missing inside the selection, so the range dynamically adds it behind the scenes, along with a new </b> end tag to enclose "He", thus altering the DOM to the following:
<p><b>He</b><b>llo</b> world!</p>Additionally, the "world!" text node is split into two text nodes, one containing " wo" and the other containing "rld!". The resulting DOM tree is shown in Figure 16-8, along with the contents of the document fragment for the range.

With the range created, the contents of the range can be manipulated using a variety of methods. (Note that all nodes in the range's internal document fragment are simply pointers to nodes in the document.)
The first method is the simplest to understand and use: deleteContents(). This method simply deletes the contents of the range from the document. Here is an example:
let p1 = document.getElementById("p1"),helloNode = p1.firstChild.firstChild,worldNode = p1.lastChild,range = document.createRange();range.setStart(helloNode, 2);range.setEnd(worldNode, 3);range.deleteContents();
Executing this code results in the following HTML being shown on the page:
<p><b>He</b>rld!</p>Because the range selection process altered the underlying DOM structure to remain well formed, the resulting DOM structure is well formed even after removing the contents.
extractContents() is similar to deleteContents() in that it also removes the range selection from the document. The difference is that extractContents() returns the range's document fragment as the function value. This allows you to insert the contents of the range somewhere else. Here is an example:
let p1 = document.getElementById("p1"),helloNode = p1.firstChild.firstChild,worldNode = p1.lastChild,range = document.createRange();range.setStart(helloNode, 2);range.setEnd(worldNode, 3);let fragment = range.extractContents();p1.parentNode.appendChild(fragment);
In this example, the fragment is extracted and added to the end of the document's <body> element. (Remember, when a document fragment is passed into appendChild(), only the fragment's children are added, not the fragment itself.) The resulting HTML is as follows:
<p><b>He</b>rld!</p><b>llo</b> wo
Another option is to leave the range in place but create a clone of it that can be inserted elsewhere in the document by using cloneContents(), as shown in this example:
let p1 = document.getElementById("p1"),helloNode = p1.firstChild.firstChild,worldNode = p1.lastChild,range = document.createRange();range.setStart(helloNode, 2);range.setEnd(worldNode, 3);let fragment = range.cloneContents();p1.parentNode.appendChild(fragment);
This method is very similar to extractContents() because both return a document fragment. The main difference is that the document fragment returned by cloneContents() contains clones of the nodes contained in the range instead of the actual nodes. With this operation, the HTML in the page is as follows:
<p><b>Hello</b> world!</p><b>llo</b> wo
It's important to note that the splitting of nodes ensures that a well-formed document isn't produced until one of these methods is called. The original HTML remains intact right up until the point that the DOM is modified.
Inserting DOM Range Content
Ranges can be used to remove or clone content, as you saw in the previous section, and to manipulate the contents inside of the range. The insertNode() method enables you to insert a node at the beginning of the range selection. For example, suppose that you want to insert the following HTML prior to the HTML used in the previous example:
<span style="color: red">Inserted text</span>The following code accomplishes this:
let p1 = document.getElementById("p1"),helloNode = p1.firstChild.firstChild,worldNode = p1.lastChild,range = document.createRange();range.setStart(helloNode, 2);range.setEnd(worldNode, 3);let span = document.createElement("span");span.style.color = "red";span.appendChild(document.createTextNode("Inserted text"));range.insertNode(span);
Running this JavaScript effectively creates the following HTML code:
<p id="p1"><b>He<span style="color: red">Inserted text</span>llo</b> world</p>Note that <span> is inserted just before the "llo" in "Hello", which is the first part of the range selection. Also note that the original HTML didn't add or remove <b> elements because none of the methods introduced in the previous section were used. You can use this technique to insert helpful information, such as an image next to links that open in a new window.
Along with inserting content into the range, it is possible to insert content surrounding the range by using the surroundContents() method. This method accepts one argument, which is the node that surrounds the range contents. Behind the scenes, the following steps are taken:
- The contents of the range are extracted.
- The given node is inserted into the position in the original document where the range was.
- The contents of the document fragment are added to the given node.
This sort of functionality is useful online to highlight certain words in a web page, as shown here:
let p1 = document.getElementById("p1"),helloNode = p1.firstChild.firstChild,worldNode = p1.lastChild,range = document.createRange();range.selectNode(helloNode);let span = document.createElement("span");span.style.backgroundColor = "yellow";range.surroundContents(span);
This code highlights the range selection with a yellow background. The resulting HTML is as follows:
<p><b><span style="background-color:yellow">Hello</span></b> world!</p>In order to insert the <span>, the range has to contain a whole DOM selection. (It can't have only partially selected DOM nodes.)
Collapsing a DOM Range
When a range isn't selecting any part of a document, it is said to be collapsed. Collapsing a range resembles the behavior of a text box. When you have text in a text box, you can highlight an entire word using the mouse. However, if you left-click the mouse again, the selection is removed and the cursor is located between two letters. When you collapse a range, its location is set between parts of a document, either at the beginning of the range selection or at the end. Figure 16-9 illustrates what happens when a range is collapsed.

You can collapse a range by using the collapse() method, which accepts a single argument: a Boolean value indicating which end of the range to collapse to. If the argument is true, then the range is collapsed to its starting point; if it is false, the range is collapsed to its ending point. To determine if a range is already collapsed, you can use the collapsed property as follows:
range.collapse(true); // collapse to the starting pointconsole.log(range.collapsed); // outputs "true"
Testing whether a range is collapsed is helpful if you aren't sure if two nodes in the range are next to each other. For example, consider this HTML code:
<p id="p1">Paragraph 1</p><p id="p2">Paragraph 2</p>If you don't know the exact makeup of this code (for example, if it is automatically generated), you might try creating a range like this:
let p1 = document.getElementById("p1"),p2 = document.getElementById("p2"),range = document.createRange();range.setStartAfter(p1);range.setStartBefore(p2);console.log(range.collapsed); // true
In this case, the created range is collapsed because there is nothing between the end of p1 and the beginning of p2.
Comparing DOM Ranges
If you have more than one range, you can use the compareBoundaryPoints() method to determine if the ranges have any boundaries (start or end) in common. The method accepts two arguments: the range to compare to and how to compare. It is one of the following constant values:
Range.START_TO_START (0)—Compares the starting point of the first range to the starting point of the second.-
Range.START_TO_END(1)—Compares the starting point of the first range to the end point of the second. Range.END_TO_END (2)—Compares the end point of the first range to the end point of the second.Range.END_TO_START(3)—Compares the end point of the first range to the starting point of the second.
The compareBoundaryPoints() method returns –1 if the point from the first range comes before the point from the second range, 0 if the points are equal, or 1 if the point from the first range comes after the point from the second range. Consider the following example:
let range1 = document.createRange();let range2 = document.createRange();let p1 = document.getElementById("p1");range1.selectNodeContents(p1);range2.selectNodeContents(p1);range2.setEndBefore(p1.lastChild);console.log(range1.compareBoundaryPoints(Range.START_TO_START, range2)); // 0console.log(range1.compareBoundaryPoints(Range.END_TO_END, range2)); // 1
In this code, the starting points of the two ranges are exactly the same because both use the default value from selectNodeContents(); therefore, the method returns 0. For range2, however, the end point is changed using setEndBefore(), making the end point of range1 come after the end point of range2 (see Figure 16-10), so the method returns 1.

Cloning DOM Ranges
Ranges can be cloned by calling the cloneRange() method. This method creates an exact duplicate of the range on which it is called:
let newRange = range.cloneRange();The new range contains all of the same properties as the original, and its end points can be modified without affecting the original in any way.
Cleanup
When you are done using a range, it is best to call the detach() method, which detaches the range from the document on which it was created. After calling detach(), the range can be safely dereferenced, so the memory can be reclaimed through garbage collection. Here is an example:
range.detach(); // detach from documentrange = null; // dereferenced
Following these two steps is the most appropriate way to finish using a range. Once it is detached, a range can no longer be used.
SUMMARY
The DOM Level 2 specifications define several modules that augment the functionality of DOM Level 1. DOM Level 2 Core introduces several new methods related to XML namespaces on various DOM types. These changes are relevant only when used in XML or XHTML documents; they have no use in HTML documents. Methods not related to XML namespaces include the ability to programmatically create new instances of Document and to enable the creation of DocumentType objects.
The DOM Level 2 Style module specifies how to interact with stylistic information about elements as follows:
- Every element has a
styleobject associated with it that can be used to determine and change inline styles. - To determine the computed style of an element, including all CSS rules that apply to it, you can use a method called
getComputedStyle(). - It's also possible to access style sheets via the
document.styleSheetscollection.
The DOM Level 2 Traversals and Range module specifies different ways to interact with a DOM structure as follows:
- Traversals are handled using either
NodeIteratororTreeWalkerto perform depth-first traversals of a DOM tree. - The
NodeIteratorinterface is simple, allowing only forward and backward movement in one-step increments. TheTreeWalkerinterface supports the same behavior and moves across the DOM structure in all other directions, including parents, siblings, and children. - Ranges are a way to select specific portions of a DOM structure to augment it in some fashion.
- Selections of ranges can be used to remove portions of a document while retaining a well-formed document structure or for cloning portions of a document.