
Chapter 2
Using SQL Azure for Business Intelligence
What's in This Chapter?
- Understanding the basics of SQL Azure
- Understanding the different types of business intelligence solutions you can build using SharePoint and SQL Azure
- Building a business intelligence solution using SQL Azure
The goal of this chapter is to introduce you to SQL Azure and describe how you can build a business intelligence (BI) solution using SQL Azure and SharePoint 2010 (or just SharePoint in this chapter). Similar to the other chapters in this book, this chapter first provides some grounding, then walks through a high-level solution architecture, and then describes the practical how-to guidance to create the solution. Because it is possible to build both no-code and code-based solutions using SQL Azure and SharePoint, the solution incorporates both of these into the final solution.
SQL Azure is one of the core parts of Windows Azure and represents Microsoft's transactional database offering in the cloud. It is also a highly available cloud-based relational database service that is architected similar to SQL Server. Similar to Windows Azure, SQL Azure represents a pay-as-you-go service that scales out with your needs. If you've used SQL Server before, you'll easily transition into using SQL Azure. Because SQL Azure is hosted in a data center, you don't need to do anything to manage it (e.g., upgrade, configure, patch, and so on). Also, because SQL Azure is scalable and elastic, it grows as you use it; you don't need to worry about running into storage-capacity issues, as you would need to manage within an on-premises data center or lab.
SQL Azure supports many of the same features as SQL Server. For example, you can manage tables, databases and primary keys; issue stored procedures; create views; query data; and much more. SQL Azure also uses a set of familiar tools. As you'll see in this chapter, you primarily use SQL Server 2008 R2 Management Studio to manage your SQL Azure database. Many of the same functions that you use with on-premises databases are available to you with SQL Azure; however, some menu options may not be available in the current release (which at the time of writing was the May 2011 release). You can use Transact-SQL (T-SQL) scripts in situations where menu options don't exist to issue commands against your SQL Azure database, such as creating databases and tables and populating tables with data.
In this chapter, you'll use SQL Azure as your cloud-based data storage engine, and you'll store fictional sales data in it. The goal of the chapter is to surface the sales data within a no-code BI application and a code-based BI application, which together comprise the chapter's BI solution.
Uses of SQL Azure
SQL Azure is your transactional and relational database in the cloud, and, as such, there exist many uses for it. For example, you can store different types of data in SQL Azure and then use this data as a back-end to websites, web applications, and web services. You can also use SQL Azure to mirror your on-premises data so that you have a replicated cloud instance of your database available to remote users or partner extranets. SQL Azure also serves as a temporary storage facility to manage transactional records that don't require long-term storage.
How you manage data in SQL Azure is very similar to how you would interact with data in other relational databases. For example, you can create, access, and manage tables, views, roles, stored procedures, and functions using SQL Azure. You can also issue queries and then join together multiple tables. Furthermore, you can insert, update, and delete data from SQL Azure, as well as perform many other core relational database functions.
As a developer, you can also program against SQL Azure in a number of different ways. For example, you can use Open Database Connectivity (ODBC) to open communication with SQL Azure and create simple SQL queries or leverage stored procedures in code. In the “Code-Based Solutions in SharePoint” section later in this chapter, you'll learn how you can programmatically interact with SQL Azure in greater detail, and throughout the chapter you'll get hands-on coding experience that will enable you to put this programming into practice.
Migrating SQL Server to SQL Azure
In this chapter, you'll create a small database and table and then populate that table with some fictional sales data. However, because you use SQL Azure as your data source, you don't necessarily need to start from scratch; you can migrate data from your on-premises instance of SQL Server to SQL Azure. Furthermore, you have the option to use either the native tools and scripts that are built into SQL Server Management Studio 2008 R2 or one of a growing set of migration tools.
One way to migrate your data is to export the database schema of your on-premises SQL Server database and then transfer the data to SQL Azure. This requires exporting a script from SQL Server Management Studio and configuring your export options, which then creates the schema in the SQL Azure database. You can also use the Generate and Publish Scripts Wizard to transfer a database from your local machine to a SQL Azure database. This wizard creates T-SQL scripts for your local database, which then enables you to move the data to SQL Azure. For more information, visit www.msdn.microsoft.com/en-us/library/ee621790.aspx.
Another way to migrate your data from SQL Server to SQL Azure is to use the Microsoft Sync Framework 2.1, which supports synchronization between on-premises and SQL Azure servers. In essence, Microsoft Sync Framework 2.1 enables you to extend the schema of your on-premises database to the cloud. Microsoft Sync Framework 2.1 comes with a great set of documentation and an SDK, which can be found at http://msdn.microsoft.com/en-us/sync/default.aspx.
The SQL Azure Migration Wizard, a CodePlex project, also supports migrating data to SQL Azure by enabling you to select specific SQL objects, create SQL scripts that are conversant with SQL Azure, and move data from on-premises to the cloud. You can also move data across SQL Azure databases. For more information, see http://sqlazuremw.codeplex.com/.
Finally, you can also use the SQL Server Integration Services (SSIS) to move data in and out of SQL Azure. Using SQL Server 2008 R2, the Import and Export Data Wizard provides support for migrating data into SQL Azure. For more information, visit http://msdn.microsoft.com/en-us/library/ms141026.aspx.
![]() A great resource is Roger Doherty, a longtime SQL Server evangelist/technologist. You can find his blog at http://blogs.msdn.com/b/rdoherty/.
A great resource is Roger Doherty, a longtime SQL Server evangelist/technologist. You can find his blog at http://blogs.msdn.com/b/rdoherty/.
Interacting with SQL Azure with SQL Server 2008 R2 Management Studio
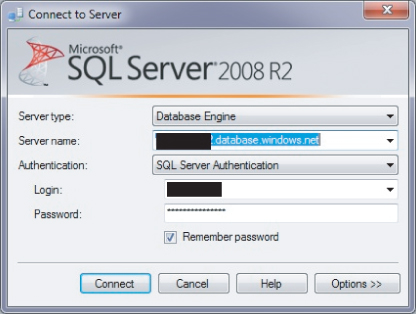
SQL Server 2008 R2 Management Studio is one of the main ways in which you can interact with SQL Server data. It is an integrated environment that enables you to log in to your SQL Azure database and configure, manage, administer, and develop against your data. In essence, it represents your GUI interface with SQL Azure. When you launch Management Studio, you'll need to select the server type (e.g., Database Engine), enter your server name (e.g., servername.database.windows.net), select the authentication type (e.g., SQL Server Authentication), provide a login username (e.g., johndoe), and, finally, your password. Figure 2.1 illustrates the Connect to Server dialog that connects you to your SQL Azure instance.
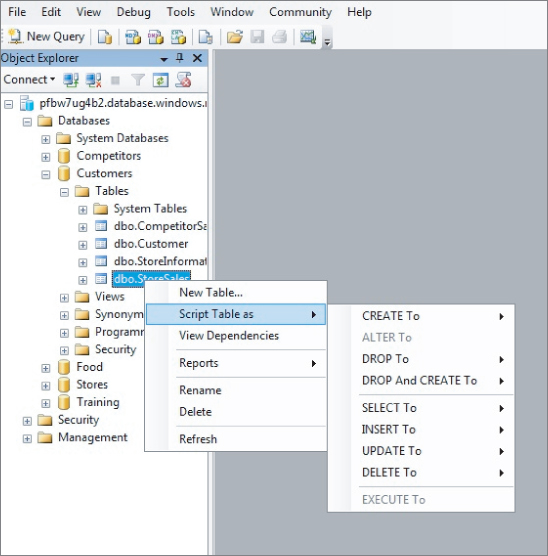
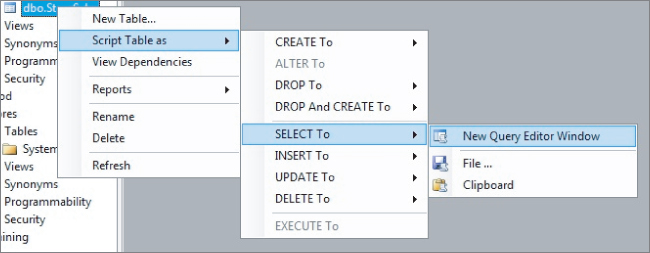
After logging into SQL Azure, you can use many of the core SQL Server Management Studio functions to interact with your data. This functionality includes creating queries against your data (e.g., to create tables, insert data, query and display data, etc.). Management Studio also provides right-click functionality in the 2008 R2 version, enabling you to use shortcuts to common functions. For example, Figure 2.2 illustrates the shortcut menu that is available for a table. As you can see, you can dynamically create generic T-SQL scripts that perform different functions, ranging from CREATE to SELECT.
Querying data in SQL Azure using the SQL Server 2008 R2 Management Studio GUI is slightly different from its SQL Server counterpart. For example, when you right-click the table and select Script Table as ⇒ SELECT To ⇒ New Query Editor Window, the result is a generic SELECT * statement that queries your data (see Figure 2.3). Thus, the shortcut menus offer an easy way to run some default T-SQL script against your database in the cloud.

As you explore SQL Server 2008 R2 Management Studio to manage your SQL Azure data, you'll surely discover many ways to interact with your cloud-based data.
SQL Azure is your relational database in the cloud; it represents a starting point for managing data for your organization. However, managing relational data is but one aspect of a BI solution. A second and equally critical aspect of the BI solution is presenting that data in such a way that it is meaningful and relevant (and perhaps filterable and manageable). Accomplishing this requires not only the careful storage of data, but also the capability to render and manipulate the data on the client in a variety of ways. SharePoint provides many ways for you to interact with SQL Azure — some of these are no-code solutions and others are code-centric solutions.
No-Code BI Solutions in SharePoint
No-code BI solutions in SharePoint provide a range of integrated capabilities that can help you manage your SQL Azure data. Some of these solutions are built into the native SharePoint capabilities, while others require some configuration or declarative development to create and deploy.
Out-of-the-box solutions for SharePoint vary. For example, one possibility is the Chart web part, which enables you to connect to data and expose that data in different ways and types of charts in a web part. The types of data you can connect to range from SQL Server data to SharePoint list data. The Chart web part uses the System.Web.DataVisualization library (the ASP.NET Chart control) to create an in-browser configuration experience to create some simple, but effective, charting. Another possibility are the Key Performance Indicators (KPIs), which enable you to set status indicators using a range of data types, ranging from SharePoint list data to Microsoft Excel data to SQL Server data. Finally, Excel Services enables you to bridge SQL Azure data with Excel and then populate Excel Web Access web parts with that cloud data.
Another example of a no-code solution is the use of SQL Server Reporting Services (SSRS) to build form-based views of SQL Azure data in SharePoint. Some configuration is required for SSRS, but after you get the SSRS bits installed and configured, you can create many different reports for your SQL Azure data.
Another no-code example, and one that is more commonly used with external data systems, is using Business Connectivity Services (BCS). BCS provides you with the capability to integrate directly with external systems — both ADO.NET-based and web-service-based systems. This enables you to connect to SQL Azure natively using SharePoint Designer 2010 to declaratively build what are called external content types (XML files that define the relationship between SharePoint and the external data system).
Code-Based Solutions in SharePoint
When you build a code-based solution, first you need to get the data from SQL Azure, and then you need to do something with it within SharePoint. If you've done any development before, you know that data-driven programming can take many different forms. For example, you can use ODBC or ADO.NET to interact with your database. This can take the form of SQL query strings (e.g., to connect and query a database), or it can take the form of WCF Data Services (formerly ADO.NET Data Services), which provides a richer form of data-binding and querying. For example, you can leverage the WCF Data Services to create an entity data model of the SQL Azure data construct. This approach enables you to easily query the data from SQL Azure using LINQ. When using the WCF Data Services, you should be aware that not all .NET client technologies supported in SharePoint support WCF Data Services. For example, if you want to use Silverlight, you may want to either choose a different data connectivity method or abstract the call to SQL Azure using a WCF service proxy (which does support entity data models).
For more query-string-driven applications, you can also use the SqlDataAdapter class to build and execute SQL connection strings and queries against your SQL Azure database. Although you can do this, you must generate the query strings in your code, which can sometimes be cumbersome with elaborate queries. Using the SqlDataAdapter class provides a more universal approach to your data connections; that is, it's widely supported. This mitigates the need for WCF service proxies, although it doesn't completely eliminate the possibility of using them. For more information on the SqlDataAdapter class, visit http://msdn.microsoft.com/en-us/library/system.data.sqlclient.sqldataadapter.aspx.
Of course, after you are able to connect and query the data in SQL Azure, you must do something with the data when you retrieve it. This is where you dig a little deeper into SharePoint. Using SharePoint, you can, for example, leverage Silverlight, web parts, BCS (e.g., external lists), ASP.NET charting, and so on, to surface data from SQL Azure. Each artifact supported by SharePoint provides slightly different results, though. For example, Silverlight is very handy when it comes to building BI solutions, given the smooth and dynamic UI experience that can be easily built and deployed. Examples of this are theming and the chart toolkit for Silverlight, which provide simple design augmentation and different graphical charting capabilities. Web parts, one of the most commonly developed artifacts within SharePoint, also serve as a great way to display data. You can use web parts to create filterable and queryable views to SQL Azure data. BCS provides a native connection to SQL Azure, which enables end users to manage data into and out of SQL Azure, while also allowing you to programmatically connect to and leverage the SQL Azure data in the external list through the SharePoint client object model. The ASP.NET Chart control provides a rich and programmatic way to interact with SQL Azure.
In this chapter, you'll use a combination of the preceding approaches — except for Silverlight, which is discussed in Chapter 7 — to build your BI solution. Specifically, you'll first build a no-code solution using BCS to create an external list that provides the native connection to SQL Azure. Then, you'll also build a code-based web part that uses the ASP.NET Chart control programmatically to aggregate and display data from SQL Azure. Although the application you'll build could have used the server object model or even the client object model to interact with the external list data (i.e., to query it), we think it's more useful to walk through abstracting the data connection and query layer with a WCF service proxy. This way, you can repurpose the WCF service across multiple applications. As you work beyond this chapter, though, keep in mind that the SharePoint object model is also a possibility within this solution architecture. Similarly, rather than use, say, the DataSet data construct, you'll use a custom class to manage and bind data within the web part.
Creating a BI Dashboard Using SQL Azure and SharePoint
Dashboards provide a quick-and-easy way to scan and understand how specific metrics are performing. For example, sales professionals and executives often track the sales of products through sales dashboards, which, as you can imagine, provide sales figures across time, potentially regions, for specific products. Dashboards can be created in any number of ways, many of which have been mentioned already in this book. The BI dashboard you'll create in this chapter will integrate an external list with an ASP.NET Chart control within a web part.
The Solution Architecture
The design of the solution you'll build in this chapter is straightforward. It uses SQL Azure as the back-end data source and incorporates a no-code and code-centric approach to building the two core BI applications that will make up the solution. The no-code approach leverages BCS to integrate SQL Azure with SharePoint, and the code-centric approach leverages the ASP.NET Chart control to build a custom connection to the SQL Azure data. The use of BCS enables you to connect to SQL Azure directly, and the ASP.NET Chart control leverages a WCF service proxy that queries the SQL Azure data and dynamically generates a chart in SharePoint.
Figure 2.4 provides a high-level overview of the solution architecture. In the diagram, the ASP.NET Chart control consumes a WCF service, which further queries the SQL Azure database. Note that the WCF service is deployed to the SharePoint server; however, you can also deploy the service to Windows Azure. Deploying the service to Windows Azure would enable you to leverage the WCF service in other applications and platforms such as SharePoint Online/Office 365 (e.g., developing a Silverlight-based chart application using the same data in a SharePoint Online application). This is indicated by the parts of the diagram marked with dotted lines. The core web method within the WCF service is the GetAllSalesData method, which will do the heavy lifting to retrieve the sales data from the SQL Azure database. The BCS is built directly against the SQL Azure data source, which provides a read-write external list for you to manage the sales data.
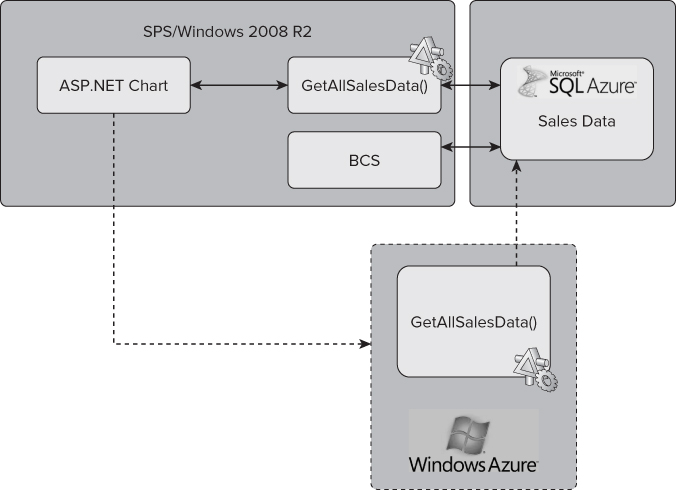
As you work through the example, you'll notice that the bridge between the SQL Azure database and the external list is managed through an application ID, which helps manage two sets of credentials. Because SQL Azure has a different set of credentials from Windows credentials, you cannot pass the active user's credentials across; you must provide a way to authenticate the call to SQL Azure.
The result of this architecture is manifested in two parts to the BI solution: an external list that provides read/write access to the SQL Azure database, and an ASP.NET Chart web part that provides an aggregate sales view of the data.
Creating the Sales BI Application
The first step in building the BI application is to create the sales data in SQL Azure. To complete this step, you must have a Windows Azure account provisioned. To get a trial account, visit www.microsoft.com/windowsazure/free-trial/sharepoint-integration/.
Creating the SQL Azure Database
You need to create the SQL Azure database to store your sales data in the cloud.
1. Navigate to http://windows.azure.com and sign in using your Live ID.
2. In the left navigation pane, click Hosted Services, Storage Accounts & CDN, and then select New Storage Account.
3. Map the new storage account to your subscription and provide a namespace for the storage account. You'll also need to select a region. When done, click Create.
4. Click the Firewall Rules control to set the firewall rule for the storage account (see Figure 2.5).
This rule enables your machine to connect and interact with the storage account. In a production environment, you should always ensure that this is set to a strictly defined IP, but for a proof of concept or demo you can set the IP rule to be more open. Provide a name for the firewall rule (e.g., MyServerFWRule), and then select the IP range (e.g., 0.0.0.0-255.255.255.255).
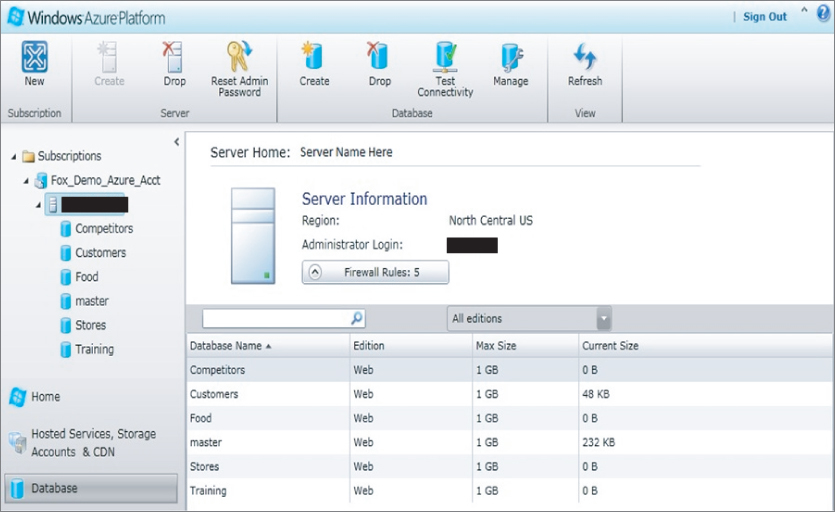
5. Click the Database tab in your portal, and then select the subscription where you want to create your Sales database.
6. Create a new database by clicking Create. Provide a name (e.g., TotalSales) and select the edition (select Web, which is the scaled-down database for smaller, more low-cost usage). Make a note of the administrator username and password.
7. Open SQL Server Management Studio 2008 R2 and log into your new SQL Azure instance by providing the username and password credentials. When done, click Connect.
8. When connected, click the New Query button.
9. Type the following query into the Query window, and then click Execute Query. This will create a new table in your TotalSales database called StoreSales.
CREATE TABLE [StoreSales](

       [StoreID] [int] IDENTITY(1,1)NOT NULL PRIMARY KEY CLUSTERED,
       [StoreName] [nvarchar](50)NULL,
       [StoreRegion] [nvarchar](50)NOT NULL,
       [StoreFY08Sales] [nvarchar](50)NOT NULL,
       [StoreFY09Sales] [nvarchar](50)NULL,
       [StoreFY10Sales] [nvarchar](30)NULL,
       [StoreFY11Sales] [nvarchar](30)NULL,
       [Timestamp] [timestamp] NOT NULL
)
Now that you have a StoreSales table, you'll want to populate that table with some data. To do this, you'll create another SQL script to add several records to it.
10. Click the New Query button and type the following into the Query window. This will create a set of new records in your StoreSales table.
INSERT INTO [StoreSales]

([StoreName],[StoreRegion],[StoreFY08Sales],[StoreFY09Sales],[StoreFY10Sales],[StoreFY 11Sales])

     VALUES

(‘Seattle Downtown’, ‘Pac West’,‘12091029’,‘13092802’,‘13291028’,‘14291820’),
(‘Redmond Eastside’,‘Pac West’, ‘32039201’,‘32991821’,‘32003910’,‘33210921’),
(‘New York Upstate’, ‘North East’,‘22120928’,‘22291092’,‘23309211’,‘23430291’),
(‘Boston Eastgate’,‘North East’, ‘13000902’,‘13445702’,‘13220882’,‘13233211’),
(‘San Diego Downtown’, ‘South West’,‘15561029’,‘16772802’,‘15441028’,‘14981820’),
(‘Oakland Bay’,‘South West’, ‘23043102’,‘23332102’,‘23443192’,‘23998291’),
(‘Orlando Universal’, ‘South East’,‘31093329’,‘33111802’,‘33295428’,‘34291220’),
(‘Minnesota Earling’,‘Mid West’, ‘13099002’,‘13443102’,‘13229972’,‘13946591’),
(‘Ohio State’, ‘Mid West’,‘12091029’,‘22093302’,‘22291228’,‘22294420’),
(‘Chicago Main’,‘Mid West’, ‘33222102’,‘33213102’,‘33223192’,‘33433291’),
(‘West Virginia’, ‘Mid East’,‘14121029’,‘14332802’,‘14121028’,‘14998820’),
(‘New Orleans Central’,‘South East’, ‘15011103’,‘15291302’,‘15224092’,‘15221291’),
(‘Jacksonville Villa’, ‘South East’,‘23231029’,‘23000902’,‘23291029’,‘24299288’),
(‘Portland Downtown’,‘Pac West’, ‘15220102’,‘15298112’,‘15223302’,‘15332292’),
(‘San Francisco Bay’, ‘South West’,‘12091029’,‘13092802’,‘13291028’,‘14291820’),
(‘Bellingham North’,‘Pac West’, ‘10112102’,‘1022202’,‘10220121’,‘10993311’),
(‘Houston Main’, ‘Central’,‘12091029’,‘13033202’,‘13112128’,‘14432820’),
(‘Vancouver South WA’,‘Pac West’, ‘16654102’,‘16755102’,‘16344192’,‘16332291’),
(‘Kansas City Downtown’,‘Mid West’, ‘22392012’,‘22302910’,‘23302903’,‘23403920’),
(‘Los Angeles West’, ‘South West’,‘12998098’,‘12899878’,‘12998190’,‘13201920’),
(‘Redwood South’,‘South West’, ‘20029102’,‘20123321’,‘21221092’,‘21221998’),
(‘Georgetown Central’, ‘Central’,‘31029901’,‘32910928’,‘33321112’,‘34302910’),
(‘Washington DC’,‘Central’, ‘13022212’,‘13118102’,‘13998192’,‘13443291’),
(‘Madison South’, ‘Mid West’,‘14191229’,‘14432802’,‘14039028’,‘14221820’),
(‘Grand Forks’,‘Mid West’, ‘22109102’,‘22009102’,‘23100192’,‘21108291’),
(‘Tusla South’, ‘Mid West’,‘44531029’,‘45443802’,‘45665028’,‘46654820’),
(‘Dallas Downtown’,‘Central’, ‘19989002’,‘18998902’,‘19887992’,‘19129891’),
(‘Bellevue Lincoln’, ‘Pac West’,‘12094454’,‘13009802’,‘13341028’,‘13111820’),
(‘Detroit’,‘Central’, ‘18998902’,‘18556502’,‘18776792’,‘18334391’)
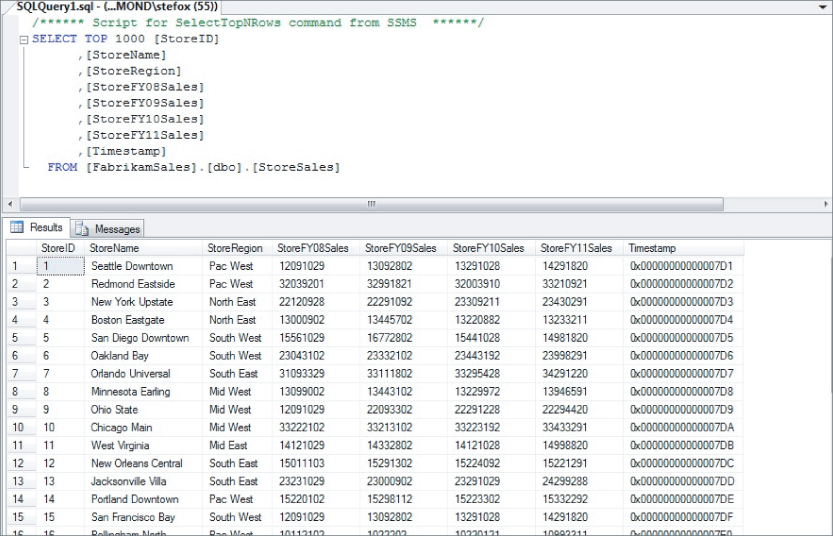
11. Right-click the StoreSales table and select Script Table as ⇒ SELECT to ⇒ New Query Editor Window to auto-generate a generic SQL SELECT statement (see Figure 2.6).
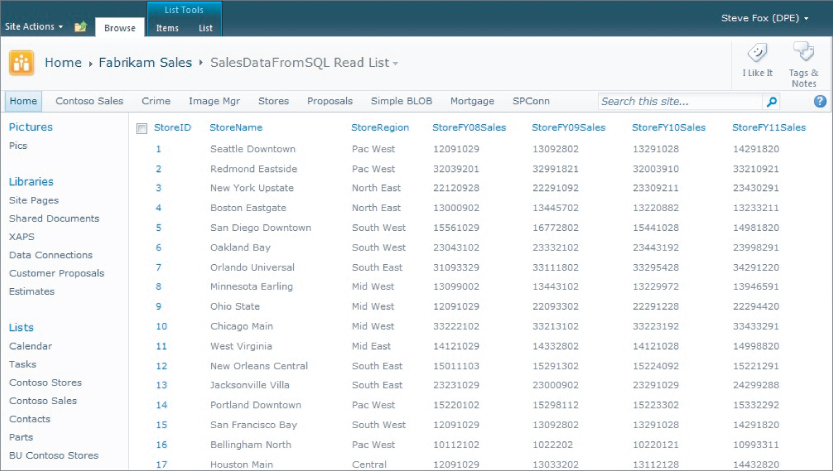
The result of this query will display all the data you just entered using the INSERT SQL script (see Figure 2.7).
Your SQL Azure database is now populated with some fictional sales data. In the following section, you'll create an external list that connects to the SQL Azure database (using BCS) and provides a read/write way to manage the sales data.
Creating an External List
An external list dynamically loads external data to enable users to create, read, update, and delete records in the external system.
1. You first need to create an application ID, which mediates the security handshake with SQL Azure. To create the application ID, open SharePoint Central Administration. Under Application Management, select Manage Service Applications.
2. Under Secure Store Service, click the Secure Store Service proxy link.
3. Click New in the ribbon to create a new application ID, which invokes a browser-based wizard comprising three steps.
4. On the Target Application Settings page, enter a target application ID (e.g., MyAppID), a display name (e.g., My App ID), and contact e-mail, and then click Next. (You can leave all other default options.)
5. In the Field page, add a username and password. Select User Name and Password in the Field Type drop-down lists.
6. Enter a valid user from your SharePoint site (e.g., administrator) to be the application ID administrator. Click OK to complete the creation of the application ID. Your new application ID should now be listed in the application ID list.
7. Navigate to the root-level SharePoint site and select Site Actions ⇒ Edit Site in SharePoint Designer.
8. Click External Content Types in the Navigation pane.
9. Click External Content Type.
10. Provide a name and display name (e.g., MySQLAzureECT), leave the default options, and then select “Click Here to Discover External Data Sources and Define Operations.”
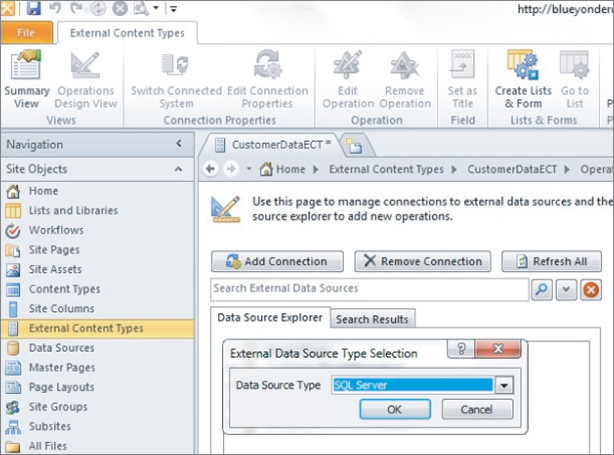
11. Click Add Connection, select SQL Server from the drop-down list, and then click OK (see Figure 2.8).
12. When prompted, enter the name of the SQL Azure server and the database name, and then provide a display name for the external content type. Click the Connect with Impersonated Custom Identity option and then enter the name of the application ID you created earlier (e.g., MyAppID) in the Secure Store Application ID field.
13. Click OK to connect to SQL Azure. (Note that you will now be prompted for your SQL Azure credentials.)
14. When SharePoint Designer loads the data connection, right-click the StoreSales table and select Create All Operations.
15. To create the external content type, you must work through the wizard. Be sure to click the StoreID and then click Map To Identifier. You can then click Next twice or, optionally, click Finish.
16. When done, click Save.
17. You can now create a new list using the external content type by clicking Create Lists and Form. Add a name for the list in the List Name field, leave the other default options, and then click OK.
18. Now that you've created the external content type that connects SharePoint to SQL Azure, you must set the permissions that allow specified users to access the list. To do this, navigate to SharePoint Central Administration and click Business Data Connectivity Services under Manage Service Applications.
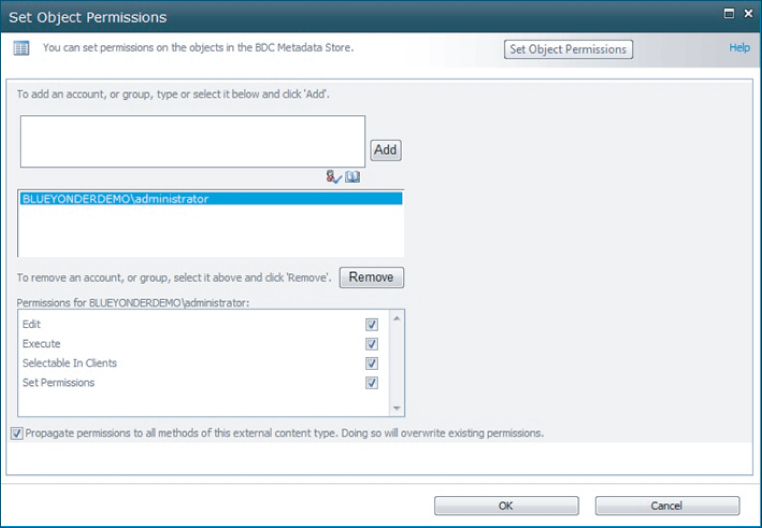
19. Click the external content type you just created and then click Set Object Permissions.
20. In the dialog that appears, enter the user and permissions you want to assign to that person, as shown in Figure 2.9.
You can now navigate back to the SharePoint list and reload it. You will need to enter the SQL Azure permissions to authenticate (see Figure 2.10), after which the credentials will be cached on the server.

The final external list should now look something like Figure 2.11.
Now that you've completed the external list, which is the no-code part of the solution, let's move on to a more code-centric approach. In the next part of the chapter, you'll first create a WCF service to interact with the SQL Azure database, and then you'll create a web part to consume the service.
Creating the WCF Service
The WCF service will be used to query the SQL Azure database.
1. Open Visual Studio 2010 and click File ⇒ New ⇒ Project ⇒ Blank Solution. Provide a name for the solution (e.g., SalesDataSolution) and click OK.
2. When Visual Studio creates the new solution, right-click the solution and select Add ⇒ New Project.
3. Select WCF ⇒ WCF Service Application. Provide a name for the project (e.g., SalesDataService) and click Add.
4. When the project has been added, double-click the Service.svc file and then right-click the default Service1 in the code and select Refactor ⇒ Rename. Rename the service to something that is more intuitive (e.g., SalesDataSvc). Do the same for IService1 (e.g., ISalesDataSvc).
5. Double-click your interface file (ISalesDataSvc) and amend the service contract code as per the following bolded code:

using System;
using System.Collections.Generic;
using System.Linq;
using System.Runtime.Serialization;
using System.ServiceModel;
using System.ServiceModel.Web;
using System.Text;

namespace SalesDataService
{
    [ServiceContract]
    public interface ISalesDataSvc
    {
        [OperationContract]
        List<SalesData> GetAllSalesData();
    }
}
code snippet 076576 Ch02_Code.zip/ISalesDataSvc.cs
6. Click the Data tab and select Add New Data Source.
7. In the Choose a New Data Type dialog, select Database, and then click Next.
8. In the Choose a Data Model dialog, select Entity Database Model, and then click Next.
9. In the Choose Model Contents dialog, select Generate from Database, and then Click Next.
10. In the Choose Your Database Connection dialog, click New Connection. Enter the server name of your SQL Azure database. Select Use SQL Server Authentication, and enter the username and password for your SQL Azure database.
11. In the Select or enter a database name drop-down list, select the TotalSales database.
12. Click Test Connection to test the authenticated connection to your SQL Azure database.
13. In the Save entity connection settings in Web.config As field, enter FabrikamSalesEntities, and then click Next.
14. In the Choose Your Database Objects dialog, expand the Tables option, select the StoreSales table, and then click Finish.
15. Right-click the project and select Add ⇒ Class. Provide a name for the class (e.g., Sales Data) and amend the class properties as per the following bolded code:
using System;
using System.Collections.Generic;
using System.Linq;
using System.Web;

namespace SalesDataService
{
    public class SalesData
    {
        public string StoreID { get; set; }
        public string StoreName { get; set; }
        public string StoreRegion { get; set; }
        public string StoreFY08Sales { get; set; }
        public string StoreFY09Sales { get; set; }
        public string StoreFY10Sales { get; set; }
        public string StoreFY11Sales { get; set; }
    }
}
code snippet 076576 Ch02_Code.zip/SalesData.cs
16. Double-click the main service file (SalesDataSvc) and amend the service code, as per the following bolded code:
using System;
using System.Collections.Generic;
using System.Linq;
using System.Runtime.Serialization;
using System.ServiceModel;
using System.ServiceModel.Web;
using System.Text;

namespace SalesDataService
{
    public class SalesDataSvc : ISalesDataSvc
    {
        List<SalesData> listOfReturnSales = new List<SalesData>();
        FabrikamSalesEntities dc = new FabrikamSalesEntities();

        public List<SalesData> GetAllSalesData()
        {
            var sales = from salesData in dc.StoreSales
                        select salesData;

            GenerateReturnDataObject(sales);

            return listOfReturnSales;
        }

        private void GenerateReturnDataObject(IQueryable<StoreSale> sales)
        {

            foreach (var item in sales)
            {
                SalesData tempObj = new SalesData();
                tempObj.StoreID = item.StoreID.ToString();
                tempObj.StoreName = item.StoreName.ToString();
                tempObj.StoreRegion = item.StoreRegion.ToString();
                tempObj.StoreFY08Sales = item.StoreFY08Sales.ToString();
                tempObj.StoreFY09Sales = item.StoreFY09Sales.ToString();
                tempObj.StoreFY10Sales = item.StoreFY10Sales.ToString();
                tempObj.StoreFY11Sales = item.StoreFY11Sales.ToString();
                listOfReturnSales.Add(tempObj);
            }
        }
    }
}
code snippet 076576 Ch02_Code.zip/SalesDataService.cs
In the preceding code snippet, your WCF service is the handshake between your calling application (which will be a web part) and the SQL Azure data source. You use the entity data model to help provide a queryable layer against the SQL Azure database. The following line of code creates an instance of the data context that you'll use to query the data you added to SQL Azure:
…
      FabrikamSalesEntities dc = new FabrikamSalesEntities();
…
In this case you are using the service within a web part, but you can also use this service with other applications, such as Silverlight applications or .NET applications. This extends the use of your SQL Azure database to other applications.
You're using a list collection object (listOfReturnSales) that returns a collection of populated SalesData objects. Using a LINQ query (using the entity data model layer), you query the StoreSales table in the data context object (dc) to return the data in the table. Note that the GenerateReturnDataObject method is called to populate the list collection. This design enables you to add other filtered queries (e.g., to get sales from a specific region or company), and you can optimize your code by leveraging one method to populate the in-memory object. In the following code listing, you can see how the foreach block iterates through each of the items in the sales object to populate the list collection (listOfReturnSales).
…
private void GenerateReturnDataObject(IQueryable<StoreSale> sales)
        {

            foreach (var item in sales)
            {
                SalesData tempObj = new SalesData();
                tempObj.StoreID = item.StoreID.ToString();
                tempObj.StoreName = item.StoreName.ToString();
                tempObj.StoreRegion = item.StoreRegion.ToString();
                tempObj.StoreFY08Sales = item.StoreFY08Sales.ToString();
                tempObj.StoreFY09Sales = item.StoreFY09Sales.ToString();
                tempObj.StoreFY10Sales = item.StoreFY10Sales.ToString();
                tempObj.StoreFY11Sales = item.StoreFY11Sales.ToString();
                listOfReturnSales.Add(tempObj);
            }
        }
…
Finally, the WCF service returns the list collection to the calling application.
17. You can now deploy your WCF service. In this walkthrough, you'll deploy to your local IIS; however, you also have the option to deploy this service to Windows Azure. To deploy locally, create a folder on your server (e.g., c:/MyNewService).
18. Right-click the project and select Publish. In the Publish method drop-down, select the File System option and then browse to the folder you just created. Click Publish when done.
19. Open IIS Manager 7.0, right-click Sites, and then select Add Web Site.
20. Provide a name for the site (e.g., SQLAzureWCFService), browse to the new folder location where you just published your code, and then click Connect as ⇒ Specific user ⇒ Set — to set your username and password to connect to the service. Finally, change the Port number to something other than the default port 80.
21. Click the Content tab, right-click the .svc file in IIS, and then select View in Browser.
Note that you may raise an error if your application pool is not set to the correct version of the .Net Framework. To fix this error, click the application pool that corresponds to your service and select Basic Settings. In the .Net Framework Version drop-down, select the correct version.
You should now see something similar to Figure 2.12 — a service deployed to IIS that enables you to query SQL Azure.

Now that you've created a WCF service, you can create a simple Windows Forms test application. For example, the following code snippet illustrates a Windows Forms application with three controls: a DataGrid (datagrdSalesData) and two buttons (btnExit and btnGetSales). This small snippet of code enables you to add a service reference to your Windows Forms application and then test the service call. The returned data (results) will be bound to the DataGrid when the data is successfully returned from the web service call. Creating a small test application (either Windows Forms or console) enables you to both inspect a successful call and understand the data structure returned to the calling application.
…
using ServiceTestApplication.SQLAzureServiceReference;
using System.ServiceModel;

namespace ServiceTestApplication
{
    public partial class Form1 : Form
    {
        public Form1()
        {
            InitializeComponent();
        }

        private void btnExit_Click(object sender, EventArgs e)
        {
            Application.Exit();
        }

        private void btnGetSales_Click(object sender, EventArgs e)
        {
            SalesDataSvcClient myWCFProxy = new SalesDataSvcClient();
            var results = myWCFProxy.GetAllSalesData();
            datagrdSalesData.DataSource = results;
        }
    }
}
If you're comfortable progressing without a test application, you can move to the next step, which will implement the WCF service in a web part using the ASP.NET Chart control.
Creating the Sales Web Part
The Sales web part will retrieve data using the WCF service and then data-bind the sales data to an ASP.NET Chart control.
1. Open the Visual Studio solution and right-click it.
2. Select Add ⇒ New Project ⇒ SharePoint, and then click Empty SharePoint Project. In the SharePoint Customization wizard, select Deploy as Farm Solution, and then click Finish. Provide a name for the new project (e.g., SalesDataChart) and click OK.
3. Right-click the newly added project and select Add ⇒ New Item. Select SharePoint ⇒ Web Part, and provide a name for the new web part (e.g., SalesData), and then click Add.
4. Right-click the project, select Add Reference, and add the System.Web .DataVizualization.dll to your project. (You may need to browse to the GAC to load the DLL — e.g., c:/windows/assembly/System.Web.DataVizualization.dll.)
5. You will create an in-memory object to data-bind, so you now need to add a custom class to your project. Right-click the project and select Add ⇒ Class. Provide a name for the class (e.g., Sales). Amend the properties of the class as per the following bolded code:
using System;
using System.Collections.Generic;
using System.Linq;
using System.Text;

namespace SalesDataChart
{
    class Sales
    {
        public string StoreID { get; set; }
        public string StoreName { get; set; }
        public string StoreRegion { get; set; }
        public Int32 FY08Sales { get; set; }
        public Int32 FY09Sales { get; set; }
        public Int32 FY10Sales { get; set; }
        public Int32 FY11Sales { get; set; }
        public Int32 TotalSales { get; set; }
    }
}
code snippet 076576 Ch02_Code.zip/SalesDataChart.cs
6. After you've added the ASP.NET Chart control library (System.Web .UI.DataVisualization.Charting.dll) and the custom class, you need to add the service reference to the WCF service. To do this, right-click the SharePoint project and select Add Service Reference. Add the service URL in the Address field and click Go. When the service resolves, provide a namespace for the service in the Namespace field (e.g., SQLAzureSalesDataService). Click OK to add the service reference to the project. You may need to add System.Drawing.dll and System.Collections.dll to your project, as well.
7. Double-click the main web part class (e.g., SalesData.cs) and then amend the code in the web part as per the following bolded code:
using System;
using System.ComponentModel;
using System.Web;
using System.Web.UI;
using System.Web.UI.WebControls;
using System.Web.UI.WebControls.WebParts;
using Microsoft.SharePoint;
using Microsoft.SharePoint.WebControls;
using System.Web.UI.DataVisualization.Charting;
using System.Drawing;
using System.Collections.Generic;
using System.Collections;
using SalesDataChart.SQLAzureSalesDataService;
using System.ServiceModel;
using System.Linq;

namespace SalesDataChart.SalesData
{
    [ToolboxItemAttribute(false)]
    public class SalesData : WebPart
    {
        List<Sales> returnSalesData = new List<Sales>();

        protected override void OnLoad(EventArgs e)
        {
            BasicHttpBinding mySvcbinding = new BasicHttpBinding();
            //You will need to amend the URI to be your local domain.
            UriBuilder serviceURI = new
               UriBuilder("http://blueyonderdemo:55887/SalesDataSvc.svc");
SalesDataSvcClient myWCFProxy = new SalesDataSvcClient(mySvcbinding, new
               EndpointAddress(serviceURI.Uri));

            var salesData = myWCFProxy.GetAllSalesData();

            foreach (var item in salesData)
            {
                Sales tempSalesObj = new Sales();
                tempSalesObj.StoreID = item.StoreID;
                tempSalesObj.StoreName = item.StoreName;
                tempSalesObj.StoreRegion = item.StoreRegion;
                tempSalesObj.FY08Sales = Int32.Parse(item.StoreFY08Sales);
                tempSalesObj.FY09Sales = Int32.Parse(item.StoreFY09Sales);
                tempSalesObj.FY10Sales = Int32.Parse(item.StoreFY10Sales);
                tempSalesObj.FY11Sales = Int32.Parse(item.StoreFY11Sales);
                tempSalesObj.TotalSales = tempSalesObj.FY08Sales +
                     tempSalesObj.FY09Sales +
                     tempSalesObj.FY10Sales + tempSalesObj.FY11Sales;
                returnSalesData.Add(tempSalesObj);
            }

            myWCFProxy.Close();
        }

        protected override void CreateChildControls()
        {
            Chart chrtSalesData = new Chart();
            chrtSalesData.ImageStorageMode = ImageStorageMode.UseImageLocation;

            chrtSalesData.Legends.Add("Legend");
            chrtSalesData.Width = 800;
            chrtSalesData.Height = 400;
            chrtSalesData.RenderType = RenderType.ImageTag;
            //This refers to a path that you will need to manually create.
            string imagePath = "∼/_layouts/ChartImages/";
chrtSalesData.ImageLocation = imagePath + "ChartPic_#SEQ(200,30)";
            chrtSalesData.Palette = ChartColorPalette.Berry;

            Title chartTitle = new Title("Store Sales", Docking.Top,
               new Font("Calibri", 12,
               FontStyle.Bold), Color.FromArgb(26, 59, 105));
            chrtSalesData.Titles.Add(chartTitle);
            chrtSalesData.ChartAreas.Add("Sales");

            chrtSalesData.Series.Add("Total Sales");

            foreach (Sales salesItem in returnSalesData)
            {
             chrtSalesData.Series["Total Sales"].Points.AddY(salesItem.TotalSales);
            }

            chrtSalesData.BorderSkin.SkinStyle = BorderSkinStyle.Emboss;
            chrtSalesData.BorderColor = Color.FromArgb(26, 59, 105);
            chrtSalesData.BorderlineDashStyle = ChartDashStyle.Solid;
            chrtSalesData.BorderWidth = 1;
            this.Controls.Add(chrtSalesData);
        }
    }
}
code snippet 076576 Ch02_Code.zip/SalesData.cs
The preceding code snippet performs two main functions: It calls the WCF service to get the sales data stored in the SQL Azure database, and it data-binds the returned data to a Chart control.
The calling of the WCF service is done in an event that executes as the web part loads. This execution is accomplished using the OnLoad event, where you first create an instance of the service using the BasicHttpBinding object, then call the GetAllSalesData method using the service proxy (myWCFProxy), and then iterate through the returned data to populate a class-level list collection (returnSalesData):
…
      List<Sales> returnSalesData = new List<Sales>();

      protected override void OnLoad(EventArgs e)
        {
            BasicHttpBinding mySvcbinding = new BasicHttpBinding();
            UriBuilder serviceURI = new  UriBuilder("http://blueyonderdemo:55887/SalesDataSvc.svc");
            SalesDataSvcClient myWCFProxy = new SalesDataSvcClient(mySvcbinding, new EndpointAddress(serviceURI.Uri));

            var salesData = myWCFProxy.GetAllSalesData();

            foreach (var item in salesData)
            {
                Sales tempSalesObj = new Sales();
                tempSalesObj.StoreID = item.StoreID;
                tempSalesObj.StoreName = item.StoreName;
                tempSalesObj.StoreRegion = item.StoreRegion;
                tempSalesObj.FY08Sales = Int32.Parse(item.StoreFY08Sales);
                tempSalesObj.FY09Sales = Int32.Parse(item.StoreFY09Sales);
                tempSalesObj.FY10Sales = Int32.Parse(item.StoreFY10Sales);
                tempSalesObj.FY11Sales = Int32.Parse(item.StoreFY11Sales);
                tempSalesObj.TotalSales = tempSalesObj.FY08Sales + tempSalesObj.FY09Sales + tempSalesObj.FY10Sales + tempSalesObj.FY11Sales;
                returnSalesData.Add(tempSalesObj);
            }

            myWCFProxy.Close();
        }
…
Because the list collection is a class-level object, you can also leverage it in the second part of the code snippet. This is executed in the CreateChildControls method, which first creates an instance of the Chart object (which derives from System.Web.DataVizualization.dll) and then sets a number of properties for the Chart. Note that these properties range from width and height to chart graphic location (which in this app is in the _layouts directory), to title and formatting. After you've created an instance of the chart, you need to data-bind the sales data to it. This is done by iterating through the returnSalesData list collection and, for each item in the list, adding a new series in the chart using the AddY method. This new series represents the total sales that were calculated from the data returned from the WCF service:
…
    protected override void CreateChildControls()
        {
            Chart chrtSalesData = new Chart();
            chrtSalesData.ImageStorageMode = ImageStorageMode.UseImageLocation;

            chrtSalesData.Legends.Add("Legend");
            chrtSalesData.Width = 800;
            chrtSalesData.Height = 400;
            chrtSalesData.RenderType = RenderType.ImageTag;
            string imagePath = "∼/_layouts/ChartImages/";
            chrtSalesData.ImageLocation = imagePath + "ChartPic_#SEQ(200,30)";
            chrtSalesData.Palette = ChartColorPalette.Berry;

            Title chartTitle = new Title("Store Sales", Docking.Top,
               new Font("Calibri", 12,
               FontStyle.Bold), Color.FromArgb(26, 59, 105));
            chrtSalesData.Titles.Add(chartTitle);
            chrtSalesData.ChartAreas.Add("Sales");

            chrtSalesData.Series.Add("Total Sales");

            foreach (Sales salesItem in returnSalesData)
            {
             chrtSalesData.Series["Total Sales"].Points.AddY(salesItem.TotalSales);
            }

            chrtSalesData.BorderSkin.SkinStyle = BorderSkinStyle.Emboss;
            chrtSalesData.BorderColor = Color.FromArgb(26, 59, 105);
            chrtSalesData.BorderlineDashStyle = ChartDashStyle.Solid;
            chrtSalesData.BorderWidth = 1;
            this.Controls.Add(chrtSalesData);
        }
…
8. Optionally, you can edit the elements.xml and SalesData.webpart files to provide users who may want to find and add your web part with a more intuitive experience. For example, the first XML code snippet shows how you can amend the elements.xml file, and the second is the SalesData.webpart file:
<?xml version="1.0" encoding="utf-8"?>
<Elements xmlns="http://schemas.microsoft.com/sharepoint/" >
  <Module Name="SalesData" List="113" Url="_catalogs/wp">
    <File Path="SalesDataSalesData.webpart" Url="SalesData.webpart" Type="GhostableInLibrary">
      <Property Name="Group" Value="SQL Azure Sales Data" />
    </File>
  </Module>
</Elements>


<?xml version="1.0" encoding="utf-8"?>
<webParts>
  <webPart xmlns="http://schemas.microsoft.com/WebPart/v3">
    <metaData>
      <type name="SalesDataChart.SalesData.SalesData, $SharePoint.Project.AssemblyFullName$" />
      <importErrorMessage>$Resources:core,ImportErrorMessage;</importErrorMessage>
    </metaData>
    <data>
      <properties>
        <property name="Title" type="string">Azure Sales Web Part</property>
        <property name="Description" type="string">Sales data from SQL Azure that uses the ASP.NET Chart control.</property>
      </properties>
    </data>
  </webPart>
</webParts>
9. You can now build and deploy the web part to SharePoint by right-clicking the project and selecting Deploy.
10. After you deploy successfully, open SharePoint and click Site Actions ⇒ Edit Page. Select Add a Web Part (or simply click the Insert tab) and then navigate to your newly added web part and click Add.
After you add the web part to SharePoint, the web part loads and, at the same time, calls the WCF service to retrieve sales data. It then binds the data from the WCF service to the Chart control, which should resemble what is shown in Figure 2.13.

Note that you may need to amend the web.config file of your SharePoint site. The following illustrates the three recommended amendments and the sections within which you would need to make those updates:
...
<httpHandlers>
<add path="ChartImg.axd" verb="GET,HEAD,POST"
type="System.Web.UI.DataVisualization.Charting.ChartHttpHandler,
System.Web.DataVisualization, Version=3.5.0.0, Culture=neutral,
PublicKeyToken=31bf3856ad364e35"
validate="false" />
</httpHandlers>
...
<handlers>
<add name="ChartImageHandler" preCondition="integratedMode" verb="GET,HEAD,POST"
path="ChartImg.axd" type="System.Web.UI.DataVisualization.Charting.ChartHttpHandler,
 System.Web.DataVisualization, Version=3.5.0.0, Culture=neutral,
PublicKeyToken=31bf3856ad364e35" />

</handlers>
...<appSettings>
<add key="ChartImageHandler" value="storage=file;timeout=20;dir=c:Temp;" />
</appSettings>
...
At this point, you've created the two separate pieces of the BI solution; now you need to put them together. In the next section, you'll create a SharePoint site that combines both the external list and the Sales web part to provide a concerted view of these artifacts.
Creating the Sales Dashboard UI
Because you've created the components of the BI solution, creating a dashboard will be very straightforward; all you need to do is create a new site in SharePoint (e.g., a Team Site) and then add the external list on the left-hand side of the landing page and add the web part to the right-hand side of the page.
The Sales dashboard will render the no-code BCS external list and the code-based web part.
1. Navigate to your SharePoint site. Create a new site by clicking View All Site Content ⇒ Create ⇒ Blank Site. Provide a name for your new site (e.g., Sales) and a URL suffix (e.g., sales).
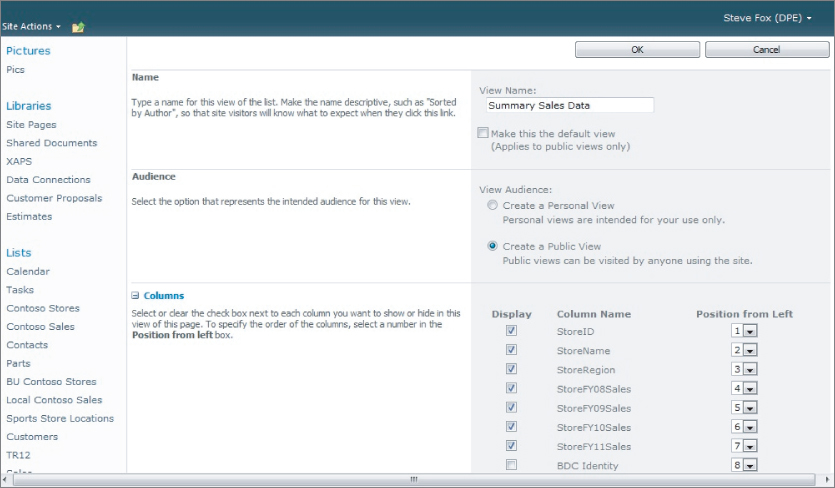
2. Navigate to your external list (e.g., Store Sales). Click the List tab and then click Create View. Select Standard View, as shown in Figure 2.14.
3. Provide a name for the view (e.g., Summary Sales Data), select Create a Public View, check the fields you want to expose in the view, and then click OK. Figure 2.15 illustrates this process.
4. Return to your newly created site (e.g., Sales), and click Site Actions ⇒ Edit Page.
5. Select Insert ⇒ Existing List. Select Store Sales from the options and click Add.
6. Load the view of the external list you just created by clicking Edit Web Part and then selecting the newly created view.
7. Click Site Actions ⇒ Edit Page and then either click Add a Web Part or click within a specific region on the web page. Select the Insert tab, click Web Part, and then navigate to the SQL Azure Sales Data category and add the Sales Chart web part by clicking Add.
The result of creating the no-code solution and the code-based solution should look similar to Figure 2.16: an external list on the left (that enables you to create, read, update, and delete records from SQL Azure), and the ASP.NET Chart control in a web part on the right (that uses the WCF service to query data from SQL Azure and then dynamically generate a new chart).


Congratulations! At this point, you've finished creating the BI solution. The next question you might have is how to extend it. While we'll leave you mostly to your own creativity in that regard, here are a couple of suggestions. The first is to extend the WCF service to provide additional web methods for passing filters. You could then provide a richer Chart web part experience by enabling service calls that dynamically generate different views on the data. Alternatively, you could also use Silverlight to create a chart-based view (using the Chart Toolkit); this is an excellent and very straightforward way to create a compelling BI experience.
You could also deploy the WCF service and entity data model to Windows Azure; as mentioned earlier, this would enable you to leverage the SQL Azure data not only in an on-premises solution, but also in the cloud within SharePoint Online and Office 365 (assuming you use Silverlight as the application that consumes the WCF service, because you cannot call external services from a regular sandboxed solution). Finally, you could swap out the WCF service call and leverage the SharePoint server object model or the client object model to interact with the external list. This would entail one thoroughfare for the data connection to SharePoint, but two different ways of surfacing that data within SharePoint: one for managing the data and another to render tabular and chart-based views of the data.
This chapter illustrated how to create a modest BI solution that comprised a no-code and code approach, using SQL Azure as the main cloud-based database. The no-code approach was BCS-based and surfaced SQL Azure data in an external list, and the code-based approach used the ASP.NET Chart control within a web part that leveraged WCF to query SQL Azure. Together, these different applications demonstrated two ways to create a BI application using SQL Azure and SharePoint.
While the solution itself was not overly complex, one important takeaway should be the way in which you used the SQL Azure database within your solution: you used an external list and a service-based query to interact with the data. The external list connected to a SQL Azure database is an easy way to tie cloud-based data to SharePoint, and it provides you with a way to manage data into and out of SQL Azure using a SharePoint list. SharePoint also provides ways to discretely control the security and permissions of the list. The service-based proxy you built to communicate with SQL Azure can be used across multiple application types and, in some cases, can be used in SharePoint Online. For example, with the sandboxed solution constraint in SharePoint Online, you can use Silverlight and services deployed to Windows Azure as an integration technique.
There are many more and different ways in which you can interact with cloud-based data. Some of these ways are discussed in this book, and others you will discover as you explore further the area of cloud-based BI. There is also a great deal of potential with cloud-based data; the oft-stated value-add of the Windows Azure usage model notwithstanding, you can use the cloud to scale data, use Windows Azure to move more code off of the server, and provide a way to create portable BI applications across SharePoint Server and SharePoint Online.
In the next chapter, you'll move beyond SQL Azure data and dive deeper into how you can use Windows Azure to host custom WCF services that you can consume in SharePoint.
The following list provides some additional references you might find useful:
- SQL Azure Introduction — www.microsoft.com/en-us/sqlazure/database.aspx
- Migrating Databases to SQL Azure — http://msdn.microsoft.com/en-us/library/ee730904.aspx
- Windows Azure Free Trial Offer — www.microsoft.com/windowsazure/free-trial/sharepoint-integration/
- Overview of SQL Server Reporting Services (SSRS) — http://technet.microsoft.com/en-us/library/cc526677.aspx
- Overview of BCS in MSDN — http://msdn.microsoft.com/en-us/magazine/ee819133.aspx
- Overview of WCF Data Services — http://msdn.microsoft.com/en-us/library/cc668794.aspx