Chapter 15
Workflow Development in SharePoint 2013
WHAT’S IN THIS CHAPTER?
- Learning about the core workflow concepts
- Understanding the workflow platform architecture
- Reviewing the key workflow development tools
- Modeling workflows using Visio 2013
- Developing workflows using SharePoint Designer 2013
- Developing custom declarative activity and actions using Visual Studio 2012
- Developing custom code activity using Visual Studio 2012
- Developing workflows using Visual Studio 2012
- Considering key development issues
Workflow systems are extremely valuable to organizations as they provide improved measurability of human performance, increased productivity, and ensure consistent execution by the individuals and groups employed and participating in the business process.
SharePoint 2013 provides in-depth support to directly host or incorporate external hosted workflows in your SharePoint environment in both cloud and on-premise scenarios. As in SharePoint 2010, SharePoint 2013 continues to provide the ability to host workflows, based on the .NET 3.5 Windows workflow run time within SharePoint 2013. In SharePoint 2013, this workflow is commonly referred to as a SharePoint 2010 workflow. SharePoint 2013 provides a new capability to host workflow outside of your SharePoint farm, either on-premise or using a cloud-hosted service. This is based on the .NET 4.5 Windows Azure Workflow (WAW) platform. In SharePoint 2013, this workflow is commonly referred to as a SharePoint 2013 workflow.
This chapter focuses on introducing the key workflow concepts to uninitiated and aspiring workflow developers and an in-depth overview of the workflow platform architecture. Next, you look at the key development tools and how they have been improved to support the WAW platform. Next, you briefly review the requirements to configure your development environment to begin developing SharePoint 2013 workflows. You look at some development scenarios that highlight the new workflow features of SharePoint 2013. You finish with a discussion on key development considerations to help you make good technical decisions to save you time and money.
INTRODUCING CORE WORKFLOW CONCEPTS
The workflow support provided by SharePoint 2013 is extensive. This support has evolved over successive releases of SharePoint technologies. As a result, it is vital to understand key workflow concepts and how they are interpreted from a SharePoint perspective.
What Is a Workflow?
Workflows, at the heart of it, model, automate, and orchestrate managed business processes by managing the series of activities and actions required to achieve the wanted final outcome or outcomes. Key categories of workflow include:
- Human workflows — Human workflows automate common processes in your organization. Common examples include document and page approval workflows. Usage of these workflows is totally dependent on human needs.
- Business execution workflows — Business execution workflows involve automating, monitoring, and improving a key business process of your organization. For example, your customer or supplier call center may receive 10,000 calls per day. Each call, after being logged and categorized, needs to follow the correct process (workflow) to completion. Bottlenecks and issues must be resolved; speed-of-ticket resolution must be monitored on a daily basis; and demand for call center staffing needs to be calculated to ensure efficient customer response times are maintained. Usage of these workflows is intrinsic and directly contributes to the success of your business.
- Long-running processes — Long-running workflows need to manage a process over a long or indeterminate period of time. A good example is a legal document that needs a quarterly or yearly review.
- Connecting to external systems — Large organizations often have a number of systems internally and a number of external organizations that they interact with. As a result workflows may need to call into these systems to send or receive information. For example, an invoice or credit note may need to be submitted to an external supplier’s system, or time entry information may need to be submitted to an internal HR and billing system.
SharePoint 2013 workflows are modeled using a collection of workflow activities and actions, with defined starting and endpoints.
A key difference between workflow and other types of software is the support for long-running processes. These processes can last from seconds to months and even years. For example, a short-running process may involve a leave request or document approval, whereas a longer workflow may be responsible for managing the yearly employee review process.
Workflow Activities
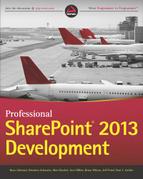
Activities are the building blocks used to compose SharePoint 2013 workflows. SharePoint 2013 workflow activities, based on .NET 4.5 Windows Workflow Foundation, represent the underlying managed objects and code used to compose and drive your workflow. Each activity represents a functional component of the business process modeled by the workflow.
Figure 15-1 categorizes the key types of activities in Windows Azure Workflow.
From a SharePoint perspective, these categories can be grouped into core Windows Workflow Foundation functionality, SharePoint 2013 workflow functionality, and custom activities. The core Windows workflow categories are shown in Table 15-1. Table 15-2 lists the SharePoint workflow activity categories. Custom activities will be determined by the needs of your organization, and will provide tailored functionality to your workflow. Custom activities are discussed later in this chapter in the “Developing Custom Workflow Activities and Actions Using Visual Studio 2012” section.
TABLE 15-1: Core Windows Workflow Foundation Activities in Visual Studio 2012

SharePoint provides a number of specific activities. Table 15-2 lists the SharePoint workflow activity categories.
TABLE 15-2: SharePoint 2013 Activities in Visual Studio 2012
| CATEGORY | DESCRIPTION |
| Coordination Actions | Coordination actions are used to invoke workflows based on the SharePoint 2010 workflow platform. |
| Events | Events enable workflows to wait for an event to occur. Three events are provided as part of the SharePoint 2013 Workflow Designer including WaitForCustomEvent, WaitForFieldChange, and WaitForItemEvent. |
| List Actions | List actions group actions related to manipulation of a list and list items. |
| SharePoint Conditions | SharePoint Condition activities provide the ability to test for various conditions. Examples include testing whether the current item was created by a specified user, or whether the current item was created within the specified date range. |
| Task Actions | Task actions provide the ability to run a simple task process (SingleTask) or run an entire task process (CompositeTask). The SingleTask activity assigns a single task to a single person or group, and waits for the task to complete. The CompositeTask activity assigns multiple tasks to multiple people in series or parallel, waits for the task to complete, and calculates the aggregate outcome. |
| User Actions | User actions provide the ability to perform common utility-type actions relating to users and groups in SharePoint. These include validating user accounts, performing lookups to SharePoint groups and group membership, and retrieving user properties. |
| Utility Actions | Utility actions provide helper activities to perform common methods required by workflows. These include sending e-mail, getting the current item/list/list id/history list/task list, and a number of other utility activities. |
For more information on Workflow activity classes, see http://msdn.microsoft.com/en-us/library/jj163790(v=office.15).aspx.
Workflow Actions
Workflow actions wrap a set of workflow activities into a user-friendly action available to authors of workflows in SharePoint Designer 2013.
SharePoint Designer 2013 makes available a different set of workflow actions, depending on whether you opt to create a SharePoint 2010 workflow or SharePoint 2013 workflow. In addition, different actions are made available to site and list workflows.
SharePoint Designer 2013 groups these actions into the following buckets:
- Core actions — Core actions are those most commonly performed; Microsoft groups these together for easy access. Examples include Add a Comment, Log to History List, Send an Email, and Go to Stage.
- Document Set actions — SharePoint 2010 workflow provide the ability to perform actions on Document Sets. Examples include Capture a Version of the Document Set and Send Document Set to Repository.
- List actions — List actions group actions related to manipulation of list and list items. Examples include Check in Item, Copy Document, and Delete Item.
- Relational actions — SharePoint 2010 workflow provides the workflow action to Look Up Manager of a User.
- Task actions — Task actions provide the ability to invoke a workflow based on the SharePoint 2010 workflow platform from within a workflow based on SharePoint 2013 workflow platform. Examples include Assign a Task and Start a Task Process.
- Utility actions — Utility actions provide the ability to work with and manipulate strings or find the interval between dates. Examples include Trim String, Extract Substring from End of String, and Find Interval between Dates.
- Coordination actions — Coordination actions are used to invoke workflows based on the SharePoint 2010 workflow platform. Examples of these include Start a List Workflow and Start a Site Workflow.
- Project actions — Project actions support the integration of Microsoft Project. These actions are used to build workflow based on Microsoft Project.
To view a detailed list on workflow actions available in SharePoint Designer 2013, see http://msdn.microsoft.com/en-us/library/jj164026(v=office.15).aspx.
There are a number of scenarios in which a SharePoint 2013 workflow may need to interact with an existing (SharePoint 2010) workflow or action, or vice versa and interact with a SharePoint 2013 workflow or action from a SharePoint 2010 workflow.
To cater for interaction between the 2010 and 2013 workflows, the product teams have provided a feature called the workflow interop bridge. This features workflows, managed under different hosts, to communicate and leverage features from each of the hosts.
Microsoft documented the complete list of workflow actions that can be used via the workflow interop bridge. See http://msdn.microsoft.com/en-us/library/jj163929(v=office.15).aspx.
Workflow Forms
Forms are a key part of any SharePoint workflow because they commonly provide the main interface with which the user has to interact. As a result, forms are a pivotal aspect of any workflow development project.
Workflows use four different types of forms for associating, initiating, modifying, and providing data to a workflow. These form types apply regardless of whether the forms are the default .ASPX or InfoPath forms. The following list presents the key types of workflow forms:
- Association — Association forms enable users to associate the workflow to a site, list, library, or content type.
- Initiation — Initiation forms enable users to enter data before kicking off the workflow.
- Modification — Modification forms enable your users to alter the workflow at certain points while it is running.
- Task Forms — Task forms enable you to present custom forms to the user when they click a task.
A key difference between SharePoint 2010-based and 2013-based workflows is the support for InfoPath as the forms designer. In SharePoint 2013, Microsoft has departed from using InfoPath as the main designer of forms for SharePoint workflows. SharePoint 2013 now creates .ASPX forms instead of InfoPath forms.
You can see the forms used by a workflow by opening a workflow in SharePoint Designer and looking at the Forms section, as shown in the lower right of Figure 15-2.

For SharePoint 2010-based workflows, SharePoint continues to support both .ASPX forms and InfoPath forms. When a user accesses an InfoPath form associated with a workflow, the form is rendered in an InfoPath Form web part that is hosted within an .ASPX page.
We will use the Mandated Employee Training scenario to explain each of these forms. The scenario relates to the common requirement to ensure employees have completed training mandated by the business. The training is web-based but is housed on various internal sites and websites, and the manager wants an automated process track and ensures his team has completed the training. The workflow will be set up against a training list. As training items are added to the list, the manager will kick off the workflow to notify the team.
Now have a look at the four different types of forms in more detail.
Workflow Association Form
The association form is used for initially configuring a workflow instance on a particular list, site, or content type. Association forms often capture key configuration data about the workflow behavior and its participants. Association forms are generally used only by administrators.
Using the Mandated Employee Training example, the workflow will require default information. In this case, the association form will be set up by administrators and may not include a lot of default data.
One key piece of information you want to capture during the setup of the workflow (against the training list) is the e-mail alias of the manager and the Human Resources team that must be notified when employees have completed the mandated training. Another key piece of information you want to capture is the name of the list containing the list of employees.
Workflow Initiation Form
The initiation form is used by users when they start (or initiate) a workflow. Initiation forms can be used to provide additional information on top of the default parameters defined by administrators in the association form. The association and initiation forms are often the same form but could be different in scenarios in which unique data is required to initiate the workflow, and the use of default values (from an association form) is not suitable.
Using the Mandated Employee Training example, the manager would add a new training item to the list. When the manager is ready, he would kick off the workflow. At this point, it is possible to display a workflow initiation form. In this case, the initiation form would typically be the form that the manager uses to provide the workflow with specific settings for this workflow. This may be the reminder date, completion date, and how many times to notify the user.
Workflow Modification Form
The modification form is used to alter workflows that are already running and executing. For example, an administrator may need to manually reassign tasks from one user to another user. Another example is where initiation and association variables, entered early on, need to be updated. For example, an e-mail address of the Mandated Employee Training example may need to be updated for existing workflows.
Workflow Task Form
The task form is used to collect data from users by assigning workflow tasks to the user. When the user opens the task, he will be shown the task form, which may have any number of fields, conditional formatting, and all the other features of your workflow task form.
In the Mandated Employee Training example, the workflow task form would be used to assign a task for each employee. When employees open the task, it would show them the relevant training material, such as the link to the training and when the training must be completed.
Workflow Tasks
Tasks are a core part of SharePoint workflow. They are commonly used to progress the workflow, receive input, and collect information during steps requiring input from participants of the workflow. Tasks, by default, are stored in a list called Workflow Tasks.
By default, SharePoint 2013 workflow tasks lists implement the content type called workflow tasks (SharePoint 2013). The Workflow Tasks (SharePoint 2013) Content Type inherits the Task Content Type. The key difference between these is a new SharePoint 2013 column called Task Outcome, based on a new field data type called Outcome Choice.
If the defaults are accepted when associating (setting up) workflows, all workflows in a site collection use the same workflow tasks list to store tasks. For high-volume sites, this list could get large quickly.
Although the support for large lists has been improved in SharePoint 2010 and 2013, it is still a best practice to minimize list sizes where possible. On this basis, it is recommended that high-volume workflows are configured with their own dedicated Workflow Tasks list.
The next section looks at the Workflow History list. The Workflow History list is the primary audit trail for workflow activity.
Workflow History
When associating (setting up) a workflow, the administrator will be asked for a Workflow History list. This is a special type of SharePoint list that is used to store data about the workflow and the route that a workflow has taken. By default, the Workflow History list is hidden to users of the site.
It is part of the workflow design process to establish when and how the Workflow History list is used. The Workflow History list is intended as a human-readable audit of what has occurred during the workflow and is important if data collected in the workflow is needed for compliance or record management.
Typically, workflows will log to the history list at each activity point at the start and end of the workflow. However, remember that the workflow is intended to be read by humans, so it is important to ensure that any history list submissions are readable and relevant to any users who might be looking at the history.
The act of writing to the workflow history list is a built-in SharePoint activity that is available in both SharePoint Designer and Visual Studio workflows. The activity allows you to pull in data from the workflow and gives you a good level of control on how the history list entry is displayed and laid out.
The next section delves into the various workflow flow control options and best practices for deciding which one to use.
Workflow Flow Control Templates
SharePoint 2013 supports three flow control templates, namely flowchart, sequence, and state machine. When using the SharePoint 2010 .NET 3.5 workflow host in SharePoint 2013, the sequential and state machine templates are available to develop workflows.
When using the Windows Azure Workflow host (based on .NET 4.5) in SharePoint 2013, Microsoft no longer provides a dedicated SharePoint workflow template for sequence and state machine workflows. The reason is that you can use all three flow control templates by selecting the required workflow activity from the Visual Studio 2012 toolbox. As a result, SharePoint 2013 workflows support the following flow control templates:
- Flowchart workflow — Flowchart workflows, based on the FlowChart activity, is an activity in Windows Workflow 4. Flowcharts provide the simplicity of sequence plus the ability of looping back to a previous point of execution (state machine).
- Sequential workflow — Sequential workflows, based on the sequence activity, executes a set of contained activities in a sequential order. Procedural constructs such as ForEach, If, Switch, DoWhile, and While; or parallel constructs such as Parallel and ParallelForEach to model parallel execution logic; any activities provided in Windows Workflow activity palette; or any third-party or custom activity can be included.
- State machine workflow — State Machine workflows, based on the StateMachine activity, enable workflows to be developed based on state transitions, as opposed to predictable, predefined paths followed by sequential workflows.
Workflow development still requires a good understanding of the sequential and state machine paradigm. It is one of the important early design decisions that will affect your workflow and development process. The flowchart workflow template caters to both the state machine and sequential workflow paradigms. Now you will look at the sequential and state machine paradigms in more detail.
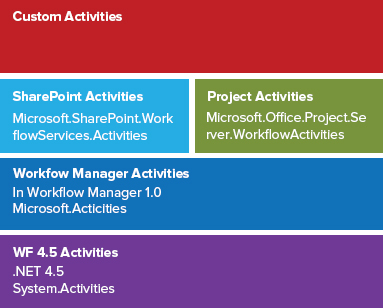
Sequential Workflow Paradigm
Sequential workflows are perhaps the easiest to understand because they are what someone may intuitively understand workflows to be. Sequential workflows have a starting point and an ending point, with various defined sequential paths between the two. Each path through the workflow is constituted from a series of workflow activities (things such as “send an e-mail,” “collect data from user,” “update list item,” “run some code,” and so on). The outcome of an activity will determine the next path the workflow takes toward the endpoint. Figure 15-3 shows an example of the sequential workflow paradigm.
The main point to remember with sequential workflows are that the paths are predefined and sequential — that is, the workflow follows a defined set of activities until it reaches an endpoint. Sequential workflow does not necessarily mean linear. The use of conditional logic, branching, and so on, means that there can be multiple paths through a sequential workflow, and the outcome of activities can change the path. However, the key point is that the paths are always predefined by the workflow designer.
A good example of a sequential workflow is the Approve Expenses example. The starting point is that a user submits his expense report, and the ending point is that the expenses are approved or rejected by his manager and logged in the system. There may be several predefined paths and sets of activities between the start and endpoints.
State Machine Workflow Paradigm
A state machine workflow does not follow a predefined path but simply moves between a set of states. These workflows are event-driven in that the outcome of a given event may change the state of the workflow. Although state machine workflows do have a starting and ending state, the path between these two cannot be predetermined and is driven by the workflow. State machine workflows are generally well-suited to long-running workflows where the process may stay in a particular state for a long period of time. Figure 15-4 shows an example of the state-machine workflow paradigm.

A state machine workflow is ideal if the process must go backward and forward between states, rather than following a sequential path. A great example of a state machine workflow is a support call that may get logged with your IT support organization. The call may have several states and may transition between them several times before the call reaches the closed state.
For example, the end user may log the call, whereby at this point it may be in the “unassigned” state. A support engineer may pick up the call from the queue and assign it to himself, at which point the state becomes “with support worker.” The support worker may contact the end user and request some data, where the state may change again to “awaiting data from end user.” The end user may supply this data and the state would change back to “with support worker.” The process may go on and on with the states constantly changing until the call is closed off.
This kind of process is difficult to implement as a sequential workflow because the path between the start and end of the workflow is undetermined and, therefore, cannot be predefined as part of a sequential set of activities.
Workflow Scopes
SharePoint 2013, as in SharePoint 2010, enables you to bind your workflow to specific SharePoint scopes. SharePoint 2013 provides two workflow execution hosts, and the choice of host affects the out-of-the-box options available to “scope” your workflow.
When using the SharePoint 2010-based workflows engine in SharePoint 2013, you can associate and bind your workflow to sites, lists, and content types.
When using the SharePoint 2013 workflow engine in SharePoint 2013, site (SPSite) and list (SPList) scoped workflows are supported. It is worth noting that the scopes are essentially a set of subscription rules stored in the Windows Azure publication/subscription service responsible for processing incoming messages to ensure they are consumed by the associated workflow instances.
The beauty of both workflow engines in SharePoint 2013 is that they both support site-based and list-based workflows. Site workflows are extremely valuable tools because they cater to so many scenarios that cannot be accomplished using list-based and item-based workflows. The following list describes key use cases for site-based workflows:
- Site reporting workflows — A report, summarizing key information, can be e-mailed on a regular basis for a site.
- Site governance workflows — Site preparation workflows could be used to guide users through a set of steps to automate the configuration of their site. Site disposition workflows could be created to guide site owners through common administrative tasks to manage the disposal of their site in accordance with the governance principles of your organization’s SharePoint 2013 platform. Other examples include requesting additional storage, by increasing the site collection quota through a managed workflow rather than having to rely on a manual change request to your SharePoint support team.
- Working on multiple items in one or more lists — A workflow can be created to perform actions on one or more lists and one or more items in each of those lists.
- Performing actions on a periodic basis — The new support for stages, transitions, and “pause/delay until” functionality makes it possible to perform a set of actions on your site on a timer. For example, you can create a site workflow that fetches the latest stock information on a daily basis and update a list containing stock prices.
List-based workflows are the most common type of workflow used in SharePoint, and a number of workflows are provided out of the box. This type of workflow scope is fantastic for managing processes relating to individual list items. The most common example is using workflow to manage approval or a document or page.
Workflow Associations and Subscriptions
SharePoint 2013 provides a number of methods to associate workflows to libraries, lists, content types, and sites. Workflows can be associated and started either manually or automatically. This is achieved using the SharePoint website interface, using SharePoint Designer, or programmatically using Visual Studio 2012. This applies to both workflows hosted in either the SharePoint 2010 workflow engine or the SharePoint 2013 Azure-based workflow engine.
From a programmatic and object model perspective, workflows can be associated (and subscribed to) using the Microsoft.SharePoint.Workflow namespace.
The SPWorkflowAssociation class enables developers to add, configure, and remove workflow associations.
The SPWorkflowManager provides functionality to centrally control the running instances of workflows across your site collection through the object model. It provides methods to start, run, or cancel workflows; return all the workflows running on a specific item; and perform other workflow administration operations.
SharePoint 2013 workflows differ in that workflows are hosted outside of the SharePoint platform using the Azure Workflow Host. Table 15-3 describes how workflows are associated to SharePoint 2013 workflows.
TABLE 15-3: Workflow Associations for SharePoint 2013 Workflows
| Manual workflows | Manual workflows are started when the PubSub service receives a StartWorkflow message containing the following information:
|
| Auto-start workflows | Automatically started workflows are initiated using the Add message to the PubSub service. The message contains the following information:
|
The “other side” to workflow execution is how workflows execute based on events that are being broadcasted to the Windows Azure Workflow engine, and how specific running workflows can selectively receive and act on these events.
This “side” of the workflow puzzle defines how running workflows subscribe to and listen for specific events. In Windows workflow terminology, these are known as workflow subscriptions. SharePoint 2013 workflows must create subscriptions on the Windows Azure Service Bus using create and delete methods.
The create method, which is used to create the subscription, provides the ability to pass in a number of initialization and subscription parameters, including:
- Optional and required parameters that are defined by the workflow author
- Initialization parameters of the workflow definition
- Specific SharePoint options, either an SPWeb or SPList object, as part of one of the required parameters.
Luckily, this is simplified for SharePoint developers, as the SharePoint object model takes care of the “plumbing” between SharePoint 2013 and the Azure Workflow engine.
Workflow Event Listeners
SharePoint 2013, as in previous versions, makes it possible for your workflow to listen for events occurring in SharePoint and use these events to perform activities or actions. Table 15-4 describes the out-of-the-box workflow activities and actions provided by SharePoint.
TABLE 15-4: Out-of-the-Box Workflow Event Listeners
| SHAREPOINT DESIGNER ACTION | WORKFLOW ACTIVITY | DESCRIPTION |
| Wait for an event in the list item | WaitForItemEvent | Waits for a new item to be created, or alternatively a change to be made to an existing item |
| Wait for a field change in the current item | WaitForFieldChange | Waits for a specified field to change to a specified value on the specified list item |
| (No corresponding event) | WaitForCustomEvent | Waits for a custom event to be sent in to the workflow |
| Wait for a project event | Waits for a project to be checked-in, committed, or submitted | |
| Assign a task | SingleTask | Assigns a single task to a single person or a group and waits for the task to complete |
| Start a task process | CompositeTask | Assigns multiple tasks to multiple people in a series or parallel; waits for the task to complete and aggregates the outcome |
SharePoint provides extensive support for initiating and triggering workflows using the extensive event receiver support baked into the SharePoint 2013 platform. This includes support for handling events received from the new apps for a SharePoint model as well as handling and responding to events in the classic on-premise model. Finally, SharePoint 2013 provides new functionality to support remote event receivers. These can be used to trigger workflow in one SharePoint environment based on events occurring in another environment.
Workflow Visualization
Visio 2013 and SharePoint Designer 2013 can be used to model and visualize workflows. These can then be exported to SharePoint Designer for implementation. SharePoint Designer 2013 now integrates the Visio design surface as an additional view to the text-based view.
SharePoint 2013 provides support for visualizing the stage and progress of workflows developed using the SharePoint 2010 workflow engine. This is made possible by the Visio Service Application within SharePoint 2013.
The Visio Service Application enables Visio diagrams to be rendered and viewed in a web browser. By default, the diagram is shown in the workflow properties screen.
Workflow Authorization
SharePoint workflows need to run in the context of an identity.
For SharePoint 2010-based workflows, they can run either in the context of the workflow initiator or as the publisher of the workflow. SharePoint Designer 2013 continues to provide the impersonation step action. This enables the workflow to run under the publisher of the workflow (as opposed to the user using the workflow). Using Visual Studio 2012, custom-developed SharePoint 2010 workflows can elevate privileges to run under the application pool account of the web application hosting the site collection.
For SharePoint 2013-based workflows, SharePoint 2013 workflows now support server-to-server authentication and app authentication through the implementation and extension of Open Authorization 2.0 (OAuth 2.0) web authorization protocol.
What this essentially gives you is the ability to run the SharePoint 2013 workflow under an identity, more commonly referred to as the App Principal or App Identity. As shown in Figure 15-5, this requires the site collection feature to be activated to support workflows running under an application identity.

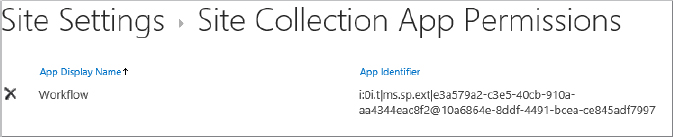
Figure 15-6 shows how you can view the permissions that have been granted to apps in your site collection.
The next section provides an overview of the workflow platform architecture in SharePoint 2013.
UNDERSTANDING THE WORKFLOW PLATFORM ARCHITECTURE IN SHAREPOINT 2013
One of the biggest areas to evolve in SharePoint 2013 is the workflow platform architecture in SharePoint 2013, and a number of challenges were overcome successfully to provide support for both SharePoint 2010-based and 2013-based workflows in the same farm.
As a result, the SharePoint 2010 workflow host (based on the .NET 3.5 Windows Workflow Foundation) is continued in SharePoint 2013. SharePoint 2013 workflows, powered by Windows Workflow Foundation 4, provide the ability to host Windows Azure-based workflows external to the SharePoint farm and either on-premise or in a cloud-hosted environment.
As shown in Figure 15-7, look at the key components of the workflow platform in SharePoint 2013.
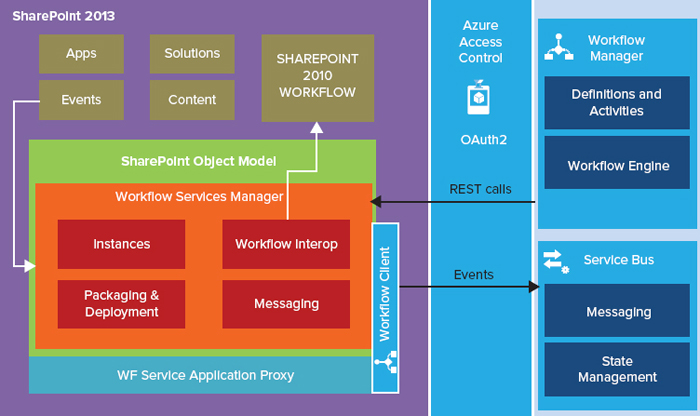
As you can see, SharePoint 2013 integrates the Workflow Services Manager into the heart of SharePoint 2013. Following is a list of the key components of the SharePoint 2013 workflow platform:
- SharePoint 2010 workflow host — The SharePoint 2010 workflow host is provided in SharePoint 2013 to support workflows developed using the SharePoint 2010 workflow model. The workflow host is based on the .NET 3.5 Windows Workflow run time.
- Workflow Services Manager — The Workflow Services Manager is a collective name given to the collection of additions to the SharePoint workflow object model. These additions provide support for SharePoint 2013 workflows. For example, it includes features to manage workflow instances, packaging, and deployment of workflow definitions of workflows hosted in Windows Azure Workflow. One of the key features provided is interoperability and messaging between workflows developed using the SharePoint 2010 and 2013 model.
Workflow Manager — The Workflow Manager, provided by Windows Azure, is a multitenant host for running and managing Windows Workflow Foundation workflows, supporting high-scale and high-density execution. The client essentially provides the ability to manage workflow definitions and host execution processes for workflow instances. The Workflow Manager can either be consumed from a cloud-hosted service (such as Windows Azure) or installed and used on-premise. For more information on the Workflow Manager, see http://msdn.microsoft.com/en-us/library/jj193471(v=azure.10).aspx.
- Service bus — The service bus, a key component of the Windows Azure platform, is the messaging infrastructure that manages the exchange messages between applications.
- Azure Access Control — Azure Access Control is a service that provides support for authenticating and authorizing users and system accounts via various protocols. From a workflow perspective, Azure Access Control mediates server-to-server authentication using Open Authorization (OAuth2).
Another key challenge that was solved was how to ensure legacy SharePoint 2010 workflows (and activities) would interoperate and play nicely with workflows (and activities) based on the new Azure workflow model. This challenge was solved with the introduction of SharePoint workflow interop. TechNet provides an in-depth article explaining workflow interop. See http://msdn.microsoft.com/en-us/library/jj670125(v=office.15).aspx.
The next section provides an overview of the key development tools that will be used to model, author, and develop workflows, activities, and actions.
UNDERSTANDING KEY WORKFLOW DEVELOPMENT TOOLS
SharePoint offers a variety of tools that you can use to model and develop workflows. Microsoft provides three key tools to cover workflow modeling, configuration, and development.
- Visio Professional 2013 — As with Visio 2010, you can create and model SharePoint workflows in Visio 2013. Visio 2013 supports both SharePoint 2010 and 2013 workflows. The Visio file can then be exported to SharePoint Designer 2010 to be fully implemented and deployed. Visio is a fantastic tool that enables business analysts to create the workflow and hand the modeled process to the designer/developer to complete and implement in SharePoint.
- SharePoint Designer 2013 — You can use SharePoint Designer 2013 to create simple, site collection-scoped, declarative (no-code) workflows. You can also build custom actions that can be used in SharePoint Designer.
- Visual Studio 2012 — You can use Visual Studio 2012 to write more advanced workflows, using either the SharePoint 2010 or 2013 workflow templates. These workflows can be made available to multiple site collections and are widely accessible throughout the farm.
Now look at each of these tools in more detail.
Visio Professional 2013
Start the discussion with Visio because this tool is the most common starting point for business analysts and end users.
Visio 2013 is the go-to tool for drawing professional diagrams and is especially suitable for drawing business processes. As with the Visio 2010 application, the Visio 2013 application provides in-depth support for modeling SharePoint workflows. Additionally, these models can be used as a starting point for creating fully operational workflows in SharePoint Designer and Visual Studio 2012.
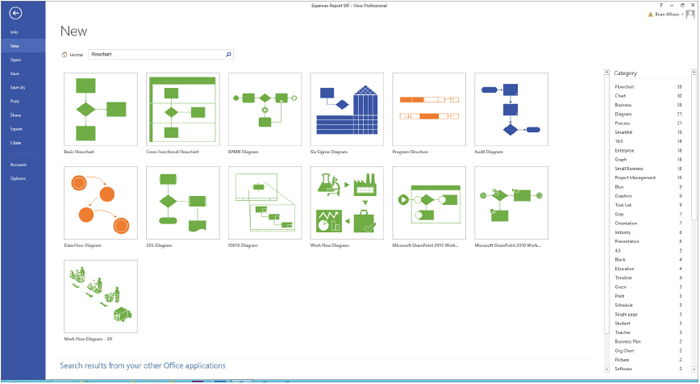
The user experience is almost the same as any other Visio diagram; the only difference is that the user must start the drawing from the Microsoft SharePoint workflow template (New ⇒ Flowchart) and use either the SharePoint 2010 workflow or SharePoint 2013 workflow stencils when drawing the process. See Figure 15-8.
What is great about the integration between Visio 2013 and SharePoint Designer is that it is two-way. This means that designers can export workflows back to Visio for the analysts to make changes to the process, and then “round-trip” back to SharePoint Designer for further updates.
Visio 2013 provides fantastic new support for SharePoint 2013 workflows. After you create a SharePoint 2013 workflow, it now starts with an empty container, called a stage, instead of a blank canvas. As shown in Figure 15-9, each stage contains all of the actions for each section of the workflow. Although simple workflows may have only one stage, more complex workflows may contain multiple stages.

SharePoint Designer 2013
SharePoint Designer 2013 is the tool of choice to undertake no-code customization across the whole range of SharePoint capabilities, including designing, deploying, and configuring workflows targeting the SharePoint 2010 and 2013 workflow engines. SharePoint Designer 2013 includes new functionality designed specifically for Windows Azure Workflow Manager and SharePoint 2013 workflows.
Both SharePoint 2010 and 2013 workflows created in SharePoint Designer are known as declarative workflows. Declarative workflows is the term used to describe no-code workflows in SharePoint and are essentially a set of rules that declare to SharePoint (and the underlying workflow host) how the workflow will function.
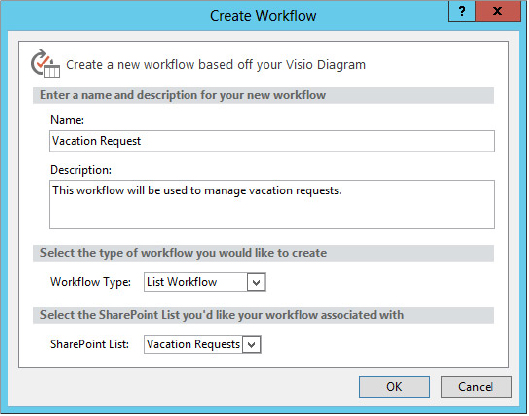
As shown in Figure 15-10, when you create a new workflow in SharePoint Designer 2013, you have the option to select the workflow platform (using the Platform Type choices) in the new workflow creation dialog. This has the effect of selecting what workflow hosting platform will be used and the type of workflow functionality available to build the workflow.

Designers can design workflows using all of the actions that are installed on the SharePoint server to which they are attached (including custom actions). When complete, the workflow can be published to your SharePoint site.
As shown in Figure 15-11, a new Visual Designer view is available within SharePoint Designer.
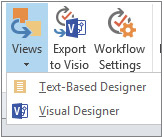
This view provides an alternative experience to the text-based view and enables the same modeling experience of Visio directly within SharePoint Designer.
SharePoint provides a number of new actions that can be used in your workflows. Examples of these include the ability to call out to web services within your workflows, new actions for creating simple and complex task processes, and new coordination actions that provide interoperability between the SharePoint 2010 and SharePoint 2013 workflow platforms.
One of the biggest new additions in SharePoint Designer is new support for stages, loops, steps, and parallel blocks. To help understand these four new shapes, Figure 15-12 shows how these can be used to configure your workflow.
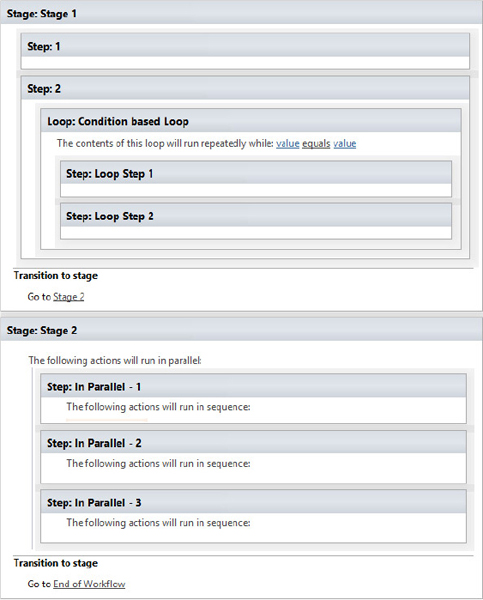
Following is an overview of each of these shapes:
- Stage shapes can contain any number of shapes. Stages support one path in and one path out. Most important about stages is that they support transitions to other stage shapes, or alternatively to the end of the workflow.
- Steps are different from stages in that they occur sequentially. Steps must be contained by a stage. As with a stage shape, a step shape must also define the paths in and out of the shape.
- Loops are a series of connected shapes that execute in a loop for a defined number of times or until a condition is met. Loop shapes can contain step shapes but cannot contain stage shapes.
- Parallel blocks support the execution of multiple actions at the workflow at the same time. Furthermore, parallel blocks support parallel executions of containers that host actions, including step and loop shapes. Parallel block shapes must be hosted by a stage container.
Another key enhancement is the new dictionary variable type supported by SharePoint 2013 workflows. This data type acts as a container to hold collections of variables. Working with dictionaries is supported by three new SharePoint Designer actions called Build Dictionary, Count Items in a Dictionary, and Get an Item from a Dictionary. For more information, see http://msdn.microsoft.com/en-us/library/jj554504.aspx.
As mentioned earlier, SharePoint Designer makes it possible to import 2010 and 2013 workflows modeled in Visio 2013. Updates can be made to the workflow, and if required, can be re-exported into Visio for further modeling.
It must be noted that although SharePoint Designer 2013 is greatly improved, deployment limitations still exist. Key examples include where an important workflow must be configured for hundreds of site collections, sites, and libraries, or when a workflow must be available to all site collections in a farm. In these cases Visual Studio is a much better option to facilitate the deployment and configuration using the solution packaging, and feature framework and activation/deactivation processes.
Despite these deployment limitations, SharePoint Designer 2013 is a powerful and wonderful tool that enables the development and deployment of complex workflows without writing any code, and hits the sweet spot when modeling, authoring, and deploying workflows against individual sites, libraries, and lists.
Visual Studio 2012
Visual Studio 2012 offers the highest level of control and customization over your SharePoint workflows and supports both 2010 and 2013 workflow development.
SharePoint 2013 workflows, based on Windows Workflow Foundation and hosted externally in the Windows Azure workflow engine, no longer provide support for custom code within the workflow. SharePoint 2013 workflows are now declarative in nature in that workflows are no longer made up of code compiled as assemblies. Instead they are described as XAML and then executed interpretively at run time. This has the effect of moving all custom code out of the workflow into custom activities (and custom actions) and external web services.
There are a number of scenarios that can be achieved only using Visual Studio 2012. These include automating the deployment of workflows and related lists required for sites in your SharePoint environment through the use of the SharePoint Feature framework.
Another key scenario is the support for workflow in SharePoint apps. Workflow can be used in all types of SharePoint apps to host middle-tier logic for managing long-running business logic.
Another key consideration for developing workflows using Visual Studio is when your workflow requires custom initiation, association, modification, or task forms. In these cases, form generation no longer uses InfoPath forms but instead relies on ASP.NET forms.
The workflow and SharePoint tooling in Visual Studio 2012 treats SharePoint 2010 and 2013 workflows as normal SharePoint project items that can be easily added to a solution, packaged, and deployed as part of a .wsp file, just like every other item in a SharePoint Visual Studio solution.
Reusable workflows that have been built in SharePoint Designer 2013 can be exported as a .wsp file and imported into Visual Studio 2012 for further customization.
Now that you looked at the various tools for creating workflow, look at getting your development environment set up to develop Azure workflows.
SETTING UP THE DEVELOPMENT PREREQUISITES
There are a number of prerequisite steps to complete before you can start creating SharePoint 2013-based workflows using SharePoint Designer and Visual Studio 2012. This section covers the high-level steps required to configure your environment.
Creating Your Workflow and SharePoint Development Environment
If you have not already done so, you must install and configure SharePoint 2013 on your development machine. For detailed instructions, see http://technet.microsoft.com/en-us/sharepoint/fp142376.aspx.
Installing the Workflow Manager
The following steps highlight the key steps to installing the Azure Workflow engine in your development environment:
To verify the Azure workflow service has been installed correctly, browse to the list of service applications in central administration, select the workflow service application, and view the service status message.
Following are some tips that may be of assistance to you:
- Use the correct notation/format when specifying accounts in the Azure platform configuration wizard.
- Understand permissions between your Azure workflow host and SharePoint.
- Ensure that the local policies on your development have the correct rights.
- Check that your database access permissions are consistent and accurate.
There is a great step-by-step walkthrough at http://www.sharepointassist.com/2012/08/22/sharepoint-2013-lab-build-part-8-windows-azure-workflow-installation-and-configuration/.
Installing Your Development Tools
Ensure you have installed SharePoint Designer 2013, Visual Studio 2012, and Visio 2013 (Visio is required to enable the Visual Designer view in SharePoint Designer) and the Visual Studio 2012 Tools for SharePoint 2013.
The latest Visual Studio 2012 Tools for SharePoint 2013 are available via the web platform installer. The Visual Studio tools provide the SharePoint project items and templates, including the new Azure workflow template.
This section provided a brief summary of the development prerequisites needed to develop workflows for SharePoint 2013. The next section looks at developing a sample scenario.
MODELING A WORKFLOW USING VISIO 2013
Visio has always been a wonderful tool for diagramming business processes and has grown in leaps and bounds in its usefulness to organizations needing a great diagramming tool.
One of the great features, first introduced in the Office 2010 wave, was the ability to model workflows and draw business processes in Visio before sending the diagram to designers and developers in the implementation phase. Visio 2013 improves the workflow modeling features in a number of ways, including implementation of a new file format (.VSDX); increased integration between the SharePoint Designer and Visio; and by providing a number of new SharePoint workflow stencil actions that can be dragged onto the canvas. For more information on Visio 2013 improvements, see the “Understanding the Key Development Tools” section.
In this section, you model the Request Holiday Workflow in Visio 2013 and use the file so that it can be imported into SharePoint Designer in the next section.
- SharePoint 2013 Workflow Actions
- SharePoint 2013 Workflow Conditions
- SharePoint 2013 Workflow Components


You have now finished modeling your workflow, and you may want to use the validation feature in Visio 2013 before passing it on to the designer to implement.
In SharePoint Designer 2010 you had to export the file to an intermediary file format. Although this feature is still supported for legacy diagrams and SharePoint 2010 workflows, it is not required for SharePoint 2013 workflows.
The next step is to save and send the diagram to your designer to use this as the basis of the workflow.
DEVELOPING WORKFLOWS USING SHAREPOINT DESIGNER 2013
After your workflow has been modeled in Visio, it can be handed off to IT professionals who are more technical to implement and extend the workflow using SharePoint Designer.
Setting Up the Site and List Prerequisites
Before starting this activity, you need to set up the development site and supporting lists.
- Title — Single Line of Text
- Description — Multiple Lines of Text
- Nearest City — Single Line of Text
- Start Date — Date Time
- Return Date — Date Time
- Number of leave days required — Number
You will use this site and the list to manage vacation requests.
Importing the Visio Workflow Diagram
The first step to implement the workflow starts with importing the Visio workflow into SharePoint Designer. To start, follow these steps:

- Shape level — Checks that shapes, connectors, and connections are valid
- XAML level — Occurs when you select Check for Errors or Publish and validates the underlying XAML generated by SharePoint Designer
On the left, stencil shapes are provided to use in implementing your workflow. Although this may look similar to the Visio modeling experience, the stencils provided are filtered based on the type of workflow created. In your case, only list-based workflow stencils will display.
You are now ready to begin fleshing out the workflow.
Creating the Vacation Request List Workflow
Creating the Vacation Request list workflow involves implementing each of the stages of workflow as described in the “Modeling a Workflow Using Visio 2013” section:
Now you’ll proceed with each of the stages.
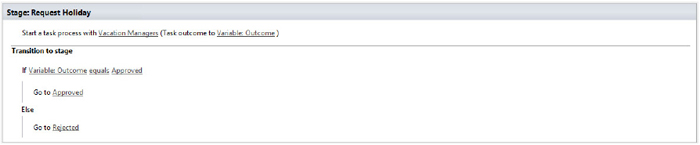
Stage: Request Holiday
The first stage of the workflow starts when an employee creates a new item in the vacation request list. When this happens, you want the vacation managers’ group to be notified of the new workflow task. They either approve or reject the request. Lastly, you will progress the workflow based on their action. To do this, follow these steps:

- Wait for all responses — This option makes the workflow wait until all of the responses have been collected. It then returns the outcome that returned the most responses.
- Wait for first response — This option makes the workflow wait until the first response is received. It then returns the outcome of the first response.
- Wait for a specific response — This option makes the workflow wait until the required outcome is received. If the required outcome is not received, it returns the default outcome.
- Wait for percentage of response — This option makes the workflow wait until a specified percentage of a particular outcome is received. If the required percentage is not achieved, it returns the default outcome.
TABLE 15-5: Start a Task Process Values
| ITEM | VALUE |
| Participants | Vacation Managers (Use the picker to select this group) |
| Task Title | A new vacation request is ready for review |
| Description | Please review the new vacation request |
| Due Date | Today’s date |
| Completion Criteria | Wait for first response |
- Business logic — This part is able to host conditional logic, actions, steps, and the loops of your stage. For more information on these activities, see the “Introducing Core Workflow Concepts” section.
- Transition to Stage — This part tells your workflow what to do when the stage business logic completes. This may be to move to another stage or to finish the workflow.
Stage: Approved
Now continue with the Approved stage of the workflow. This stage executes when a vacation manager has approved a vacation request. In this stage, you want to do three key things:
- Log the approval to the workflow history list.
- Send an e-mail to the employee notifying him that the leave request was approved.
- Transition to the next stage.
Here are the steps:
The stage will now be configured, as shown in Figure 15-20.

Stage: Get Weather
This goal of this step in the workflow is to pause the workflow until five days before the start of the employee vacation. SharePoint Designer provides two actions to accomplish this type of action:
- Pause for duration — Provides the ability to specify the number of days, hours, and minutes to pause the workflow. This action is useful in scenarios in which you need to execute business logic on a regular basis in your site. Furthermore, combining it with a looping container or the Go to a Stage action enables you to repeatedly call your business logic. For example, you can create a site workflow that retrieves the latest stock quotes on a daily basis and caches them in a list. These values can then be consumed by other functionality in your site.
- Pause until date — Provides the ability to pause execution of the workflow until a specific date and time. This action is great for scenarios in which you need to perform an action based on date information provided by users during the workflow or based on date data provided in a list.
To configure this stage to pause the workflow execution five days before the vacation, follow these steps:

You have now configured this stage to pause (and resume) workflow execution 5 days before the vacation.
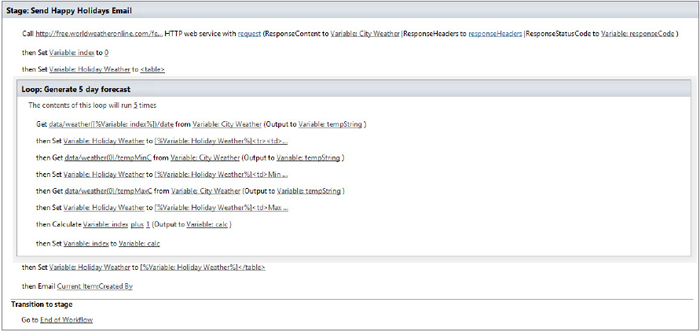
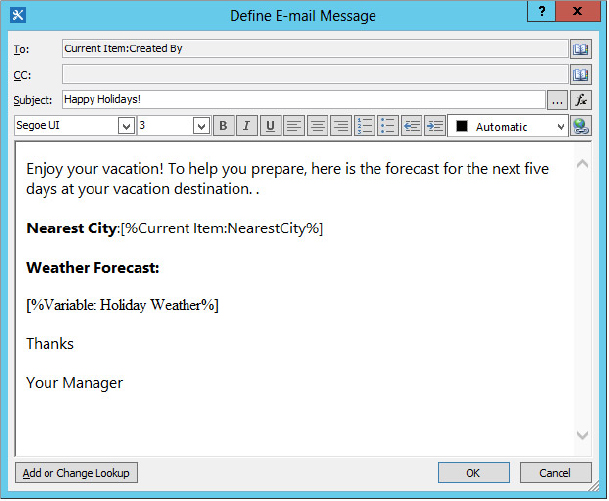
Stage: Send Happy Holidays E-mail
The goal of this workflow stage is to call out to an external web service to retrieve information, loop through the results, prepare a five-day weather forecast, prepare the e-mail, and send it to the employee about to take vacation.
Before you start with the steps required to set up this stage, take a step back and consider some of the new features SharePoint 2013 provides to achieve this.
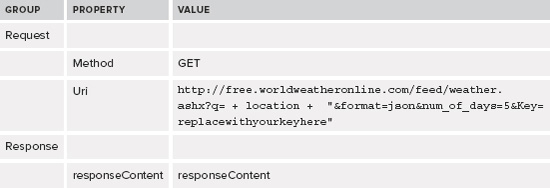
The first is a powerful new action called Call HTTP Web Service that provides the ability to call out to on-premise or external web services and return data back to the workflow. The web service data is returned in JSON format. Other key features of this action include:
- Web service address — The uniform resource identifier (URI) or URL to call.
- Type of HTTP Request — HTTP defines methods, often referred to as verbs, to indicate the desired action to be performed in the identified resource. HTTP DELETE, HTTP GET, HTTP POST, and HTTP PUT verbs are supported.
- Request Headers — Attach additional headers to the HTTP request.
- Request Content — Provide content to a HTTP request that is stored in a local workflow variable based on the new dictionary variable.
- Response Content — Store the returned JSON-formatted response content into a local workflow variable.
- Response Headers — Store the HTTP response headers returned from the HTTP request into a local workflow variable.
- Response Status Code — Store the response status code of the HTTP request into a local workflow variable.
To cater for JSON data responses and to make it easier to work with collections of variables, SharePoint Designer provides a new variable type called the Dictionary variable. The Dictionary variable is a container designer to hold a collection of variables. Three actions are provided to assist working with dictionary data:
- Build Dictionary
- Count Items in a Dictionary
- Get an Item from a Dictionary
For more information, see http://msdn.microsoft.com/en-us/library/jj554504.aspx.
Bringing it back to HTTP web service, a dictionary variable is used to store and work with data returned from the web service.
Another key feature you use in this stage is the new looping functionality. SharePoint 2013 provides two looping constructs:
- Loop n Times — Run the loop repeatedly for the n number of times you specify. For example, you may call out to a web service that, depending on your query, returns an unknown number of items. The Count Items in a Dictionary action can return the count, and this can be specified to set up the number of items to execute the loop to process the items.
- Loop with condition — Run the loop until a condition is met. For example, you may decide to loop until you find a single item in your dictionary of items.
Now that you have examined these key constructs, you can implement the Send Happy Holidays Email stage, as shown in Figure 15-22.
- q — Provide the city name from the list item.
- num_of_days — Five days of weather.
- format — Data to be returned in JSON format.
- Key — A unique key that grants access to the web service. To get the key, you need to sign up for a free account at www.worldweatheronline.com.
TABLE 15-6: Configure the Following Actions

Stage: Rejected
As shown in Figure 15-24, the final Reject stage is similar to the Approved stage, except that Log to History and Email describe that the vacation request has been rejected.

Publishing the Workflow
You have now finished implementing the workflow. To test the workflow, you need to check for and fix any errors, and publish the workflow to the SharePoint site. To do this, on the Ribbon, select Publish. This deploys the workflow definition to your site. Well done!
DEVELOPING CUSTOM WORKFLOW ACTIVITIES AND ACTIONS USING VISUAL STUDIO 2012
Custom workflow activities and actions can be defined as the development and composition of new workflow activities to cater for specialized requirements and new behaviors.
There are many scenarios in which it makes sense to invest time up front in the creation of useful activities and actions that can be reused over and over again. This results in further extending the rich workflow authoring experience in SharePoint Designer 2013 and Visual Studio 2012, enhancing development and authoring productivity, reducing the number of defects, and improving the maintainability and reliability of tailor-made workflow solutions.
You must understand the key building blocks that make up activities and action, as follows:
- A workflow activity is a building block of a workflow and a unit of workflow execution.
- A workflow action is a wrapper of a workflow activity with a human readable statement that makes it easy to implement via the SharePoint Designer user interface.
- Apart from a few exceptions, there is typically a 1:1 correlation between workflow activities and SharePoint Designer actions.
Microsoft has worked hard to move all custom code out of workflows. Consequently, SharePoint 2013 workflows are now completely declarative in nature and no longer compile as .NET assemblies. To further enhance workflows with specific business logic, Microsoft recommends the following set of options:
- Leverage the out-of-the-box web services — Microsoft has greatly improved the web services provided with SharePoint 2013. Use out-of-the-box activities and actions to interact with the out-of-the-box web services.
- Develop a custom web service — When interacting with other internal business solutions or cloud-based services, move custom code and business logic to a web service. Use out-of-the-box activities and actions to interact with the web service. Host the web service on its own machine, or alternatively host it on one of your web front ends in your farm.
- Develop a custom declarative activity and action — This is the most common option many developers use to create new activities and actions declaratively. Use out-of-the-box and custom activities to create new behaviors required by your workflow.
- Develop a custom code activity and action — Custom code activities are more advanced and require an increased knowledge to develop and deploy successfully. This option is only available in on-premise workflow environments.
Custom declarative activities and actions require Visual Studio 2012 to develop and package as a Windows Solution Package (WSP) to deploy to the SharePoint farm. Custom code activity and actions must be deployed, both to the SharePoint environment and the on-premise Windows Azure Workflow (WAW) environment. Cloud-based deployment of custom code activities is not supported by Microsoft. After the actions file has been deployed to SharePoint, they are available to workflow authors in SharePoint Designer.
Under the hood, activities are made up of a set of workflow definition files that define various parts of the activity or action. For SharePoint 2010-hosted workflows, based on Workflow Foundation 3.x, they are made up of a .RULES and .XOML file. For SharePoint 2013 workflows, based on Windows Foundation 4.x, these files have been consolidated to a single .XAML file.
To make custom code or declarative activities available as actions in SharePoint 2013, a custom .ACTIONS4 file is required. The .ACTIONS4 file is the successor of the SharePoint 2010 .ACTIONS file extension and provides key information required by SharePoint Designer, including the name, underlying class and assembly, rule designer, and input and result parameters. This file must be deployed to the following location in your SharePoint farm: C:Program FilesCommon FilesMicrosoft sharedWeb Server Extensions15TEMPLATE1033Workflow.
Creating a Custom Declarative Activity and Action
In the previous section “Developing Workflows Using SharePoint Designer,” you created workflow to approve holiday vacation requests. As part of this workflow, you called out to a free weather service that returned a five-day forecast that you used to send out a happy holidays e-mail to the employee.
For the purposes of this development scenario, you create a custom declarative activity that can provide better control of the parameters supported by the free weather service to further enhance the authoring experience of the designer.
Before You Continue
Ensure you have set up the site and lists described in the previous section “Developing Workflows Using SharePoint Designer.”
In addition, you shared information about free weather service that you continue to use in this section. To use this service, you need to sign up for a free account at www.worldweatheronline.com. You can find more information about this weather service API at http://www.worldweatheronline.com/weather-api.aspx. The URL and querystring you used in the Call HTTP Web Service action follows: http://free.worldweatheronline.com/feed/weather.ashx?q=london&format=json&num_of_days=5&Key=replacewithyourkeyfromworldweatheronline.
Furthermore, it is assumed that you now have an understanding of the JSON weather data structure and have downloaded the JSON Viewer to parse and view JSON data.
Finally, ensure you have followed the steps in the “Setting Up the Development Prerequisites” section.
Goals for Your Custom Declarative Activity
You need to develop a custom declarative activity that achieves the following goals:
- Wrap the inner workings and protect your key to the weather service from the author in SharePoint Designer.
- Make it easy to specify the city location in the SharePoint Designer action and human-readable statement.
- Return a dictionary containing only the date and minimum and maximum temperatures for the five-day forecast.
Implement the Custom Declarative Activity in Visual Studio
Start implementing the custom declarative activity.

- The project has a default feature and is responsible for setting up the custom workflow activity.
- The WeatherActivity folder consists of an elements.XML file, WeatherActivity.actions4 file, and WeatherActivity.XAML definition file.
- The toolbox has been updated to show the various workflow categories and associated activities.
- A default sequence activity to begin defining your custom activity.
- At the bottom of the screen, there are three tabs called Variables, Arguments, and Imports. Variables enable your store and interact with content; Arguments specify input and output parameters; and Imports specify the various namespaces that have been imported to this project.
TABLE 15-7: Argument Values

TABLE 15-8: Start a Task Process Values
<Action
Name="Get Weather Forecast for Location"
ClassName="WorldWeather.WeatherActivity"
Category="Custom"
AppliesTo="all">

<RuleDesigner
Sentence="Get 5 day weather forecast for %1 location (Output to %2) ">

<FieldBind
Field="Location"
DesignerType="TextArea"
Text="specify location"
Id="1"
DisplayName="Location" />

<FieldBind Field="responseContent"
DesignerType="ParameterNames"
Text="responseContent"
Id="2"
DisplayName="responseContent" />
</RuleDesigner>


<Parameters>
<Parameter
DesignerType="StringBuilder"
Name="Location"
Type="System.String, mscorlib"
Description="Name or path of the item (key)
to get from the dictionary."
Direction="In"/>

<Parameter
DesignerType="ParameterNames"
Name="responseContent"
Type="Microsoft.Activities.DynamicValue, Microsoft.Activities,
Version=1.0.0.0, Culture=neutral, PublicKeyToken=null"
Description="Output variable to store the response content"
Direction="Out"/>
</Parameters>
</Action>
- Action — Action is the top-level element that contains all elements that make up the .ACTIONS4 file. It describes the action, including the name, class name, category, and who the action applies to. The name is used in an action drop down in SharePoint Designer.
- RuleDesigner — RuleDesigner is a child of the Action top-level element. It provides the human readable sentence that will be displayed when the action is added to the SharePoint Designer user interface. The %1 tags correspond numerically to FieldBind entries within this section.
- FieldBind — The FieldBind element is a child of the RuleDesigner element. It describes each of the fields in a human-readable sentence, is associated by the ID, and lets SharePoint Designer know what type of field designer to display to the user.
- Parameters and Parameter — Parameters describe each of the underlying Visual Studio parameters that have been defined and the direction the parameter will be used.

To summarize, using custom declarative activities and Visual Studio, there is so much more we can do to further extend the features of this activity. For example, we could provide the option to only return Celsius or Fahrenheit temperature data.
Developing a Custom Code Activity and Action
Developing custom code activities requires additional development and deployment steps that are not required when developing custom declarative activities. Custom code activities can only be developed for on-premise deployments of Windows Azure. Unfortunately, due to space constraints of this chapter, only the high-level steps are provided.
To summarize, the Azure Workflow engine is a powerful and extensible beast. There may be valid cases when your organization has already developed and deployed custom code activities to your on-premise workflow environment that it would like to leverage in SharePoint 2013 workflows. The previous steps provide a summary of the key steps to incorporate these into your SharePoint 2013 environment.
DEVELOPING WORKFLOWS USING VISUAL STUDIO 2012
Visual Studio 2012 fully supports developing either SharePoint 2010-based or SharePoint 2013-based workflows for SharePoint 2013. Visual Studio includes a number of SharePoint workflow project item templates to support both workflow hosts. For SharePoint 2010, the legacy state machine and sequence project item templates are available, and for SharePoint 2013, a single workflow template is available.
As in SharePoint 2010, you can import workflows created in SharePoint Designer and convert them into a Visual Studio 2012 project. SharePoint Designer supports saving a workflow as a solution package, and this solution package can be used with the following Visual Studio New Project templates:
- SharePoint 2013 – Import Solution Package
- SharePoint 2013 – Import Reusable 2010 Workflow
- SharePoint 2010 – Import Solution Package
- SharePoint 2010 – Import Reusable Workflow
Another great enhancement is that SharePoint 2013 workflows are entirely declarative in nature. This means sandboxed solutions can be used to deploy Visual Studio developed workflows to individual site collections. If the workflow is deployed as part of a SharePoint app, then only the app can access it. As in SharePoint 2010, farm-level solutions can still be used to make workflows available to all site collections in the farm.
From a SharePoint app perspective, Visual Studio must be used to incorporate, package, and deploy workflow as a SharePoint app. This is not supported by SharePoint Designer.
Earlier you learned about the new Dictionary variable data type. The underlying activity class associated to this is DynamicValue. DynamicValue enables you to create, store, and consume complex data structures and is a perfect companion for working with JSON formatted data. The following activities are available in Visual Studio to manipulate DynamicValues:
- BuildDynamicValue
- ContainsDynamicValueProperty
- CopyDynamicValue
- CreateDynamicValue
- CreateUrlFromDynamicValue
- GetDynamicValueProperties
- GetDynamicValueProperty<T>
- ParseDynamicValue
From an activity perspective, using Visual Studio gives you access to the full range of workflow activities. You are not limited to the list of actions available in SharePoint Designer. This provides a great opportunity to build new, powerful behaviors that are not possible simply using SharePoint Designer.
One final thing to note is the ability to develop custom task forms, association and initiation forms, and modification forms as .ASPX pages for your workflow.
To summarize, Visual Studio 2012 picks up where SharePoint Designer leaves off and caters for scenarios that require greater technical ability. As a result, it provides a powerful declarative workflow development model, access to the full spectrum of .NET 4.5 and SharePoint activities, extreme control of how the workflow will be packaged and deployed, and full control over the appearance of the user interface elements of your workflow. Happy coding!
KEY DEVELOPMENT CONSIDERATIONS
Beyond what has already been discussed in this chapter, there are a number of design and development factors that you should consider. These key considerations are included in this section.
SharePoint 2010 Versus SharePoint 2013 Workflow
Determining whether to develop a SharePoint 2010 or SharePoint 2013 workflow is important.
By default, where it makes sense, you should always aim to use the SharePoint 2013 workflow engine over the 2010 workflow engine. When you do this, you accomplish the following:
- Future-proof any new development investment in the SharePoint platform.
- Increase the portability, scalability, and performance of workflow-based solutions in your organization.
- Leverage the latest workflow software from Microsoft.
- Decrease the amount of custom code required by your workflows.
- Leverage the expressiveness SharePoint 2013-based workflows provide.
- Develop workflows for SharePoint 2013 cloud-hosted environments.
Specific cases may require the use of the SharePoint 2010 workflow engine, including the following:
- The SharePoint 2013 workflow engine is not available or configured in your SharePoint 2013 environment.
- Extensive SharePoint 2010 workflow development has already occurred, and your team is not ready or has not been able to move custom-coded activities and business logic into web services.
Declarative Versus Programmatic Workflows
SharePoint 2013 workflows are declarative in nature; no custom code is required to create a SharePoint 2013 workflow. The benefit is that no .NET assembly is required to run the workflow.
Programmatic workflows, available only via SharePoint 2010 workflows, can be developed using Visual Studio 2012 using custom code. These workflows are compiled and deployed as .NET Framework assemblies and must be deployed to the Global Assembly Cache (GAC).
Always prefer SharePoint 2013 workflows to SharePoint 2010 workflows.
Considering Where Workflows Execute
SharePoint 2013 supports two workflow hosts. The first workflow host, based on the SharePoint 2010 workflow host, resides within the SharePoint 2013 farm. SharePoint 2010 workflow instances execute either on the web front ends or in the background timer job of the SharePoint 2013 farm. The location it executes depends on the last action. If the last action was caused by a user, it can execute on the web front end. If the last action was caused by a delay timer or from an event occurring elsewhere, it can execute in the timer job.
SharePoint 2013 workflows execute outside of the SharePoint farm in Azure Workflow Service either on-premise or in the cloud. Execution and interaction with the SharePoint farm occurs through events occurring in SharePoint or when the Azure workflow engine processing occurs and submits information to SharePoint.
Determining Whether to Convert SharePoint 2010 Workflows to SharePoint 2013 Workflows
It depends on what your goals are for converting the workflow. The biggest benefit to investing resources in converting workflows is the scalability, performance, flexibility, and integration of the new SharePoint app model you get from the Azure Workflow engine.
Other factors to consider include
- How much customization is there? The lower the amount of customization and custom code required, the more it makes sense to move the workflow to the new Azure Workflow engine.
- Is this a sensible budget investment? Converting the workflow to SharePoint 2013 will not necessarily provide any more functionality than the previous version. It may be that this budget could be used to provide additional value in other areas of your portal deployment.
- What level or privileges does your existing workflow require to execute in your on-premise or cloud-hosted farm? Your workflow might require high-level permissions to perform actions that are not possible in SharePoint 2013. In these cases, custom logic could be moved into web services that execute under custom elevated permission sets.
SharePoint Designer Versus Visual Studio 2012
Whenever a developer cracks open Visual Studio 2012, an experienced SharePoint portal governance manager somewhere in the world unfortunately sheds a tear. The reason is that custom developed solutions tend to require a greater deal of support, assurance testing, and maintenance effort than third-party supported and out-of-the-box (supported by Microsoft) solutions.
SharePoint Designer was developed by Microsoft for a reason, and the reasons to use it include:
- Supports rapid development of rich and powerful workflows for the SharePoint platform
- Supports modeling of workflows using Visio 2013 and moving workflows back and forth between Visio 2013 and SharePoint Designer 2012
- Provides great authoring support for authoring workflows targeting the Azure workflow engine, without requiring developer knowledge
There is a case to be made for developing workflows using Visual Studio 2012. The benefits to developing solutions in Visual Studio over SharePoint Designer are the following:
- More control and options to deploy workflows, and supporting artifacts to SharePoint sites using the Feature framework
- Better control, packaging, and deployment options in Visual studio 2012
- Greater control and support for using the full range of the activities provided by Microsoft
- Requires advanced debugging
- Requires reuse of workflow definitions across multiple site collections
- Creating workflow apps for SharePoint
- Greater degree of customization and more expressive workflow development options.
- The ability to develop custom activities and actions, and web services required by your workflow
Consider the full life cycle of development, testing, and deployment cost associated with Visual Studio 2012 solution versus a SharePoint Designer solution. Consider the cost of hiring a SharePoint Designer author versus a SharePoint developer to maintain and enhance the workflow.
To summarize, unless there is a specific requirement that can be met using Visual Studio, always prefer SharePoint Designer.
Deciding Between Sequential Versus State Machine Workflow
In SharePoint 2010, this was a big decision because SharePoint Designer 2010 supported only sequential workflows, and Visual Studio 2010 made you choose between two templates, which locked you into a choice early on. SharePoint Designer 2013 provides stages and transitions, and Visual Studio 2012 provides one template to support both Sequential and State Machine workflows.
SUMMARY
SharePoint 2013 workflow has fully embraced the latest features of Windows Workflow Foundation 4.5 and Windows Azure to provide a great platform for hosting and scaling workflow either on-premise or in the cloud. At the same time it hasn’t forgotten its roots and continues to fully support customer investments by maintaining the capability to host SharePoint 2010-based workflows.
With the introduction of SharePoint 2013-based workflow, a number of enhancements to the underlying WF 4.5 Windows Azure platform can now be leveraged. These include richer flow control paradigms, modular building blocks, stages and transitions, and the move to a fully declarative model.
SharePoint Designer 2013 and Visual Studio 2012 have been vastly improved to make it easier for authors and developers to build, connect, consume, and use complex data in workflows from external services provided on-premise or in the cloud through new features such as the capability to call REST web services, the new dictionary data type in SharePoint Designer, and the DynamicValue support in Visual Studio.
SharePoint 2013 workflow capability is a first-class citizen in the new app model and provides a fantastic opportunity for developers, independent software vendors, and Microsoft partners.