
Understanding source item type and reference types
Editing source item references and attributes
Learning some strategies for organizing assets in a project
Creating and adding new source files
Adding source items for existing files, folders, and frameworks
Reorganizing a project
You've learned how to create and reorganize projects. Everything you've learned so far has dealt exclusively with the project document. The project document contains its settings, targets, and preferences, but it doesn't contain any of the assets — files and folders — that will be used to build the project. All of your project's assets, essentially everything to which your project needs to refer, are defined and organized in the project source group. Each item in the source group contains a reference to an actual file or folder in the filesystem.
The most important concept to keep in mind while you're working with source items is this: Every item in the project group is a reference to a real file or folder. There are different kinds of source items and there are different kinds of references. Just to make things interesting, source items can refer to other source items, creating references to references.
Source item references in Xcode are very flexible, affording you a great deal of latitude to organize your source files and projects in just about any way imaginable. The number of possible combinations, however, can potentially create a lot of confusion and indiscriminately defined references can quickly create a tangled maze of relationships. Once you learn the basic reference types you shouldn't have any problem understanding your project's structure, choosing the correct type for new source items, or straightening out broken ones.
This chapter describes the different types of source items and references, shows you how to add and redefine source items, gives you some strategies for maintaining some sanity in your project's source references, and provides some tips on how to reorganize a project without breaking it, or fixing it if necessary.
Every file, folder, and framework that you see in the project group of your project's window is a source item. Every source item contains a reference to a file or folder in the filesystem. Each reference consists of two attributes:
The path attribute is a POSIX path to a file or folder. The reference type determines where the path originates. The six reference types, their path types, and their origins are listed in the following table.
REFERENCE TYPE | PATH TYPE | PATH ORIGIN |
|---|---|---|
Relative to Enclosing Group | Relative | Location of Enclosing Folder |
Relative to Project | Relative | Project Folder |
Absolute | Absolute | None |
Relative to Build Product | Relative | Active Build Product Folder |
Relative to Current SDK | Relative | Current SDK Root Folder |
Relative to Xcode | Relative | /Developer |
Note
A relative path can be empty, which means that it refers to the origin directory — equivalent to the identity POSIX path (.).
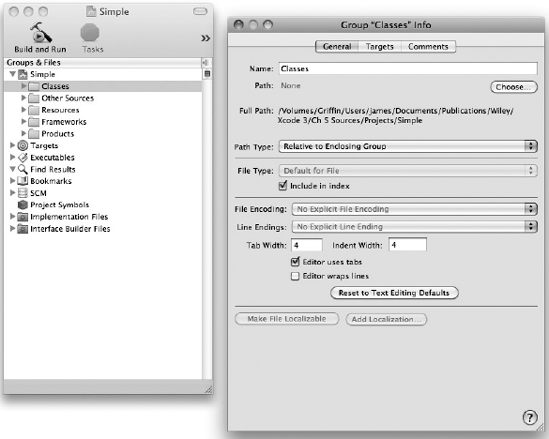
A Relative to Enclosing Group reference, like the one shown in Figure 5-1, is the typical reference type and the one created by default. To view or edit a source item's reference, select the item, open its Info window, and switch to the General tab. The path of an enclosing group reference is relative to the folder referred to by the source group that contains the item. This reference type is the default because it simplifies many aspects of project organization. Ironically, it's also the most difficult to explain, so I'll come back to it after I've described the other reference types.
A Relative to Project reference uses a path relative to the current location of the project folder — the folder that contains the project document. The topmost project group always refers to the location of the project folder (you can't change the folder reference of the project group). The origin of these references is dynamic; if you move or rename the project's folder, the origin of the references changes accordingly. Items with this kind of reference are always valid as long as the relative path from the project folder to the source item remains consistent. The most likely candidate for a Relative to Project reference would be a key subfolder inside the project folder. A less common use would be a sister folder outside the project folder that shares a common enclosing folder, or some other near relationship.
Absolute references are the easiest to explain; the path of an absolute reference contains an absolute path to a source file or folder. Absolute references are usually used for referencing system components, such as libraries and frameworks, that never move. You would never use an absolute reference to a source file that you've created. You might use an absolute path to refer to a shared pool of resources on a file server, but source control or source trees would provide a better solution. Both of these alternatives are described in Chapter 21.
The last three reference types — Relative to Build Product, Relative to Current SDK, and Relative to Xcode — define references relative to one of three dynamic locations.
A Relative to Build Product reference uses a path relative to the current product build folder. A single target can produce several different products (typically one built for debugging and a different one built for deployment). Each of these variations is defined by a build configuration. Changing the build configuration changes the active project build folder.
If you want to include the product of one target (say, a target that produces a plug-in) as a source item for another target (say an application that includes that plug-in), you would use a source item with a Relative to Build Product reference. When the application is being built with the Debug build configuration, the source item of the application will refer to the plug-in that was built with the Debug configuration. When the application is built with the Release configuration, its source item will automatically refer to the plug-in that was built with the Release configuration. All items in the Product source group (naturally) use Relative to Build Product references.
Similarly, a Relative to Current SDK reference is relative to the active SDK being used to build the project — specifically, the SDKROOT build setting. You would use this kind of reference to include SDK resources (like system-supplied image files) in your project. The reference will refer to a different file should you change your base SDK setting.
Last, the Relative to Xcode reference is much like the Relative to Project reference. The reference path is relative to the folder where the Xcode tools are installed. Unless you selected an alternate installation location in Chapter 1, this will be /Developer. You would use this reference type if your project were using one of the developer tool resources, like the unit testing framework.
Now, back to the Relative to Enclosing Group reference type. Enclosing group references are those created by default, and the origin of each is the folder referred to by its enclosing group. If all of the references are relative to other references, you might be wondering to what they all refer. To find out, examine any newly created Xcode project. The Simple project, shown in Figure 5-2, uses an enclosing group reference with a path of MyDocument.h.
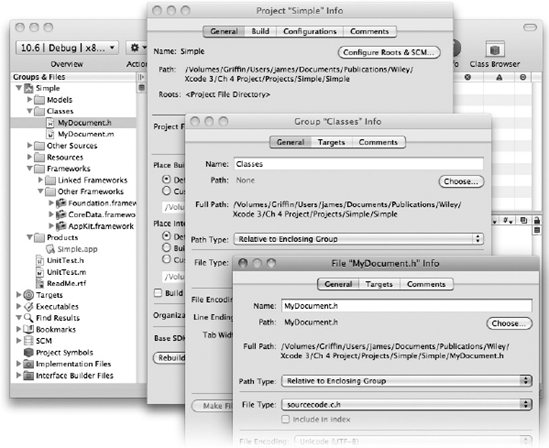
The file to which it refers is the MyDocument.h file in the folder of its enclosing group — the Classes group. If you examine the Classes source item, it also uses an enclosing group reference with an empty path, meaning that it simply refers to the folder of its enclosing group. Its enclosing group is the Simple project group, whose folder reference is always the project folder.
Mystery solved: Every source item reference in the project is relative to its enclosing group, so eventually all references refer (indirectly) to the project folder. The effect is stunningly simple. You can create, rename, and reorganize your project's source groups and items any way you want. No matter how you arrange them, each group eventually refers to the project folder, and all asset files get stored in that one folder.
This is a simple, flat, storage arrangement for the assets of your project; it doesn't require any maintenance and is extremely robust. You use source groups to organize your assets and eschew any attempt to organize the actual files. This project organization strategy is discussed later in the chapter, along with some alternatives.
A source item — the generic term for anything in the project group — will be one of the following four types:
SOURCE ITEM TYPE | REFERENCE |
|---|---|
Source File | Any file used to build the project |
Source Group | A folder that members of the group can refer to |
Source Folder | A folder used to build the project |
Framework | A folder containing a framework |
A source file item is a reference to a data file. It can be a program source file, a header, an Interface Builder document, an XML file, an image file, or a font — it doesn't matter. Every source file item refers to exactly one file or package.
You've already spent some time working with source groups. They are the logical containers of the project. Each source group refers to a real folder on the filesystem. What the group contains (in the project structure group) is entirely up to you and may have little or no correspondence with the files in that folder. The folder to which it refers is of primary interest to subitems that use enclosing group references.
Two more source item types also refer to a folder but much more directly. A source folder item is very much like a source file item, but the folder to which it refers defines its content. The visual differences between a source group and source folder are slight, but their behavioral differences are profound.
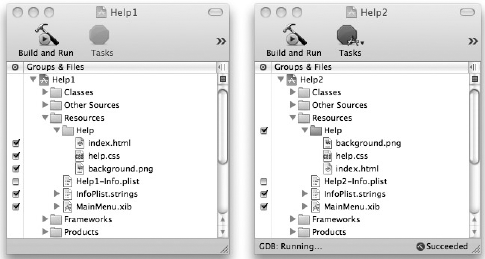
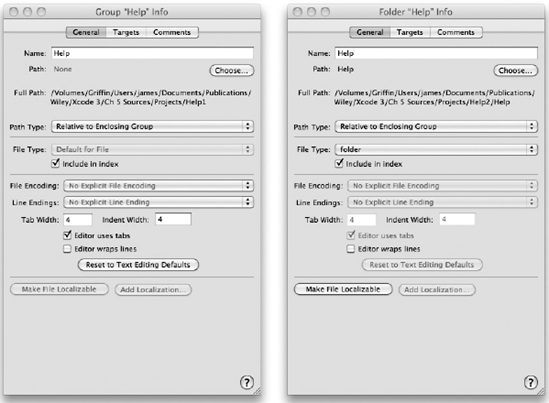
Figure 5-3 shows two projects. In the one on the left, the Help item is a source group containing three items (index.html, help.css, and background.png). In the project on the right, the Help item is a source folder containing three files. Do they look the same? In a black-and-white illustration it's going to be hard to tell the difference. The source group (left) is yellow in the Xcode interface, whereas the source folder (right) is blue. Looking at the attributes of the two items, as shown in Figure 5-4, reveals that the item on the right is of type "folder."
The key difference is this:
A source group is a logical container for other source items.
A source folder is a source item.
To put it another way, a source group is a folder within your project, while a source folder is a folder in the filesystem. Although Xcode lets you browse the contents of both, a source folder is treated as a single source object. The contents of the folder are not treated as separate source items. This means that they can't be individually included in a target or otherwise referred to in the project, nor do they have attributes or references.
Source folders are not that common, but are handy when you have a prepopulated folder structure that you need to treat as a single entity in a target or build phase. Typical examples would be a folder of HTML help files or a precompiled database.
You can see this difference in the interface. Look again at Figure 5-2. A target membership attribute appears next to the source folder, but not next to any of its items; a source folder is a single object that can be a member of a target. The situation for the source group is reversed. A source group is never a member of a target; it's only a container for other source items, which have their own target membership attributes.
How you add a source folder item to your project isn't particularly obvious. It's described later in this chapter in the section "Adding Existing Items," under the subsection "Recursively Creating Groups and Creating Folder References."
Finally, a framework item is yet another kind of folder item. The only difference between a framework item and a folder item is that Xcode automatically recognizes framework folders and integrates them into the project. It indexes the headers of the framework, includes the framework symbols in auto-completion, and correctly links to the dynamic libraries in the framework. In the project, treat it as you would a single library to which your project links. Xcode takes care of the details
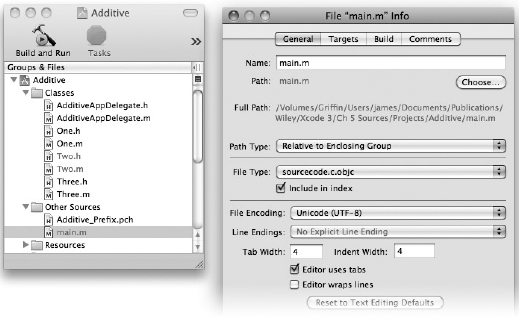
You already know how to see the source item's attributes in its Info window, as shown in Figure 5-5. This section explains how to edit an item's reference. You can do this individually or for a group of items.
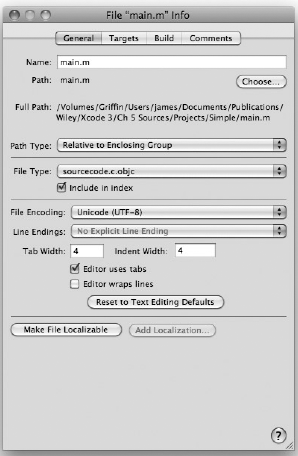
The Name field contains the name of the item. If the item can be renamed, this field is editable. The name of a file, folder, or framework item is always the same as the item's actual filename. Editing the name of a file, folder, or framework item renames the actual file or folder. A source group's name is independent of the folder it refers to, and renaming a source group merely renames it in the project document.
The Path and Path Type fields define the item's reference, and are what most of this chapter has been about so far. The Full Path field displays the ultimate (resolved) path to the file or folder. This is how Xcode interprets the path using the given reference type. You can change the reference type using the pop-up menu. Xcode recalculates an equivalent path.
Note
If you want to see the file or folder to which an item refers, Control/Right-click the source item in the project and choose Reveal in Finder
To change the path, click the Choose button. Select a file or folder from the browser. For file, folder, and framework items, the name of the item changes to match that of the newly selected file or folder.
Note
Selecting a new path for a source group also renames the source group to the name of the chosen folder. If you want the group to have a different name, edit it after choosing the folder.
The next section in the Info window is the item's type. This is an internal categorization based on the file's file type and extension so that Xcode knows how to treat the item. It is used to determine whether an item can be included in a target, and in what phase of the target the item should be. It determines how, or whether, Xcode will display the item in an editor window and what language and syntax coloring should be used.
You can change how Xcode treats an item by selecting a different type. Normally Xcode sets the type correctly, but on rare occasions you might need to change it if, say, Xcode identifies a file as being text.xml when it's actually text.plist.xml. The type attribute only affects Xcode's handling of the file. The operating system, external build systems, and compilers still interpret the file based on its type and extension. That is, changing the type of an .m file from source.c.objc to source.c.cpp will not cause the file to be compiled as a C++ file.
The File Encoding, Line Endings, and Tab attributes apply only to text files and are disabled for all other types. The File Encoding defines the expected binary format for the characters in the file. Change this setting if the assumption is wrong. The Line Endings attribute is also an assumption, but one that is largely superfluous; most Xcode editors determine what line endings are being used when the file is opened.
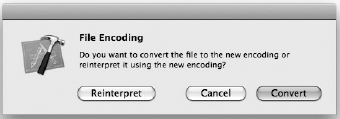
Changing the File Encoding for a text file presents the dialog box shown in Figure 5-6. The Convert button interprets the file using the previous encoding, and then rewrites the file using the new encoding. Use this option if the encoding of the file was correct and you want to change the format of the file to a different encoding. The Reinterpret button simply changes the encoding attribute in the source item, leaving the file unaltered. Select Reinterpret if the encoding attribute of the file was incorrect, and you're changing it to what it should be.
The Tab Width, Indent Width, and Editor Uses Tabs options (see Figure 5-5 again) are explained in the next chapter. Normally, you will want to use the same settings for all files, but you can change them for an individual file here, or by using the View
The Make File Localizable and Add Localization buttons are used to create multiple, locale-specific versions of a file. Many files can be localized so that language- and location-specific information in the file can be customized for different regions and populations. File localization is also covered in the next chapter.
In Chapter 3, you learned how to use the Inspector palette or an Info window to display the aggregate attributes for multiple items. Settings that are common to all of the items are shown. If all of the items have the same value for a particular setting, that value is displayed. If a value differs for some items, the value displayed is some kind of Mixed value, as shown in Figure 5-7. For check boxes, this displays as a dash. Changing any of the settings in a multi-item Info window changes that setting for all of the items to the same value.
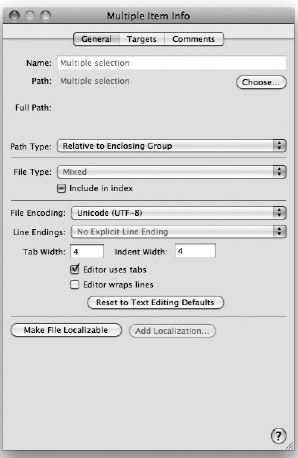
Some settings behave a little differently when they are changed for multiple items. This is particularly true of the Path attribute. You wouldn't want Xcode literally to set the same path attribute for multiple items; all of the items would suddenly point to the same file or folder! Instead, the Choose button in a multi-item Info window enables you to choose the folder that contains all of the items. The name of each item is not altered, and a new path for each is constructed by combining the chosen folder and the item's file or folder name. This is an efficient way of setting the location for any number of source files at once. Note that this can cause item references to be broken if the folder chosen does not contain one or more of the items.
You use this ability of Info windows later in this chapter to reorganize some large projects and fix the properties of targets.
This section presents several strategies for organizing source items and references in a project. To illustrate how references can be configured, start with the very simple project pictured in Figure 5-8.
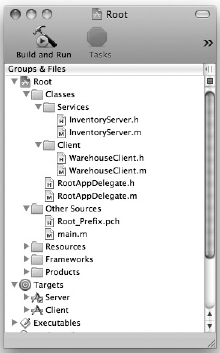
This project is, ostensibly, an Objective-C project for inventory management. It consists of four primary source files: main.m, RootAppDelegate.m, InventoryServer.m, and WarehouseClient.m. The three class files have matching header files, and there is a precompiled header file along with other Interface Builder documents and property lists in the Resources group.
This section reorganizes this project four different ways, using different types and combinations of references. All of these projects are available for download at http://www.wrox.com. Open the Root, Root2, Root3, Root4, and RootRot projects as you work through this section. These aren't functional projects, and make no attempt to be. They exist solely to demonstrate various source item reference strategies. As you work through these different schemes, keep the following in mind:
Source items and groups are objects in the project. Source files and folders are the physical items in the filesystem.
Every source item has a reference to its source file or folder.
The name of a source group, and its location in the project structure group tree, can be completely independent of the name and location of the folder to which it refers. The name of all other types of source items is always the same as the file or folder to which it refers.
The folder referred to by the topmost project structure group (also known as the project group) is always the project folder.
In Chapter 3, you created, renamed, and deleted source groups. You then moved groups around and moved source files into and out of groups. If you used what you've learned in Chapter 3 to create the example project shown in Figure 5-8, you would end up with a project folder that looks like Figure 5-9.
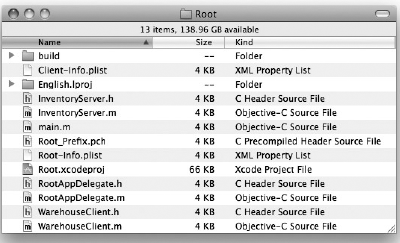
In Chapter 3 you were probably unaware that every group you created had a folder reference. The InventoryServer.m file is relative to the folder referred to by the Services group, which is relative to the folder referred to by the Classes group, which is relative to the folder referred to by the Root project group. You can see this by examining any source item's reference.
Now you know that all of these source items and groups use enclosing group references, which mean they all indirectly refer to the project folder. This is why all of the files are in the same folder (see Figure 5-9).
Whenever you create a new group using the File
Thus, the default organization of Xcode projects places all of the source files directly in the project folder. You are free to reorganize the hierarchy of your source groups and items to any depth you want; the organization of the actual files will remain flat. For small- to medium-sized projects that are self-contained and have no duplicate filenames, this is the easiest organization. It is uncomplicated and shouldn't cause any surprises. Better yet, you don't have to worry about source group folder references. If your project falls into this category, feel free to skip ahead to the next section now and come back here when your projects get more complex.
However, if you want to control the physical organization of the files in your project, or your project source files are already organized into multiple folders, read on.
Often, source files are already organized into a hierarchy of folders. They may have been organized this way in a former project, for source control, or by an obsessive programmer — we know who you are. The next few variations of the Root project present different techniques for grafting a source group structure onto an existing folder structure.
Figure 5-10 shows a reorganization of the source files by type. All of the programming source files in the Root2 project have been moved into a Source folder and the application bundle resource files have been moved into a Resources folder.
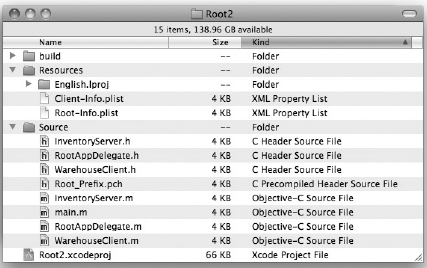
The folder references for the Classes, Other Source, and Resources groups were changed from enclosing group to project relative. The paths of the first two groups were both set to Source. The Resources group's path was set to Resources.
This is a variation of the default references you looked at in Root. Instead of lumping everything together in the project folder, a few key folders are designated as gathering places for a broad collection of assets. The Source folder contains all of the program source files. In the project, the Classes, Services, Client, and Other Sources groups all refer to the same folder. This allows fine-grained organization within the project structure group, using a coarser folder structure.
This is a good organization for a medium-sized project whose files are grouped by type, where you just want to keep the main project folder uncluttered, or there is some other logical reason for subdividing the files. A good application of this approach would be for a project that produced multiple targets (that is, a client and a server). The project might have broad subfolders like Common, Client, and Server, whereas the project structure group would have more detailed groups, like Utilities, Network Services, Logging, Database, and so on.
By establishing a few key high-level groups anchored to a specific subfolder, then using default subgroups, you keep much of the flexibility of Xcode default source group arrangement, while imposing a modest amount of structure on the actual files.
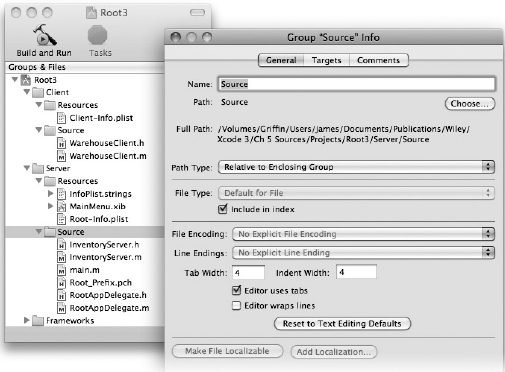
Another approach is to mirror the structure of a complex hierarchy of folders in the project group. Rather than being disconnected from the folder structure in the filesystem, the project source groups mimic them verbatim. This is a good solution for large projects with an extensive folder hierarchy. The folder structure in Figure 5-11 isn't that large or extensive, but the technique applies to a hundred folders as easily as it applies to these six.
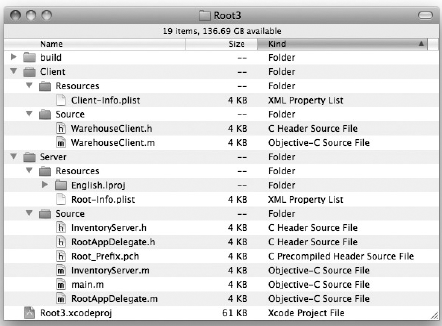
In this scheme, each source group uses its path to point to a specific subfolder within its enclosing group's folder. In earlier projects, all of the source groups using an enclosing group reference type have had empty paths — referring to the same folder as their parent group. These groups all have paths that refer to a subfolder of the enclosing group and have the same name as the folder to which they refer. The end result is a source group structure that parallels the folder structure in the filesystem.
In Figure 5-12, the Source group refers to the Source folder within the folder of its enclosing group. Its enclosing group (Server) refers to the Server folder within its enclosing group, which is the project folder.
A few of the source items in the Root3 project are listed in the following table to illustrate the relationships.
ITEM | REFERENCE TYPE | PATH | COMPLETE PATH |
|---|---|---|---|
Root3 | Fixed | project | .../Root3 |
Client | Enclosing-group | Client | .../Root3/Client |
Resources | Enclosing-group | Resources | .../Root3/Client/Resources |
Source | Enclosing-group | Source | .../Root3/Client/Source |
Server | Enclosing-group | Server | .../Root3/Server |
Resources | Enclosing-group | Resources | .../Root3/Server/Resources |
Source | Enclosing-group | Source | .../Root3/Server/Source |
Warehouse-Client.m | Enclosing-group | WarehouseClient.m | .../Root3/Client/Source/WarehouseClient.m |
Root-Info.plist | Enclosing-group | Root-Info.plist | .../Root3/Server/Resources/Root-Info.plist |
main.m | Enclosing-group | main.m | .../Root3/Server/Source/main.m |
As you develop the project, it's pretty easy to maintain the relationship between the source groups and the filesystem folder structure. New and imported files are automatically added to the correct folder. If a folder is reorganized or renamed, making the same change to its source group keeps all enclosing references valid.
You might think that setting up all of these references would be tedious — especially for the imagined project containing hundreds of source files. Fear not. Xcode's import process, described a little later in this chapter, will create any number of nested source groups — exactly like those described here — with a single command.
Conveniently, all of the references so far have been to folders inside the folder of the enclosing group or project, but this does not have to be the case. Figure 5-13 shows the project group and the files in project folder for Root4.
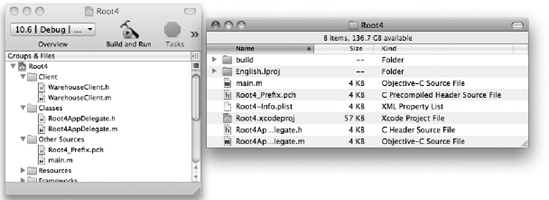
You'll notice that the project includes a Client group that contains two source files (WarehouseClient.h and WarehouseClient.m) that aren't in the project folder, so where do these files come from? The answer can be found in the Client group's properties, as shown in Figure 5-14.
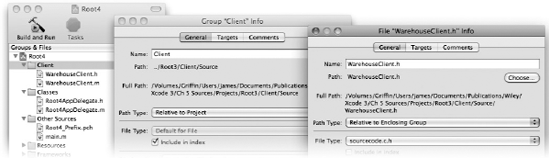
The Client group uses a project relative reference. Its POSIX path refers to a subfolder of Root4's sister project, Root3. The Root4 project has included files outside its project folder, just as if it owned them. Some selected source item references are listed in the following table.
ITEM | REFERENCE TYPE | PATH | COMPLETE PATH |
|---|---|---|---|
Root4 | fixed | Project | .../Root4 |
Client | Project-relative | ../Root3/Client/Source | .../Root3/Client/Source |
WarehouseClient.h | Enclosing-group | WarehouseClient.h | .../Root3/Client/Source/WarehouseClient.h |
WarehouseClient.m | Enclosing-group | WarehouseClient.m | .../Root3/Client/Source/WarehouseClient.m |
Root4AppDelegate.h | Enclosing-group | Root4AppDelegate.h | .../Root4/Root4AppDelegate.h |
Although it's easier to create a single project with multiple targets, as you see in Chapter 16, this isn't always possible. If you must create multiple projects that need to share common assets, relative paths that refer to sister project folders is one way to share a single source file.
A popular use for this scheme is to set up "libraries" of source files (that is, a Utilities folder full of commonly used C functions or classes). Any number of projects can include selected files from the shared Utilities folder, without duplicating source files, or incurring the added complexity of creating a formal framework or dynamic library.
Note
A more robust solution to sharing folders amongst multiple projects is to use source trees. See Chapter 21 if you have this type of folder structure.
This technique can also be used to create "shell" projects. Suppose you have a large project written for Linux in an Eclipse project folder. You can create an Xcode project that uses source group paths that refer to the folders inside the Eclipse workspace folder. The Xcode project wouldn't have to contain anything beyond the project document and any project-specific files.
The disadvantage to this technique is that it creates a rather fragile project structure:
If the first project's folder were renamed, the references in the second project would break.
If either project were moved without the other, the references would break.
If the folder structure of the first project were reorganized, the references in the second project would break.
Ideally, project folders are self-contained and autonomous. The only references they have to assets outside the project folder are to system frameworks that never change location. When the ideal isn't practical, you can use relative paths to include shared assets outside the project's folder.
It's just as important to know what kind of references you should not create. I left this last project open overnight, and some mischievous pixies snuck in and decided they would have a little fun with it.
At first glance, the RootRot project looks pretty much like project Root3. All of the references are valid, and the project builds and runs — at least on my computer. Things can't be all bad, can they? The following table lists a few of the references in the project.
ITEM | REFERENCE TYPE | PATH | COMPLETE PATH |
|---|---|---|---|
RootRot | fixed | project | .../RootRot |
Client | Absolute | .../RootRot/Client | .../RootRot/Client |
Source | Enclosing-group | Database | .../RootRot/Source/Database |
WarehouseClient.h | Enclosing-group | ../Source/WarehouseClient.h | .../RootRot/Client/Source/WarehouseClient.h |
main.m | Project-relative | Server/Source/main.m | .../RootRot/Server/Source/main.m |
Resources | Project-relative | ../Root3/Server/Resources | .../Root3/Server/Resources |
Root-Info.plist | Enclosing-group | Root-Info.plist | .../Root3/Server/Resources/Root-Info.plist |
Here's some of what's going on in the RootRot project:
The Client source group uses an absolute path. If you copied this project to your system — or moved it anywhere other than where the project was originally created — the project won't build because Client won't refer to a valid folder, and all items that refer to Client's folder will be broken.
The
WarehouseClient.hitem was moved from the Source group to the Resources group. Xcode conveniently "fixed" the path of the item so that it still refers to theWarehouseClient.hfile that's in the sister directory to Resources. If the location or name of theSourcefolder ever changed, this reference would break.main.muses a project relative path. If the location or name of either theServerorSourcefolder changed, the reference would break. On the other hand, this item could be moved anywhere in the project structure group and would still refer to themain.mfile.The second Resources group has been changed to a project relative reference that refers to the
Resourcesfolder in the Root3 project. None of the references for its subitems (likeRoot-Info.plist) has been altered. Because they all use enclosing folder references, they all now refer to items in Root3's, not RootRot's, project folder. This could create a great deal of confusion.
Although Xcode provides you very flexible structures for organizing and referring to your project's assets, you can see that this flexibility can be abused. If you checked out a project like RootRot to a new directory, you'd probably end up spending more time trying to figure out what's wrong with the project than you would building it.
Here are some simple tips for keeping your project group functional and tidy:
Use enclosing group references unless there's a compelling reason to use some other reference type.
Avoid references to items outside your project folder.
Use project relative references to point to top-level folders within the project folder that aren't likely to move, or to top-level folders outside the project that contain assets shared with other projects.
When referring to assets included in an SDK or the Xcode tool, use the appropriate SDK or Xcode reference type.
Never use absolute references for anything except system frameworks or other reasonably static assets, like a shared repository of development resources on a file server.
Learn to use source trees (see Chapter 21).
If your asset is a product, or any part of a product, that's produced by a target, always use a product relative reference (or an enclosing folder reference that refers to a product relative reference).
In this section you learn how to add new files to a project. You've already created source groups. This section describes how to create new files and add them to your project. The next section shows you how to import existing files and folders into a project.
Unless your project is trivial, you will soon want to create new source files. The File
Figure 5-15 shows the New File Assistant where you choose a file template. Most templates areself-explanatory. Source file templates produce skeletal files with some basic comments and appropriate #include or #import statements. The C++ and Objective-C class file templates declare an empty class with the same name as the file.
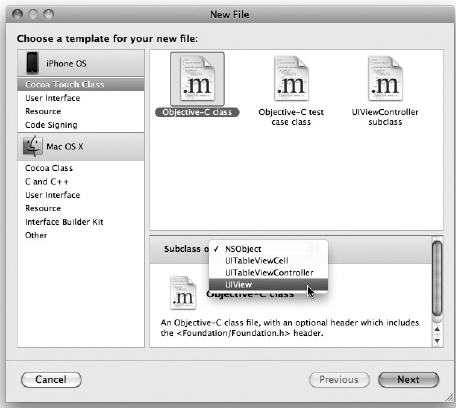
Many templates have other options that can be selected before creating the file. For example, the Objective-C template has an option to choose the base class for the new class. The UIViewController class template will optionally produce a companion NIB document containing the UIView for the new controller. Choose your desired options and click the Next button. This presents the dialog box shown in Figure 5-16.
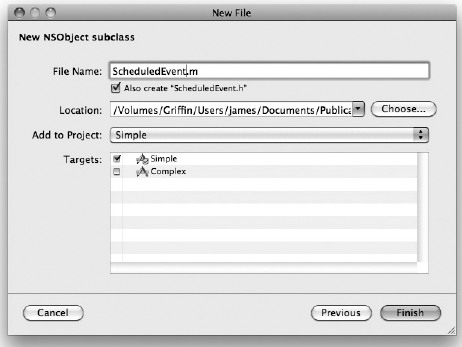
In the File Name field, edit the name of the file. Be careful not to alter the file's extension. If the template is for a source file type that normally has a companion header file (C, C++, and Objective-C templates), Xcode offers to create both files at the same time. Uncheck this option if, for some exceptional reason, you want Xcode to skip the creation of the companion header file.
The Location field displays the path to the folder where the new file will be created. This is always the folder referred to by the source group where the new item will be created. New file references are always relative to the enclosing group. Think twice before navigating to another folder, because Xcode will construct a relative path from the group's folder to the new file. Review the RootRot project again, if you need a reminder of why that's probably a bad idea.
If you do decide to change the location, enter the path or click the Choose button to select an existing folder. You can also create an arbitrary number of new folders at the same time by appending the paths of the nonexistent folders to the path. Before the new folders are created, a dialog appears that asks whether you really want to create them. Alternatively, you can use the New Folder button in the Choose browser to create any number of new folders before selecting the final one.
The Add to Project option (see Figure 5-16) selects the project to which the new source item will be added. The default is the active project, but you can choose another open project or "none." Selecting none creates the file, or files, but does not add any new source items to the project. That's one situation where changing the file's location field won't have unexpected consequences.
The Targets list shows all of the targets that accept the type of file being created. Only targets in the project selected in the Add to Project pop-up menu are considered; the list will be empty if the project is "none," or if no targets in the selected project accept the type of file being created.
Each target in the list has a check box next to it. If checked, the newly created source item is added to that target. If you are creating both a source file and its companion header file, checking a target adds both files to the target — unless the target only accepts one of the two types. This can actually be a hazard for targets that accept both types, because you often want to add the source file to a target but not the header. The "Ridding Targets of Unwanted Files" section has a trick for quickly getting unwanted headers out of a target.
Once the new file has a name, a location, a project, and a list of targets, click the Finish button to create the file and add its source item to the project. The new file opens automatically in an editor window.
If you try to create a file that already exists, Xcode warns you with the dialog box shown in Figure 5-17.
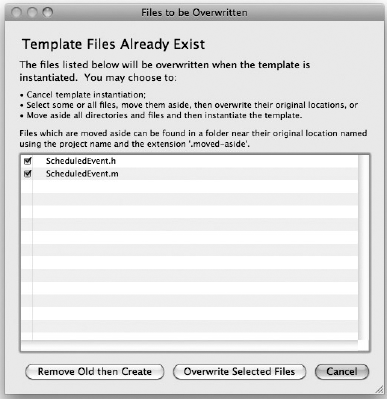
You have three choices, obtusely explained in the dialog box. The first choice, which is probably the best, is to cancel the operation.
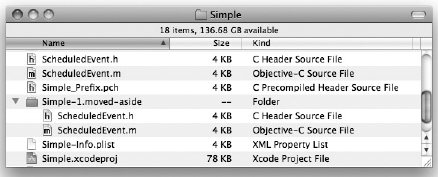
Your second choice is to check the boxes next to the files you want to replace and click the Overwrite Selected Files button. Despite the fact that the button says "Overwrite," the checked files are not overwritten. They are first moved to a new subfolder named with a numeric suffix and the extension .moved-aside, as shown in Figure 5-18. The folder will be in the same folder where the new files are being created.
The third choice is to click the Remove Old Then Create button. The action of this button is equivalent to first checking all of the files listed and clicking the Overwrite Selected Files button. When the dialog box is first presented, all of the files are checked, making the action of the two buttons identical.
After the files are moved aside, new files are created in the same location from the template. If there were already source items for these files, you now have duplicate source items. Make note of the new source items (which will be selected) and remove the duplicates.
The files that were moved aside are no longer referred to from the project. You can examine the files, recover what you want, and then trash them along with the spontaneously generated folder that contains them.
The File
The first time it is saved, Xcode kindly offers to add the new file to the active project. You can accept or decline. If you accept, you are presented with the same options you're given when you add any existing source file to a project. These options are explained fully in the next section.
You won't create every file in your project from scratch. There will be many occasions when you have an existing file or document that you want to add to your project — and you certainly don't write the frameworks you link to.
At some point, you are going to need to add existing files, folders, and frameworks to your project. Essentially, you select the filesystem items you want to add and Xcode creates new source items in your project group that refer to those items. Once the references are created, those files become assets of your project.
You have basically two ways of selecting the items to add to your project: start in Xcode or start in the Finder.
The first is to use Xcode's Project
The second method is more direct. Select any group of items in the Finder (or any application that lets you drag files) and drag them into the source group of your project. A drop indicator shows you where in the source group the new item, or items, will be created — exactly as it does when you're dragging items around in the tree.
The only significant disadvantage of the drag-and-drop method is that Xcode permits you to create duplicate items to files that are already referred to in the project.
Warning
One quirk to be aware of when using the drag-and-drop technique, at least when dragging from the Finder, is that symbolic links and aliases are not resolved. The source item created will refer to the alias, not to the file or folder to which the alias resolves.
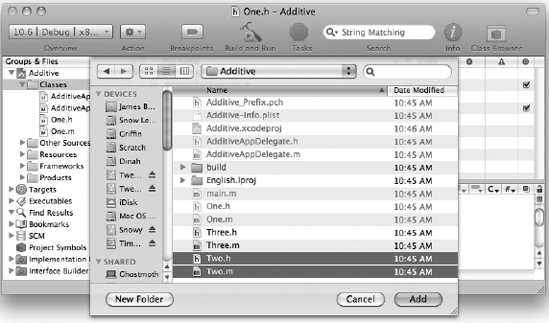
As soon as Xcode knows where to create the new source items in the project and what files will be used to create those items, it presents the dialog box shown in Figure 5-20.
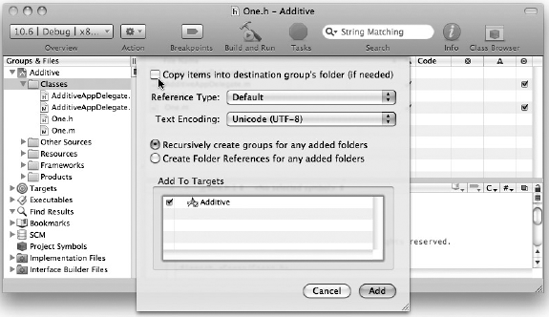
This dialog box contains several controls that determine what kind of source items are created, the type of references they will have, and where the final source files will reside. The effect of these options is often interconnected; some options behave differently depending on the choices you make for other options.
Check the Copy Items into Destination Group's Folder (If Needed) option to make physical copies of the original files or folders inside the group's folder. The group's folder is the folder referred to by the group to which the new source items are being added. If you select this option, all of the files and folders being added are first copied into the group's folder. Each source item created refers to the copy made in the group's folder, not the original. Note that items contained inside a subfolder of the group's folder are not considered to be in the group's folder. Files or folders in any other folder on the filesystem are copied; if you've selected files already in your project this will create duplicate source files. Use this option only to import sources from locations outside of the project folder.
The "(If Needed)" qualifier is there because this option is ignored if the files are already in the enclosing group's folder. Well, not entirely ignored. Due to a long-standing bug in Xcode, this works with files but not folders. If you check this option when you're adding a folder to a group whose folder already contains that folder, Xcode displays an error that it can't copy the folder to itself. No harm will come of this, but you will have to perform the operation again, this time turning the Copy option off.
The Reference Type option controls what type of reference each new source item will have. The choice you make applies to all items being added. Choosing the special reference type of Default individually selects a reference type best suited for each item's location, as listed in the following table.
DEFAULT REFERENCE TYPE | |
|---|---|
In the enclosing group's folder | Enclosing-group |
Inside any subfolder in the enclosing group's folder | Enclosing-group, with a path into the subfolders |
Anywhere inside the project folder but not inside the enclosing group's folder | Project-relative |
Anywhere outside the project folder, but inside | Project-relative, with a path that refers outside of the project folder |
Anywhere outside the | Absolute |
Another volume | Absolute |
If you select any other type of reference, all items created have that reference type regardless of their location.
The Text Encoding option applies only to source items created for text files. It sets the text encoding for the file, which determines how the bytes in the file are translated into characters when the file is opened for editing. Normally, you wouldn't need to change this for regular program source files. The gcc compiler always assumes plain ASCII text, so all program source files must be ASCII text files. Change this option if you are adding things like XML files that are in UTF-8 or UTF-16 encoded Unicode, or text files in any other ISO encoding. You can always change the encoding later if you need to. See the "Source Item Attributes" section earlier in this chapter on how to change the encoding of a file.
The two radio buttons, Recursively Create Groups for Any Added Folder and Create Folder References for Any Added Folders, determine whether folders added to the project will create source groups or folder items.
With the Recursively Create Groups radio button selected, adding a folder creates a source group. After that, every file and folder in that folder is recursively added to the new group using the same settings. The folder reference of the new group points to the folder that was added, using the reference type selected. The recursively added items get the same treatment.
If the reference type is Default — all of the recursively added items will (by definition) have enclosing-group references regardless of the reference type or location of the first new group. Does that organization sound familiar? Look again at the Root3 project. Each source group refers to a single subfolder in the folder of its enclosing group, and every source item refers to a file in the folder of its enclosing group. When you use these Add to Project settings, Xcode turns an entire folder hierarchy into an equivalent tree of source groups and source items with a single command.
If, instead, you choose Create Folder References for Any Added Folders, Xcode does not recursively process the contents of the folders being added. Instead, it creates a single source folder item as described in the "Source Item Types" section earlier in this chapter. Adding an existing folder and choosing this option is the only way of creating a source folder item.
At the bottom of the dialog box is a list of targets defined in the project. If you check the box next to a target, Xcode attempts to add each source item created to that target. The key word is "attempts." Some targets only accept, or understand, certain types of source items. An item is added to a target only if the target accepts that type of item.
When everything is set, click the Add button to add the items to the project.
Xcode has a special interface just for adding frameworks. Right/Control+click the source group where you want the framework added and choose the Add
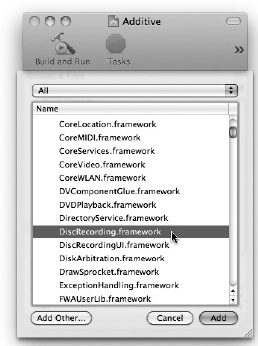
Xcode assembles a list of all known frameworks and libraries. Choose one or more from the list and click Add. If you're having trouble finding what you're looking for, the pop-up menu at the top will narrow the list to a specific class of library or framework.
To add a framework that isn't one of the standards, use the Project
Xcode can open an arbitrary file into an editor window. The file does not have to belong to a project. You can add the file of any open editor window to the current project by selecting the Project
It is very easy, when you're adding lots of new source files to a project, to end up with files in targets where they don't belong. This most often happens when you're adding source and header files at the same time. Targets that compile C source into object files (native targets) normally only accept C, C++, or Objective-C source files. Trying to add the companion header files to those targets at the same time does nothing, but some native targets have a Copy Files phase that accepts any kind of file. The end result is that all of the .h files get added to the target's Copy Files phase, and the target dutifully copies all of the headers files in your project into the final application. This is probably not what you want.
To fix this, select the project structure group in the Groups & Files list to display all of the files in the project in the details window (choose View
You can adapt this technique to make similar changes in other types of files.
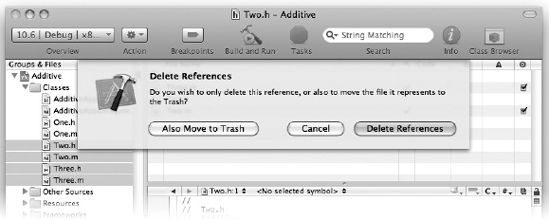
Removing source items from your project is just about as easy as you would imagine it would be. Select one or more source items and press the Delete key, choose Edit
This section walks you through reorganizing the files in a project. This usually entails rearranging the actual files and then altering the source item references to agree.
When you're working with source item references, it's useful to know when an item's reference is valid and when it's broken. Whenever Xcode discovers that a reference no longer refers to a file or folder, the item in the source group turns red. Figure 5-23 shows invalid references for the Two.h, Two.m, and main.cpp items.
Again, this is hard to see in black-and-white. Red items are usually a clue that the item's reference needs to be fixed — but not always. Whenever you create a new project or target, a source item is created for the product that will be produced. Until you successfully build the target, its product doesn't exist and its product item in the source tree will be red. This is perfectly normal and expected.
You can fix a reference in two ways: open the Info window for the item and correct its Path attribute, or put the file or folder the item is pointing to where the reference expects it to be. Xcode immediately recognizes that the reference is valid again, and changes the item's color back to black.
The next three sections present typical project item reorganization chores, and the steps you need to follow to keep your source item references valid.
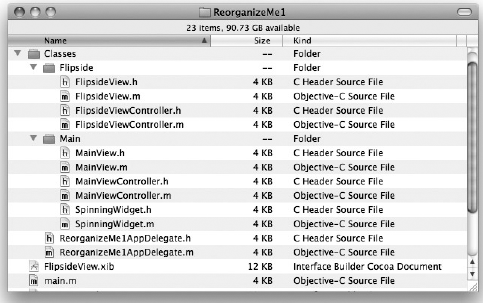
The ReorganizeMe1 project, shown in Figure 5-24, has two subfolders: Main and Flipside. You decide that the SpinningWidget class files need to be moved from the Main group to the Flipside group.
To relocate the two files, follow these steps:
Open the ReorganizeMe1 project.
Drag the
SpinningWidget.handSpinningWidget.mitems from the Main group into the Flipside group.Control/Right-click the Main source group and choose Reveal in Finder.
In the Finder window, move the two source files,
SpinningWidget.handSpinningWidget.m, from theMainfolder into theFlipsidefolder.Switch back to the project window. Notice that the two source items are now red. Select both items and choose File

In the multi-item Info window, click the Choose button. Select the
Flipsidefolder and click Choose. The item references are now valid again.
Whenever you move a source item, Xcode adjusts the path (never the reference type) of the item so it continues to refer to the same file or folder. This is convenient in one sense, because it allows you to reorganize your source items freely without breaking any references. The disadvantage is that it permits you to create convoluted item references with relative paths through parent folders and an organization that no longer reflects the organization of the physical files.
All of the items in this exercise use enclosing-group references. When you moved the two source file items from one group to the other in step 2, Xcode recalculated new paths starting from the new group back to the old one's folder. If you had stopped and looked at the attributes of the two items after step 2, their paths would have been ../Main/SpinningWidget.h and ../Main/SpinningWidget.m. This also explains why the two items were still valid after the move.
In step 4, you moved the actual files. As a result, the files were no longer in the Main folder and the source item references broke. When you switched back to the project window, Xcode displayed the two items in red.
In steps 5 and 6, you examined the attributes of the two items in a multi-item Info window and used it to point both items to their respective files in the Flipside folder. Remember that when you select a new path for multiple items, you're selecting the parent folder for every individual item — you're not setting every item to the same path. The path for each was recalculated using a relative path to the Flipside folder (which is nothing, because the enclosing group's folder is the Flipside folder) and their respective filenames. The references are once again valid.
Now you are going to relocate entire folders. This demonstrates the principle advantage of using enclosing-group references in your project.
ReorganizeMe2 has a Source folder that contains two subfolders: Product and Order. The project is about to grow into a client and server. The source files for the client and server are to be kept apart, and the common code moved into a shared tree. Follow these steps:
Open the ReorganizeMe2 project.
Select the Order group. Control/Right-click the Order group and choose Reveal in Finder. In the Finder window, create three new folders inside the
Sourcefolder:Common,Client, andServer. Drag theProductandOrderfolders into theCommonfolder.Switch back to the project window. Select the Product and Order groups and choose Project
Select the Common group. Control/Right-click the Common group and choose Get Info. In the Info window, click the Choose button and select the
Commonfolder in the project. Click Choose to change the path.Repeat step 4 for the Client and Server groups, choosing the
ClientandServerfolders, respectively.
The Order and Product source groups refer to the Order and Product subfolders in their enclosing group's folder. Moving the Order and Product folders into the newly created Common folder broke the references to those folders, and all the references of the items they contained.
In step 3, the new groups Common, Client, and Server were created with enclosing group references that referred to the folder in the source group (remember that this is the default for all newly created source groups). Although the Order and Product groups are now enclosed in the Common group, they still indirectly refer to the same location and are still broken.
In step 4, you changed the Common group's folder from the Source folder to the new Common subfolder. As soon as that happened, the references in the Order and Product folders were valid again.
Step 5 simply prepared the other two groups, Client and Server, so they reference files in their respective folders.
When you're using enclosing-group references, it is usually easier to rearrange folders than it is to move individual files around. Xcode only adjusts the path of the group being moved. Items within that group are not adjusted and continue to have the same relative relationship to their enclosing group. After the parent group references are fixed, all of the child references are valid again.
You can see how using the multi-item Info window and relative references can save a lot of time when changing references for large trees of groups and files. If you're moving just a few folders around, that's probably the best way, but even this can be a fair amount of work if you're making a lot of changes at once.
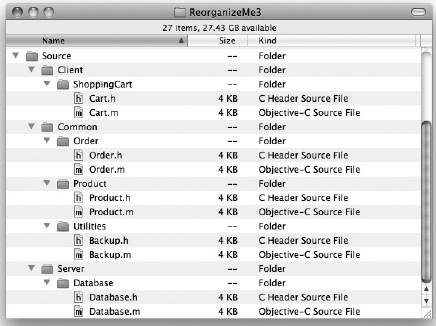
Another technique is simply to throw the whole thing away and let Xcode rebuild all of the relationships from scratch. Start with the ReorganizeMe3 project. All of the items in this project have enclosing-group references.
ReorganizeMe3 has several subfolders: Database, Product, Order, ShoppingCart, and Utilities. Create three new folders in the Source folder: Common, Client, and Server. Move the Database folder into the Server folder. Move the ShoppingCart folder into the Client folder. Move the Product, Order, and Utilities folders into the Common folder. The file structure should now look like Figure 5-25.
Now follow these steps:
Open the ReorganizeMe3 project.
Select the Source group. Control/Right-click the Source group and choose Delete. In the dialog box, click Delete References.
Select the Project Structure group. Choose Project
In the Add to Project dialog box, uncheck the Copy option, set Reference Type to Default, and select Recursively Create Groups for Any Added Folders. Click the Add button.
Remember that the project document doesn't contain any of the source material for your project; just references to those files. In step 2, you deleted all of the references to the source files in this project — but just the references; the original source files are still in the project folder.
In steps 2 and 3, you used the Add to Project command to re-create new groups and source file items that match the reorganized folder hierarchy exactly.
If you have major asset reorganization to do, the fastest and easiest way to rectify your groups and source items might be simply to start over. This might inadvertently include other files, or place files in targets that don't belong there, but these aberrations can usually be dealt with swiftly.
Warning
Why you would not want to let Xcode rebuild all the groups and items? Deleting the source items also deletes any other attributes associated with those items. File encoding, custom tab settings, specific target membership, comments, and build options are lost when the source items are deleted. The newly created source items will all have default attributes. If you need to preserve attributes for a large number of source items, you probably have no choice but to reorganize the groups and folders "the hard way," using one of the first two techniques.
You should now have a clear understanding of how Xcode refers to source files in a project. As you work with Xcode, keep these key concepts in mind:
Every source item has a path to the file or folder to which it refers.
A path can be absolute, relative to the project folder, or relative to the folder of the enclosing group.
File, folder, and framework items have the same names as the source files or folders to which they refer. Renaming the source item renames the physical file or folder. In contrast, the name of a source group is independent of the folder to which it refers.
The path and reference type of an item can be changed in an Info window. A multi-item Info window can change the location or reference type for several items at once.
Moving an item in the source tree adjusts its path so that it continues to refer to the same file or folder.
Now that you can add new and existing source files to your project, you will undoubtedly want to edit them. Editing text is the topic of the next chapter.