
Chapter 8. MapPoint Web Service Render APIs
The Render Service is another of the four core components of the MapPoint Web Service, allowing you to render maps with places/addresses, routes, pushpins and more. In this chapter, we’ll take an in-depth look at the MapPoint Web Service Render APIs.
Understanding Render APIs
The Render Service end point is located at the RenderService.asmx, and the APIs available
for it are exposed via the RenderServiceSoap class in the Web Service
proxy (Reference.cs or Reference.vb).
The RenderServiceSoap class
contains methods related to render functionality , namely GetMap,
GetBestMapView, ConvertToLatLong, and ConvertToPoint, which can be used to get
maps, get map views, and to convert a point on a map to a pixel
coordinate or vice versa. Table
8-1 describes the methods of the RenderServiceSoap class.
Before getting into the details of using the render-related methods, let’s look at the essential basics to understand in rendering maps.
Introduction to Views
A view defines a specific area that needs to be rendered on a map and can be expressed in four ways using MapPoint Web Service.
View by bounding locations
In this case, a map view is defined using a set of
locations, and the map is rendered to contain all of the locations
on the map. Programmatically, this view is represented by the
ViewByBoundingLocations class,
which takes an array of Location objects to define the map view.
All input Location objects must
have a valid LatLong property.
This view is useful if you want to render Location objects from different find
calls on one map. When this view is requested, MapPoint Web
Service calculates the best possible map view to fit all locations
on the map. The following code shows how to define and use the
ViewByBoundingLocation object
to render a map:
//Define an array of locations
//In this case 4 has been randomly chosen
Location[] myLocations = new Location[4];
//Obtain LatLong values for each Location object
. . .
//Define view by
Location and assign locations
ViewByBoundingLocations viewByBoundingLocations
= new ViewByBoundingLocations( );
viewByBoundingLocations.Locations = myLocations;
//Get a map
MapSpecification mapSpec = new MapSpecification( );
mapSpec.Views = new MapView[] {viewByBoundingLocations};
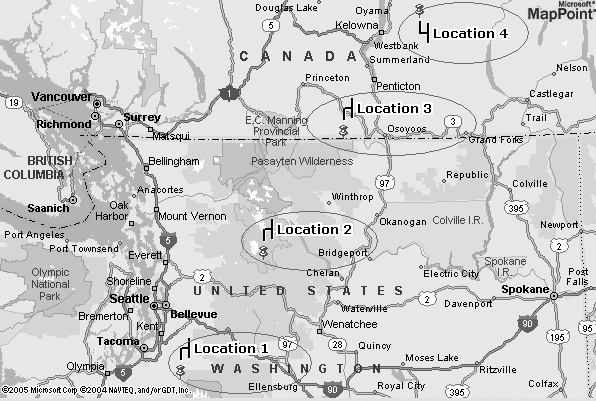
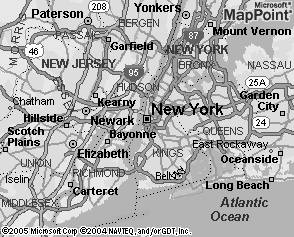
. . .These four locations are rendered on the map shown in Figure 8-1.
View by height and width
In this case, a map view is defined by the height and width of the area that you want to cover on the ground. The height and width you express essentially equal the ground distance in either miles or kilometers. It is important to keep in mind that this height and width is different from the height and width of the map image that you want to render. If you want to render 50 km of height and 100 km of width on the ground, you can do so on a 200 × 200 pixel map image. Although the height and width specified for the map are different from the height and width of the map image, they are related to each other via map scale, which we will look at in detail later in this chapter.
When a map is rendered using ground height and width, it is
rendered to contain at least the requested area, which means that
MapPoint Web Service may render more area than requested depending
on the aspect ratio. Programmatically, this view is represented by
the ViewByHeightWidth class,
which defines the map view using height and width specifications
as integers. When this view is requested, MapPoint Web Service
calculates the best possible map view to fit the requested area on
the map. The following code shows how to define a ViewByHeightWidth object to render a
map:
//Define a center point
LatLong centerPoint = new LatLong( );
centerPoint.Latitude = centerLatitude;
centerPoint.Longitude = centerLongitude;
//Define view by height and width
ViewByHeightWidth viewByHW = new ViewByHeightWidth( );
viewByHW.CenterPoint = centerPoint;
//Define height and width on the ground
//In this case area covering
//200 km and
//300 km
//on the ground
viewByHW.Height = 200;
viewByHW.Width = 300;
//Create map specification
MapSpecification mapSpec = new MapSpecification( );
mapSpec.Views = new ViewByHeightWidth[] {viewByHW};
//Get a map
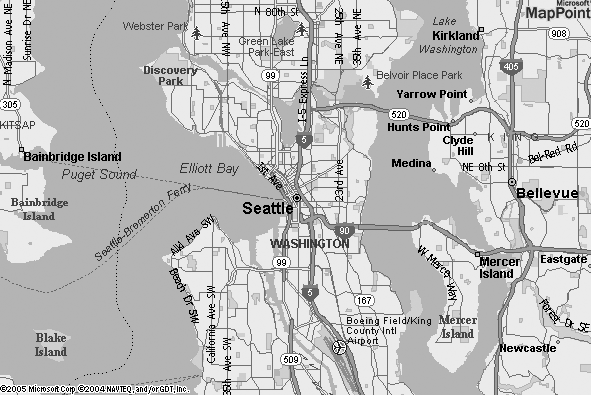
. . .The rendered map requested in the previous code is shown in Figure 8-2.
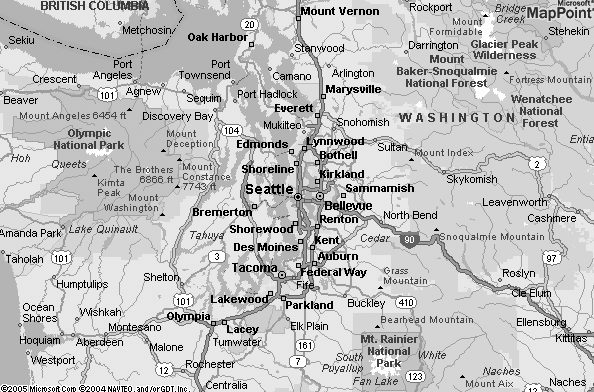
The same map rendered with 20 × 30 km height and width, respectively, is shown in Figure 8-3.
Although the image (bitmap) size here is constant, a change in the map’s height and width caused the scale to change, creating a “zoom in” effect.
View by scale
In order to understand view by scale , you need to understand the notion of scale first.
Scale can be defined as (map image size) /
(map size in real world); so, if you have a map of the world as a
globe rendered on a 1 inch map image, the scale is 1: 520,000,000,
since the world’s diameter is 520,000,000 inches. This means that
one inch on the image represents 520,000,000 actual inches in the
world. Remember though, that the image size (such as 400 × 600
pixels and 2,000 × 2,000 pixels) has no impact on the scale; to
control the scale of a rendered map, you need to use view by
scale. This view is represented by the ViewByScale object. To use this object,
set a center point as LatLong
object and scale value. The scale ranges are dependent on the
MapPoint data sources. The following code shows how to use the
ViewByScale object:
    //Define a center point
    LatLong centerPoint = new LatLong( );
    centerPoint.Latitude = centerLatitude;
    centerPoint.Longitude = centerLongitude;

    //Define view by scale
    ViewByScale viewByScale = new ViewByScale( );
    viewByScale.CenterPoint = centerPoint;

    //Define scale value
    viewByScale.MapScale = 20000;

    //Create map specification
    MapSpecification mapSpec = new MapSpecification( );
    mapSpec.Views = new ViewByScale[] {viewByScale};

    //Get a map
    . . .
This view is extremely useful in controlling the zoom levels for rendered maps. Also, note that you can use this view for device-specific resolution map rendering ; by default, MapPoint Web Service renders maps at 96 dpi; however, you can alter this value to match your device-specific resolution, as shown below:
    //Define scale value
    viewByScale.MapScale = 20000 * 96/120;
A resolution of 120 dpi is applied to the scale to match the device’s dpi resolution.
View by bounding rectangle
This view defines the map area by a bounding
rectangle. Unlike the view by bounding locations, there are only
two LatLong objects involved in
defining the rectangle: one for the northeast corner and one for
the southwest corner. When a bounding rectangle is defined using a
LatLongRectangle object, a map
that covers the specified area is rendered. This view is useful if
you want to render a specific area on the map (unlike the area
dictated by the number of points, as in ViewByBoundingLocations). This view is
programmatically represented by the ViewByBoundingRectangle object. The
following code shows how to use this view:
//Define northeast point
LatLong northEastPoint = new LatLong( );
. . .
//Define southwest point
LatLong southWestPoint = new LatLong( );
. . .
//Define view by bounding rectangle
ViewByBoundingRectangle vbr = new ViewByBoundingRectangle( );
vbr.BoundingRectangle = new LatLongRectangle( );
vbr.BoundingRectangle.Northeast = northEastPoint;
vbr.BoundingRectangle.Southwest = southWestPoint;
//Create map specification
MapSpecification mapSpec = new MapSpecification( );
mapSpec.Views = new ViewByBoundingRectangle[] {vbr};
//Get Map
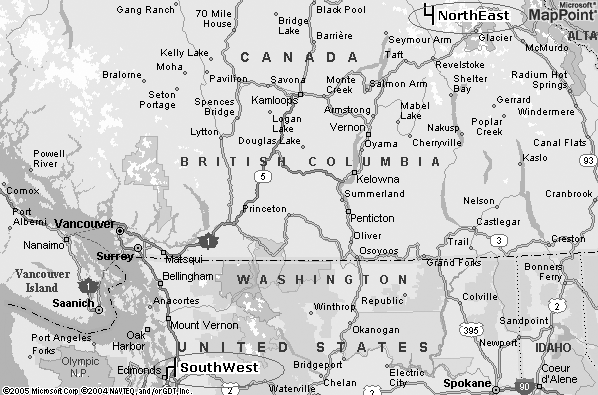
. . .This code generated the map shown in Figure 8-4.
The map has covered the corners defined by the northeast and southwest latitude, longitude combinations.
Now that you know what map views are, let’s look at map styles before moving on to look at the Render APIs in detail.
Understanding Map Styles
Map Style in MapPoint Web Service is a rendering -specific flag that indicates what kind of detail is rendered on the map. To that end, Map Style can be used to control which information is rendered on the maps.
For example, when you use Road map style, the maps are rendered with
full road data; however, when you choose to use Political map style, maps display only
political entities (such as countries, and regions). Map Style in
MapPoint Web Service is programmatically represented using the
MapStyle enumeration. There are
currently 31 Map Styles supported in MapPoint Web Service; it is
important to keep in mind that Map Styles are data
source-dependent—not all map styles are supported by all data
sources.
With this introduction to map views and map styles, let’s next look at how Rendering APIs works.
Anatomy of Render APIs
MapPoint Web Service provides Render APIs for you to
render maps using the RenderServiceSoap.GetMap method. The
GetMap method takes a MapSpecification object as an argument
that defines the map to be rendered and returns an array of MapImage objects. The MapSpecification object defines the map to
be rendered in terms of the view, data source, route (only for
rendering a route), pushpins, or polygons (only to render polygons),
along with optional map options that give you control over map
features such as size and style. Table 8-2 shows the fields
of the MapSpecification class,
and Table 8-3 shows
the MapOptions class
fields.
Field | Description |
| Name of the data source name as a string. |
| An array of the IDs of geographic entities that should appear as selected on the map. Valid array range is 0 through 50. |
| The map rendering options
( |
| An array of |
| An array of pushpins ( |
| The route ( |
| An array of map views ( |
Field | Notes |
| The highlight color ( |
| The highlight color ( |
| The relative font size ( |
| The format ( |
| Identifies whether the requested map should be rendered as an overview map. |
| A positive or negative number reflecting the percentage of the map image to pan west (negative) or east (positive). |
| A positive or negative number reflecting the percentage of the map image to pan south (negative) or north (positive). |
| Identifies whether the |
| The highlight color ( |
| The map style ( |
| Identifies the amount the map image is magnified, expressed as a fractional percentage. |
The GetMap method returns
an array of MapImage objects out
of which the first MapImage
contains the actual rendered map. The returned MapImage object contains either the map
image serialized into a byte array or the URL to the map image
stored on MapPoint Servers. The following code shows how to use
MapSpecification object to get a
map:
    //Find a place to render
    FindServiceSoap findService  = new FindServiceSoap( );

    //Assign credentials
    . . .

    //Find place
    FindSpecification findSpec = new FindSpecification( );
    findSpec.DataSourceName = "MapPoint.NA";
    findSpec.InputPlace = "Seattle, WA";
    FindResults foundResults = findService.Find(findSpec);

    //Get the view
    ViewByHeightWidth view
         = foundResults.Results[0].FoundLocation.BestMapView.ByHeightWidth;

    //Create a RenderServiceSoap instance
    RenderServiceSoap renderService  = new RenderServiceSoap( );

    //Assign to credentials
    . . .

       //Define MapSpecification
    MapSpecification mapSpec  = new MapSpecification( );

    //Assign DataSource
    mapSpec.DataSourceName = "MapPoint.NA";

    //Assign view
    mapSpec.Views = new MapView[] {view};

    //Get Map
    MapImage[] mapImages = renderService.GetMap(mapSpec);

    //Get the map image stream
    System.IO.Stream streamImage
             = new System.IO.MemoryStream(mapImages[0].MimeData.Bits);

    //Load the image stream into a bitmap
    Bitmap bitmapImage = new Bitmap(streamImage);
The MapImage instance
returned by the GetMap method
contains the map image as a byte array that can be used in your
application, which works well for a Windows application. But what if
you have a web application where you have an image tag and all you
need is a URL to display the map?
Rendering for Windows Versus Rendering for the Web
Using the GetMap
method, you can get either a map image as a byte array or a URL that
contains the map image stored on MapPoint Web Service servers. Once
you have the image URL, you can set it to an image tag for a web
application. By default, the GetMap method returns the map image as a
byte array, but you can use the MapOptions object to change this option to
return the map URL by setting the ReturnType property:
    //Create map specification
    MapSpecification mapSpec  = new MapSpecification( );

    //Assign data source and views
    ..

       //Define map options
    mapSpec.Options = new MapOptions( );

    //Request map URL
    mapSpec.Options.ReturnType = MapReturnType.ReturnUrl;

    //Get map
    MapImage[] mapImages =
                renderService.GetMap(mapSpec);

       //Get the URL
    string url = mapImages[0].Url;
From this code, MapPoint Web Service returns a URL to the map
image when the MapOptions.ReturnType is set to either the
MapReturnType.ReturnUrl or the
MapReturnType.ReturnSecureUrl
enumeration. This method is very efficient since the SOAP message
response from MapPoint Web Service contains only a URL instead of
the entire image.
However, keep in mind that a returned URL is valid for
returning up to ten images within five minutes of the call to the
GetMap method. After five minutes
or ten images (whichever occurs first), accessing the URL returns a
session time-out message.
Rendering Maps
Now that you know about views, map styles, and how to get a map image for both Windows and web applications, in this section of the chapter, let’s look at how to render places, addresses, pushpins, and routes.
Rendering Places and Addresses
Rendering a place or address on a map starts with some
type of Find call—either a
Find call for a place or a
FindAddress call. Once you
successfully find a place or an address, use the found location’s
best map view to get the map using the RenderServiceSoap.GetMap method. For
example, to render New York City on a map, start with the Find call and pass the found location’s
best map view to the GetMap
method:
//Find New York, NY
FindServiceSoap findService = new FindServiceSoap( );
//Assign credentials
. . .
//Define find specification
FindSpecification findSpec = new FindSpecification( );
//Assign data source
findSpec.DataSourceName = "MapPoint.NA";
//Assign input place
findSpec.InputPlace = "New York, NY";
//Find place
FindResults foundResults = findService.Find(findSpec);
//Get the best map view
ViewByHeightWidth view =
foundResults.Results[0].FoundLocation.BestMapView.ByHeightWidth;
//Get Render Service Soap
RenderServiceSoap renderService = new RenderServiceSoap( );
//Assign credentials
. . .
//Define map specification
MapSpecification mapSpec = new MapSpecification( );
//Assign data source
mapSpec.DataSourceName = "MapPoint.NA";
//Assign the view
mapSpec.Views = new MapView[] {view}
//Get the map image
MapImage[] mapImages = renderService.GetMap(mapSpec);
//Get the bitmap image and assign it to a picture box
System.IO.Stream streamImage =
new System.IO.MemoryStream(mapImages[0].MimeData.Bits);
Bitmap bitmapImage = new Bitmap(streamImage);
//Assign it to the picture box
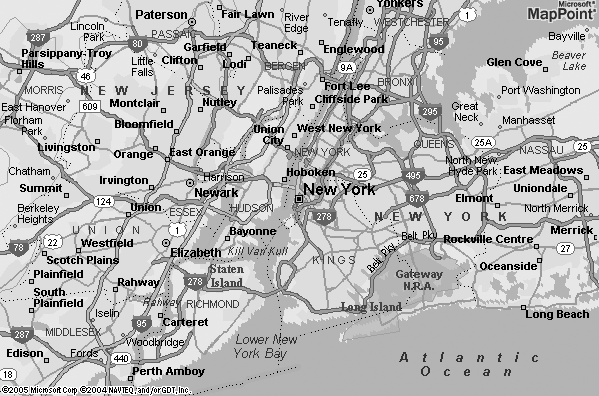
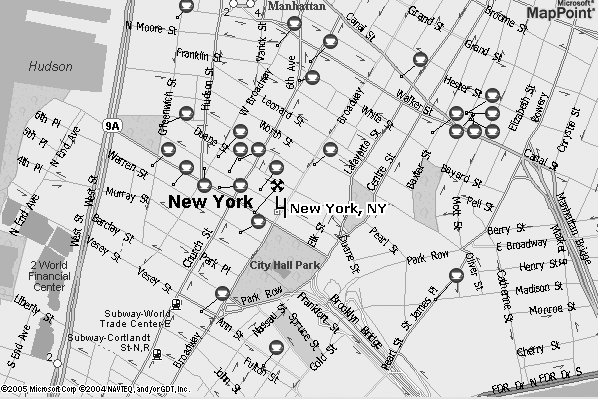
pictureBox1.Image = bitmapImage;When this code is executed, MapPoint Web Service renders the map shown in Figure 8-5.
This map was rendered using all default map options, such as
style, zoom level, and map image size; with the default settings,
the map image size was 240 pixels high and 296 pixels wide. What if
you need a map 400 pixels high and 600 pixels wide? In order to
render a map image with different dimensions, use the MapOptions.Format property of the MapOptions object. The Format property is of type ImageFormat object, and it holds the
definition for the map image settings , such as the height, width, and Mime type of the image. To get a 400 × 600 map image, set the
MapOptions as follows:
//Create MapSpecification object
MapSpecification mapSpec = new MapSpecification( );
//Assign views and data source
. . .
//Create MapOptions
mapSpec.Options = new MapOptions( );
//Set Map Image Format Settings
mapSpec.Options.Format = new ImageFormat( );
//Set height
mapSpec.Options.Format.Height = 400;
//Set width
mapSpec.Options.Format.Width = 600;
//Get map
MapImage[] mapImages =
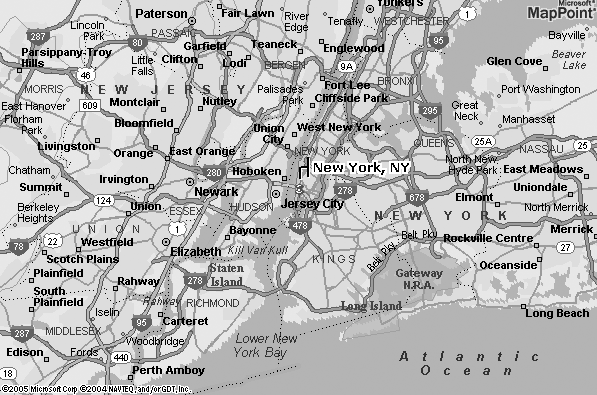
renderService.GetMap(mapSpec);Once you add the map image specifications for width and height, the map is rendered using the desired settings, as shown in Figure 8-6.
The map is now the desired size, but there is still a
problem—even though we know the map center is New York, there is no
clear indication of which place you were looking for. To work around
this issue, you can place a pushpin on New York City as a visual
indication using the MapSpecifications.Pushpins
property.
Rendering Pushpins
To render pushpins on a map, you need to define them
and assign them to the corresponding MapSpecification.Pushpins property. This
property takes an array of Pushpin objects that define the exact
locations (as latitude/longitude coordinates) to be marked with
pushpins. To add a pushpin to the map in Figure 8-6 to show that
exactly where New York City is, add a Pushpin to the MapSpecification object:
    //Create a pushpin
    Pushpin pin = new Pushpin( );

    //Assign data source
    pin.IconDataSource = "MapPoint.Icons";

    //Assign icon name
    pin.IconName = "1";

    //Assign label
    pin.Label = this.inputPlace.Text;

    //Assign location
    pin.LatLong = foundLocation.LatLong;

    //Add pushpin to map specificiation
    mapSpec.Pushpins = new Pushpin[] {pin};
Adding this code renders a map with a pushpin as shown in Figure 8-7.
The MapSpecifications.Pushpins property is an
array of pushpins, so of course you can draw more than one pushpin.
However, the maximum limit to the number of pushpins that can be
rendered on one map is 100. If you have more than 100 pushpins to be
displayed on one map, the best solution is to implement pagination
without cluttering the map with too many pushpins. If you look at
how each pushpin is defined, it has a data source (standard data
source is MapPoint.Icons, which
has number of pushpins that you can use), a label, and a
latitude/longitude.
Tip
For a full list of icons supported by MapPoint.Icons data source, go to
http://msdn.microsoft.com/library/default.asp?url=/library/en-us/mappointsdk/HTML/mpn35devTablesIcons.asp.
Of course, you can also upload your own icons to the MapPoint Web Service servers using the Customer Services site to use them with your render calls. Since you know how to render one pushpin, let’s learn how to add more pushpins.
Rendering points of interest
One of the most frequently used scenarios for rendering maps and pushpins is to find a place and render points of interest around it. For example, first find New York City, and then render all coffee shops within five miles:
    //Define a find nearby specification
    FindNearbySpecification fnbSpec = new FindNearbySpecification( );
    //Assign data source
    fnbSpec.DataSourceName = "MapPoint.FourthCoffeeSample";
    //Assign original location
    fnbSpec.LatLong = foundLocation.LatLong;
    //Assign distance
    fnbSpec.Distance = 5.0;

    //Assign entity type
    fnbSpec.Filter = new FindFilter( );
    fnbSpec.Filter.EntityTypeName = "FourthCoffeeShops";

    //Find nearby coffeeshops
    FindResults findResults = findService.FindNearby(fnbSpec);

       //Add all locations to an array list
    System.Collections.ArrayList pinList =
                new ArrayList( );
    foreach(FindResult findResult in findResults.Results)
    {
        //Create a pushpin
        Pushpin pin = new Pushpin( );
        pin.IconDataSource = "MapPoint.Icons";
        pin.IconName = "CoffeeShopIcon";
        pin.LatLong = findResult.FoundLocation.LatLong;
        pin.Label = findResult.FoundLocation.Entity.DisplayName;
        pinList.Add(pin);
    }

    //Add the original location pin
    Pushpin originalLoc = new Pushpin( );
    originalLoc.IconDataSource = "MapPoint.Icons";
    originalLoc.IconName = "33";
    originalLoc.LatLong = foundLocation.LatLong;
    originalLoc.Label = "New York, NY";
    pinList.Add(originalLoc);

    //Assign pins to the map specification
    mapSpec.Pushpins = pinList.ToArray(typeof(Pushpin)) as Pushpin[];

    //Get map
After finding coffee shops around the input place, I added
them to an ArrayList so that I
can assign all the coffee shop locations, along with the original
location, to the MapSpecification.Pushpins property to
render on a map. When this code is executed, a map is rendered as
shown in Figure
8-8.
The map is not usable because the original map view is optimized to display the input location (New York, NY) but not the points of interest around it. You need to recalculate the map view to be optimized for all of these locations before rendering it. There are two methods you can use to perform the recalculation of the map view with all the pushpins around:
The
ViewByBoundingLocationsview to setMapSpecificationviewsThe
RenderServiceSoap.GetBestMapViewmethod to calculate the map view and then assign it to theMapSpecification.Viewsproperty
Either way, you will get a better-looking map. In the
following code, I have added each coffee shop to another array
list that holds all location objects to be used for ViewByBoundingLocations view, which will
be defined later using those locations:
       //Add all locations to an array list
    System.Collections.ArrayList locationList =
                    new ArrayList( );

    //Add all pushpins to an array list
    System.Collections.ArrayList pinList =
                    new ArrayList( );
    foreach(FindResult findResult in findResults.Results)
    {
        //Create a pushpin
        Pushpin pin = new Pushpin( );
        pin.IconDataSource = "MapPoint.Icons";
        pin.IconName = "CoffeeShopIcon";
        pin.LatLong = findResult.FoundLocation.LatLong;
        //pin.Label = findResult.FoundLocation.Entity.DisplayName;
        pinList.Add(pin);

           //Add location
        locationList.Add(findResult.FoundLocation);
    }

    //Add the original location pin
    Pushpin originalLoc = new Pushpin( );
    originalLoc.IconDataSource = "MapPoint.Icons";
    originalLoc.IconName = "33";
    originalLoc.LatLong = foundLocation.LatLong;
    originalLoc.Label = "New York, NY";
    pinList.Add(originalLoc);


       //Define view
    ViewByBoundingLocations vbl = new ViewByBoundingLocations( );
    //View by Locations
    vbl.Locations = locationList.ToArray(typeof(Location)) as Location[];

    //Assign pins to the map specification
    mapSpec.Pushpins = pinList.ToArray(typeof(Pushpin)) as Pushpin[];

       //Assign view
    mapSpec.Views = new MapView[] {vbl};

    //Get map
When this code is executed, MapPoint Web Service recalculates the map view to fit all locations within an optimized view for all the encompassing locations. The map rendered for the new view is shown in Figure 8-9.
The map clearly shows all the coffee shops without much clutter, but some coffee shops overlap each other. How can you avoid this issue?

Avoiding icon collision
MapPoint Web Service allows you to render pushpins
without icon collisions using the MapOptions.PreventIconCollisions
property:
    //Prevent Icon Collisions
    mapSpec.Options.PreventIconCollisions = true;
When this flag is set to true, the map is rendered as shown in
Figure 8-10 in “icons
on stick” mode to prevent icon collisions.
As you can see, the map is now free of colliding icons and is much more readable.
Suppressing standard entity types
To improve the readability, you can also suppress standard
entities from the map. For example, in the map shown in Figure 8-10, there are two
subway stations rendered on the map along with the coffee shops.
For improved readability, you can suppress that extraneous
information using the MapSpecification.HideEntityTypes
property. This property takes an array of standard entity type
names that needs to be eliminated from rendering; the map in Figure 8-11 is rendered
when you chose to eliminate the MetroStation entity type from
rendering:
    //Hide entity types
    mapSpec.HideEntityTypes = new string[] {"MetroStation"};
The map no longer renders the subway stations.
Tip
You can get a full list of standard entity types supported by each data source at http://msdn.microsoft.com/library/default.asp?url=/library/en-us/mappointsdk/HTML/index.asp.
Converting pushpins to pixel coordinates
Sometimes, you may need to know the pixel
coordinates of the pushpins rendered on the map or the latitude
and longitude coordinates of the pushpin pixel coordinates. Render
Service offers two methods, ConvertToPoint and ConvertToLatLong, to calculate pixel
position from a LatLong object
and to obtain LatLong objects
from pixel coordinates on a rendered map. The key to converting
location to pixel and pixel to location on a map is the map view,
which MapPoint Web Service uses to perform these calculations. If
you have a requirement to build an application to obtain latitude
and longitude when a user clicks on a map, it can be accomplished
as follows:
    //Define a pixel coordinate array
    PixelCoord[] pixels = new PixelCoord[1];
    pixels[0] = new PixelCoord( );
    //Trap OnMouseDown event and X, Y coordinates
    pixels[0].X = e.X;
    pixels[0].Y = e.Y;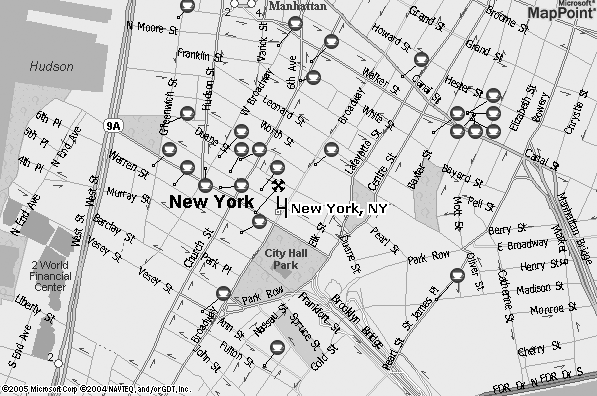
    //Get the latitude longitude from the point
    LatLong[] latlongs =
         renderService.ConvertToLatLong(pixels, mapSpec.Views[0],
                                        400, 600);
The method ConvertToLatLong takes the pixel
position, current map view, and the height and width of the map
image (not the map distance covered on the ground) and returns the
latitude and longitude coordinates for the corresponding pixel
positions.
Rendering Routes
Although we have talked enough about
rendering points, we have not yet discussed rendering
routes on a map. As it turns out, the same MapSpecification object and the GetMap method can be used to render
routes. The only difference is that while rendering routes, in
addition to the map view, you also need to assign the route to be
rendered on the map. The assigned Route object must have either the Route.Specification or the Route.CalculatedRepresentation present.
Here is an example of rendering a route:
    //Route between two locations
    LatLong[] latLongs = new LatLong[2];
    latLongs[0] = new LatLong( );
    latLongs[1] = new LatLong( );
    //Define start location
    latLongs[0].Latitude = 40;
    latLongs[0].Longitude = -120;
    //Define stop location
    latLongs[1].Latitude = 41;
    latLongs[1].Longitude = -121;

    //Create a route service
    RouteServiceSoap routeService = new RouteServiceSoap( );
    //Add credentials
    . . .
    //Calculate route
    Route route = routeService.CalculateSimpleRoute(latLongs, "MapPoint.NA",
                                    SegmentPreference.Quickest);

    //Get a map view of the route
    ViewByHeightWidth[] views = new ViewByHeightWidth[1];
    views[0] = route.Itinerary.View.ByHeightWidth;

    //Create Start Pushpin
    Pushpin start = new Pushpin( );
    start.IconName = "1";
    start.IconDataSource = "MapPoint.Icons";
    start.Label = "Start";
    start.LatLong = latLongs[0];

    //Create Stop Pushpin
    Pushpin stop = new Pushpin( );
    stop.IconName = "1";
    stop.IconDataSource = "MapPoint.Icons";
    stop.Label = "Stop";
    stop.LatLong = latLongs[1];


    //Define map specification
    MapSpecification mapSpec  = new MapSpecification( );
    mapSpec.DataSourceName = "MapPoint.NA";
    //Assign view
    mapSpec.Views = views;
       //Assign route
    mapSpec.Route = route;
    //Assign start and stop locations
    mapSpec.Pushpins = new Pushpin[] {start, stop};

    //Assign map options
    mapSpec.Options = new MapOptions( );
    mapSpec.Options.Format = new ImageFormat( );
    mapSpec.Options.Format.Height = 400;
    mapSpec.Options.Format.Width = 600;

    //Get map
    . . .
When this code is executed, the map in Figure 8-12 is rendered.
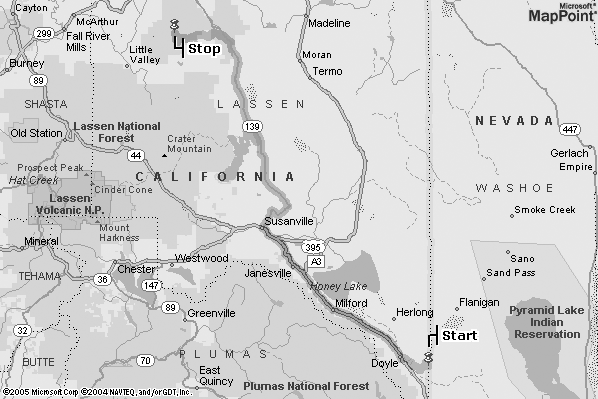
If you pass only the route and not the view, the entire route
is rendered on the map. So, if you have a long route and want to
render only a section of it, you can use the views; in case of a
missing view specification, GetMap renders the entire route on the
map. Also, keep in mind that any itinerary present in the Route object is ignored during the
GetMap method.
You render routes using the standard GetMap method, but if you want to render
LineDrive route maps, use the GetLineDriveMap method.
Rendering LineDrive Maps
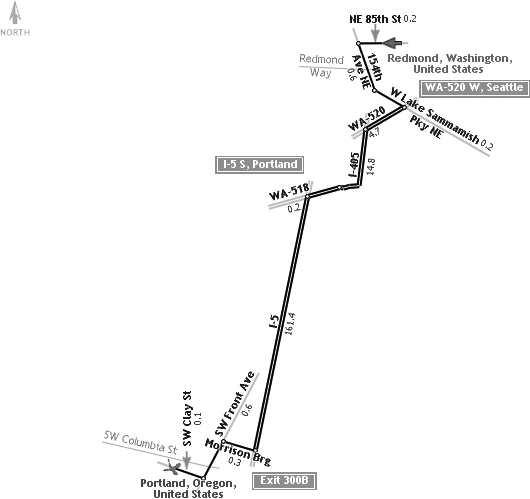
Before we get into rendering LineDrive maps , let’s look at what exactly they are. LineDrive maps are route maps that show the map of a route in an intuitive format, much as you might draw directions for a friend on a piece of paper. LineDrive provides the essential information about a route in an easy-to-use format that includes start and end points, names of streets and cross-streets, and mileage information. The core difference between a regular route map and a LineDrive map is that a LineDrive map gives more emphasis to starting/ending points and turns. For example, if you are driving from Redmond, WA to Portland, OR, a regular route map may look like Figure 8-13.
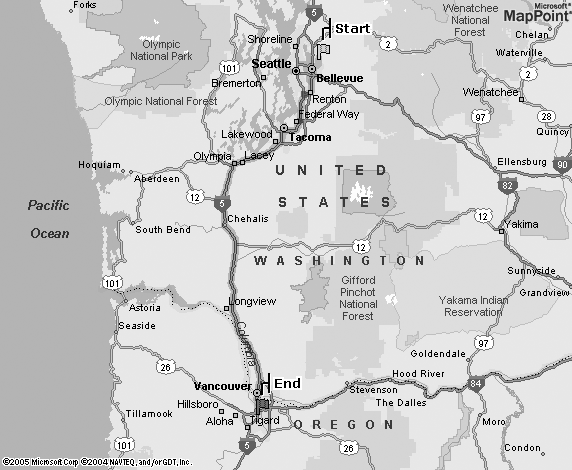
Rendering the same route on a LineDrive map gives you the map shown in Figure 8-14.
More emphasis is given to the turns and the starting and end points in the LineDrive map. It is important to note that a LineDrive route is not always identical to the route created using the standard map style. LineDrive maps also have some limitations in that they:
To render a LineDrive map, you still need a valid Route object (after all, a LineDrive map
is just a variation in rendering a route). Call the GetLineDriveMap method using a valid
LineDriveMapSpecification object.
The LineDriveSpecification object
specifies the size of the map, the route to be rendered, and the
palette to be used for rendering the LineDrive map. You can pick a
palette style using the PaletteType enumeration. The available
options for the PaletteType
enumeration are shown in Table 8-4.
Item | Description |
| Returns a full color representation of the LineDrive map. This is the default value. |
| Returns a grayscale representation of the LineDrive map. |
| Returns a black and white representation of the LineDrive map. |
The following code shows how to use the LineDriveSpecification object to render a
LineDrive map displaying a route:
    //Create an instance of RenderServiceSoap and
    //Assign Credentials
    RenderServiceSoap renderSoap =
                          new RenderServiceSoap( );


    //Create a LineDriveMapSpecification object
    LineDriveMapSpecification lineDriveSpec =
                          new LineDriveMapSpecification( );

    //Assign the route to be rendered
    //Assumes that the route is pre-calculated.
    lineDriveSpec.Route = myroute;

    //Set the LineDriveMapOptions such as Palette
    LineDriveMapOptions lineDriveOptions =
                          new LineDriveMapOptions( );
    //Return Map Url
    lineDriveOptions.ReturnType = MapReturnType.ReturnUrl;
    //Set palette type as Color map
    lineDriveOptions.PaletteType = PaletteType.Color;

    //Assign options to the specification
    lineDriveSpec.Options = lineDriveOptions;

    //Get LineDrive maps
    LineDriveMapImage[] lineDriveMaps
                     = renderSoap.GetLineDriveMap(lineDriveSpec);

    //Display the LineDrive Maps
    . . .
The GetLineDriveMap returns
the LineDriveMapImage array.
Depending on the driving directions, the LineDrive map may be split
into many map images, so you have to check for the image array
length and display them accordingly. Also, to display the driving
directions along with each LineDrive map image, match each LineDriveMapImage instance with the
corresponding driving directions using the FirstDirectionID and LastDirectionID properties. The following
code shows how to display LineDriveMapImage array along with the
matching driving directions:
    //Get LineDrive Maps
    LineDriveMapImage[] lineDriveMapImages =
                   renderSoap.GetLineDriveMap(lineDriveSpec);
    //Now process them to display the map and the driving directions
    foreach(LineDriveMapImage lineDriveImage in lineDriveMapImages)
    {
        //Display the map image
        //Something like: Assign the url to your img tag
        . . .

        //Display the matching driving directions
           FormatDirectionsForLineDriveImage(lineDriveImage,
                                          lineDriveSpec.Route);
    }
The helper function FormatDirectionsForLineDriveImage is shown
in the following code:
    //Returns the matching driving directions for a LineDriveImage
    private string FormatDirectionsForLineDriveImage(
                            LineDriveMapImage lineDriveMapImage,
                            Route route)
    {
        if(lineDriveMapImage == null || route == null)
            return string.Empty;

        System.Text.StringBuilder stringBuffer = new System.Text.StringBuilder( );

        //For each route segment
        foreach(Segment segment in route.Itinerary.Segments)
        {
            //For each direction entry
            foreach(Direction direction in segment.Directions)
            {
                //See if the id of the direction falls in the range for the current
                //LineDrive image
                   if(direction.ID >= lineDriveMapImage.FirstDirectionID ||
                    direction.ID <= lineDriveMapImage.LastDirectionID)
                {
                    //If so display it
                    stringBuffer.Append(direction.Instruction);
                    //Append a line break for display formatting purposes
                    stringBuffer.Append("<BR>");
                }
            }
        }
        //Return the matching directions
        return stringBuffer.ToString( );
    }
Use the LineDriveMapImage.FirstDirectionID and
LineDriveMapImage.LastDirectionID
properties to match the driving directions. Now that you have seen
rendering of both points and routes, let’s look at rendering
polygons .
Rendering Polygons
In Chapter 6, we looked at finding polygons depending on various spatial filters; in this section, we’ll learn how to render the polygons using render service.
Rendering polygons in MapPoint Web Service is fairly
straightforward; just like rendering roads and pushpins, you use the
RenderServiceSoap.GetMap method
to render polygons by specifying which polygons to render using the
MapSpecification object. Before
getting into the rendering details, let’s look at how polygons are
represented programmatically in MapPoint Web Service.
In MapPoint Web Service, polygons are programmatically
represented by Polygon class
instances. Each Polygon class
exposes a set of fields listed in Table 8-5 that define the
identity and style of the polygon.
The BorderColor and
FillColor use the ElementColor object to set the colors and
transparency of the polygon. The ElementColor class defines the Red, Blue,
and Green components of the color, along with the Alpha value, which
defines transparency. Valid values range from 0 to 255. The fields
exposed by the ElementColor class
are shown in Table
8-6.
Let’s look at the following code, which defines a polygon
using the Polygon class:
    //Define a polygon instance
    Polygon polygon = new Polygon( );

    //Assign data source name and id
    polygon.DataSourceName = "your poly data source";
    polygon.EntityID = 23354;

    //Define border color
    ElementColor borderColor = new ElementColor( );
    borderColor.A=221;
    borderColor.B=255;
    borderColor.G=255;
    borderColor.R=128;

    //Define fill color
    ElementColor fillColor = new ElementColor( );
    fillColor.A=90;
    fillColor.B=255;
    fillColor.G=255;
    fillColor.R=128;

    //Assign border and fill colors
    polygon.BorderColor=borderColor;
    polygon.FillColor=fillColor;
Once you have a valid polygon, it is easy to render it using
the GetMap method:
    //Define a RenderServiceSoap instance
    RenderServiceSoap renderSoap = new RenderServiceSoap( );

    //Assign credentials
    . . .

    //Define a MapSpecification object
    MapSpecification mapSpec = new MapSpecification( );

    //Assign rendering data source
    spec.DataSourceName = "MapPoint.NA";

    //Assign views and map options
    . . .

    //Create a polygon
    //Define a polygon instance
    Polygon polygon = new Polygon( );

    //Assign data source name and id
    polygon.DataSourceName = "your poly data source";
    polygon.EntityID = 23354;

    //Define border color
    ElementColor borderColor = new ElementColor( );
    borderColor.A=221;
    borderColor.B=255;
    borderColor.G=255;
    borderColor.R=128;

    //Define fill color
    ElementColor fillColor = new ElementColor( );
    fillColor.A=90;
    fillColor.B=255;
    fillColor.G=255;
    fillColor.R=128;

    //Assign border and fill colors
    polygon.BorderColor=borderColor;
    polygon.FillColor=fillColor;

    //Assign to Polygons array
    mapSpec.Polygons = new Polygon[1] {polygon};

    //Render them on a map
    MapImage[] mapImages = renderSoap.GetMap(mapSpec);
Creating Polygon instances
and assigning them to the MapSpecification.Polygons field is all it
takes to render polygons using the GetMap method. Now that you know how to
render points, routes, and polygons, let’s look at map interaction,
such as panning and zooming, in the context of rendering.
Map Interaction
Once you have rendered your initial map, your users may
want to interact with it by zooming in, zooming out, or panning around the map. In order to provide this functionality,
you need to implement panning and zooming on your map using the same
RenderServiceSoap.GetMap method
with more specific map options.
Programming Map Zoom
MapOptions object
offers the Zoom property, of type
double, with which you can set the zoom level of any given map. The
MapPoints.Zoom property
identifies the factor by which the map image is magnified; when a
map is rendered, the Zoom value
is initially set to one. To zoom in by 50%, set the Zoom value to 0.5; to zoom in again
another 50%, set the Zoom value
to 0.25; each time you divide the zoom value by 2, you zoom in 50%
more than the previous level. The same logic works for zoom out. To
zoom out the map by 50%, simply multiply the Zoom value by 2. After setting the new
Zoom value to the MapSpecification object, call the GetMap method again with the same
specification to zoom in or out; you can also get the initial map
with the view zoomed in or out by setting the appropriate value. The
following code shows how to set the zoom value to get the initial
map with the view zoomed in by 50%:
    //Create render service
    RenderServiceSoap renderService = new RenderServiceSoap( );

    //Set credentials
    . . .

    //Create Map Specification
    //Or assign to an existing map specification

       //Zoom in by 50%
    mapSpec.Options.Zoom = mapSpec.Options.Zoom/2;

    //Get Map
    MapImage[] maps = renderService.GetMap(mapSpec);
The Zoom value is set to
the MapOptions.Zoom value and
passed to the GetMap method; one
thing to keep in mind regarding the Zoom value is that it must be a positive
value, and it can’t be zero.
Programming Map Pan
Similar to zoom, MapOptions object offers two properties,
PanVertical and PanHorizontal, both of type double, which
you can use to pan rendered maps. The MapPoints.PanVertical and MapPoints.PanHorizontal properties
identify the factor by which the map image is panned. When a map is
originally rendered, both the vertical and horizontal pan factors
are set to zero. To pan the map north by 50% (half of the view), set
the PanVertical value to 0.5, and
to pan north by another 50%, increment the PanVertical value by 0.5 again; each time
you increment the pan value by 0.5, you pan the map by another 50%.
The same logic works for pan horizontal. However, there are a couple
of things you need to keep in mind:
Positive pan values indicate pans east or north
Negative pan values indicate pans west or south
To pan northeast, southwest, southeast, or northwest, you need to set both pan vertical and pan horizontal values.
The following code shows how to set the pan the initial map by 20% north:
    //Create render service
    RenderServiceSoap renderService = new RenderServiceSoap( );

    //Set credentials
    . . .

    //Create Map Specification
    //Or assign to an existing map specification
    . . .

       //Pan map North by 20%
    mapSpec.Options.PanVertical =
                   mapSpec.Options.PanVertical + 0.20

    //Get Map
    MapImage[] maps = renderService.GetMap(mapSpec);
Similarly, to pan the same map south instead of north, use the following pan factor:
       //Pan map South by 20%
    mapSpec.Options.PanVertical =
                   mapSpec.Options.PanVertical - 0.20

    //Get Map
    MapImage[] maps = renderService.GetMap(mapSpec);
Along the same lines, to pan the map northwest, set both
PanVertical and PanHorizontal as follows:
// +ve value for North
mapSpec.Options.PanVertical
          = mapSpec.Options.PanVertical + 0.20;

//-ve value for West
mapSpec.Options.PanHorizontal
          = mapSpec.Options.PanHorizontal - 0.20;

//Get Map
MapImage[] maps = renderService.GetMap(mapSpec);
While these pan settings work well at higher zoom levels, you will soon realize that the 20% pan factor pans the map more than you would like it to pan at lower zoom levels; to compensate, you just need to multiply the pan factor by the zoom factor:
    //Compensate map pan with zoom factor
       mapSpec.Options.PanVertical
             = mapSpec.Options.PanVertical + 0.20 * mapSpec.Options.Zoom;
    //Compensate map pan with zoom factor
       mapSpec.Options.PanHorizontal
            = mapSpec.Options.PanHorizontal - 0.20 * mapSpec.Options.Zoom;

    //Get Map
    . . .
Compensating the map pan with zoom value makes sure the panning is nonlinear at different zoom levels.
Asynchronous Programming
The asynchronous programming techniques that we have seen in Chapter 6 are applicable to Render Service as well. Depending on which application you are developing (for either Windows or the Web), you have two different options to use asynchronous programming for getting maps and enabling map interaction such as panning and zooming .
Asynchronous Programming for Windows Applications
When you use Visual Studio .NET to generate the MapPoint Web
Service proxy class, it also generates the necessary methods for
asynchronous programming. For example, if you look for the RenderServiceSoap.GetMap method, you also
find the RenderServiceSoap.BeginGetMap and RenderServiceSoap.EndGetMap methods in the
proxy class. The Begin and
End method pairs together enable
the asynchronous programming patterns for your Web Service client
applications. Using these methods is easy; in a synchronous
scenario, your Find call looks as
follows:
    //Call the GetMap Method
    MapImage[] mapImages = renderSoap.GetMap(mapSpec);
    //Now display the map
    . . .
If this code is running on the UI thread, it gets blocked
until the GetMap returns the map
image array and results in an unresponsive application during that
time. To avoid this situation, create a worker thread and use it to
call GetMap methods so that your
UI thread is free during this long network round-trip. In fact,
that’s exactly what the BeginGetMap and EndGetMap methods do behind the scenes. To
implement the previous code using asynchronous methods, you would do
something similar to the following code. First, define a “callback”
method for your asynchronous method calls:
    private void RenderServiceCallback(IAsyncResult ar)
    {
       RenderServiceSoap renderSoap
          = ar.AsyncState as RenderServiceSoap;
       if(renderSoap == null)
         return;
       MapImage[] mapImages = renderSoap.EndGetMap(ar);
       //Display map
       . . .
    }
Next, modify your GetMap
call to be an asynchronous BeginGetMap call:
    //Async call to GetMap
    AsyncCallback callback = new AsyncCallback(RenderServiceCallback);
    rendersoap.BeginGetMap(mapspec, callback, rendersoap);
The BeginGetMap call
invokes the GetMap method on a
different (worker) thread and passes a pointer to the RenderSeviceCallback method as a
“callback” method; when the GetMap method returns the MapResult array, the callback delegate is
invoked so that the RenderServiceCallback method gets executed
on the UI thread again. In the RenderServiceCallback method, you need to
obtain the MapImage array
returned by the GetMap method by
calling the EndGetMap method and
displaying it. Keep in mind that the HTTP session is kept alive
during this asynchronous operation behind the scenes—so this pattern
is only asynchronous at your application thread level, not at the
HTTP communication level.
Asynchronous Programming for Web Applications
As with AJAX, discussed in Chapter 6, you can use the combination of XML over HTTP and asynchronous JavaScript to create web applications that give the user a rich experience.
AJAX-Enabling Your Web Applications
Since the basics of AJAX implementation have already been covered in Chapter 6, in this section I will discuss the items specific to render. To AJAX-enable your rendering, you need to implement:
Also, when you are implementing the ASP.NET page that
returns the map URL to the HTML page, you have to cache the
corresponding MapSpecification
at HTTP Session scope to enable map interaction, such as panning
and zooming.
Where Are We?
In this chapter, you have seen how map rendering works in
MapPoint Web Service. To render maps, use a valid MapSpecification object to call the RenderServiceSoap.GetMap method. Once a map
is rendered, it allows you to interact by setting appropriate MapOptions to the MapSpecification object. RenderServiceSoap also offers methods to
convert pixels on any given map to latitude and longitude coordinates
and vice versa. Finally, using the Render Service, you can render not
only maps, but points, routes, and polygon shapes.