Visual Studio 2008 is an IDE for developing and maintaining managed, native, and mixed-mode applications. Many project templates are available to create a diverse assortment of projects and applications. There are templates for Microsoft Windows Forms, Console, ASP.NET Web Site, ASP.NET Web Service, Windows Presentation Foundation (WPF), Windows Communication Foundation (WCF), Microsoft Office, and many more application types. You also can create Microsoft SQL Server, Testing, Setup And Deployment, and other projects. There are templates that target specific devices, including mobile devices.
In addition, developers can choose the language of their choice, including C#, Microsoft Visual Basic .NET, and Managed C++. Some templates, such as the Windows Forms application, are language-specific.
The Visual Studio 2008 IDE has many rapid application development (RAD) tools. The Visual Studio Code Editor, Microsoft IntelliSense, Solution Explorer, Class View, Object Browser, and the class diagram are essential elements of the user interface and contribute to improved developer productivity, accuracy, and efficiency. Many of the mature tools, such as IntelliSense, have been enhanced further in Visual Studio 2008.
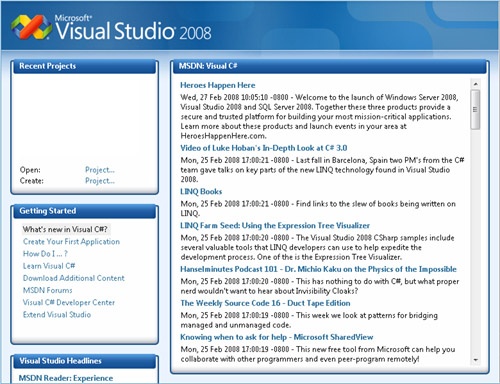
The Start Page, shown in Figure 4-3, is the gateway screen into Visual Studio. For developers, the Start Page is the first window presented in Visual Studio after installation. Visual Studio often presents the Start Page upon startup as well. If the page is not visible, you can open the Start Page from the View menu by selecting Other Windows and then selecting Start Page.
The Start Page has four panes:
Recent Projects. This pane lists the recently opened projects. Select an item in the project list to open that project. The Open and Create buttons at the bottom of this pane open and create a new project, respectively.
MSDN: Visual C#. This pane contains links to recent news articles pertaining to Visual Studio or related topics. Each topic has preview text to help the user. Click the related link to view the complete article.
Getting Started. This pane contains helpful links for new Visual Studio developers.
Visual Studio Headlines. This pane is where Microsoft posts links on topics of interest for Visual Studio developers, including new product releases.
Developing an application in Visual Studio typically starts with the creation of a project. Projects are the basic organization component of Visual Studio, in which files, resources, reference, and other constituents of an application are grouped. Related projects are sometimes grouped into solutions, which can contain projects from different templates and languages. For example, it is common to group applications, related libraries, and test projects in the same solution.
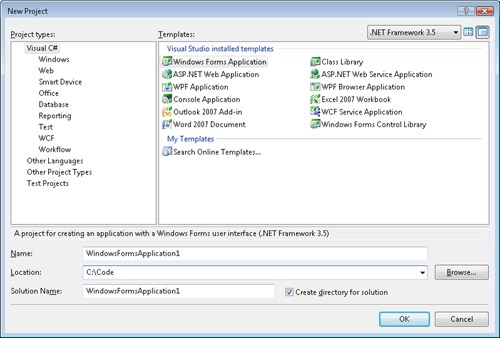
Create a new project by selecting File, New, and then Project. Figure 4-4 shows the New Project dialog box. Toward the bottom of the dialog box is a drop-down list box containing the Create New Solution and Add To Solution options. (Note that the Add To Solution option is not available unless a solution is currently open.) To add the new project to the current solution, choose Add To Solution. If no solution is opened, the only choice is to create a new solution. Select the Create Directory For Solution check box to create a dedicated directory for the new solution.
Multiple-targeting of the .NET Framework version is a feature introduced in Visual Studio 2008. This feature allows you to set the build context of an application to a specific version of the .NET Framework. For example, imagine that you maintain an application that was created initially in .NET Framework 2.0. Compiling the application with a new version of the .NET Framework might introduce dependencies or other unforeseen problems, and is not necessary simply to maintain the product. With Visual Studio 2008, this can be avoided by targeting the .NET Framework 2.0 version.
Select the target .NET Framework in the upper right corner of the New Project dialog box. Click .NET Framework and a list of available .NET Framework versions is presented. The choices are .NET Framework 2.0, 3.0, and 3.5.
Here are some of the reasons to use multiple-targeting:
You can build applications toward specific platforms based on customer expectations.
You maintain applications created in an earlier version of the .NET Framework, while developing new applications to the newest platform in Visual Studio 2008.
You can develop what-if scenarios based on different .NET platforms, which is important for testing.
Most important, you now can create and deploy to the .NET platform of your choice.
In Visual Studio 2008, the default platform is .NET Framework 3.5. Visual Studio will enable and remove specific features based on the target platform. For example, if targeting .NET Framework 2.0, LINQ is not available. (LINQ had not been introduced in .NET Framework 2.0, so references to LINQ are not allowed.) In addition, references and user interface elements that are not supported in a specific version of the .NET Framework are not available and typically are not shown in Visual Studio.
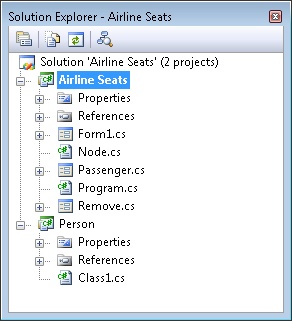
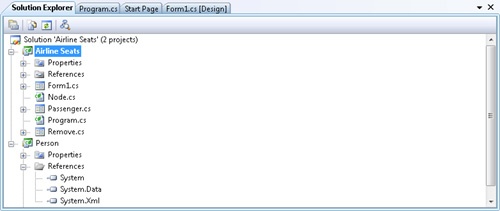
Solution Explorer provides a view into a solution, including projects contained in that solution. You can configure both solutions and projects from the Solution Explorer window (shown in Figure 4-5). If it is not visible, display the Solution Explorer window by selecting Solution Explorer from the View menu. In the example shown in the figure, the solution is named Airline Seats and has two projects: Airline Seats and Person.
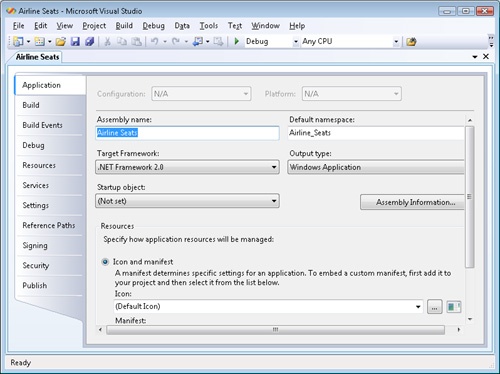
To change solution or project settings, right-click the solution or project icon in Solution Explorer to open a context menu. Select the Properties command from the context menu. The Properties command for a project opens the Project Designer window, as shown in Figure 4-6. In the Project Designer window, you can configure application settings, the build environment, debug settings, and resources. You also can define default application settings, sign assemblies, or create ClickOnce manifests (explained later in this chapter). You also can open the Project properties by choosing <project name> Properties from the Project menu.
The location of the Solution Explorer window and other Visual Studio windows default to a docking window. Figure 4-7 shows Solution Explorer in a tabbed window. You can select the correct window orientation from a context menu. Open the context menu by right-clicking the title bar of the window.
Where is AssemblyInfo.cs? The AssemblyInfo.cs file contains assembly attributes that define assembly level metadata, such as the version number and culture. (Metadata is discussed in Chapter 13.) Source code files and related files are displayed in the Solution Explorer window. Users of previous versions of Visual Studio might be accustomed to seeing AssemblyInfo.cs at the root of the project, with other source files. However, the AssemblyInfo.cs file now has been moved to the Properties folder. Open the Properties folder to view the file.
Several project types are available in Visual Studio 2008, the most commonly used of which are Windows Application and Class Library. Project templates are grouped in categories. The Windows Application and Class Library templates are included in the Visual C# templates and are part of the Windows category. Table 4-1 lists all the templates found in the Windows category.
Table 4-1. Project templates in the Windows category
Template name | Description |
|---|---|
Windows Forms Application | Creates a Windows Forms desktop application. |
Class Library | Creates a managed dynamic-link library (DLL). |
WPF Application | Creates a WPF client application. |
WPF Browser Application | Creates a WPF browser application. |
Console Application | Creates a console application. |
Empty Project | Creates an empty project, which has no files, You are responsible for building the project essentially from scratch, including adding the necessary files. |
Windows Service | Creates a Windows Service application, which is a daemon process that can run across logon sessions. |
WPF Custom Control Library | Creates a library that hosts WPF custom controls, which is likely a composite of standard controls with some customization. |
WPF User Control Library | Creates a library that hosts WPF user controls. User controls extend a standard control with custom properties and behavior. |
Windows Forms Control Library | Creates custom controls for Windows Forms Applications. |
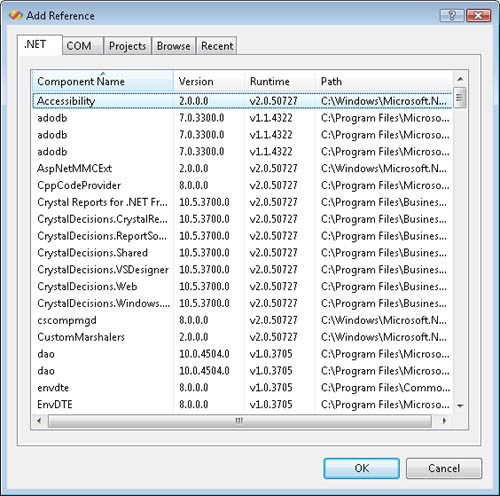
A project can access external code, managed or unmanaged, by adding a reference. You can add a normal reference or you can add a Web reference to a Web service. From the Project menu, select Add Reference to add a normal reference and select Add Web Reference to add a reference to a Web service. References also can be added from the Solution Explorer window by right-clicking the References folder and choosing Add Reference or Add Web Reference from the context menu.
The Add Reference dialog box, shown in Figure 4-8, has five tabbed windows. References can be added from any of these windows:
The .NET window displays libraries from the Common Language Runtime (CLR) and .NET Framework Class Library (FCL).
The COM window displays registered COM servers, which contain unmanaged code.
The Projects window displays other projects of the current solution. You can create references to those projects.
The Recent window displays recent references. The reference may not still be valid; in that case, you can add a reference to that item again.
Visual Studio offers an assortment of windows that serve a variety of purposes. This includes the code editor, debugging windows, the Server Explorer, Solution Explorer, and Properties windows, and a variety of toolboxes. The positioning of these windows is flexible. Most of them can float or be tabbed, docked, hidden, or auto-hidden. In the past, it has been relatively easy to hide, overlap, or otherwise muddle the Visual Studio IDE. Visual Studio 2008 provides visual clues to aid in moving and docking windows, including a guide diamond with docking arrows to help you position windows appropriately.
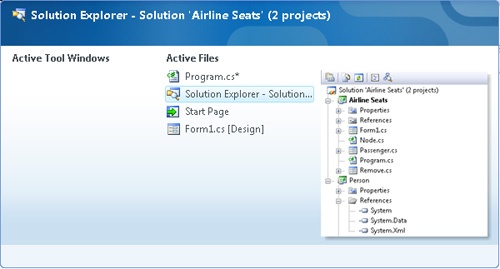
The Visual Studio IDE can become crowded with various windows and files. The IDE Navigator (shown in Figure 4-9) provides easy switching to help you scroll through windows and files. Pressing Ctrl+Tab opens the IDE Navigator. Once there, you can navigate between open files and windows. When the window is open, use Ctrl+arrow keys or press Ctrl+Tab or Ctrl+Shift+Tab repeatedly to navigate the items.
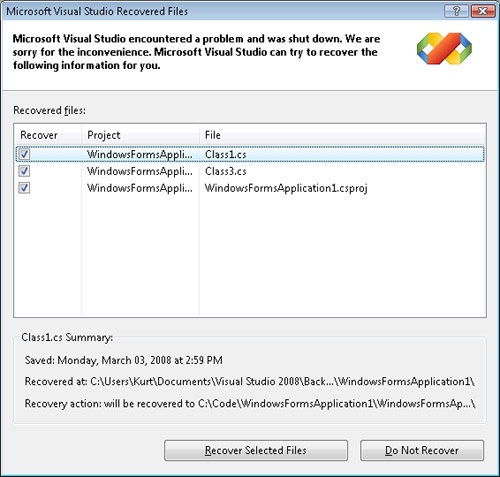
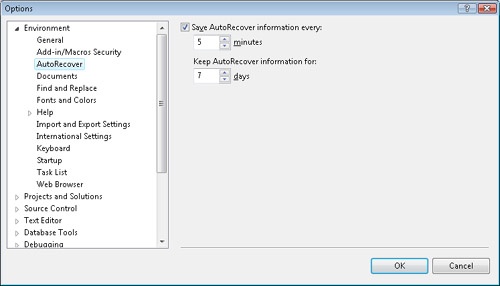
AutoRecover is another excellent feature of Visual Studio 2008. This option periodically saves a project and prevents the loss of data when Visual Studio is not closed properly. Figure 4-10 shows the AutoRecover window of the Options dialog box. Open this window by selecting Options from the Tools menu, then expanding the Environment node in the left-hand pane. In the AutoRecover window, set the frequency of auto saves and the length of time that backups are retained.
When re-entering Visual Studio after an abnormal termination, the Microsoft Visual Studio Recovered Files dialog box (shown in Figure 4-11) automatically displays. In the dialog box, confirm the files that you want to recover. The AutoRecover option controls how often changes are saved and recovery files created.