Chapter 16. Video
This chapter has been revised for Early Release. It reflects iOS 14, Xcode 12, and Swift 5.3. But screenshots have not been retaken; they still show the Xcode 11 / iOS 13 interface.
Video playback is performed using classes provided by the AV Foundation framework (import AVFoundation), such as AVPlayer. An AVPlayer is not a view; rather, an AVPlayer’s content is made visible through a CALayer subclass, AVPlayerLayer, which can be added to your app’s interface.
An AV Foundation video playback interface can be wrapped in a simple view controller, AVPlayerViewController: you provide an AVPlayer, and the AVPlayerViewController automatically hosts an associated AVPlayerLayer in its own main view, providing standard playback transport controls so that the user can start and stop play, seek to a different frame, and so forth. AVPlayerViewController is provided by the AVKit framework; you’ll need to import AVKit.
A simple interface for letting the user trim video (UIVideoEditorController) is also supplied. Sophisticated video editing can be performed in code through the AV Foundation framework, as I’ll demonstrate later in this chapter.
If an AVPlayer produces sound, you may need to concern yourself with your application’s audio session; see Chapter 15. You will almost certainly want the category to be .playback. AVPlayer deals gracefully with the app being sent into the background: it will pause when your app is backgrounded and resume when your app returns to the foreground.
A movie file can be in a standard movie format, such as .mov or .mp4, but it can also be a sound file. An AVPlayerViewController is an easy way to play a sound file, including a sound file obtained in real time over the internet, along with standard controls for pausing the sound and moving the playhead — unlike AVAudioPlayer, which, as I pointed out in Chapter 15, lacks a transport interface.
A web view (Chapter 12) supports the HTML5 <video> tag. This can be a simple lightweight way to present video and to allow the user to control playback. Both web view video and AVPlayer support AirPlay.
AVPlayerViewController
An AVPlayerViewController is a view controller whose view contains an AVPlayerLayer and transport controls. It must be assigned a player, which is an AVPlayer. An AVPlayer can be initialized directly from the URL of the video it is to play, with init(url:). You’ll instantiate AVPlayerViewController, create and set its AVPlayer, and get the AVPlayerViewController into the view controller hierarchy. You can instantiate an AVPlayerViewController in code or from a storyboard; look for the AVKit Player View Controller object in the Library.
The simplest approach is to use an AVPlayerViewController as a presented view controller. In this example, I present a video from the app bundle:
let av = AVPlayerViewController()
let url = Bundle.main.url(forResource:"ElMirage", withExtension: "mp4")!
let player = AVPlayer(url: url)
av.player = player
self.present(av, animated: true)
The AVPlayerViewController is presented fullscreen. (This is a good example of the .automatic modal presentation style in action: normally, this would resolve to .pageSheet, but for an AVPlayerViewController it is .fullScreen.) It knows that it’s being shown as a fullscreen presented view controller, so it provides fullscreen video controls, including a Done button which automatically dismisses the presented view controller. There is literally no further work for you to do.
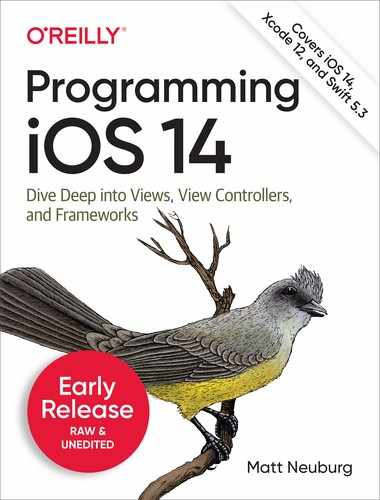
Figure 16-1 shows a fullscreen presented AVPlayerViewController. Exactly what controls you’ll see depends on the circumstances; in my case, at the top there’s the Done button (which appears as an X), the zoom button, and a volume slider, and at the bottom are transport controls including the current playhead position slider, along with the AirPlay button. The user can hide or show the controls by tapping the video.
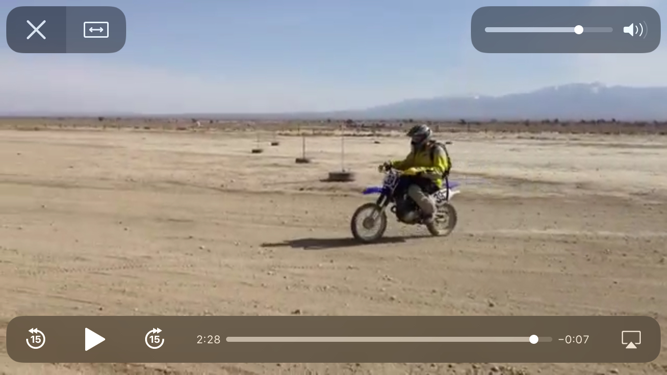
Figure 16-1. A presented AVPlayerViewController
If the AVPlayer’s file is in fact a sound file, the central region is blacked out, and the controls can’t be hidden.
Instead of a presented AVPlayerViewController, you might push the AVPlayerViewController onto a navigation controller’s stack. Again, the AVPlayerViewController behaves intelligently. The controls include a fullscreen button, which results in almost exactly the same interface shown in Figure 16-1.
There is now no Done button, because the user can tap the back button when finished with this screen.
Ensuring that the back button is visible is up to you! You might set the navigation controller’s hidesBarsWhenVerticallyCompact to false and the AVPlayerViewController’s edgesForExtendedLayout to [].
If you want the convenience and the control interface that come from using an AVPlayerViewController, while displaying its view as a subview of your own view controller’s view, make your view controller a parent view controller with the AVPlayerViewController as its child, adding the AVPlayerViewController’s view in good order (see “Container View Controllers”):
let url = Bundle.main.url(forResource:"ElMirage", withExtension:"mp4")!
let player = AVPlayer(url:url)
let av = AVPlayerViewController()
av.player = player
av.view.frame = CGRect(10,10,300,200)
self.addChild(av)
self.view.addSubview(av.view)
av.didMove(toParent:self)
Once again, the AVPlayerViewController behaves intelligently, reducing its controls to a minimum to adapt to the reduced size of its view. On my device, at the given view size, there is room for a fullscreen button, a volume button, a play button, the playhead position slider, and the AirPlay button (Figure 16-2). From here, the user can enter fullscreen mode, either by tapping the fullscreen button or by pinching outward on the video view, and now the full complement of controls is present (exactly as in Figure 16-1).
Figure 16-2. An embedded AVPlayerViewController’s view
Starting in iOS 13 (and backward compatible to iOS 12), the AVPlayerViewController’s delegate (AVPlayerViewControllerDelegate) can be notified when the user enters and exits fullscreen mode. There are two relevant delegate methods:
-
playerViewController(_:willBeginFullScreenPresentationWithAnimationCoordinator:) -
playerViewController(_:willEndFullScreenPresentationWithAnimationCoordinator:)
The user can start to enter fullscreen mode with an outward pinch without completing the gesture; to find out whether the user really entered fullscreen mode, check the transition coordinator to see whether the transition was cancelled:
func playerViewController(_ av: AVPlayerViewController,
    willBeginFullScreenPresentationWithAnimationCoordinator
    coordinator: UIViewControllerTransitionCoordinator) {
        coordinator.animate { con in
            // ...
        } completion: { con in
            if con.isCancelled {
                // ...
            } else {
                // really went fullscreen!
            }
        }
}
Other AVPlayerViewController Properties
An AVPlayerViewController has very few properties:
player-
The view controller’s AVPlayer, whose AVPlayerLayer will be hosted in the view controller’s view. You can set the
playerwhile the view is visible, to change what video it displays (though you are more likely to keep theplayerand tell it to change the video). It is legal to assign an AVQueuePlayer, an AVPlayer subclass; an AVQueuePlayer has multiple items, and the AVPlayerViewController will treat these as chapters of the video. An AVPlayerLooper object can be used in conjunction with an AVQueuePlayer to repeat play automatically. (I’ll give an AVQueuePlayer example in Chapter 17, and an AVPlayerLooper example in Chapter 18.) showsPlaybackControls-
If
false, the controls are hidden. This could be useful if you want to display a video for decorative purposes, or if you are substituting your own controls. contentOverlayView-
A UIView to which you are free to add subviews. These subviews will appear overlaid in front of the video but behind the playback controls. Starting in iOS 11, the content overlay is sized to fit its contents, or you can give it constraints to size it as you prefer.
videoGravity-
How the video should be positioned within the view. Possible values are (AVLayerVideoGravity):
-
.resizeAspect(the default) -
.resizeAspectFill -
.resize(fills the view, possibly distorting the video)
-
videoBoundsisReadyForDisplay-
Read-only. The video position within the view, and the ability of the video to display its first frame and start playing, respectively. If the video is not ready for display, we probably don’t yet know its bounds either. In any case,
isReadyForDisplaywill initially befalseand thevideoBoundswill initially be reported as.zero. This is because, with video, things take time to prepare. I’ll explain in detail later in this chapter. updatesNowPlayingInfoCenter-
If
true(the default), the AVPlayerViewController keeps the MPNowPlayingInfoCenter (Chapter 15) apprised of the movie’s duration and current playhead position. Iffalse, it doesn’t do that, leaving your code in charge of managing the MPNowPlayingInfoCenter. Starting in iOS 13, you can leave this property attrueand still govern what information appears in the remote control interface, by setting the player item’sexternalMetadata; here’s an example (without further comment):let metadata = AVMutableMetadataItem() metadata.keySpace = .common metadata.key = AVMetadataKey.commonKeyTitle as NSString metadata.value = "El Mirage" as NSString av.player?.currentItem?.externalMetadata = [metadata]
entersFullScreenWhenPlaybackBeginsexitsFullScreenWhenPlaybackEnds-
If
true, a child AVPlayerViewController’s view switches to and from fullscreen mode automatically when play begins and ends.
Everything else there is to know about an AVPlayerViewController comes from its player, an AVPlayer. I’ll discuss AVPlayer in more detail in a moment.
Picture-in-Picture
An iPad capable of running iOS 14 supports picture-in-picture video playback (unless the user turns it off in the Settings app). This means that the user can move your video into a small system window that floats in front of everything else on the screen. This floating window persists if your app is put into the background.
Your iPad app will support picture-in-picture if it supports background audio, as I described in Chapter 15: you check the checkbox in the Signing & Capabilities tab of the target editor (Figure 15-2), and your audio session’s policy must be active and must be Playback. If you want to do those things without your app being forced to support picture-in-picture, set the AVPlayerViewController’s allowsPictureInPicturePlayback to false.
If picture-in-picture is supported, an extra button appears among the upper set of playback controls (Figure 16-3). When the user taps this button, the video is moved into the system window (and the AVPlayerViewController’s view displays a placeholder). The user is now free to leave your app while continuing to see and hear the video. Moreover, if the video is being played fullscreen when the user leaves your app, the video is moved into the picture-in-picture system window automatically.

Figure 16-3. The picture-in-picture button appears
The user can move the system window to any corner. Buttons in the system window, which can be shown or hidden by tapping, allow the user to play and pause the video or to dismiss the system window. There’s also a button to dismiss the system window plus return to your app; if the user taps it while the video is playing, the video goes right on playing as it moves back into place within your app.
Various delegate methods keep you informed of when the user causes your app to enter and leave picture-in-picture mode; the most important are:
-
playerViewControllerDidStartPictureInPicture(_:) -
playerViewControllerDidStopPictureInPicture(_:)
If your AVPlayerViewController is being presented fullscreen when the video is taken into picture-in-picture mode, then the presented view controller, by default, is dismissed. If the user tries to return to your app from the system picture-in-picture window, the video has no place to return to. To handle this situation, give the AVPlayerViewController a delegate (AVPlayerViewControllerDelegate) and deal with it in a delegate method. You have two choices:
- Don’t dismiss the presented view controller
-
Implement this method:
-
playerViewControllerShouldAutomaticallyDismissAtPictureInPictureStart(_:)
Return
false. Now the presented view controller remains, and the video has a place in your app to which it can be restored. -
- Recreate the presented view controller
-
Implement this method:
-
playerViewController(_:restoreUserInterfaceForPictureInPictureStopWithCompletionHandler:)
Do what the name tells you: restore the user interface! The first parameter is your original AVPlayerViewController; all you have to do is get it back into the view controller hierarchy. At the end of the process, call the completion function.
-
I’ll demonstrate the second approach:
func playerViewController(_ pvc: AVPlayerViewController,
    restoreUserInterfaceForPictureInPictureStopWithCompletionHandler
    ch: @escaping (Bool) -> ()) {
        self.present(pvc, animated:true) {
            ch(true)
        }
}
The outward difference between the two approaches lies in what happens if the user comes back to your app while picture-in-picture is still going on:
-
With the first approach, the presented AVPlayerViewController is still there, but it’s black and empty, with a legend: “This video is playing picture in picture.” The user can then animate the video back to its place within your app.
-
With the second approach, the presented AVPlayerViewController is gone, and if the user were to present it, you’d have two copies of the video, the one still playing picture-in-picture and the one now being presented. That’s bad, so you need to prevent it from happening. In other words, while you are still in picture-in-picture mode, the second delegate method should be the only way that your app presents the AVPlayerViewController. Luckily, you know when you are in picture-in-picture mode, because the other delegate methods tell you.
Tip
Once you’ve entered picture-in-picture mode, you are effectively a background app, and you should reduce resources and activity so that playing the video is all you’re doing until picture-in-picture mode ends.
Introducing AV Foundation
The video display performed by AVPlayerViewController is supplied by classes from the AV Foundation framework. This is a big framework with a lot of classes, but there’s a good reason for that: video has a lot of structure and can be manipulated in many ways, and AV Foundation very carefully and correctly draws all the distinctions needed for good object-oriented encapsulation. I’ll just point out some of the principal classes, features, and techniques associated with video. Further AV Foundation examples will appear in Chapters 17 and 18.
Some AV Foundation Classes
The heart of AV Foundation video playback is AVPlayer. AVPlayer is not a UIView, but rather is the locus of video transport; the actual video, if shown, appears in an AVPlayerLayer associated with the AVPlayer. AVPlayerViewController provides a play button, but what if you wanted to start video playback in code? You’d talk to the AVPlayerViewController’s player — an AVPlayer. You’d tell it to play or set its rate to 1.
An AVPlayer’s video is its currentItem, an AVPlayerItem. In the examples earlier in this chapter we initialized an AVPlayer directly from a URL, with no reference to any AVPlayerItem; but that was just a shortcut. AVPlayer’s real initializer is init(playerItem:), which takes an AVPlayerItem; when we called init(url:), the AVPlayerItem was created for us.
An AVPlayerItem, too, can be initialized from a URL with init(url:), but again, this is just a shortcut. AVPlayerItem’s real initializer is init(asset:), which takes an AVAsset. An AVAsset is an actual video resource, and comes in one of two subclasses:
AVURLAsset-
An asset specified through a URL.
AVComposition-
An asset constructed by editing video in code. I’ll give an example later in this chapter.
To configure an AVPlayer using the complete “stack” of objects that constitute it, you could say something like this:
let url = Bundle.main.url(forResource:"ElMirage", withExtension:"mp4")!
let asset = AVURLAsset(url:url)
let item = AVPlayerItem(asset:asset)
let player = AVPlayer(playerItem:item)
Once an AVPlayer exists and has an AVPlayerItem, that player item’s tracks, as seen from the player’s perspective, are AVPlayerItemTrack objects, which can be individually enabled or disabled. That’s different from an AVAssetTrack, which is a fact about an AVAsset. This distinction is a good example of how AV Foundation encapsulates its objects correctly: an AVAssetTrack is a hard and fast reality, but an AVPlayerItemTrack lets a track be manipulated for purposes of playback on a particular occasion.
Things Take Time
Working with video is time-consuming. Just because you give an AVPlayer a command or set a property doesn’t mean that it obeys immediately. All sorts of operations, from reading a video file and learning its metadata to transcoding and saving a video file, take a significant amount of time. The user interface must not freeze while a video task is in progress, so AV Foundation relies heavily on threading (Chapter 25). In this way, AV Foundation covers the complex and time-consuming nature of its operations; but your code must cooperate. You’ll frequently use key–value observing and callbacks to run your code at the right moment.
Here’s an example; it’s slightly artificial, but it illustrates the principles and techniques you need to know about. There’s an elementary interface flaw when we create an embedded AVPlayerViewController:
let url = Bundle.main.url(forResource:"ElMirage", withExtension:"mp4")!
let asset = AVURLAsset(url:url)
let item = AVPlayerItem(asset:asset)
let player = AVPlayer(playerItem:item)
let av = AVPlayerViewController()
av.view.frame = CGRect(10,10,300,200)
av.player = player
self.addChild(av)
self.view.addSubview(av.view)
av.didMove(toParent: self)
There are two issues here:
-
The AVPlayerViewController’s view is initially appearing empty in the interface, because the video is not yet ready for display. Then there’s a visible flash when the video appears, because now it is ready for display.
-
The proposed frame of the AVPlayerViewController’s view doesn’t fit the actual aspect ratio of the video, which results in the video being letterboxed within that frame (visible in Figure 16-2).
Fixing those issues requires us to grapple with the fact that it takes time to learn when the video is ready for display and what its aspect ratio is.
Key–value observing a property
To prevent the flash, we can start out with the AVPlayerViewController’s view hidden, and not show it until isReadyForDisplay is true. But how will we know when that is? Not by repeatedly polling the isReadyForDisplay property! That sort of behavior is absolutely wrong. Rather, we should use KVO to register as an observer of this property. Sooner or later, isReadyForDisplay will become true, and we’ll be notified. Now we can unregister from KVO and show the AVPlayerViewController’s view:
av.view.isHidden = true
var ob : NSKeyValueObservation!
ob = av.observe(.isReadyForDisplay, options: [.initial, .new]) { vc, ch in
    guard let ok = ch.newValue, ok else {return}
    self.obs.remove(ob)
    DispatchQueue.main.async {
        vc.view.isHidden = false
    }
}
self.obs.insert(ob) // obs is a Set<NSKeyValueObservation>
Note that, in that code, I make no assumptions about what thread KVO calls me back on: I intend to operate on the interface, so I step out to the main thread.
Asynchronous property loading
Next, let’s talk about setting the AVPlayerViewController’s view.frame in accordance with the video’s aspect ratio. An AVAsset has tracks (AVAssetTrack); in particular, an AVAsset representing a video has a video track. A video track has a naturalSize, which will give me the aspect ratio I need. But we cannot access these properties immediately. For the sake of efficiency, these and many other AV Foundation object properties don’t even have a value unless we specifically request that they be evaluated — and when we do, it takes time to fulfill our request.
AV Foundation objects that behave this way conform to the AVAsynchronousKeyValueLoading protocol. You call loadValuesAsynchronously(forKeys:completionHandler:) ahead of time, for any properties you’re going to be interested in. When your completion function is called, you check the status of a key and, if its status is .loaded, you are now free to access the property.
To obtain the video’s aspect ratio, I’m going to need to do that twice — first for the AVAsset’s tracks property, in order to get the video track, and then for the video track’s naturalSize property, in order to get the aspect ratio. Let’s go all the way back to the beginning. I’ll start by creating the AVAsset and then stop, waiting to hear in the completion function that the AVAsset’s tracks property is ready:
let url = Bundle.main.url(forResource:"ElMirage", withExtension:"mp4")!
let asset = AVURLAsset(url:url)
let track = #keyPath(AVURLAsset.tracks)
asset.loadValuesAsynchronously(forKeys:[track]) {
    let status = asset.statusOfValue(forKey:track, error: nil)
    if status == .loaded {
        DispatchQueue.main.async {
            self.getVideoTrack(asset)
        }
    }
}
When the tracks property is ready, my completion function is called, and I call my getVideoTrack method. Here, I obtain the video track and then stop once again, waiting to hear in the completion function that the video track’s naturalSize property is ready:
func getVideoTrack(_ asset:AVAsset) {
    let visual = AVMediaCharacteristic.visual
    let vtrack = asset.tracks(withMediaCharacteristic: visual)[0]
    let size = #keyPath(AVAssetTrack.naturalSize)
    vtrack.loadValuesAsynchronously(forKeys: [size]) {
        let status = vtrack.statusOfValue(forKey: size, error: nil)
        if status == .loaded {
            DispatchQueue.main.async {
                self.getNaturalSize(vtrack, asset)
            }
        }
    }
}
When the video track’s naturalSize property is ready, my completion function is called, and I call my getNaturalSize method. Here, at long last, I get the natural size and use it to finish constructing the AVPlayer and to set AVPlayerController’s frame:
func getNaturalSize(_ vtrack:AVAssetTrack, _ asset:AVAsset) {
    let sz = vtrack.naturalSize
    let item = AVPlayerItem(asset:asset)
    let player = AVPlayer(playerItem:item)
    let av = AVPlayerViewController()
    av.view.frame = AVMakeRect(
        aspectRatio: sz, insideRect: CGRect(10,10,300,200))
    av.player = player
    // ... and the rest is as before ...
}
AVPlayerItem provides another way of loading an asset’s properties: initialize it with init(asset:automaticallyLoadedAssetKeys:) and then observe its status using KVO. When that status is .readyToPlay, you are guaranteed that the player item’s asset has attempted to load those keys, and you can query them just as you would in loadValuesAsynchronously.
Tip
Apple recommends that, as a matter of best practice, you should always use KVO to observe the player item’s status. The reason is that if that status changes to .failed, you’re going to want to know about it. Fetch the player item’s error property to find out more. For possible errors, consult the AVError documentation. If the error is .mediaServicesWereReset, the media services daemon is hosed (similar to AVAudioSession.mediaServicesWereResetNotification in Chapter 15), and you should recreate your AVFoundation objects from scratch.
Remote assets
An AVURLAsset’s URL doesn’t have to be a local file URL; it can point to a resource located across the internet. Now things really take time: the asset has to arrive by way of the network, which may be slow, interrupted, or missing in action. There’s a buffer, and if it isn’t sufficiently full of your AVAsset’s data, playback will stutter or stop.
Before iOS 10, you had to use your AVPlayer’s AVPlayerItem as the locus of information about the arrival and playback of your AVAsset from across the network, keeping track of properties such as playbackLikelyToKeepUp and the accessLog, along with notifications such as AVPlayerItemPlaybackStalled, to keep abreast of any issues, pausing and resuming to optimize the user experience.
Starting in iOS 10, Apple made this entire procedure much easier: just tell the AVPlayer to play and stand back! Play won’t start until the buffer has filled to the point where the whole video can play without stalling, and if it does stall, it will resume automatically. To learn what’s happening, check the AVPlayer’s timeControlStatus; if it is .waitingToPlayAtSpecifiedRate and you want to know why, check the AVPlayer’s reasonForWaitingToPlay. To learn the actual current play rate,
call CMTimebaseGetRate with
the AVPlayerItem’s timebase.
Time Is Measured Oddly
Another peculiarity of AV Foundation is that time is measured in an unfamiliar way. This is necessary because calculations using an ordinary built-in numeric class such as CGFloat will always have slight rounding errors that quickly begin to matter when you’re trying to specify a time within a large piece of media. Therefore, the Core Media framework provides the CMTime class, which under the hood is a pair of integers; they are called the value and the timescale, but they are simply the numerator and denominator of a rational number.
When you call the CMTime initializer init(value:timescale:) (equivalent to C CMTimeMake), that’s what you’re providing. The denominator represents the degree of granularity; a typical value is 600, sufficient to specify individual frames in common video formats.
In the convenience initializer init(seconds:preferredTimescale:) (equivalent to C CMTimeMakeWithSeconds), the two arguments are not the numerator and denominator; they are the time’s equivalent in seconds and the denominator. For instance, CMTime(seconds:2.5, preferredTimescale:600) yields the CMTime (1500,600).
Constructing Media
AV Foundation allows you to construct your own media asset in code as an AVComposition, an AVAsset subclass, using its subclass, AVMutableComposition. An AVComposition is an AVAsset, so given an AVMutableComposition, we could make an AVPlayerItem from it (by calling init(asset:)) and hand it over to an AVPlayerViewController’s player; we will be creating and displaying our own movie!
Cutting and pasting
In this example, I start with an AVAsset (asset1, a video file) and assemble its first 5 seconds of video and its last 5 seconds of video into an AVMutableComposition (comp):
let type = AVMediaType.video
let arr = asset1.tracks(withMediaType: type)
let track = arr.last!
let duration : CMTime = track.timeRange.duration
let comp = AVMutableComposition()
let comptrack = comp.addMutableTrack(withMediaType: type,
    preferredTrackID: Int32(kCMPersistentTrackID_Invalid))!
try! comptrack.insertTimeRange(CMTimeRange(
    start: CMTime(seconds:0, preferredTimescale:600),
    duration: CMTime(seconds:5, preferredTimescale:600)),
    of:track, at:CMTime(seconds:0, preferredTimescale:600))
try! comptrack.insertTimeRange(CMTimeRange(
    start: duration - CMTime(seconds:5, preferredTimescale:600),
    duration: CMTime(seconds:5, preferredTimescale:600)),
    of:track, at:CMTime(seconds:5, preferredTimescale:600))
This works perfectly. But we are not very good video editors, as we have forgotten the corresponding soundtrack from asset1. Let’s go back and get it and add it to our AVMutableComposition (comp):
let type2 = AVMediaType.audio
let arr2 = asset1.tracks(withMediaType: type2)
let track2 = arr2.last!
let comptrack2 = comp.addMutableTrack(withMediaType: type2,
    preferredTrackID:Int32(kCMPersistentTrackID_Invalid))!
try! comptrack2.insertTimeRange(CMTimeRange(
    start: CMTime(seconds:0, preferredTimescale:600),
    duration: CMTime(seconds:5, preferredTimescale:600)),
    of:track2, at:CMTime(seconds:0, preferredTimescale:600))
try! comptrack2.insertTimeRange(CMTimeRange(
    start: duration - CMTime(seconds:5, preferredTimescale:600),
    duration: CMTime(seconds:5, preferredTimescale:600)),
    of:track2, at:CMTime(seconds:5, preferredTimescale:600))
To display our edited movie in an AVPlayerViewController, we would talk to its player, replacing its player item with a new player item made from our AVMutableComposition:
let item = AVPlayerItem(asset:comp)
let p = vc.player! // vc is an AVPlayerViewController
p.replaceCurrentItem(with: item)
Adding tracks
We can use the same technique to overlay another audio track from another asset; this might be, let’s say, some additional narration taken from a sound file (comp is the AVMutableComposition from the previous example):
let type3 = AVMediaType.audio
let s = Bundle.main.url(forResource:"aboutTiagol", withExtension:"m4a")!
let asset2 = AVURLAsset(url:s)
let arr3 = asset2.tracks(withMediaType: type3)
let track3 = arr3.last!
let comptrack3 = comp.addMutableTrack(withMediaType: type3,
    preferredTrackID:Int32(kCMPersistentTrackID_Invalid))!
try! comptrack3.insertTimeRange(CMTimeRange(
    start: CMTime(seconds:0, preferredTimescale:600),
    duration: CMTime(seconds:10, preferredTimescale:600)),
    of:track3, at:CMTime(seconds:0, preferredTimescale:600))
Transitions
You can apply audio volume changes, and video opacity and transform changes, to the playback of individual tracks. I’ll continue from the previous example, applying a fadeout to the second half of the narration track (comptrack3) by creating an AVAudioMix:
let params = AVMutableAudioMixInputParameters(track:comptrack3)
params.setVolume(1, at:CMTime(seconds:0, preferredTimescale:600))
params.setVolumeRamp(fromStartVolume: 1, toEndVolume:0,
    timeRange:CMTimeRange(
        start: CMTime(seconds:5, preferredTimescale:600),
        duration: CMTime(seconds:5, preferredTimescale:600)))
let mix = AVMutableAudioMix()
mix.inputParameters = [params]
The audio mix must be applied to a playback milieu, such as an AVPlayerItem. So when we make an AVPlayerItem out of our AVComposition, we can set its audioMix property to our AVAudioMix:
let item = AVPlayerItem(asset:comp)
item.audioMix = mix
Filters
You can add a CIFilter (Chapter 2) to be applied to your video. In this example, I’ll apply a sepia filter to my entire edited video (comp from the previous examples):
let vidcomp = AVVideoComposition(asset: comp) { req in
    // req is an AVAsynchronousCIImageFilteringRequest
    let f = "CISepiaTone"
    let im = req.sourceImage.applyingFilter(
        f, parameters: ["inputIntensity":0.95])
    req.finish(with: im, context: nil)
}
Like an AVAudioMix, an AVVideoComposition must be applied to a playback milieu:
let item = AVPlayerItem(asset:comp)
item.videoComposition = vidcomp
You can also use an AVVideoComposition to dictate how video tracks are to be composited.
Synchronizing animation with video
An intriguing feature of AV Foundation is AVSynchronizedLayer, a CALayer subclass that effectively crosses the bridge between video time (the CMTime within the progress of a movie) and Core Animation time (the time within the progress of an animation). This means that you can coordinate animation in your interface (Chapter 4) with the playback of a movie! You attach an animation to a layer in more or less the usual way, but the animation takes place in movie playback time: if the movie is stopped, the animation is stopped; if the movie is run at double rate, the animation runs at double rate; and the current “frame” of the animation always corresponds to the current frame of the video within its overall duration.
The synchronization is performed with respect to an AVPlayer’s AVPlayerItem. To demonstrate, I’ll draw a long thin gray rectangle containing a little black square; the horizontal position of the black square within the gray rectangle will be synchronized to the movie playhead position:
let vc = self.children[0] as! AVPlayerViewController
let p = vc.player!
// create synch layer, put it in the interface
let item = p.currentItem!
let syncLayer = AVSynchronizedLayer(playerItem:item)
syncLayer.frame = CGRect(10,220,300,10)
syncLayer.backgroundColor = UIColor.lightGray.cgColor
self.view.layer.addSublayer(syncLayer)
// give synch layer a sublayer
let subLayer = CALayer()
subLayer.backgroundColor = UIColor.black.cgColor
subLayer.frame = CGRect(0,0,10,10)
syncLayer.addSublayer(subLayer)
// animate the sublayer
let anim = CABasicAnimation(keyPath:#keyPath(CALayer.position))
anim.fromValue = subLayer.position
anim.toValue = CGPoint(295,5)
anim.isRemovedOnCompletion = false
anim.beginTime = AVCoreAnimationBeginTimeAtZero // important trick
anim.duration = item.asset.duration.seconds
subLayer.add(anim, forKey:nil)

Figure 16-4. The black square’s position is synchronized to the movie
The result is shown in Figure 16-4. The long gray rectangle is the AVSynchronizedLayer, tied to our movie. The little black square inside it is its sublayer; when we animate the black square, that animation will be synchronized to the movie, changing its position from the left end of the gray rectangle to the right end, starting at the beginning of the movie and with the same duration as the movie. Although we attach this animation to the black square layer in the usual way, that animation is frozen: the black square doesn’t move until we start the movie playing. Moreover, if we pause the movie, the black square stops. The black square is automatically representing the current play position within the movie. This may seem a silly example, but if you were to suppress the video controls it could prove downright useful.
Adding layers to video
Instead of adding a CALayer to the interface, you can render a CALayer into the video itself. In effect, you treat the video itself as a layer, combine it with other layers however you like, and then package everything into a new video.
Suppose, for instance, that we want to add a caption, title, or other text to our video. If the video itself is a layer, the text is obviously a CATextLayer in front of it. I’ll describe the procedure backward, starting with some boilerplate.
To render layers into a video, you have to export the video to a file on disk. That requires an AVExportSession. To demonstrate, I’ll export comp, the AVMutableComposition from the earlier examples, and load the exported video into our AVPlayerViewController:
let pre = AVAssetExportPresetHighestQuality
guard let exporter = AVAssetExportSession(asset:comp, presetName:pre) else {
    print("oops")
    return
}
// create a URL to export to
let fm = FileManager.default
var url = fm.temporaryDirectory
let uuid = UUID().uuidString
url.appendPathComponent(uuid + ".mov")
exporter.outputURL = url
exporter.outputFileType = AVFileType.mov
// warning: this can take a long time!
exporter.exportAsynchronously() {
    DispatchQueue.main.async {
        let item = AVPlayerItem(url: url)
        let p = vc.player! // vc is an AVPlayerViewController
        p.replaceCurrentItem(with:item)
    }
}
(In real life, you’d probably want to put up some kind of interface to cover the fact that exporting can take a significant amount of time.) The result of that code isn’t very interesting, because we didn’t make any change to our video. To make a change — in particular, to render the video as a layer along with other layers — we need to attach an AVVideoComposition to the exporter:
exporter.videoComposition = vidcomp
Very well, but what’s vidcomp? I’ll continue with some more boilerplate. First, we construct our layer architecture. At a minimum, you need two layers — a parent layer with the video layer as its sublayer:
let vidtrack = comp.tracks(withMediaType: .video)[0]
let sz = vidtrack.naturalSize
let parent = CALayer()
parent.frame = CGRect(origin: .zero, size: sz)
let child = CALayer()
child.frame = parent.bounds
parent.addSublayer(child)
Next, we package up that layer architecture into an animation tool, and attach it to an AVVideoComposition. There’s a lot of boilerplate here, but if you don’t perform this complete dance, you can crash at runtime or end up with a black video:
let tool = AVVideoCompositionCoreAnimationTool(
    postProcessingAsVideoLayer: child, in: parent)
let vidcomp = AVMutableVideoComposition()
vidcomp.animationTool = tool
vidcomp.renderSize = sz
vidcomp.frameDuration = CMTime(value: 1, timescale: 30)
let inst = AVMutableVideoCompositionInstruction()
let dur = comp.duration
inst.timeRange = CMTimeRange(start: .zero, duration: dur)
let layinst = AVMutableVideoCompositionLayerInstruction(assetTrack: vidtrack)
inst.layerInstructions = [layinst]
vidcomp.instructions = [inst]
If we now attach vidcomp to exporter as we export comp, we still end up with a video that looks like comp itself. But that’s not bad; it’s good! Our boilerplate is working, and now at long last we are ready to introduce more layers into the architecture. Let’s go back and add our text layer:
let lay = CATextLayer()
lay.string = "This is cool!"
lay.alignmentMode = .center
lay.foregroundColor = UIColor.black.cgColor
lay.frame = child.bounds
child.addSublayer(lay)
// ... and the rest is as before ...
The exported version of comp now displays the words “This is cool!” superimposed in front of it.
We’ve accomplished our original goal, but let’s go further. These are CALayers. That means we can animate them! To demonstrate, I’ll cause our text to fade in slowly, starting one second after the start of the video. To do so, I simply add an opacity animation to the text layer (lay). As with a synchronized layer, it is crucial to coordinate our timing by starting at AVCoreAnimationBeginTimeAtZero:
let ba = CABasicAnimation(keyPath: #keyPath(CALayer.opacity))
ba.duration = 1
ba.fromValue = 0
ba.toValue = 1
ba.beginTime = AVCoreAnimationBeginTimeAtZero + 1 // crucial
ba.fillMode = .backwards
lay.add(ba, forKey: nil)
All of that is extremely cool, but keep in mind that exporting video can take quite a bit of time. You might want to give the user something to look at while waiting. An AVAssetExportSession has a progress property for this very purpose; it vends a Progress object (see “The Progress Class”).
AVPlayerLayer
An AVPlayer is not an interface object. The corresponding interface object — an AVPlayer made visible, as it were — is an AVPlayerLayer (a CALayer subclass). It has no controls for letting the user play and pause a movie and visualize its progress; it just shows the movie, acting as a bridge between the AV Foundation world of media and the CALayer world of things the user can see.
An AVPlayerViewController’s view hosts an AVPlayerLayer for you automatically; otherwise you would not see any video in the AVPlayerViewController’s view. But there may be situations where you find AVPlayerViewController too heavyweight, where you don’t need the standard transport controls, where you don’t want the video to be expandable or to have a fullscreen mode — you just want the simple direct power that can be obtained only by putting an AVPlayerLayer into the interface yourself.
Here, I’ll display the same movie as before, but without an AVPlayerViewController:
let m = Bundle.main.url(forResource:"ElMirage", withExtension:"mp4")!
let asset = AVURLAsset(url:m)
let item = AVPlayerItem(asset:asset)
let p = AVPlayer(playerItem:item)
self.player = p // might need a reference later
let lay = AVPlayerLayer(player:p)
lay.frame = CGRect(10,10,300,200)
self.playerLayer = lay // might need a reference later
self.view.layer.addSublayer(lay)
As before, if we want to prevent a flash when the video becomes ready for display, we can postpone adding the AVPlayerLayer to our interface until its isReadyForDisplay property becomes true — which we can learn through KVO.
In a WWDC 2016 video, Apple suggests an interesting twist on the preceding code: create the AVPlayer without an AVPlayerItem, create the AVPlayerLayer, and then assign the AVPlayerItem to AVPlayer, like this:
let m = Bundle.main.url(forResource:"ElMirage", withExtension:"mp4")!
let asset = AVURLAsset(url:m)
let item = AVPlayerItem(asset:asset)
let p = AVPlayer() // *
self.player = p
let lay = AVPlayerLayer(player:p)
lay.frame = CGRect(10,10,300,200)
self.playerLayer = lay
p.replaceCurrentItem(with: item) // *
self.view.layer.addSublayer(lay)
Apparently, there is some increase in efficiency if you do things in that order. The reason, it turns out, is that when an AVPlayerItem is assigned to an AVPlayer that doesn’t have an associated AVPlayerLayer, the AVPlayer assumes that only the audio track of the AVAsset is important — and then, when an AVPlayerLayer is assigned to it, the AVPlayer must scramble to pick up the video track as well.
The movie is now visible in the interface, but it isn’t doing anything. We haven’t told our AVPlayer to play, and there are no transport controls, so the user can’t tell the video to play either. That’s why I kept a reference to the AVPlayer in a property! We can start play either by calling play or by setting the AVPlayer’s rate. Here, I imagine that we’ve provided a simple play/pause button that toggles the playing status of the movie by changing its rate:
@IBAction func doButton (_ sender: Any) {
    let rate = self.player.rate
    self.player.rate = rate < 0.01 ? 1 : 0
}
Without trying to replicate the full transport controls, we might also like to give the user a way to jump the playhead back to the start of the movie. The playhead position is a feature of an AVPlayerItem:
@IBAction func restart (_ sender: Any) {
    let item = self.player.currentItem!
    let time: CMTime = CMTime(seconds:0, preferredTimescale:600)
    item.seek(to:time, completionHandler:nil)
}
If we want our AVPlayerLayer to support picture-in-picture, then (in addition to making the app itself support picture-in-picture, as I’ve already described) we need to call upon AVKit to supply us with an AVPictureInPictureController. This is not a view controller; it merely endows our AVPlayerLayer with picture-in-picture behavior. You create the AVPictureInPictureController (checking first to see whether the environment supports picture-in-picture in the first place), initialize it with the AVPlayerLayer, and retain it:
if AVPictureInPictureController.isPictureInPictureSupported() {
    let pic = AVPictureInPictureController(playerLayer: self.playerLayer)
    self.pic = pic
}
There are no transport controls, so there is no picture-in-picture button. Supplying one is up to you. Don’t show the button if picture-in-picture isn’t supported! When the button is tapped, tell the AVPictureInPictureController to startPictureInPicture:
@IBAction func doPicInPic(_ sender: Any) {
    if self.pic.isPictureInPicturePossible {
        self.pic.startPictureInPicture()
    }
}
You might also want to set yourself as the AVPictureInPictureController’s delegate (AVPictureInPictureControllerDelegate). As with the AVPlayerViewController delegate, you are informed of stages in the life of the picture-in-picture window so that you can adjust your interface accordingly. When the user taps the button that dismisses the system window and returns to your app, then if the AVPlayerLayer is still sitting in your interface, there may be no work to do. If you removed the AVPlayerLayer from your interface, and you now want to restore it, implement this delegate method:
-
pictureInPictureController(_:restoreUserInterfaceForPictureInPictureStopWithCompletionHandler:)
In your implementation, configure your interface so that the AVPlayerLayer is present. Make sure that the AVPlayerLayer that you now put into your interface is the same one that was removed earlier; in other words, your player layer must continue to be the same as the AVPictureInPictureController’s playerLayer.
Further Exploration of AV Foundation
Here are some other things you can do with AV Foundation:
-
Extract single images (sometimes referred to as thumbnails or poster images) from a movie (AVAssetImageGenerator). Displaying a poster image of a video’s initial frame can help cover up for the delay before the video is ready to start playing.
-
Export a movie in a different format (AVAssetExportSession), or read/write raw uncompressed data through a buffer to or from a track (AVAssetReader, AVAssetReaderOutput, AVAssetWriter, AVAssetWriterInput, and so on).
-
Capture audio, video, and stills through the device’s hardware (AVCaptureSession and so on). I’ll say more about that in Chapter 18.
-
Tap into video and audio being captured or played, including capturing video frames as still images (AVPlayerItemVideoOutput, AVCaptureVideoDataOutput, and so on; and see Apple’s Technical Q&A QA1702).
The media capabilities of AV Foundation are nicely summarized in a classic WWDC video, https://developer.apple.com/videos/play/wwdc2011/415/.
UIVideoEditorController
UIVideoEditorController is a view controller that presents an interface where the user can trim video. Its view and internal behavior are outside your control, and you’re not supposed to subclass it. You are expected to treat the view controller as a presented view controller on the iPhone or as a popover on the iPad, and respond by way of its delegate.
Warning
UIVideoEditorController is one of the creakiest pieces of interface in iOS. It dates back to iOS 3.1, and hasn’t been revised since its inception — and it looks like it. It has never worked properly on the iPad, and still doesn’t. I’m not going to dwell on its bugginess or we’d be here all day.
Before summoning a UIVideoEditorController, be sure to call its class method canEditVideo(atPath:). (This call can take some noticeable time to return.) If it returns false, don’t instantiate UIVideoEditorController to edit the given file. Not every video format is editable, and not every device supports video editing. You must also set the UIVideoEditorController instance’s delegate and videoPath before presenting it; the delegate should adopt both UINavigationControllerDelegate and UIVideoEditorControllerDelegate. You must manually set the video editor controller’s modalPresentationStyle to .popover on the iPad (a good instance of the creakiness I was just referring to):
let path = Bundle.main.path(forResource:"ElMirage", ofType: "mp4")!
let can = UIVideoEditorController.canEditVideo(atPath:path)
if !can {
    print("can't edit this video")
    return
}
let vc = UIVideoEditorController()
vc.delegate = self
vc.videoPath = path
if UIDevice.current.userInterfaceIdiom == .pad {
    vc.modalPresentationStyle = .popover
}
self.present(vc, animated: true)
if let pop = vc.popoverPresentationController {
    let v = sender as! UIView
    pop.sourceView = v
    pop.sourceRect = v.bounds
    pop.delegate = self
}
The view’s interface (on the iPhone) contains Cancel and Save buttons, a trimming box displaying thumbnails from the movie, a play/pause button, and the movie itself. The user slides the ends of the trimming box to set the beginning and end of the saved movie. The Cancel and Save buttons do not dismiss the presented view; you must do that in your implementation of the delegate methods. There are three of them, and you should implement all three and dismiss the presented view in all of them:
-
videoEditorController(_:didSaveEditedVideoToPath:) -
videoEditorControllerDidCancel(_:) -
videoEditorController(_:didFailWithError:)
Implementing the second two delegate methods is straightforward:
func videoEditorControllerDidCancel(_ editor: UIVideoEditorController) {
    self.dismiss(animated:true)
}
func videoEditorController(_ editor: UIVideoEditorController,
    didFailWithError error: Error) {
        self.dismiss(animated:true)
}
Saving the trimmed video is more involved. Like everything else about a movie, it takes time. When the user taps Save, there’s a progress view while the video is trimmed and compressed. The trimmed video has already been saved to a file in your app’s temporary directory by the time the delegate method videoEditorController(_:didSaveEditedVideoToPath:) is called.
Warning
videoEditorController(_:didSaveEditedVideoToPath:) is actually called twice in quick succession. That’s more of its creaky bugginess.
Doing something useful with the saved file at this point is up to you; if you merely leave it in the temporary directory, you can’t rely on it to persist. In this example, I copy the edited movie into the Camera Roll album of the user’s photo library, by calling UISaveVideoAtPathToSavedPhotosAlbum. For this to work, our app’s Info.plist must have a meaningful “Privacy — Photo Library Additions Usage Description” entry (NSPhotoLibraryAddUsageDescription) so that the runtime can ask for the user’s permission on our behalf:
func videoEditorController(_ editor: UIVideoEditorController,
    didSaveEditedVideoToPath path: String) {
        self.dismiss(animated:true)
        if UIVideoAtPathIsCompatibleWithSavedPhotosAlbum(path) {
            UISaveVideoAtPathToSavedPhotosAlbum(path, self,
                #selector(savedVideo), nil)
        } else {
            // can't save to photo album, try something else
        }
}
The function reference #selector(savedVideo) in that code refers to a callback method that must take three parameters: a String (the path), an Optional wrapping an Error, and an UnsafeMutableRawPointer. It’s important to check for errors, because things can still go wrong. In particular, the user could deny us access to the photo library (see Chapter 18 for more about that). If that’s the case, we’ll get an Error whose domain is ALAssetsLibraryErrorDomain:
@objc func savedVideo(at path: String,
    withError error: Error?,
    ci: UnsafeMutableRawPointer) {
        if let error = error {
            print("error: (error)")
        }
}