3
Python Basics
The time has come to start creating some of our own programs for the Raspberry Pi. The language we are going to use is called Python. It has the great benefit that it is easy to learn while at the same time being powerful enough to create some interesting programs, including some simple games and programs that use graphics.
As with most things in life, it is necessary to learn to walk before you can run, and so we will begin with the basics of the Python language.
Okay, so a programming language is a language for writing computer programs in. But why do we have to use a special language anyway? Why couldn’t we just use a human language? How does the computer use the things that we write in this language?
The reason why we don’t use English or some other human language is that human languages are vague and ambiguous. Computer languages use English words and symbols, but in a very structured way.
Mu
The best way to learn a new language is to begin using it right away. So let’s start up the program we are going to use to help us write Python. This program is called Mu, and you will find it in the Programming section of the Menu. You can see that Mu is asking us what we are going to be using Mu for. Select the option Python 3. Figure 3-1 shows what you will see when you first start Mu.
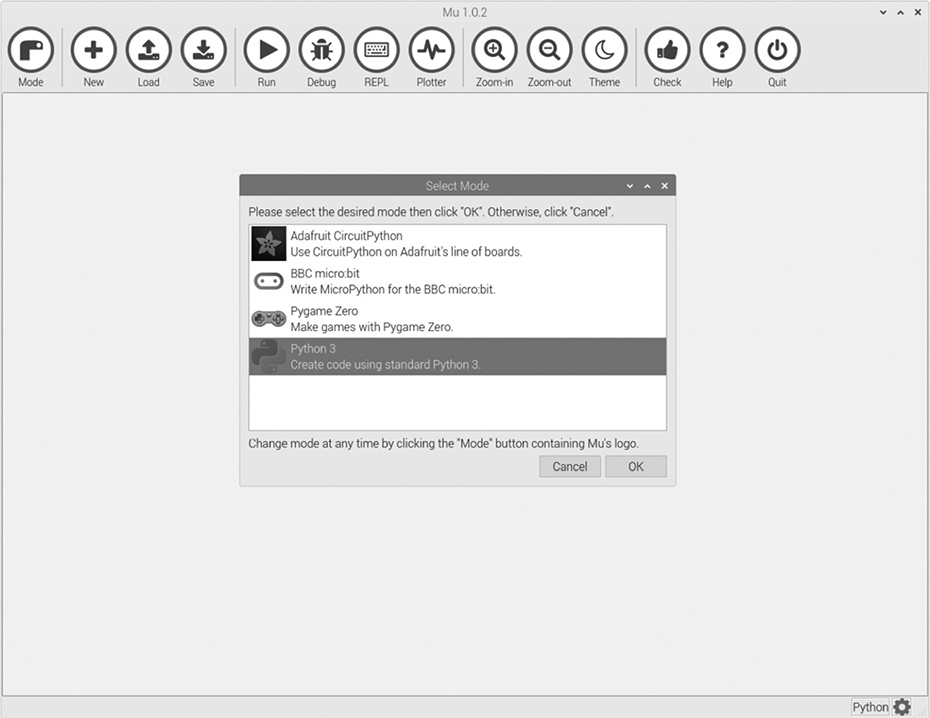
Figure 3-1 Starting Mu for the first time.
Python Versions
Python 3 was a major change over Python 2. This book is based on Python 3, but as you get further into Python you may find that some of the modules you want to use are not available for Python 3 and you need to revert to Python 2.
Python Shell
While you are learning Python, it’s very helpful to be able to interactively type in Python commands to see what they do. To try this out, click on the REPL icon at the top of the Mu window and the window will split (Figure 3-2), opening up an area at the bottom of the screen where you can type commands. This area is called the REPL for Read-Evaluate-Print-Loop.
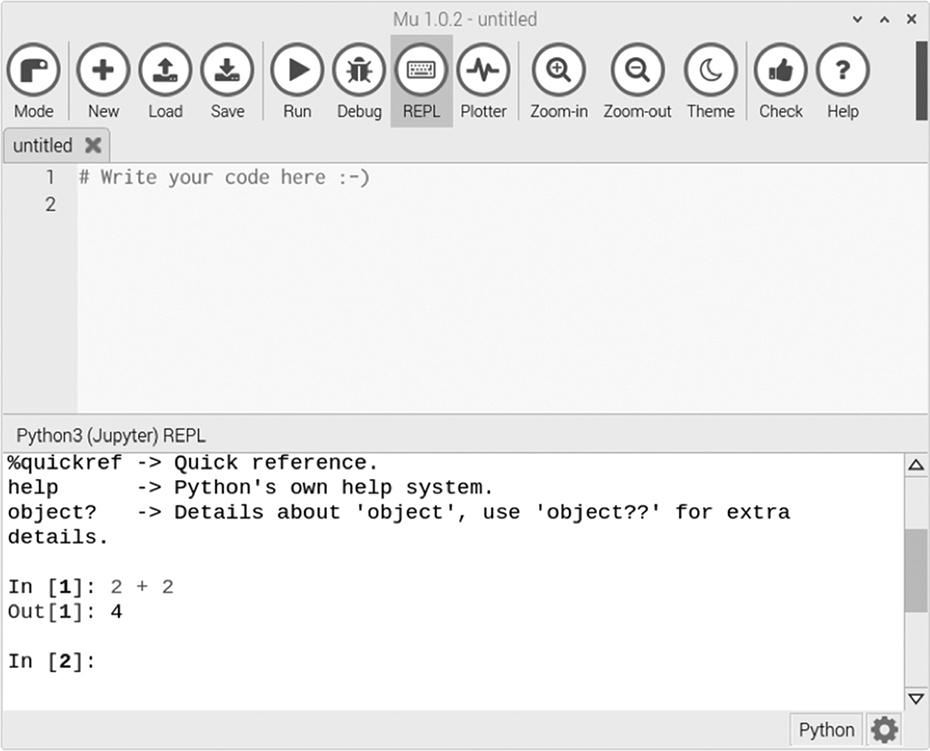
Figure 3-2 Arithmetic in the REPL.
Rather like at the Linux command prompt, you can type in commands after the prompt (in this case, IN [1]) and the Python console will show you what it has done on the line below.
Arithmetic is something that comes naturally to all programming languages, and Python is no exception. Therefore, type 2 + 2 after the prompt in the Python Shell and you should see the result (4) on the line below, as shown in Figure 3-2.
Editor
The REPL is a great place to experiment, but it is not the right place to write a program. Python programs are kept in files so that you do not have to retype them. A file may contain a long list of programming language commands, and when you want to run all the commands, what you actually do is run the file.
The menu bar at the top of Mu allows us to create a new file, but we don’t need to use that because Mu has thoughtfully provided us with a new file ready to use. Note that at the moment there is some text in the file editor area that says: ‘# Write your code here :-)’. This is just a reminder for us as to where the code should go. You can delete this text now.
Click on the REPL icon again to close the REPL area of the window and then type the following two lines of code into the Mu editor window (Figure 3-3):
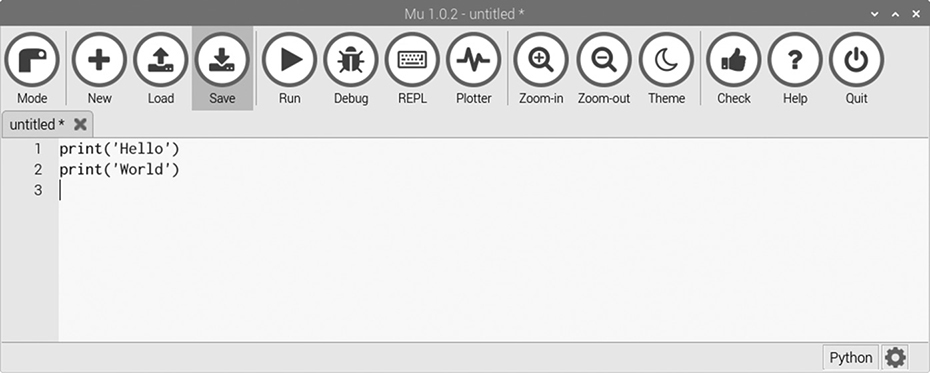
Figure 3-3 The Mu editor.
![]()
You will notice that the editor does not have the In [1] prompt. This is because what we write here will not be executed immediately; instead, it will just be stored in a file until we decide to run it. If you wanted, you could use nano or some other text editor to write the file, but the Mu editor integrates nicely with Python. It also has some knowledge of the Python language and can thus serve as a memory aid when you are typing out programs.
The first time we run Mu, it will create a directory for us called ‘mu_code’ in our home directory. This is where we are going to keep the Python programs that we write. So, click on the Save icon in Mu. This will open a dialog (Figure 3-4) so that you can give your program a name (hello.py) and choose a location to save it. Type hello.py in the File name field and then click Save.

Figure 3-4 Saving the hello.py program.
Now that we have saved it, we can run the program and see what it does, click on the Run button. The results will appear at the bottom of the window (Figure 3-5). It is no great surprise that the program prints the two words Hello and World, each on its own line.
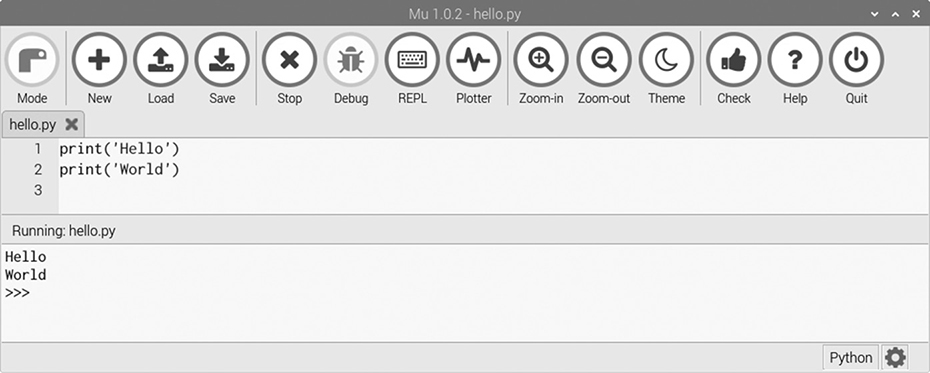
Figure 3-5 Running the program.
What you type in the REPL does not get saved anywhere; therefore, if you exit Mu and then start it up again, anything you typed in the REPL will be lost. However, because we saved our editor file (hello.py), we can load it at any time by clicking on the Load button.
As you can see in Figure 3-5, after the two lines of hello world message have been printed, a prompt of >>> is shown. This is called the Python Shell and is just another version of the REPL. So, here you can type Python commands like the line ‘2 + 2’ that we tried earlier.
NOTE To save this book from becoming a series of screen dumps, from now on if I want you to type something in the REPL or Python Shell, I will precede it with >>>. The results will then appear on the lines below it.
Numbers
Numbers are fundamental to programming, and arithmetic is one of the things computers are very good at. We will begin by experimenting with numbers, and the best place to experiment is the Python Shell.
Type the following into the Python Shell:
![]()
This isn’t really advancing much beyond the 2 + 2 example we tried before. However, this example does tell us a few things:
![]() * means multiply.
* means multiply.
![]() / means divide.
/ means divide.
![]() Python does multiplication before division, and it does division before addition.
Python does multiplication before division, and it does division before addition.
If you wanted to, you could add some parentheses to guarantee that everything happens in the right order, like this:
![]()
The numbers you have there are all whole numbers (or integers as they are called by programmers). We can also use a decimal point if we want to use such numbers. In programming, these kinds of numbers are called floats, which is short for floating point.
Variables
Sticking with the numbers theme for a moment, let’s investigate variables. You can think of a variable as something that has a value. It is a bit like using letters as stand-ins for numbers in algebra. To begin, try entering the following:
>>> k = 9.0 / 5.0
The equals sign assigns a value to a variable. The variable must be on the left side and must be a single word (no spaces); however, it can be as long as you like and can contain numbers and the underscore character (_). Also, characters can be upper- and lowercase. Those are the rules for naming variables; however, there are also conventions. The difference is that if you break the rules, Python will complain, whereas if you break the conventions, other programmers may snort derisively and raise their eyebrows.
The conventions for variables are that they should start with a lowercase letter and should use an underscore between what in English would be words (for instance, number_of_chickens). The examples in Table 3-1 give you some idea of what is legal and what is conventional.
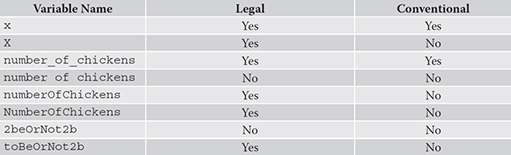
Table 3-1 Naming Variables
Many other languages use a different convention for variable names called bumpy-case or camel-case, where the words are separated by making the start of each word (except the first one) uppercase (for example, numberOfChickens). You will sometimes see this in Python example code. Ultimately, if the code is just for your own use, then how the variable is written does not really matter, but if your code is going to be read by others, it’s a good idea to stick to the conventions.
By sticking to the naming conventions, it’s easy for other Python programmers to understand your program.
If you do something Python doesn’t like or understand, you will get an error message. Try entering the following:
![]()
This is an error because you are trying to define a variable that starts with a digit, which is not allowed.
A little while ago, we assigned a value to the variable k. We can see what value it has by just entering k, like so:
![]()
Python has remembered the value of k, so we can now use it in other expressions. Going back to our original expression, we could enter the following:
![]()
For Loops
Arithmetic is all very well, but it does not make for a very exciting program. Therefore, in this section you will learn about looping, which means telling Python to perform a task a number of times rather than just once. In the following example, you will need to enter more than one line of Python. When you press RETURN and go to the second line, you will notice that Python is waiting. It has not immediately run what you have typed because it knows that you have not finished yet. The : character at the end of the line means that there is more to do.
These extra tasks must each appear on an indented line. To get this two-line program to actually run, press RETURN twice after the second line is entered.
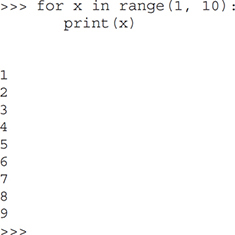
This program has printed out the numbers between 1 and 9 rather than 1 and 10. The range command has an exclusive end point—that is, it doesn’t include the last number in the range, but it does include the first.
You can check this out by just taking the range bit of the program and asking it to show its values as a list, like this:
![]()
Some of the punctuation here needs a little explaining. The parentheses are used to contain what are called parameters. In this case, range has two parameters: from (1) and to (10), separated by a comma.
The for in command has two parts. After the word for there must be a variable name. This variable will be assigned a new value each time around the loop. Therefore, the first time it will be 1, the next time 2, and so on. After the word in, Python expects to see something that works out to be a list of items. In this case, this is a list of the numbers between 1 and 9.
The print command also takes an argument that displays it in the Python Shell. Each time around the loop, the next value of x will be printed out.
Simulating Dice
We’ll now build on what you just learned about loops to write a program that simulates throwing a dice 10 times.
To do this, you will need to know how to generate a random number. So, first let’s work out how to do that. If you didn’t have this book, one way to find out how to generate a random number would be to type random numbers python into your search engine and look for fragments of code to type into the Python Shell. However, you do have this book, so here is what you need to write:
![]()
Try entering the second line a few times, and you will see that you are getting different random numbers between 1 and 6. By the way, you can avoid having to type in a line you have typed before by pressing the up arrow on your keyboard. This will recall your previous commands in turn. When you have the one you want to execute, press the ENTER key.
The first line imports a library that tells Python how to generate numbers. You will learn much more about libraries later in this book, but for now you just need to know that we have to issue this command before we can start using the randint command that actually gives us a random number.
NOTE I am being quite liberal with the use of the word command here. Strictly speaking, items such as randint are actually functions, not commands, but we will come to this later.
Now that you can make a single random number, you need to combine this with your knowledge of loops to print off 10 random numbers at a time. This is getting beyond what can sensibly be typed into the Python Shell, so we will use the Mu editor.
You can either type in the examples from the text here or download all the Python examples used in the book from the book’s web page simonmonk.org/prog-pi-ed3. Each programming example has a number. Thus, this program will be contained in the file 3_1_dice.py, which can be loaded into the Mu editor.
Installing the Example Programs
To copy all the example programs for this book onto your Raspberry Pi, make sure that it is connected to the Internet and then issue the following commands:
![]()
To see the full list of programs and other files needed in the book, list the contents of the directory using the ‘ls’ command.
At this stage, it is worth typing in the examples to help the concepts sink in. Open up a new Mu editor tab (by clicking on the New button), type the following into it, and then save your work:
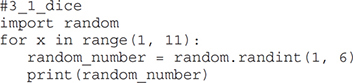
The first line begins with # character. This indicates that the entire line is not program code at all, but just a comment to anyone looking at the program. Comments like this provide a useful way of adding extra information about a program into the program file, without interfering with the operation of the program. In other words, Python will ignore any line that starts with #.
Now, save the file giving it the file name 3_1_dice.py and then click on the Run button. The result should look something like Figure 3-6, where you can see the output below the editor window.
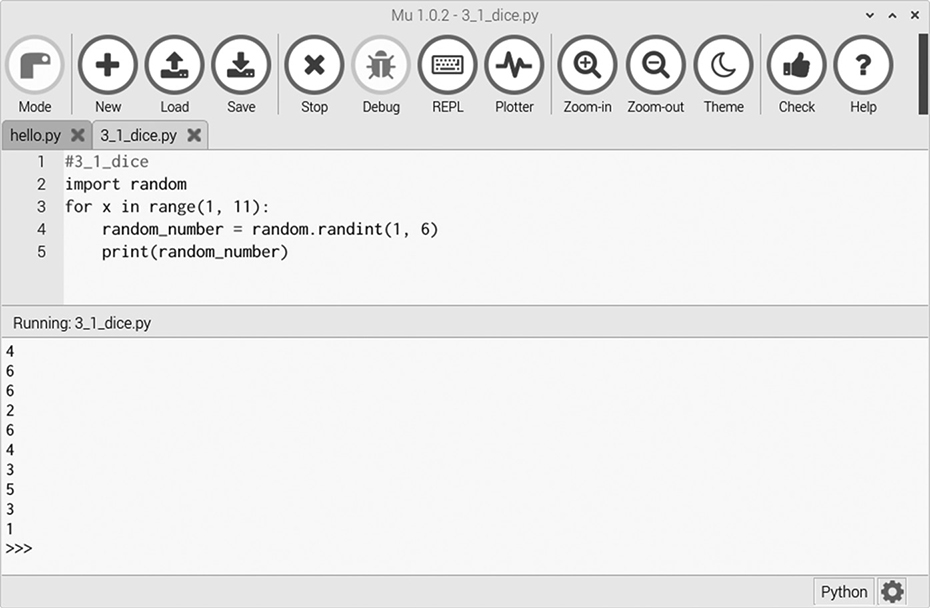
Figure 3-6 The dice simulation.
If you followed the instructions to install the example code, then you can open these examples by clicking on Load and then the prog_pi_ed3 folder (Figure 3-7), in which you will find all the example programs for the book.
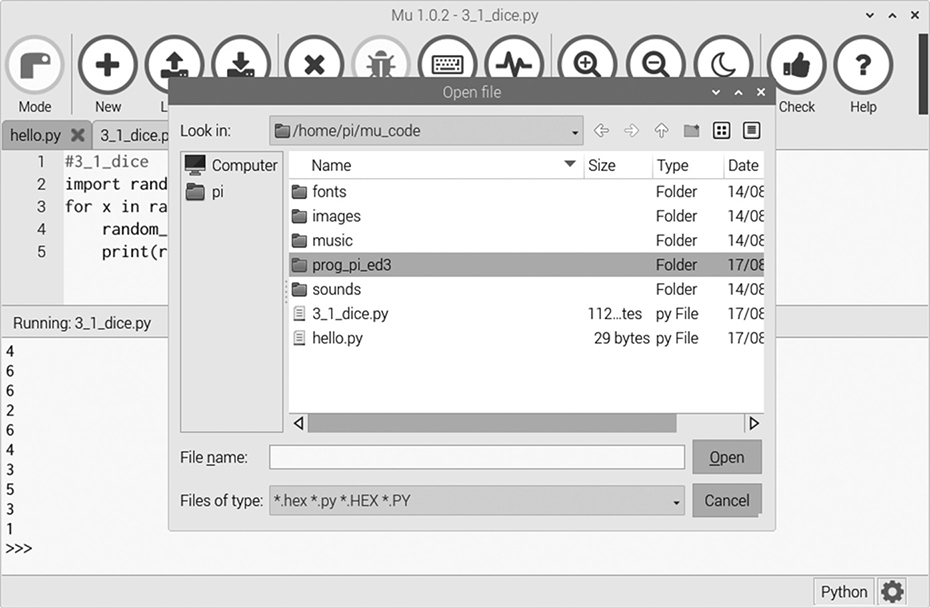
Figure 3-7 Finding the example code.
If
Now it’s time to spice up the dice program so that two dice are thrown, and if we get a total of 7 or 11, or any double, we will print a message after the throw. Type or load the following program into Mu:

When you run this program, you should see something like this:

The first thing to notice about this program is that now two random numbers between 1 and 6 are generated. One for each of the dice. A new variable, total, is assigned to the sum of the two throws.
Next comes the interesting bit: the if command. The if command is immediately followed by a condition (in the first case, total == 7). There is then a colon (:), and the subsequent lines will only be executed by Python if the condition is true. At first sight, you might think there is a mistake in the condition because it uses == rather than =. The double equal sign is used when comparing items to see whether they are equal, whereas the single equal sign is used when assigning a value to a variable.
The second if is not tabbed in, so it will be executed regardless of whether the first if is true. This second if is just like the first, except that we are looking for a total of 11. The final if is a little different because it compares two variables (throw_1 and throw_2) to see if they are the same, indicating that a double has been thrown.
Now, the next time you go to play Monopoly and find that the dice are missing, you know what to do: Just boot up your Raspberry Pi and write a little program.
Comparisons
To test to see whether two values are the same, we use ==. This is called a comparison operator. The comparison operators we can use are shown in Table 3-2.

Table 3-2 Comparison Operators
You can do some experimenting with these comparison operators in the Python Shell. Here’s an example:
![]()
In this case, we have basically said to Python, “Is 10 greater than 9?” Python has replied, “True.” Now let’s ask Python whether 10 is less than 9:
![]()
Being Logical
You cannot fault the logic. When Python tells us “True” or “False,” it is not just displaying a message to us. True and False are special values called logical values. Any condition we use with an if statement will be turned into a logical value by Python when it is deciding whether or not to perform the next line.
These logical values can be combined rather like the way you perform arithmetic operations like plus and minus. It does not make sense to add True + True, but it does make sense sometimes to say True and True.
As an example, if we wanted to display a message every time the total throw of our dice was between 5 and 9, we could write something like this:
![]()
As well as and, we can use or. We can also use not to turn True into False, and vice versa, as shown here:
![]()
Thus, another way of saying the same thing would be to write the following:
![]()
Exercise
Try incorporating the preceding test into the dice program. While you are at it, add two more if statements: one that prints “Good Throw!” if the throw is higher than 10 and one that prints “Unlucky!” if the throw is less than 4. Try your program out. If you get stuck, you can look at the solution in the file 03_03_double_dice_solution.py.
Else
In the preceding example, you will see that some of the possible throws can be followed by more than one message. Any of the if lines could print an extra message if the condition is true. Sometimes you want a slightly different type of logic, so that if the condition is true, you do one thing and otherwise you do another. In Python, you use else to accomplish this:
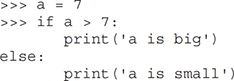
![]()
In this case, only one of the two messages will ever be printed.
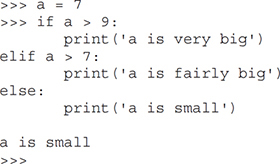
Another variation on this is elif, which is short for else if. Thus, we could expand the previous example so that there are three mutually exclusive clauses, like this:
While
Another command for looping is while, which works a little differently than for. The command while looks a bit like an if command in that it is immediately followed by a condition. In this case, the condition is for staying in the loop. In other words, the code inside the loop will be executed until the condition is no longer true. This means that you have to be careful to ensure that the condition will at some point be false; otherwise, the loop will continue forever and your program will appear to have hung.
To illustrate the use of while, the dice program has been modified so that it just keeps on rolling until a double 6 is rolled:

This program will work. Try it out. However, it is a little bigger than it should be. We are having to repeat the following lines twice—once before the loop starts and once inside the loop:
![]()
A well-known principle in programming is DRY (Don’t Repeat Yourself). Although it’s not a concern in a little program like this, as programs get more complex, you need to avoid the situation where the same code is used in more than one place, which makes the programs difficult to maintain.
We can use the command break to shorten the code and make it a bit “drier.” When Python encounters the command break, it breaks out of the loop. Here is the program again, this time using break:
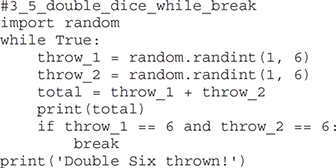
The condition for staying in the loop is permanently set to True. The loop will continue until it gets to break, which will only happen after throwing a double 6.
The Python Shell from the Terminal
Another way of running the Python shell is to use the Terminal. To do this, enter the command:
$ python3
Note that if you just use the command python rather than python3, the shell that starts will be for Python 2 not Python 3 and some of the examples in this book will not work.
After you enter the command python3, the Terminal will show the >>> Python prompt ready for you to enter Python commands (Figure 3-8).
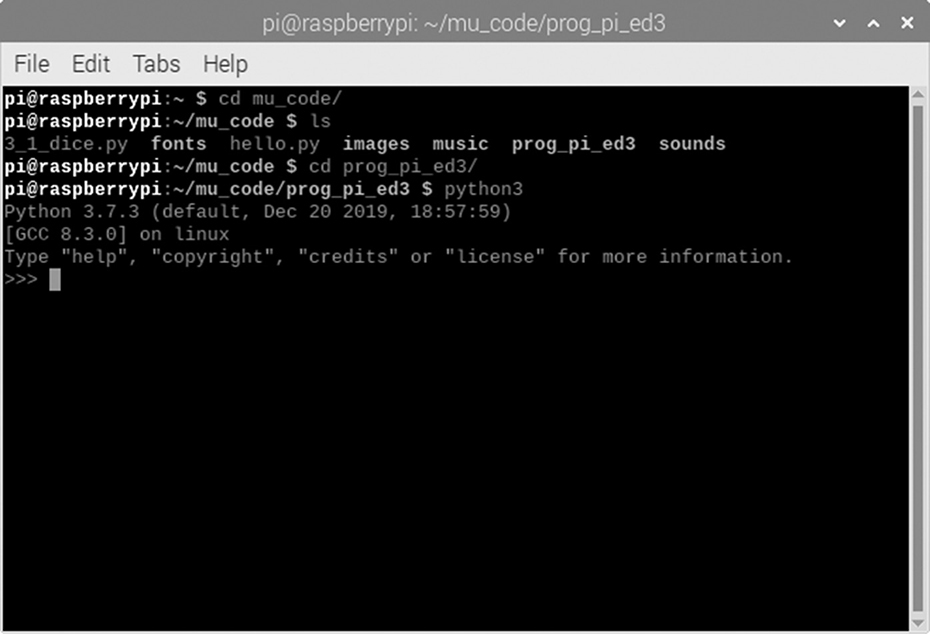
Figure 3-8 Python in the Terminal.
You can also run Python programs from the Terminal using the command python3 followed by the name of the program you want to run. You can try this by entering the following commands:
![]()
Summary
You should now be happy to play with Mu and tryssse things out in the Python Shell. I strongly recommend that you try altering some of the examples from this chapter, changing the code and seeing how that affects what the programs do.
In the next chapter, we will move on past numbers to look at some of the other types of data you can work with in Python.