

Diagram showing the handshaking between the Spin cog and the PASM cog
As shown in Figure 9-1, the main Spin cog will set myns to a nonzero value, which will trigger the PASM cog to perform the compression. When the PASM cog finishes its work, it will set myncompr to a nonzero value, which signals the main cog that the compression is complete.
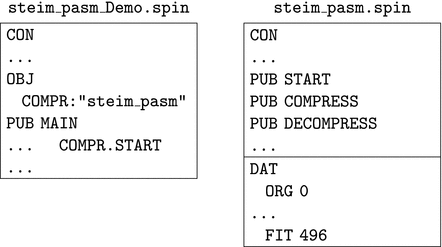
The file-level view of the compression program, with the driver file on the left and the worker file on the right
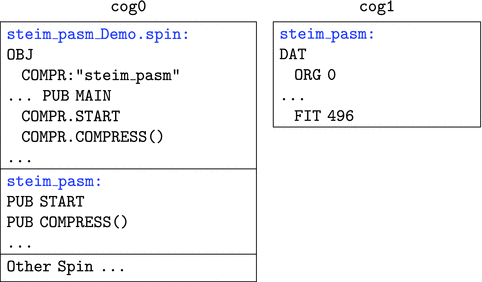
The cog-level view of the compression program
9.1 Overall Flowchart
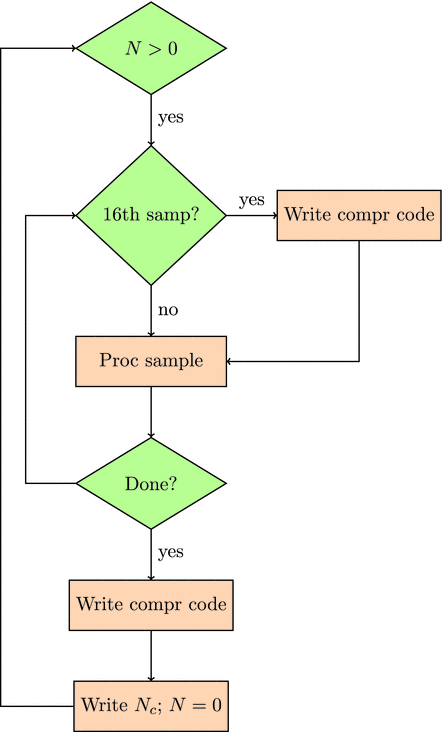
Flowchart for compression of samples
9.2 Test 1: Passing nsamps and ncompr
- 1.
The calling cog (main) will set the number of samples (myns in the COMPR object) to the number of samples in sampsBuf.
- 2.
Upon completion of compression, the STEIM PASM cog will set the number of compressed bytes (myncompr) to a non-negative number.
9.2.1 Spin Code
Listing 9-1 shows the Spin code . Add it to main.
Spin Code
The test is relatively simple . The test method in main sets nsamps to 1 and calls COMPR.COMPRESS. Within the COMPRESS object, myns is set to 1, which triggers the compression.
9.2.2 PASM Code
Listing 9-2 shows the START code that launches the PASM cog, the COMPRESS code, and the PASM code from the previous chapter with the handshaking discussed in detail.
PASM Code
The START function is called once by the driver file, and that starts the PASM cog. The COMPRESS function can be called any number of times, and it communicates with the (running) PASM cog via the value of myns. When the COMPRESS function sets myns := ns, that sets myns to 1. The running PASM cog is continually monitoring myns (via the rdlong in the steim cog that sets _cns). Because of the wz effect of the rdlong, the instruction will set Z to 0 when _cns is nonzero. Now, instead of jumping back around to :mainLoop, control will pass to the next instructions:
Next, we set _ cns to zero and write that back to hub memory (to myns) so that when we go back up to :mainLoop, we don’t immediately start another compression cycle. Finally, we set the variable _cncompr to 3 and then write that value to hub memory (to myncompr) with the wrlong instruction.
In the Spin code in COMPRESS, the following statement will loop at that line continuously until myncompr is greater than zero, which it will be soon, when the PASM code does its wrlong!
At that point, the Spin code will continue to the next instruction.
Back in the calling function, nc will be set to 3, the value t0 will be true, and the ASSERT_TRUTHY call will print OK.
9.3 Test 2: Packing Sample 0
In the previous section, we passed nsamps to the steim cog, which signals the start of the compression process. In this section, we will actually compress sample 0 and populate packBuf and comprCodeBuf. If you recall from the specification and from the Spin code examples, the three low bytes of sampsBuf[0] are placed in packBuf, and the code for a 3-byte compression is placed in the low 2 bits of comprCodeBuf[0].
9.3.1 Spin Code
To read from sampsBuf and write to the other two arrays, we need to pass their addresses to the steim cog. Listing 9-3 shows the modified calling routine, with three new tests that check whether sample 0 is packed correctly, whether ncompr is set correctly (to 3), and whether comprCodeBuf[0] is set correctly to COMPR.CODE24.
Driver File Testing Code
9.3.2 Memory Layout of Arrays and Parameters
As in the previous section, we now need to pass the addresses of sampsBuf, packBuf, and comprCodeBuf as well to the steim cog.
Modify the VAR declaration for myns and myncompr to now include three new variables: sampsBufAddr, packBufAddr, and comprCodeBufAddr. These variables are all listed one after the other, so they occupy successive long locations.
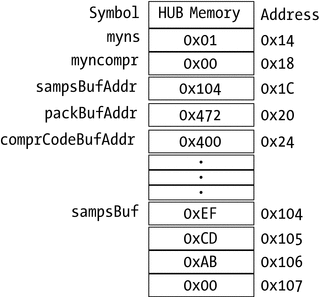
Memory layout in hub showing the arrangement of variables that will be passed to the PASM cog. sampsBufAddr contains the address to the first sample of sampsBuf, which is shown further along in memory.
The COMPRESS method gets those values because the calling routine passes @sampsBuf (the address of sampsBuf), and this is similar for the other two arrays.
Those three addresses are stored in the variables sampsBufAddr, packBufAddr, and comprCodeBufAddr, and when myns is set to nonzero, the steim cog will start the compression, using those addresses.
9.3.3 PASM Code
In the PASM code, we have already looked at how to access myns; now let’s look at how to access sampsBuf[0] using indirect addressing (Listing 9-4).
Indirect Addressing in PASM to Read from an Array
Lines 8– 9 : Copy the contents of PAR (the address of myns) to a temporary variable r0 and add 8 to it. Now r0 will have the address of the location that has the address of sampsBuf (0x1C).
Line 10: The rdlong gets that address so that _csampsBufPtr is set to 0x104 (the address of the sampsBuf array in the hub).
We then copy the contents of the long at 0x1C to csampsbufPtr: csampsbufPtr = 0x104. We now have the location of sampsBuf[0]. We go through a similar procedure for the other two arrays, packBuf and comprCodeBuf.
9.3.4 Subroutines in PASM
As in other languages, you can define a subroutine when there is code that is often repeated or simply to keep your code modular and organized. In this case, I define two subroutines: GET_SAMPLE and HANDLE_SAMP0.
Subroutines are defined by enclosing them between two labels: SUBROUTINE_NAME and SUBROUTINE_NAME_ret. In addition, the second label (SUBROUTINE_NAME_ret) should be immediately followed by the PASM instruction ret. There are no formal arguments or parameters for the subroutine. Rather, the subroutine is in the same scope as the calling code. All variables are available and can be read and modified. Therefore, it is important to be clear on which variables are needed by the subroutine and which are modified. In Listing 9-5, I show the GET_SAMPLE and HANDLE_SAMP0 subroutines. The comments at the start show which variables are read and which are modified.
Examples of subroutines, with comments showing variables that are used and modified
GET_SAMPLE is straightforward. It reads a long from the current index of sampBuf (initially 0) and increments the index to point at the next value in sampsBuf.
HANDLE_ SAMP0 takes that sample and writes the low 3 bytes back to packBuf. The following sequence is like a repeat 3 in Spin or a for loop in C. Set r0 to the number of times you want to loop and, at the end of the loop, decrement it by 1 and test for when it is equal to 0 (djnz r0, #:s0loop says “decrement r0 and jump to s0loop if r0 is not zero”). After three times, the loop terminates, and the instructions following djnz are executed.
The “do something” part is where the 3 bytes of sampsBuf[0] are copied to packBuf. The instruction wrbyte _csamp, _cpackbufPtr will copy the lowest byte of _csamp to the current address in _cpackbufPtr. The next instruction, add _cpackbufPtr, #1, will add the literal value 1 to the address _cpackbufPtr. This increments the index of packBuf. The next and final instruction in the loop, shr _csamp, #8, shifts the contents of the variable _csamp right by 8 bits (in other words, shifts the low byte out and moves the next higher byte into the low byte position). Finally, the instruction djnz r0, #:s0loop will decrement r0 by 1 and loop to :s0loop if r0≠0.
The first time through the loop, the low byte (bits 0–7) of _csamp is copied to packBuf[0]. The second time (after the increment of _cpackbufPtr and the shift right by 8 bits of _csamp), the second byte (the original bits 8–15 of _csamp) is copied to packBuf[1]. The third time, the third byte of _csamp is copied to packBuf[2]. In the process, _csamp is destroyed—and we note that in the comments for the subroutine so that the calling routine knows not to use _ csamp again.
9.3.5 Testing the Compression of Sample 0
Let’s run our tests (including running our previous test). If these succeed, we are confident that the array addresses are being passed correctly.
9.4 Packing Differences for Latter Samples
Now that we know how to access the arrays, we can proceed with compressing all the samples by forming differences and packing those differences in packBuf based on their length.
Here is the PASM code in Listing 9-6. Here we add code to handle all the samples and to set the compression codes correctly.
Changes to the PASM code to handle all the samples and to set the compression codes correctly
_cj: The current sample number.
_ccodelongidx: The index into the array comprCodeBuf where the current sample’s code will be stored.
_ccodebitidx: The bit location within the long where the code will be stored.
_cprev and _cdiff: The previous sample and the difference between the current and previous samples.
After initializing these variables (lines 6–14), we handle the special case of sample 0 (lines 16–18). Here we add the instruction mov _cprev, _csamp before the subroutine call HANDLE_SAMP0. Remember, that subroutine destroys _csamp, so if we want to use it to form the difference, we must save it. Next, we check for whether there is only one sample, and if so, we are done (lines 20–21): subtract 1 from _cns (the number of samples) and set the Z flag if the result is 0 (that is the effect of wz). If Z is set, jump to the code to finalize the compression (done) when the myncompr variables in hub memory are set to the correct values (which signals the main cog that the compression has completed).
Lines 24–25: Get the next sample and process it (we’ll look at HANDLE_SAMPJ in a moment).
Lines 26–27: Save the sample for the next loop and increment j.
Lines 29–31: The bit index moves up by 2, and we check whether we need to move to the next comprCodeBuf long. The instruction test_ccodebitidx, #31 wz will set Z if ccodebitidx is equal to 32 (31=%0001 1111 and 32=%0010 0000; the bitwise AND of the two numbers is 0, which will set Z to 1) The instruction test is like and, but doesn’t save the result; it only affects the flags. If Z is not set, then we are still within this comprCodeBuf long, and we jump around the subsequent code.
Lines 33–35: New comprCodeBuf long. Write the completed long to hub memory and increment the pointer to point to the next long.
OK, now let’s look at HANDLE_SAMPJ , shown in Listing 9-7. Here we take the difference between the two samples and determine if that number would fit in one, two, or three bytes and handle packBuf and comprCodeBuf accordingly.
Subroutine to form the difference between two samples and to update packBuf and comprCodeBuf depending on the size of the difference
Lines 9–10: Form the difference diff = samp - prev.
Lines 17–24: Write the low byte of diff to packBuf and set the code temporarily to CODE08. Check if ||δ j || < 127: cmp r2, _onebyte wc,wz. The constant _onebyte is 127, and wz says to set Z if r2 is equal to 127; wc says to set C if r2 is less than 127. if_c_or_z jmp #:donej says to jump to donej if C or Z is set.
Lines 26–41: If r2 is greater than 127, then write the second byte of diff; check again if that is all we need to do. If not, write the third byte of diff.
Lines 43–46: r0 has the number of bytes of diff (1, 2, or 3). Add it to _cncompr. r1 has the compression code (CODE08, CODE16, or CODE24). Shift it to the correct location (rol means “rotate left”) and set those two bits of _ccode (with an or instruction).
9.4.1 Testing Compressing Two Samples!
The following are the tests for the new code to test the code for compression (Listing 9-8). Hopefully the names of the methods and the informational string (in TDD.ASSERT_TRUTHY) are self-explanatory. Each testing method tests a small piece of functionality and should be re-run whenever changes are made to the code.
Some of the tests that exercise different parts of the compression code
9.4.2 Test Compressing an Arbitrary Number of Samples
Now that we have tested the cases of two samples being packed correctly, let’s see if an arbitrary number of samples are packed correctly. Remember, the compression codes are written two bits at a time; the compression codes for samples 0–15 are stored in comprCodeBuf[0] and for sample 16 into comprCodeBuf[1]. We need to exercise the code in as many “edge” cases as possible. Here are the most basic ones: 16 samples, 17 samples, and 127 samples. This is not an exhaustive test but will give us some confidence that we are packing the bytes correctly and writing the compression codes correctly. Now that we know that the first and second sample are handled correctly, let’s write tests that walk through compressing the whole array, including testing for “edge cases” where problems often occur (Listing 9-9).
Testing that more than two samples can be compressed correctly
In all these tests, we zero out sampsBuf and then set the last two samples to known values. We run the compression and make sure the number of compressed bytes is correct and that the packed array and compression code array have the correct values.
9.5 Success?
Did we speed things up? By how much?
The Spin version took 1.5 million clocks, and the PASM version takes 29,000 clocks. This is a factor of 50 speedup. (Our original estimate was for 25,000 clocks in the PASM version, so that’s not bad.)
Let’s do a more comprehensive set of tests by writing a decompressor in the next chapter.
9.6 Summary
In this chapter, we showed how to pass an array to a PASM cog. When a new cog is launched, the address (in the hub) of a variable can be stored in the PAR register, which the new cog can use. To pass arrays, we need another level of indirection! The address at the start of the array is stored in a memory location. The address of that memory location is passed to the PASM cog in PAR (Listing 9-10 has a template that you can modify for new programs). PASM requires that we pay attention to every detail of the computation and build the “scaffolding” of our program from the ground up, much as is shown in Figure 9-6 for a railroad bridge used by Union Army during the Civil War.
Template for passing parameters to a PASM cog that uses both methods discussed in this chapter

Railroad bridge across Potomac Creek, 1863 or 1864. “That man Haupt has built a bridge across Potomac Creek, about 400 feet long and nearly 100 feet high, over which loaded trains are running every hour and, upon my word, gentlemen, there is nothing in it but beanpoles and cornstalks!” —Abraham Lincoln, May 23, 1862. Library of Congress, ppmsca.11749.