Spark
is a distributed framework for facilitating parallel processing. The parallel algorithms require computation and communication between machines. While communicating, machines send or exchange data. This is also known as
shuffling
.
Writing code is easy. But writing a program that is efficient and easy to understand by others requires more effort. This chapter presents some techniques for making the PySpark program clearer and more efficient.
Making decisions is a day-to-day activity. Our data-conscious population wants to include data analysis and result inference at the time of decision-making. We can gather data and do analysis, and we have done all of that in previous chapters. But people are becoming more interested in analyzing data as it is coming in. This means people are becoming more interested in analyzing streaming data.
Handling streaming data requires more robust systems and proper algorithms. The fault-tolerance of batch-processing systems is sometimes less complex than the fault-tolerance of a streaming-execution system. This is because in stream data processing, we are reading data from an outer source, running execution, and saving the results, all at the same time. More activities translate into a greater chance of failure.
In PySpark, streaming data is handled by its library, PySpark Streaming. PySpark Streaming
is a set of APIs that provide a wrapper over PySpark Core. These APIs are efficient and deal with many aspects of fault-tolerance too. We are going to read streaming data from the console by using PySpark and then analyze it. We are also going to read data from Apache Kafka by using PySpark Streaming and then analyze the data.
This chapter covers the following recipes:
- Recipe 7-1. Optimize the page-rank algorithm using PySpark code
- Recipe 7-2. Implement the k-nearest neighbors algorithm using PySpark
- Recipe 7-3. Read streaming data from the console using PySpark Streaming
- Recipe 7-4. Integrate Apache Kafka with PySpark Streaming, and read and analyze the data
- Recipe 7-5. Execute a PySpark script in local mode
- Recipe 7-6. Execute a PySpark script using Standalone Cluster Manager and the Mesos cluster manager
Recipe 7-1. Optimize the Page-Rank Algorithm by Using PySpark Code
Problem
Solution
We already implemented the page-rank algorithm in Chapter 5. Can we optimize the code? Whenever we start looking at every line of code, we can try to optimize it. In this recipe, we are going to optimize RDD joining. But you might want to look at other parts of the code and try to optimize different lines of the program.
Paired RDD joining is one of the costliest activities in PySpark or any distributed framework. Why? Because for any key in the first RDD, the system looks for all the keys in different data partitions of other RDDs. And then after lookup, the data is shuffled. If we repartition the data in such a way that the similar keys come to the same machine, then the data shuffle will be reduced. PySpark provides partitioners for the same purpose. We can use the partitionBy() function with the partitioner of our choice, so that similar keys occur on the same machine and less data shuffles. This results in improved speed of code execution.
How It Works
We already discussed the page-rank algorithm in detail in Chapter 5; if you need a refresher, please review that detailed discussion. In this recipe, I discuss only the code lines that have been modified. The modified code lines are in bold font. Let’s look at those lines:
>>> pageLinks = [['a', ['b','c','d']],
... ['b', ['d','c']],
... ['c', ['b']],
... ['d', ['a','c']]]
>>> pageRanks = [['a',1],
... ['b',1],
... ['c',1],
... ['d',1]]
>>> numIter = 20
>>> pageRanksRDD = sc.parallelize(pageRanks, 2).partitionBy(2,hash).persist()
>>> pageLinksRDD = sc.parallelize(pageLinks, 2).partitionBy(2,hash).persist()
In the bold code lines, I have added the partitionBy() method. The first argument of partitionBy() is 2, which tells us that the data is split into two partitions. There is another argument value that we have provided, hash. This argument value is the partitioner name. We repartition the data into two partitions, using the hash partitioner. The hash partitioner uses a hashing technique to repartition the data. We are using the same technique on both pageRanksRDD and pageLinksRDD, so the same key will go to the same machine. Therefore, we are tackling the shuffling problem. The other parts of the code are the same as in Chapter 5.
>>> s = 0.85
>>> def rankContribution(uris, rank):
... numberOfUris = len(uris)
... rankContribution = float(rank) / numberOfUris
... newrank =[]
... for uri in uris:
... newrank.append((uri, rankContribution))
... return newrank
>>> for i in range(numIter):
... linksRank = pageLinksRDD.join(pageRanksRDD)
... contributedRDD = linksRank.flatMap(lambda x : rankContribution(x[1][0],x[1][1]))
... sumRanks = contributedRDD.reduceByKey(lambda v1,v2 : v1+v2)
... pageRanksRDD = sumRanks.map(lambda x : (x[0],(1-s)+s*x[1]))
...
>>> pageRanksRDD.collect()
Here is the output:
[('b', 1.357243795127982),
('d', 0.8746512999550939),
('a', 0.5217268024809147),
('c', 1.2463781024360086)]
We have the final answer for the page-rank implementation.
Recipe 7-2. Implement the k-Nearest Neighbors Algorithm by Using PySpark
Problem
You want to implement the k-nearest neighbors (KNN) algorithm
by using PySpark.
Solution
The k-nearest neighbors algorithm is one of the simplest data-classification algorithms. The similarity between two data points is measured on the basis of the distance between two points.
We have been given a dataset of nine records. This dataset is shown in Table 7-1. In this table, you can see a column named RN. That column indicates the record number. This is not part of the data; the record number is given to help you understand the KNN algorithm.
Table 7-1.
Data for Classification by KNN
Let’s say that we have a record (ivs1 = 2.5, ivs2 = 1.7, ivs3 = 4.2). We will call this record new record. We have to classify this record; it will be in either group1 or group2.
To classify the record, we’ll use the KNN algorithm. Here are the steps:
- 1.Decide the k.k is the number of nearest neighbors we are going to choose for deciding the class of the new record. Let’s say k is 5.
- 2.Find the distance of the new record from each record in the data.The distance calculation is done using the Euclidean distance method, as shown in Table 7-2.Table 7-2.Distance Calculation
 In this table, we have calculated the distance between the new record and other records. The third column is the distance. The distance value of the first row of this table is the distance between the new record and record 1.
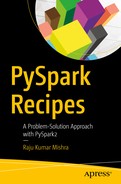
 - 3.Sort the distances.Sorting is required now. And we have to sort the distances in increasing order. Simultaneously, we have to maintain the association between the RN column and the Distance column. In Table 7-3, we have sorted the Distance column, which is still associated with the RN and Group columns.Table 7-3.Distance Calculation
- 4.Find the k-nearest neighbors.Now that we have sorted the Distance column, we have to identify the neighbors of the new record. What do I mean by neighbors here? Neighbors are those records in the table that are near the new record. Near means having less distance between two nodes. Now look for the five nearest neighbors in Table 7-3. For the new record, records 3, 4, 2, 1, and 9 are neighbors. The group for records 3, 4, 2, and 1 is group1. The group for record 9 is group2. The majority of neighbors are from group1. Therefore, we can classify the new record in group1.
We have discussed the KNN algorithm in detail. Let’s see how to implement it by using PySpark. We are going to implement KNN in a naive way and then we will optimize it in the “How It Works” section.
First, we are going to calculate the distance between two tuples. We’ll write a Python function, distanceBetweenTuples(). This function will take two tuples, calculate the distance between them, and return that distance:
>>> def distanceBetweenTuples(data1, data2) :
... squaredSum = 0.0
... for i in range(len(data1)):
... squaredSum = squaredSum + (data1[i] - data2[i])**2
... return(squaredSum**0.5)
Now that we’ve written the function to calculate the distance, let’s test it:
>>> pythonTuple1 = (1.2, 3.4, 3.2)
>>> pythonTuple2 = (2.4, 2.2, 4.2)
>>> distanceBetweenTuples(pythonTuple1, pythonTuple2)
Here is the output:
1.9697715603592207
Our method has been tested. It is a general function. We can run it for tuples of length 4 or 5 also. In the following lines of code, we’ll create a list. The elements of this list are tuples. Each tuple has two elements. The first element is itself a tuple of data. The second element of each tuple is the group associated with each tuple.
>>> knnDataList = [((3.09,1.97,3.73),'group1'),
... ((2.96,2.15,4.16),'group1'),
... ((2.87,1.93,4.39),'group1'),
... ((3.02,1.55,4.43),'group1'),
... ((1.80,3.65,2.08),'group2'),
... ((1.36,4.43,1.95),'group2'),
... ((1.71,4.35,1.94),'group2'),
... ((1.03,3.75,2.12),'group2'),
... ((2.30,3.59,1.99),'group2')]
>>> knnDataRDD = sc.parallelize(knnDataList, 4)
The data has been parallelized. We define newRecord as [(2.5, 1.7, 4.2)]:
>>> newRecord = [(2.5, 1.7, 4.2)]
>>> newRecordRDD = sc.parallelize(newRecord, 1)
>>> cartesianDataRDD = knnDataRDD.cartesian(newRecordRDD)
>>> cartesianDataRDD.take(5)
Here is the output:
[(((3.09, 1.97, 3.73), 'group1'), (2.5, 1.7, 4.2)),
(((2.96, 2.15, 4.16), 'group1'), (2.5, 1.7, 4.2)),
(((2.87, 1.93, 4.39), 'group1'), (2.5, 1.7, 4.2)),
(((3.02, 1.55, 4.43), 'group1'), (2.5, 1.7, 4.2)),
(((1.8, 3.65, 2.08), 'group2'), (2.5, 1.7, 4.2))]
We have created a Cartesian by using the older record data and the new record data. You might be wondering why I have created this Cartesian. at the time of defining the list knnDataList. In a real case, you would have a large file. That file might be distributed also. So for that condition, we’d have to read the file first and then create the Cartesian. After creating the Cartesian, we have the older data and the new record data in the same row, so we can easily calculate the distance with the map() method:
>>> K = 5
>>> groupAndDistanceRDD = cartesianDataRDD.map(lambda data : (data[0][1], distanceBetweenTuples(data[0][0], data[1])))
>>> groupAndDistanceRDD.take(5)
Here is the output:
[('group1', 0.8011866199581719),
('group1', 0.6447480127925947),
('group1', 0.47528938553264566),
('group1', 0.5880476171195661),
('group2', 2.9642705679475347)]
We have calculated the RDD groupAndDistanceRDD; its first element is the group, and the second element is the distance between the new record and older records. We have to sort it now in increasing order of distance. You might remember the takeOrdered() function described in Chapter 4. So let’s get five groups in increasing order of distance:
>>> ourClasses = groupAndDistanceRDD.takeOrdered(K, key = lambda data : data[1])
>>> ourClasses
Here is the output:
[('group1', 0.47528938553264566),
('group1', 0.5880476171195661),
('group1', 0.6447480127925947),
('group1', 0.8011866199581719),
('group2', 2.9148241799463652)]
Using the takeOrdered() method, we have fetched five elements of the RDD, with the distance in increasing order. We have to find the group that is in the majority. So we have to first fetch only the group part and then we have to find the most frequent group:
>>> ourClassesGroup = [data[0] for data in ourClasses]
>>> ourClassesGroup
Here is the output:
['group1', 'group1', 'group1', 'group1', 'group2']
The group part has been fetched. The most frequent group can be found using the max() Python function as follows:
>>> max(ourClassesGroup,key=ourClassesGroup.count)
Here is the output:
'group1'
We finally have the group of the new record, and that is group1.
You might be thinking that now that we have implemented KNN, what’s next? Next, we should optimize the code. Let me say that again. We can optimize different aspects of this code. For this example, we’ll use the broadcasting technique using the broadcast variable. This is a very good technique for optimizing code.
The Cartesian has been applied to join the older records with the new record. PySpark provides another way to achieve a similar result. We can send the new record to every executor before. This new record data will be available to each executor, and they can use it for distance calculations. We can send the new record tuple to all the executors as a broadcast variable.
Broadcast variables are shared and read-only variables. Read-only means executors cannot change the value of a broadcast variable; they can only read the value of it. In PySpark, we create a broadcast variable by using the broadcast() function. This broadcast() function is defined on SparkContext. We know that in the PySpark console, we have SparkContext as sc. We are going to reimplement the KNN by using the broadcast technique.
How It Works
We have already discussed most of the code. Therefore, I will keep the discussion short in the coming steps.
Step 7-2-1. Creating a Function to Calculate the Distance Between Two Tuples
>>> def distanceBetweenTuples(data1, data2) :
... squaredSum = 0.0
... for i in range(len(data1)):
... squaredSum = squaredSum + (data1[i] - data2[i])**2
... return(squaredSum**0.5)
We have already created and tested this method.
Step 7-2-2. Creating a List of Given Records and Transforming It to an RDD
>>> knnDataList = [((3.09,1.97,3.73),'group1'),
... ((2.96,2.15,4.16),'group1'),
... ((2.87,1.93,4.39),'group1'),
... ((3.02,1.55,4.43),'group1'),
... ((1.80,3.65,2.08),'group2'),
... ((1.36,4.43,1.95),'group2'),
... ((1.71,4.35,1.94),'group2'),
... ((1.03,3.75,2.12),'group2'),
... ((2.30,3.59,1.99),'group2')]
>>> K = 5
We again want to go for five neighbors in order to determine the group of the new record. We also parallelize the data and transform it to an RDD of four partitions:
>>> knnDataRDD = sc.parallelize(knnDataList, 4)
>>> knnDataRDD.take(5)
Here is the output:
[((3.09, 1.97, 3.73), 'group1'),
((2.96, 2.15, 4.16), 'group1'),
((2.87, 1.93, 4.39), 'group1'),
((3.02, 1.55, 4.43), 'group1'),
((1.8, 3.65, 2.08), 'group2')]
Step 7-2-3. Broadcasting the Record Value
Now we have to create the required new record:
>>> newRecord = [(2.5, 1.7, 4.2)]
Broadcasting the new record will be done by the broadcast() method, which is defined on the SparkContext object. We can read the value of the broadcasted variable by using the value attribute:
>>> broadCastedValue = sc.broadcast(newRecord)
>>> broadCastedValue.value
Here is the output:
[(2.5, 1.7, 4.2)]
We can see that it returns the data as we have broadcasted it. But we need the tuple that we can get by fetching the first element of the list:
>>> broadCastedValue.value[0]
Here is the output:
(2.5, 1.7, 4.2)
Step 7-2-4. Broadcasting the Record Value
After broadcast, we have to create an RDD that will be an RDD of tuples. Each tuple’s first element is the group, and the second element is the distance:
>>> groupAndDistanceRDD = knnDataRDD.map(lambda data : (data[1], distanceBetweenTuples(data[0], tuple(broadCastedValue.value[0]))))
To calculate the distance, we use the distanceBetweenTuples() method:
>>> groupAndDistanceRDD.take(5)
Here is the output:
[('group1', 0.8011866199581719),
('group1', 0.6447480127925947),
('group1', 0.47528938553264566),
('group1', 0.5880476171195661),
('group2', 2.9642705679475347)]
The requirement is achieved.
Step 7-2-5. Finding the Class of a New Record
We’ll find the class of the new record in the same way as we did in its naive part:
>>> ourClasses = groupAndDistanceRDD.takeOrdered(K, key = lambda data : data[1])
>>> ourClasses
Here is the output:
[('group1', 0.47528938553264566),
('group1', 0.5880476171195661),
('group1', 0.6447480127925947),
('group1', 0.8011866199581719),
('group2', 2.9148241799463652)]
>>> ourClassesGroup = [data[0] for data in ourClasses]
>>> ourClassesGroup
Here is the output:
['group1', 'group1', 'group1', 'group1', 'group2']
>>> max(ourClassesGroup,key=ourClassesGroup.count)
Here is the output:
'group1'
We can see that the class of the new record is group1.
Note
You can read more about the PySpark broadcast variable in the following blogs:
You can find more on KNN on Wikipedia, at
https://en.wikipedia.org/wiki/K-nearest_neighbors_algorithm
.
Recipe 7-3. Read Streaming Data from the Console Using PySpark Streaming
Problem
You want to read streaming data
from the console by using PySpark Streaming.
Solution
Netcat
is network utility software. It can read and write data using TCP or UDP. It can be used as a client or server or both. Many options can be provided. We can provide listen mode by using the -l option. And the s option can be used to keep inbound sockets open for multiple connections. We are going to use a Netcat server to create a console source for data.
Open a terminal and start a Netcat server by using the command nc -lk 55342. Figure 7-1 depicts the starting of a Netcat server.
Figure 7-1.
Netcat server in a console
PySpark Streaming can read data from many sources. In order to read data from a console source, we are going to use the
socketTextStream() function
. This function is defined on the StreamingContext object. Just as SparkContext is a way to enter PySpark, StreamingContext is a way to enter the PySpark Streaming library and use the APIs available in the package.
Just consider that a source produces numeric data. A source puts data on the console. A line of numeric data is created with time. We have to read the console data by using PySpark Streaming, do a summation of each line, and print the result on the console. The data is shown here:
22 34 21 11
22 32 44 11
32 43 34 54
21 23 32 21
The result looks like this:
88.0
109.0
163.0
97.0
How It Works
Step 7-3-1. Starting a Netcat Server
A Netcat server can be started by using the
nc command
. After starting the server, we can type some data on it. Or we can type some data after connecting PySpark Streaming to this server. Here is the data:
$ nc -lk 55342
22 34 21 11
22 32 44 11
32 43 34 54
21 23 32 21
22 32 21 32
21 23 32 21
22 32 21 32
22 32 21 32
32 44 54 32
Step 7-3-2. Defining a Function to Sum Row Data
In this step, we’ll define a function named stringToNumberSum()
. PySpark will read the data from the Netcat server as a string. Sometimes a string might have leading and trailing spaces. So first we have to remove the spaces, which can be done by using the
strip() function
defined on the String data type. Sometimes we might get a blank string; we can deal with that by using an if block. If we get a blank string, we return the None data type. But if a string is not empty, we split the data points by using the
split() function
defined on the Python string. But remember, even after splitting the data points, they are of the String type. We can change it to a float type by using the float() function or integers by using the int() function. A string is transformed to a float by using list comprehension. And finally, the sum() function is used to calculate the sum of a list of elements, and the final result is returned.
>>> def stringToNumberSum(data):
... removedSpaceData = data.strip()
... if removedSpaceData == '' :
... return(None)
... splittedData = removedSpaceData.split(' ')
... numData = [float(x) for x in splittedData]
... sumOfData = sum(numData)
... return (sumOfData)
Step 7-3-3. Reading Data from the Netcat Server and Calculating the Sum
We should start reading data from the Netcat server by using the PySpark Streaming library. In order to use the APIs defined in the Streaming library, we have to first import StreamingContext and create an object out of it:
>>> from pyspark.streaming import StreamingContext
>>> pysparkBookStreamingContext = StreamingContext(sc, 10)
Let me explain the preceding code. First, we import StreamingContext. Then we create an object of StreamingContext. In StreamingContex(), the first argument is the SparkContext object sc, and the second argument is the time in seconds. Using this StreamingContext object pysparkBookStreamingContext, we are going to read data from the Netcat server by using the
socketTextStream() function
:
>>> consoleStreamingData = pysparkBookStreamingContext.socketTextStream(
... hostname = 'localhost',
... port = 55342
... )
The first argument of the socketTextStream() method is the hostname where the Netcat server is running. The second argument is the port of the server.
>>> sumedData = consoleStreamingData.map(stringToNumberSum)
>>> sumedData.pprint()
We do the summation using map(), and then we print it to the console by using the pprint() function:
>>> pysparkBookStreamingContext.start() ;pysparkBookStreamingContext.awaitTerminationOrTimeout(30)
A streaming program will start working only when you apply the start() method. And then you have to also provide a function to terminate the execution. We terminate the execution by using awaitTerminationOrTimeout() after 30 seconds. Both methods, start() and awaitTerminationOrTimeout(), are defined on StreamingContext. The output of our code is as follows:
-------------------------------------------
Time: 2017-08-27 12:58:20
-------------------------------------------
88.0
109.0
163.0
97.0
107.0
-------------------------------------------
Time: 2017-08-27 12:58:30
-------------------------------------------
-------------------------------------------
Time: 2017-08-27 12:58:40
-------------------------------------------
97.0
107.0
-------------------------------------------
Time: 2017-08-27 12:58:50
-------------------------------------------
107.0
162.0
-------------------------------------------
Time: 2017-08-27 12:59:00
-------------------------------------------
For the time interval of 10 seconds, whatever row it is getting, it returns the sum of numbers in each row.
Recipe 7-4. Integrate PySpark Streaming with Apache Kafka, and Read and Analyze the Data
Problem
You want to integrate PySpark Streaming with Apache Kafka
, and read and analyze the data.
Solution
We discussed Apache Kafka in Chapter 1, and you already know the meaning of topic, producer, consumer, and broker. You know that Kafka uses ZooKeeper. Let’s see the working of Apache Kafka. We will start a ZooKeeper server. Then we will create a Kafka topic. Let’s start a ZooKeeper server first:
Starting zookeeper
kafka$ bin/zookeeper-server-start.sh config/zookeeper.properties
The ZooKeeper server is started by using the zookeeper-server-start.sh script. This script is in the bin directory of the Kafka installation. After starting ZooKeeper, we are going to create a Kafka topic. This can be created by using the kafka-topics.sh script, which resides in the bin directory:
Starting a Kafka Topic
kafka$ bin/kafka-topics.sh --create --zookeeper localhost:2185 --replication-factor 1 --partitions 1 --topic pysparkBookTopic
Here is the output:
Created topic "pysparkBookTopic".
We have provided many options to Kafka. The ZooKeeper option provides data about ZooKeeper; we provide a replication factor of 1, as we are not replicating the data. On a real-time server, you are supposed to replicate the data for fault-tolerance.
We have created a topic named pysparkBookTopic.
Let’s start the broker:
Starting Kafka Server
kafka$ bin/kafka-server-start.sh config/server.properties
We are going to start a console producer. The Apache Kafka console producer will read data from the console and produce it to the broker:
kafka$ bin/kafka-console-producer.sh --broker-list localhost:9092 --topic pysparkBookTopic
We can start the Kafka console producer by using the kafka-console-producer.sh script. You will find this script under the bin directory of Kafka home. The console producer produces message from the console.
Let’s put some data in the console where the console producer has been started:
20 25 25 23
21 24 21 20
20 25 25 23
21 23 21 23
Now it is time to start a console consumer. The console consumer will finally print the data on the console:
kafka$ bin/kafka-console-consumer.sh --from-beginning --zookeeper localhost:2185 --topic pysparkBookTopic
20 25 25 23
21 24 21 20
20 25 25 23
21 23 21 23
Just after starting the console consumer, you will see the data produced by the console producer on the console of the console consumer.
Now that you understand the workings of Kafka, we have to rework Recipe 7-3 with some changes. This time, we’ll read data from the console by using Apache Kafka, and then from Kafka we will read the data by using PySpark Streaming. After reading the data, we have to analyze it. We’ll read rows of numbers and calculate the sum of the numbers of each row.
How It Works
Step 7-4-1. Starting ZooKeeper, Creating the Topic, Starting the Apache Kafka Broker and the Console Producer
kafka$ bin/zookeeper-server-start.sh config/zookeeper.properties
kafka$ bin/kafka-server-start.sh config/server.properties
kafka$ bin/kafka-console-producer.sh --broker-list localhost:9092 --topic pysparkBookTopic
kafka$ bin/kafka-console-producer.sh --broker-list localhost:9092 --topic pysparkBookTopic
32 43 45
43 54 57
32 21 32
34 54 65
Step 7-4-2. Starting PySpark with the spark-streaming-kafka Package
$ pyspark --packages org.apache.spark:spark-streaming-kafka-0-8_2.11:2.0.0
Step 7-4-3. Creating a Sum of Each Row of Numbers
We already created this function in the previous recipe and explained it too:
>>> def stringToNumberSum(data):
... removedSpaceData = data.strip()
... if removedSpaceData == '' :
... return(None)
... splittedData = removedSpaceData.split(' ')
... numData = [float(x) for x in splittedData]
... sumOfData = sum(numData)
... return (sumOfData)
>>> dataInString = '10 10 20 '
>>> stringToNumberSum(dataInString)
40.0
We have tested this function too.
Step 7-4-4. Reading Data from Kafka and Getting the Sum of Each Row
The function for dealing with Kafka has been defined in the KafKaUtils class. Therefore, we first have to import it. Then we have to create the StreamingContext object:
>>> from pyspark.streaming.kafka import KafkaUtils
>>> from pyspark.streaming import StreamingContext
>>> bookStreamContext = StreamingContext(sc, 10)
Next we are going to read data from Kafka by using the createStream() method defined in KafkaUtils:
>>> bookKafkaStream = KafkaUtils.createStream(
ssc = bookStreamContext,
zkQuorum = 'localhost:2185',
groupId = 'pysparkBookGroup',
topics = {'pysparkBookTopic':1}
)
The first argument of the
createStream() function
is the StreamingContext object. The second argument is zkQuorum, where we provide the host machine and port of ZooKeeper. The topic is pysparkBookTopic, which we already created, and 1 in the dictionary is the replication factor of the data.
>>> sumedData = bookKafkaStream.map( lambda data : stringToNumberSum(data[1]))
After getting the data, we run a summation on it:
>>> sumedData.pprint()
>>> bookStreamContext.start() ;bookStreamContext.awaitTerminationOrTimeout(30)
Here is the output:
-------------------------------------------
Time: 2017-08-26 20:21:40
-------------------------------------------
120.0
154.0
17/08/26 20:21:44 WARN BlockManager: Block input-0-1503759104200 replicated to only 0 peer(s) instead of 1 peers
----------------------------------- --------
Time: 2017-08-26 20:21:50
------------------------------- ------------
85.0
17/08/26 20:21:51 WARN BlockManager: Block input-0-1503759110800 replicated to only 0 peer(s) instead of 1 peers
---------------------------------- ---------
Time: 2017-08-26 20:22:00
------------------------------------ -------
153.0
-------------------------------- -----------
Time: 2017-08-26 20:22:10
------------------------------------ -------
-------------------------------- -----------
Time: 2017-08-26 20:22:20
------------------------------------ -------
Note
You can read more about Apache Kafka in the following blogs:
Recipe 7-5. Execute a PySpark Script in Local Mode
Problem
You want to execute a PySpark script in local mode
.
Solution
We have written the PySpark script innerJoinInPySpark.py. The content of this code file is as follows:
from pyspark import SparkContext
studentData = [['si1','Robin','M'],
['si2','Maria','F'],
['si3','Julie','F'],
['si4','Bob', 'M'],
['si6','William','M']]
subjectsData = [['si1','Python'],
['si3','Java'],
['si1','Java'],
['si2','Python'],
['si3','Ruby'],
['si4','C++'],
['si5','C'],
['si4','Python'],
['si2','Java']]
ourSparkContext = SparkContext(appName = 'innerDataJoining')
ourSparkContext.setLogLevel('ERROR')
studentRDD = ourSparkContext.parallelize(studentData, 2)
studentPairedRDD = studentRDD.map(lambda val : (val[0],[val[1],val[2]]))
subjectsPairedRDD = ourSparkContext.parallelize(subjectsData, 2)
studenSubjectsInnerJoin = studentPairedRDD.join(subjectsPairedRDD)
innerJoinedData = studenSubjectsInnerJoin.collect()
print innerJoinedData
This is the inner join program we used in Chapter 5 for inner joins. But two extra lines have been added. The extra lines are as follows:
from pyspark import SparkContext
and
ourSparkContext = SparkContext(appName = 'innerDataJoining')
We found that in the PySpark console, PySpark itself creates the SparkContext object as sc and enables us to use it. But in PySpark scripts, we have to create our own SparkContext. SparkContext is a way to use the APIs provided by PySpark. Therefore, there are two extra lines. The first line imports SparkContext, and the second line creates the SparkContext object with the application name (appName) innerDataJoining. Let’s run this PySpark script in PySpark local mode.
How It Works
To run the PySpark script, we use the spark-submit command. In the following command, local[2] means we are using two threads for execution. The spark-submit option master defines which master we are going to use. We are using the local master.
[pysparkbook@localhost bookCode]$ spark-submit - -master local[2] innerJoinInPySpark.py
Here is the output:
17/08/29 12:52:09 INFO executor.Executor: Starting executor ID driver on host localhost
17/08/29 12:52:09 INFO util.Utils: Successfully started service 'org.apache.spark.network.netty.NettyBlockTransferService' on port 42886.
17/08/29 12:52:09 INFO netty.NettyBlockTransferService: Server created on 42886
17/08/29 12:52:09 INFO storage.BlockManagerMaster: Trying to register BlockManager
17/08/29 12:52:09 INFO storage.BlockManagerMasterEndpoint: Registering block manager localhost:42886 with 517.4 MB RAM, BlockManagerId(driver, localhost, 42886)
17/08/29 12:52:09 INFO storage.BlockManagerMaster: Registered BlockManager
[('si3', (['Julie', 'F'], 'Java')), ('si3', (['Julie', 'F'], 'Ruby')), ('si2', (['Maria', 'F'], 'Python')), ('si2', (['Maria', 'F'], 'Java')), ('si1', (['Robin', 'M'], 'Python')), ('si1', (['Robin', 'M'], 'Java')), ('si4', (['Bob', 'M'], 'C++')), ('si4', (['Bob', 'M'], 'Python'))]
We have the inner join data as output. In the next recipe, we are going to run the same script using Standalone and Mesos cluster managers.
Recipe 7-6. Execute a PySpark Script Using Standalone Cluster Manager and Mesos Cluster Manager
Problem
You want to execute a PySpark script by using Standalone Cluster Manager and the Mesos cluster manager
.
Solution
We can execute our script by using spark-submit. But first we have to start Standalone Cluster Manager. It can be started with the start-all.sh script in sbin of SparkHome:
[pysparkbook@localhost sbin]$ /allPySpark/spark/sbin/start-all.sh
Here is the output:
starting org.apache.spark.deploy.master.Master, logging to /allPySpark/logSpark//spark-pysparkbook-org.apache.spark.deploy.master.Master-1-localhost.localdomain.out
localhost: starting org.apache.spark.deploy.worker.Worker, logging to /allPySpark/logSpark//spark-pysparkbook-org.apache.spark.deploy.worker.Worker-1-localhost.localdomain.out
Similarly, to run on Mesos, we have to start the Mesos master and slaves:
[pysparkbook@localhost bookCode]$ mesos-master --work_dir=/allPySpark/mesos/workdir &
[root@localhost bookCode]# mesos-slave --master=127.0.0.1:5050 --work_dir=/allPySpark/mesos/workdir --systemd_runtime_directory=/allPySpark/mesos/systemd &
How It Works
Let’s first run our script by using Standalone Cluster Manager:
[pysparkbook@localhost bookCode]$ spark-submit --master spark://localhost.localdomain:7077 --num-executors 2 innerJoinInPySpark.py
Here is the output:
[('si3', (['Julie', 'F'], 'Java')), ('si3', (['Julie', 'F'], 'Ruby')), ('si2', (['Maria', 'F'], 'Python')), ('si2', (['Maria', 'F'], 'Java')), ('si1', (['Robin', 'M'], 'Python')), ('si1', (['Robin', 'M'], 'Java')), ('si4', (['Bob', 'M'], 'C++')), ('si4', (['Bob', 'M'], 'Python'))]
In the command, the value of the master option is the Standalone master URL. Similarly, we can execute on Mesos by using the Mesos master URL:
spark-submit --master mesos://127.0.0.1:5050 --conf spark.executor.uri=/home/pysparkbook/binaries/spark-1.6.2-bin-hadoop2.6.tgz innerJoinInPySpark.py