
Chapter 1. An Introduction to PyTorch
PyTorch is one of the most popular deep learning Python libraries, and it is widely used by the AI research community. Many developers and researchers use PyTorch to accelerate deep learning research experimentation and prototyping.
In this chapter, I will give you a brief introduction into what PyTorch is, and some of the features that make it popular. I’ll also show you how to install and set up your PyTorch development environment on your local machine and in the cloud. By the end of this chapter, you will be able to verify that PyTorch is properly installed and run a simple PyTorch program.
What is PyTorch?
The PyTorch library is primarily developed by Facebook’s AI Research Lab (FAIR) and is free and open source software. It allows you to easily run array based calculations on a GPU and compute tape based auto-differentiation, two features required by most deep learning research. Although some use it for accelerated tensor computing, most use it for deep learning development.
PyTorch‘s simple and flexible interface enables fast experimentation. You can load data, apply transforms, and build models with a few lines of code. Then, you have the flexibility to write customized training, validation, and test loops and deploy trained models with ease.
It has a strong ecosystem and large user community including universities like Stanford, and companies such as Uber, NVIDIA, and Salesforce. In 2019, PyTorch dominated Machine Learning and Deep Learning conference proceedings with 69% of CVPR (Conference on Computer Vision and Pattern Recognition) using PyTorch, 75+% of both NAACL and ACL (Association for Computational Linguistics), and 50+% of ICLR (International Conference on Learning Representations) and ICML (International Conference on Machine Learning).
Many developers and researchers use PyTorch to accelerate deep learning research experimentation and prototyping. It’s simple Python API, GPU support, and flexibility make it a popular choice among academic and commercial research organizations. Since being open sourced in 2018, PyTorch has reached a stable release and can be installed on Windows, Mac, and Linux operating systems. The framework continues to expand rapidly and now facilitates deployment to production environments in both the cloud and mobile platforms.
Why use PyTorch?
If you’re studying DL, conducting DL research or building DL systems you will probably need to use a DL framework. PyTorch became very popular with the academic and research communities due to its simplicity and flexibility. Here are some reasons why you may want to learn and use PyTorch.
PyTorch is popular. Many companies and research organizations use PyTorch as their main deep learning framework. In fact, some companies have built their custom machine learning tools on top of PyTorch. As a result, PyTorch skills are in demand and companies are hiring people with PyTorch skills.
PyTorch is supported by all major cloud platforms such as AWS (Amazon Web Services), GCP (Google Cloud Platform), Microsoft Azure, and Alibaba Cloud. You can spin up a virtual machine with PyTorch pre-loaded for frictionless development. You can use pre-built docker images, compute large scale training on cloud GPU platforms, and run models at production scale.
PyTorch is supported by Google Colaboratory and Kaggle Kernels. You can run PyTorch code in your browser with no installation or configuration needed. You can compete in Kaggle competitions by running PyTorch directly in your kernel.
PyTorch is mature and stable. PyTorch is regularly maintained and is now beyond release 1.5.
PyTorch supports CPU, GPU, TPU as well as parallel processing. You can accelerate your training and inference using GPUs and TPUs. You can apply transforms on your CPU while training a model using the GPU.
PyTorch supports Distributed Training. You can train neural networks over multiple GPUs on multiple machines.
PyTorch supports Deployment to Production. With newer Torchscript and TorchServe features, you can deploy models to cloud servers.
PyTorch is beginning to support Mobile Deployment. Although it’s currently experimental, you can now deploy models to iOS and Android devices.
PyTorch has a vast ecosystem and set of open source libraries. Libraries such as torchvision, Fast.ai, and PyTorch Lightning extend capabilities and support specific fields like NLP and Computer Vision.
PyTorch also has a C++ Front End. Although I will focus on the Python interface in this book, PyTorch also supports a front-end C interface. If you need to build high performance, low latency, or bare metal applications, you can write them in C using the same design and architecture of the Python API.
PyTorch supports native ONNX (Open Neural Network Exchange) format. You can easily export your models to ONNX format and use them with ONNX-compatible platforms, runtimes, or visualizers.
PyTorch has a large community of developers and user forums. It’s easy to get support or post questions to the community.
Getting Started
If you are familiar with PyTorch, you may already have installed PyTorch and set up your development environment. If not, I will show you some options to do so in this section. The fastest way to get started is to use Google Colaboratory (or “Colab” for short.) Google Colab is a free cloud based development environment similar to Jupyter Notebook and comes with PyTorch already installed. Colab comes with free limited GPU support and interfaces nicely with Google Drive for saving and sharing notebooks.
If you do not have internet access, or want to run on your own hardware, then I will show you how to install PyTorch on a local machine. You can install PyTorch on Windows, Linux, and MacOS operating systems. I recommend that you have an NVidia GPU for acceleration, but it is not required.
Lastly, you may want to develop PyTorch code using a cloud platform like AWS, Azure, or GCP. If you would like to use a cloud platform, I will show you the options to quickly get started on each platform.
Running in Google Colaboratory
With Google Colab, you can write and execute Python and PyTorch code in your browser. You can save files directly to your Google Drive Account and easily share your work with others. To get started, visit Google Colab as shown in Figure 1-1.

Figure 1-1. Google Colaboratory welcome page
If you are already signed into your Google account, you will get a pop up window. click New Notebook in the bottom right. If not, click File - New Notebook from the menu. You will be prompted to sign in or create a Google account as shown in Figure 1-2.

Figure 1-2. Google sign in
To verify your configuration, import the PyTorch library, print the installed version, and check if you are using a GPU as shown in Figure 1-3.
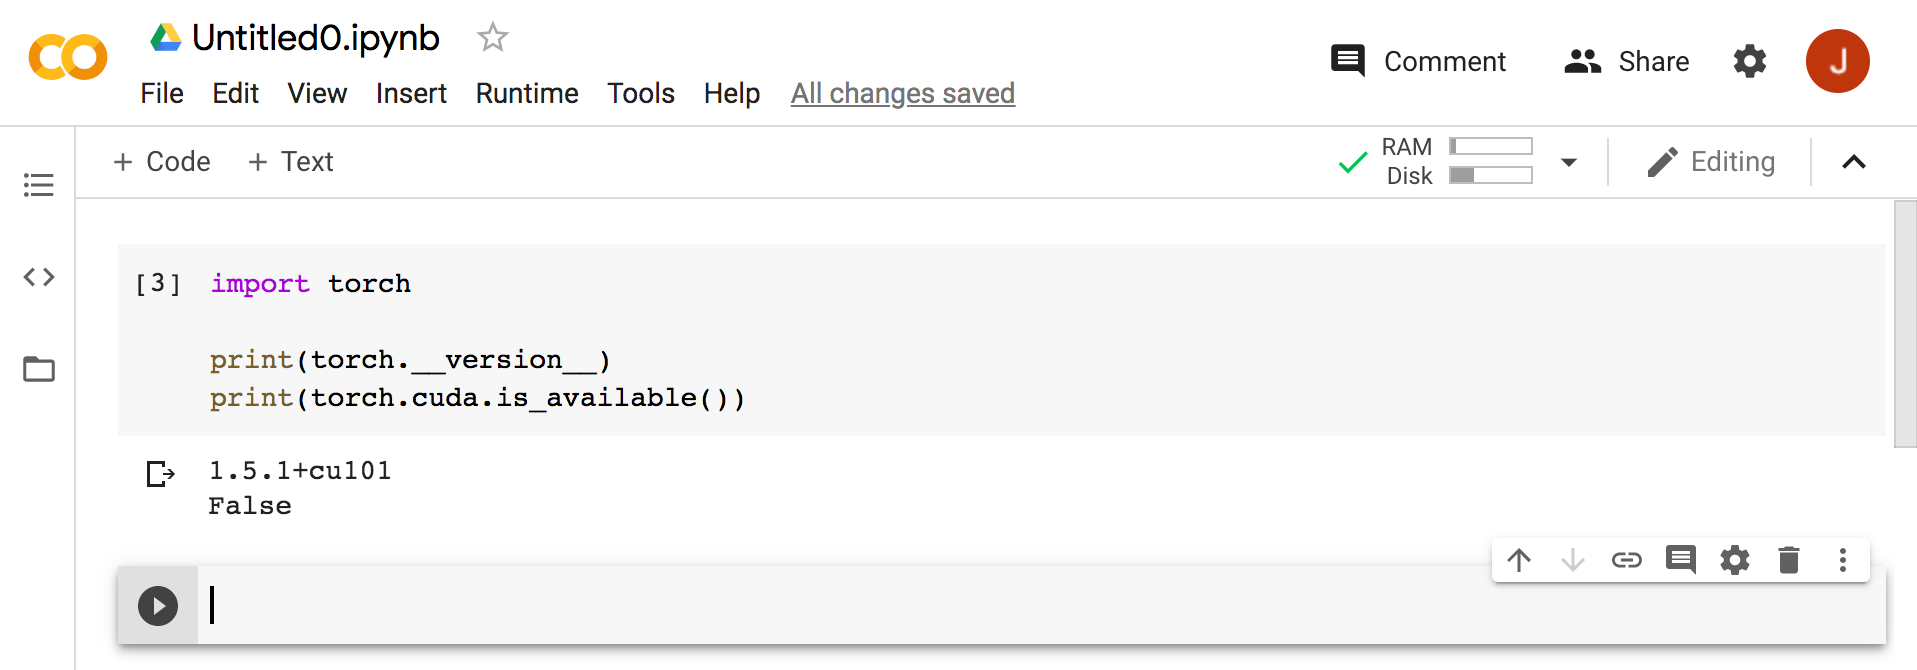
Figure 1-3. Verify PyTorch installation in Google Colaboratory
By default, our Colab notebook does not use a GPU. You will need to select Runtime - Change Runtime Type from the menu and select GPU from the Hardware Accelerator dropdown menu and click Save as shown in Figure 1-4.
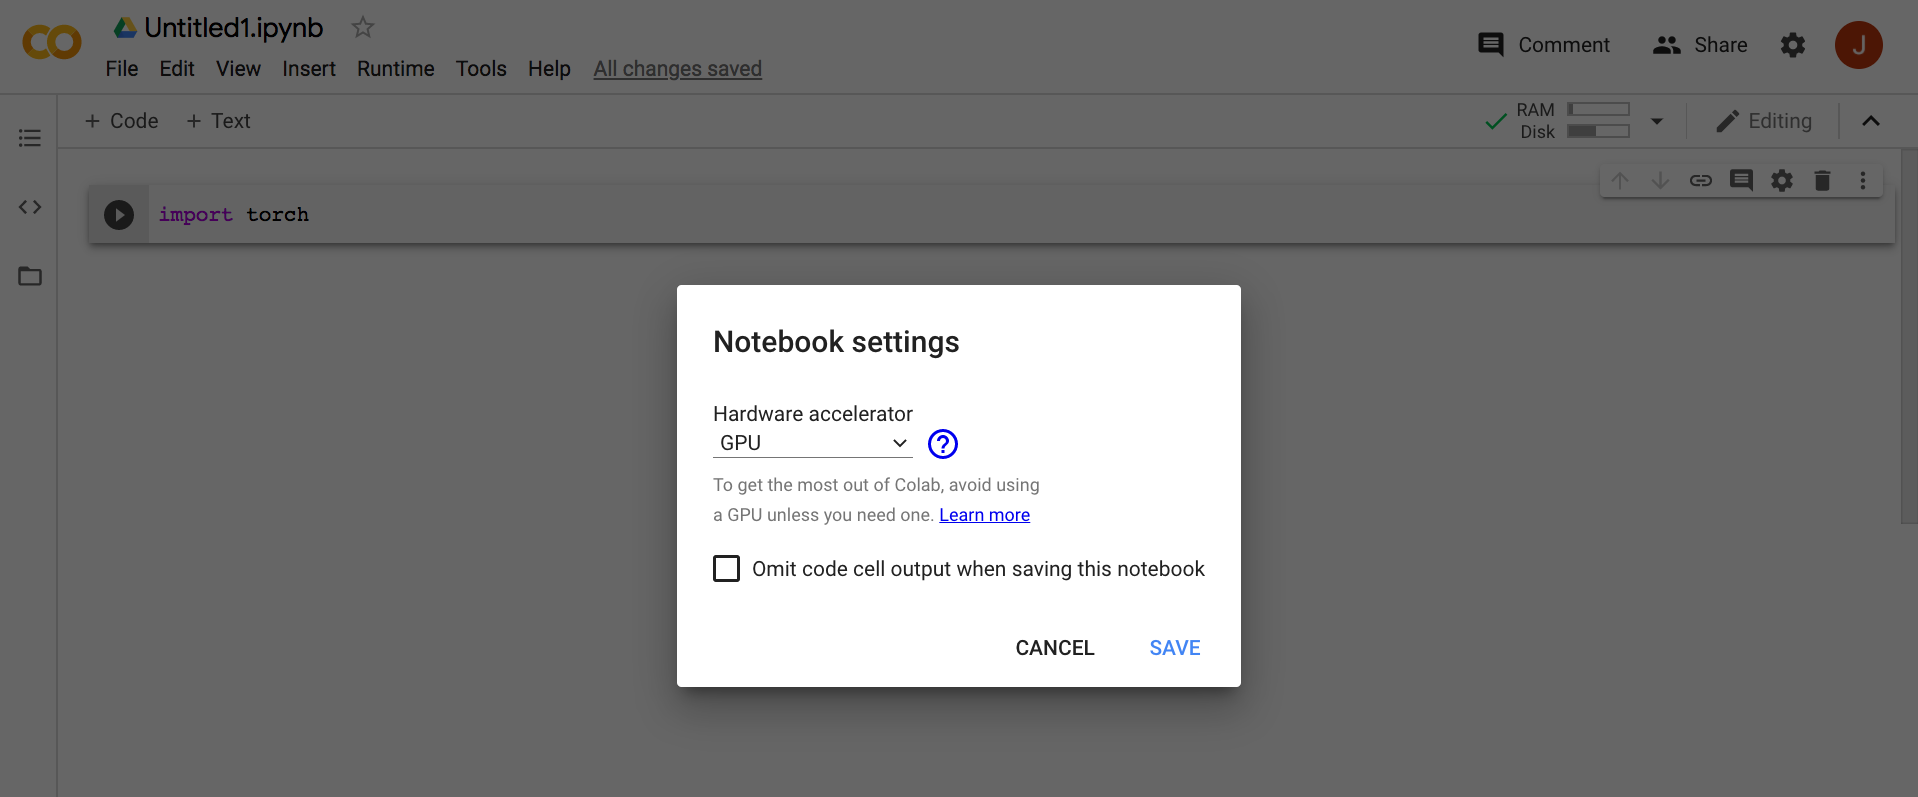
Figure 1-4. Use a GPU in Google Colaboratory
Now run the cell again by selecting the cell and pressing Shift-Enter. You should see True as the output of is_available() as shown in Figure 1-5.

Figure 1-5. Verify GPU is active in Google Colab
Note
Google offers a paid version called Colab Pro which provides Faster GPUs longer runtimes, and more memory. For the examples in this book the free version of Colab should be sufficient.
Now you have verified that PyTorch is installed and you know the version. You have also verified that you have a GPU available and that the proper drivers are installed and operating correctly. Next, I will show you how to verify your PyTorch on a local machine.
Running on Local Computer
You may want to also install PyTorch on a local machine or your own server under certain conditions. For example, you may want to work with local storage, use your own GPU or faster GPU hardware, or you do not have internet access. Running PyTorch does not require a GPU but it would be needed to run GPU acceleration. I recommend using an NVIDIA GPU as PyTorch is closely tied to the CUDA drivers for GPU support.
Warning
Check your GPU and CUDA version first! PyTorch only supports specific GPU and CUDA versions and many Mac computers use non-NVIDIA GPUs. If you are using a Mac, verify that you have an NVidia GPU by clicking the Apple icon on the menu bar - About This Mac, and selecting the Displays tab. If you do see an NVidia GPU on your Mac and want to use it, you must also build PyTorch from scratch. If you do not see an NVidia GPU, you should use the CPU only version of PyTorch or choose another computer with a different OS.
The PyTorch website offers a convenient browser tool for installation as shown in Figure 1-6. Select latest stable Build, your OS, your preferred python package manager (conda is recommended), the Python language, and your CUDA version. Execute the command line and follow the instructions for your configuration. Note the prerequisites, installation instructions, and verifications methods.

Figure 1-6. PyTorch online installation configuration tool
You should be able to run the verification code snippet in your favorite IDE (e.g. Jupyter Notebook, Microsoft Visual Studio Code, PyCharm, Spyder, etc.) or from the terminal. Verifying from a terminal on a Mac is shown in Figure 1-7. The same commands can be used to verify in a Windows or Linux terminal as well.

Figure 1-7. PyTorch verification using Mac terminal
Running on Cloud Platforms
If you’re familiar with cloud platforms like AWS, GCP, or Azure, you can run PyTorch in the cloud. Cloud platforms provide powerful hardware and infrastructure for training and deploying deep learning models. Remember using cloud services especially GPU instances incurs additional costs. To get started, follow the instructions in the online PyTorch cloud setup guide for your platform of interest.
Setting up your cloud environment is beyond the scope of this book but we will summarize your available options. Each platform offers a virtual machine instance as well as managed services to support PyTorch development.
Running on Amazon Web Services
AWS offers multiple options to run PyTorch in the cloud. If you prefer a fully managed service, you can use AWS Sagemaker. Otherwise, you can use AWS Deep Learning AMIs or Containers if you’d rather manage your own infrastructure.
Amazon Sagemaker is a fully managed service to train and deploy models. You can run Jupyter Notebooks from the dashboard and use Sagemaker Python SDK to train and deploy models in the cloud. You can run your notebooks on a dedicated GPU instance.
AWS Deep Learning AMIs are pre-configured virtual machine environments. You can choose the Conda AMI which has many libraries including PyTorch pre-installed or you can use the BASE AMI if you ‘d prefer a clean environment to set up private repositories or custom builds.
AWS Deep Learning Containers are Docker images that come pre-installed with PyTorch. They enable you to skip the process of building and optimizing your environment from scratch, and are mainly used for deployment.
For more detailed information on how to get started, review the instructions at Getting Started with PyTorch on AWS.
Running on Microsoft Azure
Azure also offers multiple options to run PyTorch in the cloud. You can develop PyTorch models using the fully managed service called Azure Machine Learning or run Data Science Virtual Machines if you prefer to manage your own infrastructure.
Azure Machine Learning is an enterprise-grade machine learning service to build and deploy models. It includes a drag-and-drop designer and MLOps capabilities to integrate with existing DevOps processes.
Data Science Virtual Machines are pre-configured virtual machine environments. They come pre-installed with PyTorch and other deep learning frameworks as well as development tools like Jupyter Notebooks and VS Code.
For more detailed information on how to get started, review the instructions at Azure Machine Learning.
Running on Google Cloud
GCP also offers multiple options to run PyTorch in the cloud. You can develop PyTorch models using the managed service called AI Platform Notebooks or run Deep Learning VM Images if you prefer to manage your own infrastructure.
AI Platform Notebooks is a managed service whose integrated JupyterLab environment allows you to create pre-configured GPU instances.
Deep Learning VM Images are pre-configured virtual machine environments.. They come pre-installed with PyTorch and other deep learning frameworks as well as development tools.
For more detailed information on how to get started, review the instructions at Google Cloud AI and Machine Learning products.
Verifying Your PyTorch Environment
Whether you use Colab, your local machine, or your favorite cloud platform, you should verify that PyTorch is properly installed and check to see if you have a GPU available. To verify that PyTorch is properly installed, use the following code snippet. The code imports the PyTorch library, prints the version, and checks to see if a GPU is available.
importtorch(torch.__version__)(torch.cuda.is_available())
Warning
You import the library using import torch not import pytorch. PyTorch is originally based on the Torch library, an open source machine learning framework based on C and the Lua programming language. Keeping the library named torch allows torch code to be reused with a more efficient PyTorch implementation.
Now that you verified that your environment is configured properly, you can execute PyTorch code. The remainder of the book will provide a quick reference for PyTorch programming and API usage. In the next chapter, I will provide a quick reference to the Tensor object, the fundamental data structure of PyTorch.