Hour 23. Creating Basic Pi/Python Projects
What You’ll Learn in This Hour:
![]() How to display HD images via Python
How to display HD images via Python
![]() How to use Python to play music
How to use Python to play music
![]() How to create a special presentation
How to create a special presentation
In this hour, you will learn how to create some basic projects on your Raspberry Pi using Python. You will learn how to make your very own high-definition image presentation, how to use Python to play a list of music on your Raspberry Pi, and how to create a special presentation using Python.
Thinking About Basic Pi/Python Projects
The sky is the limit when it comes to creating projects using your Raspberry Pi and Python! The projects in this hour and the next will help you improve and solidify your Python script-writing skills. Also, you will learn to take advantage of some of the nice features on your Raspberry Pi. And, hopefully, by working on these projects, you will be inspired for additional ventures!
This hour covers a few simple projects. You’ll create something useful, without spending any additional money. You already have all you need for this hour’s basic projects: a Raspberry Pi and Python.
Displaying HD Images via Python
One of the Raspberry Pi’s greatest features is its small size. Carrying around a Pi is even easier than carrying a tablet computer. Another great feature is the Raspberry Pi’s HDMI port. The HDMI port allows you to display high-definition images from your Pi.
These two features together make the Raspberry Pi a perfect platform for many uses. You can take your Pi over to a friend’s house, hook it up to his or her television, and show your vacation pictures. For a business person, the small size of a Pi makes it ideal for travel and making business presentations. For a student, imagine how impressed your teacher will be to not only see your presentation from the Pi, but to learn that you wrote the script that runs it.
Understanding High Definition
There can be a lot of confusion concerning HD. Therefore, before you begin to build the scripts this hour, you need to learn about—or review—what is meant by a high-definition (HD) image.
Other terms for the dimensions of an image are canvas, size, and resolution. This alone can cause confusion! Basically, the dimensions of a picture are the image’s width times its height. It is measured in pixels and is often written in the format width × height. For example, a picture may have the dimensions 1280×720 pixels.
The dimensions of a picture determine whether it is HD. Larger dimension numbers mean a higher resolution. A higher resolution provides a clearer picture. Thus, if you have a new beautiful product to sell your client, an HD picture of it will be worthwhile. Table 23.1 shows the resolutions for each current definition.

You may have noticed that dots per inch (dpi) is not mentioned in the definitions in Table 23.1. This is because dpi has nothing to do with the quality of a picture. dpi is actually an old term that has to do with printing pictures on a computer printer.
By-the-Way: Horizontal and Megapixel
Often a camera’s ability to take still HD photos is rated by giving the height (horizontal) only or giving a megapixel rating (multiplying the height by the width). For example, an HD camera with a resolution of 1280×720 could be listed as 720 or 720p. Its megapixel rating would be 0.92MP.
If you do not know a picture’s resolution, you can determine whether the image is HD by using the Image Viewer utility on Raspbian. In the Raspbian GUI on your Raspberry Pi, click on the LXDE Programs Menu icon. (If you need help remembering where this icon is located, refer to Hour 2, “Understanding the Raspbian Linux Distribution.”)
Within the LXDE menu, in the Accessories submenu is File Manager. When you open the File Manager, you can navigate to any photo or image files currently stored on or accessible by your Raspberry Pi. When the photo or image files are showing in the File Manager window, you can right-click an image file and have the Image Viewer open it. Figure 23.1 shows an example of an image file, /home/pi/python_games/cat.png.

In Figure 23.1, you can see that the Image Viewer’s title bar shows the resolution of the image file: 125×79. This image of a cat is obviously not an HD image. Figure 23.2 shows an example of an HD image.

The photograph’s resolution is 5616×3744, as you can see in the Image Viewer’s title bar. Its resolution makes this still photo of an encased Raspberry Pi an ultra HD image.
The resolution of the pictures you want to present via your Raspberry Pi is up to you. Just remember that higher resolution photos generally provide a clearer image.
Creating the Image Presentation Script
To create the HD image presentation script, you need to draw on the Python skills you’ve learned so far. For this script, you will be using several methods from the PyGame library.
The following are the basics for importing and initializing the PyGame library:
import pygame #Import PyGame library
from pygame.locals import * #Load PyGame constants
pygame.init() #Initialize PyGame
This should look very familiar because the PyGame library is covered in Hour 19, “Game Programming.” If you need a refresher on using PyGame, go back and review that hour.
Setting Up the Presentation Screen
At this point, you need to determine what color you want to make the background screen. Your photos or images should guide your choice of the best background color to use. In general, you should use a monochrome color such as black, white, or gray. To generate the necessary background color, you need to set the RGB color settings. The RGB setting to achieve white is 255,255,255. Black is 0,0,0. The following example uses gray, with a setting of 125,125,125:
ScreenColor = Gray = 125,125,125
Notice that two variables are set up: ScreenColor and Gray. Using two variables not only makes the script more readable but gives you some flexibility in your script. If you plan to always use gray as your background color, you can use the Gray variable throughout the script. If you want to change the background color, you can use the variable ScreenColor in your script.
Flexibility is the name of the game with this Python script. The script you’re creating now is very flexible. It will allow you to walk into a room and use whatever size presentation screen is available. It could be a 30-inch computer monitor sitting on your client’s desk, a 75-inch television screen at your neighbor’s house, or a 10-inch tablet at school. You will not need to edit your script to use the full screen size when you arrive at your presentation site, no matter what the screen size is! To accomplish this feat, when the screen is initialized using pygame.display.set_mode, you use the flag FULLSCREEN, as shown here:
ScreenFlag = FULLSCREEN | NOFRAME
PrezScreen = pygame.display.set_mode((0,0),ScreenFlag)
This causes the PyGame display screen to be set to the full size of the screen the script is encountering at that moment.
Notice that in addition to using FULLSCREEN, you also use the NOFRAME flag. This causes any frames around your screen to disappear during your presentation, allowing the entire available screen to be used for your HD images.
Finding the Images
Now that you have your presentation screen set up, you need to find your images, so you need to know their file names. Once again, the idea is flexibility: You want to be able to add or delete photo files without needing to edit the Python script.
To have your script find your images for you, put two variables in the script that describe where the pictures are located and their file extensions. In this example, the variable PictureDirectory is set to point to the location of the stored photographs:
PictureDirectory = '/home/pi/pictures'
PictureFileExtension = '.jpg'
The variable PictureFileExtension is set to the photo’s current file extension. If you have multiple file extensions, you can easily add additional variables, such as PictureFileExtension1.
After you set the location of the photos and their file extensions, list the files in that photo directory. To accomplish this, you need to import another module, the os module, as shown here:
import os #Import OS module
You can use the os.listdir operation to list the contents of the directory that contains the photos. Each file located in the directory will be captured by the Picture variable. Thus, you can use a for loop to process each file as it is encountered:
for Picture in os.listdir(PictureDirectory):
You may have other files located in this directory, especially if you use a removable drive. (See the section “Storing Photos on a Removable Drive,” later in this hour.) To grab and display only the desired images, you can have the script check each file for the appropriate file extension before loading it with the .endswith operation. You can use an if statement to conduct this operation. The for loop should now look as follows:
for Picture in os.listdir(PictureDirectory):
if Picture.endswith(PictureFileExtension):
Now, all the pictures ending with the appropriate file extension will be processed. The rest of the loop simply loads each picture and then fills the screen with the designated screen color:
Picture=PictureDirectory + '/' + Picture
Picture=pygame.image.load(Picture).convert_alpha()
PictureLocation=Picture.get_rect() #Current location
#Display HD Images to Screen #################3
PrezScreen.fill(ScreenColor)
PrezScreen.blit(Picture,PictureLocation)
pygame.display.update()
Also, you use the .blit operation to put the picture on the screen. Finally, the pygame.display.update operation causes all the pictures to be displayed.
Did You Know: Movies
Many cameras can capture high-definition videos as well as photos. They use something called HDSLR (high-definition single-lens reflex) technology. These cameras save the videos in MPEG format. In the PyGame library, you can use the pygame.movie operation to display these MPEG-format videos.
Before moving on, you need to know about some additional flexibility concerning your images. Putting your photos on another storage device besides the SD card will allow you to not only store larger and higher-resolution photo files, it will also allow you to store more photos. This means more vacation photos to share. Your poor neighbors!
Storing Photos on a Removable Drive
HD photos can take up a great deal of space. If you have a large number of photos to present, your SD card may not have the space needed to hold them all. Remember that the Raspbian operating system also resides on the SD card. One way to fix this problem is to use a removable drive to hold your presentation photos. However, using a removable drive introduces a new problem: How does your Python presentation script access the photos on the removable drive?
Before you start modifying the presentation script, you need to determine the “device file” name Raspbian will assign to your removable drive. Basically, a device file is a file name Raspbian uses to access a device, such as a removable hard drive. To determine the device file name, you follow these steps:
1. While in the GUI, plug your removable drive into an open USB port on your Raspberry Pi.
2. When the Removable Medium Is Inserted window appears, select Open in File Manager if it is not already selected and then click the OK button. The File Manager window opens, showing your files and some other important information (see Figure 23.3).

3. Look at the File Manager address bar for the directory that contains the files. Record the directory name for later use (The directory name in Figure 23.3 is /media/28BE-27DC).
4. Close the File Manager window.
5. Open LXTerminal in the GUI and type in the command ls directory, where directory is the name of the directory you recorded in step 3. Press Enter. You should see your picture files (and any other files located there) on your removable hard drive.
6. Now type mount and press Enter. You should see results similar to those shown in Listing 23.1. When you use the mount command, you can see the device file name that will be used for the removable drive when it is attached to the Raspberry Pi. (In Listing 23.1, the device file is /dev/sda1.)
LISTING 23.1 Using mount to Display the Device File Names
1: pi@raspberrypi ~ $ mount
2: /dev/root on / type ext4 (rw,noatime,data=ordered)
3: ...
4: /dev/mmcblk0p1 on /boot type vfat (rw,relatime,fmask=0022,dmask=0022,
5: codepage=cp437,iocharset=ascii,shortname=mixed,errors=remount-ro)
6: /dev/sda1 on /media/28BE-27DC type vfat (rw,nosuid,nodev,relatime,uid=1000,
7: ...
It looks like a bunch of just letters and numbers on the screen, but a couple clues show you the name of the removable drive’s device file. The first clue is to look for the name of directory you recorded in step 3. In this example, the directory name is /media/28B3-27DC. Do you see it on line 6 of Listing 23.1? The next clue is to look for the word /dev on the same line as the directory name. In this example, the device file name is /dev/sda1, also listed on line 6.
7. Record the device file name for your removable hard drive that you found in step 6. You will need this information in your Python presentation script.
Watch Out!: Changing Device File Names
Device file names can change! This is especially true if you have other removable hard drives or devices attached to the USB ports on a Raspberry Pi. They can also change if you plug your removable hard drive into a different USB port.
8. Type umount device file name, where device file name is the device file name you recorded in step 6. (Yes, that command is umount and not unmount.) This command unmounts your removable hard drive from the Raspberry Pi. You can then safely remove it from the USB port.
9. Type mkdir /home/pi/pictures to create a directory for your removable hard drive’s files.
Now that you have determined the device file name Raspbian will use to refer to your removable hard drive, you need to make some modifications to your presentation script. First, create a variable in your Python script to represent the device file name you determined in the steps above. Here’s an example:
PictureDisk = '/dev/sda1'
The os module has a nice little function called .system. This function allows you to pass dash shell commands (which you learned about in Hour 2) from your Python script to the operating system.
In your script, you should make sure that the removable hard drive has not been automatically mounted. You can do this by issuing an umount command, using os.system, as shown here:
Command = "sudo umount " + PictureDisk
os.system(Command)
However, if the removable hard drive has not been mounted, this command generates an error message and then continues on with the presentation script. Getting this error message is not a problem. However, error messages certainly are not nice looking in a presentation! Not to worry: You can hide the potential error message by using a little dash shell command trick, as shown here:
Command = "sudo umount " + PictureDisk + " 2>/dev/null"
os.system(Command)
Now to mount your removable hard drive using the Python script, you use the os.system function again to pass a mount command to the operating system, like this:
Command = "sudo mount -t vfat " + PictureDisk + " " + PictureDirectory
os.system(Command)
Remember that the PictureDirectory variable was set earlier to /home/pi/pictures. The files on the removable hard drive will now be available in the /home/pi/pictures directory. (Don’t worry if this concept is a little confusing to you. It is an advanced Linux concept!)
Watch Out!: Removable Drive Format
The majority of removable hard drives are formatted using VFAT. However, some have been formatted using NTFS. If your removable hard drive is NTFS, you need to change the -t vfat to -t ntfs in the mount command line of the script.
Now you have set up your presentation screen, found the image files, and even incorporated the use of a removable hard drive into your Python script. However, you need to resolve a few more issues before you are ready to conduct your presentation.
Scaling the Photos
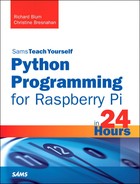
When you don’t always know what the presentation screen size will be, you can end up with oversized photos on a screen that’s too small. Figure 23.4 shows how an oversized photo might look on a small screen. In this photo, it appears that you are trying to show your audience a picture of a particular chip. However, you are really trying to show a picture of an entire Raspberry Pi.
To ensure that your photos are properly sized, you need to determine the size of the current presentation screen. The .get_size operation helps with this. When the presentation screen is originally set up, you have your script determine the size of the current screen and assign it to a variable. Then you set up a variable called Scale, to be used to scale down any oversized pictures, as shown here:
PrezScreenSize = PrezScreen.get_size()
Scale=PrezScreenSize
Within your picture display for loop, you add the following if statement to check the size of the current picture. If the picture is larger than the current presentation screen, you have the script scale it down to screen size by using pygame.transform.scale, like this:
# If Picture is bigger than screen, scale it down.
if Picture.get_size() > PrezScreenSize:
Picture = pygame.transform.scale(Picture,Scale)
This causes that one oversized photo in Figure 23.4 to now look like a great HD picture, as shown in Figure 23.5.

Now that the photo is correctly sized, you can see the entire Raspberry Pi and not just a single chip. Also, the paper clip is now showing, giving the viewing audience a nice size comparison.
Framing the Photos
To make your photo presentation just a little nicer, you can add a frame to all your photos. Just a minor adjustment to your Scale variable, as shown here, does the trick:
Scale=PrezScreenSize[0]-20,PrezScreenSize[1]-20
Now that you’ve added the frame, your photos will look as shown in Figure 23.6. Each one will have the screen’s background color surrounding it.

Note that if you have photos of different sizes, the thickness of your frame will change. Also, if a photo is already smaller than the current presentation screen, the frame will have a different thickness than any displayed oversized photos that must be scaled.
Centering the Photos
One problem you haven’t seen yet is keeping your images in the middle of the presentation screen. When you use the functions in the PyGame library to display photos, by default, the photos are displayed in the upper-left corner of the screen. For larger pictures that are framed, the effect of being off-center is subtle. Notice in Figure 23.7 that the frame is missing from the upper and left sections of the display screen.

To properly center your images, you need to add an additional variable to the place where the display screen is set up in your Python script. This variable, called CenterScreen, uses the .center method on the display screen to find exactly the center point of the current screen. Here’s an example:
PrezScreenRect = PrezScreen.get_rect()
CenterScreen = PrezScreenRect.center
Within the display picture for loop, you modify the variable PictureLocation slightly. After the current location of the picture’s rectangular area is obtained, the center of the picture’s rectangle is set, using .center method:
PictureLocation=Picture.get_rect() #Current location
PictureLocation.center=CenterScreen #Put picture in center of screen
Thus, when the picture is put on the screen using the following code, its center will be exactly the center of the presentation screen:
PrezScreen.blit(Picture,PictureLocation)
How cool is this?!
You have seen lots of bits and pieces of code to produce this presentation script. Listing 23.2 shows the entire script that has been put together so far.
LISTING 23.2 The script2301.py Presentation Script
#script2301.py - HD Presentation
#Written by Blum and Bresnahan
#
##########################################
#
##### Import Modules & Variables ######
import os #Import OS module
import pygame #Import PyGame library
import sys #Import System module
#
from pygame.locals import * #Load PyGame constants
#
pygame.init() #Initialize PyGame
#
# Set up Picture Variables #####################
#
PictureDirectory = '/home/pi/pictures'
PictureFileExtension = '.jpg'
PictureDisk = '/dev/sda1'
#
# Mount the Picture Drive ######################
#
Command = "sudo umount " + PictureDisk + " 2>/dev/null"
os.system(Command)
Command = "sudo mount -t vfat " + PictureDisk + " " + PictureDirectory
os.system(Command)
#
# Set up Presentation Screen ###################
#
ScreenColor = Gray = 125,125,125
#
ScreenFlag = FULLSCREEN | NOFRAME
PrezScreen = pygame.display.set_mode((0,0),ScreenFlag)
#
PrezScreenRect = PrezScreen.get_rect()
CenterScreen = PrezScreenRect.center
#
PrezScreenSize = PrezScreen.get_size()
Scale=PrezScreenSize[0]-20,PrezScreenSize[1]-20
#
###### Run the Presentation #######################################
#
while True:
#
#Get HD Pictures ###################################
#
for Picture in os.listdir(PictureDirectory):
if Picture.endswith(PictureFileExtension):
Picture=PictureDirectory + '/' + Picture
Picture=pygame.image.load(Picture).convert_alpha()
#
# If Picture is bigger than screen, scale it down.
if Picture.get_size() > PrezScreenSize:
Picture = pygame.transform.scale(Picture,Scale)
#
PictureLocation=Picture.get_rect() #Current location
PictureLocation.center=CenterScreen #Put picture in center of screen
#
#Display HD Images to Screen #################
PrezScreen.fill(ScreenColor)
PrezScreen.blit(Picture,PictureLocation)
pygame.display.update()
pygame.time.delay(500)
#
# Quit with Mouse or Keyboard if Desired
for Event in pygame.event.get():
Command = "sudo umount " + PictureDisk
os.system(Command)
sys.exit()
This script works fine, but it runs slowly! Just getting the first picture to display can take a rather long time.
While testing your presentation script, use small, simple, non-HD image files, such as the .png files in the /home/pi/python_games directory. That way, you can get everything working correctly without having to deal with the slow loading of HD files. To do this, you just change the variable PictureDirectory to /home/pi/python_games and the variable PictureFileExtension to .png.
Unfortunately, when you load any HD image file, a Python script can really slow down. However, there are a few things you can do to speed up the script as well as give the appearance of speed to your presentation audience.
Improving the Presentation Speed
To improve the speed of the Python HD image presentation script, here are some modifications you can make:
![]() Load only functions used in modules instead of loading entire modules.
Load only functions used in modules instead of loading entire modules.
![]() Remove any implemented delays.
Remove any implemented delays.
![]() Add buffering to the screen.
Add buffering to the screen.
![]() Do not convert images.
Do not convert images.
![]() Add a title screen.
Add a title screen.
![]() Add finer mouse and/or keyboard controls.
Add finer mouse and/or keyboard controls.
Each one of these changes might improve the speed of the presentation by only a second or even just a millisecond. However, each little bit will help improve the flow of your HD image presentation. The following sections describe how to implement these optimizations.
Loading Only Functions Instead of Entire Modules
Loading only the functions used will speed up any Python script. When you load an entire module using the import statement, all the functions it contains are also loaded—and this can really slow down a script. A good tip is to create a chart of your Python script that shows the modules imported and the actual functions used. Table 23.2 shows how this might look. This table lists each module, along with each of the functions used from that module. This type of chart will be helpful as you make the necessary modifications to your script.

To load only the functions you use from each module, you modify your import statements, using the chart you’ve created as a guide. The import statements will now look similar to the following:
##### Import Functions & Variables #######
#
from os import listdir, system #Import from OS module
#
#Import from PyGame Library
from pygame import event, font, display, image, init, transform
#
from sys import exit #Import from System module
After you make this change, you need to change all the calls to the various functions. For example, you change pygame.init() to init(), and you change sys.exit() to exit(). Python no longer recognizes the entire pygame module because you no longer load it. Instead, it only recognizes the functions you load from that module.
Use the chart you created and step through the Python script, making all the necessary changes to the function calls. When you have completed these changes, you should test the Python image presentation script. You will be amazed at how much faster it starts up! This is a good activity for any Python script you write: Load up whole modules; tweak the script until you are happy with it; chart your modules and their functions; modify the script to load only the functions; and modify the function calls.
Removing Any Implemented Delays
This optimization is an easy one! For smaller, non-HD images, you needed to include the pygame.time.delay operation to allow the images to “pause” on the screen. When loading the large HD images, this pause is not needed, so you simply remove the line below from the script:
pygame.time.delay(500)
You also need to be sure to remove the loading of the time function in the pygame module’s import statement.
Adding Buffering to the Screen
This speed fix will gain you only a millisecond or two, but implementing it is still worthwhile—and it’s easy. You simply add an additional flag, DOUBLEBUF, to the flags for your presentation screen, as shown here:
ScreenFlag = FULLSCREEN | NOFRAME | DOUBLEBUF
PrezScreen = display.set_mode((0,0),ScreenFlag)
Avoiding Converting Images
In Hour 19, you learned that for games, it is wise to use the .convert_alpha() operation to load images. This way, game images can be converted once to speed up the operation of the game. The opposite is true here because these pictures will be displayed to the screen only one time. To make this modification, you need to make the image.load function for each picture look as follows.
Picture = image.load(Picture)
Remember that this statement was previously written like this:
Picture = pygame.image.load(Picture).convert_alpha()
You remove pygame here because you are no longer loading the entire pygame module. You remove .convert_alpha() to improve the speed of the image loading.
Making this change improves the speed of image loading by about 3 to 5 seconds. Making this change also gives you the exact pixel format displayed on the screen that is in the image file. So you get two improvements in one!
Even with these two improvements to image.load, this particular command will still be the slowest one in the entire script due to the large size of HD image files. However, many performance enhancements are in the works for the Raspberry Pi, so this may not be a problem in the future.
Watch Out!: Preloading Images
Since loading images takes so long, it would make sense to preload the images into a Python list before you begin displaying them to the screen. However, if you try to do this, you will most likely run out of memory. It would work, though, if you had non-HD images or just a few pictures. But trying to load up several HD photos will cause your Python script to run out of memory, suddenly quit, and leave you with the message “Killed” displayed on the screen.
Adding a Title Screen
The next best thing to do to improve the speed of the presentation script is to give the audience the illusion of speed.
Sending text to the presentation screen happens relatively quickly. Thus, by adding a title screen at the beginning of the script, you can give that first picture time to load. Also, this will prevent your audience from staring at a blank screen for 20 to 30 seconds.
To incorporate a title screen, you set up some variables and text to be used within the presentation, as follows:
# Set up Presentation Text #######################
#
# Color #
#
RazPiRed = 210,40,82
#
# Font #
#
DefaultFont='/usr/share/fonts/truetype/freefont/FreeSans.ttf'
PrezFont=font.Font(DefaultFont,60)
#
# Text #
#
IntroText1="Our Trip to the"
IntroText2="Raspberry Capital of the World"
IntroText1=PrezFont.render(IntroText1,True,RazPiRed)
IntroText2=PrezFont.render(IntroText2,True,RazPiRed)
Notice that a color called RazPiRed is being used for the text color to provide a nice contrast to the presentation screen’s gray background.
Now you can place the text prior to the for loop in the presentation script, as follows:
# Introduction Screen ##############################
#
PrezScreen.fill(ScreenColor)
#
# Put Intro Text Line 1 above Center of Screen
IntroText1Location = IntroText1.get_rect()
IntroText1Location.center = AboveCenterScreen
PrezScreen.blit(IntroText1,IntroText1Location)
#
# Put Intro Text Line 2 at Center of Screen
IntroText2Location = IntroText2.get_rect()
IntroText2Location.center = CenterScreen
PrezScreen.blit(IntroText2,IntroText2Location)
#
display.update()
#
#Get HD Pictures ###################################
#
for Picture in listdir(PictureDirectory):
Adding Finer Mouse and/or Keyboard Controls
This last fix will provide you with another speed illusion. Many people give business presentations while holding a remote or using a mouse to control the flow of the images shown on the screen. Adding an event loop immediately after a picture is loaded allows you to incorporate this type of control, as shown here:
Picture = image.load(Picture)
#
Continue = 0
# Show next Picture with Mouse
while Continue == 0:
for Event in event.get():
if Event.type == MOUSEBUTTONDOWN:
Continue = 1
This added event gives the illusion of picture display control by the presenter. You still have the same long load time, but by knowing the approximate time between pictures, you can talk through each image and then click the mouse after the approximate time. This gives the illusion of the pictures immediately loading when you click the mouse.
If you just want to show your friends and neighbors vacation pictures, you can leave out this optimization. In that case, the photos will continuously feed to the screen in a continuous loop.
The Optimized Presentation
The HD image presentation script, with all of its “speed” modifications, has changed quite a bit. Listing 23.3 shows some of the new script, script2302.py, which is available to download at informit.com/title/9780789752055.
LISTING 23.3 The Optimized script2302.py Presentation Script
...
##### Import Functions & Variables #######
#
from os import listdir, system #Import from OS module
#
#Import from PyGame Library
from pygame import event, font, display, image, init, transform
#
from sys import exit #Import from System module
#
from pygame.locals import * #Load PyGame constants
#
init() #Initialize PyGame
#
# Set up Picture Variables ######################
...
# Set up Presentation Text #######################
#
# Color #
#
RazPiRed = 210,40,82
#
# Font #
#
DefaultFont='/usr/share/fonts/truetype/freefont/FreeSans.ttf'
PrezFont=font.Font(DefaultFont,60)
#
# Text #
#
IntroText1="Our Trip to the"
IntroText2="Raspberry Capital of the World"
IntroText1=PrezFont.render(IntroText1,True,RazPiRed)
IntroText2=PrezFont.render(IntroText2,True,RazPiRed)
#
# Set up the Presentation Screen ################
#
ScreenColor = Gray = 125,125,125
#
ScreenFlag = FULLSCREEN | NOFRAME | DOUBLEBUF
PrezScreen = display.set_mode((0,0),ScreenFlag)
#
PrezScreenRect = PrezScreen.get_rect()
CenterScreen = PrezScreenRect.center
AboveCenterScreen = CenterScreen[0],CenterScreen[1]-100
#
PrezScreenSize = PrezScreen.get_size()
Scale=PrezScreenSize[0]-20,PrezScreenSize[1]-20
#
###### Run the Presentation #######################################
#
while True:
# Introduction Screen ##############################
#
PrezScreen.fill(ScreenColor)
#
# Put Intro Text Line 1 above Center of Screen
IntroText1Location = IntroText1.get_rect()
IntroText1Location.center = AboveCenterScreen
PrezScreen.blit(IntroText1,IntroText1Location)
#
# Put Intro Text Line 2 at Center of Screen
IntroText2Location = IntroText2.get_rect()
IntroText2Location.center = CenterScreen
PrezScreen.blit(IntroText2,IntroText2Location)
#
display.update()
#
#Get HD Pictures ###################################
#
for Picture in listdir(PictureDirectory):
if Picture.endswith(PictureFileExtension):
Picture = PictureDirectory + '/' + Picture
#
Picture = image.load(Picture)
#
Continue = 0
# Show next Picture with Mouse
while Continue == 0:
for Event in event.get():
if Event.type == MOUSEBUTTONDOWN:
Continue = 1
if Event.type in (QUIT,KEYDOWN):
Command = "sudo umount " + PictureDisk
system(Command)
exit()
...
Potential Script Modifications
Hopefully, as you read through the script in Listing 23.3, you thought of many improvements you could make. You have come a long way in learning Python! You may have noted improvements and changes such as these:
![]() Rewrite the script using
Rewrite the script using tkinter, which is covered in Hour 18, “GUI Programming.”
![]() Write an additional script which allows the creation of a configuration file that dictates where files are located and the file extensions of pictures. Modify the presentation script to use the information in the configuration file.
Write an additional script which allows the creation of a configuration file that dictates where files are located and the file extensions of pictures. Modify the presentation script to use the information in the configuration file.
![]() Add to the script a dictionary that contains text to be displayed along with each image.
Add to the script a dictionary that contains text to be displayed along with each image.
![]() Modify the script to determine the device file name on the fly, so it does not have to be determined beforehand.
Modify the script to determine the device file name on the fly, so it does not have to be determined beforehand.
Feel free to add as many changes as you desire. This is your HD image presentation script!
Playing Music
You can use Python to create some creative scripts for playing your music—for free! After you create such a script, you can take your Pi over to someone else’s place, hook it up to their television, and listen to your favorite music. The best part is that you’re the one writing the script playing the music!
Creating a Basic Music Script
To keep your music script simple, you will continue to use the PyGame library you’ve already learned about. PyGame does a decent job of handling music. You might think that the best way to handle music files would be to create a Sound object, as you did in Hour 19 for the Python game. That does, in fact, work, but loading the music files into Python this way goes very slowly. Thus, it’s best to avoid using the Sound object to play music.
By-the-Way: Other Modules and Packages for Playing Music
There are several other modules and packages for Python that you can use to create scripts for playing music files. A rather detailed list of them is shown at http://wiki.python.org/moin/PythonInMusic.
Besides doing the basic PyGame initialization, you primarily need to use two methods in this script: pygame.mixer.music.load and pygame.mixer.music.play. Each music file must be loaded from the disk into the Python script, before it can be played. Here’s an example of loading a music file:
pygame.mixer.music.load('/home/pi/music/BigBandMusic.ogg')
Did You Know: Problems with MP3 Formats
Music comes in several standard file formats. Three of the most popular are MP3, WAV, and OGG. However, you need to be aware that the MP3 file format is a closed-source format, so the open-source world typically frowns on it.
Python and PyGame can handle MP3 file format, but be aware that MP3 files may not play on your Linux system and can even cause the system to crash. It is best to use either uncompressed music files, such as the WAV format, or open-source compressed files such as OGG files. You can convert your MP3 music files to supported formats by using either online conversion websites or locally installed software tools. You can find a list of many audio file conversion tools at http://wiki.python.org/moin/PythonInMusic.
After a music file is loaded, you use the play method for playing the file, as shown here:
pygame.mixer.music.play(0)
The number shown here, 0, is the number of times the music file will play. You might think that zero means it will play zero times, but actually, when the play method sees 0, it plays the file one time and then stops.
By-the-Way: Queuing It Up!
If you want to play only a couple songs, you can use the queue method. You simply load and play the first song, and the first song begins to play immediately. Then you load and queue a second song. The method to queue a song is pygame.mixer.music.queue('filename'). When the first song stops playing, the second song starts playing right away.
You can queue only one song at a time. If you queue a third song, before the second song starts playing, the second song is “wiped” from the queue list.
Storing Your Music on a Removable Disk
Music files, especially if they are in uncompressed WAV file format, can take up a great deal of disk space. Once again, your SD card with Raspbian may not have the space needed to hold the music files you want to play. You can fix this problem by using a removable drive with your Python script.
Just as you used a removable hard drive in the HD image presentation script, you can use it in your music script. The only change needed is to set up variables which point to the disk and directory holding your music.
Be aware that you need to create a music directory before you run your script. To create a music directory, you open LXTerminal, type a command similar to mkdir /home/pi/music, and press Enter.
Unlike in the HD presentation script, you cannot simply unmount the drive at the end of the script. Playing music from a removable drive can introduce a few problems with keeping files open and can cause the drive to fail to unmount. However, you can clean up the umount commands from the HD presentation script and put them into a function (where they should have been in the first place). Here’s what this looks like:
# Gracefully Exit Script Function #################
#def Graceful_Exit ():
pygame.mixer.music.stop() #Stop any music.
pygame.mixer.quit() #Quit mixer
pygame.time.delay(3000) #Allow things to shutdown
Command = "sudo umount " + MusicDisk
system(Command) #Unmount disk
exit()
The method pygame.mixer.music.stop is called to stop any music from playing. Also, the mixer is shut down using pygame.mixer.quit. Finally, a delay is added, just to give everything time to shut down, before the umount command is issued. It’s a little bit of overkill, but properly unmounting a removable drive with your music is worth it!
Using a Music Playlist
While you could use the os.listdir method used earlier in this hour to load the music files, using a playlist will give you finer control (and more Python practice). You can create a simple playlist of the music files to play in a particular order by using either the nano text editor or the IDLE text editor.
You want the playlist file to have the file names of the songs, including their file extension. This way, you can play different types of music files, such as OGG or WAV. Also, each line of the playlist file should contain only a single music file name. No directory names are included because they will be handled in the Python script. The following is a simple example of a play-list that can be used with this script:
BigBandMusic.ogg
RBMusic.wav
MusicalSong.ogg
...
To open and read your playlist in the Python script, you use the open Python statement. (For a refresher on opening and reading files, see Hour 11, “Using Files.”)
Watch Out!: Ignoring the End
While PyGame is a wonderful utility for learning how to incorporate various features into your Python scripts, it can be a little flakey at times, especially when playing music. For example, PyGame often sporadically ignores the last music file loaded to play from a playlist. Therefore, you should put your least favorite song last in the playlist. When you learn how to properly code Python to play music, you can explore other music library options for Python, if you so desire.
The script opens the playlist and reads it all in, and then it saves the music file information into a list that the script can use over and over again. (If you need to review the concepts related to lists, see Hour 8, “Using Lists and Tuples.”)
Each music file name is read from the playlist file and stored into a list called SongList. You need to strip off the newline character from the end of each read-in record. The .rstrip method will help you accomplish this. Use the following for loop to read in the music file names from the playlist after it is opened:
for Song in PlayList: #Load PlayList into SongList
#
Song = Song.rstrip('
') #Strip off newline
if Song != "": #Avoid blank lines in PlayList
Song = MusicDirectory + '/' + Song
SongList.append(Song)
MaxSongs = MaxSongs + 1
Notice that this example uses an if Python statement. This statement allows your script to check for any blank lines in the playlist file and discard them. It is very easy for blank lines to creep into a file like this one. This is especially true at the bottom of the file, if you accidently press the Enter key too many times.
The for loop appends any file names to the end of the SongList list and keeps a count of how many music files are loaded into the list. Instead of keeping a count, you could also wait until the SongList list is completely built. Then you can determine how many elements are in the list, using the Python statement len(SongList).
Controlling the Playback
Now you have your playlist loaded, you have a removable drive with the music ready, and you know how to load and play the music. But just how do you control the playback of the music?
PyGame provides event handling that will work perfectly for controlling music playback. Using the .set_endevent method causes an event to queue up after a song has finished playing. This event is called an “end” event because it is sent to the queue when the song ends. The following is an example of an entire function that loads the music file, starts playing the music file, and sets an end event:
# Play The Music Function #########################
#
def Play_Music (SongList,SongNumber):
pygame.mixer.music.load(SongList[SongNumber])
pygame.mixer.music.play(0)
pygame.mixer.music.set_endevent(USEREVENT) #Send event when Music Stops
Notice that end event set is USEREVENT. This means that when the music stops playing, the event USEREVENT will be sent to the event queue.
Checking for the USEREVENT event should be handled in the main body of the Python script. You use a while loop to keep the music playing and a for loop to check for the song’s end event:
while True: #Keep playing the Music ############
for Event in event.get():
#
if Event.type == USEREVENT:
if SongNumber < MaxSongs:
Play_Music(SongList,SongNumber)
SongNumber = SongNumber + 1
if SongNumber >= MaxSongs:
SongNumber = 0 #Start over in PlayList
Play_Music(SongList,SongNumber)
SongNumber = SongNumber + 1
In this example, if the song’s end event, USEREVENT, is found in the event queue, then a couple checks are made. If the song list has not been fully played (SongNumber < MaxSongs), the next song in the SongList is played. However, if all the songs have been played, then SongNumber is set back to 0 (the first file name in the SongList), and the playing of the list starts over.
By-the-Way: Getting Fancy
You have just seen a very simple way to handle playing music in Python. You can get very fancy with PyGame operations, though. For example, you can use .fadeout to slowly fade out music at its end and .set_volume to make certain songs (like your favorites) louder than others.
At this point, the Python music script plays endlessly. To add control for ending the script, you need to check for another event, such as pressing a key on the keyboard. You do this much the same way you controlled the HD image presentation script. Here’s what it looks like:
if Event.type in (QUIT,KEYDOWN,MOUSEBUTTONDOWN):
Graceful_Exit()
But wait! This actually doesn’t work! For PyGame to properly handle events, the display screen must be initialized. Thus, you need to set up a simple display screen to gracefully control the end of your script. Here’s an example:
MusicScreen = display.set_mode((0,0))
display.set_caption("Playing Music...")
Now, when your music plays, a screen pops up, with the caption "Playing Music" at the top. You can minimize that screen and listen to your music playlist. When you are done, you just maximize the screen and either click it with your mouse or press any key on the keyboard to stop the music.
Since the display screen is already initialized in your music script, you might think that you could add images to be displayed on the screen while the music plays—and that’s a good idea! You’ll learn how to do that a bit later this hour, but first you need to do a few more things related to your music script, including reviewing the music script in its entirety. See Listing 23.4.
LISTING 23.4 The script2303.py Music Script
#script2303.py - Play Music from List
#Written by Blum and Bresnahan
#
##########################################
#
##### Import Functions & Variables #######
#
from os import system #Import from OS module
#
#Import from PyGame Library
from pygame import display, event, init, mixer, time
#
from sys import exit #Import from System module
#
from pygame.locals import * #Load PyGame constants
#
init() #Initialize PyGame
#
# Load Music Play List Function ##################
#
# Read Playlist and Queue up Songs #
#
def Load_Music ():
#
global SongList #Make SongList global
SongList = [] #Initialize SongList to Null
#
global SongNumber #Make SongNumber global
SongNumber = 0 #Initialize Song Number to 0
#
global MaxSongs #Make MaxSongs global
MaxSongs = 0 #Initialize Maximum Songs to 0
#
PlayList = MusicDirectory + '/' + 'playlist.txt'
PlayList = open(PlayList, 'r')
#
for Song in PlayList: #Load PlayList into SongList
#
Song = Song.rstrip('
') #Strip off newline
if Song != "": #Avoid blank lines in PlayList
Song = MusicDirectory + '/' + Song
SongList.append(Song)
MaxSongs = MaxSongs + 1
PlayList.close()
#
# Play The Music Function #########################
#
def Play_Music (SongList,SongNumber):
mixer.music.load(SongList[SongNumber])
mixer.music.play(0)
mixer.music.set_endevent(USEREVENT) #Send event when Music Stops
#
# Gracefully Exit Script Function #################
#
def Graceful_Exit ():
mixer.music.stop() #Stop any music.
mixer.quit() #Quit mixer
time.delay(3000) #Allow things to shutdown
Command = "sudo umount " + MusicDisk
system(Command) #Unmount disk
exit()
#
# Set up Music Variables ######################
#
MusicDirectory = '/home/pi/music'
MusicDisk = '/dev/sda1'
#
# Mount the Music Drive ########################
#
Command = "sudo umount " + MusicDisk + " 2>/dev/null"
system(Command)
Command = "sudo mount -t vfat " + MusicDisk + " " + MusicDirectory
system(Command)
#
# Queue up the Music #############################
#
Load_Music()
Play_Music(SongList,SongNumber)
SongNumber = SongNumber + 1
#
#Set up Display for Event Handling ##############
#
MusicScreen = display.set_mode((0,0))
display.set_caption("Playing Music...")
#
while True: #Keep playing the Music ############
for Event in event.get():
#
if Event.type == USEREVENT:
if SongNumber < MaxSongs:
Play_Music(SongList,SongNumber)
SongNumber = SongNumber + 1
if SongNumber >= MaxSongs:
SongNumber = 0 #Start over in PlayList
Play_Music(SongList,SongNumber)
SongNumber = SongNumber + 1
#
if Event.type in (QUIT,KEYDOWN,MOUSEBUTTONDOWN):
Graceful_Exit()
Notice that this script imports only the needed functions. The names of the module operations in the script have been modified to reflect this.
Making the Play List Random
If desired, you can make your script play music from the playlist randomly. Making this happen requires only a few minor changes. The first change is to import the randinit operation from the random module, as shown here:
from random import randint #Import from Random module
The other two changes are small tweaks to an if statement within the main while loop of the music script. For the if SongNumber >= MaxSongs: statement, you need to replace SongNumber = 0 with the statement using the randinit method, as shown here:
while True: #Keep playing the Music ############
for Event in event.get():
...
if SongNumber >= MaxSongs:
SongNumber = randint(0,MaxSongs - 1) #Pick random song
Play_Music(SongList,SongNumber)
SongNumber = MaxSongs #Keep songs random
...
Also, to keep the songs playing in a random fashion, instead of incrementing SongNumber after Play_Music is called, you set it back to being equal to MaxSongs.
Creating a Special Presentation
By now you’ve probably figured out what the “special” presentation is all about: playing music along with displaying your HD images! There are many reasons you might want to do this. You may have a special business presentation that needs music behind it. You might want to see images display while your music is playing. Or, as in this example, you might be a teacher trying to encourage your school board to buy Raspberry Pis for the students and start up some classes teaching Python.
By-the-Way: Playing One Song Continuously
You might just want to play one loaded song, such as your company’s marketing song, endlessly during a presentation. To do this, you use the Python statement pygame.mixer.music.play(-1). The negative one (-1) tells Python to keep playing the song over and over again, until the script exits.
Basically, this project, shown in Listing 23.5, melds together the HD image presentation script and the music script. It assumes that both your HD images and your music will be on the same removable drive.
LISTING 23.5 The script2305.py Special Presentation
#script2305.py - Special HD Presentation with Sound
#Written by Blum and Bresnahan
#
##########################################
#
##### Import Functions & Variables #######
#
from os import listdir, system #Import from OS module
#
#Import from PyGame Library
from pygame import event, font, display, image, init, mixer, time, transform
#
from random import randint #Import from Random module
#
from sys import exit #Import from System module
#
from pygame.locals import * #Load PyGame constants
#
init() #Initialize PyGame
#
# Load Music Play List Function ##################
#
# Read Playlist and Queue up Songs #
#
def Load_Music ():
#
global SongList #Make SongList global
SongList = [] #Initialize SongList to Null
#
global SongNumber #Make SongNumber global
SongNumber = 0 #Initialize Song Number to 0
#
global MaxSongs #Make MaxSongs global
MaxSongs = 0 #Initialize Maximum Songs to 0
#
PlayList = PictureDirectory + '/' + 'playlist.txt'
PlayList = open(PlayList, 'r')
#
for Song in PlayList: #Load PlayList into SongList
#
Song = Song.rstrip('
') #Strip off newline
if Song != "": #Avoid blank lines in PlayList
Song = PictureDirectory + '/' + Song
SongList.append(Song)
MaxSongs = MaxSongs + 1
PlayList.close()
#
# Play The Music Function #########################
#
def Play_Music (SongList,SongNumber):
mixer.music.load(SongList[SongNumber])
mixer.music.play(0)
mixer.music.set_endevent(USEREVENT) #Send event when Music Stops
#
# Gracefully Exit Script Function #################
#
def Graceful_Exit ():
mixer.music.stop() #Stop any music.
mixer.quit() #Quit mixer
time.delay(3000) #Allow things to shutdown
Command = "sudo umount " + PictureDisk
system(Command) #Unmount disk
exit()
#
# Set up Picture Variables ######################
#
PictureDirectory = '/home/pi/pictures'
PictureFileExtension = '.jpg'
PictureDisk = '/dev/sda1'
#
# Mount the Picture Drive ########################
#
Command = "sudo umount " + PictureDisk + " 2>/dev/null"
system(Command)
Command = "sudo mount -t vfat " + PictureDisk + " " + PictureDirectory
system(Command)
#
# Set up Presentation Text #######################
#
# Color #
#
RazPiRed = 210,40,82
#
# Font #
#
DefaultFont='/usr/share/fonts/truetype/freefont/FreeSans.ttf'
PrezFont=font.Font(DefaultFont,60)
#
# Text #
#
IntroText1="Why Our School Should"
IntroText2="Use Raspberry Pi's and Teach Python"
IntroText1=PrezFont.render(IntroText1,True,RazPiRed)
IntroText2=PrezFont.render(IntroText2,True,RazPiRed)
#
# Set up the Presentation Screen ################
#
ScreenColor = Gray = 125,125,125
#
ScreenFlag = FULLSCREEN | NOFRAME | DOUBLEBUF
PrezScreen = display.set_mode((0,0),ScreenFlag)
#
PrezScreenRect = PrezScreen.get_rect()
CenterScreen = PrezScreenRect.center
AboveCenterScreen = CenterScreen[0],CenterScreen[1]-100
#
PrezScreenSize = PrezScreen.get_size()
Scale=PrezScreenSize[0]-20,PrezScreenSize[1]-20
#
###### Run the Presentation #######################################
#
# Queue up the Music ##############################
#
Load_Music()
Play_Music(SongList,SongNumber)
SongNumber = SongNumber + 1
#
while True:
# Introduction Screen ##############################
#
PrezScreen.fill(ScreenColor)
#
# Put Intro Text Line 1 above Center of Screen
IntroText1Location = IntroText1.get_rect()
IntroText1Location.center = AboveCenterScreen
PrezScreen.blit(IntroText1,IntroText1Location)
#
# Put Intro Text Line 2 at Center of Screen
IntroText2Location = IntroText2.get_rect()
IntroText2Location.center = CenterScreen
PrezScreen.blit(IntroText2,IntroText2Location)
#
display.update()
#
#Get HD Pictures ###################################
#
for Picture in listdir(PictureDirectory):
if Picture.endswith(PictureFileExtension):
Picture = PictureDirectory + '/' + Picture
#
Picture = image.load(Picture)
#
for Event in event.get():
#
if Event.type == USEREVENT:
if SongNumber < MaxSongs:
Play_Music(SongList,SongNumber)
SongNumber = SongNumber + 1
if SongNumber >= MaxSongs:
SongNumber = randint(0,MaxSongs - 1)
Play_Music(SongList,SongNumber)
SongNumber = MaxSongs #Keep it random
#
if Event.type in (QUIT,KEYDOWN):
Graceful_Exit()
#
# If Picture is bigger than screen, scale it down.
if Picture.get_size() > PrezScreenSize:
Picture = transform.scale(Picture,Scale)
#
PictureLocation=Picture.get_rect() #Current location
PictureLocation.center=CenterScreen #Put in center
#
#Display HD Images to Screen #################3
PrezScreen.fill(ScreenColor)
PrezScreen.blit(Picture,PictureLocation)
display.update()
#
# Quit with Keyboard if Desired
for Event in event.get():
if Event.type in (QUIT,KEYDOWN):
Graceful_Exit()
Remember that you can also get a copy of these scripts from the publisher’s website. That way, you do not have to retype an entire script into your favorite text editor to modify it for your own needs.
Summary
In this hour, you learned how to create three Python projects: one that displays HD images to a presentation screen, one that plays music from a music playlist, and one that combines the two scripts into a special presentation.
Before you start thinking of all the modifications you can make to these projects, get ready. In the next hour, you are about to learn some really cool and rather advanced projects using Python on the Raspberry Pi!
Q&A
Q. What is Wayland, and could it help speed up the HD image presentation script?
A. Wayland is a replacement under-the-hood program that is partially responsible for displaying windows in the GUI. It is promised to eventually be used in Raspbian. Will it speed up the HD image presentation script? Possibly.
Q. Where is the Raspberry capital of the world?
A. The Raspberry capital of the world is Hopkins, Minnesota. The city hosts an annual raspberry festival. The festival concerns fruit, and not computers.
Workshop
Quiz
1. You must use images that are already appropriately sized for the display screen. True or false?
2. What is the minimum resolution for an HD image?
3. Which PyGame operation handles the playing of music?
a. .pygame.music
b. .pygame.music.play
c. .pygame.mixer.music.play
Answers
1. False. When using the PyGame library, you can transform an image to an appropriate size. However, if you increase the size of an image, you might lose the image’s original clarity.
2. An image is considered to be HD if it has at least a resolution of 1280×720 pixels.
3. Answer c is correct. The pygame.mixer.music.play operation handles the playing of a loaded music file.