
Chapter 1
Setting Up QuickBooks
IN THIS CHAPTER
![]() Planning how you’ll use QuickBooks
Planning how you’ll use QuickBooks
![]() Installing the QuickBooks program
Installing the QuickBooks program
![]() Preparing for setup
Preparing for setup
![]() Setting up QuickBooks
Setting up QuickBooks
![]() Figuring out your starting trial balance
Figuring out your starting trial balance
To use QuickBooks, you need to do two things: Install the QuickBooks software and run the QuickBooks Setup process. This chapter gives you a bird’s-eye view of both these tasks. I also want to spend just a few paragraphs talking about some of the planning that you should do before you set up QuickBooks and some of the missing steps in the QuickBooks Setup process — things it should do but doesn’t. (Don’t worry. I tell you how to complete the missing steps, partly at the end of this chapter and in the next chapter.)
Planning Your New QuickBooks System
I start with a couple of big-picture discussions: what accounting does and what accounting systems do. If you understand this big-picture stuff from the very start, you’ll find that the QuickBooks Setup process makes a whole lot more sense.
What accounting does
Think about what accounting does. People may argue about the little details, but most would agree that accounting does the following four important things:
- Measures profits and losses
- Reports on the financial condition of a firm (its assets, liabilities, and net worth)
- Provides detailed records of the assets, liabilities, and owner’s equity accounts
- Supplies financial information to stakeholders, especially to management
What accounting systems do
Now take a brief look at what accounting systems, or at least small-business accounting systems, typically do:
- Produce financial statements, including income statements, balance sheets, and other accounting reports
- Generate business forms, including checks, paychecks, invoices, customer statements, and so forth
- Keep detailed records of key accounts, including cash, accounts receivable (amounts that customers owe a firm), accounts payable (amounts that a firm owes its vendors), inventory items, fixed assets, and so on
Perform specialized information management functions
In the publishing industry, for example, book publishers often pay authors royalties. So royalty accounting is a task that book publishers’ accounting systems typically must do.
What QuickBooks does
After you understand what accounting does and what accounting systems typically do, you can see with some perspective what QuickBooks does:
- Produces financial statements
- Generates many common business forms, including checks, paychecks, customer invoices, customer statements, credit memos, and purchase orders
- Keeps detailed records of a few key accounts in simple settings: cash, accounts receivable, accounts payable, and inventory
Allow me to make an important observation here: QuickBooks does three of the four things that you expect an accounting system to do. Compare the list that I just provided with the preceding list (“What accounting systems do”). I’ll save you the time of finding the fourth thing: QuickBooks doesn’t supply the specialized accounting stuff. It doesn’t do royalty accounting, for example, as discussed in the earlier example.
And now for the bad news
So QuickBooks does three of the four things that accounting systems do, but it doesn’t do everything. QuickBooks is often an incomplete accounting solution. Be careful, therefore, about setting your expectations. Typically, you also need to figure out work-arounds for some of your special accounting requirements.
QuickBooks gives users and businesses a lot of flexibility. To return to an earlier example, a book publisher can do much of what it needs to do for royalty accounting in QuickBooks. This royalty-accounting work simply requires a certain amount of fiddling as the business is setting up QuickBooks.
But QuickBooks (or at least the most popular versions) does suffer a couple of significant weaknesses:
- QuickBooks Pro doesn’t supply a good way to handle the manufacturing of inventory. QuickBooks Premier and QuickBooks Enterprise Solutions do support simple manufacturing accounting, however, and QuickBooks Enterprise Solutions provides some additional inventory management capability (multiple inventory sites, lot and serial number tracking, and FIFO [first-in, first-out] costing) as part of its Advance Inventory feature. These versions of QuickBooks help you account for the process of turning raw materials into finished goods and also deal with some real-life inventory complexities.
- Only QuickBooks Enterprise Solutions handles the situation of storing inventory in multiple locations. In other words, QuickBooks Pro and QuickBooks Premier simply show, for example, that you have 3,000 widgets. They don’t let you keep track of the fact that you have 1,000 widgets at the warehouse, 500 widgets at store A, and 1,500 widgets at store B.
In spite of the fact that QuickBooks may be an incomplete solution and may not handle inventory the way you want or need it to, QuickBooks is still a very good solution. No, wait — that’s not really strong enough. What QuickBooks does, it does very well.
As with a lot of things in life, finding the right accounting solution is all about balance. Some of the factors that you may consider when choosing your accounting software would be ease of use, portability, price, data security, customer service, and integration with other business tools. The desktop version of QuickBooks has been a good balance of the things I need, which is why I use it for my business.
 The desktop version of QuickBooks provides considerably more horsepower than the online version of QuickBooks (or other cloud-based systems). That said, the online version makes it far easier to work with an outside accountant or bookkeeper. Accordingly, for those clients who really need outside professional help but don’t need advanced desktop features (such as job costing), the online version of QuickBooks is a very reasonable choice too.
Installing QuickBooks
You install QuickBooks the same way that you install most applications or programs: by download or via a disc containing the software. I’d begin at https://quickbooks.intuit.com/desktop, where you can compare some product options, chat with a sales agent, or (if you’re ready) purchase the version of your choosing. After purchase, you should be able to download the product; definitely reach out to Intuit if you can’t. If you purchase a copy of QuickBooks from a bricks-and-mortar store, you just need to insert the disc into the proper drive.
After downloading the program (or inserting the disc containing the software), you don’t need to do anything special to install QuickBooks. Simply follow the onscreen instructions. Typically, you’re prompted to enter the installation key or installation code. This code and key are available within the QuickBooks packaging — usually, on the back of the envelope that the disc comes in — if you purchase the software in a local store. Otherwise, Intuit provides these items during the online purchase process.
The QuickBooks installation process may ask you to answer questions about how you want QuickBooks to be installed. Almost always, you want to accept the default suggestions. In other words, QuickBooks may ask you whether it can create a new folder in which to install the program files. In this case, choose yes.
 QuickBooks can work as a multiuser accounting system, which means that several people can use QuickBooks. The QuickBooks data file — the repository of all the QuickBooks information — typically resides on a centrally available computer or server. People who want to work with the QuickBooks data file simply install the QuickBooks program on their computers and then use the program to access centrally located QuickBooks data files. This multiuser system isn’t complicated to run; in fact, I talk about it quite a bit in Book 7, Chapter 1.
 You need to own a separate copy of QuickBooks for each computer on which you install QuickBooks. You can also buy multiuser copies of QuickBooks that let you install the QuickBooks program on up to 5 computers (or on up to 40 computers if you’re running QuickBooks Enterprise Solutions). I mention this because you don’t want to get involved in software piracy — which is a felony — as part of inadvertently setting up QuickBooks the wrong way. The bottom line: You need a legal copy of QuickBooks for every machine on which you install QuickBooks.
Dealing with the Presetup Jitters
After you install QuickBooks, you run an onscreen wizard to set up QuickBooks for your firm’s accounting. Cleverly, this onscreen wizard is called QuickBooks Setup. In the following sections, I explain what you need to do before you use QuickBooks Setup so that you work in an efficient manner. I also give you an overview of what you’ll do as you go through QuickBooks Setup.
Preparing for setup
In running QuickBooks Setup, you provide quite a bit of information to QuickBooks. As a practical matter, setup and post-setup cleanup (which I describe in this chapter and the next one) require that you have the following:
- Accurate financial statements as of the conversion-to-QuickBooks date
- Detailed records of your accounts payable, accounts receivable, inventory, and fixed assets
- A complete or nearly complete list of employees, customers, vendors, and inventory items (if you buy and sell inventory)
You want to get all this stuff together before you start QuickBooks Setup, because (depending on how you go about setting up QuickBooks) you may be asked about this stuff as part of the process. Don’t try to scurry around looking for a particular piece of data while you’re running the Setup Wizard; collect this data up front. Then stack all the necessary paperwork on your desk next to your computer.
Let me also note that you’re going to make several accounting decisions as you go through QuickBooks Setup. You may be asked to decide whether you want to use an accounts payable system, for example. You may choose to use the Setup Wizard to tell QuickBooks whether you want to send customers monthly statements. You may also be asked whether you want to prepare estimates for customers or whether you want to use classes to further track your income and spending.
In general, when you’re asked any of the accounting questions, you can simply accept the default answer. You’re required by law to be consistent in your accounting for tax purposes, however. If you want to change your accounting — technically called a change of accounting method by the Internal Revenue Service — you must request permission from the IRS to make that change. How to do this and the ramifications of doing it are beyond the scope of this book, but be forewarned: The IRS insists that you be consistent in your accounting. If you’ve been treating particular items of income or expense in a certain way, the IRS says, “Hey, taxpayer, you must continue to treat them that way unless you get permission from us to change.”
I should make a clarification: You can use one accounting method for your tax return and then, within QuickBooks, use a different accounting method. You may be locked into using accrual-basis accounting on your tax return, for example, but that doesn’t mean you can’t use cash-basis accounting in QuickBooks and in managing your business. Accordingly, what I say in the preceding paragraphs is a little bit inaccurate. Technically. But you probably don’t want to use one accounting approach on your tax return and a different approach in QuickBooks. Too complicated.
One final note: You should have your tax return from last year handy because it supplies information that you need for running QuickBooks Setup. Last year’s tax return, for example, supplies your taxpayer ID number, your legal business name, and your method of accounting.
Seeing what happens during setup
As you walk through the setup process, you work with QuickBooks to set preferences (which determine how QuickBooks works and which features are initially available) and to set up a chart of accounts and your bank accounts.
The chart of accounts, just so you know, identifies those income, expense, asset, liability, and owner’s equity accounts that appear in your financial statements.
When you complete QuickBooks Setup, you’re almost ready to begin using QuickBooks. In fact, in a pinch, you could (after QuickBooks Setup) limp along with QuickBooks.
An important point of clarification: You may think that you should be ready to rock and roll after installing QuickBooks and running through the setup process. But you have two other tasks to complete: identifying your starting trial balance (which I describe at the end of this chapter) and loading your key master files (which I describe mostly in the next chapter). The trial balance identifies your year-to-date income and expense numbers, as well as your asset, liability, and owner’s equity numbers as of the conversion date. The master files store information about customers, vendors, employees, and inventory items that you use repeatedly. The customer master file, for example, stores a customer’s name and address, phone number, and the contact person’s name (if different).
Running the QuickBooks Setup Wizard
After you install the QuickBooks program, the installation program may start QuickBooks automatically and then start QuickBooks Setup. You can also start QuickBooks Setup by starting the QuickBooks program the same way that you start any program and then choosing File ⇒ New Company.
Getting the big welcome
The QuickBooks Desktop Setup screen of QuickBooks Setup (see Figure 1-1) appears when you choose File ⇒ New Company. The screen gets you started creating a new company file within QuickBooks. The screen has two radio buttons to choose between. The For Myself (I’m the Admin) button enables you to set up the new file as the admin, in which case you use your email address to create the file. The For Someone Else button enables you to set up the file on behalf of the admin, in which case you use that person’s email address to set up the file.
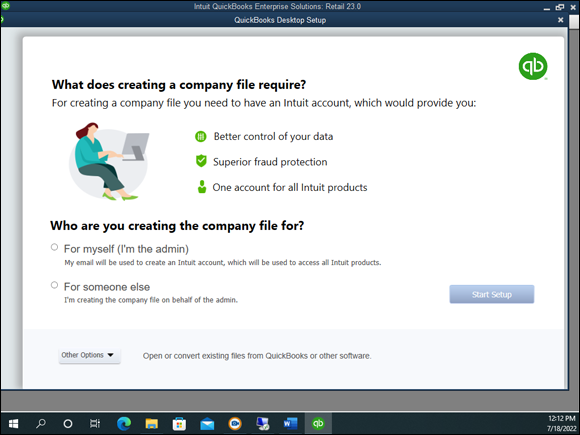
FIGURE 1-1: The QuickBooks Desktop Setup window.
The Other Options drop-down list (refer to Figure 1-1) allows you to choose the advanced setup option, which walks you through a bunch of screens full of information that let you rather tightly specify how the company file that QuickBooks sets up should look.
Supplying company information
The first few screens of the EasyStep Interview collect several important pieces of general information about your business, including your company name and the firm’s legal name, your company address, the industry in which you operate, your federal tax ID number, the first month of the fiscal year (typically, January), the type of income tax form that your firm uses to report to the IRS, and the industry or type of company that you’re operating (retail, service, and so forth). The first screen of the EasyStep Interview is shown in Figure 1-2.
QuickBooks isn’t very smart about the tax accounting rules for limited liability companies (LLCs). An LLC can be treated as a sole proprietorship if it has one owner and as a partnership if it has more than one owner. But LLCs may also elect to be treated as S corporations or C corporations. If you’ve made such an election for your LLC, be sure to indicate that the LLC is an S corporation or C corporation.
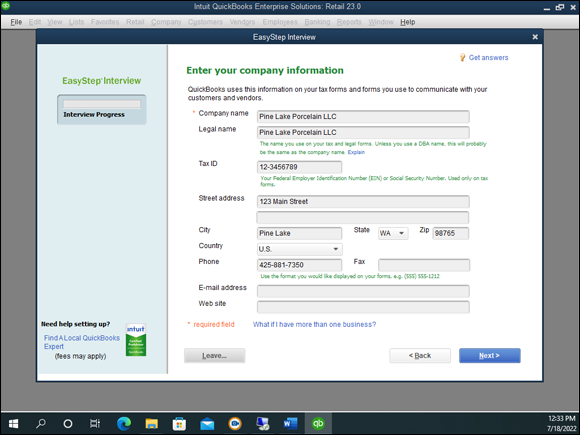
FIGURE 1-2: The first screen of the EasyStep Interview collects general company information.
To move to the next screen in the EasyStep Interview, click the Next button. To move to the previous screen, click the Back button. If you get discouraged and want to give up, click the Leave button. But try not to get discouraged.
After collecting this general company information, QuickBooks creates the company data file that stores your firm’s financial information. QuickBooks suggests a default name or a QuickBooks data file based on the company name (see Figure 1-3). All you need to do is accept the suggested name and the suggested folder location (unless you want to save the data file in the Documents folder, which isn’t a bad idea).
Customizing QuickBooks
After QuickBooks collects the general company information mentioned in the preceding paragraphs, the EasyStep Interview asks you some very specific questions about how you run your business so that it can set the QuickBooks preferences. Preferences in effect turn various accounting features of QuickBooks on or off, thereby controlling how the program works and looks. Here are the sorts of questions that the EasyStep Interview asks to set the QuickBooks preferences:
- Does your firm maintain inventory?
- Do you want to track the inventory that you buy and sell?
- Do you collect sales tax from your customers?
- Do you want to use sales orders to track customer orders and back orders?
- Do you want to use QuickBooks to help with your employee payroll?
- Do you need to track multiple currencies within QuickBooks because you deal with customers and vendors in other countries, and do these people regularly have the audacity to pay or invoice you in a currency different from the one your country uses?
- Would you like to track the time that you or your employees spend on jobs or projects for customers?
- How do you want to handle bills and payments (enter the checks directly, or enter the bills first and the payments later)?
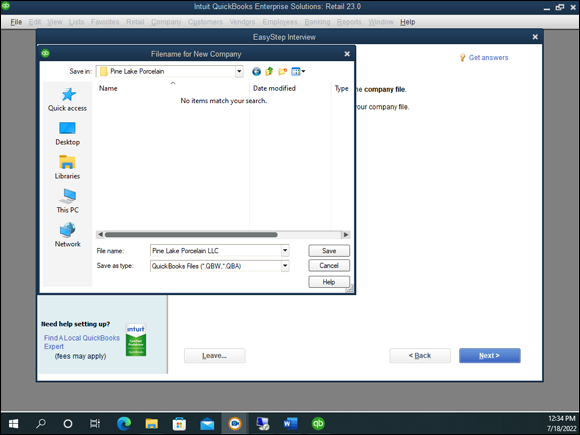
FIGURE 1-3: The Filename for New Company dialog box.
Setting your start date
Perhaps the key decision that you make in setting up any accounting system is the day on which you begin using your new system. This day is called the conversion date. Typically, you want to begin using an accounting system on the first day of the year or the first day of a new month. Accordingly, one other big question you’re asked is about the conversion date. You’re prompted to identify the start date by using the dialog box shown in Figure 1-4.
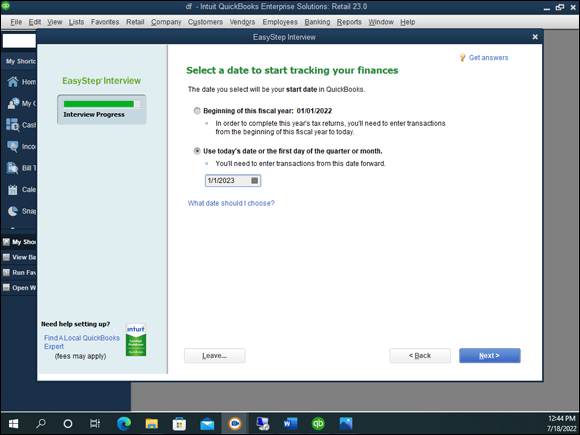
FIGURE 1-4: The EasyStep Interview dialog box that lets you select the start date.
The easiest time to start using a new accounting system is the beginning of the year. The reason? You get to enter a simpler trial balance. At the start of the year, for example, you enter only asset, liability, and owner’s equity account balances.
At any other time, you also enter year-to-date income and year-to-date expense account balances. Typically, you have this year-to-date income and expense information available only at the start of the month. For this reason, the only other feasible start date that you can pick is the start of a month.
In this case, you get year-to-date income amounts through the end of the previous month from your previous accounting system. If you’ve been using Sage 50 Accounting, for example, get year-to-date income and expense amounts from Sage.
After you’ve provided the start date, supplied the basic company information, identified most of your accounting preferences, and identified the date on which you want to start using QuickBooks, you’re almost done.
If you click the Leave button, QuickBooks leaves you in the QuickBooks program, ready to get to work. The EasyStep Interview process isn’t lost forever, however. To get back into the interview, just open the file you were in the process of setting up. When you do, the EasyStep Interview restarts.
Reviewing the suggested chart of accounts
At the very end of the EasyStep Interview, based on the information that you supply about your type of industry and the tax return form that you file with the IRS, QuickBooks suggests a starting set of accounts, which accountants call a chart of accounts. These accounts are the categories that you use to track your income, expenses, assets, liabilities, and owner’s equity. Figure 1-5 shows the screen that the EasyStep Interview displays for showing you these accounts.
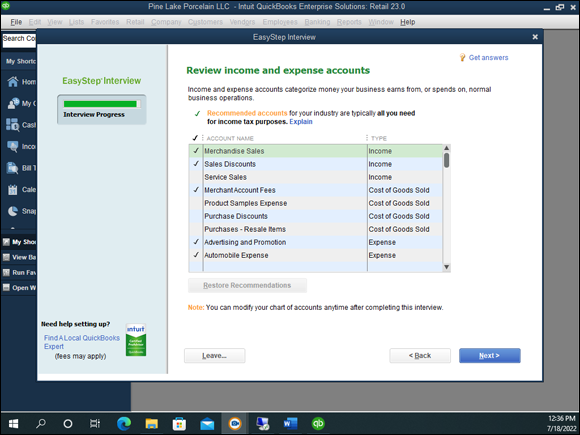
FIGURE 1-5: The EasyStep Interview screen shows you its recommended income and expense accounts.
The accounts that QuickBooks marks with a check, as the screen explains, are the recommended accounts. If you don’t do anything else, these checked accounts are the ones you’ll use (at least to start) within QuickBooks. You can remove a suggested account by clicking the check mark. QuickBooks removes the check mark, which means that the account won’t be part of the final chart of accounts. You can also click an account to add a check mark and have the account included in the starting chart of accounts.
You can click the Restore Recommendations button at the bottom of the list to return to the initial recommended chart of accounts (if you made changes that you later decide you don’t want).
When the suggested chart of accounts looks okay to you, click Next. It’s fine to accept what QuickBooks suggests because you can change the chart of accounts later.
Adding your information to the company file
After you and QuickBooks set up the company file, QuickBooks prompts you to enter your own information in the company file (see Figure 1-6).
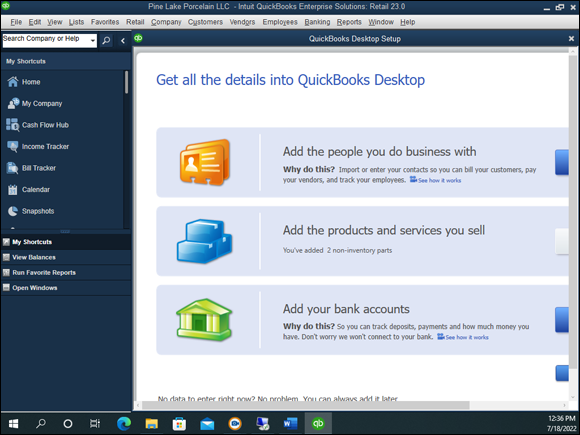
FIGURE 1-6: The QuickBooks Setup screen that prompts you to enter your own information in the company file.
Customers, vendors, and employees
To describe customers, vendors, and employees, click the first Add button. QuickBooks asks whether it’s possible to get this data from someplace else, such as an email program or email service (Outlook, Gmail, and so forth), or whether you want to enter the information into a worksheet manually. You’re probably going to enter the information manually, so click the appropriate button and then click Continue. When QuickBooks displays a worksheet window (see Figure 1-7), enter each customer, vendor, or employee in its own row and be sure to include both the name and address information. Click Continue (not shown in Figure 1-7) when you finish. Then QuickBooks asks (using a screen I don’t show here) whether you want to enter opening balances — amounts you owe or are owed — for customers and vendors. Indicate that you do by clicking the Enter Opening Balances link and then enter the opening balances in the screen that QuickBooks provides.

FIGURE 1-7: The QuickBooks Setup screen that collects information about the people you do business with.
Services and inventory items you sell
To describe the stuff you sell, click the second Add button in the second box shown in Figure 1-6. QuickBooks asks about the stuff you sell — whether you sell services, whether you sell inventory items, and whether you want to track any such inventory items you sell, for example. Answer these questions by clicking the button that conforms to your situation and then click Continue. When QuickBooks displays a worksheet window (not shown), describe each item you sell on a separate worksheet row. Also be sure to describe any inventory items you’re holding at the time you convert to QuickBooks. Click Continue when you finish. If you sell more than one type of item, you need to repeat this process for each type of item.
Business bank accounts
To describe your business bank account (or bank accounts), click the Add button in the third box shown in Figure 1-6. When QuickBooks displays the Add Your Bank Accounts worksheet window (not shown), provide each bank account’s name, account number, and balance on the conversion date. When you finish entering this information, click Continue.
Identifying the Starting Trial Balance
Whether you use the default Start version or the Detailed Start/EasyStep Interview version of the QuickBooks Setup process, you don’t get a complete trial balance in the QuickBooks company file simply by setting up. Assuming that you follow the instructions and tips provided in the preceding paragraphs, you get only your bank account, accounts receivable, inventory, and accounts payable balances in QuickBooks. Yet you need to enter all the missing trial balance information in QuickBooks, too, to begin getting good reports out of QuickBooks and to use the software for supplying financial data to your tax returns. I end this chapter by talking about how you get the rest of the trial balance data into the QuickBooks company file.
A simple example to start
To record the rest of your starting trial balance, you record a journal entry. The journal entry records the remaining trial balance amounts for all your other accounts at the conversion or start date: accounts other than your bank accounts, accounts receivable, accounts payable, and inventory.
To see how this process works, suppose that you have the trial balance shown in Table 1-1. Note that these trial balances are used in the discussion in Book 1, Chapter 2 and shown in that chapter’s Table 2-19. Notice that no balance is recorded for a bank account, no balance is recorded for accounts receivable (because this account doesn’t even show up in the trial balance), and no balances are recorded for inventory or accounts payable (because these accounts have zero balances at the conversion date). For purposes of this example (but not the next example), the cash balance isn’t a bank account but is actually cash: a desk drawer full of low-denomination, used bills with nonsequential serial numbers.
Figure 1-8 shows how the Make General Journal Entries window looks when it records the missing trial balance information from Table 1-1. After this journal entry is recorded, the trial balance is correct as of the start date.
TABLE 1-1 A Trial Balance
Account | Debit | Credit |
|---|---|---|
Cash | $5,000 | |
Inventory | 0 | |
Accounts payable | $0 | |
S. Nelson, Capital | 1,000 | |
Sales Revenue | 13,000 | |
Cost of Goods Sold | 3,000 | |
Rent Expense | 1,000 | |
Wages | 4,000 | |
Supplies | 1,000 | |
Totals | $14,000 | $14,000 |
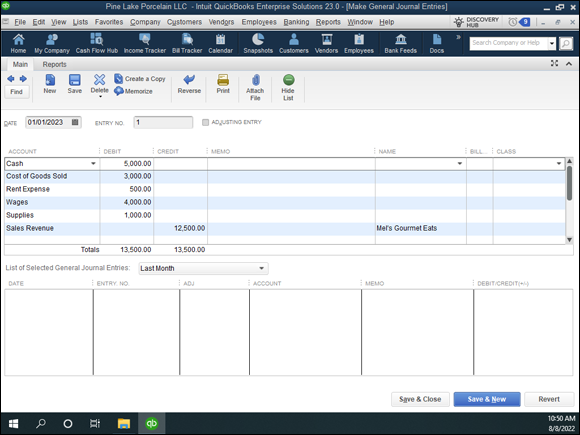
FIGURE 1-8: The Make General Journal Entries window, showing a simple trial balance.
For more information about how to record a journal entry by using the Make General Journal Entries window, see Book 4, Chapter 1. If you want to try this on your own with no further instruction from me, choose the Company ⇒ Make General Journal Entries command. When QuickBooks displays the Make General Journal Entries window, shown in Figure 1-8, use the Account, Debit, and Credit columns to record your journal entry.
If the idea of making a journal entry terrifies the heck out of you, you may find yourself in a bit of a pickle. You need to become comfortable working with double-entry bookkeeping to set up QuickBooks at a time other than at the beginning of the year. This means, unfortunately, that if you’re setting up QuickBooks sometime during the middle of the year, you must enter a general journal entry to fix the weirdness that the QuickBooks Setup creates. If you don’t know how double-entry bookkeeping works — if debits and credits aren’t your friends — you probably need to get somebody’s help. I suggest that you call your CPA or some other friend who truly understands accounting. Get them to come over and enter the last part of the trial balance for you by using the Make General Journal Entries window.
Note: This project shouldn’t be a big one if you decide to call your CPA. If they come over to your office, and if you have the trial balance ready, it should take them only a few minutes to enter the necessary general journal entry. Perhaps you can buy them a nice lunch, and that will settle the score.
A real-life example to finish
Okay, true confessions. The example I give in the preceding section? You probably won’t be lucky enough that your starting trial balance journal entry will be so simple. You probably will have to deal with a bank account and with account balances in your accounts receivable, accounts payable, or inventory accounts. Now I show you how this process works.
Suppose that you have the trial balances shown in Table 1-2. Note that in this example (unlike the preceding example), the first account shown — the one with $5,000 — is a bank account.
Here’s the tricky part of recording this trial balance. You don’t need — I repeat, don’t need — to record all this trial-balance information through a journal entry. Because the bank account, accounts receivable, accounts payable, and inventory portions have already been recorded if you added customer, vendor, item, and bank account information during the QuickBooks Setup process, you just need to enter the rest of the trial balance.
Because you won’t be recording all the trial balance, however, your journal entry not only won’t match your actual trial balance, but also won’t balance. To make it balance, therefore, you plug the difference into an account that QuickBooks supplies for just this sort of bookkeeping madness: the Opening Balance Equity account. Figure 1-9 shows this journal entry.
TABLE 1-2 A Trial Balance
Account | Debit | Credit |
|---|---|---|
Checking | $5,000 | |
Accounts Receivable | 4,000 | |
Inventory | 2,000 | |
Loan Payable | 5,000 | |
S. Nelson, Capital | 2,000 | |
Sales Revenue | 13,000 | |
Cost of Goods Sold | 3,000 | |
Rent Expense | 1,000 | |
Wages | 4,000 | |
Supplies | 1,000 | |
Totals | $20,000 | $20,000 |

FIGURE 1-9: The Make General Journal Entries window, showing the final part of a more-complicated trial balance.