Chapter 1
Administering QuickBooks
IN THIS CHAPTER
![]() Securing your data
Securing your data
![]() Managing QuickBooks in a multiuser environment
Managing QuickBooks in a multiuser environment
![]() Enabling audit trails
Enabling audit trails
![]() Setting up QuickBooks for simultaneous multiuser access
Setting up QuickBooks for simultaneous multiuser access
![]() Managing accounting controls
Managing accounting controls
QuickBooks does something that’s critically important to the success of your business: It collects and supplies financial information. For this reason, you want to have a firm understanding of how you can protect the data that QuickBooks collects and stores, as well as the assets that QuickBooks tracks. This chapter describes all this.
Keeping Your Data Confidential
Accounting data is often confidential information. Your QuickBooks data shows how much money you have in the bank, what you owe creditors, and how much (or how little) profit your firm produces. Because this information is private, your first concern in administering a QuickBooks accounting system is keeping your data confidential.
You have two complementary methods for keeping your QuickBooks data confidential. The first method for maintaining confidentiality relies on the security features built into Microsoft Windows. The other method relies on QuickBooks’s security features.
Using Windows security
You can use the security provided by Windows to restrict access to a file — either a program file or a data file — to specific users. This means that you can use Windows-level security to say who can and can’t use the QuickBooks program or access the QuickBooks data file.
I don’t describe how Windows-level security works in this book. If you’re already employing Windows-level security, you know (or someone in your office knows) how to use that tool to prevent unauthorized access to, or use of, program files and data files. To use Windows-level security for QuickBooks, you can simply apply your existing general knowledge to the QuickBooks program file or the QuickBooks data file.
If you aren’t already using Windows-level security, you don’t need to go to the trouble of learning Windows’s complicated security system. You can use the simpler QuickBooks security.
Using QuickBooks security
You can protect the confidentiality of your QuickBooks data by assigning a password to a QuickBooks company data file. You can do this during the QuickBooks setup process. You can also set up a password by choosing the Company ⇒ Change Your Password command. In non-Enterprise versions of QuickBooks, the command would be Company ⇒ Set Up Users & Passwords ⇒ Change Your Password. When you choose this command, QuickBooks displays the Change Your Password dialog box (see Figure 1-1).
To set up a password, you simply enter the same password in both the New Password text box and the Confirm New Password text box. Note that your password is associated with the username Admin (which stands for administrator). If you haven’t yet set up a password, you don’t have an old password, so you won’t see a Current Password text box. If you’re working with an Administrator password, you must also provide a challenge question and answer. (This answer will let you recover your access to your QuickBooks file if you forget the Administrator password.)
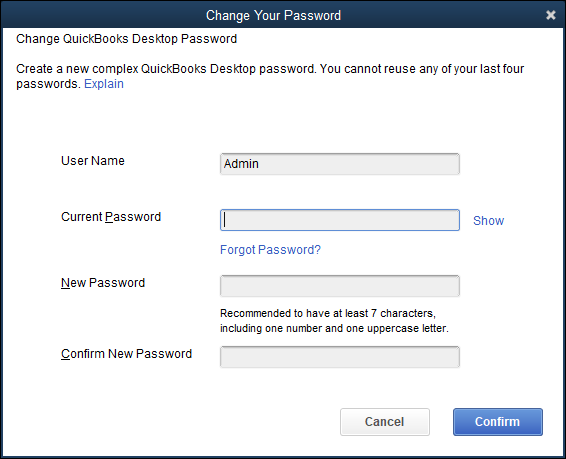
FIGURE 1-1: The Change Your Password dialog box.
I strongly encourage subscribing to a password manager service, such as 1Password or Last Pass. These services allow you to store, generate, and manage your passwords. They also help to minimize identity theft and hacking by creating complete and unique passwords for every site and program.
After you set your password, you should change it periodically. To change your password, choose the Company ⇒ Change Your Password (or possibly Company ⇒ Set Up Users & Roles ⇒ Edit) command. QuickBooks again displays the Change Your Password dialog box. This time, you must enter your old password in the Current Password text box. Then you need to enter your new password in both the New Password text box and the Confirm New Password text box.
QuickBooks requires a username and password before it will open the company data file. If you assign a password to your company data file, for example, whenever QuickBooks starts, it displays the QuickBooks Login dialog box, where you enter your username and password and then click OK. QuickBooks opens the data file. If you can’t supply the password, QuickBooks doesn’t open the data file.
Using QuickBooks in a Multiuser Environment
You aren’t limited to using one password to control access to your QuickBooks data file. You can set up several passwords for the QuickBooks data file. What’s really neat about this practice is that you can tell QuickBooks to allow certain users and passwords to do only certain things. This sounds complicated, but it’s really not. The business owner, for example, may have a password that allows them to do anything. But a new accounting clerk, for example, may have a password that allows them only to record bills in the system.
Setting up additional QuickBooks users
If more than one person will be using QuickBooks, you want to set up additional users.
Adding users in QuickBooks Enterprise Solutions
To add users in QuickBooks Enterprise Solutions, follow these steps:
Choose Company ⇒ Users ⇒ Set Up Users and Roles.
QuickBooks displays the Users and Roles dialog box (see Figure 1-2). This dialog box identifies any users for whom QuickBooks access has been set up and the roles they can fill when using QuickBooks. The Users list, which appears on the User List tab of the dialog box, also identifies who is currently logged in to the system.
Tell QuickBooks that you want to add a user by clicking the New button.
When you click this button, QuickBooks displays the New User dialog box.
Identify the user and supply a password.
You need to give each user for whom you’re setting up a username. You do this by entering a short name — perhaps the user’s first name — in the User Name box. After you identify the user, you enter the user’s password in both the Password text box and the Confirm Password text box (see Figure 1-3).
Identify the user’s role(s).
Use the Available Roles list box to select the roles (or duties) the user fills. Then add the selected role to the user’s list of assigned roles by clicking the Add button. To remove a role from a user, select the role in the Assigned Roles list box and then click Remove.
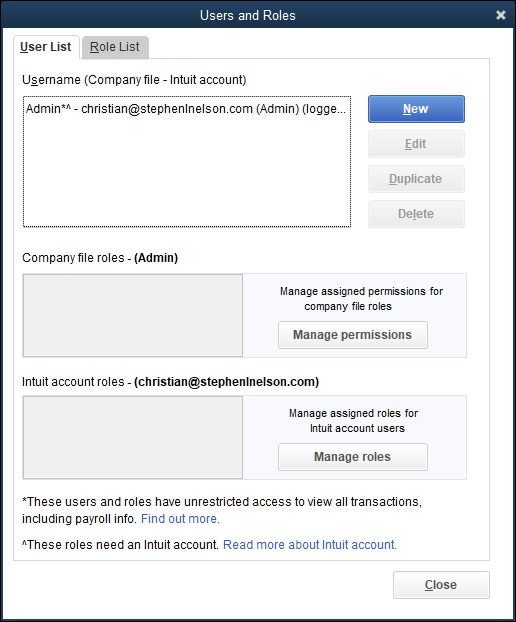
FIGURE 1-2: The Users and Roles dialog box.
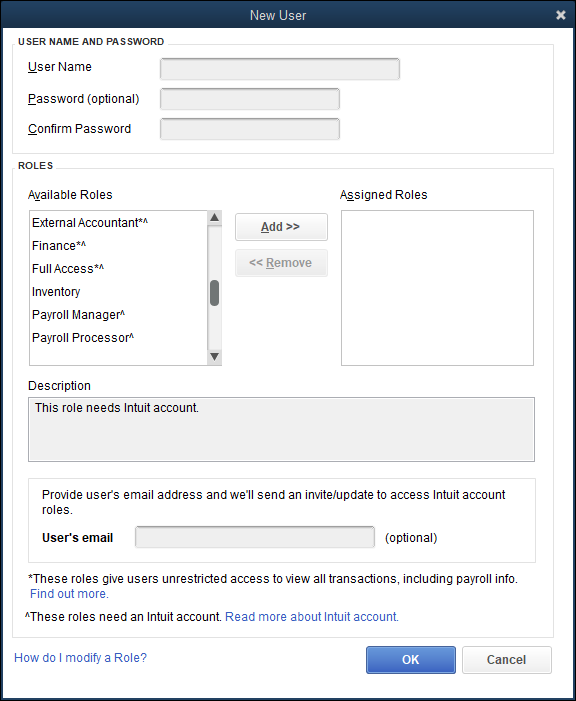
FIGURE 1-3: The New User dialog box.
 The Description box at the bottom of the New User dialog box allows you to describe the role in more detail. You might enter the type of QuickBooks user who might typically be assigned the selected role, for example.
(Optional) Modify roles as necessary.
You can fine-tune the roles that you assign (with the help of QuickBooks). To do so, go back to the Users and Roles dialog box, select the Role List tab (see Figure 1-4), click the role you want to change and then click the Edit button. When QuickBooks displays the Edit Role dialog box (not shown), select an accounting activity or area in the Area and Activities list and then use the Area Access Level radio buttons to specify what a user with the selected role can do. You can indicate that the user should have no access by selecting the None radio button. You can indicate that the user should have full access by selecting the Full radio button. If the user should have partial access, you select the Partial button and then check or clear (as appropriate) the View, Create, Modify, Delete, Print, and View Balance check boxes. Click OK to save any changes to the roles and return to the Users and Roles dialog box.
 You can see what access any role initially has by selecting one of the entries in the Area and Activities list. QuickBooks uses the Area Access Level buttons and boxes to show the current settings for the role.
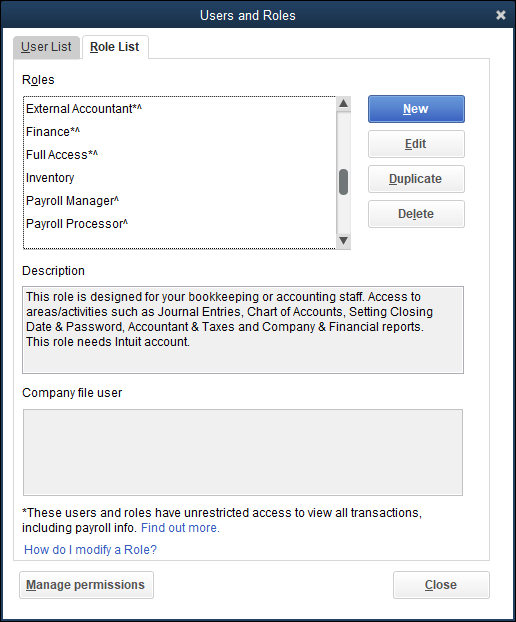
FIGURE 1-4: The Role List tab of the Users and Roles dialog box.
As a general rule, when it comes to accounting controls, you want to provide a minimal amount of access. If someone doesn’t need access to the QuickBooks data file for day-to-day duties, you should select the None button. If someone needs a little bit of access — perhaps to prepare job estimates or invoices — you give just that access and nothing more. At the end of this chapter, in “Maintaining Good Accounting Controls,” I talk about why minimizing user rights and access is so important. But the bottom line is this: The more ability you give employees or subcontractors or accountants to noodle around in your accounting system, the greater the risk that someone will either inadvertently or intentionally introduce errors into the system. Also, the greater the rights and access you give, the easier you make it for someone to steal from you.
(Optional) Review your user permissions.
After you set up a user, you should (to be careful) review the permissions you’ve given the user. To do this, click the User List tab of the Users and Roles dialog box, select the user, and then click the Manage Permissions button. When QuickBooks displays the View Permissions dialog box (not shown), select the user and then click the Display button to see the View Permissions window (see Figure 1-5), which displays a very detailed list of what the user can and can’t do.
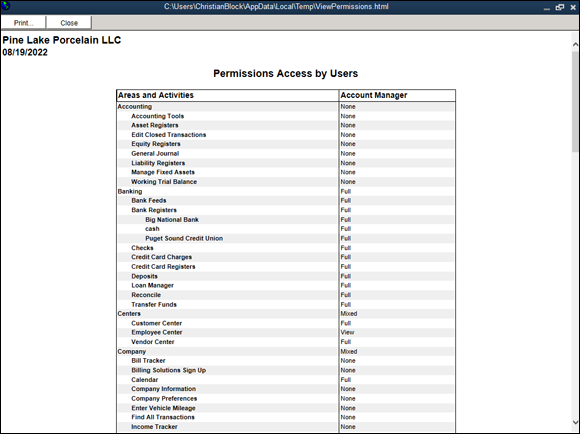
FIGURE 1-5: View Permissions window.
(Optional) Review your role modifications.
If you change a role’s permissions, you probably also want to review those changes. To do that, click the Role List tab of the Users and Roles dialog box, select the role, and then click the View Permissions button. QuickBooks displays another version of the View Permissions window that lists the roles you and QuickBooks have set up. Select the role you want to review and then click the View Permissions button. QuickBooks displays another version of the View Permissions window, with a detailed list of what someone with the role can and can’t do.
After you finish reviewing user and role permissions, click Close to close any open windows and then click the Cancel or Close button to close any open dialog boxes.
From this point forward, the new user can use QuickBooks; their rights are limited to what you specified.
Adding users in QuickBooks Pro and Premier
To set up additional users in QuickBooks Pro and QuickBooks Premier, follow these steps:
Choose Company ⇒ Set Up Users and Passwords ⇒ Set Up Users.
QuickBooks displays the Users and Roles List dialog box (refer to Figure 1-2), which identifies any users for whom QuickBooks access has been set up and who are currently logged on to the system.
Tell QuickBooks that you want to add a user by clicking the Add User button.
QuickBooks displays the first Set Up User Password and Access dialog box (not shown).
Identify the user and supply a password.
Give each user for whom you’re setting up a password a username by entering a short name — perhaps the user’s first name — in the User Name box. After you identify the user, you enter the user’s password in both the Password text box and the Confirm Password text box.
Click Next to continue and then indicate whether you want to limit access for the new user.
When QuickBooks displays the second Set Up User Password and Access dialog box (not shown), indicate whether you want to limit access and rights for the user. If you do want to limit access and rights (rights are simply the things that the user can do), select the Selected Areas of QuickBooks radio button. If you want the user to be able to do anything, select the All Areas of QuickBooks radio button. If you indicate that the new user should have access to all areas of QuickBooks, you’re done setting up the user password, and you can skip the remaining steps.
Click Next to continue and then describe access to sales and accounts receivable information and tasks.
QuickBooks displays the third Set Up User Password and Access dialog box (not shown) — the first of a series of dialog boxes that walks you through an interview, asking detailed questions about what kind of access each user should have to a particular area. With regard to sales activity, for example, QuickBooks asks about access to transactions (such as invoices, credit memos, and accounts receivable information). You can indicate that the user should have no access by selecting the No Access radio button. You can indicate that the user should have full access by selecting the Full Access radio button. If the user should have partial access, you select the Selective Access radio button and then select one of the subsidiary buttons: Create Transactions Only, Create and Print Transactions, or Create Transactions and Create Reports.
Click Next and then describe the purchases and accounts payable rights.
QuickBooks displays the fourth Set Up User Password and Access dialog box (not shown), which allows you to specify what access this new user has in the purchases and accounts payable areas. You can select the No Access radio button. You can select the Full Access radio button. Or you can select some middle ground by selecting the Selective Access radio button and one of the subsidiary buttons. The same rules for setting rights and access that apply to the purchases and accounts payable area apply to the sales and accounts receivable area.
Click Next and then describe the remaining user rights and access.
When you click the Next button at the bottom of each version of the Set Up User Password and Access dialog box, QuickBooks displays several other versions of the dialog box that it uses to query you about user rights and access. After you describe what rights are appropriate for the user in the purchases and accounts payable area, for example, QuickBooks asks about the checking and credit card area. Then it asks about the inventory area. Next, it asks about payroll, followed by questions about general, sensitive accounting activities. Finally, QuickBooks asks about access to financial reporting capabilities.
You limit rights in each of these other areas the same way that you do for the sales and accounts receivable and for the purchases and accounts payable areas. Therefore, I’m not going to describe how you select the No Access option button, the Full Access option button, or the Selective Access button over and over again. Just be thoughtful as you go through the screens, limiting the user’s rights. You want users to have the rights necessary to do their job, but you don’t want to give them any more rights than they need.
Specify whether the user can change or delete transactions.
After you’ve stepped through roughly a half-dozen versions of the Set Up User Password and Access dialog boxes that ask about specific areas of accounting, QuickBooks displays the Changing or Deleting Transactions page of the Set Up User Password and Access dialog box (not shown). The Changing or Deleting Transactions page lets you indicate whether a user can change transactions recorded before the closing date. In general, you want to limit a user’s ability to change or delete transactions.
Click Next and then review your rights decisions.
QuickBooks displays the final version of the Set Up User Password and Access dialog box (not shown), which identifies the user rights that you assigned or allowed. You can use this dialog box to review the rights that someone has. If you realize that you’ve assigned rights incorrectly, click the Back button to move back through the dialog boxes to the one where you made a mistake. Change the assignment of rights and click the Next button to return to the final window of the Set Up User Password and Access dialog box.
When you finish with the review of user rights and access, click Finish.
From this point forward, the new user will be able to use QuickBooks; their rights are limited to what you specified.
Changing user rights in Enterprise Solutions
You can modify the rights that you assign to a user. To do this in QuickBooks Enterprise Solutions, choose Company ⇒ Users ⇒ Set Up Users and Roles to display the Users and Roles dialog box (not shown).
To change a user’s rights after reviewing them, select the user and click the Edit button. QuickBooks displays the Edit User dialog box (see Figure 1-6), which closely resembles the New User dialog box that you use to set up the user and describe their rights. You use the User Name, Password, and Confirm Password text boxes to change the user information. You can use the Available Roles list, the Assigned Roles list, and the Add and Remove buttons to change what the user can do within QuickBooks. Click Close when you’re done.
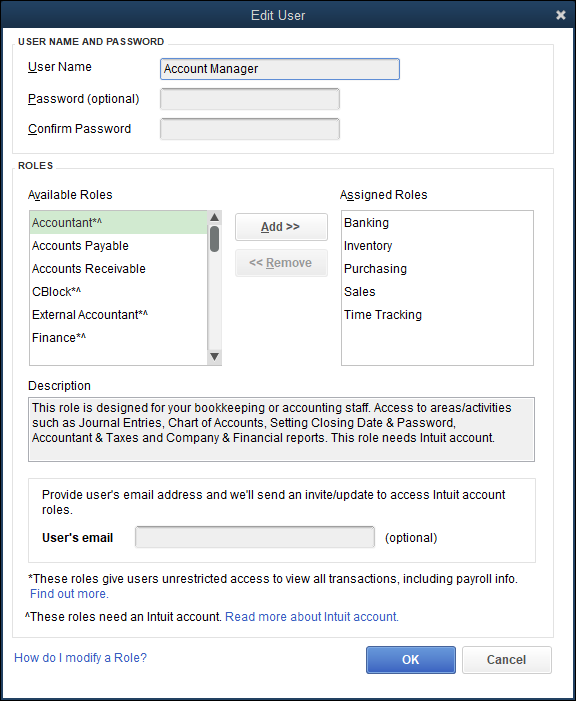
FIGURE 1-6: The Edit User dialog box.
To duplicate a user (you may want to add a second user with permissions that mirror some other user’s permissions), in the Users and Role dialog box, select the user you want to clone and then click Duplicate. When QuickBooks displays the Duplicate User dialog box (see Figure 1-7), finish describing the new user and click OK.
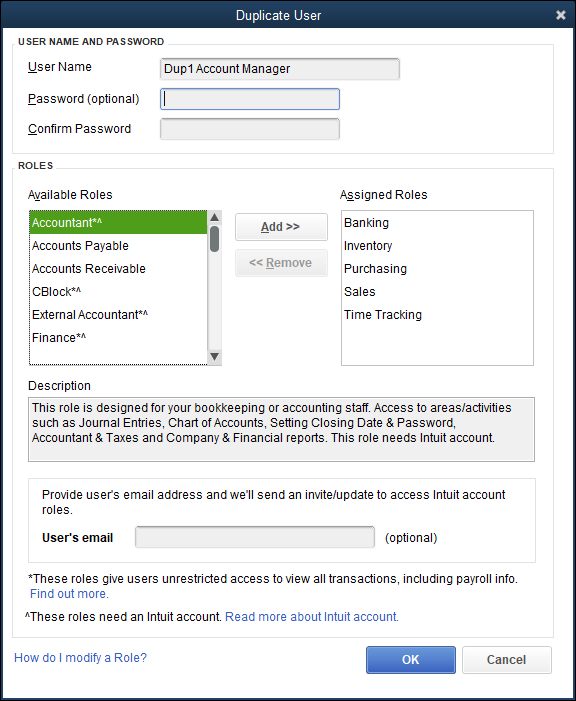
FIGURE 1-7: The Duplicate User dialog box.
To remove a user, you also use the Users and Roles dialog box. Simply select the user and then click the Delete button. QuickBooks asks you to confirm your deletion. When you click the Yes button (see Figure 1-8) for confirmation, QuickBooks removes the user.
Changing user rights in QuickBooks Pro and Premier
You can modify the rights that you assign to a user in QuickBooks Pro or Premier. To do this, choose Company ⇒ Set Up Users and Passwords ⇒ Set Up Users to display the User List dialog box (not shown).
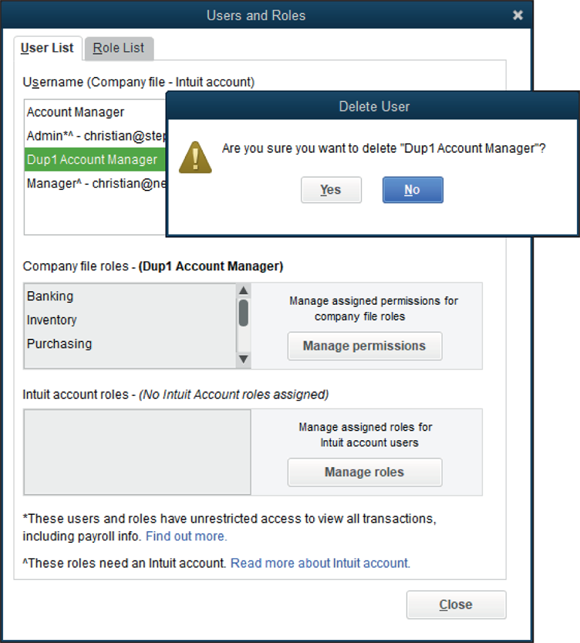
FIGURE 1-8: The Delete User dialog box.
To look at the rights that a particular user has, select the user in the list and then click the View User button. When you do, QuickBooks displays the View User Access dialog box (not shown). This dialog box shows the same information as the final version of the Set Up User Access and Password dialog box, which is the dialog box that you use initially to specify what rights a user should have. Click the Leave button to close the View User Access dialog box.
To change a user’s rights after reviewing them, select the user and then click the Edit User button. QuickBooks steps through the same set of dialog boxes that you use to set up the user and describe their rights. You use the Next and Back buttons to do things such as change the username or password, specify whether the user should be limited in their access, and — if necessary — to limit the user’s access to a particular activity within QuickBooks.
To remove a user, you also use the User List dialog box. Simply select the user and then click the Delete User button. QuickBooks asks you to confirm your deletion (not shown). When you click the Yes button for confirmation, QuickBooks removes the user.
Using Audit Trails
If you decide to allow multiple users access to the QuickBooks data file, you’ll appreciate the QuickBooks Audit Trail feature, which keeps a record of who makes what changes in the QuickBooks data file. This feature is always on, and you can use it to determine whether information in the file changed and, if so, the user who made the change.
To produce an Audit Trail report, choose Reports ⇒ Accountant and Taxes ⇒ Audit Trail. Figure 1-9 shows a QuickBooks Audit Trail report. Note that this report identifies both the type of change made and the person who made the change in the QuickBooks data file.
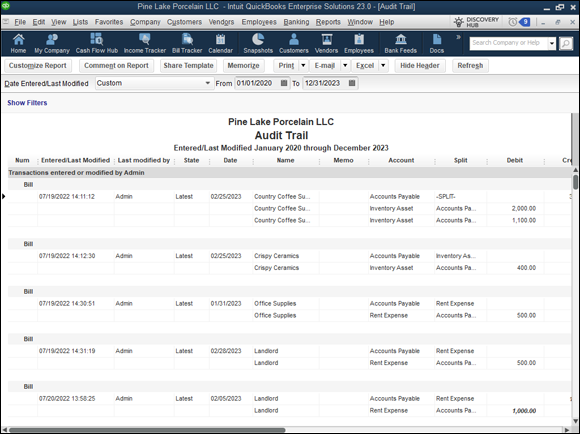
FIGURE 1-9: An Audit Trail report.
Enabling Simultaneous Multiuser Access
Sometimes, you need only a single computer and a single copy of QuickBooks, even though you have several employees using QuickBooks. If a small business has only an administrative assistant and the owner accessing a QuickBooks data file, for example, one copy of QuickBooks running on a single personal computer may be all that’s required. QuickBooks does allow for simultaneous use of the QuickBooks data file by multiple users, however. Predictably, you first need to set up multiple users, as described earlier in this chapter.
After you’ve set up multiple users, you can install the QuickBooks program on other personal computers and then — assuming that all these personal computers connect to a Windows network — use those other copies of QuickBooks to access the QuickBooks data file stored on the first or principal computer.
To use QuickBooks in an environment of simultaneous use by multiple users, you also need to tell QuickBooks that simultaneous use is okay. To do this, choose the File ⇒ Switch to Multi-User Mode command. (If you want to turn off Multi-User Mode later, choose File ⇒ Switch to Single User Mode again.)
QuickBooks supports simultaneous use by multiple users through a technology called record locking, which locks all the records that you’re working with but not the entire QuickBooks data file. If you want to work with Company A, and some other user wants to work with Company B, that’s okay. QuickBooks allows it. What you and the other user can’t do, however, is work on the same company (A or B) at the same time. This would mean that you’re working with the same customer record.
Maintaining Good Accounting Controls
In the preceding paragraphs of this chapter, I talk about how QuickBooks allows multiple users. Many businesses, after they grow to a certain size, need to support multiple users with access to accounting information and the capability, in some cases, to create accounting transactions. Unfortunately, multiple accounting system users create risk for the business owner. By having access to the accounting system, users can either inadvertently introduce errors into the accounting system or (unfortunately) intentionally defraud a business. For these reasons, I want to briefly list some QuickBooks control techniques that a business owner or business manager can use to minimize unintentional errors and minimize the opportunity for theft. Here are my best ideas:
- Regularly compare physical inventory counts with inventory accounting records. Inventory shrinks, unfortunately. People — sometimes employees, but often pseudo-customers, such as shoplifters — steal inventory. Therefore, one thing you need to do, both to minimize your inventory losses and to maintain accurate accounting records, is regularly compare physical counts of your inventory with what your accounting records show. A small convenience store, for example, may want to compare tobacco inventory on a daily basis, beer and wine inventory on a weekly basis, and all other grocery inventory items on a monthly or annual basis. This approach to frequently counting the most valuable and easiest-to-steal items accomplishes two things:
- Inventory shrinkage is quickly identified.
- The business owner can minimize inventory shrinkage by identifying the type of inventory that’s most often stolen or even when inventory is most often stolen.
Reconcile bank accounts. One thing that business owners should do, in my opinion, is reconcile their own bank accounts. Often, employee theft by accounting personnel occurs as employees figure out how to write checks on the company’s bank account that the owner doesn’t see. One sure way to find a fictitious and fraudulent transaction is to have the owner reconcile the bank statement. If the owner reconciles the bank statement, they can compare the bank’s accounting for the account with the company’s QuickBooks accounting records. Any obvious discrepancies can be fixed, which means that the QuickBooks accounting records are more accurate. Additionally, any flaky, suspicious transactions tend to become obvious when the business owner looks closely at checks.
 The first employee I ever hired was a check forger. He began forging checks on one of my business checking accounts two or three weeks after he started working for me. I caught him only because I was regularly reconciling the checking account. (He was convicted of a felony a few months later.)
- Segregate accounting from physical custody where possible. In a small business, it’s difficult to always separate the accounting for some activity from the physical custody or physical responsibility for that activity. It’s tough to segregate the inventory accounting from physical custody or access to that inventory. A store clerk, for example, may easily be able to steal cigarettes and also adjust inventory records through cash-register sales for cigarettes. Nevertheless, wherever you can segregate physical custody from accounting, built-in error checking occurs. The person doing the accounting indirectly checks on the physical custodian’s caretaking of the asset. If the physical custodian is stealing cartons of cigarettes, for example, that fact shows up when the accountant compares the accounting records with the physical accounts of inventory. Similarly, someone who doesn’t have access to the cash and the bank account can’t easily steal cash, even if they have complete access to cash accounting records. You can ask your CPA for help in devising ways to segregate physical custody of assets from accounting and bookkeeping duties. And you really, really should do this. Unfortunately, employee theft is very common.
- Train employees in the use of QuickBooks. You should train employees to use QuickBooks if you have a business of any size for two basic reasons:
- Someone who knows how to use QuickBooks is less likely to make inadvertent errors. QuickBooks isn’t difficult to use, but it’s also not something that you can learn willy-nilly with no help. Some transactions are pretty tricky, particularly for certain businesses. So if you can, it makes good sense to provide some employee help or training, or both. Those resources let people use QuickBooks’s features more comfortably and more accurately to build financial information that lets you manage your business better.
- Messy accounting records camouflage employee theft. Often, one thing you see when employee theft happens is really messed-up accounting records. For that reason, you can find yourself in a situation in which poorly trained employees create a messy accounting system that enables employee theft. So training means not only that you’ll have more accurate accounting records, but also that you’ll be less likely to have an environment conducive to theft or embezzlement.
- Set a closing date. If you take a Principles of Accounting course, you’ll discover that closing means a set of bookkeeping procedures that somebody performs to zero out revenue and expense accounts so that starting in the new year, revenue and expenses can be easily calculated. In QuickBooks, closing means something different. But you still want to close the QuickBooks file to maintain the integrity of your data. Here’s how: Choose the Edit ⇒ Preferences command, select Accounting in the Preferences dialog box, select the Company Preferences tab, and then click the Closing Date Set Date/Password button. When QuickBooks prompts you, specify a closing date and password. After you provide this information, QuickBooks prohibits or limits users from changing or entering transactions dated before the closing date. (Only people with the password can make changes to or enter transactions with dates earlier than the closing date.)
Manage your QuickBooks accounting system. I’m sorry to report that many business owners don’t view the accounting system as being anything more than a tool to produce invoices, paychecks, and information required for the annual tax return. Unfortunately, that distant relationship with the accounting system means that business owners often don’t feel much need to actively manage what happens with the accounting system.
In my opinion — an opinion based on more than 35 years of experience working as a CPA — this attitude is wrong. An accounting system should be a tool that you use to better manage your business. And it can be that. But if it’s going to be a tool for better managing your business, you need to manage the system. In other words, I respectfully suggest that you take responsibility for ensuring that employees are trained to do the things that protect your accounting system (such as backing up the data file) and that you ensure that they complete appropriate accounting procedures on a monthly and annual basis (such as sending out all invoices, reconciling bank accounts, cleaning up messy transactions, and so forth).
I don’t think that this management responsibility needs to be a heavy one. You can rather easily make sure that people are doing the sorts of things they’re supposed to be doing by creating some simple checklists. Table 1-1 shows a sample monthly accounting to-do list. Table 1-2 shows a sample annual accounting to-do list. You can use these tables as starting points for constructing your own list of things that the accounting clerk or office manager must do every month or at the end of every year.
TABLE 1-1 A Sample Monthly Accounting To-Do List
Task | Completed? |
|---|---|
Back up data and move it offsite | ❏ |
Reconcile bank accounts | ❏ |
Issue all invoices, credit memos, and statements | ❏ |
Clean up any suspense accounts | ❏ |
Deliver financial statements | ❏ |
Report exceptions (overdue invoices, bills, purchase orders, understocked inventory items, and so on) | ❏ |
TABLE 1-2 A Sample Annual Accounting To-Do List
Task | Completed? |
|---|---|
Adjust trial balance | ❏ |
Save the QuickBooks backup file to hard drive and cloud storage | ❏ |
Consider cleaning up data files if they’re huge | ❏ |
Close year when really done | ❏ |

 Let me add one more plug for password managers, which eliminate having to think or even remember all your passwords. You can simply choose them from the software.