
Chapter 3. Operating System
3.0 Introduction
This chapter explores many aspects of the Linux operating system used by the Raspberry Pi. A lot of this involves the use of the command line. If you are used to Windows or macOS, this can come as a bit of a shock. However, when you get used to it, doing things with the command line can be surprisingly effective.
You can accomplish many simple file operations like moving files around, renaming, copying, and deleting files graphically using a more Windows or macOS approach, and this is the subject of our first recipe.
3.1 Browsing Files Graphically
Solution
Use the File Manager.
You can find this program on your Main menu, in the Accessories group (Figure 3-1).
Using the File Manager, you can drag a file or directory from one directory to another or use the Edit menu to copy a file from one location and paste it to a second. This operates in much the same way as the Windows File Manager or macOS Finder.

Figure 3-1. The File Manager
Discussion
The lefthand side of the File Manager shows the folder structure.
The central area displays the files in the current folder, which you can navigate using the buttons in the toolbar or by typing a location in the file path area at the top.
You can right-click a file to open a menu presenting options you can use on that file (Figure 3-2).

Figure 3-2. Right-clicking a file opens a menu with more options
You can also select more than one file at a time for copying or dragging by holding down the Ctrl key while you select files, or you can select a range of files by selecting one file and then holding down the Shift key while you select the end of the list of files that you want to select.
See Also
See also Recipe 3.5.
3.2 Copying Files onto a USB Flash Drive
Solution
Insert the USB flash drive into a USB port, and the dialog shown in Figure 3-3 should appear. Select OK to open it in the File Manager.

Figure 3-3. The removable-media dialog box
The drive will be mounted in /media/pi followed by the name of the flash drive (in my case, UNTITLED). To copy a file from your home folder, drag it onto the folder representing your flash drive, as shown in Figure 3-4.

Figure 3-4. Copying a file by dragging it onto a USB flash drive
Windows, macOS, and Linux all have their own disk formats. The USB flash drive should be formatted as FAT32 or exFAT for maximum compatibility with macOS and Windows computers. exFAT supports larger disk sizes than FAT32.
Discussion
After your USB flash drive is mounted on the Raspberry Pi’s filesystem, you can also copy files using the command line. The following example copies the file test.txt to the flash drive:
$ cd /home/pi
$ cp test.txt /media/pi/UNTITLED/
In this example, cd is the command to change directory, and cp is the copy command. These commands are explained more fully in Recipe 3.4 and Recipe 3.5.
See Also
For general information on using the File Manager, see Recipe 3.1.
To copy files from the command line, see Recipe 3.4.
3.3 Starting a Terminal Session
Solution
At the top of the Raspberry Pi desktop, select the Terminal icon (it looks like a black computer monitor), or, on the Start menu in the Accessories group, select the Terminal menu option (Figure 3-5).

Figure 3-5. Opening the Terminal
Discussion
When the Terminal starts, it is set to your home directory (/home/pi).
You can open as many Terminal sessions as you want. It is often useful to have a couple of sessions open in different directories so that you don’t need to constantly switch directories using cd (Recipe 3.4).
When using the Terminal, everything is case sensitive. That is, if you are using a command, you must use the correct case when you’re typing. For example, the ls command that you will meet in the next recipe must be written as lowercase ls and not LS or Ls or lS. Similarly, all filenames are case sensitive, so files named picture.jpg and Picture.jpg are two different files.
See Also
In the next section (Recipe 3.4), you will look at navigating the directory structure using the Terminal.
3.4 Navigating the Filesystem Using a Terminal
Solution
The main command used for navigating the filesystem is cd (change directory). After cd, you need to specify the directory that you want to change to. This can be either a relative path to a directory within your current directory or an absolute path to somewhere else on the filesystem.
To see what the current directory is, use the command pwd (print working directory).
Discussion
Try out a few examples. Open a Terminal session, and you should see a prompt like this:
pi@raspberrypi: ~ $
The prompt that you will see after each command (pi@raspberrypi: ~ $) is a reminder of your username (pi) and your computer name (raspberrypi). The ~ character is shorthand for your home directory (/home/pi). So at any point you can change your current directory to your home directory as follows:
$ cd ~
Tip
Throughout the book, I use a $ at the beginning of each line where you are expected to type a command. This is called the prompt. The response from the command line is not prefixed by anything; it appears just as it does on the Raspberry Pi’s screen.
You can confirm that the command did indeed set the directory to the home directory by using the pwd command:
$ pwd
/home/pi
If you want to move up one level in the directory structure, you can use the special value .. (two dots) after the cd command, as shown here:
$ cd ..
$ pwd
/home
As you might have deduced by now, the path to a particular file or directory is made up of words separated by a /. So the very root of the entire filesystem is /, and to access the home directory within /, you would refer to /home/. Then, to find the pi directory within that, you would use /home/pi/. You can omit the final / from a path.
Paths can be absolute (starting with a / and specifying the full path from the root), or they can be relative to the current working directory, in which case they must not start with a /.
You will have full read and write access to the files in your home directory, but when you move into the places where system files and applications are kept, your access to some files will be restricted to read-only. You can override this (Recipe 3.12), but some care is required.
Check out the root of the directory structure by entering the commands cd / and ls, as shown in Figure 3-6.

Figure 3-6. Listing the contents of a directory
The ls command (list) shows us all of the files and directories below (/) the root directory. You will see that there is a home directory listed, which is the directory you have just come from.
Now change into one of those directories by using the commands shown in Figure 3-7.

Figure 3-7. Changing directory and listing the contents
You will see that the files and folders have some color coding. Files are displayed in various colors, whereas directories are dark blue.
Unless you particularly like typing, the Tab key offers a convenient shortcut. If you start typing the name of a file, pressing the Tab key allows the autocomplete feature to attempt to complete the filename. For example, if you’re going to change directory to network, type the command cd netw and then press the Tab key. Because netw is enough to uniquely identify the file or directory, pressing the Tab key will autocomplete it.
If what you have typed is not enough to uniquely identify the file or directory, pressing the Tab key another time will display a list of possible options that match what you have typed so far. So if you had stopped at net and pressed the Tab key, you would see something like Figure 3-8.

Figure 3-8. Autocompletion using the Tab key
You can provide an extra argument after ls to narrow down the things that you want to list. Change directory to /etc and then run the following:
$ ls f*
fake-hwclock.data  fb.modes  fstab  fuse.conf

fonts:
conf.avail  conf.d  fonts.conf  fonts.dtd

foomatic:
defaultspooler  direct  filter.conf

fstab.d:
pi@raspberrypi /etc $
The * character is called a wildcard. In specifying f* after ls, we are saying that we want to list everything that begins with an f.
Helpfully, the results first list all the files within /etc that begin with f, and then the contents of all the directories in that folder beginning with f.
A common use of wildcards is to list all files with a certain extension (e.g., ls *.docx).
A convention in Linux (and many other operating systems) is to prefix files that should be hidden from the user by starting their name with a period. Any so-named files or folders will not appear when you type ls unless you supply ls with the option -a (all).
For example:
$ cd ~
$ ls -a
.                                  Desktop               .pulse
..                                 .dillo                .pulse-cookie
Adafruit-Raspberry-Pi-Python-Code  .dmrc                 python_games
.advance                           .emulationstation     sales_log
.AppleDB                           .fltk                 servo.py
.AppleDesktop                      .fontconfig           .stella
.AppleDouble                       .gstreamer-0.10       stepper.py.save
Asteroids.zip                      .gvfs                 switches.txt.save
atari_roms                         indiecity             Temporary Items
.bash_history                      .local                thermometer.py
.bash_logout                       motor.py              .thumbnails
.bashrc                            .mozilla              .vnc
.cache                             mydocument.doc        .Xauthority
.config                            Network Trash Folder  .xsession-errors
.dbus                              .profile              .xsession-errors.old
As you can see, the majority of the files and folders in your home directory are hidden.
See Also
See also Recipe 3.14.
3.5 Copying a File or Folder
Discussion
You can, of course, copy files by using the File Manager and its copy and paste menu options (Recipe 3.1) or keyboard shortcuts.
The simplest example of copying in a Terminal session is to make a copy of a file within your working directory. The cp command is followed first by the file to copy and then by the name to be given to the new file.
For example, the following example creates a file called myfile.txt and then makes a copy of it with the name myfile2.txt; you can find out more about the trick of creating a file using the > command in Recipe 3.9:
$ echo "hello" > myfile.txt
$ ls
myfile.txt
$ cp myfile.txt myfile2.txt
$ ls
myfile.txt    myfile2.txt
Although in this example both file paths are local to the current working directory, the file paths can be to anywhere in the filesystem where you have write access. The following example copies the original file to an area /tmp, which is a location for temporary files (do not put anything important in that folder):
$ cp myfile.txt /tmp
Note that in this case, the name to be given to the new file is not specified, just the directory where it is to go. This will create a copy of myfile.txt in /tmp with the same name of myfile.tmp.
Sometimes, rather than copying just one file, you might want to copy an entire directory full of files and possibly other directories. To copy a directory and all its contents, you need to use the -r option (for recursive):
$ cp -r mydirectory mydirectory2
Whenever you are copying files or folders, the result of the command will tell you if you do not have permission. If that’s the case, you will need to either change the permissions of the folder into which you are copying (Recipe 3.14) or copy the files with superuser privileges (Recipe 3.12).
See Also
See also Recipe 3.6.
For a useful description of the many optional parameters to the cp command, see https://www.computerhope.com/unix/ucp.htm.
3.6 Renaming a File or Folder
Discussion
The mv (move) command is used in a similar way to the cp command, except that the file or folder being moved is simply renamed rather than a duplicate being made.
For example, to rename a file from my_file.txt to my_file.rtf, you use the following command:
$ mv my_file.txt my_file.rtf
Changing a directory name is just as straightforward, and you don’t need the recursive -r option you used when copying, because changing a directory’s name implicitly means that everything within it is contained in a renamed directory.
See Also
See also Recipe 3.5.
3.7 Editing a File
Discussion
To use nano, simply type the command nano followed by the file name or path to the file that you want to edit. If the file does not exist, it will be created when you save it. However, this will happen only if you have write permissions in the directory to which you are trying to write the file.
From your home directory, type the command nano my_file.txt to edit or create the file my_file.txt. Figure 3-9 shows nano in action.
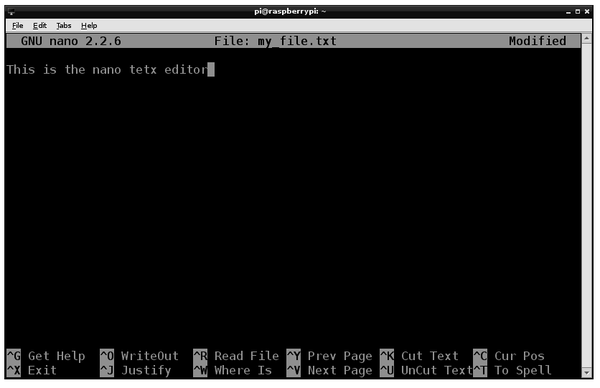
Figure 3-9. Editing a file with nano
You cannot use the mouse to position the cursor; you must use the arrow keys instead.
The area at the bottom of the screen lists a number of commands that you can access by holding down the Ctrl key and pressing the letter indicated. Most of these are not that useful. The ones that you are most likely to use are as follows:
- Ctrl-X
-
Exit. You will be prompted to save the file before nano exits.
- Ctrl-V
-
Next page. Think of it as an arrow pointing downward. This allows you to move through a large file one screen at a time.
- Ctrl-Y
-
Previous page.
- Ctrl-W
-
Where is. This allows you to search for a piece of text.
- Ctrl-O
-
Output. This will write the file without exiting the editor.
There are also some fairly crude copy-and-paste options there, but in practice, it’s easier to use the normal clipboard from the menu that you access with a right-click, as demonstrated in Figure 3-10.

Figure 3-10. Using the clipboard in nano
Using this clipboard also allows you to copy and paste text between other windows, such as your browser.
When you’re ready to save your changes to the file and exit nano, use the command Ctrl-X. Type Y to confirm that you want to save the file. nano then displays the filename as the default name to save the file under; press Enter to save and exit.
If you want to abandon the changes you have made, enter N in place of Y.
See Also
Editors are very much a matter of personal taste. Many other editors that are available for Linux will work just fine on Raspberry Pi. The vim (vi improved) editor has many fans in the Linux world. This is also included in the popular Raspberry Pi distributions. It is not, however, an easy editor for the beginner. You can run it in the same way as nano, but you use the command vi instead of nano. You can find details on using vim at https://oreil.ly/y0fym.
3.8 Viewing the Contents of a File
Solution
Use the cat command or the more command to view the file.
For example:
$ more myfile.txt
This file contains
some text
See Also
You can also use cat to concatenate (join together) a number of files (Recipe 3.32).
Another popular command related to more is less. less is like more except that it allows you to move backward in the file as well as forward.
3.9 Creating a File Without Using an Editor
Solution
Use the > and echo commands to redirect what you type on the command line to a file.
For example:
$ echo "file contents here" > test.txt
$ more test.txt
file contents here
Warning
The > command overwrites any existing file, so use it with caution.
Discussion
This can be useful for quickly creating a file.
See Also
To use the more command to view files without using an editor, see Recipe 3.8.
To use > to capture other kinds of system output, see Recipe 3.31.
3.10 Creating a Directory
Discussion
To create a directory, use the mkdir command. Try out the following example (note that only the commands are shown, not the responses):
$ cd ~
$ mkdir my_directory
$ cd my_directory
$ ls
You need to have write permissions in the directory within which you are trying to create the new directory.
See Also
For general information on using the Terminal to navigate the filesystem, see Recipe 3.4.
3.11 Deleting a File or Directory
Discussion
Deleting a single file is simple and safe. The following example will delete the file my_file.txt from the home directory; you can use the ls command to make sure it’s gone:
$ cd ~
$ rm my_file.txt
$ ls
You need to have write permissions in the directory within which you are trying to carry out the deletion.
You can also use the * wildcard when deleting files. This example deletes all the files that begin with my_file. in the current directory:
$ rm my_file.*
You could also delete all the files in the directory by typing:
$ rm *
If you want to recursively delete a directory (that is, not just the directory itself, but all the files and directories that it contains), you can use the -r option:
$ rm -r mydir
Warning
When deleting files from a Terminal window, remember that you do not have the safety net of a recycle bin from which deleted files can be retrieved. Also, generally speaking, you won’t be given the option to confirm; the files will just immediately be deleted. This can be totally devastating if you combine it with the sudo command (Recipe 3.12).
See Also
See also Recipe 3.4.
If you are concerned about accidentally deleting files or folders, you can force the rm command to confirm by setting up a command alias (Recipe 3.36).
3.12 Performing Tasks with Superuser Privileges
Solution
You need to issue commands with superuser privileges. The sudo (substitute user do) command allows you to perform actions with superuser privileges. Just prefix the command with sudo.
Discussion
Most tasks that you want to perform on the command line can usually be performed without superuser privileges. The most common exceptions to this are when you’re installing new software and editing configuration files. The apt-get command is the principal way of installing new software into Raspbian. You will meet it formally in Recipe 3.17.
Another example requiring superuser privileges is the reboot command. If you try to run it as a normal user, you will receive a number of error messages:
$ reboot
Failed to set wall message, ignoring: Interactive authentication required.
Failed to reboot system via logind: Interactive authentication required.
Failed to open /dev/initctl: Permission denied
Failed to talk to init daemon.
If you issue the same command prefixed with sudo, the command will work just fine:
$ sudo reboot
If you have a whole load of commands to run as superuser and don’t want to have to prefix each command with sudo, you can use the following command:
$ sudo sh
#
Note how the prompt changes from $ to #. All subsequent commands will be run as superuser. When you want to revert to being a regular user, enter the command:
# exit
$
See Also
To understand more about file permissions, see Recipe 3.13.
To install software using apt-get, see Recipe 3.17.
3.13 Understanding File Permissions
Discussion
Run the command ls -l (the option letter is a lowercase L), and you will see a result like this:
$ ls -l
total 16
-rw-r--r-- 1 pi pi    5 Apr 23 15:23 file1.txt
-rw-r--r-- 1 pi pi    5 Apr 23 15:23 file2.txt
-rw-r--r-- 1 pi pi    5 Apr 23 15:23 file3.txt
drwxr-xr-x 2 pi pi 4096 Apr 23 15:23 mydir
The first line of response from the ls command tells you that there are 16 files in the directory.
Figure 3-11 shows the different sections of the listing information. The first block contains the permissions. In the second block, the number 1 (labeled “Files”) indicates how many files are involved. This field makes sense only if the listing entry is for a directory; if it is a file, it will mostly just be 1. The next two entries (both pi) are the owner and group of the file. The size entry (the fifth block) indicates the size of the file in bytes. The date modified will change every time the file is edited or changed, and the final entry is the actual name of the file or directory.

Figure 3-11. File permissions
The permissions block is split into four sections (Type, Owner, Group, and Other). The first section is the type of the file. If this is a directory, it will be the character d; if it is a file, the entry will just be a -.
The next section comprises three characters that, specify the various owner permissions for the file. Each character is a flag that is either on or off. If the owner has read permissions, there will be an r in the first character position. If the owner has write permissions, there will be a w in the second slot. The third position, which is - in this example, will have an x if the file is executable (a program or script) by the owner.
The third section has the same three flags but for any users in the group. Users can be organized into groups. So, in this case, the file has a user pi and a group ownership of pi. If there were any other users in the group pi, they would have the permissions specified here.
The final section specifies the permissions for users who are neither pi nor in the group pi.
Because most people will only ever use the Raspberry Pi as the user pi, the permissions of most interest are in the first section.
See Also
To change file permissions, see Recipe 3.14.
3.14 Changing File Permissions
Discussion
Common reasons why you might want to change file permissions include needing to edit a file that is marked as read-only and giving a file execute permissions so that it can run as a program or script.
The chmod command allows you to add or remove permissions for a file. There are two syntaxes for doing this; one requires the use of octal (base 8), and the other is text based. You will use the easier-to-understand text method.
The first parameter to chmod is the change to make, and the second is the file or folder to which it should apply. This change parameter takes the form of the permission scope (+, -, = for add, remove, and set, respectively) and then the permission type.
For example, the following code will add execute (x) rights for the owner (user) of the file file2.txt:
$ chmod u+x file2.txt
If we now list the directory, we can see that the x permission has been added:
$ ls -l
total 16
-rw-r--r-- 1 pi pi    5 Apr 23 15:23 file1.txt
-rwxr--r-- 1 pi pi    5 Apr 24 08:08 file2.txt
-rw-r--r-- 1 pi pi    5 Apr 23 15:23 file3.txt
drwxr-xr-x 2 pi pi 4096 Apr 23 15:23 mydir
If we wanted to add execute permissions for the group or for other users, we would use g and o, respectively. The letter a adds the permission to everyone.
See Also
For background on file permissions, see Recipe 3.13.
See Recipe 3.15 for changing file ownership.
3.15 Changing File Ownership
Discussion
As we discovered in Recipe 3.13, any file or directory has both an owner and a group associated with it. Because most users of the Raspberry Pi will just have the single user pi, we don’t really need to worry about groups.
Occasionally, you will find files on your system that have been installed with a different user than pi. If this is the case, you can change the ownership of the file by using the chown command.
To change the owner of a file, use chown followed by the new owner and group, separated by a colon, and then the name of the file.
You will probably find that you need superuser privileges to change ownership, in which case you should prefix the command with sudo (Recipe 3.12):
$ sudo chown root:root file2.txt
$ ls -l
total 16
-rw-r--r-- 1 pi   pi      5 Apr 23 15:23 file1.txt
-rwxr--r-- 1 root root    5 Apr 24 08:08 file2.txt
-rw-r--r-- 1 pi   pi      5 Apr 23 15:23 file3.txt
drwxr-xr-x 2 pi   pi   4096 Apr 23 15:23 mydir
See Also
For background on file permissions, see Recipe 3.13.
Also see Recipe 3.14 for changing file permissions.
3.16 Making a Screen Capture
Discussion
The simplest way to trigger a screen capture is just to enter the command scrot. This will immediately take an image of the primary display and save it in a file named something like 2019-04-25-080116_1024x768_scrot.png within the current directory.
Sometimes you want a screenshot to show a menu being opened or something that generally disappears when the window in which you are interested loses focus. For such situations, you can specify a delay before the capture takes place by using the -d option:
$ scrot -d 5
The delay is specified in seconds.
If you capture the entire screen, you can crop it later with image editing software, such as GIMP (Recipe 4.7). However, it is more convenient to just capture a specific area of the screen in the first place, which you can do by using the -s option.
To use this option, type the following command and then, with the mouse, drag out the area of screen that you want to capture:
$ scrot -s
The filename will include the dimensions in pixels of the image captured.
See Also
The scrot command has a number of other options to control things like using multiple screens and changing the format of the saved file. You can find out more about scrot from its man page by entering the following command:
$ man scrot
3.17 Installing Software with apt-get
Solution
The most frequently used tool for installing software from a Terminal session is apt-get (the Advanced Packaging Tool).
The basic format of the command, which you must run as a superuser, is as follows:
$ sudo apt-get install <name of software>
For example, to install the AbiWord word processing software, you would enter this command:
$ sudo apt-get install abiword
Discussion
The apt-get package manager uses a list of available software. This list is included with the Raspberry Pi operating system distribution that you use but is likely to be out of date. So it is a good idea to always run the following command to update the list before installing new software using apt-get:
$ sudo apt-get update
The list and the software packages for installation are all on the internet, so none of this will work unless your Raspberry Pi has an internet connection.
Tip
If you find that when you update you get an error like E: Problem with MergeList /var/lib/dpkg/status, try running these commands, which will remove the offending file and replace it with a new, empty one:
$ sudo rm /var/lib/dpkg/status
$ sudo touch /var/lib/dpkg/status
The installation process can often take a while because the files must be downloaded and installed. Some installations will also add shortcuts to your desktop, or the program groups on your Start menu.
You can search for software to install by using the command apt-get search followed by a search string such as abiword. This then displays a list of matching packages that you could install.
See Also
See Recipe 3.18 for removing programs that you no longer need so that you can free up space.
See also Recipe 3.21 for downloading source code from GitHub.
3.18 Removing Software Installed with apt-get
Solution
The apt-get utility has an option (remove) that will remove a package, but it will remove only those packages that have been installed with apt-get install.
For example, if you wanted to remove AbiWord, you would use the following command:
$ sudo apt-get remove abiword
Discussion
Removing a package like this does not always delete everything, because packages often have prerequisite packages that are installed as well. To remove these, you can use the autoremove option, as shown here:
$ sudo apt-get autoremove abiword
$ sudo apt-get clean
The apt-get clean option will do some further tidying up of unused package installation files.
See Also
See Recipe 3.17 for installing packages using apt-get.
3.19 Installing Python Packages with Pip
Solution
If you have the latest version of Raspbian, pip will already be installed, and you can run it from the command line, as shown in the example here, which is taken from Recipe 8.1, in which it is used to install the Python library svgwrite:
$ sudo pip install svgwrite
If pip is not installed on your system, you can install it by using this command:
$ sudo apt-get install python-pip
Discussion
Although many Python libraries can be installed using apt-get (see Recipe 3.17), some cannot, and you must use pip instead.
See Also
To install software using apt-get, see Recipe 3.17.
3.20 Fetching Files from the Command Line
Solution
You can use the wget command to fetch a file from the internet.
For example, the following command fetches the file Pifm.tar.gz from https://www.icrobotics.co.uk:
$ wget http://www.icrobotics.co.uk/wiki/images/c/c3/Pifm.tar.gz
--2013-06-07 07:35:01--  http://www.icrobotics.co.uk/wiki/images/c/c3/Pifm.tar.gz
Resolving www.icrobotics.co.uk (www.icrobotics.co.uk)... 155.198.3.147
Connecting to www.icrobotics.co.uk (www.icrobotics.co.uk)|155.198.3.147|
:80... connected.
HTTP request sent, awaiting response... 200 OK
Length: 5521400 (5.3M) [application/x-gzip]
Saving to: `Pifm.tar.gz'

100%[==================================================>] 5,521,400    601K/s

2018-06-07 07:35:11 (601 KB/s) - `Pifm.tar.gz' saved [5521400/5521400]
If your URL contains any special characters, it is a good idea to enclose them in double quotes. This example URL is from Recipe 4.6.
Discussion
You will find instructions for installing software that rely on using wget to fetch files. It is often more convenient to do this from the command line rather than use a browser, find the file, download it, and then copy it to the place you need it.
The wget command takes the URL to download as its argument and downloads it into the current directory. It’s typically used to download an archive file of some type but will also download any web page.
See Also
For more information on installing with apt-get, see Recipe 3.17.
3.21 Fetching Source Code with Git
Solution
To use code in Git repositories, you need to use the git clone command to make your own copy of the files.
For example, the following command will download all of the source code examples from this book into a new folder:
$ git clone https://github.com/simonmonk/raspberrypi_cookbook_ed3.git
Along with the URL for the code to clone, there is a web page that you can visit with a browser. If you go to the GitHub web page, you will find a web page that looks like Figure 3-12.
Clicking the “Clone or download” button allows you to copy the repository’s URL and then paste it after the command git in your Terminal session.
Discussion
There is a difference between Git and GitHub. Git is the software and GitHub is one of many websites hosting code that you push to GitHub using Git. In fact you can actually host your own Git repository on a Raspberry Pi if you want to. However, there are benefits to using a Git-based website such as GitHub or GitLab:
Your code is stored in the cloud, so if your disk (or SD card) breaks, you won’t lose the code.
The code is publicly visible, so other people can look at it and use it, and if they find things wrong with it they might even offer up fixes for you.
You can include documentation about your project for all to see in the README file.

Figure 3-12. The GitHub repository page for this book
If you are working on a Raspberry Pi project that you think others might be interested in, I would recommend using GitHub or GitLab to host your code. There is a little bit to learn, but it’s worth the effort.
Another advantage to using Git (whether locally or with a service like GitHub) is that every time you do a chunk of work on a project, you will push that work up to the master copy of your code. This does not replace the code that was already there but is instead stored as a new edition. You can at any time recover earlier versions of the code, should you make a mistake.
I host all of the code from my books and other projects on GitHub. These are the steps I take when I make a new repository:
- Go to your home page on GitHub (you’ll need to create an account) and click the + button and select the New Repository option.
- Give the repository a name and short description.
- Check the option “Initialize this repository with a README.”
- Select a license—I select MIT for no better reason than my great respect for that august center of learning, reasoning that if it has a license for sharing my work, it’s probably a good one.
- Click “Create repository.”
- Now, back on your computer (Raspberry Pi or other), open a command prompt (Recipe 3.3).
- Run the command
gitfollowed by the URL of the repository. This will create a folder for the project. Any files that you write in this folder will eventually be saved to GitHub.
$ git add .
$ git commit -m "message about what you changed or added"
$ git push
The first of these commands adds all of the changed or new files to the list of files to be committed. The commit command gives you an option to explain what’s new in the changes being committed. Finally, the push command pushes the changes up to GitHub. At this point, you are prompted for your GitHub username and password.
You will find GitHub to be a rich source of Python and other code for use with the Raspberry Pi. This is especially true when it comes to software interfaces to different types of hardware such as displays and sensors.
See Also
Learn more about Git and the Git hosting services GitHub and GitLab.
For information on downloading this book’s program code and other files relating to this book see Recipe 3.22.
3.22 Fetching This Book’s Accompanying Code
Solution
You can either clone the files from GitHub as described in Recipe 3.21 or, as we will describe here, get the downloads as a single ZIP archive file from GitHub.
A good starting point for getting the book’s downloads is to go to the book’s web page using the browser on your Raspberry Pi. Here, in addition to a link to the book’s code hosted on GitHub, you will find errata and other information about the book.
So whether you begin at the website or directly at the GitHub page, when you click the “Clone or download” button, you will see an option to Download ZIP. You can see this in Figure 3-12 in Recipe 3.21.
Click the Download ZIP option. Chromium saves this to your Downloads folder. Click the down arrow next to the downloaded ZIP file (Figure 3-13) and then select the option “Show in folder.”

Figure 3-13. Downloading a ZIP archive for this book’s files
This opens a File Manager window in the Downloads folder. Find the ZIP file that has just been downloaded (Figure 3-14).

Figure 3-14. Finding the ZIP archive file in Downloads
Double-click the ZIP file to open the Xarchiver tool on the ZIP file (Figure 3-15) and then click the “Extract files” icon.

Figure 3-15. Using the Xarchiver tool to extract the files for this book
In the dialog that appears (Figure 3-16), change the path to which the extracted folder is to be saved to /home/pi and then click Extract.

Figure 3-16. Changing the path for the extracted files
After the files have been extracted, there will be a new folder in your home directory containing all the downloads for the book.
Discussion
If you now use the File Manager to see what’s in your home directory, you will find a folder called raspberry_pi_cookbook_ed3-master (Figure 3-17).

Figure 3-17. The extracted files
The folder PiBakery contains PiBakery configurations from Recipe 1.8. The python folder contains all the Python programs used in the book.
See Also
For more information on using Git and GitHub, see Recipe 3.21.
3.23 Running a Program or Script Automatically on Startup
Solution
Modify your rc.local file to run the program you want.
Edit the file /etc/rc.local by using the following command:
$ sudo nano /etc/rc.local
Add the following line after the first block of comment lines that begin with #:
$ /usr/bin/python /home/pi/my_program.py &
It is important to include the & on the end of the command line so that it is run in the background; otherwise your Raspberry Pi will not boot.
Discussion
This way of autorunning a program needs a very careful edit of rc.local, or you can stop your Raspberry Pi from booting.
See Also
A safer way of autorunning a program is detailed in Recipe 3.24.
3.24 Running a Program or Script Automatically as a Service
Solution
Debian Linux, on which most Raspberry Pi distributions are based, uses a dependency-based mechanism for automating the running of commands at startup. This is a little tricky to use and involves creating a configuration file for the script or program that you want to run, which will reside in a folder called init.d.
Discussion
The following example shows you how to run a Python script in your home directory. The script could do anything, but in this case, the script runs a simple Python web server, which is described further in Recipe 7.17.
Here are the steps involved:
-
Create an init script.
-
Make the init script executable.
-
Tell the system about the new init script.
First, create the init script. You need to create this in the folder /etc/init.d/. The script can be called anything, but in this example, we call it my_server.
Create the new file by using nano with the following command:
$ sudo nano /etc/init.d/my_server
Paste the following code into the editor window and save the file. This is a lot to type, so if you are reading a paper copy of this book, you can copy and paste the code from this web page; just scroll down until you find this chapter and recipe:
### BEGIN INIT INFO# Provides: my_server# Required-Start: $remote_fs $syslog $network# Required-Stop: $remote_fs $syslog $network# Default-Start: 2 3 4 5# Default-Stop: 0 1 6# Short-Description: Simple Web Server# Description: Simple Web Server### END INIT INFO#! /bin/sh# /etc/init.d/my_serverexportHOMEcase"$1"in start)echo"Starting My Server"sudo /usr/bin/python /home/pi/myserver.py 2>&1&;;stop)echo"Stopping My Server"PID=`ps auxwww|grep myserver.py|head -1|awk'{print $2}'`kill-9$PID;;*)echo"Usage: /etc/init.d/my_server {start|stop}"exit1;;esacexit0
This is quite a lot of work to automate the running of a script, but most of it is boiler-plate code that is the same for every service. To run a different script, just work your way through the script, changing the descriptions and the name of the Python file that you want to run.
The next step is to make this file executable for the owner, which you do by using this command:
$ sudo chmod +x /etc/init.d/my_server
Now that the program is set up as a service, you can use the following command to test that everything is OK before you set it to autostart as part of the boot sequence:
$ /etc/init.d/my_server start
Starting My Server
Bottle v0.11.4 server starting up (using WSGIRefServer())...
Listening on http://192.168.1.16:80/
Hit Ctrl-C to quit.
Finally, if that runs OK, use the following command to make the system aware of the new service that you have defined:
$ sudo update-rc.d my_server defaults
See Also
For a simpler approach to making a program run automatically, see Recipe 3.23.
For more information on changing file and folder permissions, see Recipe 3.13.
3.25 Running a Program or Script Automatically at Regular Intervals
Solution
Use the Linux crontab command.
To do this, the Raspberry Pi needs to know the time and date and therefore needs a network connection or a real-time clock; see Recipe 12.13.
Discussion
The command crontab allows you to schedule events to take place at regular intervals. This can be daily or hourly, and you can even define complicated patterns so different things happen on different days of the week. This is useful for backup tasks that you might want to run in the middle of the night.
You can edit the scheduled events by using the following command:
$ crontab -e
If the script or program that you want to run needs to be run by a superuser, prefix all the crontab commands with sudo (Recipe 3.12).
The comment line (starting with a #) indicates the format of a crontab line. The digits are, in order, minute, hour, day of month, month, and day of week and are followed by the command that you want to run.
If there is a * in the relevant position, that means every; if there is a number there instead, the script runs only at that minute/hour/day of the month.
So, to run the script every day at 1 a.m., you would add the line shown in Figure 3-18.
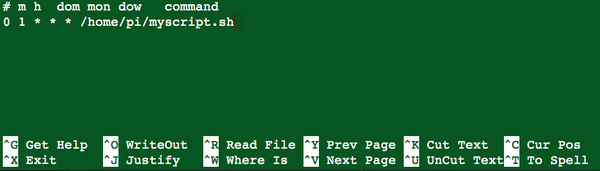
Figure 3-18. Editing crontab
By specifying a range of day numbers say 1–5 (Monday to Friday) in the day of week column, the script will run only at 1am on those days, as demonstrated here:
0 1 * * 1-5 /home/pi/myscript.sh
If your script needs to be run from a particular directory, you can use a semicolon (;) to separate multiple commands, as shown here:
0 1 * * * cd /home/pi; python mypythoncode.py
See Also
You can see the full man page documentation for crontab by entering this command:
$ man crontab
3.26 Finding Things
Discussion
Starting with a directory specified in the command, the find command will search for a file that you specify and, if it finds the file, display its location.
For example:
$ find /home/pi -name gemgem.py
/home/pi/python_games/gemgem.py
You can start the search at various points on the tree, even at the root of the entire filesystem (/). A search of the entire filesystem will take a lot longer and will also produce error messages. You can redirect these error messages by adding 2>/dev/null to the end of the line.
To search for the file throughout the entire filesystem, use the following command:
$ find / -name gemgem.py 2>/dev/null
/home/pi/python_games/gemgem.py
Note that 2>/dev/null redirects output that would make it difficult to see the file when it was eventually found. You can find out more about redirection in Recipe 3.31.
You can also use wildcards with find as follows:
$ find /home/pi -name match*
/home/pi/python_games/match4.wav
/home/pi/python_games/match2.wav
/home/pi/python_games/match1.wav
/home/pi/python_games/match3.wav
/home/pi/python_games/match0.wav
/home/pi/python_games/match5.wav
See Also
The find command has a number of other advanced features for searching. To see the full man page documentation for find, use this command:
$ man find
3.27 Using the Command-Line History
Discussion
You can access the previous command you ran by pressing the up arrow key. Pressing it again will take you to the command before that, and so on. If you overshoot the command you wanted, the down arrow key will take you back in the other direction.
If you want to cancel without running the selected command, use Ctrl-C.
Over time, your command history will grow too large for you to use the arrow keys to find a command that you used ages ago. To find a command from way back, you can use the history command:
$ history
    1  sudo nano /etc/init.d/my_server
    2  sudo chmod +x /etc/init.d/my_server
    3  /etc/init.d/my_server start
    4  cp /media/4954-5EF7/sales_log/server.py myserver.py
    5  /etc/init.d/my_server start
    6  sudo apt-get update
    7  sudo apt-get install bottle
    8  sudo apt-get install python-bottle
This lists all of your command history and is likely to have far too many entries for you to find the command you want. To remedy this, you can pipe (see Recipe 3.33) the history command into the grep command, which will display only results matching a search string. So, for example, to find all the apt-get (Recipe 3.17) commands that you’ve issued, you can use the line:
$ history | grep apt-get
    6  sudo apt-get update
    7  sudo apt-get install bottle
    8  sudo apt-get install python-bottle
   55  history | grep apt-get
Each history item has a number next to it, so if you find the line you were looking for, you can run it using ! followed by the history number, as shown here:
$ !6
sudo apt-get update
Hit http://mirrordirector.raspbian.org wheezy InRelease
Hit http://mirrordirector.raspbian.org wheezy/main armhf Packages
Hit http://mirrordirector.raspbian.org wheezy/contrib armhf Packages
.....
See Also
To find files rather than commands, see Recipe 3.26.
3.28 Monitoring Processor Activity
Solution
Use the Task Manager utility, which you’ll find on the Main menu, in the Accessories program group (Figure 3-19).

Figure 3-19. The Task Manager
The Task Manager allows you to see at a glance how much CPU and memory are being used. You can also right-click a process and select the option to kill it from the pop-up menu that appears.
The bar graphs toward the top of the window display the total CPU usage and memory usage. The processes are listed below that, and you can see the CPU share each is taking.
Discussion
If you prefer to do this type of thing from the command line, use the Linux top command to display very similar data about processor and memory usage and which processes are using the most resources (Figure 3-20). You can then use the kill command to kill a process. You will need to do this as a superuser.
In this case, you can see that the top process is a Python program that uses 97% of CPU. The first column shows its process ID (2447). To kill this process, enter this command:
$ kill 2447
It is quite possible to kill some vital operating system process this way, but if you do, powering off your Pi and turning it back on again will restore things to normal.

Figure 3-20. Using the top command to see resource usage
Sometimes you might have a process running that is not immediately visible when you use top. If this is the case, you can search all the processes running by using the ps command and piping (Recipe 3.33) the results to the grep command (Recipe 3.27), which will search the results and highlight items of interest.
For example, to find the process ID for our CPU-hogging Python process, we could run the following command:
$ ps -ef | grep "python"
pi        2447  2397 99 07:01 pts/0    00:00:02 python speed.py
pi        2456  2397  0 07:01 pts/0    00:00:00 grep --color=auto python
In this case, the process ID for the Python program speed.py is 2447. The second entry in the list is the process for the ps command itself.
3.29 Working with File Archives
Solution
Depending on the file type, you will need to use the tar command or the gunzip command.
Discussion
If the file that you want to uncompress just has the extension .gz, you can unzip it using the command:
$ gunzip myfile.gz
You also often find files (called tarballs) that contain a directory that has been archived with the Linux tar utility and then compressed with gzip into a file with a name like myfile.tar.gz.
You can extract the original files and folders out of a tarball by using the tar command:
$ tar -xzf myfile.tar.gz
If the file is a ZIP archive, you can use the File Manager and Xarchiver tools, as shown in Recipe 3.22.
See Also
You can find out more about tar from its man page, which you can access by using the command man tar.
3.30 Listing Connected USB Devices
Solution
Use the lsusb command. This lists all of the devices attached to the USB ports on your Raspberry Pi:
$ lsusb
Bus 001 Device 002: ID 0424:9512 Standard Microsystems Corp.
Bus 001 Device 001: ID 1d6b:0002 Linux Foundation 2.0 root hub
Bus 001 Device 003: ID 0424:ec00 Standard Microsystems Corp.
Bus 001 Device 004: ID 15d9:0a41 Trust International B.V. MI-2540D [Optical mouse]
Discussion
This command informs you as to whether a device is connected, but it will not guarantee that the device is working correctly. There might be drivers to install or configuration changes to make for the hardware.
See Also
For an example of using lsusb when attaching an external webcam, see Recipe 4.3.
3.31 Redirecting Output from the Command Line to a File
Solution
Use the > command to redirect output that would otherwise appear in your Terminal after you run the command.
For example, to copy a directory listing into a file called myfiles.txt, do the following:
$ ls > myfiles.txt
$ more myfiles.txt
Desktop
indiecity
master.zip
mcpi
Discussion
You can use the > command on any Linux command that produces output, even if you are running, say, a Python program.
You can also use the opposite (<) command to redirect user input, although this is not nearly as useful as >.
See Also
To use cat command to join together a number of files, see Recipe 3.32.
3.32 Concatenating Files
Discussion
Joining files is the real purpose of the cat command. You can supply as many filenames as you like, and they will all be written to the file that you specify. If you do not redirect the output, it will just appear in your Terminal window. If they are big files, this process might take some time!
See Also
See also Recipe 3.8, in which cat is used to display the contents of a file.
3.33 Using Pipes
Solution
Use the pipe command, which is the bar symbol (|) on your keyboard, to pipe the output of one command to another.
For example:
$ ls -l *.py | grep Jun
-rw-r--r-- 1 pi pi 226 Jun  7 06:49 speed.py
This example will find all the files with the extension py that also have Jun in their directory listing, indicating that they were last modified in June.
Discussion
At first sight, this looks rather like output redirection using > (Recipe 3.31). The difference is that > will not work if the target is another program. It will work only for redirecting to a file.
You can chain together as many programs as you like, as shown here, although this isn’t something you will do often:
$ command1 | command2 | command3
See Also
See Recipe 3.28 for an example of using grep to find a process, and Recipe 3.27 to search your command history using pipe and grep.
3.34 Hiding Output to the Terminal
Solution
Redirect the output to /dev/null using >.
For example:
$ ls > /dev/null
The dev directory contains operating system devices, including things like serial ports. Within this directory, a special device (the null device) is defined that simply discards everything sent to it.
Discussion
This example illustrates the syntax but is otherwise pretty useless. A more common use is when you’re running a program and the developer has left a lot of trace messages in its code, which you don’t really want to see. The following example hides superfluous output from the find command (see Recipe 3.36):
$ find / -name gemgem.py 2>/dev/null
/home/pi/python_games/gemgem.py
See Also
For more information about redirecting standard output, see Recipe 3.31.
3.35 Running Programs in the Background
Solution
Run the program or command in the background using the & command.
For example:
$ python speed.py &
[1] 2528
$ ls
Rather than wait until the program has finished running, the command line displays the process ID (the second number) and immediately allows you to continue with whatever other commands you want to run. You can then use this process ID to kill the background process (Recipe 3.28).
To bring the background process back to the foreground, use the fg command:
$ fg
python speed.py
This reports the command or program that is running and then waits for it to finish.
Discussion
Output from the background process will still appear in the Terminal.
An alternative to putting processes in the background is to just open more than one Terminal window.
See Also
For information on managing processes, see Recipe 3.28.
3.36 Creating Command Aliases
Solution
Edit the file ~/.bashrc using nano (Recipe 3.7), and then move to the end of the file and add as many lines as you want, like this:
alias L='ls -a'
This creates an alias called L that, when entered, will be interpreted as the command ls -a.
Save and exit the file using Ctrl-X and Y, and then type the following command to update the Terminal with the new alias:
$ source .bashrc
Discussion
Many Linux users set up an alias for rm like the following so that it confirms deletions:
$ alias rm='rm -i'
This is not a bad idea, as long as you do not forget when you use someone else’s system who doesn’t have this alias set up!
See Also
For more information about rm, see Recipe 3.11.
3.37 Setting the Date and Time
Solution
Use the Linux date command.
The date and time format is MMDDhhmmYYYY, where MM is the month number; DD is the day of the month; hh and mm are the hours and minutes, respectively; and YYYY is the year.
For example:
$ sudo date 010203042019
Wed  2 Jan 03:04:00 GMT 2019
Discussion
If the Raspberry Pi is connected to the internet, as it boots up it will automatically set its own time using an internet time server.
You can also use date to display Coordinated Universal Time (UTC) time by entering date on its own:
$ date
Fri 19 Jul 10:59:08 BST 2019
See Also
If you want your Raspberry Pi to maintain the correct time even when there is no network, you can use a real-time clock (RTC) module (Recipe 12.13).
3.38 Finding Out How Much Room You Have on the SD Card
Solution
Use the Linux df (disk filesystem) command:
$ df -h
Filesystem      Size  Used Avail Use% Mounted on
rootfs          3.6G  1.7G  1.9G  48% /
/dev/root       3.6G  1.7G  1.9G  48% /
devtmpfs        180M     0  180M   0% /dev
tmpfs            38M  236K   38M   1% /run
tmpfs           5.0M     0  5.0M   0% /run/lock
tmpfs            75M     0   75M   0% /run/shm
/dev/mmcblk0p1   56M   19M   38M  34% /boot
The -h option shows the sizes using the kB, MB, and GB symbols rather than the number of bytes.
Discussion
Looking at the first line of the results, you can see that there is 3.6 GB of storage on the SD card, of which 1.7 GB is used.
When you run out of disk space, you are likely to get unexpected bad behavior, such as error messages saying that a file could not be written.
See Also
You can find the man page for df by using the command man df.
3.39 Find Out What Operating System Version You Are Running
Solution
Enter the following command into a Terminal or Secure Shell (SSH) session:
$ cat /etc/os-release
PRETTY_NAME="Raspbian GNU/Linux 9 (stretch)"
NAME="Raspbian GNU/Linux"
VERSION_ID="9"
VERSION="9 (stretch)"
ID=raspbian
ID_LIKE=debian
HOME_URL="http://www.raspbian.org/"
SUPPORT_URL="http://www.raspbian.org/RaspbianForums"
BUG_REPORT_URL="http://www.raspbian.org/RaspbianBugs"
pi@raspberrypi:~ $
Discussion
As you can see from the result in the previous example, the first line tells us all we need to know. In this case, my Raspberry Pi is running Raspbian version 9, which also goes under the nickname stretch.
It can be useful to know what version of Raspbian you are running if you are having problems with a certain piece of software. Often the first question that you will be asked by support is What version of Raspbian are you running?
You might need to know what version of the Linux kernel you have on your Raspberry Pi. You can find this using the following command:
$ uname -a
Linux raspberrypi 4.14.71-v7+ #1145 SMP Fri Sep 21 15:38:35 BST 2018 armv7l GNU/Linux
Here you can see that Raspbian stretch uses v4.14 of the kernel.
See Also
To see how much room you have left on your SD card or other boot disk, see Recipe 3.38.
3.40 Updating Raspbian
Solution
Open a command line by using the Terminal (Recipe 3.3) and enter the following command to update your system to the latest version:
$ sudo apt-get update
$ sudo apt-get dist-upgrade
This will take some time especially if there is a lot to upgrade. Most important, if you have any precious files on your system, I recommend copying them onto a USB flash drive (Recipe 3.2) before upgrading.
Discussion
The first of these commands does not actually update Raspbian; it just updates the apt-get package manager to make it aware of the latest versions of the packages that comprise your operating system and related software.
The command dist-upgrade upgrades the operating system itself. During the process, you will be warned how much disk space will be required, so you should use Recipe 3.38 to check that you have enough room before pressing Y to go ahead with the upgrade.
Keeping your distribution up to date is important for a number of reasons. First, one of the main reasons that the operating system is changed is to fix bugs. So problems during the installation of software often vanish after an update. Second, if you expose your Raspberry Pi to the internet, new versions of Raspbian often patch security vulnerabilities.
See Also
To start again with a completely fresh installation of Raspbian, see Recipe 1.6.