Problem Overview
Using SaaS offerings from third parties
Renting IT infrastructure from a public cloud company
Creating and maintaining on-premises IT infrastructure by using resources within the company

Maintaining a company’s own IT infrastructure used to require a large IT staff
That has started to change in recent years with the advent of more powerful single-board computers and the help of software technologies, such as containerization, container orchestration, and clustering. They decrease the time needed to manage IT infrastructure and it is now possible for smaller businesses to run their own private cloud for a fraction of the cost of public SaaS solutions.
Business Impact
Data security: A company's local IT infrastructure can be designed in a way to provide superior data security in comparison to SaaS solutions. Unlike a public or hybrid cloud, a private cloud offers businesses full control over every aspect of the cloud infrastructure, as it is run on dedicated hardware rather than on a shared server. See Figure 8-2.

Data security is of paramount importance to companies of all sizes
Better uptime: Due to the fact that SaaS solutions are hosted by third parties, their uptime is not in your control. SaaS solutions are usually more vulnerable to downtime than on-premises solutions. That is because third-party companies that offer SaaS solutions own the servers and not the company that uses the SaaS solution. The maintenance of the hosted infrastructure is therefore in the third-party’s hands and they can choose when to do maintenance work, so in most cases the downtime is not announced in advance. Those third-party companies are also usually more susceptible to DDoS attacks (Volume Based Attacks, Protocol Attacks, Application Layer Attacks) than the company itself is, so in case of a DDoS attack, the company may experience downtime. Also, in most cases the downtime is not announced in advance. All that is not the case if you host your own infrastructure, so you can choose when to do maintenance work or upgrade your system and you can experience zero downtime in case of a DDoS attack.
Lower costs: Public cloud solutions are usually more expensive in comparison to on-premises solutions. Comparing cloud vs. on-premise costs for small and medium-sized enterprises, an on-premises system can be more cost effective. Depending on the service you provide, the need to hold massive amounts of secure data or storage isn’t always a requirement. On-premises can be an ideal solution for those who only want an initial investment for the system setup and maintenance costs can be kept to a minimum if scaling your business isn’t your goal.
Flexibility: If you choose to go with a public cloud solution, you will be limited by the way it is designed and offered by the provider. You will not be able to modify the hosted infrastructure in any way and that can be a problem if your business needs change. With on-premises infrastructure, that is not the case. You can scale up and down the infrastructure as needed and modify it in any way to fit your requirements.
Control: With on-premises infrastructure, you have complete control over the infrastructure and your data. That makes it a safer and more reliable solution for the business. On-premises is where you can build purpose-built, customizable hardware systems that cater exactly to your company's needs. If consumer or market demands change, you have the option of customizing your offerings on site and can control the solutions.
While creating business IT infrastructure is a large topic that can well take a whole series of books to describe, this chapter creates a sample project—a hosting for a company website, with the help of a cluster of Raspberry Pi 4s. This solution allows for a high-availability system that’s resilient to hardware failures and can be scaled according to demand.
Related Knowledge

Kubernetes and MicroK8s logos

Structure of a Kubernetes cluster
Main Benefits of Running a Cluster with Kubernetes
The main benefits of running a cluster with Kubernetes for a business application, for example hosting a website or database locally, are the following:
You can run your services on a cluster, instead of a single machine. A single machine might not have the processing power, memory, or storage to run your application. This is a big drawback for development purposes, as a large number of these services might be running on a single machine. With a cluster, you can run thousands of services on a much larger number of machines.
Increase the flexibility and resilience of your application. For example, if one service fails, Kubernetes can restart it. it. This is very important for a production business application, because if something goes wrong, you can restart it without any impact on your end users.
Scale your application. If there is increased demand for your application, Kubernetes can scale up the number of services running on the cluster.
Manage the life cycle of your services. Kubernetes allows you to start, stop, or restart your services. This is achieved by adding your services to a “pods” group. A pod is a group of one or more co-located containers, configured in a similar way, which can be deployed together on the same node. The pod ensures that the containers are deployed and managed together. When you want to update your service, you can do so by updating the pod. If there is a problem with one of the containers in the pod, Kubernetes can restart it.
Minimization of the human effort required to maintain and scale the cluster. Kubernetes uses declarative configuration and API calls to manage the cluster. You write declarative configuration files for each of your services and Kubernetes does the work to keep the cluster running according to this configuration. Kubernetes provides a highly scalable, highly performant platform for developing and deploying containerized applications (and not only for Docker, but also for rkt, Singularity, and other container formats). It allows you to easily deploy and manage containerized application components and services, and to treat the complete application as a single, logical unit.
Deploying Kubernetes on the Edge with MicroK8s
If Kubernetes (K8s) is as good as everyone says it is, then the next thing to try is to apply the same model elsewhere. Somewhere where resources are heavily constrained and the management of computational resources is a performance-limiting factor. How about, at the edge?
MicroK8s is the most minimal, fastest version of K8s out there, and it includes the important features of a standard K8s cluster. It is optimized for the edge with hundreds of thousands of lines of codes taken out to be exactly what you need for managing devices. It makes single-(master)-node cluster deployments of Kubernetes easy to deploy for any purpose. There’s no need to deploy a fully-blown production-grade cluster when you’re prototyping or developing; you can test everything on MicroK8s before scaling. Here are some of the problems it solves:
First, it gives you a Kubernetes cluster to play within seconds, so you can learn how it works. You can play with Kubernetes at your own pace without having to set up a big cluster.
Second, it is super-small, so it boots up in seconds, which means you can start to use it when you need it. It’s also much smaller than a full K8s cluster, so it can easily run on your device or your laptop.
Third, it takes the guesswork out of installing Kubernetes. It’s a single binary, so there’s nothing to install, nothing to configure—just use it.
Fourth, it’s designed from the ground up for the edge, so it works well with resource-constrained devices. It enables you to run a Kubernetes cluster on a single machine, so you can get a full pods experience.
Fifth, if you have a complex deployment, you can easily break it into small components that can be deployed independently, then glue them together for a complex deployment.
Sixth, it lets you get your hands dirty with a real cluster, so you know what you’re learning about works.
Implementation
- 1)
Install Ubuntu Server 20.04 on two Raspberry Pi 4s.
- 2)
Install MicroK8s on two Raspberry Pi 4s running Ubuntu Server 20.04.
- 3)
Deploy a web application to a cluster.
Install Ubuntu Server 20.04 on Two Raspberry Pi 4s
While Kubernetes and by extension MicroK8s can be deployed to a multitude of different hardware platforms, the easiest installation can be achieved by using the Ubuntu 20.04 64-bit image for Raspberry Pi, which is available from the official Ubuntu website. The process of installing Ubuntu differs just slightly from the process of installing Raspberry Pi OS, described in Chapter 2.
First, insert the microSD card into your computer.
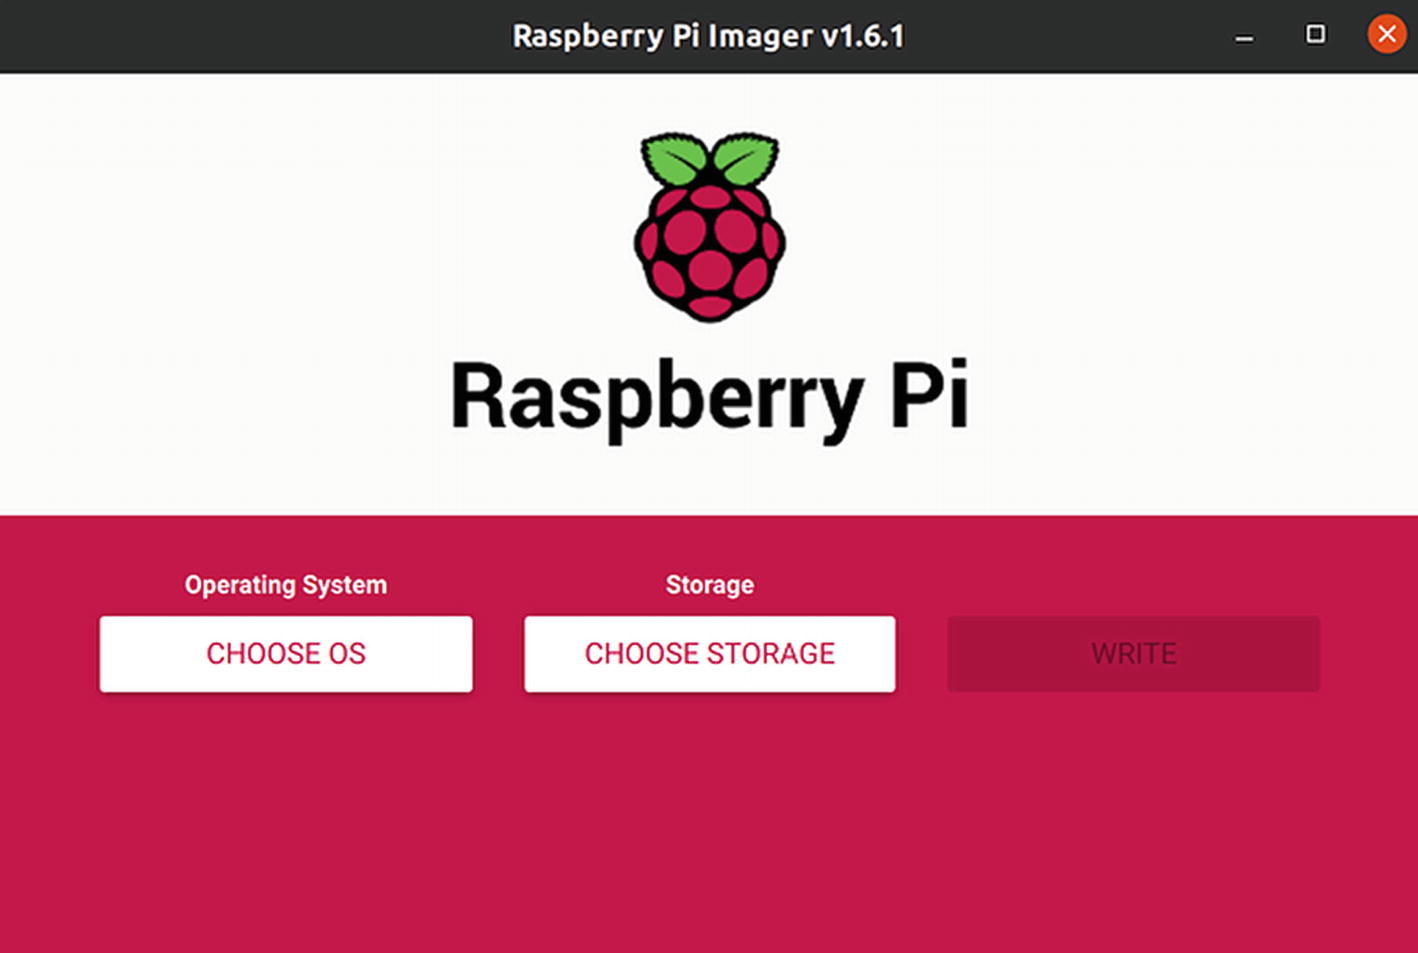
Raspberry Pi Imager main menu

OS selection menu
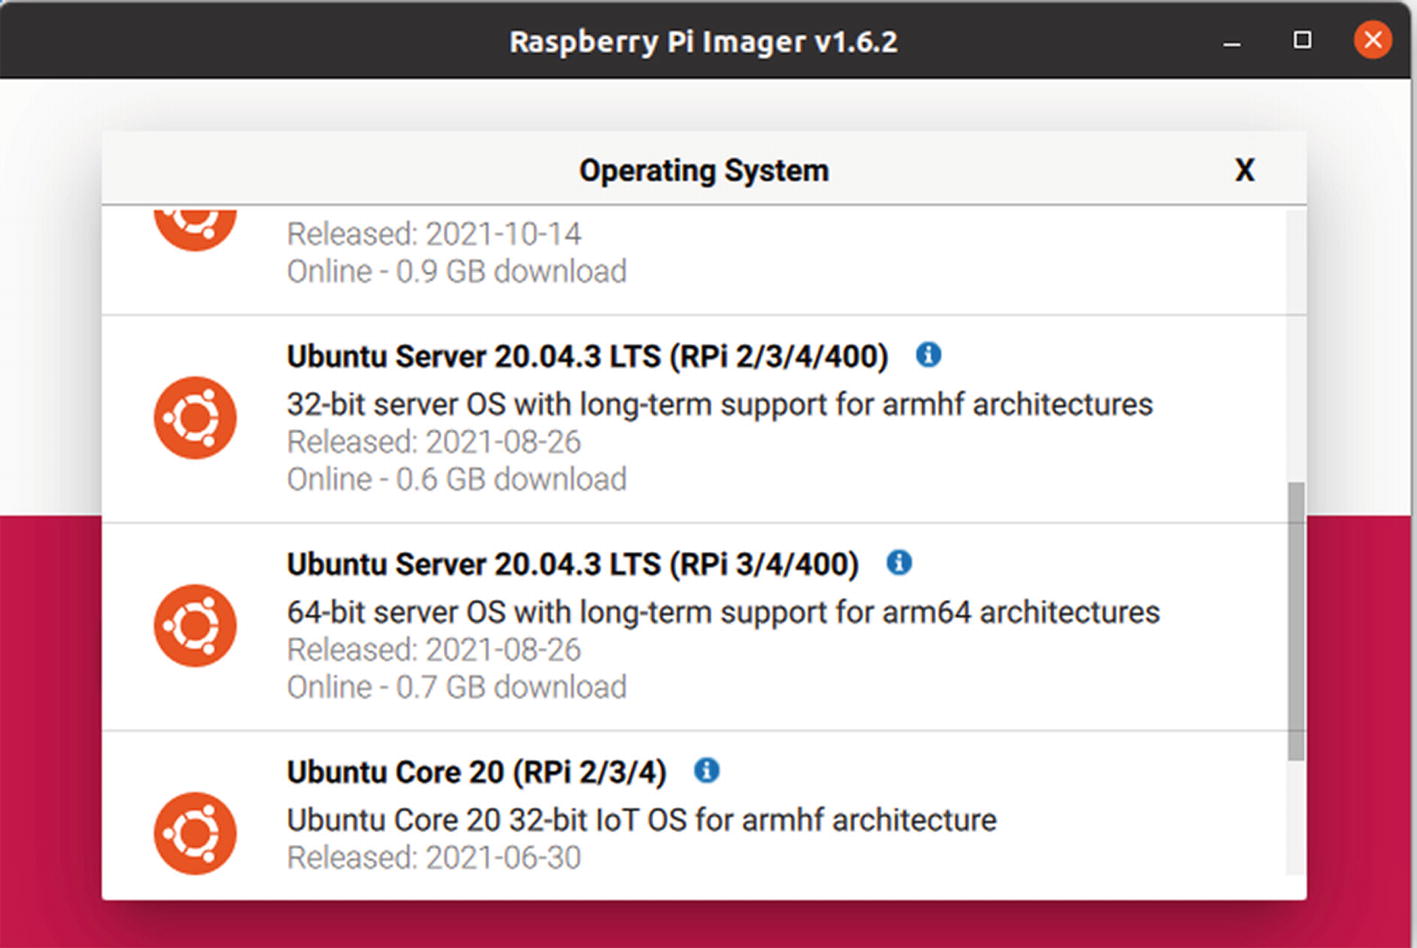
Available options for Ubuntu
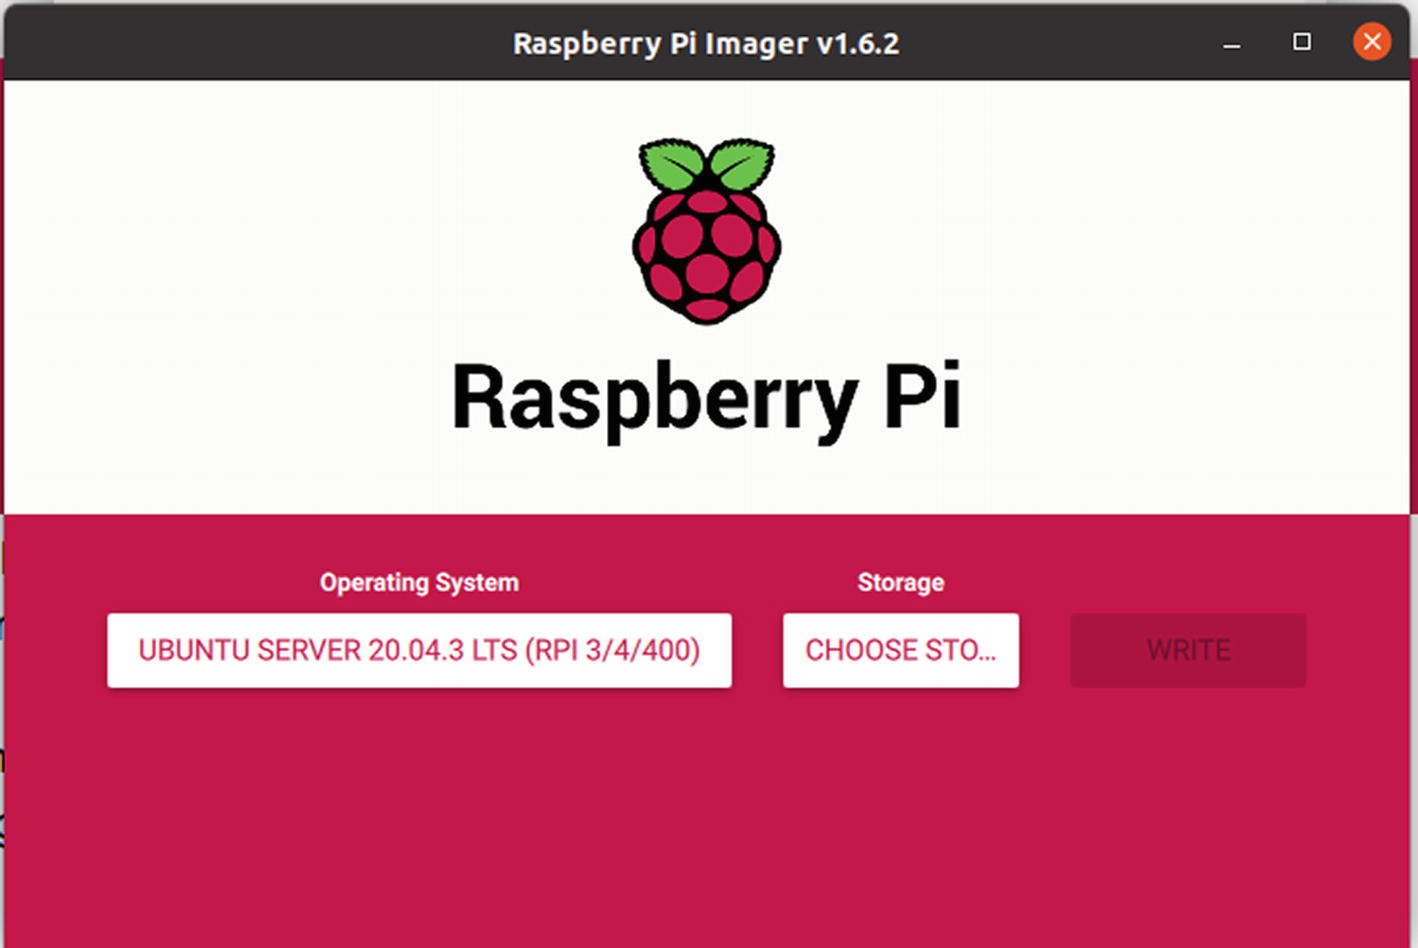
Ready to choose storage and write
Finally, click WRITE and wait for the process to finish.
For Ubuntu 20.04, you do not need to create an SSH file in the boot partition of the SD card. However, if you are using WiFi to access your Raspberry Pi, you still need to create a network-config file to add your WiFi credentials. The process is described in more detail in Chapter 2.
During your first boot, a tool called cloud-init does the configuration. Wait for it to finish before trying to log in. It typically takes less than two minutes, but there is a break between the login prompt and cloud-init completing. If you interrupt the process, you’ll have to start again. You’ll know it’s done when it outputs some more lines after the login prompt appears.
Once cloud-init finishes, log in using SSH with ubuntu as both the password and the login ID. The first login should be done using the command line, since the OS will ask you to change the default password. After the default password has been changed, you can SSH into the machine using your favorite IDE. The procedure for using Visual Studio Code is described in Chapter 2.
Install MicroK8s on Two Raspberry Pi 4s Running Ubuntu Server 20.04
Follow this section for each of your Pis. Once it’s completed, you will have MicroK8s installed and running everywhere.

Successful installation of MicroK8s
What Version of Kubernetes Is Being Installed?
MicroK8s is a snap and as such it will be automatically updated to newer releases of the package, which closely follows upstream Kubernetes releases.
Channels are made up of a track (or series) and an expected level of stability, based on the MicroK8s releases (Stable, Candidate, Beta, Edge).
Discovering MicroK8s
For this chapter, we use ubuntu-master for the master node and ubuntu-worker1 for the first leaf node.
To conform with notation used in most tutorials on the Internet (which are written for the MicroK8s full-fledged version, or just simply Kubernetes), we assign an alias to the MicroK8s application.
Deploy a Web Application to a Cluster
In the context of Kubernetes, a “node” is a machine that is running the Kubernetes control plane and is managed by the master. A node is also referred to as a “worker node”.
A “pod” is a group of one or more containers that run on a “node” and share resources such as storage and network.
A “service” is a set of “pods” that perform a related function. Services are more abstract than pods and are intended to be more long-lived. Services provide a single IP address and port that can be load-balanced. “Deployments” are used to describe the desired state of Kubernetes. They dictate how pods are created, deployed, and replicated.
“Labels” are key/value pairs that are attached to resources (like pods) and are used to organize related resources. You can think of them as CSS selectors.
An “ingress” is a set of routing rules that control the external access to “services” based on the request host or path.
“Volumes” are used to persist data beyond the life of a container. They are especially important for stateful applications like Redis and Postgres. In Kubernetes, a “persistent volume” is a virtual block device or file with a predetermined size that can be attached to a pod. When a pod is created, a persistent volume claim is created to request the use of a persistent volume. The persistent volume claim and the persistent volume are bound together, and the persistent volume is mounted on the pod.
To create a new object in Kubernetes, you must provide a “spec” that describes its desired state.
apiVersion: The version of the Kubernetes API that the object was created with.
kind: A string value representing the REST resource this object represents. Servers should convert recognized values into appropriate concrete resource identifiers before performing a request.
metadata: An ordered map of string-valued keys and JSON strings as values.
spec: Fields that describe the desired state of the object.
In this example, this spec will create a new deployment for a Flask app with a single replica (pod). Take note of the containers section. Here, we specified the Docker image along with the container port the application will run on.
Persistent Volume and Persistent Volume Claim
Again, since containers are ephemeral, we need to configure a volume, via a PersistentVolume and a PersistentVolumeClaim , to store the Postgres data outside of the pod.
The files and directories described here are located in the Chapter_8 directory.
This configuration will create a hostPath PersistentVolume at /data/postgres-pv within the node. The size of the volume is 2GB, with an access mode of ReadWriteOnce, which means that the volume can be mounted as read-write by a single node.

Created persistent volume
Secrets

Volume claim status
The secret object uses base-64 encoding and plaintext strings to store the sensitive information.
Postgres
This is a Kubernetes configuration file for deploying a PostgreSQL database. The PostgreSQL image is pulled from DockerHub. The user and password for the database are stored in a secret (which is not shown here). The PostgreSQL data directory is mounted into the container. The pods are created by the Deployment controller.
This is a more advanced topic, but the controller watches the Kubernetes API for new pods and automatically schedules them onto nodes in the cluster. The pod is a group of containers that are scheduled together. The PostgreSQL container is what actually runs the database. The Deployment controller will create one pod for this deployment. The pod will have one replica, which means it will be scheduled onto one node in the cluster. The replica count is set to 1, so the Deployment controller will schedule one pod onto one node. All pods in a deployment must have the same number of replicas, and the Deployment controller will schedule those replicas onto nodes in the cluster.
The matchLabels line means that the pod will only be scheduled onto nodes that have these labels: service: postgres The template line means that the pod will be created from this template. The template contains the configuration for the PostgreSQL database. The volumeMounts line mounts a persistent volume into the PostgreSQL container. This persistent volume is created by aPersistentVolumeClaim. The PersistentVolumeClaim creates a claim that can be used by pods in this deployment. The restartPolicy: Always line tells the Deployment controller to always restart the pod if it fails. The PostgreSQL container is the one that runs the database. The PostgreSQL data directory is mounted into the container.
Finally, when applied, the volume claim will be mounted into the pod. The claim is mounted to /var/lib/postgresql/data—the default location—while the data is stored in the PersistentVolume, /data/postgres-pv.

Deployments status
The service has a label called service and another label called type. The type label has the value called ClusterIP. ClusterIP is a special type of IP address, which is used by Kubernetes to route traffic to the correct pod. The selector label defines how to route traffic to the pod. The selector could be based on a resource type, such as an ingress (or LoadBalancer), or a pod label. In this case, it is based on the service label. The service type is a ClusterIP, so the selector will route traffic to the correct pod based on the service label.
The port 5432 is the port that the container exposes. The container runs a PostgreSQL database, so it has a port for PostgreSQL. If you have a PostgreSQL client, you can connect to this port and communicate with the database. You can also connect to the port from outside of Kubernetes, but you will need to know the IP address of the database. The IP address is the IP address of the pod that contains the database. The IP address is a ClusterIP, which is a special type of IP address used by Kubernetes to route traffic to the correct pod.
Since the service type is ClusterIP, it's not exposed externally, so it's only accessible from within the cluster by other objects.

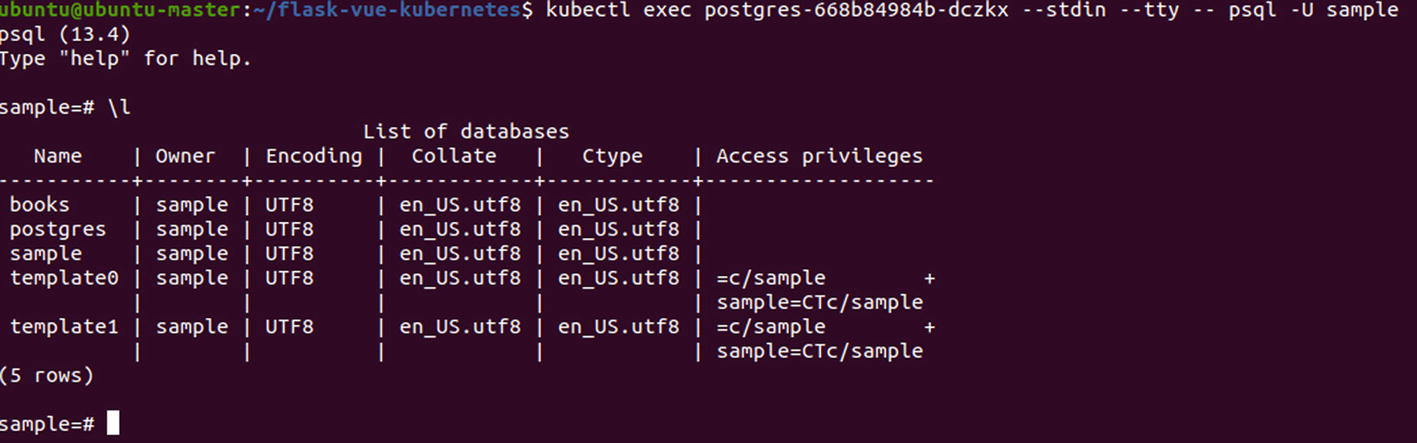
The pod with PostgreSQL database
Of course, you need to change postgres-xxxxxxx-xxxxx to the name of pod you see after running the get pods command. This change applies to the following instructions as well.
Database in the container
Type exit and press Enter to exit the interactive PostgreSQL prompt.
Flask
Why do you need to create a service for every deployment? The service provides a way to access a deployment. Deployments cannot be accessed without a service. You can think of the service as an entry point to your application. When you create a deployment, you create a pod. If you want to access your application, you need to bind the service to an external IP address. So if you want to access your application from outside of your cluster, you need to create a service for it. The service will be bound to an external IP address and the pods will be accessible through that IP address. You can also access your pods through their internal IP addresses, but that’s only useful if you want to access them from within your cluster. The service is also used to check if the pods are healthy.

Flask pod status

Sample from the database
Ingress
The Ingress controller is a sidecar container that proxies and translates HTTP requests to the application containers. It's like a reverse proxy. It is the only way to expose an application to the outside world. The Ingress controller watches the Kubernetes API for new services and automatically configures itself to route traffic to those services.
/ routes requests to the Vue service (which you need to set up)
/books routes requests to the Flask service
It normally will be something similar to 192.168.1.108.
Then try it out by accessing the following addressees with your computer’s browser:
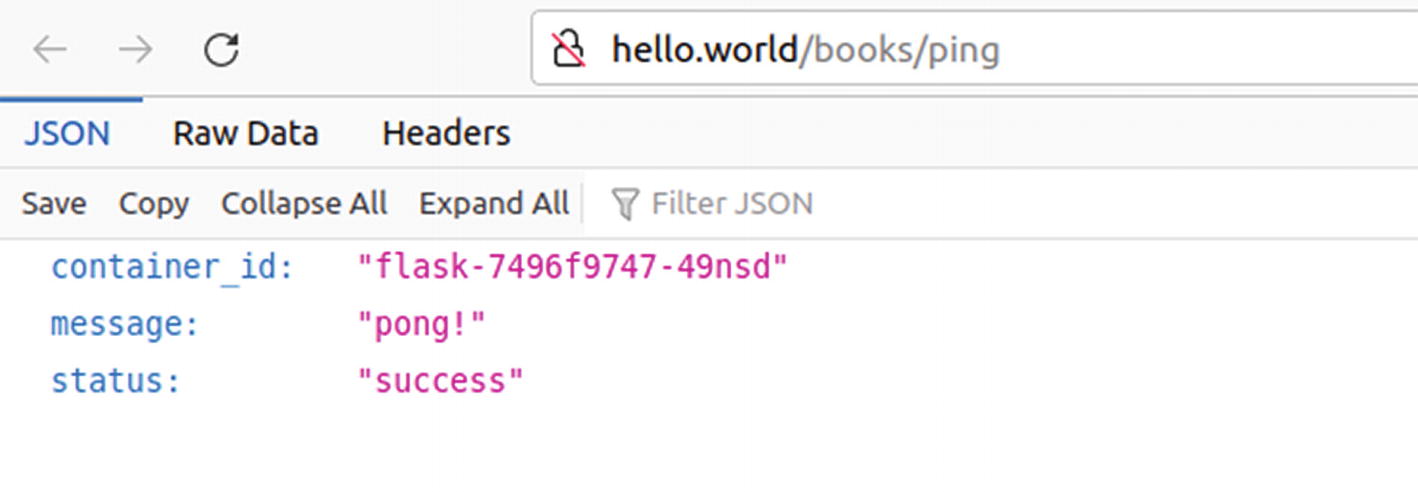
Result of accessing the address in a PC’s web browser

Result of accessing the address in a PC’s web browser
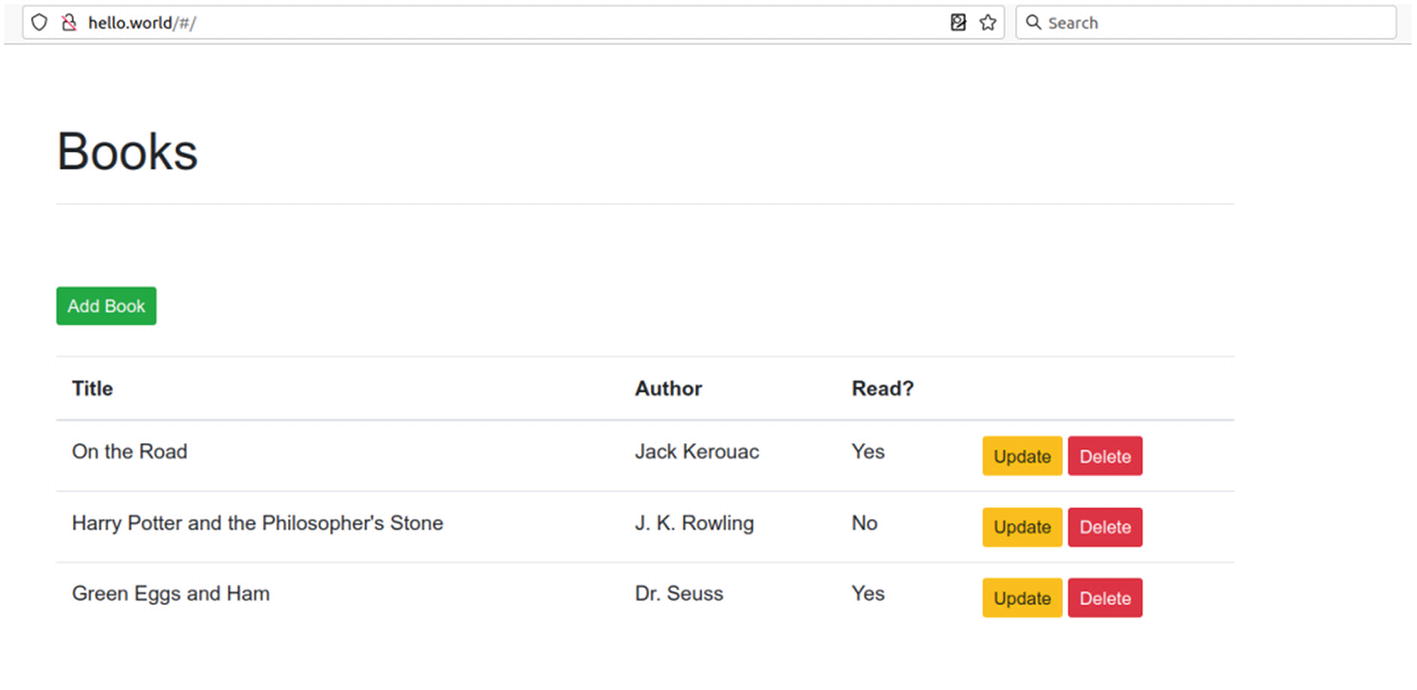
Vue
Vue is a front-end framework that is used to create single-page web applications. It is similar to React in terms of usage, but uses a different template syntax. It is easy to learn and the syntax is simple. Vue is used in combination with other frameworks like React, Angular, or even with jQuery. It can be used to create single-page applications, but can also be used to create pages with multiple pages, like a blog. Vue is easy to learn and use. It has a simple syntax that allows you to create dynamic web pages quickly. It has a strong focus on the view layer only.

Newly created Vue pod status
Working web application on a MicroK8s cluster consisting of a single Raspberry Pi 4
Scale and Add Nodes
Kubernetes makes it easy to scale, adding additional pods as necessary, when the traffic load becomes too much for a single pod to handle. The pods will be distributed across nodes in the cluster to better handle the load.
This command will generate a connection string in the form of <master_ip>:<port>/<token>.

Connection string generated by master node
For example:

Joining new node to the cluster
For each new node, you need to run the microk8s.add-node command on the master, copy the output, then run microk8s.join <master node output> on the leaf.

Scaling up the flask nodes

Additional flask nodes status
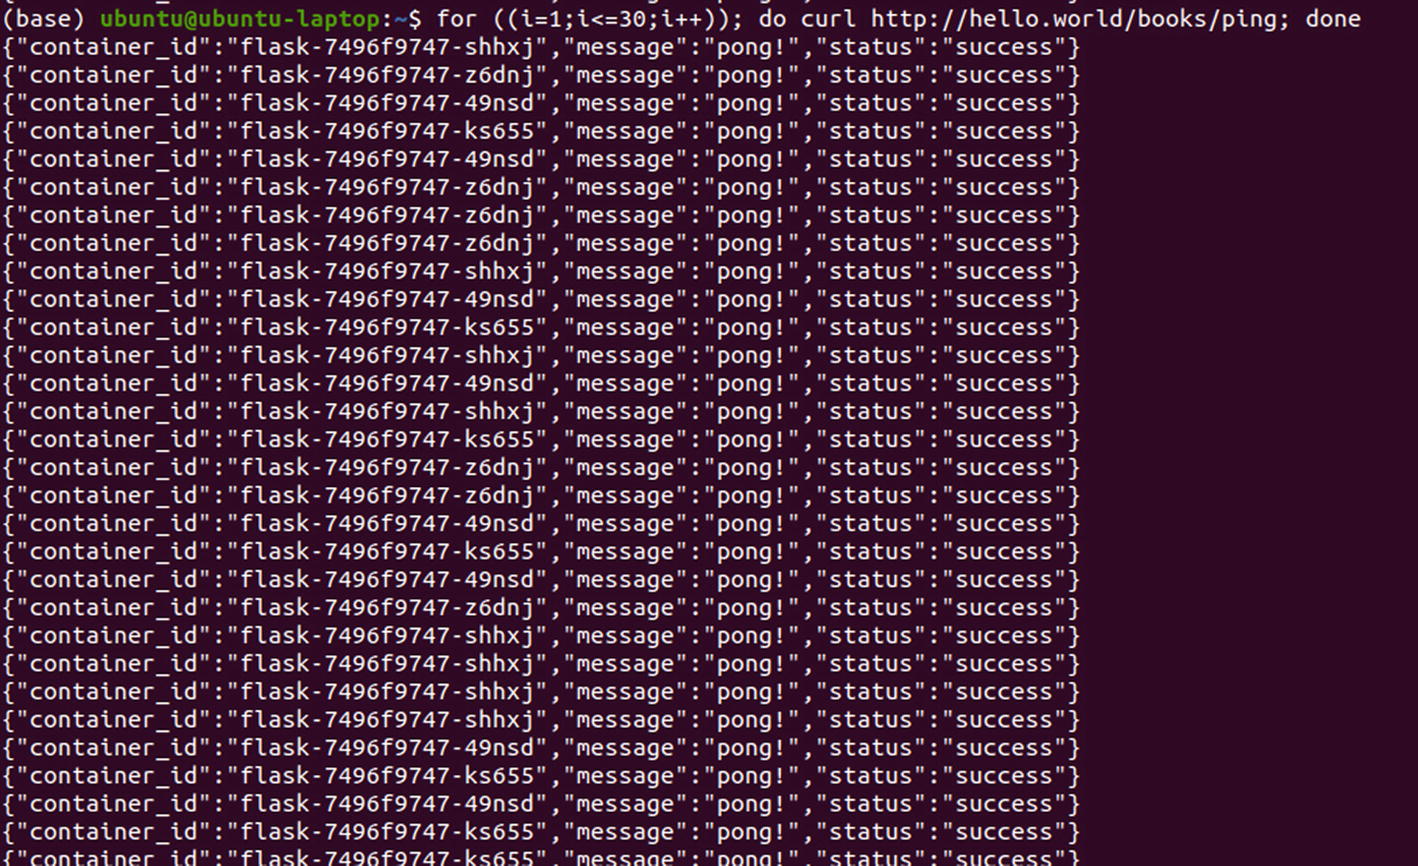
Replies recieved from different pod replicas
Pro Tips
There must be more than one node available at any time.
The control plane must be running on more than one node so that losing a single node would not render the cluster inoperable.
The cluster state must be in a datastore that is itself highly available.
Additional nodes in the cluster also will help in maintaining swift response time when you have a large amount of clients accessing the web application at the same time.
While the web application created in this chapter can only be accessed from the local network, it is fairly trivial to set a domain name purchased on one of the websites, such as godaddy.com or namycheap.com, to point at the IP address of the cluster, so it becomes available to clients on the Internet.
Finally, when deploying your cluster to production, it is important to pay attention to security, both within the cluster and when it interacts with the Internet. There are a number of ways to enhance security when using a Kubernetes cluster. One is to require all communications between Kubernetes nodes be secured using TLS/SSL. This can be done by configuring Kubernetes to use TLS/SSL for all communications, or by configuring Kubernetes to use TLS/SSL for communications between nodes and the API server.
Another way to enhance security is to use role-based access control (RBAC). This can be done by creating roles and assigning specific permissions to those roles. Then, you can assign users or groups to those roles. This will give those users or groups the permissions specified in the role. You can also use pod security policies to enhance security. Pod security policies allow you to specify which containers can run on a particular pod and what privileges they have. This can help to prevent unauthorized access to sensitive data or to the Kubernetes API. Finally, you can use network security controls to help secure the network traffic between nodes and pods. Network security controls can help prevent unauthorized access to data and to the Kubernetes API.
Summary
MicroK8s is a single-node Kubernetes cluster that enables you to get a complete Pods experience. It’s a small, self-contained binary that runs on a single machine. It is designed from the ground up for the edge, so it works well with resource-constrained devices. It takes the guesswork out of installing Kubernetes by being a single binary that you can run. It enables you to run a Kubernetes cluster on a single machine, so you can get a full pods experience. It lets you get your hands dirty with a real cluster, so you know that what you’re learning about actually works. It also makes it easy to break up complex deployments into smaller components, so you can test individual components before deploying them together. You learned how to set up the MicroK8s cluster on two Raspberry Pi 4s and how to run a simple web application with a database that can be further extended to be accessible from the Internet.