
Design the Data Flow
We’ll start by analyzing our application so we can figure out how to express its functionality with actions and reducers, and how these actions map to features. Then we’ll design the state and use reducers to create updated copies of the state, and we’ll examine the behavior of the Redux store in the browser with the Redux development tools, even when you haven’t built any user interface yet.
The techniques we’ll use might feel a bit odd at first, so initially we won’t concern ourselves with the UI so you can focus on the basics of Redux itself. Creating actions and reducers separately from the UI will also demonstrate one of the main features of Redux: keeping the data layer completely decoupled from the structure of the UI.
Let’s set up the project structure so we have got a place for our files. Create a new directory named movieguide and copy the package.json and index.html files from the word counter project. We will also use modules, so copy .babelrc and webpack.config.js too.
Often, it’s easiest to start with the actions, because they map to features. Each action represents an event that affects the state. In our case, from the list of features, we can extract the following events: MOVIES_LOADED, FILTER_CHANGED, FAVORITED and UNFAVORITED. Then we turn each event into an action, which we represent with an object. Reducers must know which action they’ve received, so the only required field in the action object is type, which must be one of the string constants we define. Create a new src directory in the project root and define the constants in a file named actions.js in the src. Preface every constant with export so that you can import them in the reducers module you’ll create next:
| | export const FILTER_CHANGED = 'FILTER_CHANGED'; |
| | export const MOVIES_LOADED = 'MOVIES_LOADED'; |
| | export const FAVORITED = 'FAVORITED'; |
| | export const UNFAVORITED = 'UNFAVORITED'; |
Once we’ve defined the actions, we can determine what the state should look like. FILTER_CHANGED must toggle some variable that indicates whether the filter is on or off. MOVIES_LOADED must update an array of movies. FAVORITED and UNFAVORITED must add and remove movies from an array of favorites. The state object will look like this:
| | { loading, movies, filter, favorites } |
loading is a boolean variable indicating whether the movie list is loading; movies is an array containing all the current movies; filter is a boolean indicating whether the filter is active; and favorites is an array of the current favorite movies.
Once we’ve got the shape of the state object, we need to organize our reducers. We’ll take a shortcut and use the combineReducers function that Redux provides. With combineReducers, each reducer manages a single field in the state object, so we need exactly one reducer function for every field in the state object. We’ll define functions for movies, favorites, filter, and loading.
We’ll start with the movies reducer. This reducer responds to the MOVIES_LOADED action and updates the state with the new movies. Create a new file named reducers.js in the src directory and import the action constants you defined in actions.js:
| | import { |
| | FILTER_CHANGED, |
| | MOVIES_LOADED, |
| | FAVORITED, |
| | UNFAVORITED |
| | } from './actions'; |
We’ll use these constants to identify the actions in the reducers. The reducer examines the current action, and returns the updated state.
Now create the movies reducer, which manages the movies array in the state object. MOVIES_LOADED is the only action the movies reducer cares about. When movies receives the MOVIES_LOADED action, it replaces the current movies with the new ones defined in the action object.
| | export function movies(state = [], action) { |
| | switch (action.type) { |
| | case MOVIES_LOADED: |
| | return action.movies; |
| | default: |
| | return state; |
| | } |
| | } |
Since we’re inside the movies reducer, and we’ll be using combineReducers, the state variable represents the movies array. switch executes a different action based on the value of action.type. When action.type is MOVIES_LOADED, we return action.movies to replace the movies array. We generate the actions in our own code, so we must be careful that the structure of our action objects matches what the reducers expect based on the constant we use for the action type field. In all other cases, we want to keep the movies array the same as before, so we return the current state, in the default case. When you use combineReducers, you must always define the return value, so be sure to set the default value of state. In this case, we set it to an empty array.
Each reducer can respond to one or more actions and more than one reducer can handle the same action. This allows us to extend the application by adding new reducers and actions, without interfering with existing reducers. For example, when we receive the MOVIES_LOADED action, we also want to change the status of the loading indicator, and for that we need to toggle the loading field inside the state. In reducers.js, let’s create another reducer called loading that updates the loading state:
| | export function loading(state = true, action) { |
| | switch (action.type) { |
| | case MOVIES_LOADED: |
| | return false; |
| | default: |
| | return state; |
| | } |
| | } |
Here, combineReducers guarantees that state represents whether the movies are still waiting to load. In this case, we default to true as we’re still waiting for the movies to load when the application starts. When action.type is MOVIES_LOADED, return a new state set to false. Since all other actions don’t affect the loading state, we return the current state otherwise. Both movies and loading respond to the same action but update different parts of the state. This feature allows you to perform additional operations in response to an action without reducers stepping on each other’s toes.
Next, let’s handle the filter state. Create a new reducer called filter in reducers.js. This reducer reacts to the FILTER_CHANGED action by replacing the current state with the value of the filter:
| | export function filter(state = false, action) { |
| | switch (action.type) { |
| | case FILTER_CHANGED: |
| | return action.filter; |
| | default: |
| | return state; |
| | } |
| | } |
Here, state represents whether the filter is activated. We set the initial filter state to false by passing a default value for the state parameter. When the action type is FILTER_CHANGED, we replace the current state with the value of action.filter; otherwise, we return the current state.
The final reducer handles the favorites. Start by handling the FAVORITE action type:
| | export function favorites(state = [], action) { |
| | switch (action.type) { |
| | case FAVORITED: |
| | return [...state, action.movieId]; |
| | default: |
| | return state; |
| | } |
| | } |
We set the favorites to an empty array by default. When the action type is FAVORITED, we return a new array containing all the previous favorites and the new favorite movie id that we get from action.movieId. Then we copy the contents of the old array into a new one. The three dots before the state variable, called the spread operator, copy the contents of the state array.
Next, handle the UNFAVORITED action type:
| | export function favorites(state = [], action) { |
| | switch (action.type) { |
| | case FAVORITED: |
| | return [...state, action.movieId]; |
| » | case UNFAVORITED: |
| » | return state.filter(id => id !== action.movieId); |
| | default: |
| | return state; |
| | } |
| | } |
filter takes a function and returns a new array that contains all the elements of the old array, except those for which the function returns false. The function we pass to filter compares the ids in the state array with action.movieId. It returns false when the id in the state array matches action.movieId, so the new array contains all previous movie ids except for action.movieId.
Once you’ve written all of the reducers, we can use combineReducers to combine them into a single reducer and send each reducer the appropriate slice of the state. combineReducers returns a single reducer, called the root reducer. When the root reducer receives an action, it calls every other reducer and combines the results into a single object.
To access combineReducers, install the Redux npm package:
| | $ npm i --save redux |
In reducers.js, import the combineReducers function:
| | import { combineReducers } from 'redux'; |
combineReducers takes an object, where each property maps a slice of the state to a reducer. The object keys determine the names of the state slice managed by the corresponding reducer. Pass all reducers to combineReducers and export the result:
| | export default combineReducers({ movies, filter, favorites, loading }); |
We’ve already decided to name the state properties the same way as the reducers. When you omit the keys, you’ll use the reducer function name as the state property name, which makes it easier to remember.
Let’s get our application running. For this, we need to create the store.
You create the store by calling the createStore function on the root reducer. Since we don’t have any UI yet, we’ll use the Redux development tools to verify our code runs as expected. These come in two parts: a browser extension and an npm module that modifies the store functionality. You can install the browser extension from the Firefox and Chrome extension manager: it’s completely separate from your project, and it works on any website that uses Redux.
A mechanism called middleware lets you customize how the Redux store works. The development tools npm module is an example of middleware. It modifies the store so that the store logs every action with the browser extension. Middleware can fundamentally alter the way Redux works. That’s why we called Redux more of a toolkit. We won’t use middleware except for debugging in this chapter, but this will still give you an idea of how to apply different middleware to the store.
In the src directory, create a new file named store.js. To use the development middleware, install the redux-devtools-extension package:
| | $ npm i --save redux-devtools-extension |
The redux-devtools-extension package exposes a function called devToolsEnhancer that returns a store middleware. We’ve got all the ingredients, so create the store in store.js. Import the root reducer from reducers.js, the createStore function from the Redux package, and the devToolsEnhancer function from the redux-devtools-extension package. Pass the root reducer and the return value of devToolsEnhancer to createStore. Then export the store as a default export:
| | import { createStore } from 'redux'; |
| » | import { devToolsEnhancer } from 'redux-devtools-extension'; |
| | import rootReducer from './reducers'; |
| | |
| | export default createStore( |
| | rootReducer, |
| » | devToolsEnhancer() |
| | ); |
Now that the store is ready, we can run the application. We’re reusing the webpack configuration from the word counter project, so the index.html file you copied from the word counter should work out of the box. Ensure that index.html contains a link to app-bundle.js, which is where our webpack configuration outputs the build results:
| | <script src="app-bundle.js"></script> |
Next, serve the application in development mode by running:
| | $ npm start |
We’ll check that the store initializes correctly with the Redux developer tools. Search for “Redux DevTools” in the Chrome or Firefox extension manager and install the extension with the same name.[20]
After you’ve installed the Redux DevTools browser extension, point the browser at the webpack development server. You’ll see an icon in the address bar or next to it.
Click the icon or right-click the page and select Redux DevTools. You’ll access the Redux debugger. There’s a timeline with the dispatched actions to the left and the state change to the right. New elements are highlighted in green, and removals in red. If there’s no change, the pane is empty. After loading the page, you’ll see one action: @INIT.
When you create the store, Redux automatically sends a special action named @INIT. Since we haven’t handled @INIT explicitly, every reducer will return the default state. After the reducers process @INIT, the new state looks like this:
| | { |
| | loading: false, |
| | movies: [], |
| | filter: false, |
| | favorites: [] |
| | } |
Once you’ve verified that the store initialized correctly, it’s time to send it our actions. Let’s load the movies in the store. To make the example more realistic, we’ll pretend the movies are loaded from a web service. We’ll create a function that returns a promise containing the movie list. When the promise completes, we’ll send the store the MOVIES_LOADED action. In the src directory, create a new file named movieApi.js and create a new function that simulates loading the movies:
| | export function requestMovies() { |
| | return new Promise(resolve => |
| | setTimeout( |
| | () => |
| | resolve([ |
| | { title: 'Rebel without a Cause', date: 'Monday' }, |
| | { title: 'Ghost in the Shell', date: 'Tuesday' }, |
| | { title: 'High Noon', date: 'Monday' } |
| | ]), |
| | 1000 |
| | ) |
| | ); |
| | } |
In the Promise constructor, we wait one second by calling setTimeout with a 1000 milliseconds argument. After the timeout expires, we resolve the promise by passing a movie array to resolve. Each movie in the array is an object with a title and a date.
When requestMovies returns the movies array, we’ll send the MOVIES_LOADED action to the store. dispatch sends the action to every reducer, which checks its type property and determines how to handle it. In index.js, call dispatch with the MOVIES_LOADED action. Import requestMovies and the MOVIES_LOADED constant. Then call requestMovies and create a new action with the MOVIES_LOADED type:
| | import store from './store'; |
| | import { requestMovies } from './movieApi'; |
| | import { MOVIES_LOADED } from './actions'; |
| | requestMovies().then(movies => store.dispatch({ type: MOVIES_LOADED, movies })); |
Remember that the movies reducer expects a movies array on the MOVIES_LOADED action. Set the movies property to the movies array in the resolved promise. If you reload the page and check the redux devtools, you’ll see the MOVIES_LOADED action.
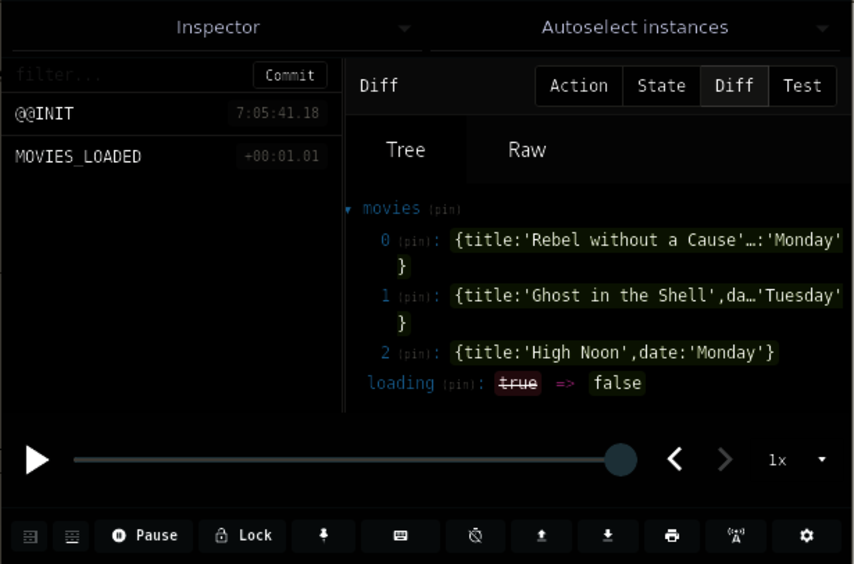
Our movies reducer will update the state with the new movies. Clicking an action lets you see how the reducers update the state. You can check whether actions are dispatched at all, and whether they result in the right state change. You can also inspect the action payload to dig further.
Of course, making a new copy of the state can be slow. If making copies of the state becomes a bottleneck, you can replace objects and arrays with data structures tuned for making efficient copies, like those in Immutable.js.[21]
You’ve set up the actions, reducers, and the store, and you’ve successfully simulated loading the movies in the store from a web service. To work with the rest of the movie guide functionality, we’ll need to build the user interface and connect it to the Redux store.