

Security in IBM MessageSight
This chapter describes a few of the security options available to set up secure messaging with IBM MessageSight. The focus is more on devices that try to connect to IBM MessageSight than on the back-end integration of the appliance.
This chapter provides information about the following topics:
IBM MessageSight is configured to provide Federal Information Processing Standards (FIPS) 140-2 support. For more information about FIPS, see the following website:
4.1 Authentication of a device connecting with IBM MessageSight
This section describes how to set up user authentication with IBM MessageSight.
4.1.1 Users and groups
In IBM MessageSight, there are two types of users and groups:
•Administration users
•Messaging users
Administration users
The administration users have access to IBM MessageSight. There are three types of such users:
•System administrator
•Messaging administrator
•Appliance user
Among other actions, an administrator can change the time zone of servers, or configure Secure Sockets Layer/Transport Layer Security (SSL/TLS) connections.
Messaging users
The messaging users are handled by the client application. The authentication can be set up based on users and groups defined on IBM MessageSight. A user ID is set up on IBM MessageSight, and can be associated with a group for easier maintenance.
For example, you can define an operatorE1 group that has a collection of user IDs belonging to operators of a particular piece of equipment. These user IDs might have an access control defined differently than other groups.
Similarly, you can create a group definition based on the user’s geographic position. For example, all users of a device from a given warehouse in a large site can be designated to be in the warehouseA group.
In case of an MQTT client, the user ID defined on IBM MessageSight maps to the MQTT user name.
4.1.2 Creating a user ID and group with the web UI
To create users and groups with the IBM MessageSight web user interface
(web UI), follow these steps:
(web UI), follow these steps:
1. Go to Messaging → Users and groups.
2. Start with creating a new group first. Under the Messaging Groups section, click the plus (+) icon to add a new group.
3. In the resulting dialog box, enter details, as shown in Figure 4-1.

Figure 4-1 Adding a new user group to IBM MessageSight
4. After this group is created, you can define and add users to this group. This user ID will be a messaging user and not a web UI user. On the same web UI page, go to the Messaging Users section and click the plus (+) icon to add a new user.
5. Enter the details, as shown in Figure 4-2 to add a new user. Note that, the group membership is set to mqttclients that was created earlier.
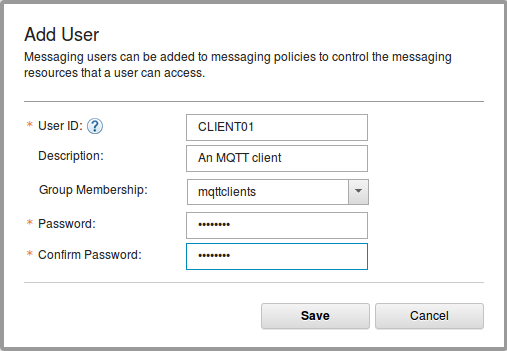
Figure 4-2 Adding a new user to the group
4.1.3 Creating a user ID and group on the command line
You can also create the user ID and group ID using the command-line interface (CLI), as shown in Example 4-1.
Example 4-1 Creating a new group and user ID on IBM MessageSight
Console> imaserver group add "GroupID=mqttclients" "Description=All MQTT clients"
The requested configuration change has completed successfully.
Console> imaserver user add "UserID=CLIENT01" "Type=Messaging" "Password=new00pwd" "GroupMembership=mqttclients" "Description=An MQTT client"
The requested configuration change has completed successfully.
Note that the type of user mentioned, Type=Messaging, indicates that the user ID being created is a messaging user and not a web UI user.
For more information about authentication, see the IBM MessageSight Information Center:
4.2 Authorization of a device connecting with IBM MessageSight
This section describes how to set up authorizations on IBM MessageSight, with a focus on MQTT connections.
4.2.1 Authorization schemes
You can set up the authorization on any combination of attributes related to network, client identification, and message data. For example, you can allow the connections on the basis of network attributes, such as certain IP addresses, or on the basis of the protocol (Java Message Service (JMS) or MQTT) used by a client and its identifier.
To set up this kind of access control, you must create a connection policy.
After a connection is established, another level of access control can be defined based on the action that the client can take. For example, users with certain types of equipment can be allowed to publish on topics as allocated to them. Similarly, they can be restricted to subscribe on certain topics on which broadcast messages are received.
To set up this kind of access control, you must create a messaging policy.
4.2.2 Authorizing MQTT clients
An MQTT client on a network is uniquely identified with its client ID. Optionally,
an MQTT client can connect to IBM MessageSight with a user name and a password. You can set up this authorization based on the client identifier,
user name, and password. The user name and password are supported by MQTT protocol.
an MQTT client can connect to IBM MessageSight with a user name and a password. You can set up this authorization based on the client identifier,
user name, and password. The user name and password are supported by MQTT protocol.
However, the client and broker communication can also be secured using TLS, too. For more detail, see 4.3, “Transport Layer Security” on page 87.
For a full description about connecting to a server, see the MQTT specification:
Authorizing with a client identifier
According to the MQTT specification, an MQTT client is required to have a client ID. IBM MessageSight can be set up to authorize access based on this client ID. Figure 4-3 shows this scheme.

Figure 4-3 An MQTT client authenticating with a client identifier
With this scheme, it is possible to limit connections to only those MQTT clients who have a known client ID in a network. For example, a topology of MQTT clients can use the MAC address of the devices in the networks as their client ID.
|
Restriction: Note that such a connection policy is not secure if a malicious client can spoof a valid identifier.
|
Authorizing with a client ID, user name, and password
According to the MQTT specification, an MQTT client can optionally pass a user name and a password for authentication. This user name and password combination can also be used to authorize with IBM MessageSight. Figure 4-4 shows this scheme.

Figure 4-4 An MQTT client authenticating with a client ID, user name, and password
In this scheme, an additional layer of authorization is set up on the basis of an MQTT user name and password. Such a scheme is suitable for MQTT clients that can have multiple human operators over time.
For example, an electronic kit can have probes for temperature, a voltmeter, or an ammeter to read parameters of a piece of equipment. However, this kit might be used by different personnel over time. Therefore, an additional security layer can be added so that only known personnel using known devices can connect to IBM MessageSight.
4.2.3 Setting up authorization in IBM MessageSight: Connection policy
To set up authorization in IBM MessageSight, you can start with a connection policy. This connection policy is referred to in one or more endpoints on the appliance. In other words, a given endpoint on the appliance can have one or more connection policies applied to it. A client connection is allowed when at least one of the connection policies evaluates to true.
For complete information about connection policies, see the IBM MessageSight Information Center:
Creating a connection policy with the web UI
To create a connection policy with the web UI, follow these steps:
1. Go to Messaging → Message Hubs.
2. From the message hub, select a hub that you want to work with, and click the pencil icon to edit it.
3. The resulting page shows a page for connection and messaging policies, along with the end-points related with the selected hub. Click the Connection Policies pane, and click the green plus (+) icon to create a new connection policy.
Figure 4-5 shows a sample connection policy for MQTT clients, with criteria set for client IDs and group IDs. A group ID enables user IDs defined for that group. Alternatively, the policy can be set up for a given user ID only.

Figure 4-5 Sample connection policy for MQTT clients
Creating a connection policy using the CLI
You can also create a connection policy using the CLI, as shown in Example 4-2.
Example 4-2 Command-line option to create a connection policy for MQTT clients
Console> imaserver create ConnectionPolicy "Name=SampleConnectionPolicy" "Description=Sample connection policy for MQTT clients" "ClientID=CLIENT*" "GroupID=mqttclients" "Protocol=MQTT"
The requested configuration change has completed successfully.
Note the following aspects of the code in Example 4-2:
•The client ID has the word CLIENT and an asterisk as the wildcard character to match zero or more characters. Therefore, MQTT clients with various client IDs, such as CLIENT99, CLIENTA, or CLIENT, are all considered valid.
•To limit connections to a set of specific client identifiers, individual connection policies for each one must be created.
•The group ID is set to mqttclients, which means that the client must connect to a user name that belongs to this group. The password for this user name must match with the name that was provided when creating the user name.
4.2.4 Setting up authorization in IBM MessageSight: Messaging policy
After a client is successfully connected to the appliance, another layer of access control exists, such that a given client has the appropriate level of access to correct resources. An endpoint is associated with one or more messaging policies. These policies are applied after the connection policy allows a connection to pass through.
For more information about messaging policies, see the IBM MessageSight Information Center:
Creating a messaging policy with the web UI
To create a messaging policy with the web UI, follow these steps:
1. Go to Messaging → Message Hubs.
2. From the message hub, select a hub that you want to work with, and click the pencil icon to edit it.
3. The resulting page shows pages for connection and messaging policies, along with the endpoints related to the selected hub. Click the Messaging Policies pane, and click the green plus (+) icon to create a new messaging policy.
Figure 4-6 shows a sample messaging policy for MQTT clients.

Figure 4-6 Sample messaging policy for MQTT clients
Creating a messaging policy with the CLI
You can also create a connection policy using the CLI, as shown in Example 4-3.
Example 4-3 Command-line option to create a messaging policy for MQTT clients
Console> imaserver create MessagingPolicy "Name=SampleMessagingPolicy" "Description=Sample messaging policy for publishing MQTT clients" "DestinationType=Topic" "Destination=/root/sample/*"
"ClientID=CLIENT*" "GroupID=mqttclients" "Protocol=MQTT"
The requested configuration change has completed successfully.
4.3 Transport Layer Security
This section describes how to enable TLS for MQTT connections. With TLS, you can achieve (independently or in combination) the following security objectives:
•Encrypted communication with IBM MessageSight
•Client authentication based on certificates
•Client authentication based on user name and password
Enabling TLS in IBM MessageSight is a three-step process:
1. Creating a certificate profile
2. Creating a security profile
3. Associating a security profile to an endpoint
Additionally, a step for adding trusted certificates must be completed if the security profile is set to authenticate a client based on the client certificate.
Use TLS 1.1 and 1.2 as the default for secure communication with IBM MessageSight, MQTT clients, and JMS clients.
|
Important: In the rest of this section, all screen captures that refer to certificates are fictitious and self-signed. A self-signed certificate is not secure and ought to be avoided in security setup.
|
Note that IBM MessageSight expects that all certificates are in the privacy enhanced mail (PEM) format.
For more information about the .pem file extension, see the OpenSSL topic in the IBM WebSphere MQ Information Center:
For a background on digital certificates in general, see the Digital certificates topic in the IBM MessageSight Information Center:
4.3.1 Certificate profile
To enable TLS, the first step is to create a certificate profile using the certificate and key pair designated for IBM MessageSight. You can have as many profiles as the number of endpoints you have in a message hub. Alternatively, you can use one certificate profile throughout the message hub.
Creating a certificate profile using the web UI
To set up certificate profile using the web UI, follow these steps:
1. Go to Appliance → Security Settings.
2. Under Certificate Profiles, click the green plus (+) icon to create a new certificate profile. Figure 4-7 shows the panel for creating a new certificate profile.

Figure 4-7 Adding a new certificate profile using the web UI
3. The password fields are not marked as mandatory. However, at a minimum, the private key is expected to be secured with a password and so, in Figure 4-7, enter the password for the private key.
Note that IBM MessageSight expects that the certificate and the key selected are in the PEM format.
Creating a certificate profile using the CLI
To create a certificate profile using the CLI, complete the following tasks in order:
1. Import the certificate and key files to the IBM MessageSight appliance.
2. Apply the certificate and key.
3. Create the certificate profile.
In Example 4-4, you import the certificate and key from a server using the scp protocol.
Example 4-4 Importing certificate and key for the appliance
Console> file get scp://[email protected]/servers/msightServer.pem
[email protected]'s password:
The requested configuration change has completed successfully.
Console> file get scp://[email protected]/servers/msightServerKey.pem
[email protected]'s password:
The requested configuration change has completed successfully.
In Example 4-5, you apply the certificate and key.
Example 4-5 Applying the certificate and the key
Console> imaserver apply Certificate "CertFileName=msightServer.pem" "CertFilePassword=" "KeyFileName=msightServerKey.pem" "KeyFilePassword=redb00ks"
Note that the argument CertFilePassword is provided with no value after the equals sign (=) to indicate that no password is required for the certificate file.
In Example 4-6, you create the certificate profile using the certificate and the key file that you imported (Example 4-4 on page 88) and applied (Example 4-5).
Example 4-6 Creating a certificate profile
Console> imaserver create CertificateProfile "Name=MSIGHT_SERVER_CERT" "Certificate=msightServer.pem" "Key=msightServerKey.pem"
For more information about importing certificates, see Importing a server certificate using the command line:
For more information about creating a certificate profile using the CLI, see Creating a certificate profile on the command line:
4.3.2 Security profile
After the certificate profile is created, IBM MessageSight knows the names of the certificate and keys to enable secure communication. To provide the rest of the parameters to set up secure communication, a security profile is created for the certificate profile.
Creating a security profile using the web UI
To set up a certificate profile using the web UI, follow these steps:
1. Go to Appliance → Security Settings.
2. Under Security Profiles, click the green plus (+) icon to create a new certificate profile. Figure 4-8 shows the panel for creating a new certificate profile.
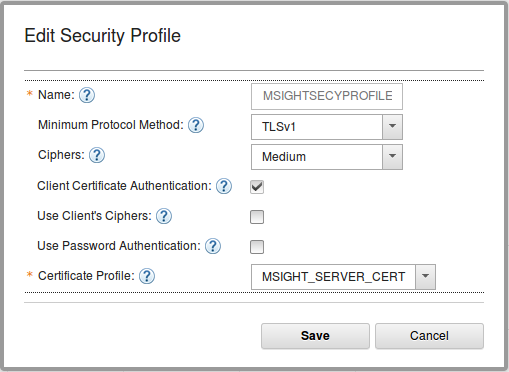
Figure 4-8 Adding a new security profile using the web UI
3. The options in the dialog box allow for various permutations of security parameters. For example, in Figure 4-8, the Client Certificate Authentication check box is selected. Therefore, when the communication is encrypted, IBM MessageSight also requests the client to send its certificate for identification.
Similarly, security can be further enhanced by making the client provide a user name and a password by selecting the Use Password Authentication check box. If this box is selected, a valid user name and password must be passed by the client.
Therefore, for the same certificate profile, multiple security profiles can be created by using different options as set when creating the security profile.
For more information about client authentication based on certificates, see Client certificate authentication:
Creating a security profile using the CLI
To create a security profile on the command line, see Example 4-7.
Example 4-7 Creating a security profile
Console> imaserver create SecurityProfile "Name=MSIGHTSECYPROFILE"
"UseClientCertificate=True" "UsePasswordAuthentication=False"
"CertificateProfile=MSIGHT_SERVER_CERT"
Because UseClientCertificate is set to True, IBM MessageSight requests the certificate from the client for identification. Similarly, because UsePasswordAuthentication is set to False, the client does not need to pass the user name and password.
For more information about creating a security profile using the CLI, see Creating a security profile on the command line:
4.3.3 Associating a security profile with an endpoint
The certificate profile provides a certificate and associated key file, as designated for a certain entity to IBM MessageSight. This entity can be an entire message hub, a given endpoint, or any other configuration that you choose. Using the certificate profile, you created a security profile so that you can set parameters, such as client authentication based on certificates or user name
and password.
and password.
With both these profiles in place, associate the security profile with an endpoint.
Associating the security profile with an endpoint using the web UI
To associate a security policy with an endpoint using the web UI, follow these steps:
1. Go to Messaging → Message Hubs.
2. From the message hub, select a hub that you want to work with and click the pencil icon to edit it.
3. The resulting page shows a page for connection and messaging policies, along with the endpoints related with the selected hub. Click the endpoint that you want to work with, and click the pencil icon to edit it.
Figure 4-9 shows the panel for editing the endpoint. Note that the red rectangle shows the name of the security profile that this endpoint is associated with.
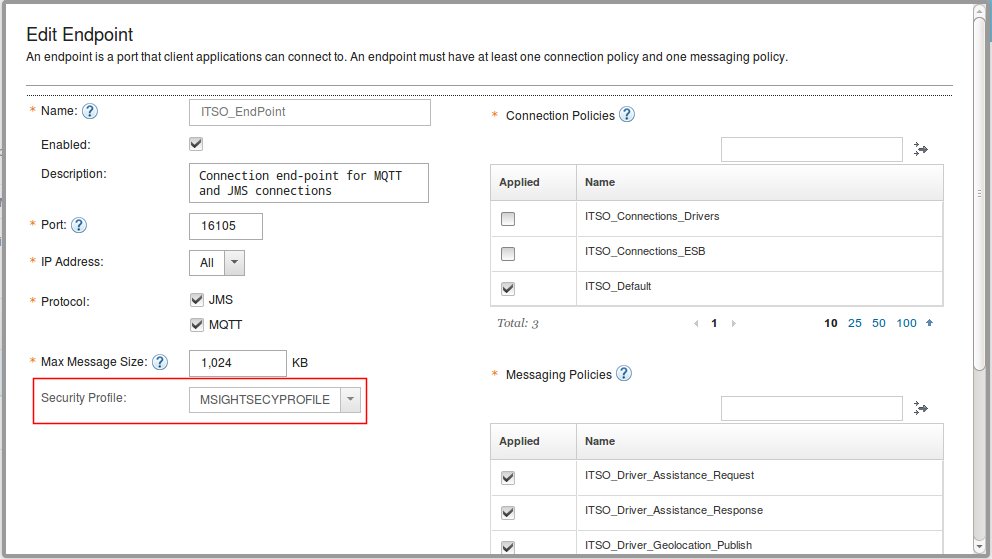
Figure 4-9 Associating a security profile with an endpoint
Associating the security profile using the CLI
Example 4-8 shows how to associate the security profile with an endpoint using the CLI.
Example 4-8 Associate security profile with an endpoint
Console>imaserver update Endpoint "Name=ITSO_EndPoint" "SecurityProfile=MSIGHTSECYPROFILE"
4.3.4 Adding trusted certificates
To set up an infrastructure for client authentication through the certificates of the certificate authority (CA), the client certificate must be present as a trusted certificate (see Figure 4-11 on page 95). This is done by adding the certificate of the CA for a given security profile.
When a client connects to an endpoint, the client provides its certificate for authentication. The security profile associated with that specific endpoint contains the certificate of the CA of the client certificate. This setup ensures a successful client authentication.
Adding a trusted certificate using the web UI
To add a trusted certificate using the web UI, follow these steps:
1. Go to Appliance → Security Settings.
2. Under Security Profiles, click the security profile that you want to work with.
3. Click Other Actions → Trusted Certificates.
4. Figure 4-10 shows the panel for adding a trusted certificate. Browse the relevant .pem file and click Upload.

Figure 4-10 Upload the CA certificate as a trusted certificate
Adding a trusted certificate using the CLI
To add a trusted certificate using the CLI, complete the following tasks in order:
1. Import the certificate to the IBM MessageSight appliance.
2. Apply the certificate.
In Example 4-9, you import the certificate and key from a server using the scp protocol.
Example 4-9 Importing certificate and key for the appliance
Console> file get scp://[email protected]/servers/clientCA.pem
[email protected]'s password:
The requested configuration change has completed successfully.
In Example 4-10, you apply the certificate and key.
Example 4-10 Applying the certificate as a trusted certificate
Console> imaserver apply Certificate "TrustedCertificate=clientCA.pem" "SecurityProfileName=MSIGHTSECYPROFILE"
4.4 Combining TLS with connection and messaging policy
With TLS, you can encrypt the communication. Further, you can apply authentication to clients, as authenticated by their certificates. Another level of authentication is to require a client to pass a valid user name and password.
With connection policy, you can apply more constraints based on protocols, client identifiers, and so on. With messaging policy, you can limit access to only certain types of action and resources.
This section shows you how to make all of these work together.
4.4.1 Overview of TLS, connection policies, and messaging policies
Figure 4-11 shows an overview of the security implemented with TLS, connection policies, and messaging policies.

Figure 4-11 Security overview with TLS, connection policies, and messaging policies
In this setup, the security is implemented using the following steps:
1. The endpoint has a security profile associated with it. This security profile has a certificate profile associated with it, where the certificate profile has the server certificate and key pair. The client has its own certificate and key pair. Together, the client and endpoint establish an encrypted channel of communication.
2. If the security profile is set up accordingly, the endpoint sends a request to the client for its certificate for authentication.
3. The client then sends its certificate for authentication. With the trusted certificate set up with the security profile, the endpoint determines whether the client certificate is signed by a trusted CA.
4. After the authenticity of the client is established, the connection policy (or policies) associated with the endpoint comes into effect. With the connection policy, the connection is allowed if the constraints are met successfully. For example, the constraint can be on protocol (JMS or MQTT), IP address, client ID, and so on. The constraint can also be set on the common name of the client certificate.
|
Important: The common name of any digital certificate is a field in the subject of the certificate. This is one of the most important certificate fields, because it plays an important role in identification in a security setup.
|
5. After clearing the connection policy, the messaging policy associated with the endpoint comes into effect. With the messaging policy, the connection is allowed if the constraints are met successfully. For example, the constraint can be on an action (send, receive, publish, or subscribe), topic string, queue name, and so on. The constraint can also be set on the common name of the client certificate.
4.4.2 Identities in a security setup with TLS, connection policies, and messaging policies for an MQTT client
Figure 4-12 shows a sample implementation of a security setup for an MQTT client. In this sample, various identities are used in the security setup.

Figure 4-12 Identities in a security setup for an MQTT client with TLS, connection policies, and messaging policies
Identities in the security step
To secure any topology, it is important to know the entities and their identities involved. Table 4-1 on page 97 lists the entities and their identities for the security setup shown in Figure 4-12.
Table 4-1 Entities and identities for security setup
|
Entity
|
Identity
|
Remarks
|
|
MQTT client
|
•Client ID
•User name and password
•Certificate common name
|
Per the MQTT protocol specification, the client ID is mandatory, and the user name and password are optional.
|
|
Endpoint
|
•IP address
•Port number
•Name of the endpoint
|
The endpoint is identified by its IP address and port number. In IBM MessageSight, the endpoint also has a name.
|
|
Appliance
|
•Messaging user and group
|
The messaging user and group are used in the connection and messaging policies to apply a constraint on the connecting client.
|
Table 4-2 lists the certificates used for the security setup in Figure 4-12 on page 96.
Table 4-2 Certificate used in the security setup
|
Entity
|
Certificates
|
Usage
|
|
MQTT client
|
•Certificate and key pair
|
The MQTT client uses the pair of certificate and key pair for encrypting the communication, and also for authenticating itself to the endpoint.
|
|
Endpoint
|
•Certificate and key pair
•Trusted certificate
|
The endpoint uses the pair of certificate and key pair for encrypting the communication.
The endpoint uses the trusted certificate to ensure that the client certificate was signed by a trusted authority.
|
The endpoint uses the trusted certificate to ensure that the client certificate was signed by a trusted authority.
The connection and messaging policies are created with respect to the following identities:
•Client ID of the MQTT client
•User name and password of the MQTT client
•Certificate common name of the client certificate
..................Content has been hidden....................
You can't read the all page of ebook, please click here login for view all page.