Project 10
A-maze-ing
It’s time to take the leap into graphical programs and user interfaces. Up until now, you’ve programmed a series of projects that used output to the terminal to interact with the code’s user. ASCII art is fun, but making a project with colorful graphics that the user can interact with is even better.
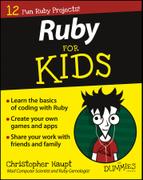
In this project, you create a simple maze exploration and treasure gathering game. You can design any maze that you like using text strings that describe the level. The text looks a little like ASCII art, in fact! But in this project, your code converts it into a graphical display with different color tiles. The user moves around in the maze and collects as many treasures as she can in the least time possible.
Organizing a New Project
In this project, you’ll use Atom to create and edit your program. Unlike other projects, this program’s source code will be stored in five different files, one for each class you create. Each file will be named after the class it contains, and all the files will be stored in the same project directory. You’ll use the terminal program to run and test the code, but this time the project will create its own window in which the game is played.
 If you haven’t created a development folder already, refer to Project 2 for instructions on how to do that.
- Start your terminal program and enter the development folder:
$ cd development - Create a new directory for this project:
$ mkdir project10 - Move in to the new directory:
$ cd project10 - Start Atom by double-clicking its icon.
- Create the first source code file by choosing File ⇒ New File command. Save it by choosing File ⇒ Save and store it in your project10 directory. Call the file amazing.rb.
- This project uses the graphical game library you installed in the first chapter (Project 1), called Gosu. If you aren’t sure that you have it installed, run the following command in your terminal program:
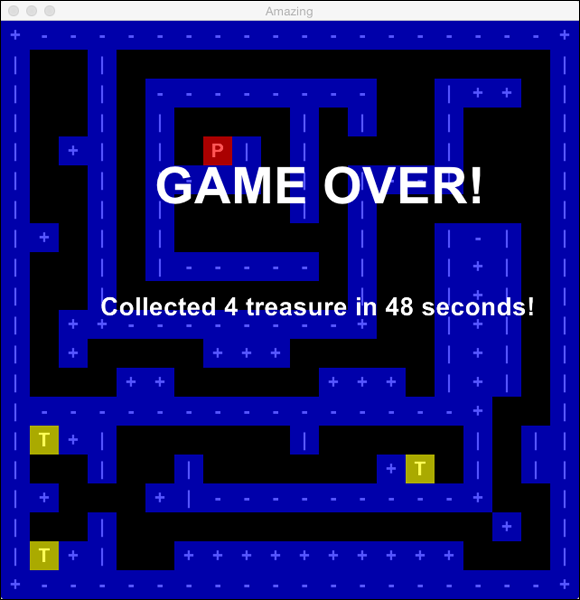
$ gem listYou should see a number of item lists, and a version of Gosu should be listed (see Figure 10-1). If it isn’t, go back to Project 1 and follow the instructions there to install it.
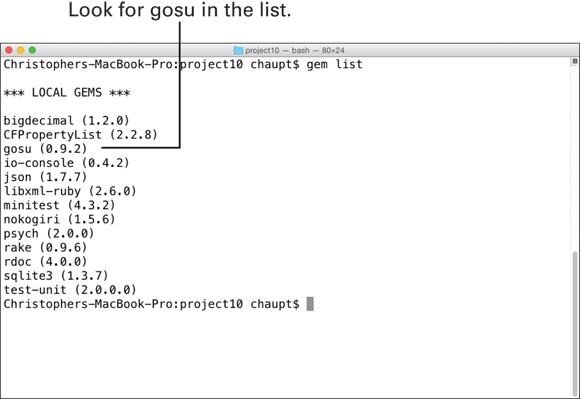
Figure 10-1: Confirm that gosu appears in your Ruby Gem list.
 If some of these steps are confusing to you, refer to the “Organizing a New Project” section from Project 4. It provides more details for each step.
Get ready to search the maze for some awesome treasure!
Planning the Project
As your projects have grown, you may have noticed that the file you were writing your Ruby code in was getting a bit long. Experienced programmers who work on larger projects, alone or with teammates, usually break the code into separate files, each of which contains one specific bit of functionality. In this project, you’ll start to use that technique and put (mostly) one class in each source code file.
The goal of this project is for you to create a simple, 2D game in which the player moves a piece around a mazelike board, collecting treasures and reaching the exit in the least amount of time possible. Let’s figure out what objects we need for such a project:
- You need a main object that is used to setup and launch the game. This main class’s job is to connect with the game library Gosu so you can use its abilities.
- You’ll have another object that represents the game itself. The game object will be responsible for setting up the player object and the game board (which I’ll call a level, although there is only one level to start). The game object will also be responsible for the player and level to display themselves, and the game object will show a user interface that displays a timer and current score.
- The level object is responsible for taking data you provide that describes what the board should look like and setting up some graphical tiles to lay out the design. The level manages movement within the maze and determines what are valid moves for the player.
- The player object is actually going to be a special version of a tile object. The tile object is an object that knows how to draw itself on the playing board. For this project, you’ll have a number of different types of tiles (walls, treasure, exit, player, and so on).
To keep this project as simple as possible, I’ll keep it to the objects I listed here, but as you go, you’ll probably start thinking of different ways you could improve the objects you code.
Looking at the Program Skeleton
This project uses a handful of classes to coordinate all the objects needed to make a simple, but very flexible game. The main starting point for your code will create all the objects needed and set up the Gosu library.
- The amazing.rb source code file is your program’s entry point. Add a comment to identify the file, but also write a note that helps people know how to run the program. Because there are going to be multiple files in this project, the note gives a little hint in case you forget which file is which.
## Ruby For Kids Project 10: A-maze-ing# Programmed By: Chris Haupt# A mazelike treasure search game## To run the program, use:# ruby amazing.rb# - Provide a hint to Ruby as to what external code is going to be used:
require 'gosu' Ruby doesn’t automatically know about code in the other files you create or extra Ruby gems you may have loaded. The require line tells Ruby to look for and load gosu in the standard system locations.
 - Create the Amazing class as a child class of Gosu’s Window class. This will connect your project up so you can use Gosu’s capabilities:
class Amazing < Gosu::Windowdef initializesuper(640, 640)self.caption = "Amazing"# More code will go hereend# Even more code will go hereendThe class’s initialize method creates a square window 640 pixels on a side. It also sets the window title (caption).
- Create an instance of the class and call the Gosu show method to display the window and get the game going. Place this code just after the final end keyword:
window = Amazing.newwindow.show - Save the code and run it in the terminal window with $ ruby amazing.rb. You should get a square, black window like in Figure 10-2. If not, make sure to check for any error messages in the terminal window and check for typos. If you don’t have the Gosu gem installed, you may have to go back and do that.
Figure 10-2: Gosu is running if you see a blank window.
To quit, just close the window or press Ctrl+C in the terminal.
Creating Placeholder Classes
There are four other classes besides the Amazing class you’ve already coded. Each of these classes will be placed in its own file and then connected using Ruby’s require functionality.
The Game class
The Game class is responsible for setting everything up and managing all the updates and drawings that may be required from the other classes.
- In Atom, create a new file called game.rb in the same directory as amazing.rb. Add the require functions that connect this class to others in the project:
require 'gosu'require_relative 'level'require_relative 'player'class GameLEVEL1 = []You’ve already seen the require function. The require_relative function is used to tell Ruby to load up and use code that is in the same directory as the current file. You’ll fill in the constant LEVEL1 later with your maze design.
- Define an initialization method:
def initialize(window)@window = window@player = Player.new(@window, 0, 0)@level = Level.new(@window, @player, LEVEL1)@font = Gosu::Font.new(32)@time_start = Time.now.to_iendThis method prepares a number of instance variables based on classes you have yet to write. The @font variable assignment looks odd — it’s creating a new object using the Gosu library. Font objects are how Gosu draws text. You’ll use that for some of the user interface (UI) later on. The @time_start instance variable is using Ruby’s Time class to get the current time and convert it into an integer (the to_i method). That number represents the current time in seconds since the beginning of computer time!
- Stub in the game loop related methods and end the class:
def button_down(id)enddef updateenddef drawendendThese methods are standard functions when using Gosu. The button_down method is used to detect if the user has pressed a button on her keyboard. You’ll use update to make changes to the game’s data (including updating tiles based on user input). The draw method will be used to tell everything to display itself.
- Save the code.
The Level class
The Level class is responsible for the game board and its pieces. The class will draw the maze based on a textual description you pass in.
- In Atom, create a new file called level.rb in the same directory as amazing.rb. Add the initial Ruby require functions and class definition:
require 'gosu'require_relative 'tile'require_relative 'player'class Level - This initialization method is a bit long, mostly because you’re going to store a lot of data. I’ll explain most of the variables in later sections:
def initialize(window, player, level_data)@window = window@tiles = []@player = player@level_data = level_data@total_rows = 0@total_columns = 0@exit_reached = falseif @level_data@total_rows = @level_data.lengthif @total_rows > 0@total_columns = @level_data.first.lengthendsetup_levelendendMost of the variable setup should be self-explanatory (even if you don’t know what the variables are used for yet). The last part is a little complicated. It’s checking to see if any level data has been supplied and, if it has, calculates the total number of rows and columns for the data before setting up the board.
The playing board for the A-maze-ing project is a grid. Think of it like a chessboard or piece of imaginary graph paper. You’ll fill in each square of the grid with a wall, an empty space, or your other playing pieces (entrance, exit, treasure, and player). The layout is a little different from graphing you might have done in math class. The rows are the y-axis and run down vertically on your imaginary graph paper. The first row is numbered zero (0) and gets larger as you move down the paper. The columns of the grid run horizontally across the imaginary graph paper. This is your x-axis, and it, too, starts counting at zero (0) and increases as you move to the right. This coordinate system is how Gosu works in general (see Figure 10-3). - Stub in the setup_level method for now:
def setup_levelend - Stub in the standard game loop methods and end the class:
def button_down(id)enddef updateenddef drawendend - Save the code before moving on to the next placeholder.

Figure 10-3: The Gosu coordinate system and the layout of a Level object’s tiles.
The Tile class
The Tile class represents a visible piece on the playing board (level). It will know how to draw itself based on its type. In this project, you use a simple code to represent the type of the tile (for example, wall, empty, exit, treasure, and so on).
- In Atom, create the tile.rb file in the same directory as the amazing.rb file. Add the require line and define the class:
require 'gosu'class Tile - Set up a number of constants that will be used to make it a little clearer what the different types of tiles are and how big they are on screen:
PLAYER_TYPE = 'P'START_TYPE = 'S'EXIT_TYPE = 'E'TREASURE_TYPE = 'T'EMPTY_TYPE = '.'WIDTH = 32HEIGHT = 32In your level design, you’ll use these symbols to place objects on a map. Any unrecognized symbol will be treated as a wall.
- Add an attribute accessor to make it easier for other parts of the code to use a tile’s variables:
attr_reader :row, :column, :type - Define an initialization method for tiles:
def initialize(window, column, row, type)@@colors ||= {red: Gosu::Color.argb(0xaaff0000),green: Gosu::Color.argb(0xaa00ff00),gold: Gosu::Color.argb(0xaaffff00),blue: Gosu::Color.argb(0xaa0000ff)}@@font ||= Gosu::Font.new(24)@@window ||= window@row = row@column = column@type = type@hidden = falseendNot only does this method set up some basic instance variables needed for any individual class (like @row and @column), but it also creates some shared class variables.
The symbol ||= is made up of two vertical bars and one equal sign. The vertical bars are sometimes called pipes.
Ruby’s class variables start with two at signs (@@) and are shared by all instances of a class. In this program, you need only one hash of colors for looking up appearance. Likewise, the font and window targeted for drawing can be shared across all tile objects. Using class variables is a convenience and saves a little memory. Perhaps the most complicated variable here is @@colors. The symbol ||= means that if the variable doesn’t already have a value, set it up; otherwise, don’t do anything. The @@colors variable is being assigned a Ruby hash where the keys are names of colors, and the values are using Gosu to define a color using a hexadecimal code. You can place numbers and letters A through F in that value to change the color. - Stub in the draw method and finish the class:
def drawendend - Save the code before moving on.
The Player class
The Player class is a specialized kind of tile object. You could break out many different special tiles, but I want to show you one that you’ll use to track the user’s location and score.
- In Atom, create a player.rb file next to the other files in the project. Add the standard requires and class definition:
require 'gosu'require_relative 'tile'class Player < TileBecause player is a child class of Tile, you’ll use the subclass syntax that you’ve seen before.
- Provide access to the player’s score with a read-only accessor:
attr_reader :score - Set up the object with an initializer and close up the class with end:
def initialize(window, column, row)super(window, column, row, Tile::PLAYER_TYPE)@score = 0endendMostly this just calls its parent class using the super keyword. You pass the parent class the tile type (using the appropriate constant you set up earlier), and then set the starting score to zero.
- Save the file before moving on. You can try running the code at this point, but you won’t see anything other than a blank screen. If you get error messages in the terminal, fix those before continuing.
Coding Amazing Methods
For this project, you’ll work top-down to get a feel for how the Gosu library’s game loop works. The Amazing class kicks things off, so start there.
- Inside of the amazing.rb file, add the missing require_relative call just below the other require:
require_relative 'game' - Create a game object in the initialize method right after the caption is set (shown for context):
self.caption = "Amazing"@game = Game.new(self) - Add the Gosu related game loop methods to the Amazing class below the initialize method:
def update@game.updateenddef draw@game.drawenddef button_down(id)@game.button_down(id)end - Save the file before moving on.
Coding Game Methods
The Game class will contain the data that describes the level and a variety of methods to help out with the game interface.
- The LEVEL1 constant is up first. The constant is made up of an array of 20 strings. Each string is made up of 20 characters. If you type this up in Atom and line things up, it looks like a map.
LEVEL1 = ["+------------------+","|S.|….T……….|","|..|.--------..|++.|","|..|.|….|T|..|T..|","|.+|.|.E|.|….|…|","|..|.|---.|.|--|…|","|..|.|….|.|……|","|+.|.|……|..|-|.|","|..|.|-----.|..|+|.|","|..|T…….|..|+|.|","|.++--------+..|+|.|","|.+….+++…..|+|.|","|…++…..+++.|+|.|","|---------------+..|","|T+|……|…..|.||","|..|..|……+T.|.||","|+…+|---------+..|","|..|………….+.|","|T+|..++++++++++…|","+------------------+"]The critical symbols here are the period (.) for blank spaces, S for where the player starts, E for the exit from the maze, and T for treasure markers. You can use any other symbol you like for the walls. I did a little ASCII art here using |, -, and +.
 You can change this map however you like, but remember that there needs to be 20 strings of 20 characters! There also needs to be a comma at the end of each string in the array except for the last one.
 - Add code to the game loop related methods you stubbed out previously:
def button_down(id)@level.button_down(id)enddef update@level.updateif [email protected]_over?@time_now = Time.now.to_iendenddef draw@level.drawdraw_hudendMostly this just calls down to the level object to take care of things. In the update method, you’ll also keep track of the current time until the player reaches the exit of the maze. You’ll use the elapsed time in the heads-up display (HUD), which displays the user interface for important game information. In Amazing, the HUD will contain the current score and the clock.
- Draw the HUD:
def draw_hudif @level.level_over?@font.draw("GAME OVER!", 170, 150, 10, 2, 2)@font.draw("Collected #{@player.score} treasure in #{time_in_seconds} seconds!",110, 300, 10)else@font.draw("Time: #{time_in_seconds}", 4, 2, 10)@font.draw("Score: #{@player.score}", 510, 2, 10)endendThis method changes what it draws depending on whether the level is over (the player reached the exit). If the game is still being played, the method uses Gosu’s font draw method to draw text on the upper corners of the screen. If the level is over, the method displays a Game Over message and the final score.
The first three number arguments of the @font.draw method calls are the x-, y-, and z-axis locations (no, this game isn’t 3D, but the z-axis is used for determining how items stack up when drawn). The other two numbers used in the Game Over message are used to scale up the size of the message. In this case, the text will be twice as high and twice as wide. - Add a helper for calculating the number of seconds that have gone by since the game started. Remember that you capture the current game time each pass through the Gosu game loop.
def time_in_seconds@time_now - @time_startend - Save your code before moving on.
Coding Level Methods
The Level class is the workhorse of the game and manages all the objects needed to display the playing board.
- Inside the level.rb file, replace the stubbed setup_level method with code that translates the string array description of the board with Tile objects:
def setup_level@level_data.each_with_index do |row_data, row|column = 0row_data.each_char do |cell_type|tile = Tile.new(@window, column, row, cell_type)# Change behavior depending on cell_typeif tile.is_start?@player.move_to(column, row)end@tiles.push(tile)column += 1endendendThis code uses a couple of new methods, but the concepts will be familiar. The each_with_index method is a looping method like the plain each method you’ve used before. Besides passing the next object to the block of code that follows, it also passes the index number of the object (its position within the array). You need to know what row number you’re on, and this is a handy way to get that info.
Inside of the outer loop, you need to also track the column number (remember the graph paper metaphor I used earlier?) as you look at each row’s string.
Once again, you use the each_char method of the string to loop through the characters that make up that row. Each specific character represents one of the types of tiles you want to build.
After creating the tile, you check to see if it’s the starting location for the player. If it is, you get the tile’s coordinates and move the player object to them.
Finally, you add the tile to the @tiles array using the array push method. Then you add one to the column count and start on the next character in the string.
- Replace the button_down method with code that moves the player if the move is valid:
def button_down(id)if level_over?returnendcolumn_delta = 0row_delta = 0First, check to see if the level is actually over. If the player reached the exit of the maze, you’ll ignore any other moves since the game is done. If the level isn’t over, you’ll calculate the direction of the movement. Setting the variables to zero means “no movement in that direction.”
- Find out if Gosu detected any player input:
if id == Gosu::KbLeftcolumn_delta = -1elsif id == Gosu::KbRightcolumn_delta = 1endif id == Gosu::KbUprow_delta = -1elsif id == Gosu::KbDownrow_delta = 1endIf the player pressed one of the arrow keys on her keyboard, Gosu will pass your method an ID of that button. You use constants provided by Gosu to see which button was pressed. The numbers for the movement are based on a bit of math. If the player wants to move left, the column she wants to move to is one less than the current one, so you use –1. If the player wants to move right, it’s one more (refer to Figure 10-2 if you’re still uncertain about the coordinates used in the project).
The same technique is used for moving up or down a row in the maze.
Delta is a word that programmers use to mean a change in something. Here I use it to mean a change in columns or rows. - Now calculate whether the move is valid. You don’t want the player to be able to move through walls after all! If the move is good, then move the player to the new location and get that location to see if the player reached the end of the maze or maybe found something to pick up:
if move_valid?(@player, column_delta, row_delta)@player.move_by(column_delta, row_delta)tile = get_tile(@player.column, @player.row)if tile.is_exit?@exit_reached = truetile.hide!else@player.pick_up(tile)endendendNote that if the player moves on to the exit tile, you remember that fact in an instance variable (and hide the exit tile so it looks better).
- Add the helper to find a tile by its coordinates:
def get_tile(column, row)if column < 0 || column >= @total_columns || row < 0 || row >= @total_rowsnilelse@tiles[row * @total_columns + column]endendThe condition has logic that checks to see if the requested coordinates are outside the grid. If the request isn’t correct, the method just returns nil. If the request is okay, then it calculates which tile to grab out of the @tiles array. The math is a little funky, but it’s what is required to find an item in a single array that is holding a grid like yours.
- Next, write a method to check for a valid move by the player:
def move_valid?(player, column_delta, row_delta)destination = get_tile(player.column + column_delta, player.row + row_delta)if destination && destination.tile_can_be_entered?trueelsefalseendendThis method calculates where the player wants to move by adding her move’s changes (deltas) to her current position and then using a helper method from the tile object to see if it is somewhere that can be moved into.
- Provide a helper that can be used by other code to see if the level is done (the player reached the exit):
def level_over?@exit_reachedend - Finally, update the draw method to actually display all the tiles and the player:
def draw@tiles.each do |tile|tile.drawend@player.drawend - Save your code. This class was probably the most complicated of the whole project. Take a breath before moving on!
Coding Tile Methods
The Tile class mostly just knows where it is located and how to draw itself. You’ll provide a number of helpers to also figure out what kind of tile it is.
- Go into the tile.rb file and replace the draw stub with the code for drawing a tile:
def drawif tile_is_drawn? && !hidden?x1 = @column * WIDTHy1 = @row * HEIGHTx2 = x1 + WIDTHy2 = y1x3 = x2y3 = y2 + HEIGHTx4 = x1y4 = y3c = color@@window.draw_quad(x1, y1, c, x2, y2, c, x3, y3, c, x4, y4, c, 2)x_center = x1 + (WIDTH / 2)x_text = x_center - @@font.text_width("#{@type}") / 2y_text = y1 + 4@@font.draw("#{@type}", x_text, y_text, 1)endendThis looks complicated, but it’s almost entirely code used to draw a square with text in the middle of it. First, it checks whether it should even be drawn. There are some tiles, like the empty tile type, that should be blank. Other tiles may be hidden, so the code skips those, too.
Otherwise, the Gosu library method draw_quad is used to render (draw or display) a rectangle. You need to give it the coordinates for each corner of the shape. x1 and y1 are the coordinates for the upper-left corner of the square, and the rest of the variables work their way around clockwise.
The text coordinate variables try to figure out the center of the tile and draw the letter used for its type.
Watch all the punctuation on this method — there are a lot of symbols, and it’s easy to make a typo. If you get errors later when testing the code, check that your code exactly matches. - Add a method to look up what color to draw based on the type of the tile:
def colorif is_player?@@colors[:red]elsif is_exit?@@colors[:green]elsif is_treasure?@@colors[:gold]else@@colors[:blue]endendThis is just a big condition statement to figure out which color to pick from the @@colors class variable’s hash structure.
- Code up the methods used to move a tile:
def move_to(column, row)@column = column@row = rowenddef move_by(column_delta, row_delta)move_to(@column + column_delta, @row + row_delta)endThe first method sets the tile’s instance variables to the exact location provided. The latter method does the calculation of where the tile should move based on the delta numbers.
- Create helper methods to test for the kind of tile:
def is_treasure?@type == TREASURE_TYPEenddef is_start?@type == START_TYPEenddef is_exit?@type == EXIT_TYPEenddef is_player?@type == PLAYER_TYPEenddef is_empty?@type == EMPTY_TYPE || @type == ' 'end - Also code up some helpers to set or check whether the tile is hidden:
def hidden?@hiddenenddef hide!@hidden = trueend - The code is going to need to make a tile empty when the player picks up an object like a treasure:
def make_empty@type = EMPTY_TYPEend - Finally, add some helpers that simplify conditions that need to test for several different common tile situations:
def tile_is_drawn?!is_empty? && !is_start?enddef tile_can_be_entered?is_empty? || is_start? || is_treasure? || is_exit?endIn many ways, these represent the “rules” of the game and how it allows movement and determines what to draw.
- As always, save your work!
Coding Player Methods
The Player class is a special kind of tile, so it can use all the code you just wrote for tiles to display itself. Player objects also need to track a score and figure out if they can pick up another tile like a treasure.
- Go back to the player.rb file and add the pickup functionality:
def pick_up(tile)if tile.is_treasure?@score += 1tile.make_emptyendendIf it’s a treasure tile, the player’s score will be updated and the old treasure tile will be cleared out.
- That’s it! Save it and test your project. If you get any errors in the terminal, go back and double-check that your code matches the instructions for writing each Ruby class above. It’s super easy to make typos. If it all works, the game should look like it does in Figure 10-4. Try moving around with the arrow keys and picking up some treasures. How fast can you collect them all and get to the green exit?
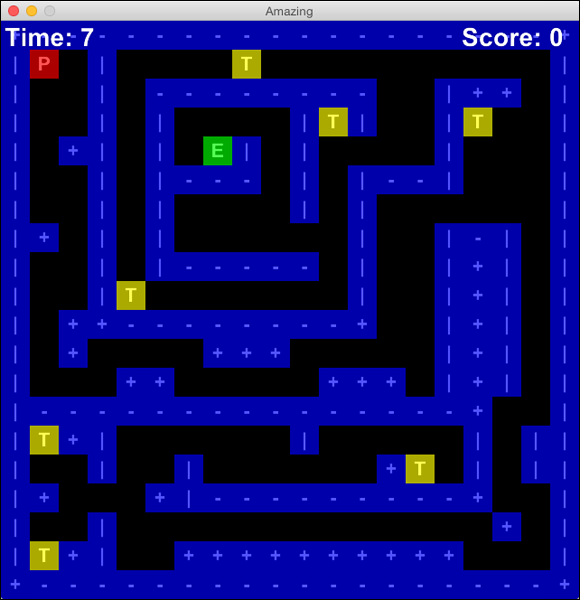
Figure 10-4: The game is alive!
Trying Some Experiments
When you get the hang of even the most basic features of Gosu, your imagination is the limit for the kinds of games and graphical programs you may create. The Ruby community has all kinds of free and open-source gems for pretty much any kind of coding need. Gosu is a great example of the kinds of code people create for the benefit of all.
There are many things you can try with the A-maze-ing code. Give a few a try:
- The maze for the level object is described with an array of strings. Try making your own mazes. If you want to keep them around, just define different constant names and swap in which constant you pass to the initializer.
- What if you wanted to add new kinds of tiles? Perhaps there are different types of treasures? Create a couple of new ones and use different colors and different numbers of points.
- What if there were a time limit to how long you could explore the maze? Try setting a limit, and if the time runs out, have the player lose his points.
- How would you make the maze window bigger and the mazes more complicated?
- What if the game had more than one level?