In the previous chapter, we added our SenseHat which contains six types of sensors, and we made use of the humidity, barometric, and joystick sensors. This allowed us to have a more intelligent Pi. In this section, we are going to add an additional peripheral, the camera. The camera is probably the most important peripheral when writing an application whose main feature is video and still capture.
But what we want to capture is still a question; when dealing with most aftermarket solutions, they tend to focus on a few approaches of the type of video content to capture:
1.
Capture all the video. Everything the camera sees is captured to video and then stored locally, in the cloud, or on a network file system. This allows the user to have maximum set of video. Oftentimes, the video stored locally will get rotated out; in addition, cloud service providers also rotate the video content out. Although if you are storing video to S3, the cost for storage these days is not too pricey; however, you will be paying quite a bit in the data transfer of uncompressed video files. And sometimes that isn’t worth it; it often depends on what you want to capture. Oftentimes, this cost can be too much and you just want to capture stills. Your standard camera will capture 24–30 frames per second (FPS). This makes for nice smooth motion, but we don’t always need that and are OK just capturing 1 frame per second. This won’t look smooth; nothing you’d necessarily want to post as a live video, but if your camera is there to just record someone breaking in or monitoring access, it will give you everything you need. This saves on processing time as well as on upload and storage cost.
2.
Capture video when there is motion. Another solution that is popular is to capture motion only. This solution is used to not only minimize storage and transport cost but also to minimize the time someone is needing to review video for. With this solution for a monitoring system, you will only have to review when there was motion. In addition, one can also capture stills on a slower frame rate to preserve space even more.
Both methods can be used in conjunction with facial recognition to enhance the videos – to know when there is a person at the location as well as to perhaps know who the person is. These two methods or combinations of those (like capture stills unless there is active movement and then start capturing full frames) can create quite a dynamic set of use for video in our application. In addition, you can combine Pis, each with cameras to get more complete pictures of an area.
Goals
There is a plethora of use cases that can be applied to using camera capture and OpenCV in particular. If I covered all the cases the code and the chapter could go on forever, and alas we still have some other topics to cover. But I wanted to make sure the reader had all the tools needed to create as dynamic as an application as they want when writing on their own. To that end the goals for this chapter is to add the camera to our Raspberry Pi that will capture all video and apply facial detection to pictures. In addition it will capture a jpeg image if a face is detected at a rate of once every 5 minutes. In detail our goals are :
1.
Installing the Raspberry Pi Camera
2.
Turning on the camera and capturing video
3.
Running face detection on the video
4.
Saving the video to a new file and intervals
5.
Saving an image file on facial detection
Facial Recognition
Facial recognition has become extremely popular in day-to-day basis, from unlocking your phones to tracking who comes to your door with a Nest/Ring camera. Facial detection can even help you track your employees’ whereabouts. In addition, it can simply be used by your camera to determine whether the motion detected was a car going by or a person walking. This latter part generally being more useful.
Facial detection in modern days is usually done two different ways. The first way is through machine learning. The machine learning can either use trained or pre-trained networks to detect user faces. These use neural networks to learn how to detect ones face and require the images fed into the network. TensorFlow is the most standard library used for network training and running, and the tensor team does have rust crate for use. However, that would at least need an entire chapter if not more dedicated to it as neural networks is a quite complex model to give any justice to.
Instead we will use an older concept that still uses some training, Open Computer Vision (OpenCV). OpenCV can actually work in conjunction with deep learning as well, but is also designed to interact with the camera directly and won’t require us to have to use a different crates to read from the camera first. We can do it all in one. Thus for the book we are going to choose to use OpenCV for our camera capture, detection, and saving of video and images.
Installation
There are many different cameras for the Pi you can purchase, from the very basic to the ones that have night vision. And of course, they all range in price. The one we are using for the book and had you buy in Chapter 1 is a 5 megapixel very basic camera that should cost around $10 (https://amzn.com/B07QNSJ32M). Regardless of what you buy, as long as it has a 15-pin MIPI Camera Serial Interface (CSI) connector, you will be able to connect it to the board. Each board has one 15-pin connector specifically for cameras.
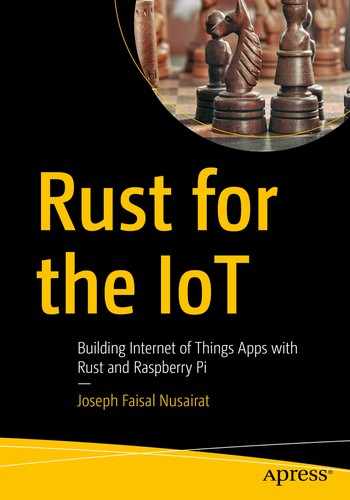
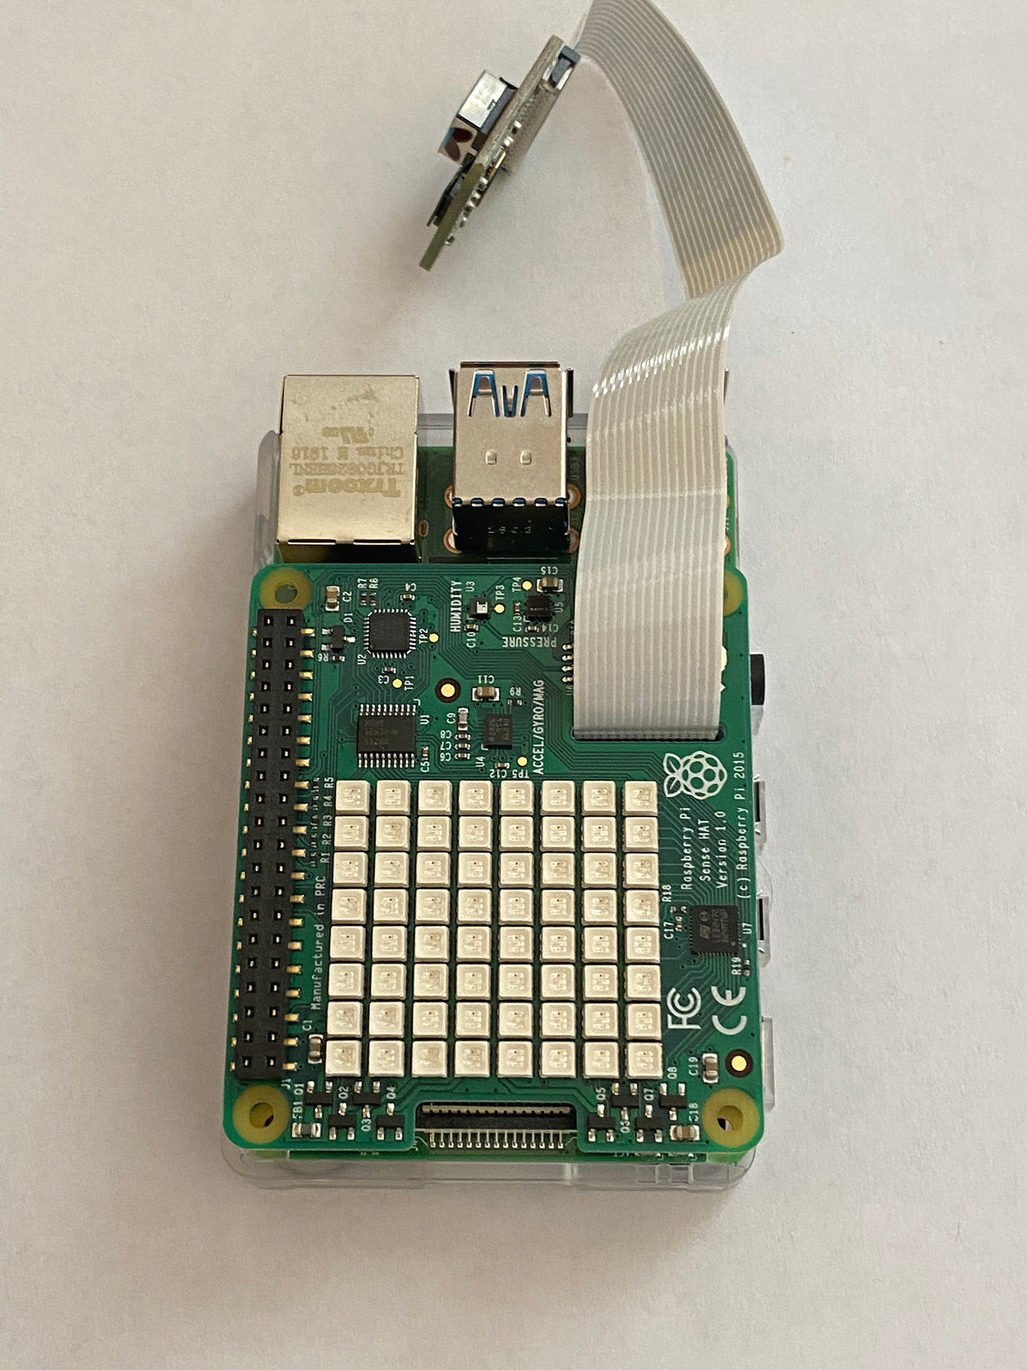
To start with, power down the Pi, and carefully detach your SenseHAT. Set it aside for now and let’s find the connector for the camera. If you look at the board closest to the Ethernet ports, you will notice a cable attachment, as shown in Figure 10-1.
Figure 10-1
Showing the board where the connector is and connected all the way
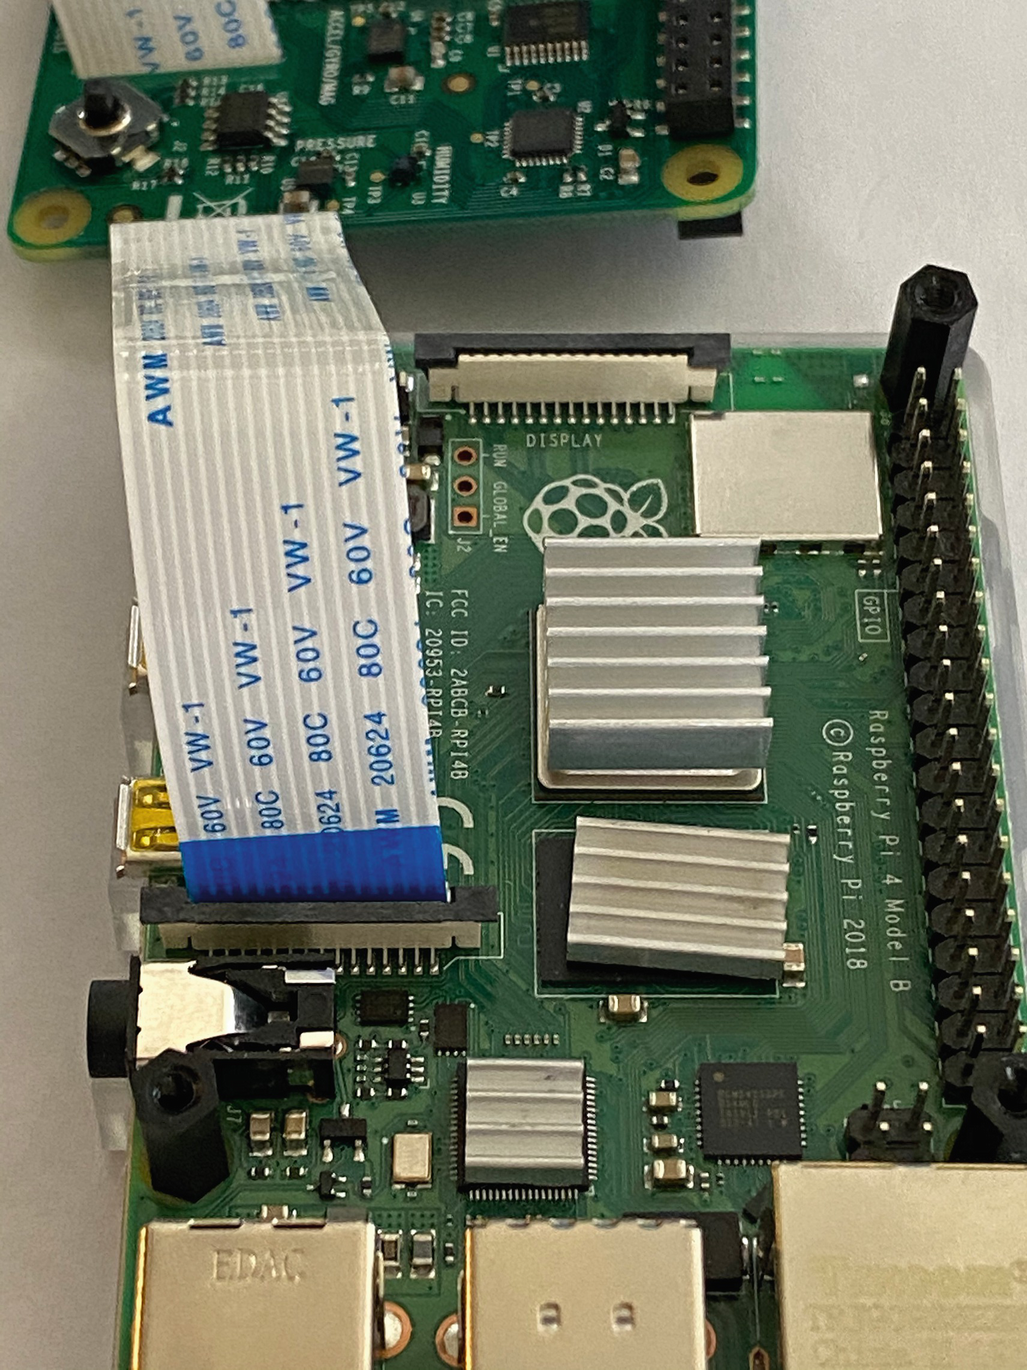
You should be able to pull up on the connector; this will allow a separation that you can then fit the cable through. Now you can insert the ribbon cable, and it is very important to do this with the correct side; it only goes in one way. The ribbon without the prongs will face the Ethernet port (on mine, it’s the blue side). You need to do this the correct way; if not, the camera will not work at all. The ribbon connected properly will look like Figure 10-2.
Figure 10-2
Camera connected to the board
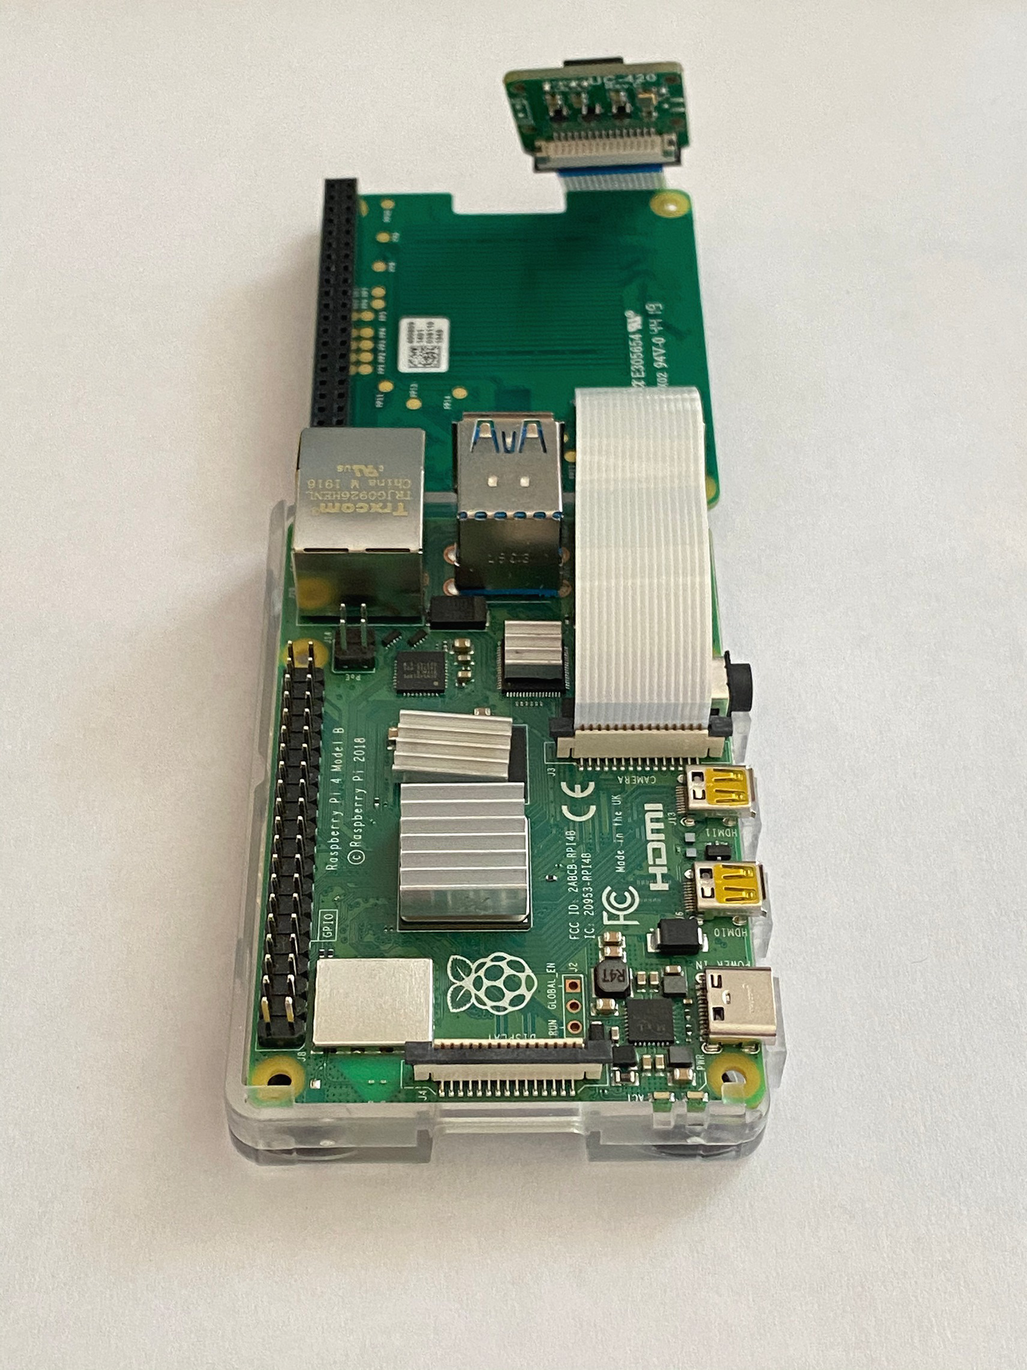
The flip side with the connections will be toward the USB-C ports, and you can see that in Figure 10-3.
Figure 10-3
Camera connected to the board
Now you can complete it by putting the SenseHat back on top roping the cable through like in Figure 10-4.
Figure 10-4
Connector pulled through with SenseHat on
The camera is now fully connected, but one final step in order for the Pi to recognize the camera is we need to update the config.txt to tell it to turn on the camera. Remember, this file is on the SD card itself, and you will have to take the card out and plug in to your own computer to update config.txt on the card. You will add the line start_x=1 like in Listing 10-1 to your config.txt. You will have to take out the disk from your Pi in order to have access to the file when mounted to your other computer.
start_x=1
Listing 10-1
Enable the camera in the /boot/config.txt on the Raspberry Pi
If you want to quickly test to make sure the camera is working, you can log onto your Pi and run raspistill -o testshot.jpg; this will take an image and save the still to testshot.jpg, from their secure copy (via scp) it back to your computer, and you can check it out. Now that we have the camera installed on the Raspberry Pi, we can start coding against it. But before we actually dive into the code, we will need to prep our build system to be able to compile OpenCV libraries for the Raspberry Pi. In order to accomplish this, we are going to switch gears and use the cross crate to build the application.
Cross
In the previous chapters, we have been performing the cross compilation for the Pi creating a MUSL capable application. This tends to work well for testing or building applications where the underlying system is not under your control. MUSL gives the user greater compatibility and uses static linking of libraries to build and run the application. But there is another option in our cross compiling ways, and that is glibc which has been around for decades has tight controls into the x86 world. You do have to have a tighter control of the operating system to use glibc; however, since we are going to create an installable ISO in a few chapters that contains the OS and the application, we will have that tight control needed. Using the gnu compilers might also make sense if you are on a Linux system right now as well. You can perform this changing your target right now if you want to compile the application (of course currently, it might fail since all the necessary libraries aren’t installed).
This notion of the library installation keeps coming back to haunt us. And in this chapter, we will be adding OpenCV libraries, which means we will need even more libraries installed to compile the application, and their musl/gnu equivalents to cross compile with – if only there was an easier way.
Luckily, there is. We are going to use a docker container that has all of our necessary libraries in it to be able to compile our application. Docker is a great solution, and we will use it later as well when creating our custom ISO image in the final chapter. In the previous chapters, we used a combination of installs and configurations to get the application to be cross compiled. This works, but also means if you are on a team of developers, you will have to make sure they all follow the same instructions; in addition, if they are on different computers, it adds to the confusion. Using the local builds worked well earlier on, but using docker to cross compile will help us create more easily reproducible builds and allow us to properly run the builds in a build system later on (we won’t cover that in this book but is usually part of the process).
If we used docker on our own, it would pose a bit of a challenge. While we’d have to build the image with our code being copied and compiled. Once it’s built, we’d then need to connect to a running container of that image to retrieve compiled artifact off and then stop the image being run. This is very messy; luckily, there is a crate that wraps all this logic into a nice neat crate to use, cross.
Rust Embedded – Cross Crate
The rust-embedded project on GitHub is a plethora of great libraries and tutorials for doing embedded application development. The cross crate is specifically designed to help us cross compile the application for multiple systems (https://github.com/rust-embedded/cross). Cross will allow us to cross compile in docker images with the output of the target being stored on the local file system. And while the first run of the cross compiler can be slow (in order to pull down docker images), subsequent runs are very fast. The beauty of cross is it gives us all the benefits of cross compiling and adding dependent libraries without the headache of having to add them explicitly to our local system and being also forced to include the cross compiler libraries.
Running cross is easy; you will need to have docker installed, but we already have it installed in previous chapters. And then in Listing 10-2, we will install the cross binary which is used for cross compiling.
➜ cargo install cross
Updating crates.io index
Package `cross v0.1.16` installed,
Listing 10-2
Installing cross
Using Cross
Cross is almost too easy to use; it essentially uses the same commands as the Cargo CLI works with. In previous examples, we built with cargo build --target armv7-unknown-linux-musleabihf; using cross, we would simply build with cross build --target armv7-unknown-linux-musleabihf. The only exception will be when it starts up the first time, you will see the docker images getting downloaded. The same targets you have in your normal cargo build you will also have in cross. In addition, you have a new file, the Cross.toml, for more configurations. Cross.toml can be used to specify environmental variables you want to pass in from your system to the underlying docker image. In Listing 10-3, we pass through the RUST_BACKTRACE and a custom POSTGRES_URL to the image. (Note: This is an example, and we don’t need this for our application.)
[build.env]
passthrough = [
"RUST_BACKTRACE",
"POSTGRES_URL",
]
Listing 10-3
Environmental variables being passed in via the Cross.toml file
Under the covers, it has a docker image for each target defined and thus a corresponding Dockerfile for each image. We aren’t going to review the contents of those files, but if you want to, here are two locations to look at:
https://github.com/rust-embedded/cross/tree/master/docker – This is the directory that contains the source files for those docker images. If you dive into a few of them, you will see the base image they use (often Ubuntu) and what libraries they are adding. There is often quite a bit of overlap between the images, and are often bringing in the same libraries but for different targets.
The tag directory is important to pay attention to, because that will be the image that is used when targeting the build.
Customizing
However, all of this wouldn’t be very helpful if we couldn’t add our own library dependencies. And we can do exactly that with the application. Inside the Cross.toml we defined earlier, you can overwrite the docker image for a custom docker image to target your application. You will add a target.{TARGET_NAME} field along with the image inside the toml file. In Listing 10-4, we overwrite the target for armv7-unknown-linux-gnueabihf with a custom image that we will build shortly that will include the OpenCV libraries.
# Custom Library with Authenticator in it
[target.armv7-unknown-linux-gnueabihf]
image = "opencvs-auth:musl"
Listing 10-4
Overwrites the target for armv7-unknown-linux-gnueabihf, in Cross.toml file
This creates our custom image. Now there is no need to create your own docker file with Rust and cargo installed. The easiest is to pick an image we already want to use and use that as our base image. Since this chapter is about the camera and using OpenCV, those are the library files we need to compile with the application. For us, our base image will be a variant of rustembedded/armv7-unknown-linux-gnueabihf. The out-of-the-box Gnu library uses Ubuntu as the base image, but I wanted to use Debian instead so I took the base image, slightly tweaked it, and pushed it to docker hub. The docker hub location of this image is at https://hub.docker.com/repository/docker/nusairat/images/general.
We will use this as our base image; just remember it’s just a branch of the armv7 gnu build. Let’s go through and start building our image for the Raspberry Pi master app. Our goal is to have this work on a 32-bit Arm7 operating system; to that end, you will notice we pull the arm hard float armhf version of libraries as opposed to the arm64. I would advise not to be tempted to use the 64 bit since 64-bit support on Raspberry Pis is not full featured or that good. Also much of the following set of Docker code we are creating is based off of the work done on Paul’s blog that can be found here: https://solarianprogrammer.com/2018/12/18/cross-compile-opencv-raspberry-pi-raspbian/. He also has instructions how to cross compile OpenCV for a Pi Zero. I wanted to make sure to give the proper credit; there were a few nuances (like some re-namings) and some of the extra library installs that I would have spent far too long figuring out without it.
The entire file is located in the rasp-pi-app-master folder, but let’s dive into the individual parts. In Listing 10-5, we have our FROM tag from the custom GNU Debian image I mentioned earlier. This is how we start every Dockerfile.
FROM nusairat/cross:arm7-gnu-debian
# FROM nusairat/cross:arm7-musl-debian
Listing 10-5
From for our application, in the Dockerfile
From there in Listing 10-6, we install the ArmHf architecture needed to compile and use against an ArmHf OS and device. This will be needed because the libraries we pull in will need to be compiled to ArmHf since that is our target.
RUN dpkg --add-architecture armhf
RUN apt-get update && apt-get install -y qemu-user-static
Listing 10-6
Install the binaries to compile the ArmHf architecture, in the Dockerfile
We then install the necessary Python libraries in Listing 10-7 to compile the application. While we won’t be using Python directly, it was needed by the underlying OpenCV crate to interface with the OpenCV libraries.
RUN apt-get install -y python3-dev
RUN apt-get install -y python3-numpy
RUN apt-get install -y python-dev
RUN apt-get install -y python-numpy
#We'll also need libpython for the armhf architecture:
RUN apt-get install -y libpython2-dev:armhf
RUN apt-get install -y libpython3-dev:armhf
Listing 10-7
Install the python binaries, in the Dockerfile
In addition, there are also misc libraries used for image manipulations and codecs that OpenCV calls in order to do perform its processing on videos; we will install those next in Listing 10-8.
RUN apt-get install -y libtiff-dev:armhf zlib1g-dev:armhf
RUN apt-get install -y libjpeg-dev:armhf libpng-dev:armhf
RUN apt-get install -y libavcodec-dev:armhf libavformat-dev:armhf libswscale-dev:armhf libv4l-dev:armhf
RUN apt-get install -y libxvidcore-dev:armhf libx264-dev:armhf
# install the default cross compilers from Debian which can be used to create armhf binaries for Raspberry Pi:
RUN apt-get install -y crossbuild-essential-armhf
RUN apt-get install -y gfortran-arm-linux-gnueabihf
# Install CMAKe etc
RUN apt-get install -y cmake git pkg-config wget
Listing 10-8
Necessary image manipulations and codecs, in the Dockerfile
Finally, we get to downloading the OpenCV source code and preparing it for compilation. We use CMAKE to set the options we want for the OpenCV. I have included mostly default options as well as installing the necessary libraries. The OPENCV_GENERATE_PKGCONFIG is necessary to work with the OpenCV crate. There are quite a few steps in this process, so in Listing 10-9, I break down the various steps.
The download and OpenCV install, in the Dockerfile
① Download the OpenCV 4.1.0 archive and untar the file.
② Create necessary environmental variables for build and directories.
③ Run cmake based on our configurations that include python and the necessary libraries.
④ Compile the OpenCV library (this will take a bit of time).
Lastly, in Listing 10-10, we do some final copying of files to the right location as well as copying in the OpenCV package config file. This just defines the library directories and lib startup flags for the application. This is custom created and based partially on the libraries we installed earlier. I haven’t included it here only because the one line is 814 characters long and is just listing out the libraries.
# Change the name since it was mislabeled by the installer
①RUN cd /opt/opencv-4.1.0/lib/python3.7/dist-packages/cv2/python-3.7/
&& cp cv2.cpython-37m-x86_64-linux-gnu.so cv2.so
②## Copy opencv-4.1.0-armhf.tar.bz2 and opencv.pc from your home folder to your Raspberry Pi.
RUN cd /opt
&& tar -cjvf ~/opencv-4.1.0-armhf.tar.bz2 opencv-4.1.0
③## Creates a Pkg-config settings file
WORKDIR /root
# Copy in the OPENCV from our file system
COPY opencv.pc opencv.pc
# Move the opencv.pc we copied in
RUN mv ~/opencv.pc /usr/lib/arm-linux-gnueabihf/pkgconfig
Defining the finally copying of the files, in the Dockerfile
① Renamed since the installer doesn’t give it the correct name.
② Copies the built OpenCV to the /opt directory.
③ Copies our local version of the package config.
④ Sets the environmental variables needed for the Rust build.
This will finish up our Dockerfile and includes everything needed to compile OpenCV as well as allows us to cross compile from our PC/Mac to a 32-bit Raspberry Pi system. However, before we can use it with cross, we need to build the docker image. In Listing 10-11, we build the docker image, tagging it as opencvs-auth:musl (the same tag we referenced earlier in the Cross.toml).
➜ docker build -t opencvs-auth:musl .
Sending build context to Docker daemon 1.741GB
Step 1/36 : FROM armv7-unknown-linux-musleabihf:debian
---> 33af951b181a
Step 2/36 : RUN dpkg --add-architecture armhf
---> Using cache
---> 661ffd2fde76
...
Step 36/36 : ENV PKG_CONFIG_ALLOW_CROSS 1
---> Running in f7b7742b4571
Removing intermediate container f7b7742b4571
---> 58e0118e604e
Successfully built 58e0118e604e
Successfully tagged opencvs-auth:musl
Listing 10-11
Docker build for our custom image used to create an environment to build our application
Now we are able to use the image in our cross build. In Listing 10-12, we run cross targeting the armv7-unknown-linux-gnueabihf and assuming you did everything right it should cross compile.
Finished dev [unoptimized + debuginfo] target(s) in 7m 19s
Listing 10-12
Cross compiling build using the image we created previously
The result of the cross compile outputs to the local directory structure just like if you used a standard cargo build. You can view the directory structure of the result in Listing 10-13.
➜ ls -al target/armv7-unknown-linux-gnueabihf/debug
total 246576
drwxr-xr-x 10 jnusairat 334330370 320 Feb 11 21:50 .
drwxr-xr-x 3 jnusairat 334330370 96 Feb 11 21:42 ..
-rw-r--r-- 1 jnusairat 334330370 0 Feb 11 21:42 .cargo-lock
drwxr-xr-x 161 jnusairat 334330370 5152 Feb 11 21:42 .fingerprint
drwxr-xr-x 27 jnusairat 334330370 864 Feb 11 21:42 build
drwxr-xr-x 403 jnusairat 334330370 12896 Feb 11 21:50 deps
drwxr-xr-x 2 jnusairat 334330370 64 Feb 11 21:42 examples
drwxr-xr-x 3 jnusairat 334330370 96 Feb 11 21:48 incremental
-rwxr-xr-x 2 jnusairat 334330370 113688176 Feb 11 21:50 rasp-app
-rw-r--r-- 1 jnusairat 334330370 553 Feb 11 21:50 rasp-app.d
Listing 10-13
View the output of our build
The final result produces a file that is 113 MB (if you have the OpenCV crate configured in your application). We don’t have that quite yet, but I wanted us to have the compiling of the application ready, so when we start building in the next section, you can also start testing. Since we are ready, let’s not waste time and let’s start building the application.
Open Computer Vision
Before we dive into coding, let’s expand on our conversation about what OpenCV is. OpenCV was originally designed by Intel in the 1990s, released in 1999, to help with real-time computer vision. Computer vision is more than just grabbing computer frames from a computer and recording to file or displaying them on another screen. The purpose is to allow the processing and analyzing of the video the camera records. In the beginning, this was mainly used to analyze objects and extract edges, lines, and 3D modelling from the video. In essence, the computer would be able to analyze and tell the user what it saw. The computer could describe the shapes, colors, and so on. The application of this is useful for monitoring, for assisting the visually impaired, and even for defense. Over the decades, CV has grown to make use of deep learning and other advanced algorithms to detect faces and the world around you. Cameras have become a very powerful tool because they are now relatively cheap, meaning you can easily have multiple and can tell quite a bit about the world around you. For example, Tesla uses only cameras around the car to run its self-driving system.
While we won’t be creating anything near as advance as that, the potential applications for an OpenCV system on your Raspberry Pi are endless with the right amount of coding, processing, and storage. This gives us the gateway to create a powerful application with less than $100 worth of hardware.
Installing OpenCV
We previously installed OpenCV for our Docker build but not for our local. While we won’t need this to compile the application for the Pi, it’s useful for testing purposes, and since OpenCV isn’t platform dependent, we can use this code locally and on our Pi. When running locally, it will use your computers’ built-in camera (assuming you have one). The easiest installation for OSX is to use brew; you can perform that install with brew install opencv. There are quite a bit of various instructions on how to install OpenCV on other platforms; you can search the https://docs.opencv.org/ site to find the instructions for whichever platform you are using.
Now let’s add OpenCV to our application’s Cargo.toml. The Rust crate can be used for any version of OpenCV above 3.2; we will be targeting the most recent, OpenCV 4.x; as such in Listing 10-14, we include that feature into our build.
# For writing out EXIF data
#rexiv2 = "0.9.0"
[dependencies.opencv]
version = "0.29"
default-features = false
features = [
"opencv-4",
"buildtime-bindgen",
]
Listing 10-14
The OpenCV crate with additional features, in Cargo.toml
In addition to the OpenCV 4 crate, we are including the buildtime-bindgen feature. This module is only needed for development when building on Windows or OSX; once you are ready to deploy the Pi, it can be removed or at least commented out (although it won’t hurt anything if it’s kept in).
Running the Application
Let’s review what we are planning to build with the OpenCV system; our application won’t be too advanced, but it’s also not the most basic either. This application will do the following things:
Capture the video from an attached camera.
Display to a local screen (for development).
Run facial recognition on the screen.
Record the video in chunks.
Save an image when a face is detected at a given interval.
Show the current date and time on the recorded video.
All of these will give a breath of information on how to create your one camera capturing application. The code is going to be mostly in one function, but we will break off the discussion into usable chunks; you can always refer to the source code to see the entire listing.
Most of the code we are going to be writing will be in one file, the src/camera/video.rs file. In Listing 10-15, we have the imports, mostly importing from the opencv crate.
use std::{thread, time::Duration};
use opencv::{
core,
highgui,
imgproc,
objdetect,
prelude::*,
types,
videoio,
};
use opencv::videoio::{VideoCapture, VideoWriter};
use opencv::objdetect::CascadeClassifier;
use opencv::calib3d::UndistortTypes;
Listing 10-15
Imports for our video capturing, in src/camera/video.rs
Much of the application will be in the run_face_detect function where we will pass in a boolean which is used to decide whether we should open up a window to see what we are recording. This is useful for debugging locally, but we do not want it running on the Raspberry Pi since we have no attached devices to view. In Listing 10-16, we have this outline.
The skeleton outline of our function, in src/camera/video.rs
The loop will be where we continuously run the video capture and processing; before we do that, we need to get into some setup that occurs before the loop. We will have to initialize a few things:
The window to display the output to
The camera to capture from
Initialization of our writers to capture the video to
Initialization of our face detection
We will tackle each of these in the following sections so part of the code will reside before the loop and the others inside the loop; I’ll call it out where the code goes when need be.
Capturing the Video
Let’s start with capturing the content of the video camera; this will require us having OpenCV connect to the camera and reading content from it. In Listing 10-17, we capture the content from the index of the capture devices. The default is 0, and since we only have one camera we are capturing from, we can set it there. The next parameter is the reader implementation; this can be DSHOW, MSFMF, or V4L, but again the default that we are using is ANY.
let mut cam = videoio::VideoCapture::new_with_backend(0, videoio::CAP_ANY)?;
// 0 is the default camera
// Open the camera
let opened = cam.is_opened()?;
if !opened {
panic!("Unable to open default camera!");
}
Listing 10-17
The camera initialization, in src/camera/video.rs
Then inside the loop, we will capture the video frame by frame. After you capture each frame, you could write it back to a file, or you could do post processing on it; it’s really up to the user at that point (we will do both in a bit). In Listing 10-18, we capture from the camera frame by frame.
let mut frame = Mat::default()?;
cam.read(&mut frame)?;
// Sleeps in case there is no screen coming
if frame.empty().unwrap() {
debug!("frame empty? camera not initialized?");
thread::sleep(Duration::from_secs(50));
continue;
}
Listing 10-18
Capturing the video content onto a frame, in src/camera/video.rs
You will notice we check if that frame has any width; if there is none, we wait for 50 seconds and retry. The reason is if there was no width, that would be because the camera hasn’t started up or some IO operation is temporally blocking it, giving it that delay gives the system time to have the camera ready. We will manipulate this frame in a bit.
Displaying to the Camera
Next up, let’s add in the camera monitor. This is not necessary to have unless we want to watch the output of the video recording during debugging; hence, why we will wrap all these calls in an if flag? Ideally, you would turn this on via command-line arguments defaulting to false. The display is all driven by the opencv::highgui libraries. In Listing 10-19, we initialize the call to that library.
let window = "video capture";
if show_window {
highgui::named_window(window, 1)?;
}
Listing 10-19
Initializing our call to open a window to capture the video, in src/camera/video.rs
And then inside the loop we pass the frame to the window that was created in Listing 10-20.
if show_window {
highgui::imshow(window, &frame)?;
// can be used for a bit of a delay
if highgui::wait_key(10)? > 0 {
break;
}
}
Listing 10-20
Show the window of the video captured, in src/camera/video.rs
At this point, we have the camera capturing out video and then returning it to our monitor; however, we still have not performed any processing of the video.
Capturing the Facial Recognition
Let’s change that now and apply some processing to the video frames that we are receiving so that we can detect the people’s faces. We will use OpenCV and Haar Cascades to not only detect whether or not the display on the screen is a face but also where those faces are and to put a rectangle around them. This is often also done with deep learning; with deep learning, you have to perform the learning part of it as well, and this actually requires quite a bit of work in not only determining what you are looking for but the tolerance of differences in the patterns. We don’t really have time for it in this book to cover training, but we do have time to cover how to use a pre-trained cascade algorithm. And to that extent, we are going to use pre-trained face detection algorithms to apply to our frames in order to detect faces.
While the science of face detection is relatively new, the math we use behind it is over a century old. Neural networks were first proposed in 1873 and 1890 by Alexander Bain and William James, respectively. They produced the theoretical basis on how neurons fired together and much of the basis for neural networks today. There are a variety of neural networks from temporal neural networks to convolution networks. Convolution neural networks use mathematical operations to produce the output of the neural network. For our facial detection, we will be using something similar; we will be using what is called Haar feature to perform the facial detection. The Haar feature is just like a kernel in convolution neural networks, except a Haar feature is manually trained and calculated.
Haar sequences were first theorized by the Hungarian mathematician Alfred Haar in 1909. He created an orthonormal system for the space between square functions. These concepts were then brought together by Paul Viola and Michael Jones in there 2001 paper "Rapid Object Detection Using a Boosted Cascade of Simple Features". The basis of the Haar features is to use the black and white (or gray-scale) differences between horizontal and vertical lines to calculate patterns.
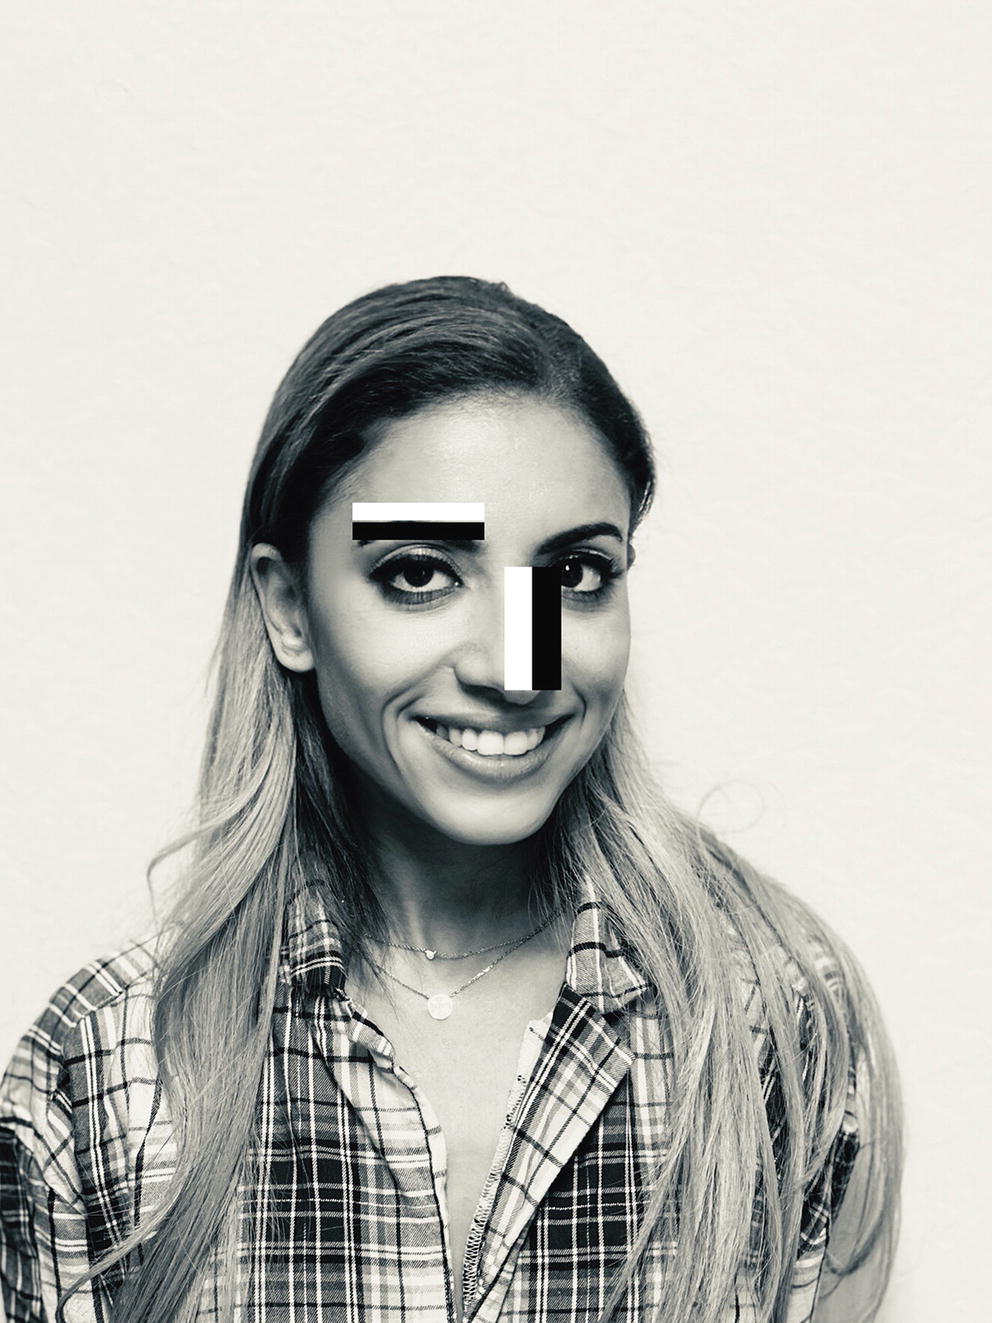
If you think about your face and the shading of it, we have natural horizontal and vertical lines in it. You essentially have three different types of features. Your edge features are where one side is dark and the other is light; you can think of your eyebrows or nose as one. You also have line features where you have one side light, middle dark, and next light; your lips closed would be an example. All of these features work vertically or horizontally. And you can even have four rectangle features as well. What this reduction does is it reduces all our calculations to looking at most four pixels (edges have 2, lines 3, rectangles 4). Take our beautiful model in Figure 10-5 also known as my wife. This is a gray-scaled image of her.
Figure 10-5
Shows the original picture
Now let’s apply some lines drawn to quite a few pixels based on edge and line features; the white will be the lighter and the black will represent the darker area in Figure 10-6.
Figure 10-6
Shows the original picture with the edge/line features
Now in a pure black and white image, these would be simply zeroes or ones. However, people’s faces aren’t generally distinguishable black and white so we use a gray scale. In a 24x24 pixel window, we can receive over 160,000 features; this is quite a bit to process and wouldn’t be usable in real time. But with the Viola-Jones algorithm, we can break it down to 6000 features; you can even have 200 features for 95% accuracy. This is because most videos you take the face is not the major component that is coming into play; much of it is external noise that can be eliminated. The way they went about making this optimization is by running the 6000+ features over 38 stages. At each stage, if nothing is detected, then the classifier moves on to another part of the image. So to find a face in the preceding image, you may see it go through various parts of the frame without finding a face. Interestingly to note, the first five stages look through 111 features, broken up as 1-10-25-25-50 features at each stage. The idea is to fail fast on the majority of the areas where there would be blank space. This optimization is what makes the classifiers very fast and able to run in real time. And this is the basis for the code we will be writing next to create the facial detection.1
Using Trained Cascades
Using this logic, you can create not only facial recognition but even emotion recognition or even determine if someone is smiling or not. Now all of these are based on the calculation of patterns. Like we stated earlier, these are manually trained algorithms, and many of these algorithms have been published for general public consumption. OpenCV publishes a list of Haar Cascades that we we can use for our applications; they are published at https://github.com/opencv/opencv/tree/master/data/haarcascades. For our application, we will be using the haarcascade_frontalface_alt.xml; you should download this to our local file system. In Listing 10-21, we load up this classifier in order to apply it to our face.
if !std::path::Path::new(&haar_cascade_file).exists() { panic!("Haar Cascade is needed!"); }
let mut face = objdetect::CascadeClassifier::new(&haar_cascade_file)?;
Listing 10-21
Loading up the Haar Cascade into our application, in src/camera/video.rs
Running the Cascade
Now that we have the cascade, we just need to apply it to our classifier. Remember even the inexpensive camera we installed is in color, and as we just went over, the classifier uses gray scale for its variant calculations. So before we run the classifier on the frame, we are going to need to convert the frame to gray scale. In addition, high-resolution cameras will have more pixels, and while there is potentially greater accuracy, this will take the face detector longer to process each image. Therefore, in addition to converting the image to gray scale, we are going to reduce the size of the frame we process on. In Listing 10-22, we convert to gray scale and then resize the image passing in the gray-scale color.
let mut gray_frame = Mat::default()?; ①
imgproc::cvt_color(
&frame,
&mut gray_frame,
imgproc::COLOR_BGR2GRAY,
0
)?;
// Resizes an image.
// The function resize resizes the image src down to or up to the specified size.
let mut reduced = Mat::default()?; ②
imgproc::resize(
&gray_frame,
&mut reduced,
core::Size {
width: 0,
height: 0
},
0.25f64, ③
0.25f64,
imgproc::INTER_LINEAR
)?;
Listing 10-22
Converting the frame to gray scale and resizing the frame, in src/camera/video.rs
① Converts the frame to a gray scale.
② Reduces the gray frame to smaller more manageable size.
③ The scale factor to use; here we pass in .25 so we reduce the image by 3/4.
The reduced variable will now contain our reduced gray-scale image. We can now take the face object we created based on the Haar Cascade and run the face detection matcher on it. If a match is found, it will return a set of rectangle boxes for each face it matches in the frame. The set will not only tell us if there is a face on the frame but will also tell us where the face is. This will allow us to dynamically create a rectangle bounding box that will be visible on the application. In Listing 10-23, we apply the bounding box onto the original full-size color frame using the coordinates found.
let mut faces = types::VectorOfRect::new();
face.detect_multi_scale( ①
&reduced,
&mut faces,
1.1,
2,
objdetect::CASCADE_SCALE_IMAGE,
core::Size {
width: 30,
height: 30
},
core::Size {
width: 0,
height: 0
}
)?;
Listing 10-23
Bounding box of the face applied to the frame, in src/camera/video.rs
Run the face detection on the frame detecting faces of different sizes returning a list of rectangles for it.
Calculate the squared coordinates multiplying the coordinates by a factor of 4 since we reduced the previous by a 1/4.
Draw a rectangle on the original frame.
We now have a working face detector, and in fact, if you run this with the show_window enabled, you will see the face bounding box dynamically appear and will follow your face around the camera. You can go ahead and move the face around to see the limits of the Haar Cascade (it’s not very good at side face detection).
Saving the Video Content
We have the camera now capturing and running facial recognition software on the image, but beyond that, it doesn’t do much with the video but just allows us to watch it in real time. In addition, we created an entire backend whose main purpose is to capture video. So let’s give the backend video something to capture. In this section, we will save the video. This part can get a bit tricky to get the capture right. You need to make sure the frames you are capturing are getting output to the same rate you are writing. There is also a delay because you aren’t just getting the video you capture and immediately dumping it into the new file. We will do our best to make this smooth, although I’ve noticed some delay in using it as well. However, OpenCV comes with all the libraries to create a new video, so we won’t have to rely on anything else to save the captured video. In order to do so, we need to know a few things about the video we want to create:
Height
Width
Frames per second
Codec
The first three are fairly easy; since we aren’t applying any lasting resize to the frame, we will just use the height and width of the video that we are receiving. The frames per second we also will retrieve from the video we are reading from, but then apply a factor to it to make the timing appear smoother. You may have to set that factor yourself. In Listing 10-24, we use these three factors to create the size and fps variables.
let width = cam.get(videoio::CAP_PROP_FRAME_WIDTH).unwrap();
let height = cam.get(videoio::CAP_PROP_FRAME_HEIGHT).unwrap();
let fps = cam.get(videoio::CAP_PROP_FPS).unwrap() * FPS_FACTOR;
info!("Camera Settings : {:?} x {:?}, with {:?} fps", width, height, fps);
// Size for the output
let size = core::Size {
width: width as i32,
height: height as i32
};
Listing 10-24
Calculate the size and FPS of the video, in src/camera/video.rs
For the codec, there are a variety of codecs we can use; however, we will have to pick one that works best for the system you are working on; for ours, I’m using the H264 codec, since that codec is widely supported by web browsers, and in the future, you may want to review the videos from the Web. There is a huge variety of codecs you can use; a complete listing is on the fourcc page at www.fourcc.org/codecs.php. I’ve created a helper method in Listing 10-25 to create the four-CC code for our application.
fn fourcc() -> i32 {
videoio::VideoWriter::fourcc('m' as i8, 'p' as i8,'4' as i8,'v' as i8).unwrap()
}
Listing 10-25
The fourcc code, in src/camera/video.rs
In addition, for the name of the file, we will use a dynamic name based on the date/time in Listing 10-26. We could have used a UUID, but in these cases, I prefer a more readable name when debugging.
fn create_file_name() -> String {
let now: DateTime<Utc> = Utc::now();
let date = now.format("%d.%m.%Y_%H.%M.%S");
format!("{}/video-{}.mp4", media_dir, date)
}
Listing 10-26
Dynamically creating the video filename, in src/camera/video.rs
Before we start the loop, initialize the writer. The writer will start up a file that will encode for the size, fps, and codec we supplied. Additionally, we don’t want to send out huge files to the servers, so we are going to chunk the files in dynamic increments set as constant variables. I would recommend 15–30-min chunks; it all depends on you, although for testing 30 seconds to one minute is easier. In Listing 10-27, we set the initialized start of the video writer; these fields then get passed to the handle_video function.
let mut writer = videoio::VideoWriter::new(create_file_name().as_str(), fourcc(), fps, size, true)?;
// Frames per second, for a minute, times how many minutes
let frames_per_file = fps * ONE_MIN_IN_SECONDS * MINUTES_BETWEEN_NEW_VIDEO;
info!("Will create {:?} frames per a file", frames_per_file);
Listing 10-27
Initialize the video writer, in src/camera/video.rs
Inside of the handle_video function in Listing 10-28, we use i to start counting the frames detected so we know when to save the video and create another video to start instead.
let mut i : f64 = 0f64;
let mut start_time: DateTime<Utc> = Utc::now();
let mut file_name = "none".to_string();
loop {
Listing 10-28
Starts the loop for the video capture, in src/camera/video.rs
And finally, when the frames_per_file variable we set equals the amount of frames we processed (i), we will close the video file writer (via release) which will trigger all the contents to be saved to that filename and then start a new writer (Listing 10-29).
info!("Created File : from {:?} to {:?}", start_time, Utc::now());
writer.release()?; ②
*file_name = create_file_name();
*writer = videoio::VideoWriter::new(&file_name.as_str(), fourcc(), fps, size, true)?; ③
*start_time = Utc::now();
*i = 1f64;
}
else {
*i = 1f64 + *i; ④
}
Ok(())
}
Listing 10-29
Save video to a file and start a new file, in src/camera/video.rs
① Writes the frame to the video writer.
② Releases the video lock flushing the contents to the file system.
③ Creates a new video writer with a new filename that should be unique.
④ Each frame that gets run gets incremented.
This code exists at the end of our loop we created, but now we save to the file system a video of us with rectangles around the face.
Apply Text to the Video
When looking at the videos later, it may be nice to know the date/time the video was taken. In addition to a bounding box, we will also write to the screen the date/time (if you want to get real adventurous, you could also add the temperature). We use the put_text command in Listing 10-30 to apply the text to the screen. There are quite a few options you can pass in including the font, location, and color of the text. We will do mostly defaults for this in Listing 10-30.
let now: DateTime<Utc> = Utc::now();
let date = format!("TS: {}", now.format("%d/%m/%Y %H:%M.%S")); ①
// scalar is the color / true : for bottom left origin
let point = core::Point::new(10, 20); ②
imgproc::put_text(&mut frame,
date.as_str(),
point,
highgui::QT_FONT_NORMAL, ③
0.8,
// BGR .. reverse of RGB
core::Scalar::new(0., 0., 255., 0.), ④
2,
imgproc::LINE_8,
false)?; ⑤
Listing 10-30
Drawing the date/time onto the frame, in src/camera/video.rs
① The date time formatting.
② The location where to put it on the screen; these are the x/y coordinates to start the display.
③ The font to choose from; we are choosing the standard normal QT font.
④ The RGB color to pick, but the field is set in reverse byte order so BGR. In this case, it will be red.
⑤ Whether to reverse the image.
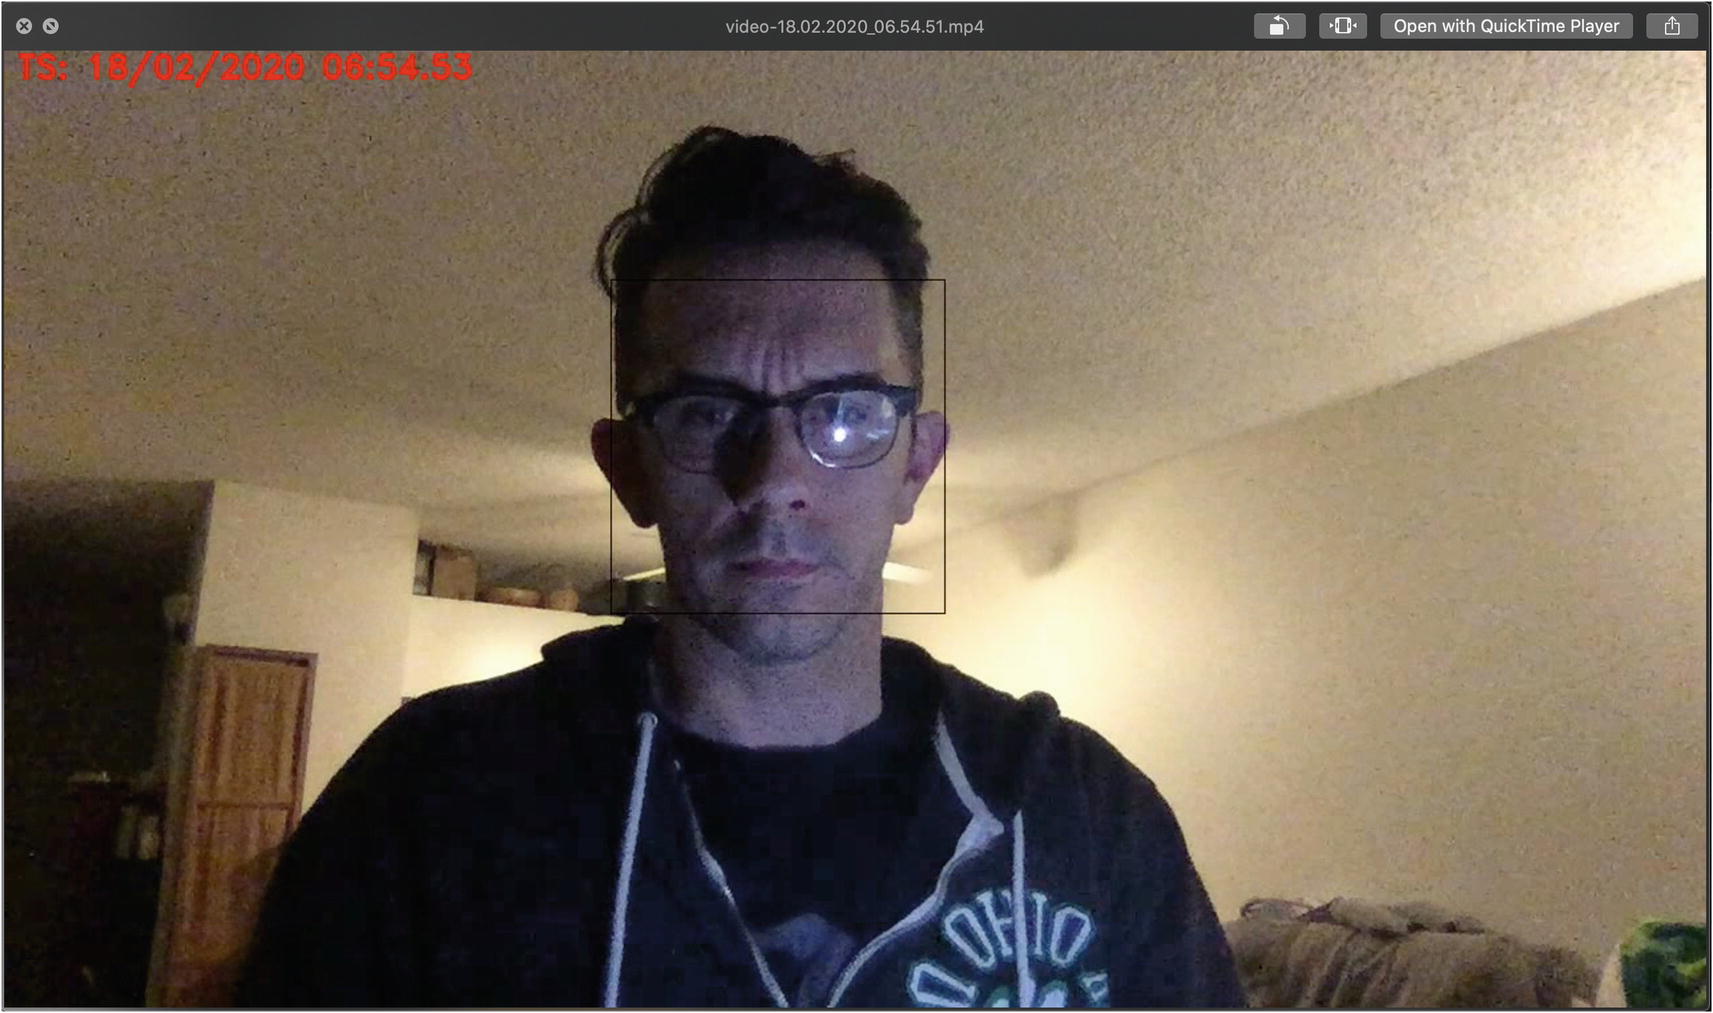
In Figure 10-7, you can get an idea of the display you will be recording when a face is detected on the screen, with the date and timestamp appearing as well.
Figure 10-7
Shows the picture with the facial bounded box and the date timestamp
Saving the Image Content
Finally, let’s see an example of saving just one frame to an image. Most of this work is to simply give us an example of saving an image. I don’t want an image saved every second or even hour; we will save the image every time there is a face detected. The code here is a bit opinionated in when to save. The rules for saving an image in Listing 10-31 will be that if a face has been detected in the frame, and we have not seen a face for a prescribed length defined by the MINUTES_BETWEEN_IMAGES variable, we will save the image and then reset the last_face_detect_time.
if !faces.is_empty() { ①
// Send that the face was detected
send(&mut face_tx, true);
// is this our first face in a minute, save an image as well.
// this part is only needed for start up
debug!("IMAGE: Check for a face every {:?} minutes", MINUTES_BETWEEN_IMAGES);
match last_face_detect_time {
Some(last_face_time) => {
let next_image_time = last_face_time + chrono::Duration::minutes(MINUTES_BETWEEN_IMAGES); ②
info!("IMAGE: Last Time: {:?} / Next Detect Time: {:?}", last_face_time, next_image_time);
if Utc::now() > next_image_time { ③
info!("IMAGE: Save image");
if save_image(&frame).is_err() { ④
warn!("Error saving the image to the file system");
}
// reset the time
last_face_detect_time = Some(Utc::now());
}
},
None => { ⑤
// first time detected save it off
info!("IMAGE: Save first image");
if save_image(&frame).is_err() {
warn!("Error saving the image to the file system");
}
last_face_detect_time = Some(Utc::now());
}
};
}
Listing 10-31
Saving the image and restarting the image writer, in src/camera/video.rs
① Checks if a face was found in the frame.
② Gets the time for the next image time; this is calculated by the last time it was detected plus our duration.
③ Checks if we should save off by seeing if that next image time has passed.
④ Creating a dynamic filename much like we did with the video and saving it.
⑤ The else is for the use case of the first time the Pi starts/restarts and image is saved.
While the OpenCV will successfully create us a JPEG image, it does not add any EXIF data on creation; in order to do so, we will need to make use of the rexiv2 crate. The rexiv2 crate wraps around two external libraries gexiv2 and exiv2; those will need to be installed on the cross compiler and also on your Pi itself. We won’t cover that here, but I wanted to go over the code to make this work. With this, you will set multiple tags for the images and then the crate will write that information to the image. In Listing 10-32, we are only writing the "Make", but you could supply as much information as you’d like.
use crate::errors::MyResult;
fn save_image(frame: &Mat) -> MyResult<bool> {
use rexiv2::Metadata;
info!("IMAGE: Save image");
let image_name = create_image_name(); ①
let mut params = opencv::types::VectorOfint::new();
params.push(opencv::imgcodecs::IMWRITE_JPEG_OPTIMIZE); ②
// Need gexiv installed on the computer for this to work
opencv::imgcodecs::imwrite(image_name.as_str(), &frame, ¶ms).unwrap(); ③
match opencv::imgcodecs::imwrite(image_name.as_str(), &frame, ¶ms) {
Ok(_) => {
// now save the meta data
if let Ok(meta) = Metadata::new_from_path(image_name.as_str()) {
Calls the run_face_detect we’ve been coding, in src/camera/video.rs
① Create a unique name for the image; this is based on the timestamp.
② Parameters for the image creation are set.
③ OpenCV writes the frame to an image file.
④ Set the Make portion of the Exif metadata.
⑤ Save the file.
We could set more on there, but I will leave this up to you to implement. In addition, you notice GPS is sadly missing. There are a number of options we could do here to make it work. There are servers that will give you your location based on IP address; some cost money and some are rate limited. There is also an ability to use the Wi-Fi locations around you to get your GPS coordinates, but I could never get this to work so I didn’t include the code. Finally and your best option is you can buy a GPS HAT for your Pi.
Calling the Video Processing
The last step is calling this from the main application; we will use tokio again to spawn the processes; we will create inside the mod.rs for the camera library to call the function we were just working. That way, you will be able to place the actual call as a single-line call in main::run function. In Listing 10-33, we will spawn an async process to run the face detector.
use crate::manager::{FaceTx};
const VIDEO_DIR: &str = ".";
pub fn run_video_capture(mut face_tx: FaceTx) {
use tokio::task;
debug!("Start spawn process ..");
task::spawn_blocking(move || {
// I want to see me
debug!("Spawning ...");
match video::run_face_detect(face_tx, false) {
Err(err) => {
error!("Error processing the face :: {:?}", err);
},
Ok(_) => {}
}
});
}
Listing 10-33
Calls the run_face_detect we’ve been coding, in src/camera/video.rs
You will notice I am doing an error capture here; this is somewhat important since there are OpenCV errors that can occur for a variety of reasons. Most of the reasons relate to being able to open the camera or the monitor window. You can put some retry logic in there, but that will be left to you.
Deploying to the Pi
After you have finished coding the camera addition to the Pi application, we will want to deploy and run it. If you try to do that right now, you will be disappointed; it will fail with an error like in Listing 10-34.
./rasp-app: error while loading shared libraries: libopencv_calib3d.so.4.1: cannot open shared object file: No such file or directory
Listing 10-34
Running the application on the Raspberry Pi
This error is because we do not have OpenCV 4 installed on the Raspberry Pi, and it will be another library we need to install. This library and procedure to install will be a bit more time-consuming than our other installs (all said a little over an hour).2 For this to work, we are going to install a few libraries to support the OpenCV and then install and configure OpenCV from source.
To start with, let’s increase the swap size for the ram; normally, it’s set at 100, but to build the OpenCV, it will make our lives easier if we increase it to 2048. In Listing 10-35, we will sudo vi /etc/dphys-swapfile and increase the size to 2048.
pi@raspberrypi:~ $ sudo vi /etc/dphys-swapfile
...
# set size to absolute value, leaving empty (default) then uses computed value
# you most likely don't want this, unless you have a special disk situation
CONF_SWAPSIZE=2048 ①
...
Listing 10-35
Increase the size of the Swap
① This is the line to search for to adjust the size.
Next, we are going to have to add some libraries to make OpenCV work for us; most of these libraries help us in creation of the videos, images, and so on. There are additional files that will help for display that we will not be installing since we aren’t attaching a display to the Pi. In Listing 10-36, we install the extra libraries needed.
pi@raspberrypi:~ $ sudo apt-get install -y build-essential cmake pkg-config ①
Installing the python libraries; this will take about 2 minutes
OpenCV Install
Now we have everything we need to actually download and install OpenCV. The version we will install needs to be the same version we used in the previous section when creating the docker image via cross build tool. For this book, we are using 4.1.0. In order to build OpenCV, we need to download and install opencv and opencv_contrib; we will download them both and unpackage them in Listing 10-38.
pi@raspberrypi:~ $ mkdir opencv_all && cd opencv_all
Downloading OpenCV and OpenCV Contrib and unpackaging the contents; this will take about 2 minutes
To install the application, we are going to create a build directory, configure it, and then compile and install the application. To do this, in Listing 10-39, we’ll start by creating a build directory and switch to that directory.
pi@raspberrypi:~ $ cd opencv-4.1.0 && mkdir build && cd build
Listing 10-39
Create the directory and change to that directory
Now we will use cmake that we installed earlier to create our makefile and configurations. The environmental arguments will mimic what we did earlier in cross; the only major difference is that we will install it to /usr/local. In Listing 10-40, I’ve included this configuration.
This configures the makefile to build OpenCV; this will take about 3 minutes
If you are trying to build this on a Raspberry Pi Zero instead of a 4, it will take longer; in addition, you will have to disable NEON and VFPV3 since they are not supported by the Pi software. In addition, most of the timings I’ve estimated will be much longer on a Zero or Pi 3.
Now the part that will take the most time is making the binaries. This will take roughly an hour, so go grab some food, a tea, and so on before starting. We will pass in -j4 to make four threads to make use of the four cores on the Pi. In Listing 10-41, we will make the binaries and install it.
pi@raspberrypi:~ $ make -j4
pi@raspberrypi:~ $ sudo make install && sudo ldconfig
Listing 10-41
This makes the binaries and installs it to the Pi; this will take about 60 minutes
Now that OpenCV is installed, you will be able to run the application on the Raspberry Pi.
Summary
This chapter brought us all our interactions with the camera. This was not a terribly long chapter but very important for the purpose of this book. We covered how to use OpenCV to allow us to more easily develop an application that interacts with a camera. This saved us quite a bit of custom development and makes that code more easily portable between local development and the Pi. The final result was saving off video and images to our local directory complete with timestamps and face detection on the videos. However, we did not cover what to do with those images once saved. Right now, we are simply saving them locally. In the next chapter, we will cover the processing of these images, and for that, we will switch back to the MQTT module which will push the files to the cloud.