
In this final chapter on Succession Management, we walk through the remaining features of the Succession Management module (SCM). These features allow you to view and organize your talent and Succession data in many helpful ways. We start with Talent Search which allows you to find employees by searching on any of their talent fields. We then cover Talent Pools which allow you to organize these employees into logical groupings. Next, we cover the Position Tile View which offers an alternate way to view positions outside of the Succession Org Chart. We then cover the Lineage Chart which shows succession planners’ “what if” scenarios of succession. Finally, we conclude with Succession Presentations which help planners make quality presentations using real-time talent management data. We continue to utilize the model company example described in Chapter 5 to bring a practical example to each functionality.
Talent Search
Talent Search allows end users to search for employees through any talent field within their span of security permissions. In addition, users can download search results, compare employees, make succession and Talent Pool nominations, and more! This section will show you how to configure the functionality and run it as an end user.
Prerequisites for Configuring Talent Search
Prior to being able to configure and run Talent Search, the following settings and permissions must be set. Additionally, be sure your Employee Talent Profile has been configured in the data model. For more information, see Volume 1, Chapter 2.
Provisioning Settings Required for Talent Search
- 1.
Log in to Provisioning and select your company instance.
- 2.
Navigate to Company Settings and click the checkbox next to “Succession Talent Search” as shown in Figure 7-1. Click Save.
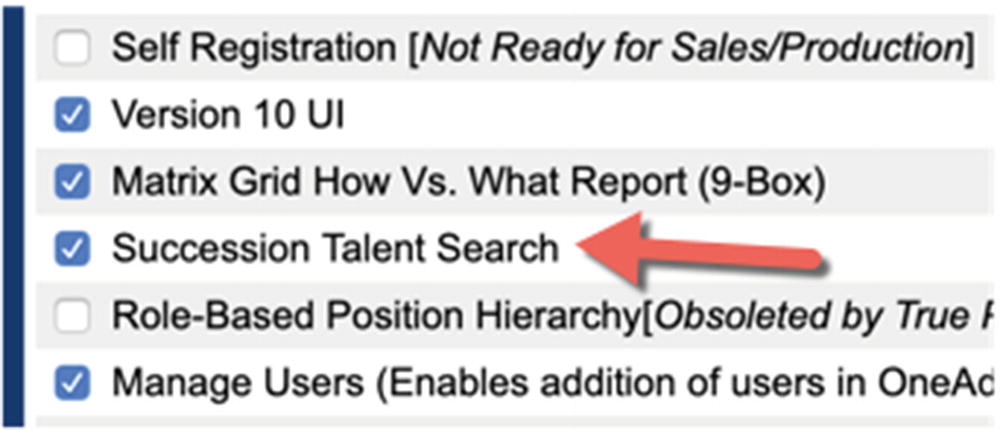
Succession Talent Search Provisioning Setting
- 3.If you would like to use the option keyword search that performs a quick search across all available fields rather than just individual field keyword searches, follow these additional steps:
- a.
Add Read permission for all fields you would like to make searchable within the data model XML. See Volume 1, Chapter 2 for more information.
- b.
In Provisioning, go to Search Index and generate an index (even as a partner, you will not have permission to access this and need to contact SAP to index for the first time).
Permission Settings Required for Talent Search
- 1.
Type and select “Manage Permission Roles” in the search bar.
- 2.
When the screen loads, click the role you wish to modify. Then click “Permission…:”
- 3.
Ensure the following permissions shown in Figure 7-2 are active on your assigned roles to enable Talent Search configuration: Manage System Properties ➤ Talent Search Management.

Permissions to Enable Talent Search Configuration
- 4.
Ensure the following permissions shown in Figure 7-3 are active on your assigned roles to enable Talent Search as an end user: Succession Planners ➤ Talent Search Access. Talent Search Export can optionally be added if you would like to be able to download an export file of your search results. Click “Done.” Be sure to save your role on the main screen as well.
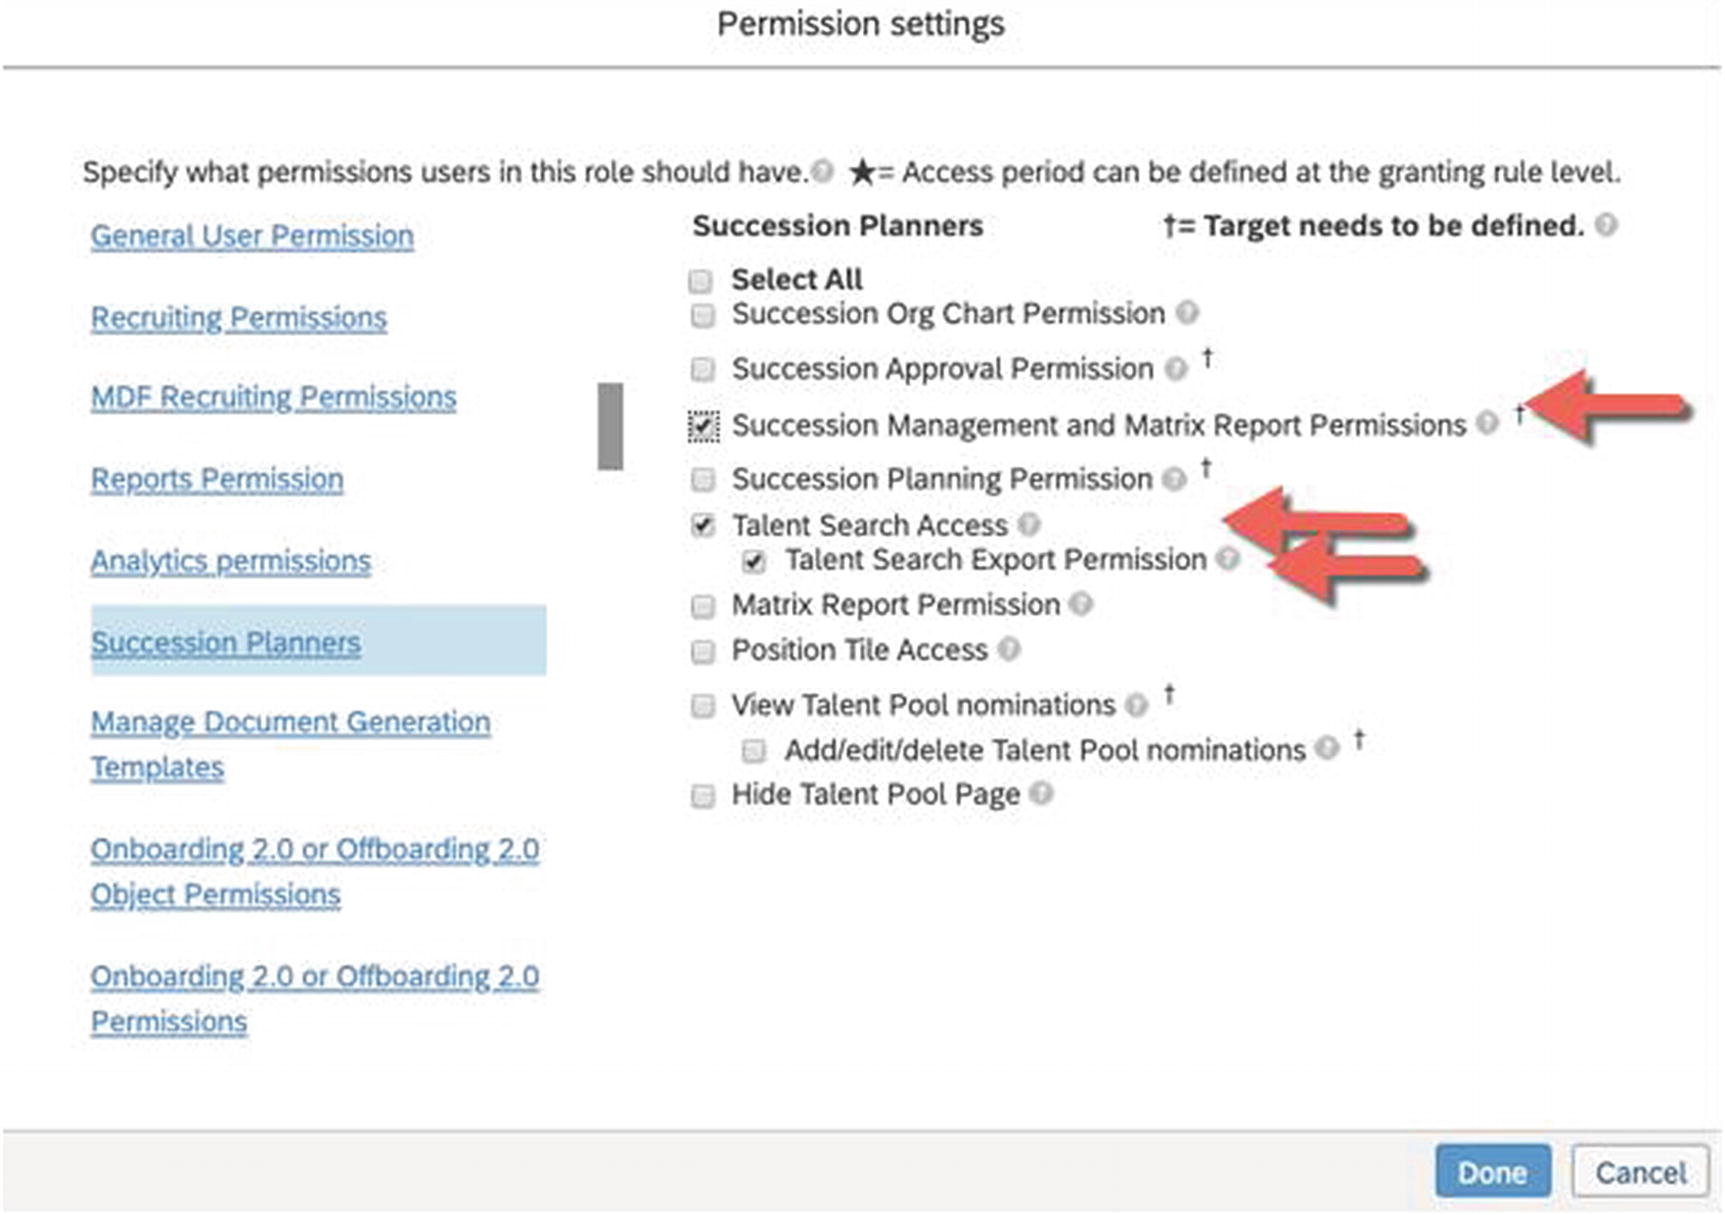
Permissions to Enable Talent Search as an End User
The Succession Management and Matrix Report Permissions you added in Chapter 5 also needs to be enabled. The assigned user groups associated with this permission will determine which employees you can search.
Configuring Talent Search
- 1.
Access the Talent Search Settings configuration screen by typing and selecting “Talent Search Settings” in the search bar. The screen will load as shown in Figure 7-4.

The Talent Search Settings Screen
- 2.
Check the “Enable keyword search in Talent Search” if you would like to enable the simple keyword search we have mentioned earlier in this section.
Note We recommend turning on this option as it can save end users time having to build their queries. In addition, users may not know where in the data model structure a particular field is located. This can allow the users to still search without as much knowledge of these structures.
- 3.
Check “Show Competencies & Behaviors” if you wish to include competencies in your search.
Note We recommend turning this option on if your organization uses competencies as it is the only way to include competencies in the search.
- 4.
For the “Choose process” field, select either “All data sources” or one of your configured processes.
Note We recommend you mirror the same configurations you selected for your data sources during the matrix grid configuration in the previous chapter for the sake of consistency for the end users.
- 5.
Select a value for “Search talents based on their” field. “All ratings” will include all ratings, whereas “Latest rating” will only include the latest.
Note We recommend setting this to “Latest rating” so that the most relevant ratings appear unless resources have a specific search need to search through historical scores.
- 6.
Select a value for the “Search Job Info based on” field. Selecting “As Of Date” will offer one date field where the employee must have held the job when performing a job search, whereas “Date Range” will offer two date fields where employees can hold the job anytime in between those dates.
Note We recommend using the Date Range option as it allows for more flexibility.
- 7.
Select a value for each type of advanced information search default rating scale. These allow you to select from any settings in the matrix grid configurations or the performance rating scales.
Note We recommend these settings match what you have configured in the matrix grid configurations unless you have not performed such configurations.
- 8.
Select any default search fields you would like to appear when the page first loads or when the user clicks “Start Over.”
Note We don't recommend setting any default fields here.
- 9.
Click “Save.”
Running Talent Search
- 1.
Type and select “Talent Search” in the search bar to load the Talent Search screen as shown in Figure 7-5.

The Talent Search Selection Criteria Screen
- 2.
If the keyword search has been configured, the first field you will see is a field to search by keyword. This field performs a quick search across all available fields rather than just individual field keyword searches. It is useful for quick searches, but is not as precise as picking fields individually. Enter a keyword here, or optionally click “More options…” to expand the screen to search fields individually. If you use quotes around groups of words, it will treat those words with AND logic, whereas not using quotes will use OR logic.
- 3.If you are searching by fields individually, click the “+” icon next to the type of information you would like to search:
- a.
Basic Information: This area lists all of the basic fields in your data model XML. Enter the search text next to each field selected.
- b.
Advanced Information: This area lists the background elements from your configured data model regardless of permissions set in the XML, as well as your Talent Pools (see the next section for more information on Talent Pools). You will need to choose “As Of Date” or Date Range depending on your configuration options. Background elements will allow you to search for each individual field within the background element. Talent Pool will allow you to select from a list of Talent Pools as well as other fields you may have configured in the MDF object (see the next section for how to configure the MDF object).
- c.
Rating & Competencies: This area allows you to select performance, potential, objective, and competency ratings. Select which type and then choose high and low values from the rating scale. If you would like to select individual competencies, then click “Competencies…”; and in the popup, select a competency from the library of your choice and click “Select.”
- 4.Prior to running you search, click the “Settings” icon to choose from the following:
- a.
Which role to run: You can choose which permission role to run for the query. For example, if you are a manager and an HR admin, you may have roles for both. The HR admin role would return results for all employees for whom you are the HR responsible individual, whereas the manager role would return results for all employees for whom you are the manager.
- b.
Check the checkbox “Make All Criteria Optional” to make the search inclusive, whereas unchecking the box makes the search exclusive.
- 5.
You can also call up saved searches by clicking the “Save” icon.
- 6.
If you want to clear your screen back to the default search criteria, click “Start Over.”
- 7.
When you are ready to execute your search query, click “Search.” A results screen will display similar to Figure 7-6.
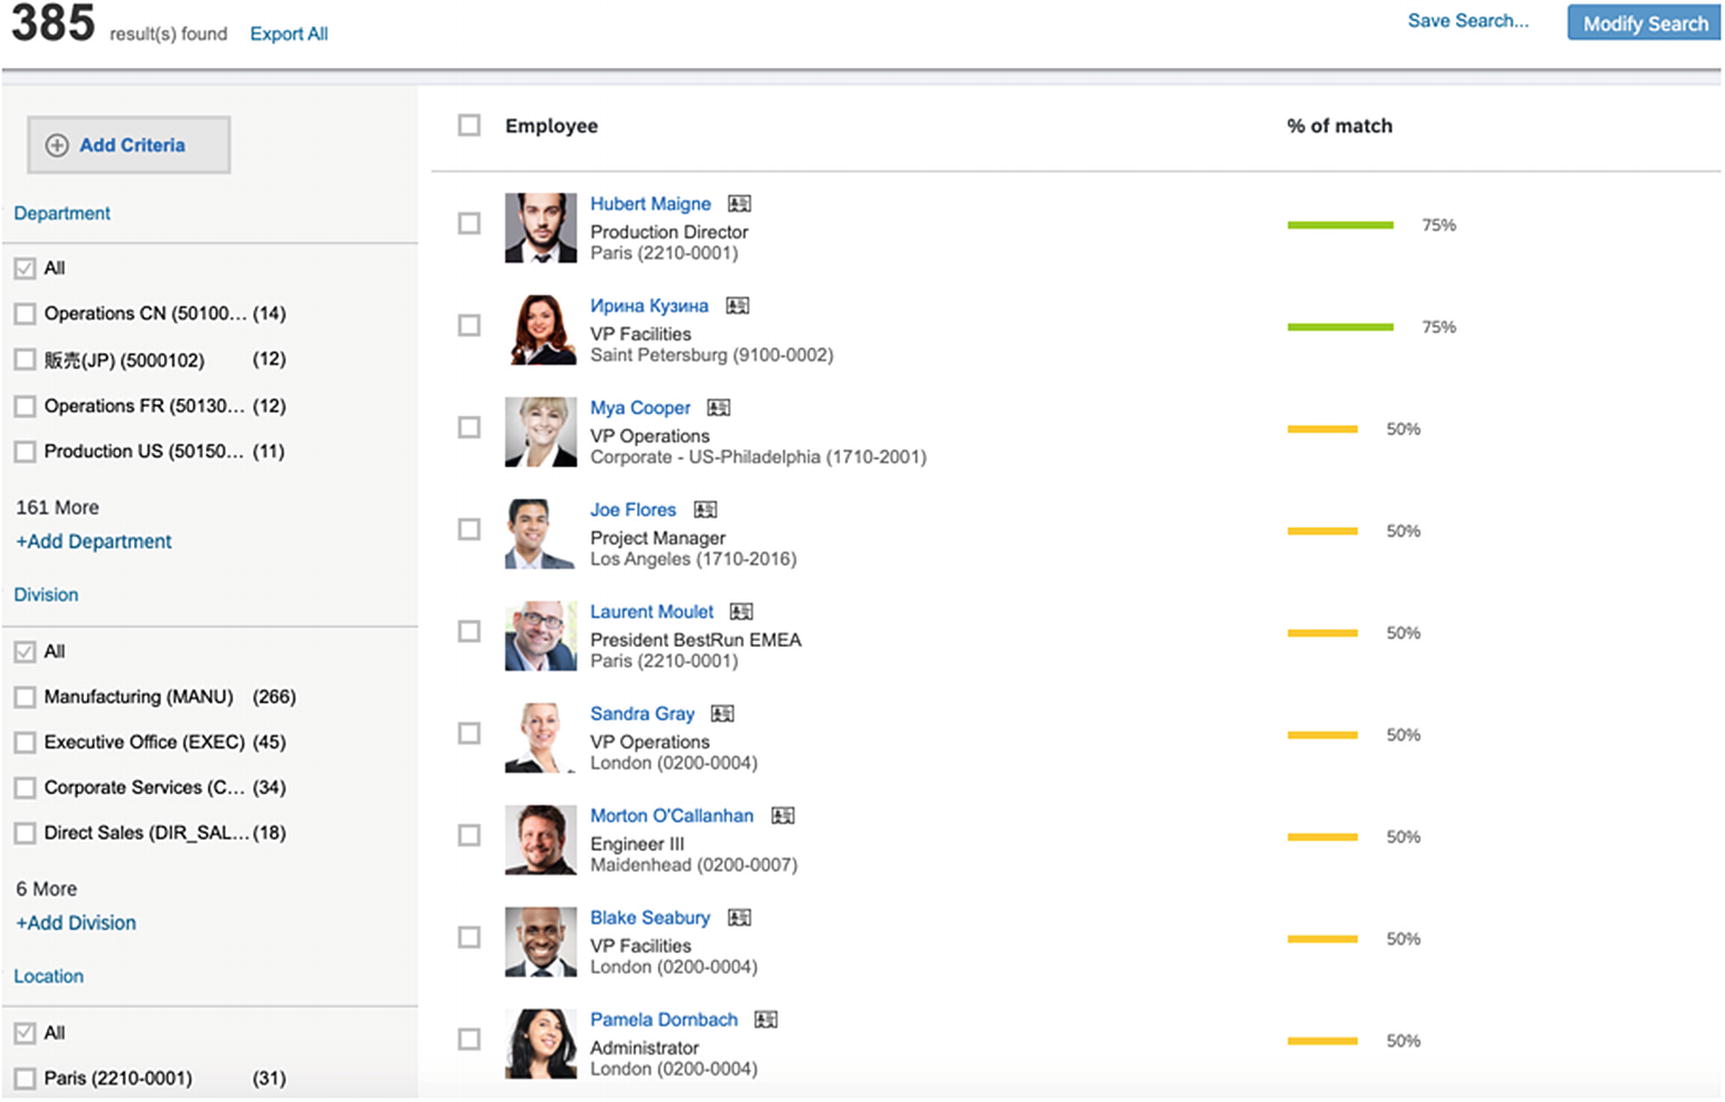
The Talent Search Results Screen
- 8.The results screen shows a list of employees along with a calculated percentage match to the criteria you defined in the prior screen. To the left is filter criteria to refine the current search results:
- a.
Click the name of an employee to open the quick card for the employee.
- b.
Click the percentage to show details of how the employee matched the search.
- c.
Click “Add Criteria” to add additional filter criteria.
- d.
Check the boxes next to the criteria on the left to immediately refine the search.
- e.
Click Export All to open the Export popup. You can enter a name for the export file and which fields to include. Click “Export” to generate the .xls export.
- f.
Click “Save Search” to list these search criteria in your saved searches on the selection criteria screen.
- g.
Click “Modify Search” to return to the selection criteria screen.
- h.Check the box next to each employee you want to select. A menu will appear at the top of the selection screen with the following options:
- i.
Add to pool: Select this option to open a popup that will allow you to select from existing Talent Pools. You can add readiness levels, notes, and so on based on your Talent Pool MDF configuration. Click “Nominate” to add the employee(s) to the Talent Pool.
- ii.
Export: Will open the same Export popup as “Export All” except only the selected employees will be exported. Click “Export” on the popup to download the .xls file.
- iii.
Compare: This will open a popup which shows a side-by-side comparison of the selected employees for each of the fields in your selection criteria as shown in Figure 7-7. You can click “Configure Fields” to bring up another popup that will allow you to add any additional fields you might want to consider on the fly (very cool)! You can also click “Print” to open a print preview page that can be sent to a printer.

The Compare Users Popup
- iv.
Nominate: Type a position title or number in the “Nominate employees for” field to nominate the selected employees for that position. Select a readiness level and ranking (depending on your succession nomination configurations; see the next section), as well as any notes in the “Notes” field for each employee. Click “Nominate” to finish.
Now that we’ve walked through all of the steps to run Talent Search, let’s revisit our model company example. For the sake of our example, this functionality could allow an HR admin or president to perform a periodic search of employees with a high risk of loss and high impact of loss who also land in the highest performance and potential cell of the 9-box (see example in the preceding figure). In this way, the HR admin or VP can identify that the SVP of Sales in our example may be on their way out of the company! They can then proactively work with the SVP of Sales to cultivate their talent via a development plan for the President position while they search for a successor for the SVP of Sales rather than the SVP of Sales leaving as a surprise. Next, we’ll take a look at how we can organize our search results into Talent Pools.
Talent Pools
Talent Pools allow users to create organized groups of employees for the sake of talent management. They can offer an alternative to position-specific succession planning by allowing more general groupings. They can also be used for non-succession–related needs like development plans, rotation programs, or high-potential pools. Talent Pools can also be associated with positions so that, for example, if many employees may be qualified for our model company SVP of Sales position throughout the organization, these groups of employees and positions can be linked together via Talent Pools! MDF Talent Pools utilize the Metadata Framework (MDF) to make these groups even more organized. The MDF allows the system configurator to detail the data structure of the Talent Pool object, as well as allowing for detailed permission role assignments. In this section, we will cover how to configure and use Talent Pools.
Legacy Talent Pools will not be covered as they are no longer a logical choice for configuring the system and are in an end-of-maintenance phase from SAP.
Prerequisites for Configuring and Using Talent Pools
Prior to being able to configure and use Talent Pools, ensure the requirements and steps in this section are completed.
We assume the MDF is turned on in provisioning prior to these configuration steps as well.
Upgrade Center
- 1.
Type and select “Upgrade Center” in the search bar.
- 2.
Select “New MDF Pool–based Succession Planning” from the list and follow the on-screen instructions.
Configurator Permissions

Administrator Permissions ➤ Metadata Framework Permissions
Unlike other sections, we separate configurator and user permissions. This is because the MDF structure should be defined prior to the user permissions since the user permissions are dependent on the MDF configuration.

Talent Pool Field Configuration Permission
Configuring Talent Pools via MDF
Now that you have permission, you can begin defining the data structure of Talent Pools.
This section will cover some of the steps we recommend for configuring the Talent Pool object definition. It should not be considered a comprehensive guide to all MDF object definition options. The MDF is a very large and powerful tool that can take up the contents of an entire book! In our following example, we only add security to the object and add a single field from our model company to help filter through Talent Pools.
- 1.
Type and Select “Configure Object Definitions” in the search bar.
- 2.
In the “Search” field, select “Object Definition.” In the next dropdown, select “Talent Pool.” The Talent Pool object definition will appear as in Figure 7-10.
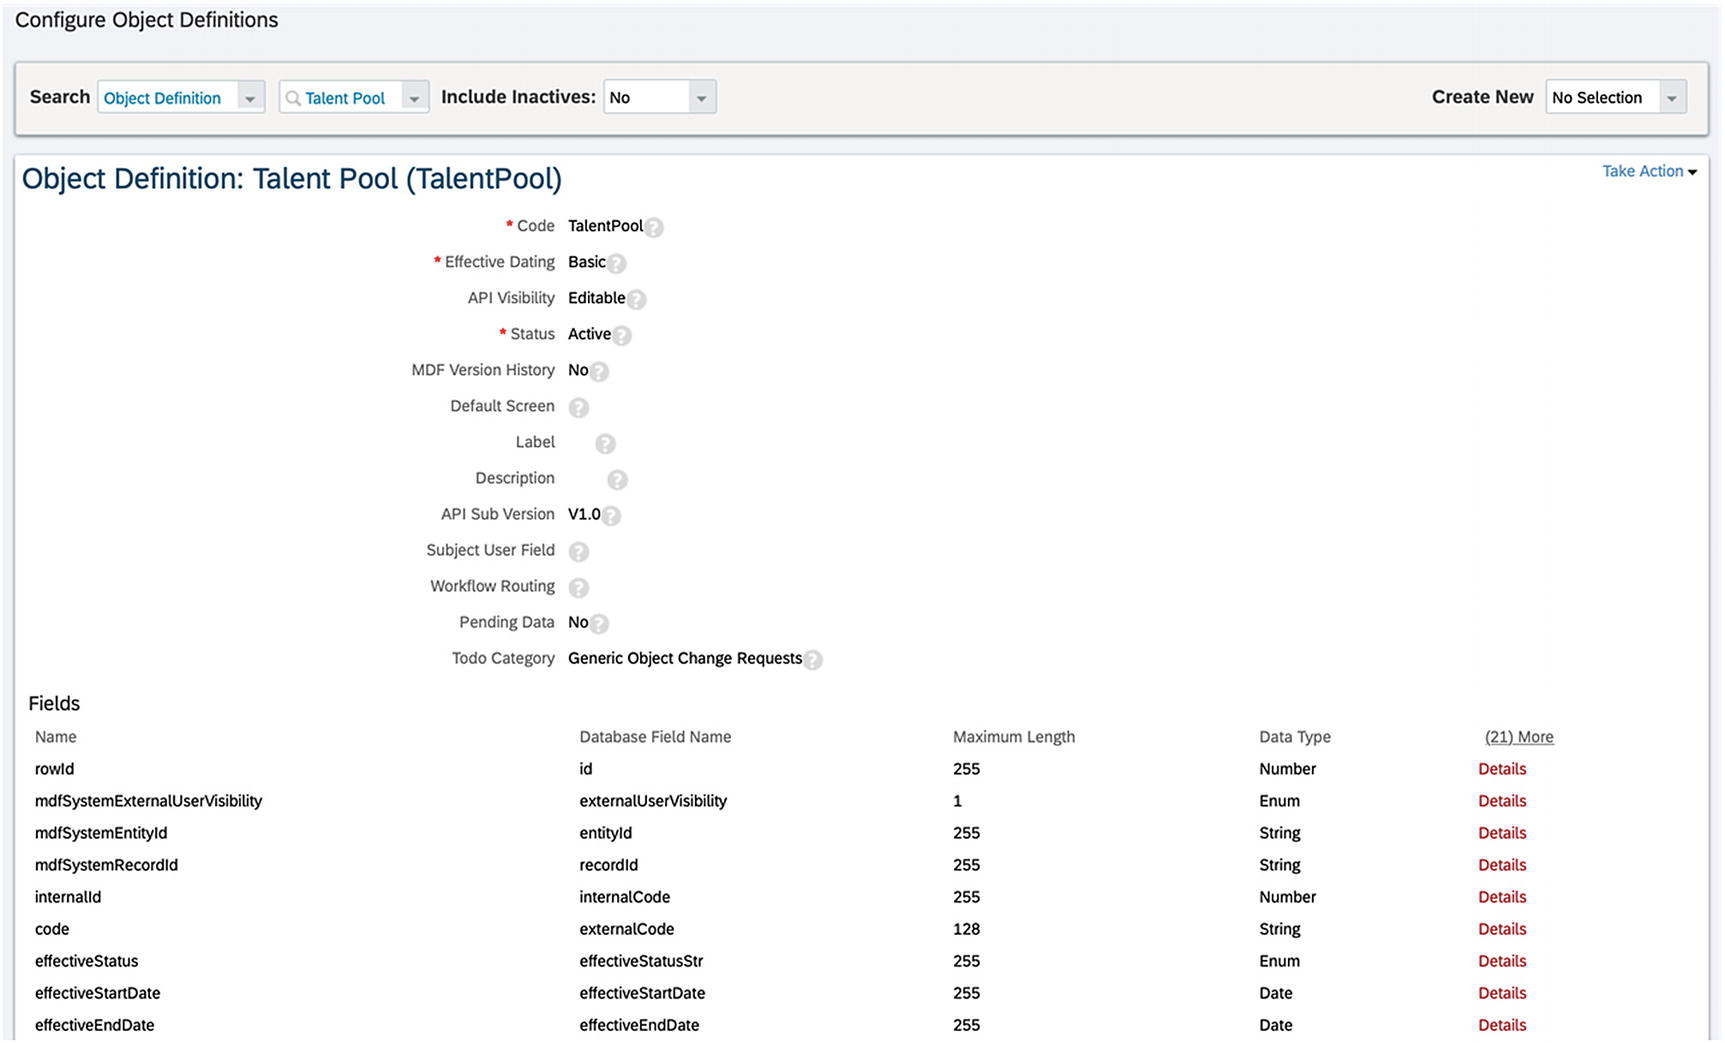
The Talent Pool Object Definition Screen
- 3.
Select the “Take Action” dropdown and select “Make Correction.” The fields will become editable.
- 4.Scroll to the end of the “Fields” section and add a field by entering “cust_ExecutiveLevel” in the “Name” field, “2” in the “Maximum Length” field, and “Number” in the Data Type field. Click “Details” next to the fields. A popup will appear.
- a.
In the popup, scroll down to the “Label” field and type “Executive Level.” Click Done.
- 5.
Back on the main screen, scroll down to the “Searchable Fields” section and type “cust_ExecutiveLevel” in the “Name” field. Then scroll down to the “Security” section and select “Yes” for the “Secured” field and “Miscellaneous Permissions” for the “Permission Category” field. Scroll to the bottom and click “Save.”
Permissions for Users
- 1.
Navigate to “Manage Permission Roles” using the search bar.
- 2.
Click the role you which to edit. Then click “Permissions…:”
- 3.
On the “Permission settings” screen, click “Miscellaneous Permissions” and scroll to “Talent Pool.” Check the checkboxes next to “View Current,” “View History,” “Create,” “Insert,” “Correct,” “Delete,” and “Import/Export” as shown in Figure 7-11. Click “Done.”
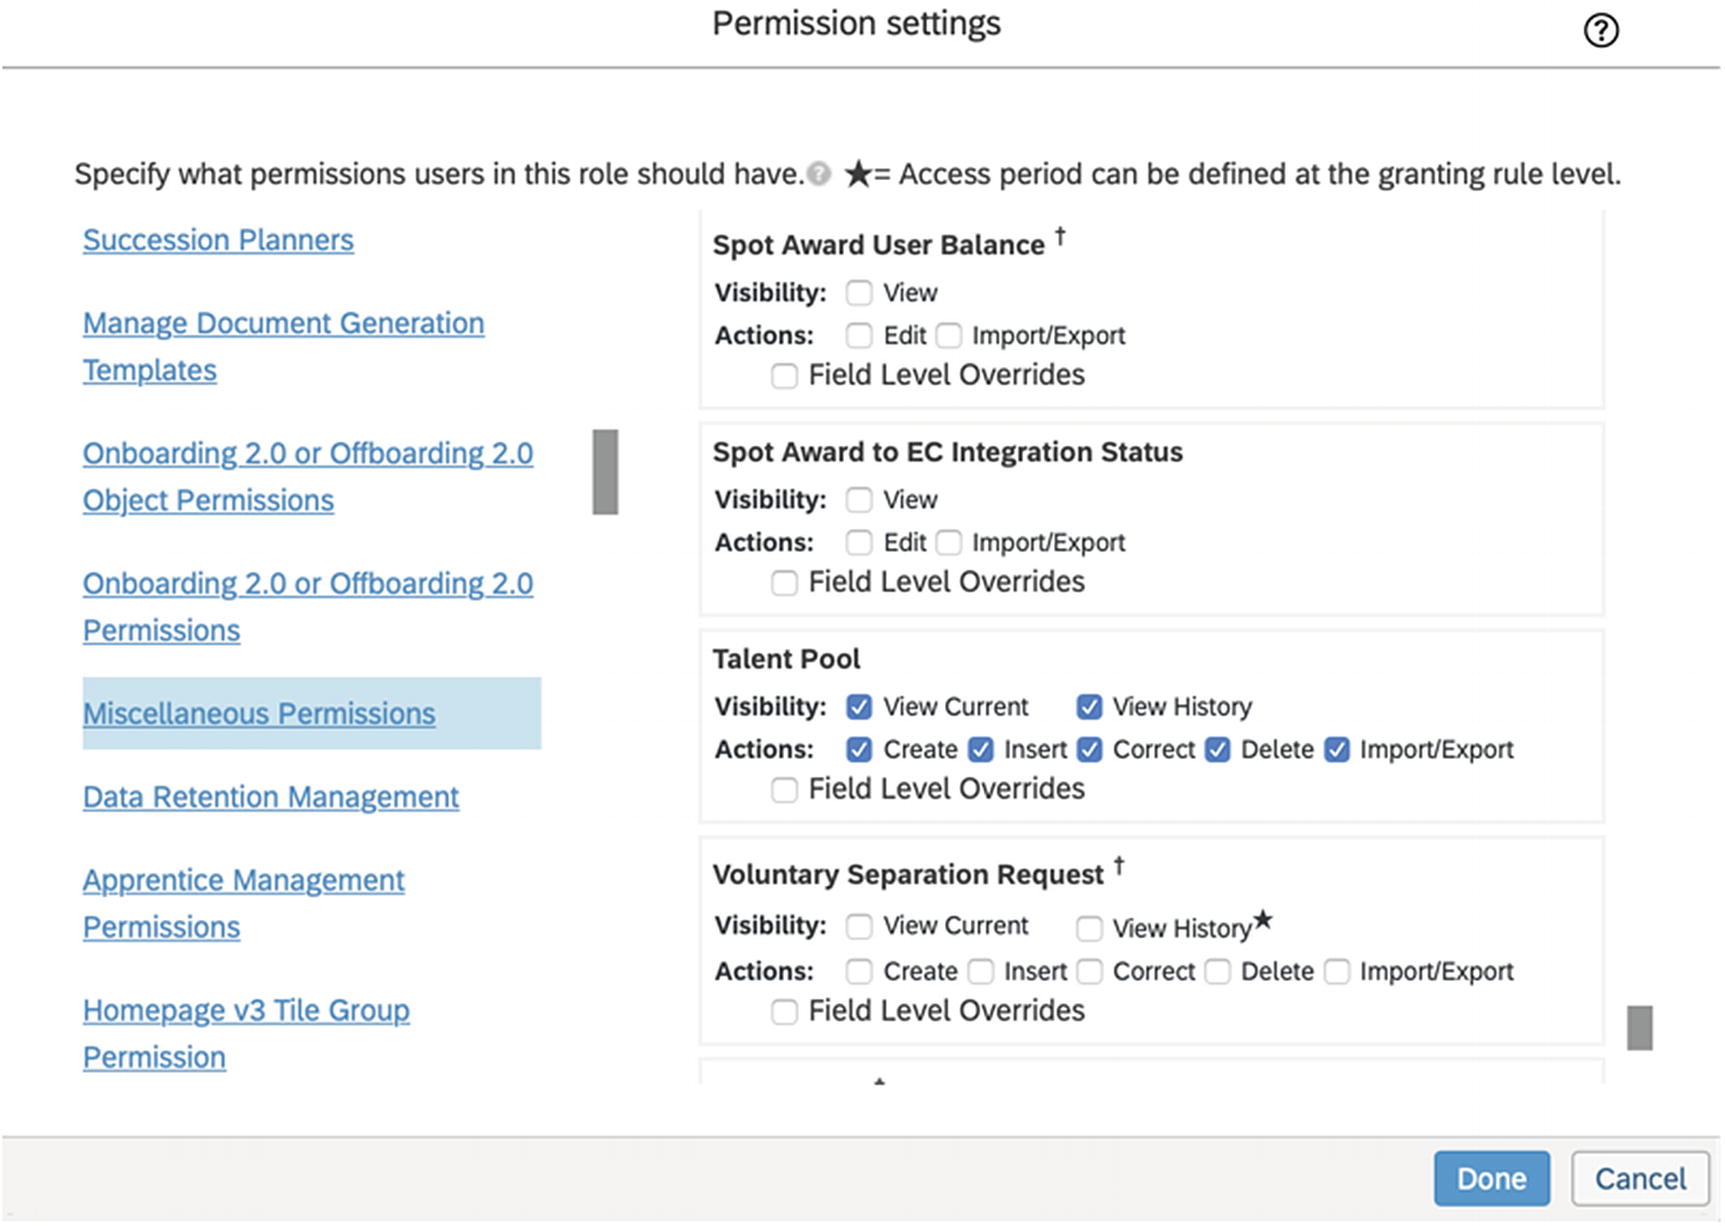
Permission Settings for Talent Pool User Permission Role
- 4.
You can further refine which Talent Pools an end user can access. For the sake of our example, we will use the new field we created, cust_ExecutiveLevel, to allow different users access to different Talent Pools. We will grant this specific role access to Executive Level 2 for use of the HR admins as shown in Figure 7-12 and assume another role will be created for Level 1 for use of the executive team only. On the Permission Role Detail screen, click “Edit Granting” and scroll down to “Talent Pool” and select the radio button for “Restrict target population to:” Check the first checkbox and enter “Executive Level,” “>=”, and “2”. Click “Done.”
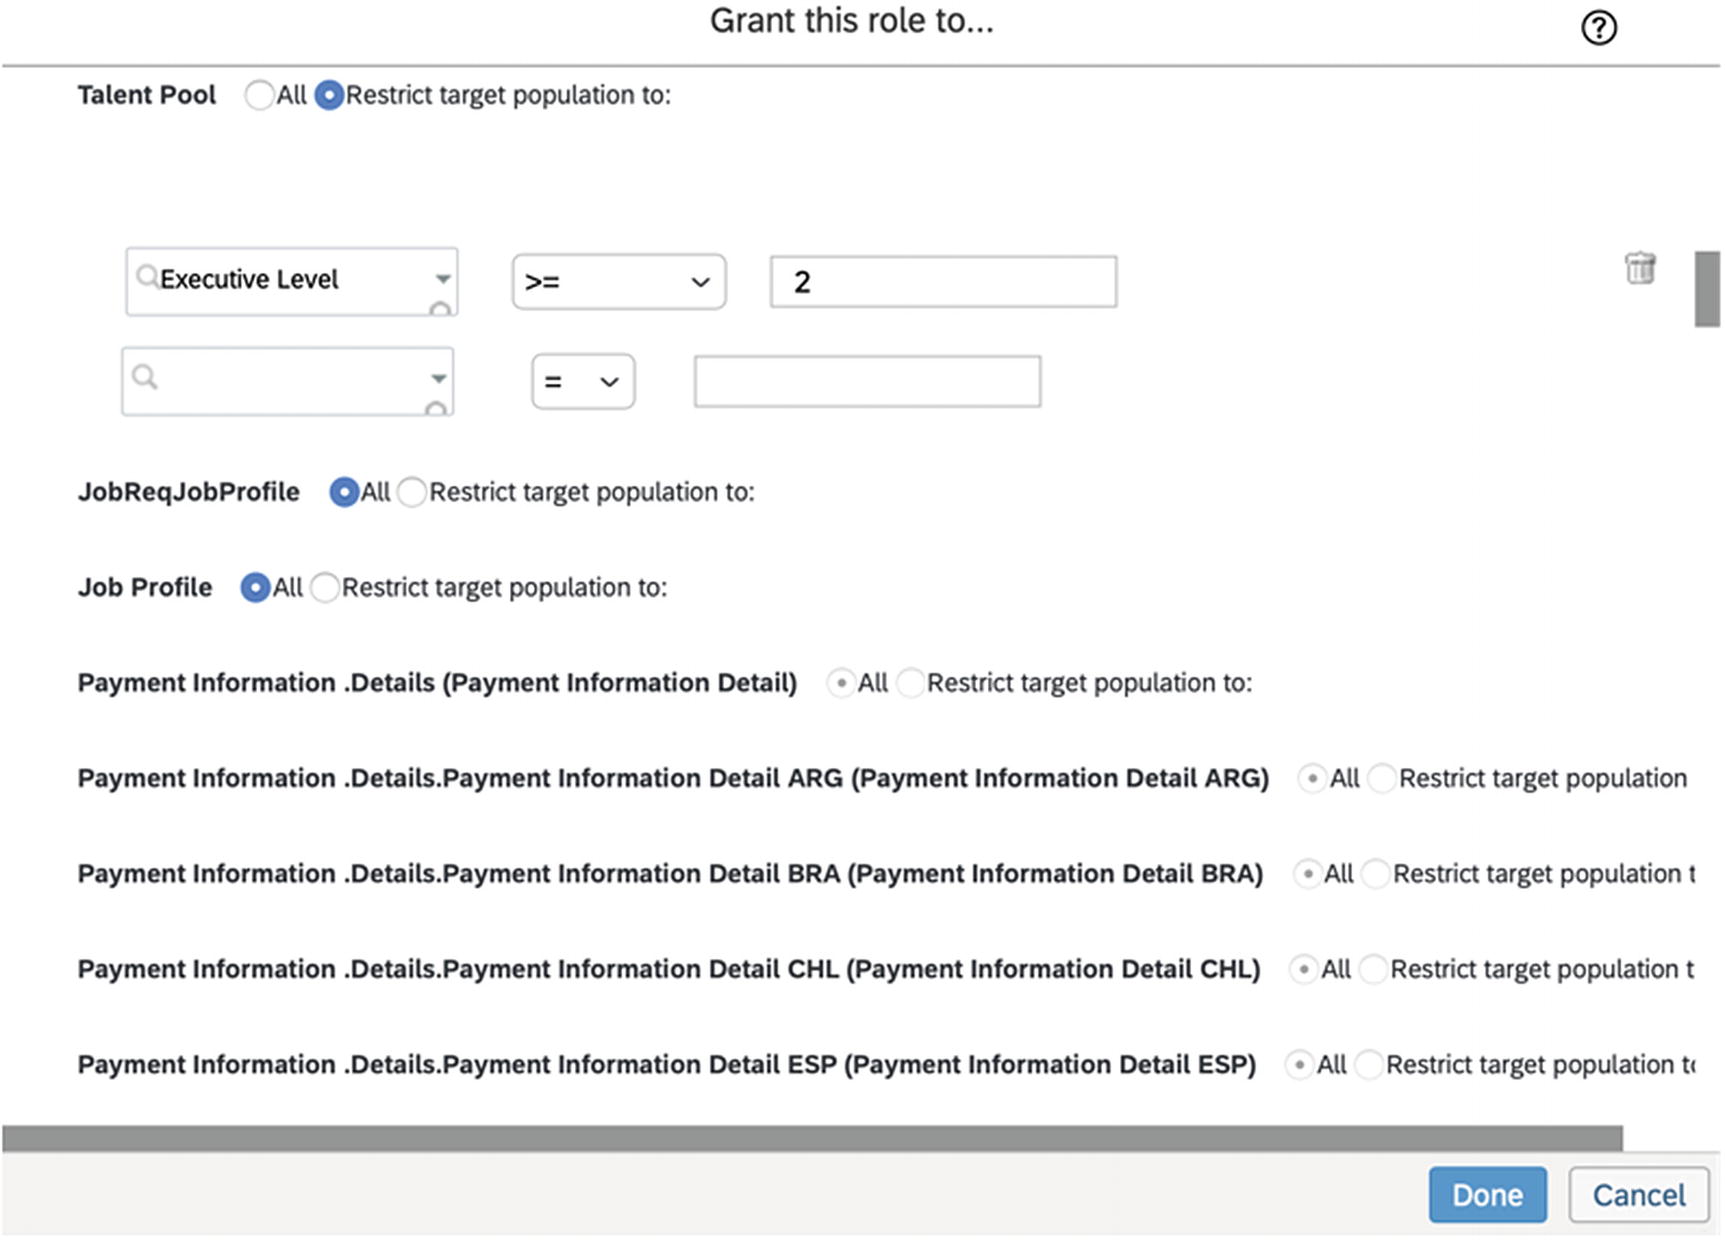
Defining the Target Population of Talent Pools to Executive Level 2 or Below
- 5.
It is important to remember the preceding permissions give the user access only to view and edit the Talent Pool objects, not the permission to view the actual nominations within Talent Pools! To add permission to view nominations, in the “Permission settings” screen, click “Succession Planners” and check the boxes next to “View Talent Pool nominations” and “Add/edit/delete Talent Pool nominations” as shown in Figure 7-13 and click “Done.” Be sure to save your role on the main screen as well.
Note By default, this will give nomination access to all employees. To make this permission specific to a target population, click “Apply target population to Talent Pool Nominations Permissions” in the “Nomination Setup” screen and then define a target population as you would with any other permission role. We will cover this screen in more detail in the next section.

Permissions for Viewing and Editing Talent Pool Nominations
- 6.
For some organizations, it may make sense to allow managers to see nominations from Talent Profile and talent cards even if they don’t have the permissions set in steps 1 and 2. If you want to enable this feature, log into Provisioning, select your organization, and click “Company Settings.” Click the checkbox next to “Viewing Talent Pool Nominations in People Profile and Talent Card Without Having the Talent Pool Object Level Permission.”
Configure Talent Pool Nomination Fields
- 1.
Type and select “Manage Talent Pool Field Settings” in the search bar. The configuration screen will show as in Figure 7-14.
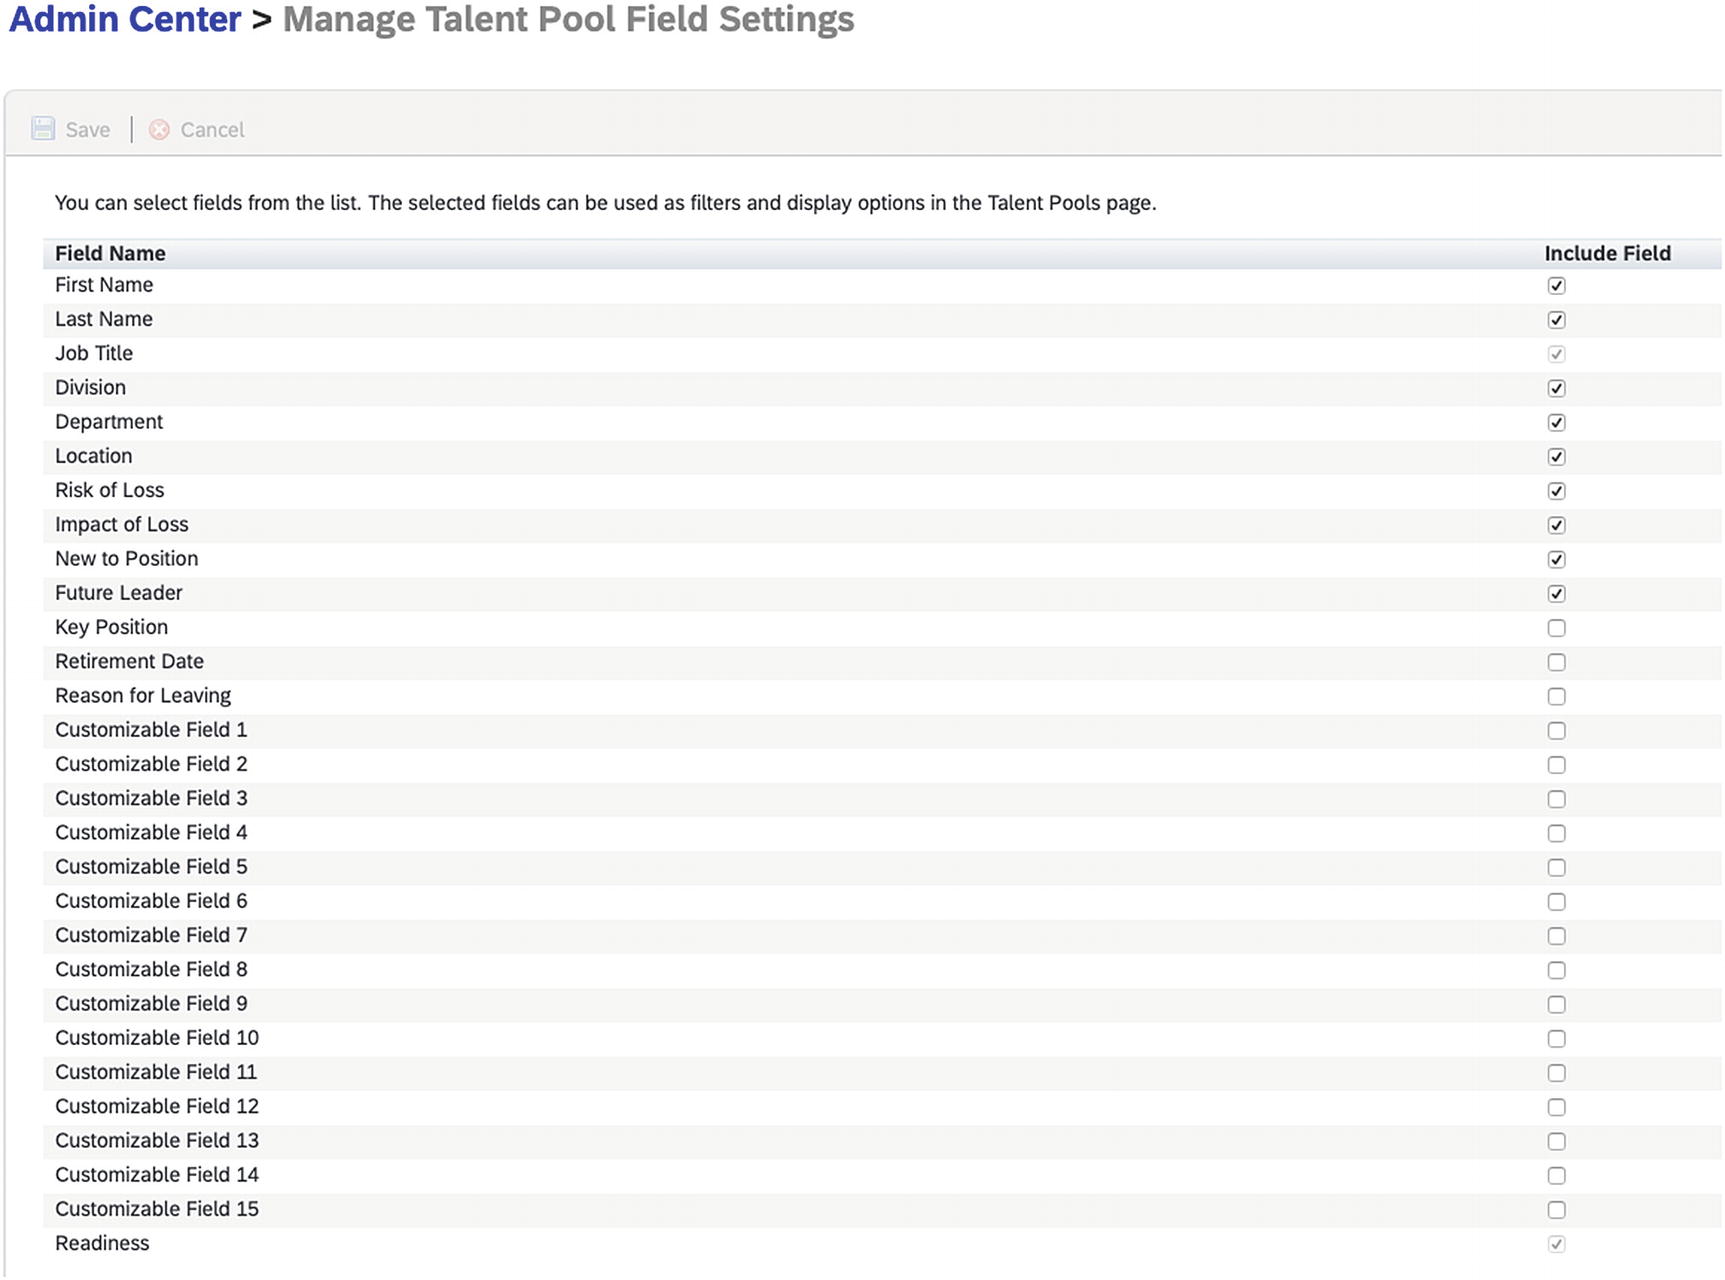
The Manage Talent Pool Field Settings Screen
- 2.
The screen will show all of the standard Talent Pool fields from your data model. Check the box next to each field you wish to add as a potential column or filter and click “Save.”
Note “Job Title” and “Readiness” are always selected by default.
Using Talent Pools
- 1.
In the search bar, type and select “View Talent Pool.”
- 2.
Click “+” to create a new Talent Pool. A popup will appear as shown in Figure 7-15. Enter “GenManagers” for the “Code” field, “Active” for the “Status” field, today’s date for the “Start Date” field, “SVP of Sales” for the “Name” field, “Yes” for the “Enable Readiness” field, and “3” for the “Executive Level” field. When you are finished, click “Save.”
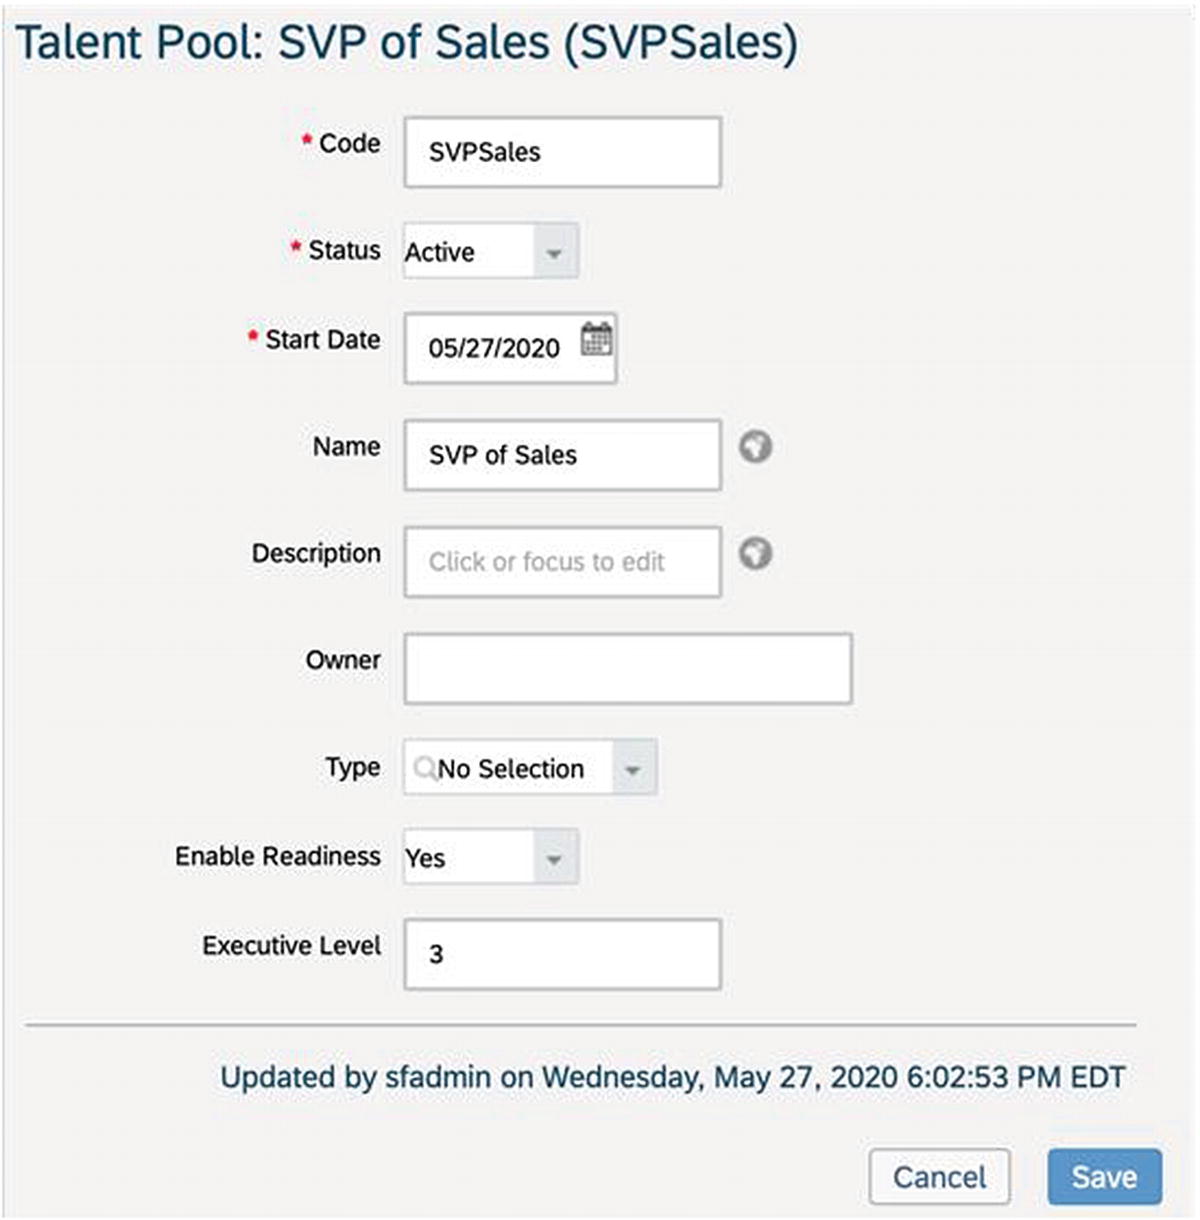
The Create Talent Pool Screen
The fields that appear here are entirely up to your MDF configuration. You may want to hide some of these extra fields if they don’t make sense for your implementation or add others. For the sake of our example, we only want to show that the custom “Executive Level” field has appeared that helps us with an extra level of security. Also note that any field with the globe icon can be translated into multiple languages depending on which languages have been activated in your instance.
- 3.
You will then be taken to a confirmation screen that shows the information you just entered for the new Talent Pool MDF object as shown in Figure 7-16. You can change the information by clicking “Edit” or “Manage.” Click the “x” to close and return to the main Talent Pool screen as shown in the following figure.

Talent Pool MDF Object Information Screen
- 4.
Repeat steps 2 and 3 for all Talent Pools you would like to create.
- 5.
After creating your Talent Pools, they will appear on the main screen as shown in Figure 7-17. You can filter and sort them by code or name by clicking the funnel icon in the upper right-hand corner. Enter your criteria in the “Code” or “Name” field and click “Filter.” Click “Reset” to clear the filters. You can also click the “Sort By…” next to the funnel icon to change the sort field and the order (ascending or descending).
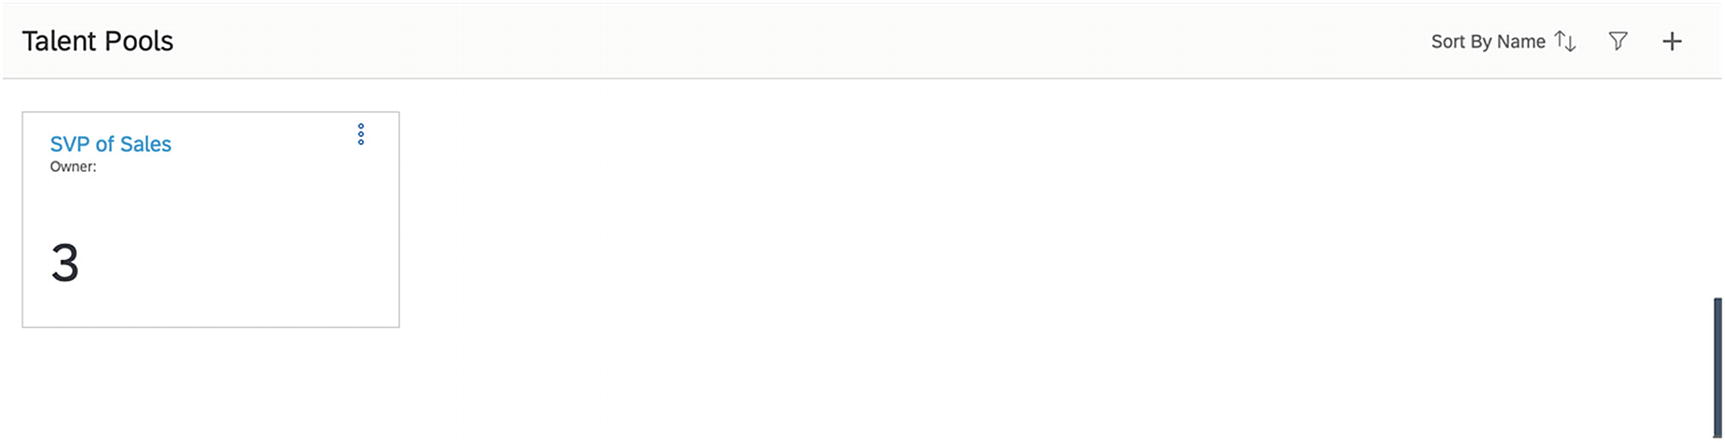
Talent Pools Filtered by Name “SVP of Sales”
- 6.
Click the three dots next to any Talent Pool name to edit the Talent Pool MDF object information or delete it.
- 7.
Click the name of the Talent Pool to view and edit the Talent Pool nominations within the Talent Pool. The screen will refresh showing any current nominations as seen in Figure 7-18.
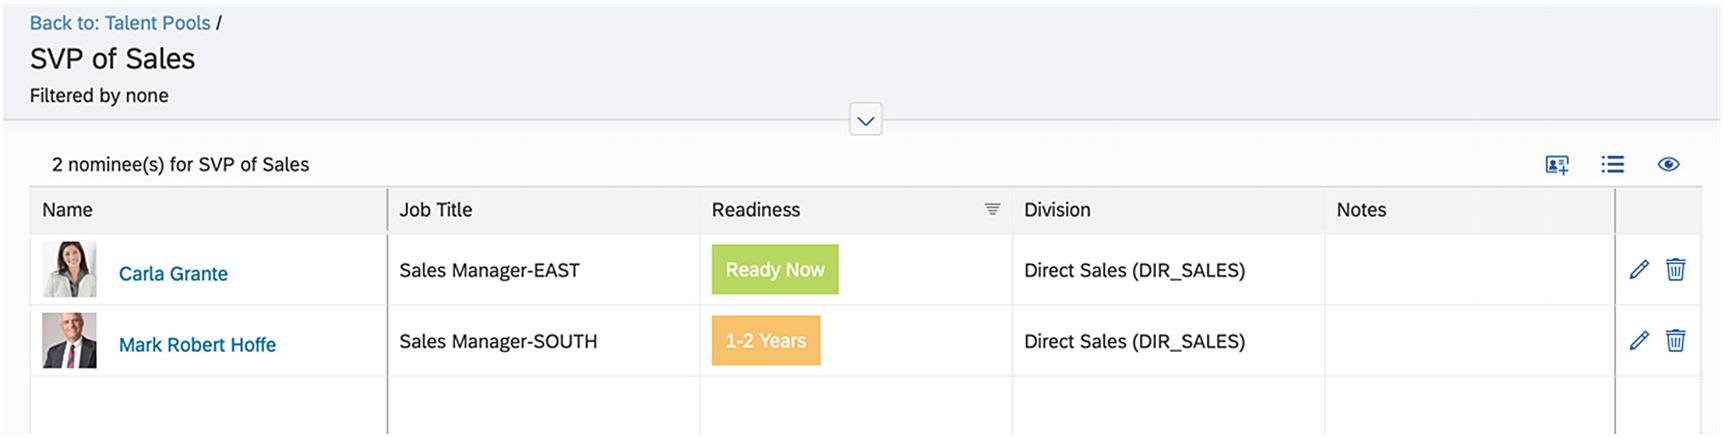
Talent Pool Nominations Screen
- 8.
To add an employee to the Talent Pool, click the business card icon. In the popup, type and select the name of the employee in the search bar. Click the “Next” button. Enter a readiness level and any notes and click “Submit.” You will be returned to the screen as shown in the preceding figure with the newly added employee showing.
- 9.
Repeat step 8 for any more nominations you would like to make.
Note So long as you have appropriate permissions, you can also make nominations from any talent card such as in the Succession Org Chart, Calibration, or Presentations, as well as from Talent Search. See those sections in this chapter for more details. These other areas are more commonly used to nominate employees because they offer more contextual information about the employees rather than simply typing their names.
- 10.
Click the menu icon to edit the Talent Pool MDF object properties.
- 11.
Click the eye icon. A popup will display as shown in Figure 7-19 to control which columns are displayed for each employee in the list of nominees. You will notice these are the talent fields you selected during configuration. Click the checkbox next to each field you would like displayed as a column and click “OK.” You will return to the main Talent Pool nominations screen.

Defining Columns to Display on the Talent Pool Nominations Screen
- 12.
You can click the title of any column to sort by each column in ascending or descending order.
- 13.
Click “Adapt Filters.” A popup will display showing the current filters. To add any of the fields from your configuration that are not yet being used as filters, click “More Filters.” In the new popup, check the boxes next to the fields you wish to add and click “OK.” You can remove fields by unchecking the boxes next to each. Each field shows a dropdown with all of the valid values for the nominees in the Talent Pool. Choose the values you wish to use to filter the list of nominees and click “Go” to apply the filters. You will return to the main nominees list with the filters applied. The filters will show in the filter bar at the top of the screen. Click the up or down arrow to toggle the filter bar open or closed.
- 14.
Click the pencil icon next to any nominee to edit the readiness or notes for the nominee in a new popup. Click Submit when completed.
- 15.
Click the trash icon next to any nominee to remove the nominee from the Talent Pool. Click “Confirm” on the popup to proceed with the removal.
For the sake of our model company example, we can easily see how Talent Pools could be used to electronically capture an active list of potential SVPs of Sales across the organization based on up-to-date talent data rather than maintaining manual offline lists based on out-of-date information. The Talent Pool screens allow users to organize their lists, and the MDF allows any needed data about Talent Pools to be captured. We can even use those MDF fields for enhanced security. Within our example, we could rest assured that the president of the United States can access Talent Pools at their level and lower, but not higher (say at the global senior leadership team level). We also understand that users could make nominations from a variety of areas in the system so that nominees are organized into Talent Pools whenever the idea or discussion occurs in the system or even proactively using Talent Search. In this manner, at the advent of a succession event, our users are well prepared to determine a list of highly qualified successors and prepare them for their new potential positions!
We can even map Talent Pools to job profiles directly when creating them using Job Profile Builder. When in the “Roles” tab of Job Profile builder, select a role and go to the “Mapped Talent Pools” tab. For the sake of our example, we could ensure the SVP of Sales Talent Pool is always associated with the job profiles as well so the pool shows up whenever viewed on the Succession Org Chart or Position Tile View. See Volume 1, Chapter 2 for more information on Job Profile Builder.
Position Tile View
The Position Tile View allows users to view positions from a different angle than the traditional org chart. Rather than viewing positions and their incumbents in a hierarchy, users can search by a variety of filters across all of the positions in the organization for which they have security access. The results are presented in a list of tiles that is sorted alphabetically. We are able to define what filters are available to the users with the MDF position object definition. This can be a very useful tool if you have added fields to your MDF position object definition that are key in differentiating positions in your organization. Let’s take a look!
Prerequisites for Configuring and Using the Position Tile View
Prior to starting our configurations, there are a few steps we need to take to ensure the system is ready. Let’s take a look at these in the following.
As with the “Succession Org Chart” section in the prior chapter, we assume MDF positions are being used per our recommendations for your Succession Org Chart. The Position Tile View cannot be used without MDF positions.
Provisioning

Provisioning Settings for the Position Tile View
Configurator Permissions
Like Talent Pools, we will need to define the MDF position object prior to using the Position Tile View. See “Configurator Permissions” in the “Talent Pools” section of this chapter for more details.
Configuring the Position Tile View
Once we have appropriate permission, we can configure the MDF position object. In the following steps, we will add a field and make it searchable so that we have an additional meaningful field by which and based on which we can filter our positions and set additional security permissions. Follow these steps to complete the configuration:
If your implementation is part of an Employee Central (EC) implementation, you may have already configured the position object or may want to work closely with the EC team to ensure you are building a cohesive solution as this is an important touch point between Succession Management and Employee Central!
- 1.
Type and select “Configure Object Definitions” in the search bar.
- 2.
In the “Search” field, select “Object Definition.” In the next dropdown, select “Position.” The Position object definition will appear as in Figure 7-21.
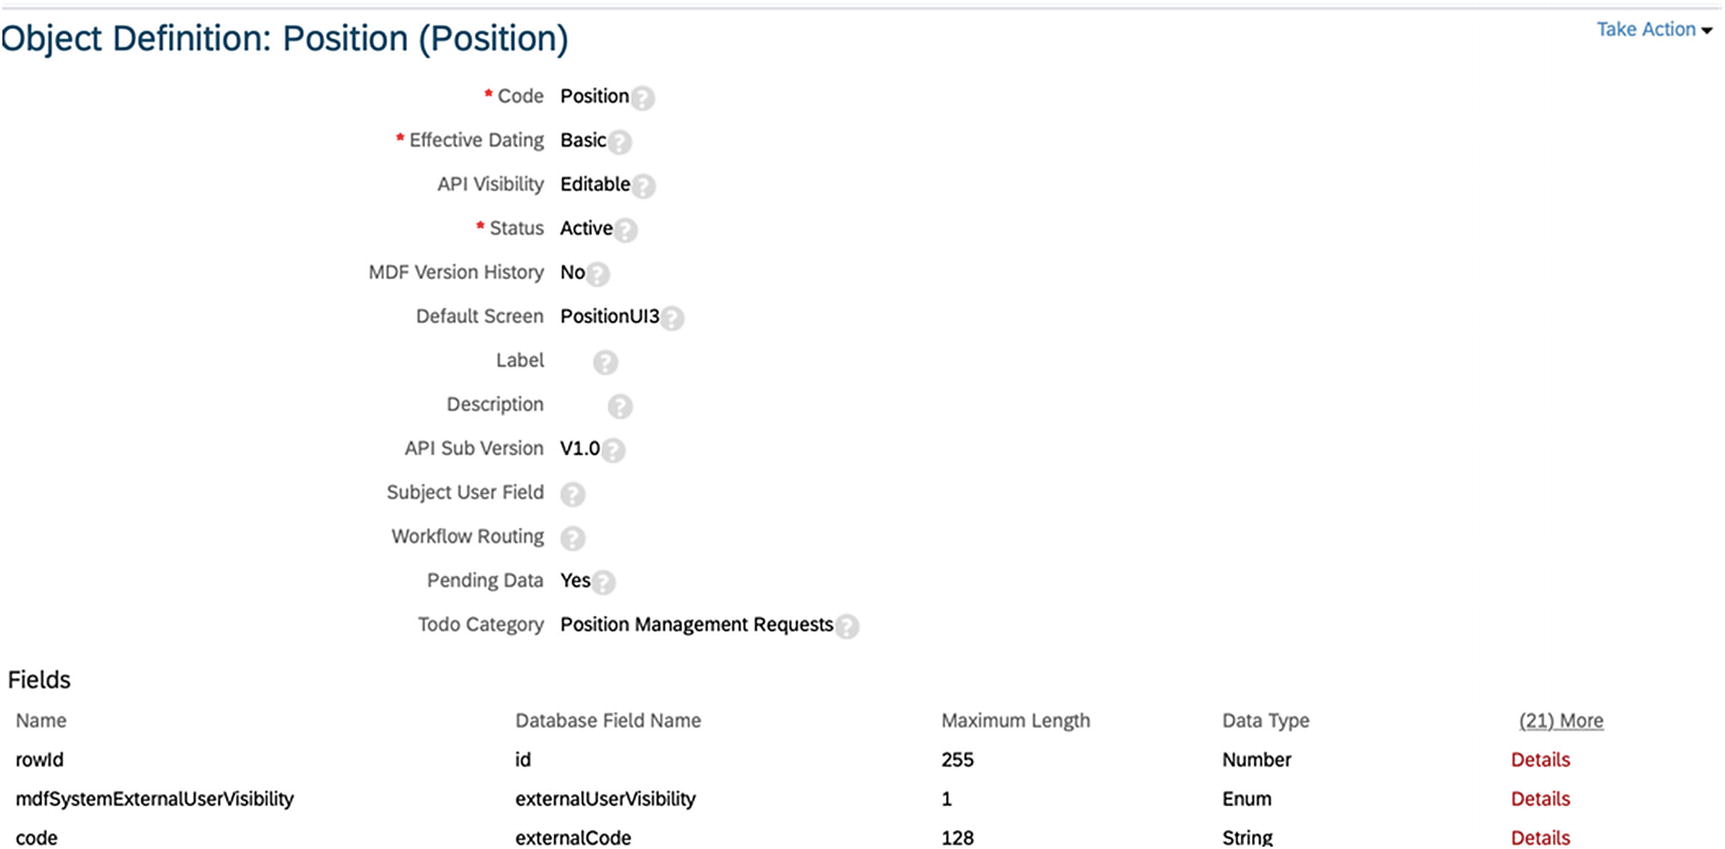
Position Object Definition
- 3.
Click “Take Action” ➤ “Make Correction.”
- 4.Scroll to the end of the “Fields” section and add a field by entering “cust_ExecutiveLevel” in the “Name” field, “2” in the “Maximum Length” field, and “Number” in the Data Type field. Click “Details” next to the fields. A popup will appear.
- a.
In the popup, scroll down to the “Label” field and type “Executive Level.” Click Done.
- 5.
Back on the main screen, scroll down to the “Searchable Fields” section and type “cust_ExecutiveLevel” in the “Name” field. Then scroll down to the “Security” section and select “Yes” for the “Secured” field and “Miscellaneous Permissions” for the “Permission Category” field. Scroll to the bottom and click “Save.”
Note While we don’t cover all of the available fields here and just try to show how a field is added and edited, at a minimum, you will need to make the code, effectiveStatus, effectiveStartDate, effectiveEndDate, and positionCriticality fields required. The Incumbent field should be included as well but can be optional since a position can be without an occupant. Job code should also be included if you wish to associate job classifications. You should also use this screen to ensure a proper picklist is created for your positionCriticality field. The picklist name MUST be EXACTLY “PositionCriticality.”
Configuring End User Permissions
- 1.
First, we will grant permission to the Position Tile View screen. On the “Permission settings” screen for your role, click “Succession Planners” and check the box next to “Position Tile Access” as seen in Figure 7-22.

Position Tile Access Permission
- 2.
Next, we will grant permissions to the position objects so that some positions will populate on the screen. On the “Permission settings” screen, click “Miscellaneous Permissions” and scroll to “Position.” Check the checkbox next to “View Current,” “View History,” “Create,” “Insert,” “Correct,” “Delete,” and “Import/Export” as shown in Figure 7-23. Click “Done.”

Granting Position Permissions
- 3.
You can further refine which Position an end user can access. For the sake of our example, we will use the new field we created, cust_ExecutiveLevel, to allow different users access to different positions. We will grant this specific role access to Executive Level 2 for use of the HR admins as shown in the following figure and assume another role will be created for Level 1 for use of the senior leadership team only. On the Permission Role Detail screen, click “Edit Granting” and scroll down to “Position” and select the radio button for “Restrict target population to:” Check the first checkbox and enter “Executive Level,” “>=”, and “2.” Click “Done.” An example is shown in Figure 7-24.
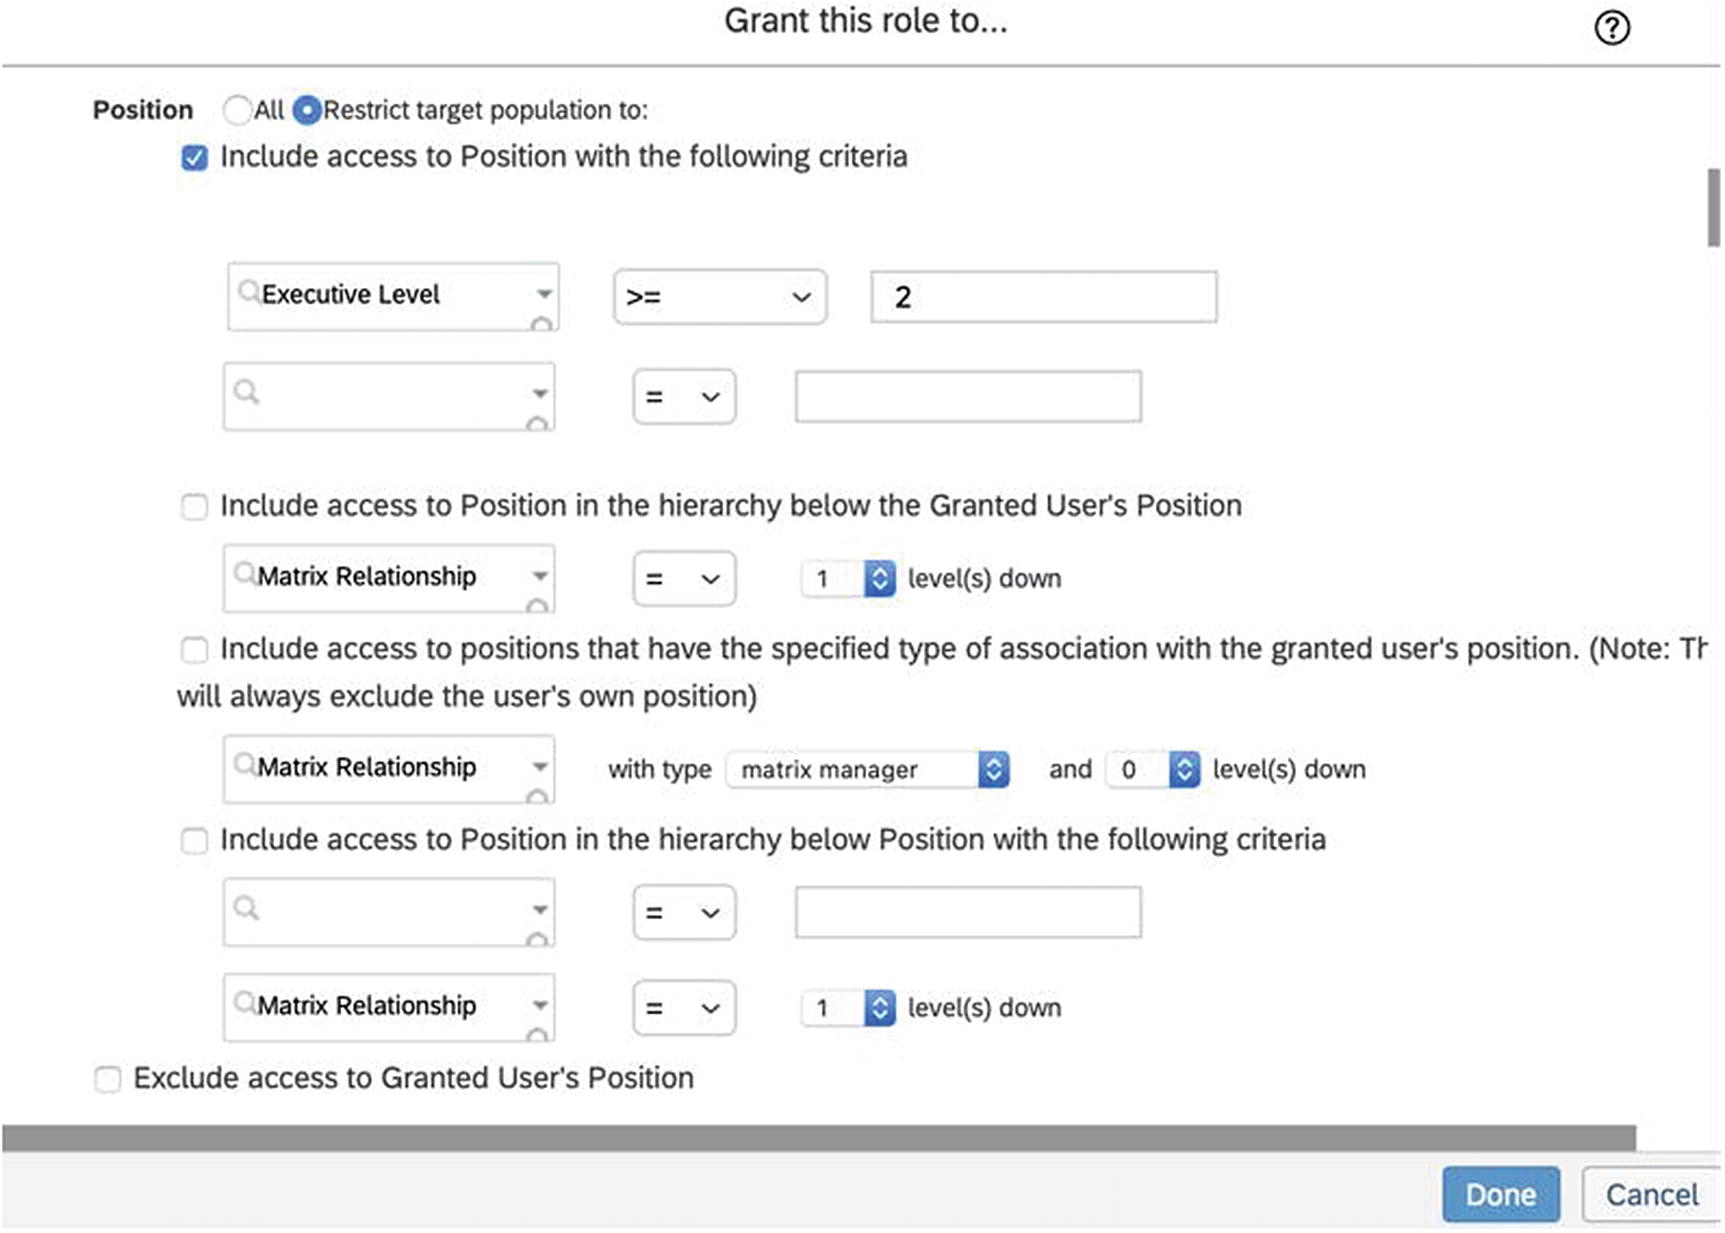
Refining Position Access to Executive Level 2 and Below
- 4.
It is important to remember the preceding permissions give the user access only to view and edit the position objects, not the permission to view the actual nominations within the positions! To add permission to view and make nominations, select the “Succession Planning Permission” as well from step 1.
- 5.
When you are finished with all permission role changes, click “Save.”
Using the Position Tile View
- 1.
In the search bar, type and select “Position Tile.” By default, the screen will load with results of all of the positions for which you have security access in alphabetical order by position name. The positions show as tiles with the position name at the top and the incumbent, if any, just below. Any named successors to the position are shown as well.
- 2.
Click the “+” icon to add a position. Note the fields here will vary depending on your configuration of the MDF position object. Enter the start date as today’s date and the title as “Regional Manager – Misc US Territories,” set “Status” to “Active,” and set “Executive Level” to “3.” Click “Save.” Then click the “x” on the confirmation screen.
- 3.
Click the funnel icon or “Add Filters” to open the filters pane on the right-hand side of the screen. Scroll to the bottom and click “Add” to add filter criteria. You will notice the “Executive Level” is present since we added this as a searchable field on our position object! Select the “Executive Level” and enter “3.” Click “Search” and the system will pull up our position! Click clear filters to show all available positions for your security again. See Figure 7-25.
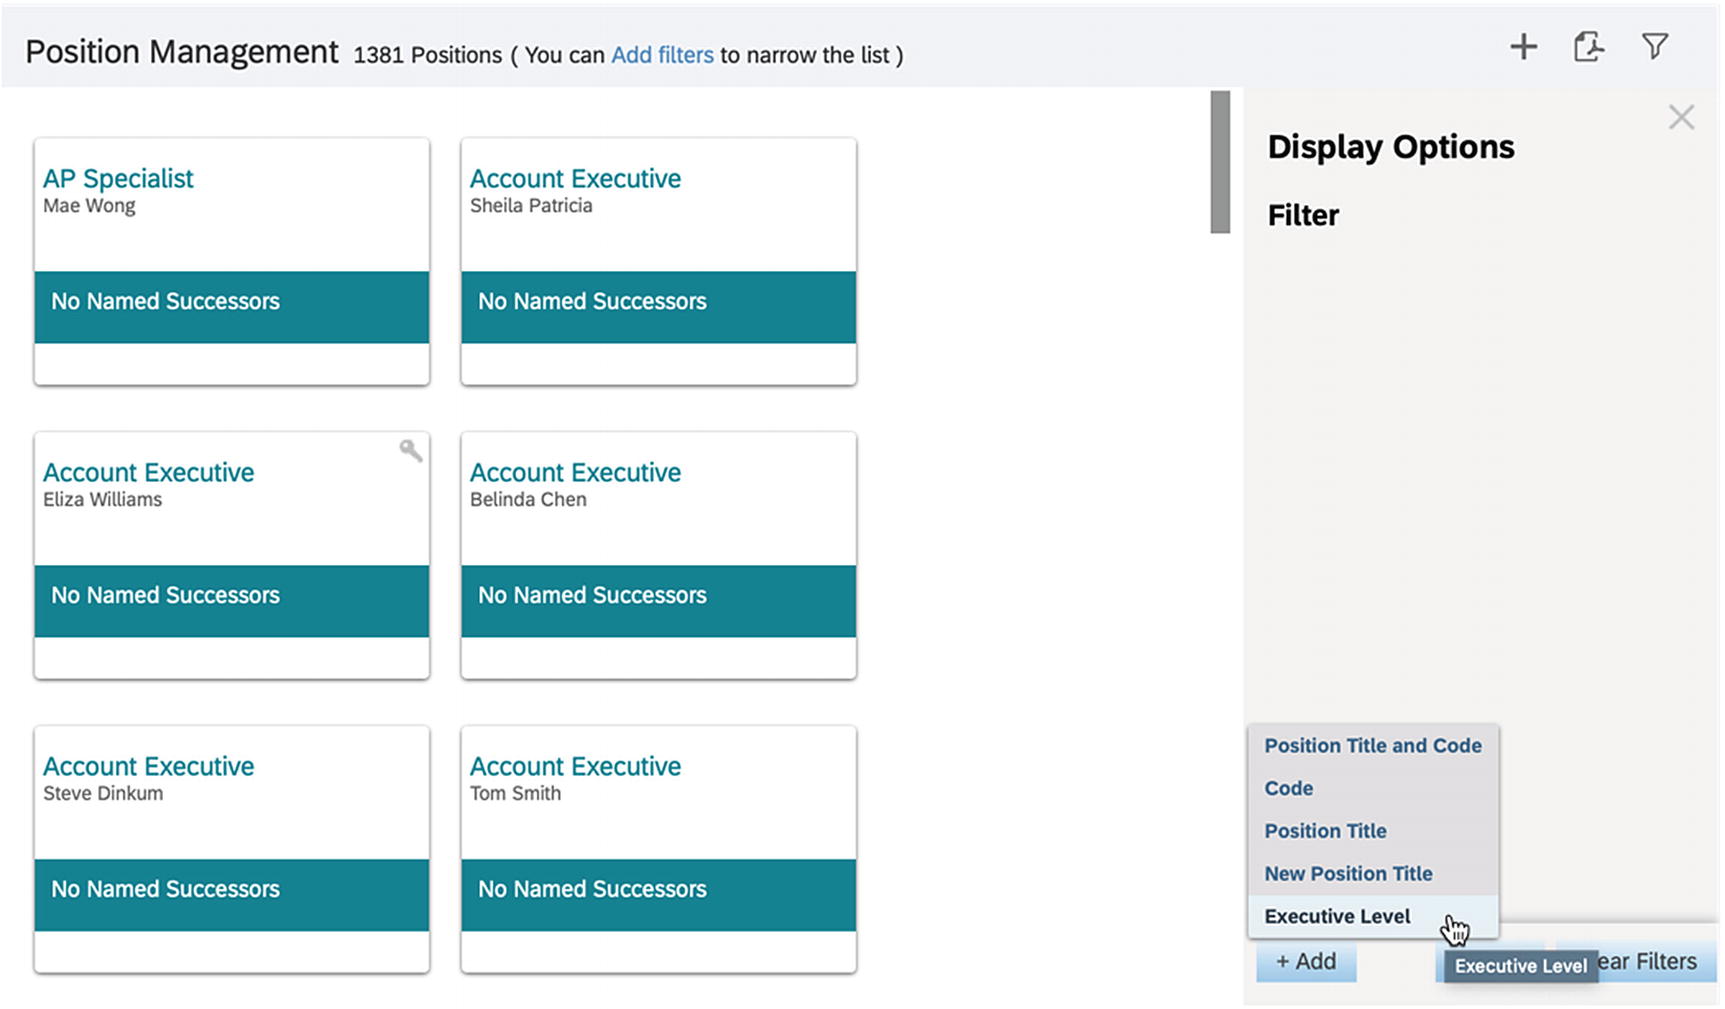
Position Tile View
- 4.
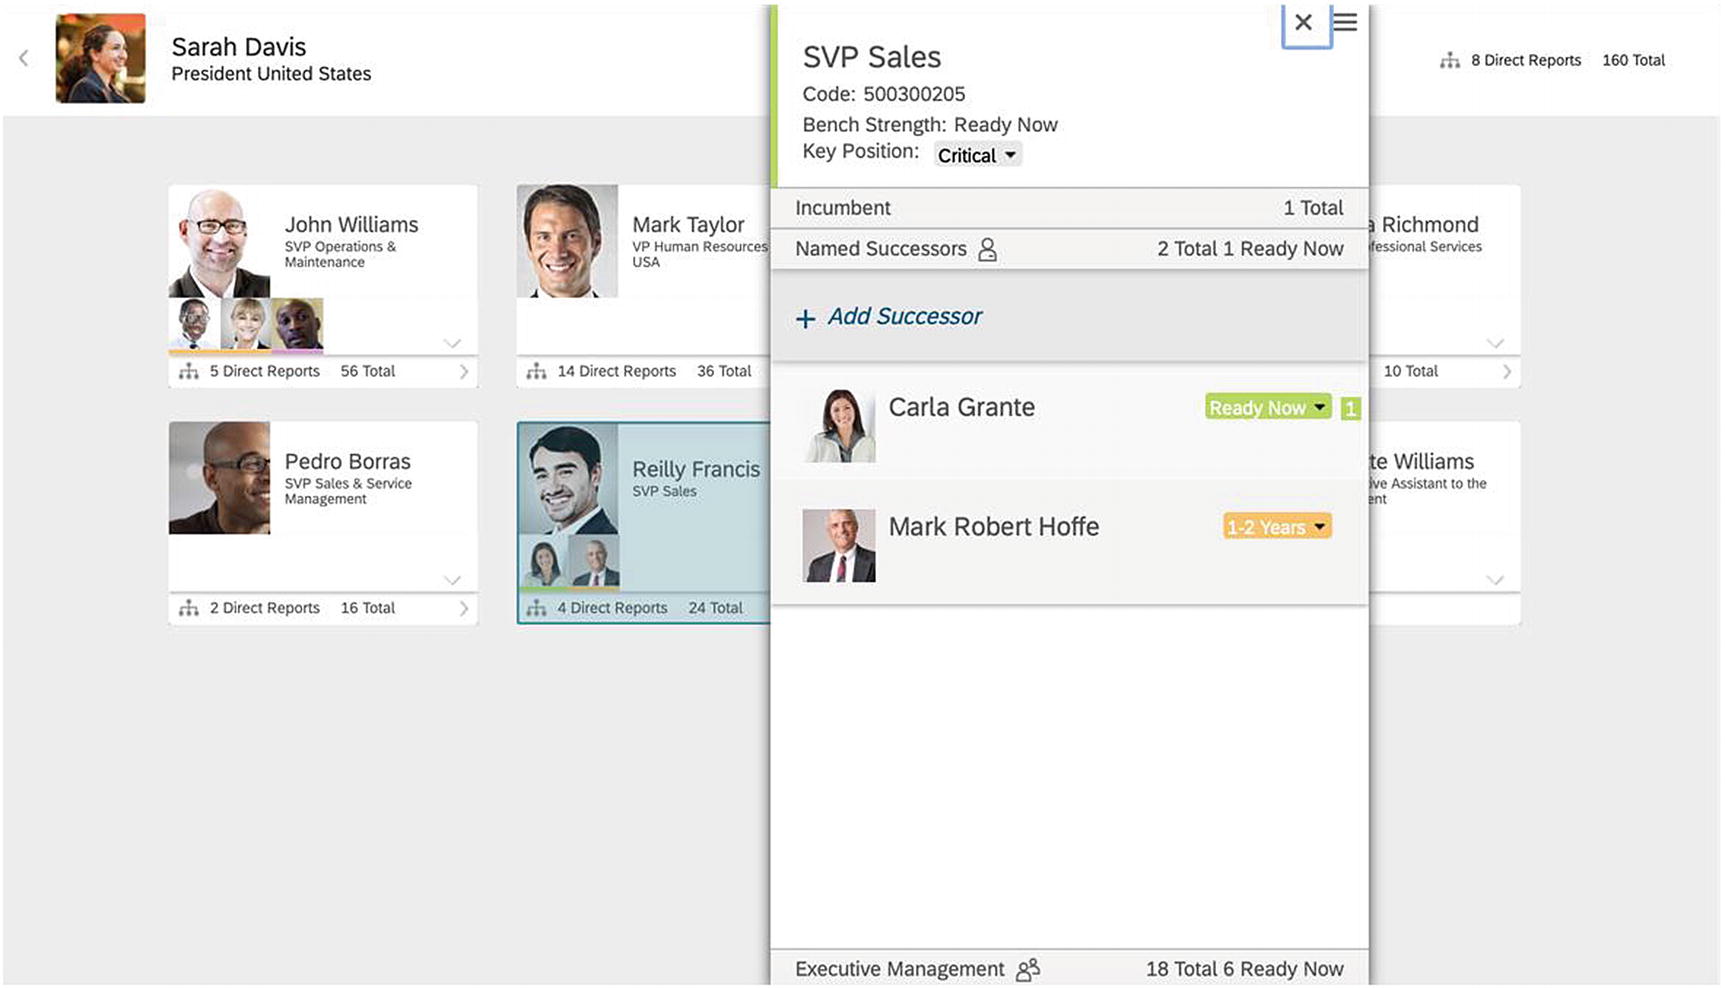
Click the tile of any position to bring up the position card. This works the same ass the Succession Org Chart where you can view incumbent talent cards, set the position as a key position, or nominate successors. You can also click the menu icon to edit the position, delete it, show nomination history, or view the Lineage Chart. Click the “x” to close the position card.
Note If you have implemented recruiting, you can also create a requisition from here as well!
- 5.
You can also click the download icon to download an output of the positions on-screen if you have created a BIRT report for this screen.
Note Downloading a printable version of this screen requires building a BIRT report and uploading it to Provisioning. The report can be uploaded in the “Import/Update/Export – BI Publisher Template/BIRT Template” section of Provisioning. We will not cover authoring a BIRT report in this book.
Lineage Chart
After you have made multiple nominations against various positions up and down the org chart via the Succession Org Chart or the Position Tile View, the Lineage Chart feature will start to become very useful! The functionality allows the user to visualize what a specific succession scenario might look like, not only in terms of the direct replacement but also those below that replacement.
Prerequisites for Accessing the Lineage Chart

Turning on Succession Lineage Report in Provisioning
Using the Lineage Chart
- 1.
Type and select “View Succession Lineage Chart” in the search bar.
- 2.
On the screen that appears, type the employee for whom you want to start the lineage in the new search bar that appears.
- 3.
When the employee appears, you can click the business card icon to open the talent card for the employee.
- 4.
Click the name of the employee to see all the text descriptions of the talent field icons showing for that employee (these are pulled from the Succession Org Chart configuration XML; see the “Succession Org Chart” section of Chapter 21 for more details).
- 5.
Click the bottom bar showing the number of nominations to vexpand and show tiles for those nominees.
- 6.
Repeat step 5 for all levels of the lineage you would like to view.
- 7.
Click and drag the mouse to move your view of the lineage. You can also use the “+” and “-” to zoom in and out. An example final output is shown in Figure 7-27.
- 8.
Click the down arrow icon to download the chart as a PDF or JPEG.
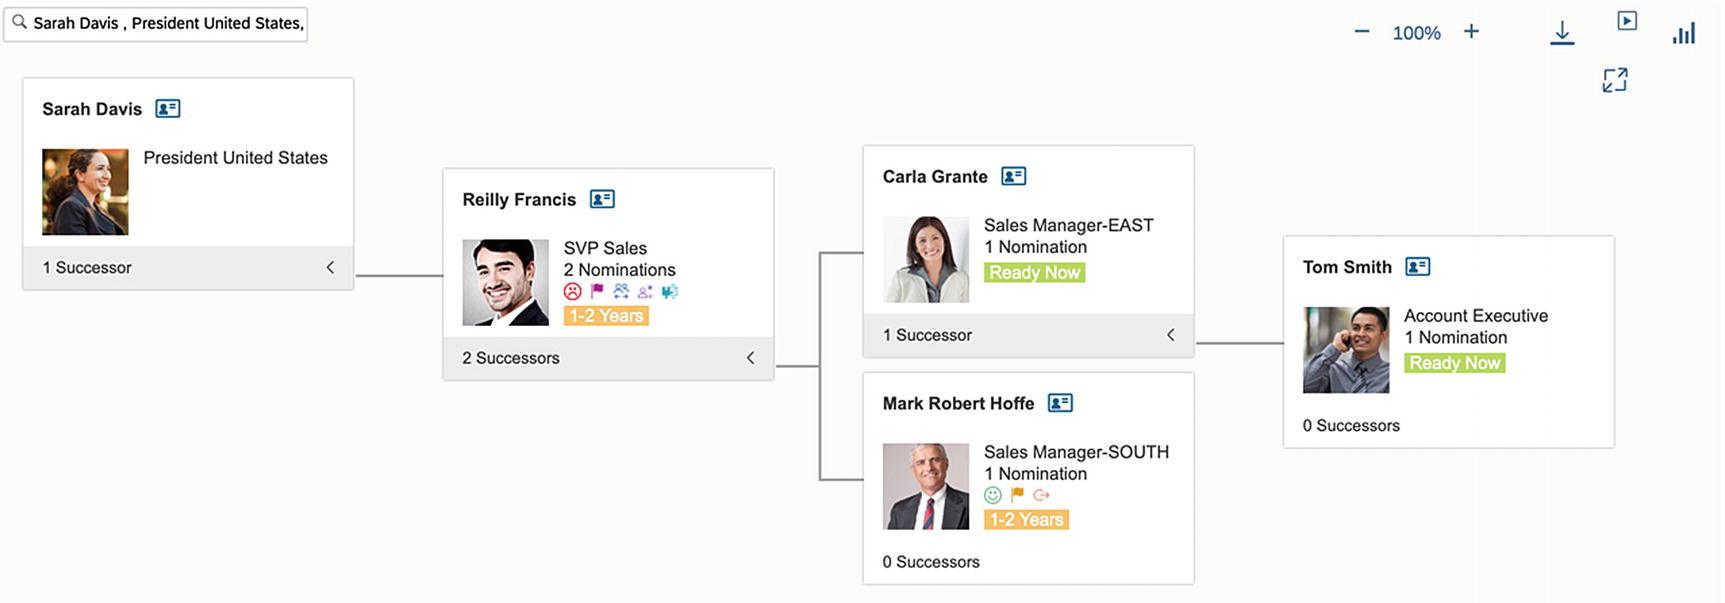
Example Lineage Chart
For the sake of our example model company, you can see how the President would find this tool very useful. They can not only see who might replace the SVP but also easily visualize who is lined up to replace those replacements as well! The example in the preceding figure shows a visualization of our model succession scenario quite nicely! The President can be confident that if the SVP moves into their position, there will be a regional sales manager ready now to take the SVP’s place and an account executive to take that regional manager’s place in turn.
Succession Presentations
Now that we’ve toured the entire set of configurations and features of Succession Management, we have one final feature left to cover: Presentations. Presentations are commonly used to present succession data in a guided way to senior executives during a succession meeting. This feature is popular with organizations who are new to online succession planning and have traditionally performed succession planning via manually building PowerPoint presentations to the senior leadership team. The feature makes a nice bridge between leveraging traditional PowerPoint format and taking advantage of the up-to-date information available in the system. Minimal configuration is required to activate Presentations. The features within Presentations once it is activated will adopt your configurations from the previous sections of this chapter.
Turning on the Presentations Feature
- 1.
Type and select “Upgrade Center” in the search bar.
- 2.
Find “Presentations” in the optional upgrades. Click “Learn More & Upgrade Now.”
- 3.
Click “Upgrade Now.”
- 4.
Click “Yes” and “OK.”
Granting Access to Presentations
- 1.
Type and select “Manage Permission Roles” in the search bar.
- 2.
When the screen loads, click the role you wish to modify. Then click “Permission…:”
- 3.
Click “Manage Presentations” and then select the checkbox next to “Manage Presentation” as seen in Figure 7-28. Click “Done.” Be sure to save your role on the main screen as well.

Manage Presentation Permission
The preceding permission will only grant access to the Presentations screen itself. It is important to remember that the data the user can see within the presentation is based on the target-based permissions we’ve already covered in this chapter for positions, employees, and nominations.
Using Presentations
- 1.
Before you can access Presentations for the first time, you will need to accent the End User Licensing Agreement (EULA). Type and select “Accept EULA” in the search bar.
- 2.
Click “Accept EULA” and read the EULA.
- 3.
Click Accept.
- 4.
Type and select “Presentations” in the search bar. The screen will appear as in Figure 7-29.
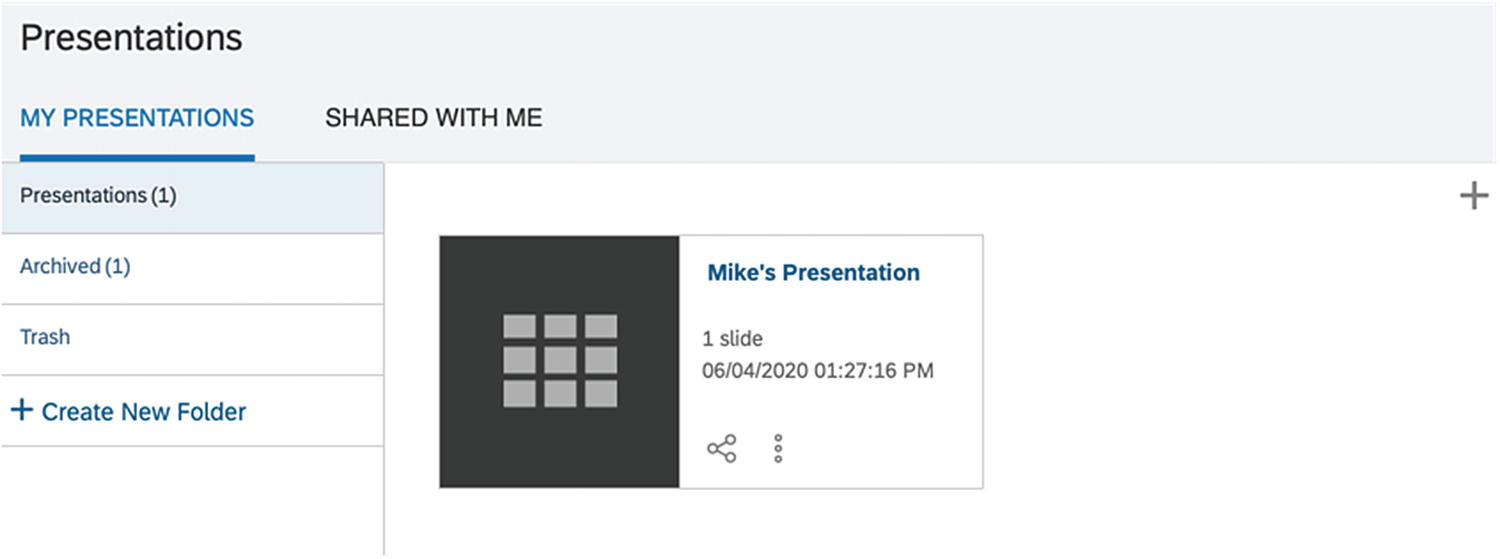
Presentations Main Screen
- 5.From this screen, you manage any existing presentations you have.
- a.
Click “Create New Folder” to create a directory aside from the default “Presentations,” “Archived,” and “Trash” folders. A popup will appear for you to enter the folder name. Click “OK” when done.
- b.
You can delete or edit the name of any folder you have created by mousing over the folder name and clicking the trash can or pencil icons, respectively (you cannot delete the default folders).
- c.
If you place a presentation in the “Trash” folder, it will not be deleted immediately. Mouse over the “Trash” folder to see the “Empty Trash” option which can be clicked to delete the presentations within.
- d.
To access a folder and see the presentations within it, click the name of the folder.
- e.To create a presentation, click the “+” sign.
- i.Type a presentation name in the popup that appears and click “OK.” You will see the Presentations edit screen load as shown in Figure 7-30.
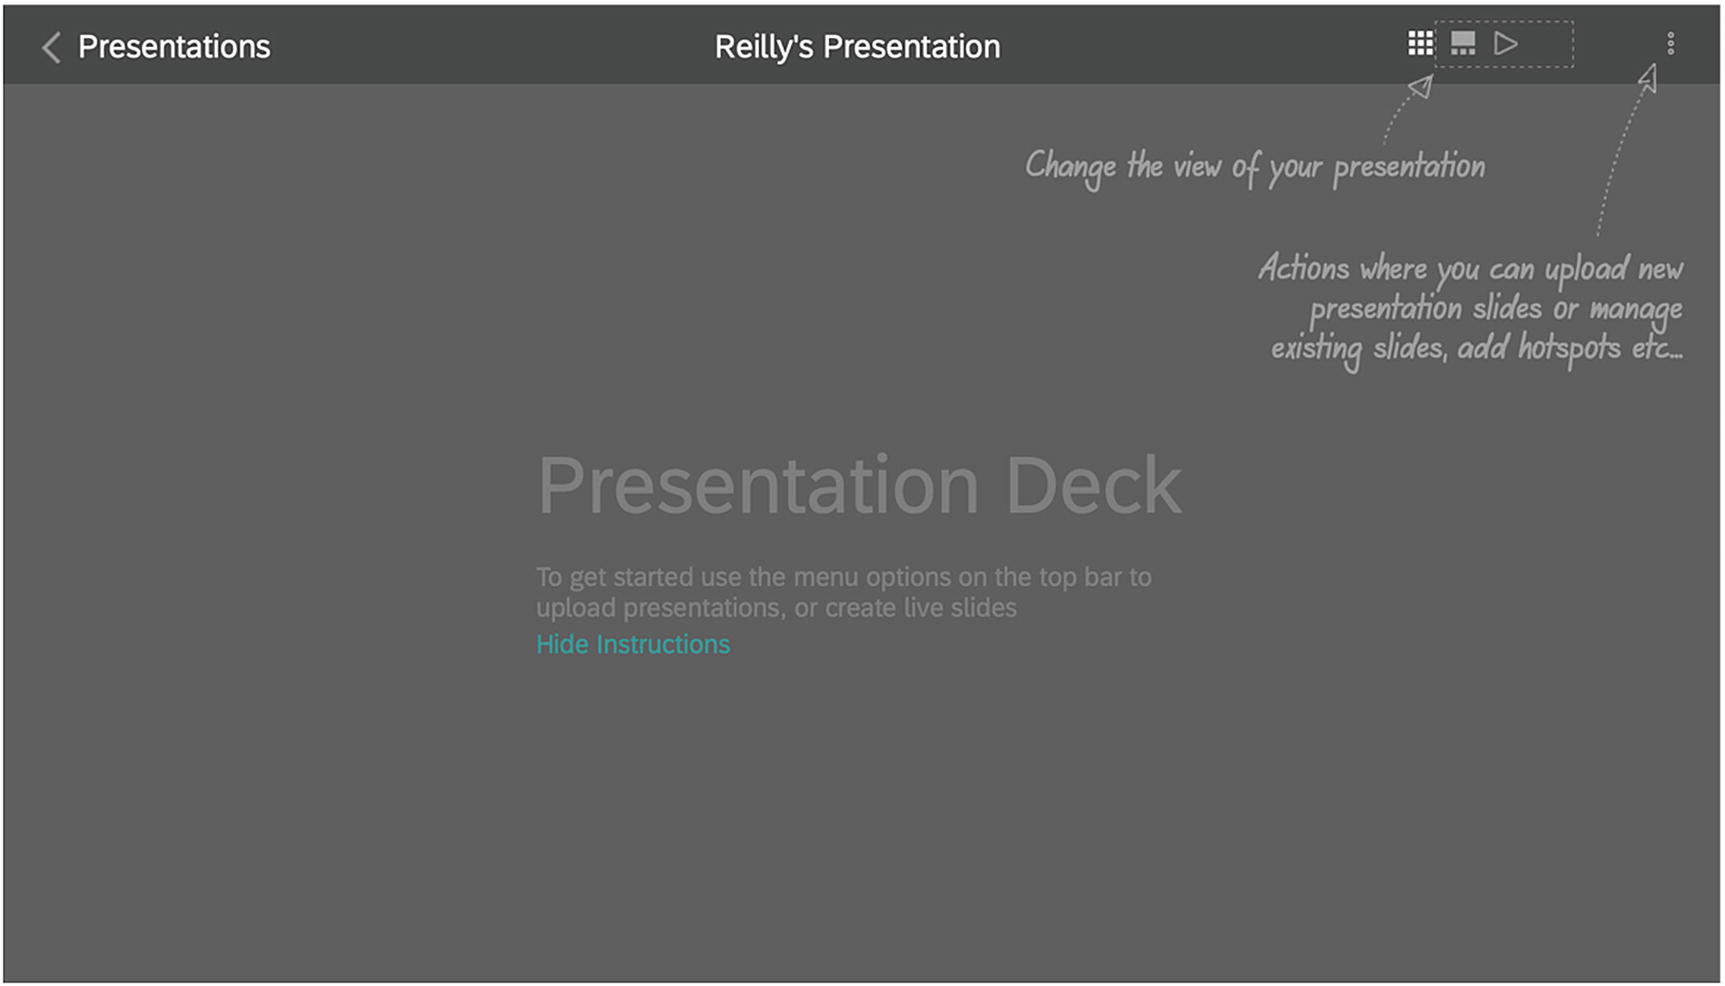 Figure 7-30
Presentations Edit Screen
- ii.
Click the three dots menu icon in the upper right-hand corner. The menu will give you the option to upload a PowerPoint or PDF to start from, add a live slide, edit the presentation details (which is just editing the name), print the presentation, or delete the presentation. If you have a slide selected, you can also create a customized slide (if the slide you are on is an uploaded slide), edit the slide that you selected when you created it, and edit the slide contents (which simply allows you to edit hotspots).
- 1.
Click “Add a Live Slide”. Select your type of live slide based on Table 7-1.
- 2.
Printing the presentation will give you options on how you want each type of slide included in your presentation to be formatted prior to final printing. Click “Print.”
- 3.
Editing the slide contents introduces the concept of hotspots which simply let you click the area of the hotspot in presentation mode to either open a link or a talent card for a particular individual. After selecting this option, click the square icon in the upper right-hand corner of the slide you are editing and then click and drag over the area of the slide you wish to make a hotspot. Then choose the link or individual you would like to show when clicking the hotspot from the menu that appears. Click “OK” to finish the hotspot. Then click “Done” when you are finished editing all slides.
- 4.
Creating a custom slide allows you to choose one of your static uploaded slides to overlay with live talent information using a drag and drop editor as shown in Figure 7-31. Selecting this option will prompt you to find an employee whose info you want to enter prior to bringing you to the editor shown in the following figure. The concept from SAP is to use this to replace the pixel-perfect talent card.
Available Live Slides
Live Slide Name | Description | Sample Screenshot |
|---|---|---|
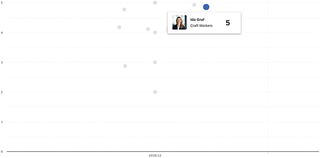
Performance-Potential Matrix | Creates a 9-box showing live data based on your matrix grid configurations. Requires you to select a particular team or group as well as date parameters as you would in the matrix grid report. |
|
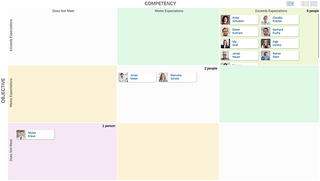
How vs. What Matrix | Same as in the preceding but for objective-competency configurations. |
|
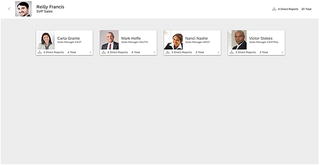
Succession Org Chart | Displays an area of the Succession Org Chart starting from a particular person or position you specify. You can optionally choose to include matrix reports and/or only show key positions. |
|
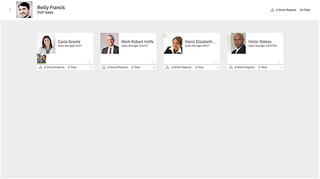
Team View | Displays the talent cards for a particular team starting from a manager of your choosing. The only difference with the previous slide is the exclusion of succession nominee information. |
|
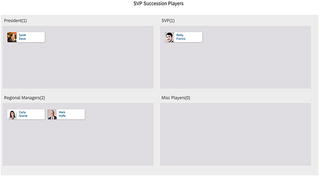
Talent Pools | Select one or more Talent Pools to which you have access to view on the slide. |
|
People Grid | Used to compare a static set of individuals on one slide. Select the orientation of one to four grids and add the individuals you prefer to each grid. |
|
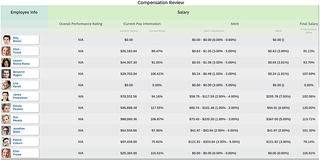
Compensation Review | If you have implemented the Compensation Management module, you can use this slide to present any relevant compensation fields for whatever team or group you choose. |
|
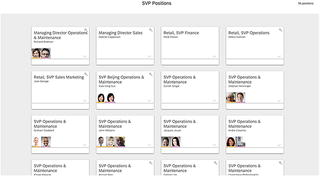
Position Tile | Allows you to run a search query for positions based off of your available MDF searchable fields and shows the tiles for those positions. |
|
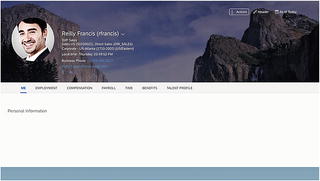
People Profile | Allows you to display the Talent Profile for an individual. Multiple slides can be added at a time using a group or team as your selection criteria. |
|
Performance History | Displays performance history for a particular process, date range, and individual or team or group of individuals. |
|
Analytics | Displays up to four analytics tiles from your library of available tiles. |
|


Editing a Custom Slide
Many users begin creating their presentations offline using PowerPoint or by creating a PDF. Often, presentations are a combination of “live” slides that are created in the tool and access real-time data and these uploaded slides which include text and images created offline.
- iii.Once slides are added to the presentation, the three view mode icons at the top toggle between seeing all slides as small icons, seeing a large preview of each slide as they are selected from a scrolling list on the bottom, or viewing them in presentation mode.
- 1.
In presentation mode, you can progress through your slides by clicking the left or right arrow, click your hotspots, or click any individual shown on a live slide to view their talent card as shown in Figure 7-32.
Presentation of Succession Org Chart Live Slides Showing a Talent Card
- 2.
To exit presentation mode, click the down arrow in the upper left-hand corner of the screen (it will only appear when you mouse over it!).
- iv.
To return to the main screen, click “Presentations” in the upper left-hand corner of the screen.
- f.To share a presentation, click the molecule icon.
- i.
A new popup will appear to let you search by name or by group (see the “ Running and Using the Matrix Grid Reports” section of Chapter 5 for reference on how to create groups).
- ii.
Enter and select the name or group. Repeat as necessarily until you have all individuals and groups with which you would like to share.
- iii.
Optionally check the box to email the individuals with whom you are sharing. You can also customize this email by clicking the “Customize Email” button. (You can edit and activate this email template in the “E-Mail Notification Templates Settings” screen).
- iv.
Click “Done” to share the presentation.
- g.
Click the three dots menu icon on a presentation to edit the title, copy it, move it to another folder, or delete it. Selecting delete will only move the presentation to the “Trash” folder.
- h.
Click the “SHARED WITH ME” tab to view presentations others have shared with you. You can only view and copy a presentation which has been shared with you.
For the sake of our model company, our president, as well as any supporting HR admins, now has access to a tool that frees them up from the manual processes involved with creating a presentation to their senior leadership team. They can quickly put together a presentation for these executives that illustrates the situation with the SVP and regional managers with factual up-to-date information presented in an organized and guided manner rather than having to have a difficult conversation or attempting to use potentially out-of-date spreadsheets as a reference.
Conclusion
We hope you have enjoyed this tour of configuring and using Succession Management! At this point, you should now have a solid understanding of what each of the features is and how to configure and grant access to them. In addition, we’ve stepped through recommended settings based on real-world experience and also touched based periodically on how our model company would take advantage of all the features of the module. With this system and practical application knowledge, you should be well on your way to empower any organization with this robust succession tool!