SQL Server runs on any platform you need, edge to cloud. Regardless of where you run SQL Server, we have seen a trend in the industry and for our customers to connect SQL Server to the cloud. Connect is a pretty broad term, so in this chapter you will learn the details of exactly how SQL Server 2022 can be connected to the cloud.
First, I’ll give you my perspective on what hybrid means and how SQL Server has been a hybrid platform over the years. Then I’ll go into each of the main areas where SQL Server 2022 is now Azure enabled in ways never seen before. This includes managed disaster recovery, near-real-time analytics, and new security capabilities. As part of this story, I’ll describe how Azure Arc is used to enable some of these technologies.
In this chapter there are examples for you to go through to learn how these features work. For any of these features, you will need an Azure subscription and the ability to connect your SQL Server to Azure, either directly connected to the Internet or through a proxy. Your company or organization may already have an Azure account for you to use or a subscription. However, if you need your own, start at https://azure.microsoft.com/get-started. I’ll describe more throughout this chapter specific access rights you may need for each scenario and any special connection configurations you may want to use like a proxy.
The Hybrid SQL Server
In this section of the book, I’ll give you my perspective on what the term hybrid means in relation to SQL Server, a brief history of how SQL Server has had hybrid capabilities in previous releases, and an overview of what is special about SQL Server 2022.
What Is Hybrid?
A product or service offered both on-premises and the cloud with consistency
SQL Server definitely meets this qualification given that SQL Server runs in the cloud with Azure SQL: SQL on Azure Virtual Machines, Azure SQL Managed Instance, and Azure SQL Database. Notice my emphasis at the end of the phrase: “with consistency.” I say this because you might be able to find other products that exist on-premises and in the cloud, but do they have the same consistency story as SQL Server? Same core database engine, same T-SQL language, and same tools.
A product on-premises connected to the cloud to enhance data capabilities
There are two keywords in this phrase: connected and enhance. Connected means to connect data somehow from an existing feature in the on-premises product. Enhance means there is true business value to this connection. You will see in this chapter that I believe SQL Server 2022 does both.
Let’s first look at how SQL Server has been connected to Azure over the years to set some context.
SQL Server Hybrid Over the Years
The most basic feature SQL Server has included for hybrid for several releases is backup. Starting with SQL Server 2012, you are able to back up or restore databases to and from Azure Blob Storage using a syntax that includes a URL. This feature has been enhanced over the years and still exists today, which you can read about at https://docs.microsoft.com/sql/relational-databases/backup-restore/sql-server-backup-to-url.
There are other methods to connect SQL Server to Azure including using existing features to extend high availability, redundancy, or queries. For example, you can extend an Always On Availability Group to Azure, which you can read about at https://docs.microsoft.com/previous-versions/azure/virtual-machines/windows/sqlclassic/virtual-machines-windows-classic-sql-onprem-availability.
You can also set up transaction replication where the publisher is an on-premises SQL Server and a subscriber database is on an Azure Virtual Machine, Azure SQL Managed Instance, or even Azure SQL Database (you can read specific instructions on how to set this up for Azure SQL Database at https://docs.microsoft.com/azure/azure-sql/database/replication-to-sql-database).
And finally, any Azure SQL service can be the data source for a linked server query from SQL Server. These are fundamental methods to connect SQL Server to Azure, but SQL Server 2022 takes it to the next level.
The SQL Server 2022 Hybrid Lineup

The S Q L server 2022 with 3 built in abilities is cloud connected to 5 azure-enabled capabilities from replicated data failover to assessments alerts.
SQL Server 2022 is cloud connected
From left to right at the top, SQL Server 2022 has built in the ability to provide these cloud-connected features.
Azure SQL Managed Instance
The link feature for Azure SQL Managed Instance provides managed disaster recovery for SQL Server 2022. The built-in capability of a Distributed Availability Group (DAG) is used to bridge SQL Server and Azure SQL Managed Instance.
Azure Synapse Analytics
Azure Synapse Link for SQL Server allows SQL Server 2022 to seamlessly synchronize data in selected tables directly to Azure Synapse–dedicated SQL pools. The self-hosted integration runtime (SHIR) is used to coordinate between Synapse and SQL Server, but SQL Server also has built-in capabilities to send data to Azure.
Azure Active Directory Authentication
SQL Server 2022 can now authenticate login using an Azure Active Directory (AAD) account. This allows support for concepts like Multi-factor Authentication. You have to enable AAD with SQL Server 2022 to support Purview-integrated policy management. AAD for SQL Server 2022 requires the Azure extension for SQL Server.
Microsoft Purview
Microsoft Purview has many capabilities, but the specific new feature integrated with SQL Server 2022 is policy management. You can use Purview to publish a policy that will be pushed to SQL Server 2022 to support authentication and access. Purview policy management with SQL Server 2022 requires that you have configured Azure Active Directory (AAD) authentication for SQL Server because policies will be based on an AAD account. Purview policy management also requires the Azure extension for SQL Server.
Microsoft Defender for SQL
Microsoft Defender for SQL, a member of the Microsoft Defender for Cloud family, supports vulnerability assessments and advanced threat protection (ATP) for SQL Server 2022. Microsoft Defender for SQL works across many SQL technologies and supports previous versions of SQL Server. Microsoft Defender for SQL for SQL Server on-premises requires the Azure Arc Agent and an extension for monitoring. I do not cover this service in detail in the chapter. You can read more about Microsoft Defender for SQL at https://docs.microsoft.com/azure/defender-for-cloud/defender-for-sql-usage.
Azure Arc Agents and Azure Extension for SQL Server
The Azure Arc Agent, which is installed when you choose to connect to Azure in SQL Server setup or through a script method, is used to connect Microsoft Purview, enable Azure Active Directory Authentication (AAD), and support Microsoft Defender for SQL. The Azure Arc Agent supports an extension framework for specific capabilities. We have built an extension called the Azure extension for SQL Server. This extension communicates with Azure to store information in the registry (or mssql.conf for Linux) that the engine has enhanced to support for AAD and Purview. Microsoft Defender for SQL uses another extension called the Monitoring Agent. You can read details about the Azure Arc Agent architecture at https://docs.microsoft.com/azure/azure-arc/servers/agent-overview. The Azure Arc Agent and extensions are designed for SQL Server on-premises. SQL Server on an Azure Virtual Machine has a similar concept but uses a different architecture including the SQL Server IaaS Agent Extension (https://docs.microsoft.com/azure/azure-sql/virtual-machines/windows/sql-server-iaas-agent-extension-automate-management). At the time of the writing of this book, Microsoft Purview and Azure Active Directory authentication were not yet supported by the IaaS Agent Extension. However, it is our plan to enable this capability, and we can enhance the extension on a timeframe different than releasing a major version of SQL Server.
The rest of the chapter is devoted to a deep dive into each of these cloud-connected capabilities. You can read all sections or jump straight to a particular cloud service you want to learn about.
Managed Disaster Recovery with Azure SQL Managed Instance
You only need to worry about disaster recovery when you…well, have a disaster. But of course no one ever knows when that is, which is why having a plan for disaster recovery for your SQL Server data and installation is a key component for any production system.
How you build your disaster recovery system is typically dependent on industry terms you may know such as Recovery Time Objective (RTO) and Recovery Point Objective (RPO). Our high-availability solutions such as built-in crash recovery for SQL Server and failover clusters can help with these requirements. The reason these solutions typically don’t help with disaster recovery is because a true disaster usually means your local copy of data is not available.
SQL Server provides many solutions to help including a basic database backup and restore solution where you typically store your backups in a different physical location that could be retrieved and restored should a disaster situation occur. You could even set up an Always On Availability Group with secondaries in different physical locations, but this could require a more complex cluster setup.
For SQL Server 2022, we wanted to provide a new option for disaster recovery, which I call managed disaster recovery.
Project Chimera and DAG
In order to understand how we built a managed disaster recovery solution, let’s look at the background of this new capability.
Distributed Availability Groups
To help with disaster recovery scenarios, we built a new feature in SQL Server 2016 called Distributed Availability Groups (DAGs). A DAG is an availability group that spans multiple availability groups (AGs) typically across distant regions. The great thing about DAG technology is it is all built into SQL Server. In fact, AG technology is also built into SQL Server to manage data replication. Technologies like Windows Server Failover Cluster (WSFC) and Pacemaker (Linux) are used to coordinate failovers.

A diagram shows D A G -configured S Q L server. Log changes flow from datacenter 1 to datacenter 2. Each datacenter has primary and secondary units.
A SQL Server Distributed Availability Group (DAG)
You can see one interesting aspect to this design is that the primary replica in Availability Group 1 (AG1) sends transaction log changes to a secondary replica in its AG but also sends changes to the primary replica of Availability Group 2 (AG2). The primary replica of AG2 forwards log changes to its secondary replica. Users can only write changes to the primary replica of AG1. But should circumstances arise, you could fail over to AG2, and now users could write to the primary replica of AG2. All the communication and replication of data between the replicas and AGs are managed within the SQL Server engine.
The fact that both an AG and DAG were built into SQL Server gave us the idea to extend this concept as a hybrid approach. Why couldn’t the second AG be in Azure? But not just in Azure, as you could definitely build a DAG between a SQL Server in your data center and the second AG on an Azure Virtual Machine. We wanted to build something new and revolutionary.
Project Chimera
Around 3 years ago, our engineering team that works on Azure SQL Managed Instance came up with an idea that led to a project called Chimera. As Dani Ljepava, Senior Program Manager with the Managed Instance team, told me, “Chimera is a mythical beast from Greek mythology, looking like a dragon with multiple heads from different animals all in one. As we are building a hybrid capability between SQL Server and the cloud, Chimera seemed like a perfect name for the project at it was referring to a hybrid beast – many animals in one.”
The team first started out to simply build a link between a SQL Server and an Azure SQL Managed Instance (MI) so that MI could be used as a read replica and eventually a target for online migration from SQL Server. Eventually the project charter grew as we laid plans for project Dallas so that this feature could support a disaster recovery scenario for SQL Server 2022.
Dani told me, “We were faced with solving problems that nobody has addressed before at Microsoft and had to go through some unique challenges along the way (and still going on today as we speak). Having said that, nobody before has built an online DR between SQL Server and fully managed Azure PaaS service.”
As we moved toward the Private Preview announcement of SQL Server 2022, we branded Chimera as the link feature for Azure SQL Managed Instance.
The Link Feature for Azure SQL Managed Instance
The link feature for Azure SQL Managed Instance allows you to connect or link an existing SQL Server database to a Managed Instance in a simple and seamless manner. We use the power of built-in availability group and Distributed Availability Group technology in the SQL Server engine along with some magic behind the scenes for Azure SQL Managed Instance.
The link feature for Azure SQL Managed Instance can be used with databases for SQL Server 2016, SQL Server 2019, or SQL Server 2022 (SQL Server 2017 support to be added later). The feature supports the ability to replicate data through AG technology to an Azure SQL Managed Instance (MI) and use the MI database for read-scale scenarios. If you eventually want to migrate from SQL Server to MI, you can then fail over to MI, and it now becomes the primary system. This is a one-way operation, which is why it can help you set up an online migration solution to Azure (and since we are using AG technology, it is the fastest method to migrate online to MI). This capability is sometimes referred to as unidirectional replication to Azure MI.
Unique to SQL Server 2022 is the ability to set up a link to Azure SQL Managed Instance where Managed Instance is declared as a disaster recovery site, failover to MI online, but then at some point failback offline to SQL Server 2022. This capability is sometimes called bidirectional replication to Azure MI. I’ll explain in the section later in this chapter called “Using the Link Feature for Offline Disaster Recovery” how the failback is offline and why I call it managed disaster recovery.
How It Works
Let’s take a look at how the link feature for Azure SQL Managed Instance (MI) works by seeing how to create the link and failover to MI.
Creating and Using the Link
The link feature for Azure SQL Managed Instance uses a combination of built-in T-SQL and PowerShell scripts to create an availability group on SQL Server 2022 (if one does not exist) and a Distributed Availability Group across SQL Server 2022 and Azure SQL Managed Instance (any service tier) that includes a database from your SQL Server 2022 instance. The process to create the link is also made easier through new GUI wizards in SQL Server Management Studio (SSMS) with an option in Object Explorer from a database context called Azure SQL Managed Instance link ➤ Replicate database.

A diagram shows link for Azure S Q L managed instance. Steps 1 to 6 are azure network, availability group 1, D A G async, create link database seeding, log changes, and availability group 2.
Link feature for Azure SQL Managed Instance
- 1.
Establish networking connectivity between SQL Server and Azure SQL Managed Instance using Azure networking and database mirroring (dbm) endpoints.
- 2.
Create an availability group (AG) on SQL Server 2022 and database mirroring (dbm) endpoint if one does not already exist. Build the AG as clusterless or CLUSTER_TYPE = NONE. We won’t use any clustering technology for the AG because this is not an automatic failover-based solution. An existing AG could have a secondary replica already. It turns out that an interesting but not well-known feature is that if you build your own AG, you don’t have to have a secondary replica (availability mode is not used in this case). But you must create an AG so you can create a DAG.
- 3.
Create a Distributed Availability Group (DAG) including the SQL Server 2022 AG and your Managed Instance name.
- 4.
Create a link to Azure SQL Managed Instance (PowerShell cmdlet). This establishes an AG for a General Purpose service tier Managed Instance or uses an existing AG from a Business Critical service tier (which already has a secondary replica). Note again that an AG doesn’t have to have a secondary replica, which is why this solution can work very nicely for a General Purpose service tier. Creating the link also initiates a copy or seeding of the database to Azure SQL Managed Instance. Seeding uses the dbm endpoint to stream a copy of the database to Managed Instance. You can read more about how seeding works at https://docs.microsoft.com/sql/database-engine/availability-groups/windows/automatically-initialize-always-on-availability-group.
- 5.
Changes now made on the primary will be transmitted automatically as log changes to Azure SQL Managed Instance.
- 6.
Users can connect to Azure SQL Managed Instance and access the database as read-only and also access secondary replicas for Business Critical service tiers.
Note When the final version of the link feature for Azure SQL Managed Instance is released, it is possible we may offer an option for you to declare your Managed Instance for disaster recovery (DR) purposes. The concept would be to make Managed Instance in this scenario license-free so you would only pay for compute and storage. If this option becomes available, you would not be able to read from the Azure SQL Managed Instance database since you are only using this for DR purposes.
Once the database is synchronized in Azure SQL Managed Instance, any changes in the transaction log are sent automatically to Azure SQL Managed Instance just like if you built your own DAG. Users can also access the database in Azure SQL Managed Instance for read purposes just like a secondary replica in a DAG.
Failing Over to Azure SQL Managed Instance
Let’s say now you are ready to move your primary workload to Azure SQL Managed Instance. You can use the link feature to perform a failover. For versions of SQL Server prior to SQL Server 2022, this is a one-way operation.
Planned manual failover
If you use this option, your SQL Server instance is available, and you want to ensure there is no data loss in the failover. This will require stopping your application from making modifications to the primary replica and synchronizing the DAG.
Forced failover
With this option you are willing to accept some data loss (even though there may be no loss if the DAG is already synchronized). This option is your only choice to fail over if the SQL Server instance is not available.
When you fail over to Azure SQL Managed Instance, the database is set to read/write. We handle all the logistics for the AGs on Managed Instance. On the SQL Server side, you have the option of also dropping an AG if it was created and/or the DAG.
You will now need to change your application to connect to the Azure SQL Managed Instance server name. You also will need to migrate any instance-level objects (SQL Agent jobs, login, etc.) manually. Therefore, it is a good idea to script out all of these objects beforehand to prepare for a failover.
Using the Link Feature for Offline Disaster Recovery
So far this doesn’t sound like a disaster recovery solution but a one-way migration solution, which is true. However, for SQL Server 2022, we will allow you to use Managed Instance as an offline disaster recovery site. I call this feature offline disaster recovery because even though the failover to Managed Instance is considered online, the failback is offline. The key capability we have added is the ability to restore a database from Azure SQL Managed Instance back to SQL Server.
Why Managed Disaster Recovery?
The title of this section of the chapter started with the words managed disaster recovery. I called it managed because with this capability your disaster recovery (DR) site uses a Platform as a Service (PaaS) SQL. SQL Server has all the capabilities for you to build a DR site, but you must manage it and make sure it is available when you need it.
Once you link your SQL Server to Managed Instance, Microsoft manages the DR site for you. Microsoft manages the entire infrastructure, availability, and backups of the SQL Server database with Managed Instance. This way you can be assured when your need your DR site, it will be available and ready to go.
SQL Server and Database Version Compatibility
You may have known for some time that we don’t allow you to restore a backup of a database from a newer major version of SQL Server to an older major version. You will encounter an error on a RESTORE T-SQL statement that tells you the version of the backup is higher than the current version.
In reality the incompatibility is at the database level, not the instance. Each database for a major version of SQL Server has a version number. You can see this version using the T-SQL function DATABASEPROPERTYEX(<db>, ‘Version’). You can also use the RESTORE HEADERONLY T-SQL statement to see the DatabaseVersion for the backup.
There can be several “steps” within each major version as we build it. You can see from the version numbers we have done several of these over the years.
Since Azure SQL Managed Instance is versionless, it will always be ahead of SQL Server major versions. This is why you cannot restore a database backup from Azure SQL Managed Instance to SQL Server.
With the release of the link feature for Azure SQL Managed Instance and SQL Server 2022, we are providing a capability so an Azure SQL Managed Instance can be compatible with SQL Server 2022 at the database version level. This is how we can support an offline disaster recovery process. A backup of an Azure SQL Managed Instance that is marked to be compatible can be restored to a SQL Server 2022 instance because they will be using the same database version.
The disaster recovery concept is offline because your SQL Server 2022 application will be down until you have restored the database from Azure SQL Managed Instance to SQL Server 2022 and it is recovered and running.
Let’s see how the link feature for Azure SQL Managed Instance could be used for offline disaster recovery with an exercise.
This exercise is based on our steps in the documentation at https://docs.microsoft.com/azure/azure-sql/managed-instance/managed-instance-link-feature-overview#use-the-link-feature. For this exercise we will use the steps to replicate and fail over using SSMS. You can see from this documentation page there are steps to follow the same process using T-SQL and PowerShell. This can be interesting to read to understand how replication and failover work behind the scenes.
I want to personally thank Dani Ljepava and Mladen Andzic from Microsoft. They both were instrumental in helping me create these exercises.
Prerequisites
Deploy an Azure SQL Managed Instance with your Azure subscription. You can view a quick-start guide in our documentation at https://docs.microsoft.com/azure/azure-sql/managed-instance/instance-create-quickstart. When you deploy your Managed Instance, be sure to choose a collation that matches your source SQL Server collation. You can check your SQL Server collation with the T-SQL statement SELECT SERVERPROPERTY(N'Collation'). Also take note of the SQL Admin account you created as you need that to log in to the Managed Instance with SSMS.
An Azure storage account with a container to store a database backup for Managed Instance. Use this documentation page for a quick-start guide to create a storage account in Azure: https://docs.microsoft.com/azure/storage/common/storage-account-create. Use this quick-start page to create a container in your storage account: https://docs.microsoft.com/azure/storage/blobs/storage-quickstart-blobs-portal#create-a-container.
A virtual machine or computer with at least two CPUs and 8Gb RAM. The link feature is supported for both Windows and Linux. The exercises in this chapter will show you the instructions for using the link feature on Windows.
SQL Server 2022 Evaluation Edition with the database engine feature.
SQL Server Management Studio (SSMS). The latest 18.x build or 19.x build will work.
You need Azure network connectivity between SQL Server and Azure. If your SQL Server is running on-premises, use a VPN link or Express route. If your SQL Server is running on an Azure VM, either deploy your VM to the same subnet as your Managed Instance or use global VNet peering to connect two separate subnets. For this exercise, I deployed an Azure Virtual Machine for SQL Server and placed it in the same subnet as Azure SQL Managed Instance. This is the fastest way to test out this feature. If you need another option, you may need to get some assistance with Azure networking. There is a complete guide to Azure networking available at https://docs.microsoft.com/azure/networking.
Download the WideWorldImporters Standard sample backup from https://github.com/Microsoft/sql-server-samples/releases/download/wide-world-importers-v1.0/WideWorldImporters-Standard.bak to the machine where you will run SQL Server. The Standard backup is used because it does not contain memory-optimized tables, which would not be supported if you chose the General Purpose service tier for Managed Instance.
A copy of the scripts from book samples from the ch3_cloudconnectedmilinkdr folder.
Preparing the Environment
Create a master key in the master database.
Enable the availability group feature for SQL Server if not already enabled.
As an optional but recommended step, enable startup trace flags for performance.
Configure network connectivity between SQL Server and Azure SQL Managed Instance.
Open up firewall and Azure Network Security Group (NSG) settings for port 5022 (dbm endpoint).
Migrate your certificate for Transparent Data Encryption (TDE) to Managed Instance if your database is to be linked on SQL Server uses TDE.
Creating the Link to Replicate the Database
- 1.Restore the WideWorldImporters database to SQL Server 2022 by executing the script restorewwi_std.sql. You may need to edit the file path for the backup and your data and log files. This script uses the following T-SQL statements:USE master;GORESTORE DATABASE WideWorldImporters FROM DISK = 'c:sql_sample_databasesWideWorldImporters-Standard.bak' WITHMOVE 'WWI_Primary' TO 'f:dataWideWorldImporters.mdf',MOVE 'WWI_UserData' TO 'f:dataWideWorldImporters_UserData.ndf',MOVE 'WWI_Log' TO 'g:logWideWorldImporters.ldf',stats=5;GO
- 2.We need to change the recovery model to FULL and back up the database. Execute the script fullandbackup.sql, which uses the following T-SQL statements. You may need to edit the file path for the backup:-- Run on SQL Server-- Set full recovery mode for all databases you want to replicate.ALTER DATABASE WideWorldImporters SET RECOVERY FULL;GO-- Execute backup for all databases you want to replicate.BACKUP DATABASE WideWorldImporters TO DISK = N'c:sql_sample_databaseswwi.bak';GO
- 3.
Launch SSMS and connect to SQL Server 2022. Right-click your database and select the option to replicate the database like in Figure 3-4.

A screenshot shows contents of s q l 2022 client folder. Sub-folder wide world import is selected for azure s q l managed instance link with replicate and failover options.
Using SSMS to create a link to Azure SQL Managed Instance
- 4.
You will now go through a series of steps in the Replicate database wizard. Select Next. The first screen validates you have met the requirements to use the link feature.
- 5.
Now choose your database to replicate and select Next.
- 6.
Now you need to provide information for the Managed Instance you deployed. This will require you to log in to Azure and choose the subscription, resource group, and Managed Instance. You will also need to select Login to connect to the selected Managed Instance. Once this is done, your screen should look like Figure 3-5.

A screenshot shows the new managed instance link. Select managed instance is selected on the left pane. A warning message on the right pane reads database collations do not match.
Choosing Managed Instance to create the link
- 7.
The next screen shows options to create the Distributed Availability Group (DAG). Leave these defaults and select Next.
- 8.
The next screen is the final step. Select Finish. Note that the time it takes to complete the link creation depends on the size of your source database because database seeding takes place here. There is also a button to generate a script for what the wizard does. When this is finished, your screen should look like Figure 3-6.

A screenshot shows the new managed instance link. The results option is selected on the left pane. Task titled scripting setup is selected under summary on the right pane.
A successful creation of a link to Azure SQL Managed Instance
- 9.
Navigate in the Azure portal to your Managed Instance. You should see your database is replicated in Azure and has a status of Online as seen in Figure 3-7.

A screenshot of azure replicated database shows 1 managed instance database. The wide world importers database is online and it has no restore point available.
A replicated database in Managed Instance
- 10.
Use Object Explorer in SSMS connected to SQL Server to see the status of the database as Synchronized (you will need to refresh to see this) and a detailed list of the AG and DAG created for the link. Your screen should look similar to Figure 3-8.

A screenshot shows a folder list with parent node s q l 2022 client. Databases, security, available groups, D A G, and other collapsible items are visible under the parent node.
Database, AG, and DAG status after link creation
- 11.Execute the script checkstatus.sql against the SQL Server 2022 instance, which uses the following T-SQL statements:SELECT @@SERVERNAME;GOSELECT DATABASEPROPERTYEX('WideWorldImporters', 'Updateability');GOSELECT DATABASEPROPERTYEX('WideWorldImporters', 'Version');GO
You will see the status of READ_WRITE and a database version that is the locked-in version for SQL Server 2022.
- 12.
Connect with SSMS to the Managed Instance you have deployed. Execute the checkstatus.sql script. You should see the Updateability is READ_ONLY, and the database version should match SQL Server 2022.
See Changes Replicated
- 1.Execute the script ddl.sql against the SQL Server 2022 database to create two new tables. This script uses the following T-SQL statements:USE [WideWorldImporters];GODROP TABLE IF EXISTS [Warehouse].[Vehicles];GOCREATE TABLE [Warehouse].[Vehicles]([Vehicle_Registration] [nchar](20) NOT NULL,[Vehicle_Type] [nchar](20) NULL,[Vehicle_State] [nvarchar](100) NULL,[Vehicle_City] [nvarchar](100) NULL,[Vehicle_Status] [nvarchar](10) NULL,PRIMARY KEY CLUSTERED([Vehicle_Registration] ASC)WITH (PAD_INDEX = OFF, STATISTICS_NORECOMPUTE = OFF, IGNORE_DUP_KEY = OFF, ALLOW_ROW_LOCKS = ON, ALLOW_PAGE_LOCKS = ON, OPTIMIZE_FOR_SEQUENTIAL_KEY = OFF) ON [USERDATA]) ON [USERDATA];GODROP TABLE IF EXISTS [Warehouse].[Vehicle_StockItems];GOCREATE TABLE [Warehouse].[Vehicle_StockItems]([Vehicle_Registration] [nchar](20) NOT NULL,[StockItemID] [int] NOT NULL,CONSTRAINT [PK_Vehicle_StockItems] PRIMARY KEY CLUSTERED([Vehicle_Registration] ASC,[StockItemID] ASC)WITH (PAD_INDEX = OFF, STATISTICS_NORECOMPUTE = OFF, IGNORE_DUP_KEY = OFF, ALLOW_ROW_LOCKS = ON, ALLOW_PAGE_LOCKS = ON, OPTIMIZE_FOR_SEQUENTIAL_KEY = OFF) ON [USERDATA]) ON [USERDATA];GO
- 2.
Execute the script populatedata.sql to add data to these tables. Note from the script that each vehicle will get one piece of cargo.
- 3.Execute the script getcargocounts.sql against both SQL Server and Managed Instance in SSMS. This script uses the following T-SQL statements:USE WideWorldImporters;GOSELECT v.Vehicle_Registration, v.Vehicle_City, count(*) AS cargoFROM Warehouse.Vehicles vJOIN Warehouse.Vehicle_StockItems vsON v.Vehicle_Registration = vs.Vehicle_RegistrationGROUP BY v.Vehicle_Registration, v.Vehicle_City;GO
You should see the same results for both SQL Server and Managed Instance.
Failover to Managed Instance
- 1.
Using Object Explorer in SSMS, select Failover database using the same option as you did to replicate the database as seen in Figure 3-9.

A screenshot shows the wide world importers option is selected under the parent node s q l 2022 client. Failover database from azure s q l managed instance link is selected from the dropdown.
Using SSMS to perform a failover
- 2.
Select Next, and you will be presented with a screen to log in to Azure. Choose your subscription for your Managed Instance deployment and select Next.
- 3.
You have a choice for a planned or forced failover. Select Planned manual failover and select the option you have stopped your workload (we don’t have one running doing any writes). Your screen should look like Figure 3-10.

A screenshot shows failover database to managed instance. The failover type in the left pane is highlighted. The planned manual failover in the right pane is selected.
Choosing a failover type
- 4.
You now have a choice to clean up the AG and/or DAG that was created earlier. You could choose to keep these and recreate the link later, but for purposes of this exercise, I’ll check both options and select Next.
- 5.
You are now on the final screen to complete the failover. Select Finish. This step changes the DAG to synchronize mode, checks that all log changes are synchronized by comparing LSN values on both systems, and then removes the link. When done, your screen should look like Figure 3-11.

A screenshot shows the failover database to managed instance. Results option is selected in the left pane. Six tasks with 4 checkmarks are visible on the right with scripting setup highlighted.
A completed failover to Managed Instance
- 6.
Using SSMS execute the script checkstatus.sql again against Managed Instance to see the status is now READ_WRITE.
- 7.
You can also see from SSMS on SQL Server the AG and DAG are removed.
In a real-world failover, you would now need to change your application to connect to Managed Instance and migrate any instance-level objects to Managed Instance like SQL Agent jobs, logins, etc.
Restoring a Database Back to SQL Server
As we have described in this chapter, this disaster recovery option is called offline because even though you can perform an online failover, your ability to fail back to SQL Server requires a database backup and restore. A full backup and restore could take some time, so your downtime is longer, hence offline.
- 1.
Stop all writes to your workload for Azure SQL Managed Instance if you want the failback to include all changes to SQL Server.
- 2.
Create a COPY_ONLY backup of your database from Azure SQL Managed Instance. Use the documentation to learn how to back up a database to Azure storage using SSMS connected to Managed Instance. (There are options for T-SQL as well if you want those. Start at the step https://docs.microsoft.com/sql/relational-databases/tutorial-sql-server-backup-and-restore-to-azure-blob-storage-service#create-credential.)
- 3.
Restore the database from Azure storage connected to SQL Server using SSMS (there are also T-SQL options). Use the steps in the documentation starting at https://docs.microsoft.com/sql/relational-databases/tutorial-sql-server-backup-and-restore-to-azure-blob-storage-service#restore-database. You will need to choose a different database name on SQL Server if the original database for the link feature exists.
- 4.
You will also need to change the application again to point to SQL Server instead of Managed Instance. In addition, you will need to migrate instance objects such as SQL Agent jobs.
- 5.
You now have the option to recreate the link to Managed Instance to reestablish your disaster recovery site. Before you do this, you will need to drop the database linked before on Managed Instance.
Keep in Mind These Details
Only one database is allowed for a created link. You can create multiple links on a SQL Server or multiple servers pointing to a single Managed Instance. Today a Managed Instance can have a maximum of 100 links. Also consider the storage required for your Managed Instance to support databases from your links.
Any feature not supported by Azure SQL Managed Instance (e.g., filestream) is not supported with the link feature.
In-Memory OLTP is not supported if the target Azure SQL Managed Instance uses the General Purpose service tier because this tier doesn’t support In-Memory OLTP.
Use best practices like taking regular transaction log backups, which is something you would do with any DAG setup.
The performance impact to your workload on the primary SQL Server will be the same as if you had set up your own async-based DAG. Since we are using async, you should see a minimal impact to write performance.
There is no listener concept for the link feature, so your application will need to be manually changed to point to Managed Instance after a failover.
Instance-level objects such as SQL Agent jobs are not replicated. You will need to manually migrate these to Managed Instance after a failover.
For the latest updates on limits and restrictions, visit our documentation at https://docs.microsoft.com//azure/azure-sql/managed-instance/managed-instance-link-feature-overview#limitations.
The Future for the Link Feature for Azure SQL Managed Instance
At the time of the writing of this book, we only offered a one-way link for SQL Server 2016, SQL Server 2019, and SQL Server 2022. As you saw in this book, we also are releasing the ability to use Azure SQL Managed Instance as an offline DR site because you must manually restore a full backup to SQL Server 2022 to fail back.
There is never a guarantee for the future, but it is our intention to enhance the disaster recovery scenario with capabilities like online failback similar to how you can fail back with an availability group today with SQL Server. We would also like to explore possibilities like a synchronous DAG. I asked Dani Ljepava the vision of the team and why building the link feature to its fullest capabilities is important to Microsoft and our customers:
Azure SQL Managed Instance was launched as a service in November of 2018 with the aim to provide the best PAAS service that is the most compatible with SQL Server. We called the project internally at the time “cloud lifter” with the main idea that we wanted to enable customers just to lift and shift their workloads from SQL Server to a fully managed PAAS service. Since we’ve launched the service, our customers have asked us the following questions – I’m not yet ready to move to Azure, and I’d like to modernize in Azure, but without migrating. I want to be able to run analytics and read scale-out on Managed Instance, while still running on my SQL Server. When ready to migrate, customers asked how can I de-risk my migration to Azure? Can I easily revert back to SQL Server in case of any issues? My workload is critical, and I need the best possible minimum migration downtime. Some customers asked – I need to have a DR in the cloud between my SQL Server and Managed Instance. I’m required legally to have the ability to easily fall back to SQL Server from Azure and perform DR drills periodically. Now, if you find yourself asking one of these questions, we’ve built the MI link having with you in mind. The link is our extension of the “cloud lifter” promise through providing an ultimate hybrid flexibility to use Azure at your own terms, pace and time.
Keep up with all the latest on the link feature for Azure SQL Managed Instance at https://aka.ms/milink.
Azure Synapse Link for SQL Server
Azure Synapse Analytics is a perfect solution for big data of all types. It is an analytics solution because it has the power and tools for applications that need to analyze data. However, the problem is: Where is the data to analyze? In many cases the data may exist in a SQL Server instance you want to analyze with Synapse. The challenge is to get the data you need from SQL Server into Synapse without having to rely on copying the data or ETL jobs. Anyone who wants to analyze data typically wants to do this in some type of near-real timeframe.
What Is Synapse Link for SQL Server?
Synapse Link for SQL Server is a feature of both SQL Server and Synapse to link data from SQL Server with Synapse in near-real time and in a seamless fashion. This involves you initially synchronizing data, and then Synapse Link will automatically capture changes in an incremental fashion allowing you to query the data in Synapse near-real time.
SQL Server has for many years included technology built into the SQL Server engine to capture changes called change feed including replication and change data capture (CDC). These features are built inside the SQL Server engine to harvest changes from the transaction log and feed them to another target. Transactions are not truncated from the transaction log until the target has committed the changes. Synapse Link uses some of the core capabilities of change feed to accomplish the same goal except the target will be Azure Synapse.
Azure Synapse Link is available for both SQL Server 2022 and Azure SQL Database. The Azure extension for SQL Server is not required to use this feature in SQL Server 2022. Synapse also offers link services for Cosmos DB and Dataverse. One big difference for Synapse Link for SQL is that the data is synchronized and fed into SQL pools. Keep up to date with the latest information on Synapse Link for SQL Server at https://aka.ms/synapselinksqlserver.
How Does Synapse Link Work?

A 6-step flowchart of the azure synapse link for the s q l server. The steps start with synapse workspace and end with change feed queue.
The Synapse Link for SQL Server architecture
- 1.
First, you will need an Azure Synapse workspace.
- 2.
Now create a SQL dedicated pool to host the data.
- 3.
Create a linked service for SQL Server 2022. This establishes a control plane within Synapse and the ability to link together SQL Server and Synapse. You will install the self-hosted integration runtime (SHIR) on the computer or network of SQL Server. This linked service is dedicated to this specific SQL Server and database. If you want to set up a link for a different database on the same SQL instance, you would need a unique linked service, which requires a different SHIR. You can only have one SHIR program running at a time on a VM or computer. But since SHIR can connect to SQL Server remotely, you could run a different copy of the program on a different VM or computer in your network. SHIR only works on Windows, so if you use Synapse Link for SQL Server on Linux, you will need to install SHIR on a Windows VM or computer on your network that can connect to your SQL Server on Linux.
- 4.
Create an Azure storage account called a landing zone and a linked service for the landing zone. This landing zone account will be dedicated to this SQL Server and database. The landing zone will store files extracted from SQL Server that Synapse understands how to ingest into SQL pool tables.
- 5.
Create a linked connection based on the linked service for SQL. Choose your tables to link from the source database on SQL Server. Start the connection. SHIR executes system stored procedures in SQL Server 2022 to start the process. Snapshots of tables are captured and submitted to the landing zone via HTTPS in the form of parquet and schema files. The ingestion service in the control plane takes the landing zone files and creates tables in the SQL pools. Data is inserted into the pool tables based on the initial snapshot. Linked connections target specific tables within a database. You can have multiple linked connections for the same database, but a table can only be in one linked connection.
- 6.
Any modifications to tables in SQL Server are recorded in the transaction log. Change feed tasks within SQL Server harvest log changes and put them in a queue, which are memory structures within SQL Server. Internal tasks publish changes from the queue to the landing zone in the form of CSV and manifest files via HTTPS. We try to keep the amount of memory required as small as possible, balanced with the need to have good throughput capturing log changes and publishing to the landing zone. SQL Server uses a pool of worker threads for the tasks to capture log changes and publish these changes to the landing zone. The worker pool is a dedicated pool for Synapse Link change feed capture and works across all databases enabled for Synapse Link for the instance. The ingestion service in Synapse takes the landing zone files and executes modifications to affected tables in the SQL pools.
- 7.
Optionally create a Power BI report to visualize your data directly on SQL pool tables.
Now that you understand the components and flow, let’s try an exercise to see Synapse Link come alive.
Try Out Synapse Link for SQL Server
In order to complete this exercise successfully, you need to carefully follow the prerequisites, steps to set up the exercise, and each exercise step.
I want to thank Chuck Heinzelman, Mine Token, Milos Vucic, and Tim Chen for helping me understand how Synapse Link works and creating all the resources for this exercise.
Prerequisites
A virtual machine or computer with at least two CPUs and 8Gb RAM. For my tests I used an E4ds_v5 Azure VM that comes with four vCPUs and 32Gb RAM. Your virtual machine or computer needs to be capable of connecting to Azure over the Internet or run as an Azure Virtual Machine.
SQL Server 2022 Evaluation Edition. You only need the database engine feature for this exercise.
An Azure subscription with permissions to create an Azure Synapse workspace and Azure Data Lake Storage Gen2 account (Synapse uses its own storage account, but you need a separate one for the landing zone).
SQL Server Management Studio (SSMS). The latest 18.x build or 19.x build will work.
Download the WideWorldImporters Standard sample backup from https://github.com/Microsoft/sql-server-samples/releases/download/wide-world-importers-v1.0/WideWorldImporters-Standard.bak to the machine where you will run SQL Server. The Standard backup is used because features like In-Memory OLTP are not supported with Synapse Link.
A copy of the scripts from book samples from the ch3_cloudconnectedsynapselink folder.
Set Up the Exercise
- 1.
Create an Azure Synapse Analytics workspace. The following is a quick-start guide on how to create a workspace: https://docs.microsoft.com/azure/synapse-analytics/get-started-create-workspace.
Here are important points to follow as you create the workspace:The Data Lake Storage Gen2 account you use during the workspace is for Synapse. You will create another for the landing zone later in this exercise.
For network settings you must select Disable for Managed virtual network and check Allow connections from all IP addresses. If you are concerned about this requirement for security, you can set up firewall rules.
Although not required I like to organize my Azure resources into specific resource groups. For this exercise I created an Azure Virtual Machine running SQL Server 2022 in the same resource group as Synapse because I’ll use the Allow Azure services and resources to access this workspace option to access Synapse instead of setting up a firewall rule.
For everything else I chose the defaults. Synapse Link should be supported in any region where Synapse is supported, but check https://docs.microsoft.com/azure/synapse-analytics/synapse-link/connect-synapse-link-sql-server-2022#prerequisites for the latest updates.
In my experience Synapse workspaces don’t take longer than 5–10 minutes to deploy.
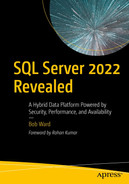
Figure 3-13 shows a portal view of my Synapse workspace after it was created.
A screenshot shows b w synapse analytics. The overview is selected in the left pane. The right pane shows the essentials, getting started, analytics pools, and Apache Spark pools.
An Azure Synapse Analytics workspace
- 2.
Next, we need a place to host our data, which for Synapse Link is called a dedicated SQL pool. Think of this as a database within Synapse to host SQL-based tables from the source SQL Server. There are a few ways to do this. One simple way is from the Azure portal. Go to the resource menu on the left side of the screen on your workspace and select SQL pools under Analytics pools. Select + New. For this exercise put in a pool name (I chose wwisqlpool) and leave the defaults. For a production system, you may want to choose different options here. See the section later in this chapter titled “More Details About Synapse Link” for more details.
- 3.
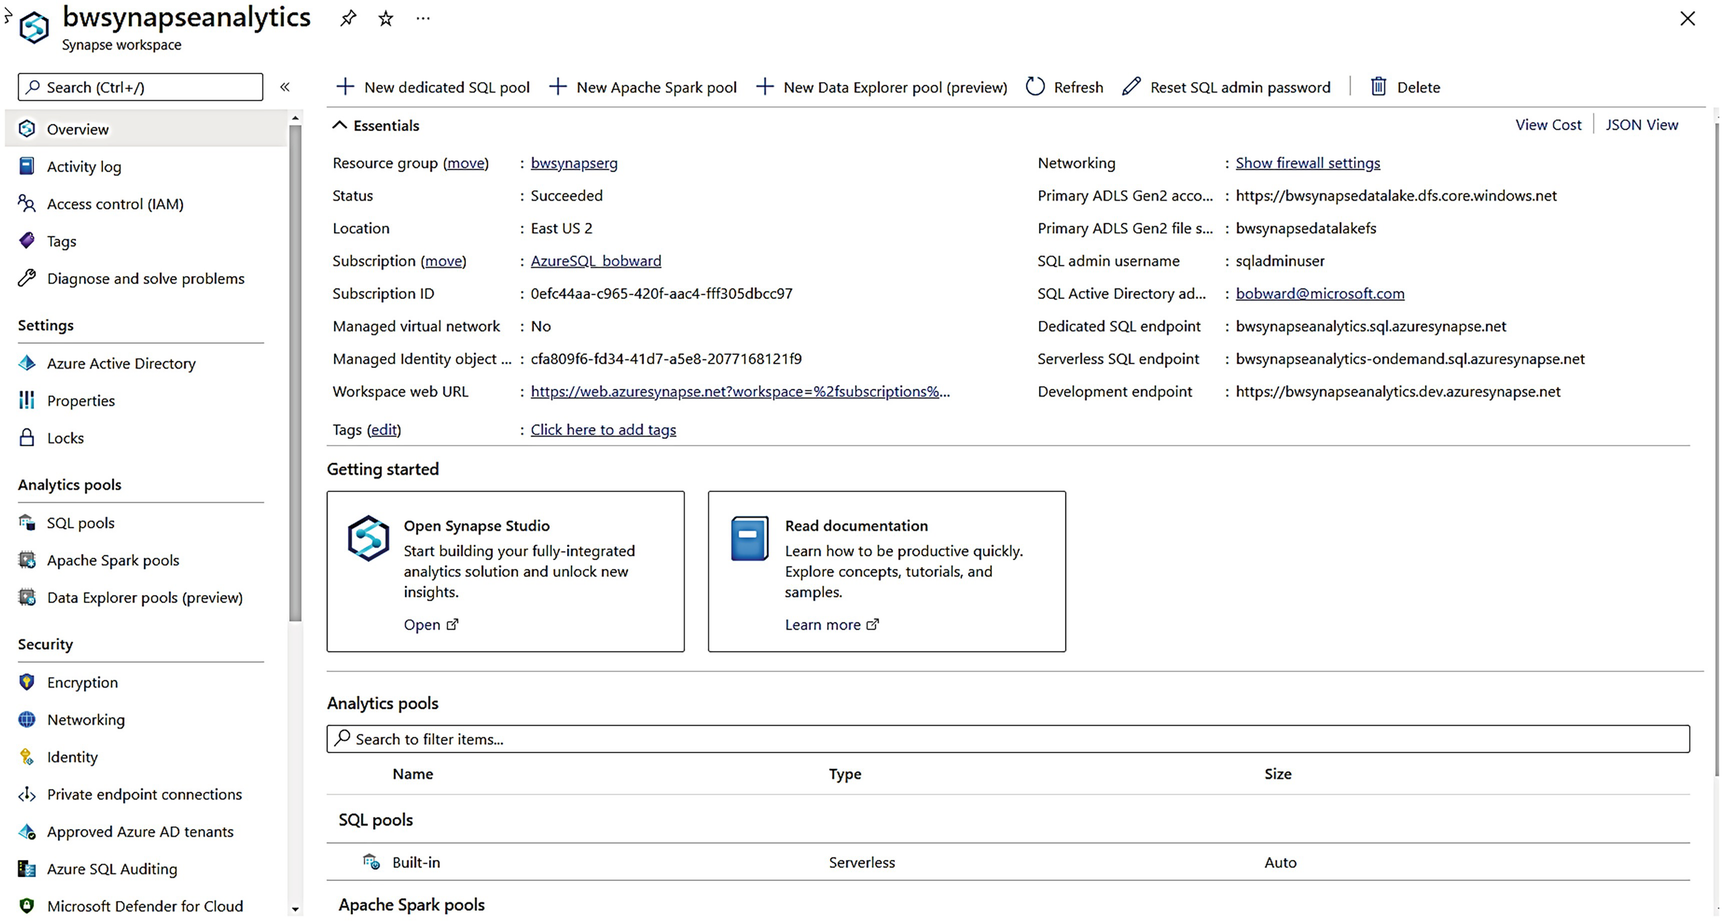
Create a new Azure storage account to be used for Azure Data Lake Storage Gen2, which is the landing zone. I used the instructions at this documentation page to create my storage account: https://docs.microsoft.com/azure/storage/blobs/create-data-lake-storage-account. For this exercise I used the same region and resource group as my Synapse workspace (not required), and I chose the Standard option for Performance (for production workloads, you may want Premium). For everything else I chose the defaults except on the Advanced blade, you MUST choose Enabled for Hierarchical namespace. Figure 3-14 shows my storage account after creation.
A screenshot shows b w landing zone. The overview is selected in the left pane. The right pane shows the essentials, data lake storage, file service, security, and networking.
The Azure storage landing zone account
- 4.
A storage account is not enough to store files from SQL Server. You need a folder or container. On the resource menu for the storage account on the left-hand side of the screen under Data storage, select Containers. Then on the new screen, select + Container. Type in the name of your choice (you will need it later). I called mine wwidata. Leave the default and select Create. This should only take seconds.
- 5.
You now need to grant access for the Synapse workspace to the landing zone storage account. Follow steps 1 and 2 at this link in the documentation to assign the Managed Identity access to the landing zone: https://docs.microsoft.com/azure/synapse-analytics/synapse-link/connect-synapse-link-sql-server-2022#create-linked-service-to-connect-to-your-landing-zone-on-azure-data-lake-storage-gen2.
My role assignment looked like Figure 3-15.

A screenshot shows add role assignment under access control. The role, scope, members, description, and condition options are visible under review + assign menu.
Assign the Synapse workspace access to the landing zone container
That was a lot of steps to set things up, but take your time to make sure you are ready to work with Synapse Link.
Synchronizing Data with Synapse Link
- 1.Since we will use the WideWorldImporters backup, you need to restore this to your SQL Server instance. You can use the restorewwi_std.sql script logged in as a sysadmin account. You may need to edit the file path for the backup and data/log files. This script executes the following T-SQL statements:USE master;GORESTORE DATABASE WideWorldImporters FROM DISK = 'c:sql_sample_databasesWideWorldImporters-Standard.bak' WITHMOVE 'WWI_Primary' TO 'f:dataWideWorldImporters.mdf',MOVE 'WWI_UserData' TO 'f:dataWideWorldImporters_UserData.ndf',MOVE 'WWI_Log' TO 'g:logWideWorldImporters.ldf',stats=5;GO
- 2.Let’s add two new tables to the database to track vehicle cargo. Execute the script extendwwitables.sql against SQL Server, which executes the following T-SQL statements:USE [WideWorldImporters];GODROP TABLE IF EXISTS [Warehouse].[Vehicles];GOCREATE TABLE [Warehouse].[Vehicles]([Vehicle_Registration] [nchar](20) NOT NULL,[Vehicle_Type] [nchar](20) NULL,[Vehicle_State] [nvarchar](100) NULL,[Vehicle_City] [nvarchar](100) NULL,[Vehicle_Status] [nvarchar](10) NULL,PRIMARY KEY CLUSTERED([Vehicle_Registration] ASC));GODROP TABLE IF EXISTS [Warehouse].[Vehicle_StockItems];GOCREATE TABLE [Warehouse].[Vehicle_StockItems]([Vehicle_Registration] [nchar](20) NOT NULL,[StockItemID] [int] NOT NULLPRIMARY KEY CLUSTERED([Vehicle_Registration] ASC,[StockItemID] ASC));GO
- 3.
Populate data into these tables by executing the script populatedata.sql against SQL Server.
- 4.
The WideWorldImporters database includes some features and data types that are not supported by Synapse Link. Therefore, execute the script alterwwi.sql against SQL Server to remove some of these features (e.g., temporal tables) and columns with unsupported data types.
Note It is possible that some of these data types can be supported by the time SQL Server 2022 is released, but to be safe for the purposes of this exercise, I removed all features or types that could cause an issue.
- 5.Both Synapse and SQL Server 2022 need a master key for encryption purposes and schemas built for Synapse.
- a.Connect to SQL Server 2022 and run the script createmasterkey.sql, which executes the following T-SQL statements:USE [WideWorldImporters];GOCREATE MASTER KEY ENCRYPTION BY PASSWORD = 'Strongpassw0rd!';GO
- b.
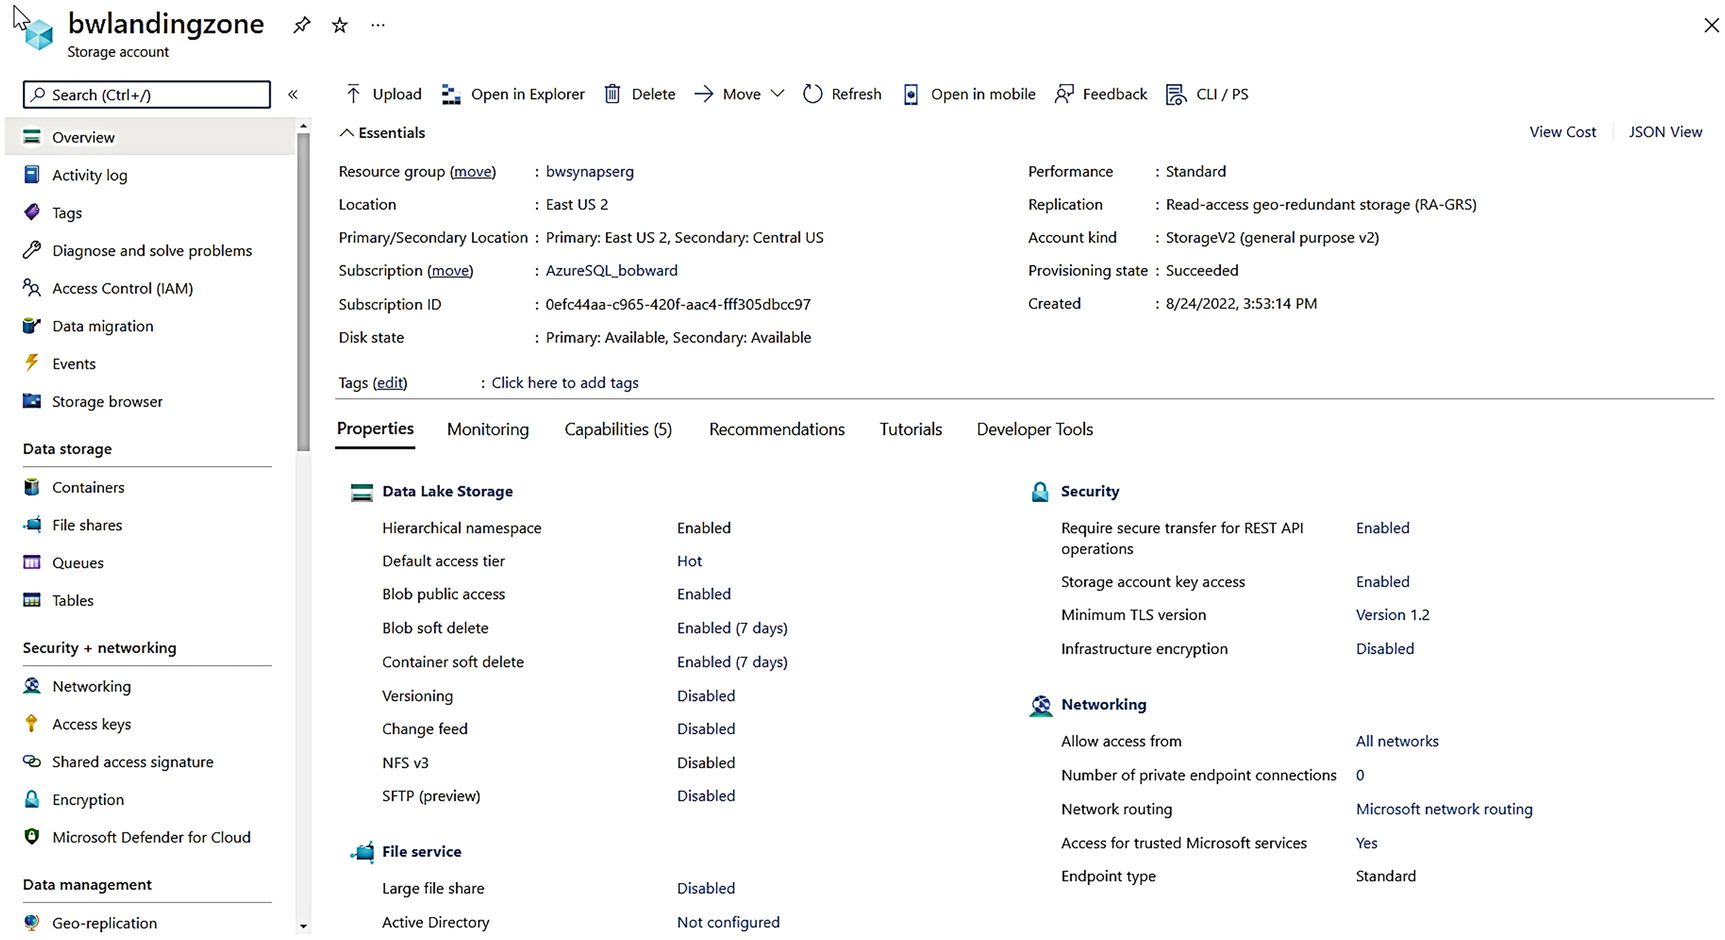
The Synapse pool also needs a master key, but you don’t need a password. Let’s get introduced to Synapse Studio (because you will need it throughout this exercise) to do this. In the Azure portal for the Synapse workspace, in the middle of the page, click Open for the box that says Open Synapse Studio as in Figure 3-16.
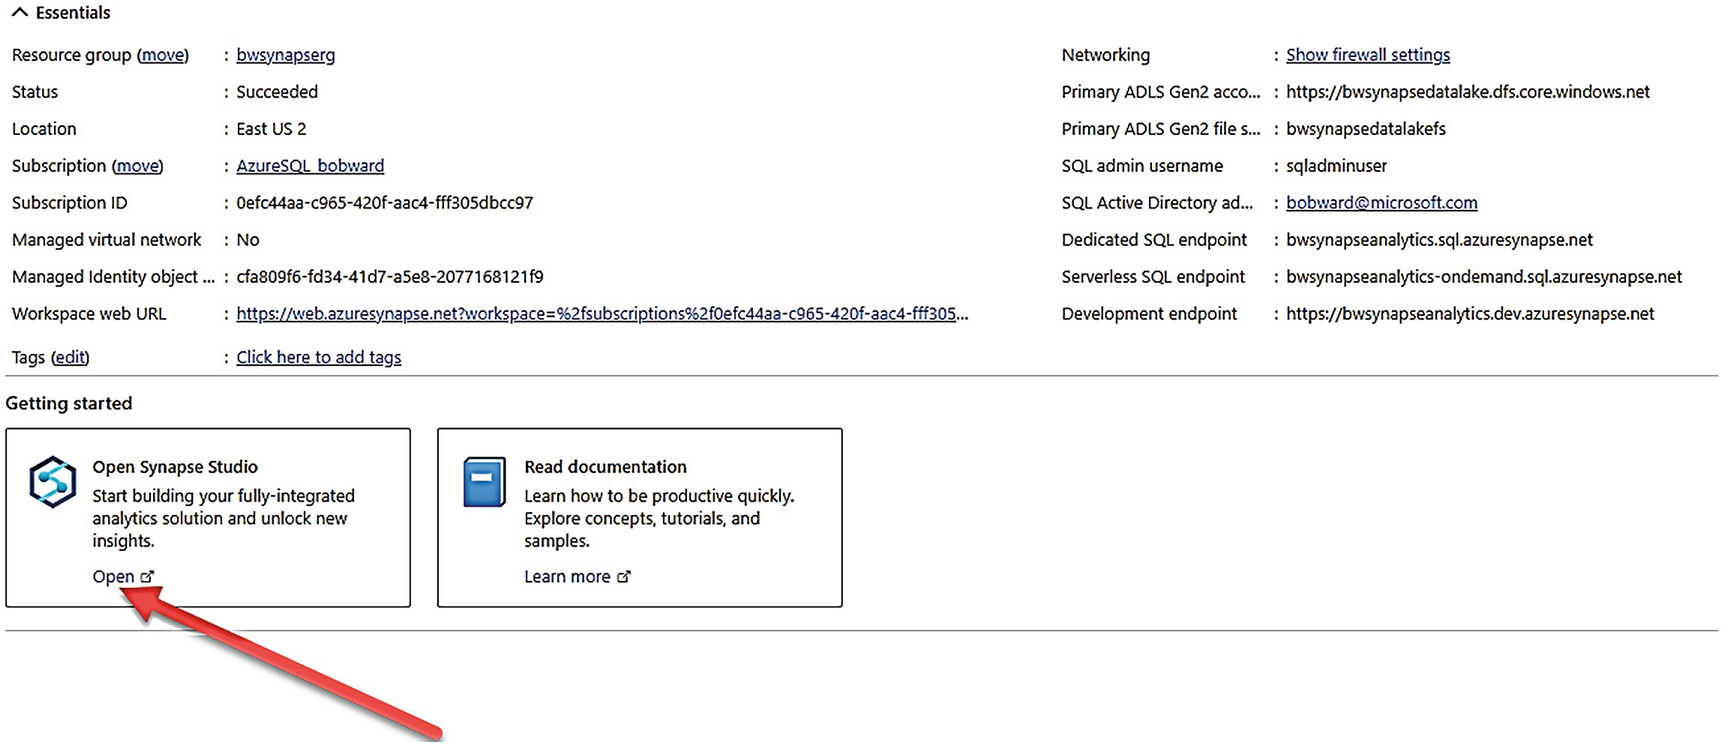
A screenshot shows the essentials and getting started. An arrow points toward the open Synapse studio option under getting started.
Launching Synapse Studio

A screenshot shows b w synapse analytics tab under Microsoft Azure. Arrows point at the data icon, w w i s q l pool option, new s q l script option, and the run icon.
Creating the master key in the SQL dedicated pool
- c.Synapse Link does not automatically create schemas when synchronizing tables from SQL Server. Since WideWorldImporters uses schemas, we need to create these first in Synapse. Use the same window you created the master key in Synapse Studio to run these SQL statements after clearing out the CREATE MASTER KEY statement:CREATE SCHEMA Application;GOCREATE SCHEMA Purchasing;GOCREATE SCHEMA Sales;GOCREATE SCHEMA Warehouse;GOCREATE SCHEMA Website;GO
- 6.
We are now ready to create the linked service to SQL Server 2022 from Synapse Studio. In Synapse Studio click the Manage icon on the left-hand menu (the last one), Linked services, and then + New as seen in Figure 3-18.

A screenshot shows part of the b w synapse analytics tab. Arrows point toward the manage icon, linked services option, and the new button.
Creating a new linked service for SQL Server 2022

A screenshot shows the new linked service tab with s q l typed in the search bar below. Amongst the 9 icons under menu option all, the s q l server is selected.
Choosing SQL Server as a linked service
You are presented with a screen to fill out several pieces of information. Stay with me on these steps because you are going to fill out some information here, move over to your machine hosting SQL Server, and then come back to this page.

A screenshot shows the new linked service. The cursor is placed over the new option from the drop-down menu for connect via integration runtime.
Selecting an integration runtime for Synapse Link for SQL
Select Self-Hosted and click Continue.

A screenshot shows the integration runtime setup. Key 1 and key 2 are visible under option 2 manual setup from the settings tab.
Instructions to install the self-hosted integration runtime
The integration runtime code is now installed in the control plane for the Synapse workspace. You need to now install the self-hosted integration runtime (SHIR) software on your machine or VM where SQL Server is installed.
SHIR can be installed anywhere on the network where it can connect to and discover SQL Server. For this exercise we will just install it locally.
Option 1 in the screen in Figure 3-21 would be the right choice if you launched Synapse Studio from the computer or VM where you planned to install SHIR. I used the portal from my own laptop when I did this exercise, so I chose Option 2 to install manually. When you click Option 2, a new browser tab will be launched to download the software. Keep the Synapse Studio browser tab open. You will need the Authentication Key on that screen, and when you are done installing SHIR, we need to come back to this place to finish installing the linked service.
After I clicked Download on the new web page, I chose the latest MSI version and then copied this downloaded .MSI file into my virtual machine in Azure. This file is ~1Gb in size, so it may take a few minutes to copy into your VM or machine.

A screenshot shows the object explorer. The standard option under X event profiler is selected. An adjacent popup with 4 options is visible.
Launching the Standard XEvent Profiler session
This will allow you to trace all SQL traffic coming into the server. We will use this to see what type of SQL procedures SHIR sends to SQL Server 2022 later in this exercise.

A screenshot shows Microsoft integration runtime configuration manager. Register integration runtime, h t t p proxy, diagnostic tool sections are visible. Launch configuration manager button is selected.
SHIR successfully registered
Click Close.

A screenshot shows Microsoft integration runtime configuration manager. The self-hosted node is connected to the cloud service option is ticked. Data source credentials are given below.
SHIR successfully connected to Synapse
SHIR runs as a service, so you can close out this window.
Go back to Synapse Studio and click Close on the integration runtime setup screen.
Don’t worry about an error you might see on Connect via integration runtime. Just click the refresh icon, and all should be “green.”
Now fill in the server name and database name (WideWorldImporters for this exercise). Use SQL authentication and fill in the SQL login and password you created as a sysadmin for SQL Server. First, click Test connection at the bottom right of the screen to verify the connection will work. Then if successful, click Create.

A screenshot shows the linked services. Filter by name with any annotation shows 3 Azure items, namely synapse analytics, data lake storage, and s q l server.
A successful linked service creation for SQL Server
- 7.
Now we need to create another linked service for the landing zone. On the Linked services page, select + New and choose Azure Data Lake Storage Gen2.
Give the linked service a name. Leave Connect via integration runtime to the default. Choose Authentication type as System-Assigned Managed Identity, which will choose your Synapse workspace Managed Identity, which was automatically created when you created the workspace. This was the Managed Identity you gave access to the landing zone earlier.
Choose your Azure subscription and the storage account name for the landing zone you created. Select Test connection at the bottom of the screen. If all goes well, your screen should look like Figure 3-26.

A screenshot shows the new linked service tab. The visible panes are name, description, connect via integration runtime, authentication type, account selection method. Create button is visible below.
Setting up the landing zone link
Click Create to create the new link.

A screenshot shows the linked services tab. An arrow points to the highlighted publish all option at the top.
Publishing the linked service to the landing zone
- 8.
Now that we have linked services in place, it is time to sync data from SQL Server to Synapse by creating a linked connection based on linked services. Choose all the tables. In Synapse Studio click the Integrate icon on the left side of the screen and then click + like Figure 3-28.

A screenshot shows b w synapse analytics under Microsoft Azure. The cursor is on the integrate icon on the left pane. An arrow points to the + icon on the right pane.
Creating a new linked connection

A screenshot shows the new link connection. The options selected for source type and source linked service are s q l server and s q l 2022 link. Source table features 33 items.
Setting up a new linked connection
You can browse a possible list of tables and even preview the columns and data. I want all tables to be linked, so click the checkbox next to Name (which selects all tables) and click Continue.
For the next screen, choose the SQL dedicated pool you created earlier. Mine was called wwisqlpool. Click Continue. You will now be presented with a screen to complete the process to create the linked connection.

A screenshot shows the new link connection. The options under connection settings are link connection name, core count, mode, and landing zone linked service, folder path, s a s token.
Completing the linked connection
- 9.
While this is still starting, you can go back to SSMS and view your XEvent Profiler session. Look for events from the client_app_name field called AzureDataMovement. These are queries from SHIR.
In these events you will see batches that use procedures and T-SQL likesys.sp_change_feed_enable_db. The sys.databases.is_change_feed_enabled column is now set to 1 for the database.
A database-scoped credential created for the landing zone storage account.
sys.sp_change_feed_create_table_group, which creates a table group that points to the Synapse workspace and landing zone. A table group is created for each linked connection for the database.
sys.sp_change_feed_enable_table. You will see an execution of sys.sp_change_feed_enable_table for each table in the database because we picked all of them in the linked connection.
Queries against system catalog views to get the schema of each table including columns and data types.
Note At the time of the writing of this book, these procedures and T-SQL are not documented or supported. Synapse Link must be configured through Synapse Studio, which communicates with SHIR.
- 10.
Use Synapse Studio to monitor the linked connection as seen in Figure 3-31.

A screenshot shows b w synapse analytics tab. An arrow points to the link connections option under integration in the left pane. The right pane lists the link connection name, source, target, status.
Monitoring the linked connection for SQL Server

A screenshot shows the s q l 2022 link connection. It features a 33-item table with the following details: source schema, target schema, status, link table i d, and others.
Monitoring the status of linked tables
- 11.
Now let’s see the tables in the SQL pool by using Synapse Studio like in Figure 3-33.

A screenshot shows synapse analytics in Microsoft Azure. The cursor is over the data icon. The workspace on the right shows application dot cities file is selected from the tables folder.
List of tables in the SQL pool
- 12.Now use Synapse Studio as you did earlier to run queries. Paste in the following T-SQL (which is found in the script getcargocounts.sql) to run a query to look at cargo counts:SELECT v.Vehicle_Registration, v.Vehicle_City, count(*) AS cargoFROM Warehouse.Vehicles vJOIN Warehouse.Vehicle_StockItems vsON v.Vehicle_Registration = vs.Vehicle_RegistrationGROUP BY v.Vehicle_Registration, v.Vehicle_City;GO
The results should look like Figure 3-34, which matches the initial population of data in these tables.

A screenshot shows s q l script 1. The top pane has a 6-line code. The bottom pane has a table with columns for vehicle registration, vehicle city, and cargo.
Executing a query to get cargo counts
- 13.
We don’t support copying or modifying files in the landing zone, but it is worth taking a look at files in the container for learning purposes. If you got to your container in the landing zone account and drill into the container, your results will look similar to Figure 3-35.

A screenshot of the containers page titled w w i data. The overview is selected in the left pane. An arrow points to the folder on the right pane.
The table group in the landing zone
The GUID value of the folder matches the table group ID created and stored in the system table changefeed.change_feed_table_groups in the WideWorldImporters database.

A screenshot of the right pane of the containers page. An arrow points to the link given for location under the root directory titled w w i data.
Parquet file from initial seeding
changefeed.change_feed_tables also has some interesting statistics about the snapshot creation of the table.
Now that your tables have been initially synchronized into Synapse, let’s see how changes are captured and automatically fed into Synapse.
Near-Real-Time Analytics with Changes from SQL Server
- 1.
Let’s make changes and see them show up in Synapse. Add random amounts of cargo in SQL Server 2022 using the script modifyvehicledata.sql running against your SQL Server instance.
- 2.
Look at the landing zone to see CSV files by looking at the container and drilling into the indexWorkingDir folder instead of Tables like in Figure 3-37.

A screenshot of the landing zone of the containers page. It has a table with columns for name, modified, access tier, archive status, and blob type.
Files in the landing zone for changes
- 3.
Go back to Synapse Studio and run the same query from getcargocounts.sql to see the changes have been applied like in Figure 3-38.

A screenshot shows s q l script 1. The top pane has a 6-line code. The bottom pane has a table with columns for vehicle registration, vehicle city, and cargo.
Updated cargo counts in Synapse
So all those steps to set up but only a few steps to see changes appear in Synapse. That is what Synapse Link provides, near-real-time changes from SQL Server automatically available in Synapse.
More Details About Synapse Link
There are a few details about Synapse Link I think you should know about. To get all the details and latest updates, be sure to consult the documentation at https://aka.ms/synapselinksqlserver.
Configuration Choices
SQL pool
When you create a SQL dedicated pool in Synapse, you can choose a performance level called a Data Warehouse Unit (DWU). We chose the default in our exercise, but for a production workload, you may want to choose another level. Your choice of DWU affects the performance of queries you run against tables in the SQL pool. But there is also a price for your performance decision. The DWU choice you make can also affect the ability to concurrently process tables for ingestion. You can change the DWU setting after you create the pool (scale up or down). You can learn more about DWU settings at https://docs.microsoft.com/azure/synapse-analytics/sql-data-warehouse/what-is-a-data-warehouse-unit-dwu-cdwu#change-data-warehouse-units.
Stopping and restarting the linked connection
If you stop the linked connection to SQL Server, all the Synapse Link system table data is removed, and the files in the landing zone container are deleted. All current data in SQL pool tables is not affected.
If you start the linked connection again, we will take a new snapshot of all tables from SQL Server and place them in the landing zone. Here is an important warning. If you restart the linked connection and don’t select the option Drop and recreate table on target, your linked connection will show errors because the target tables already exist. So you can either drop the tables yourself first in Synapse or use this option when starting the connection. This option can be found on the General tab under the window where you start the connection as seen in Figure 3-39.
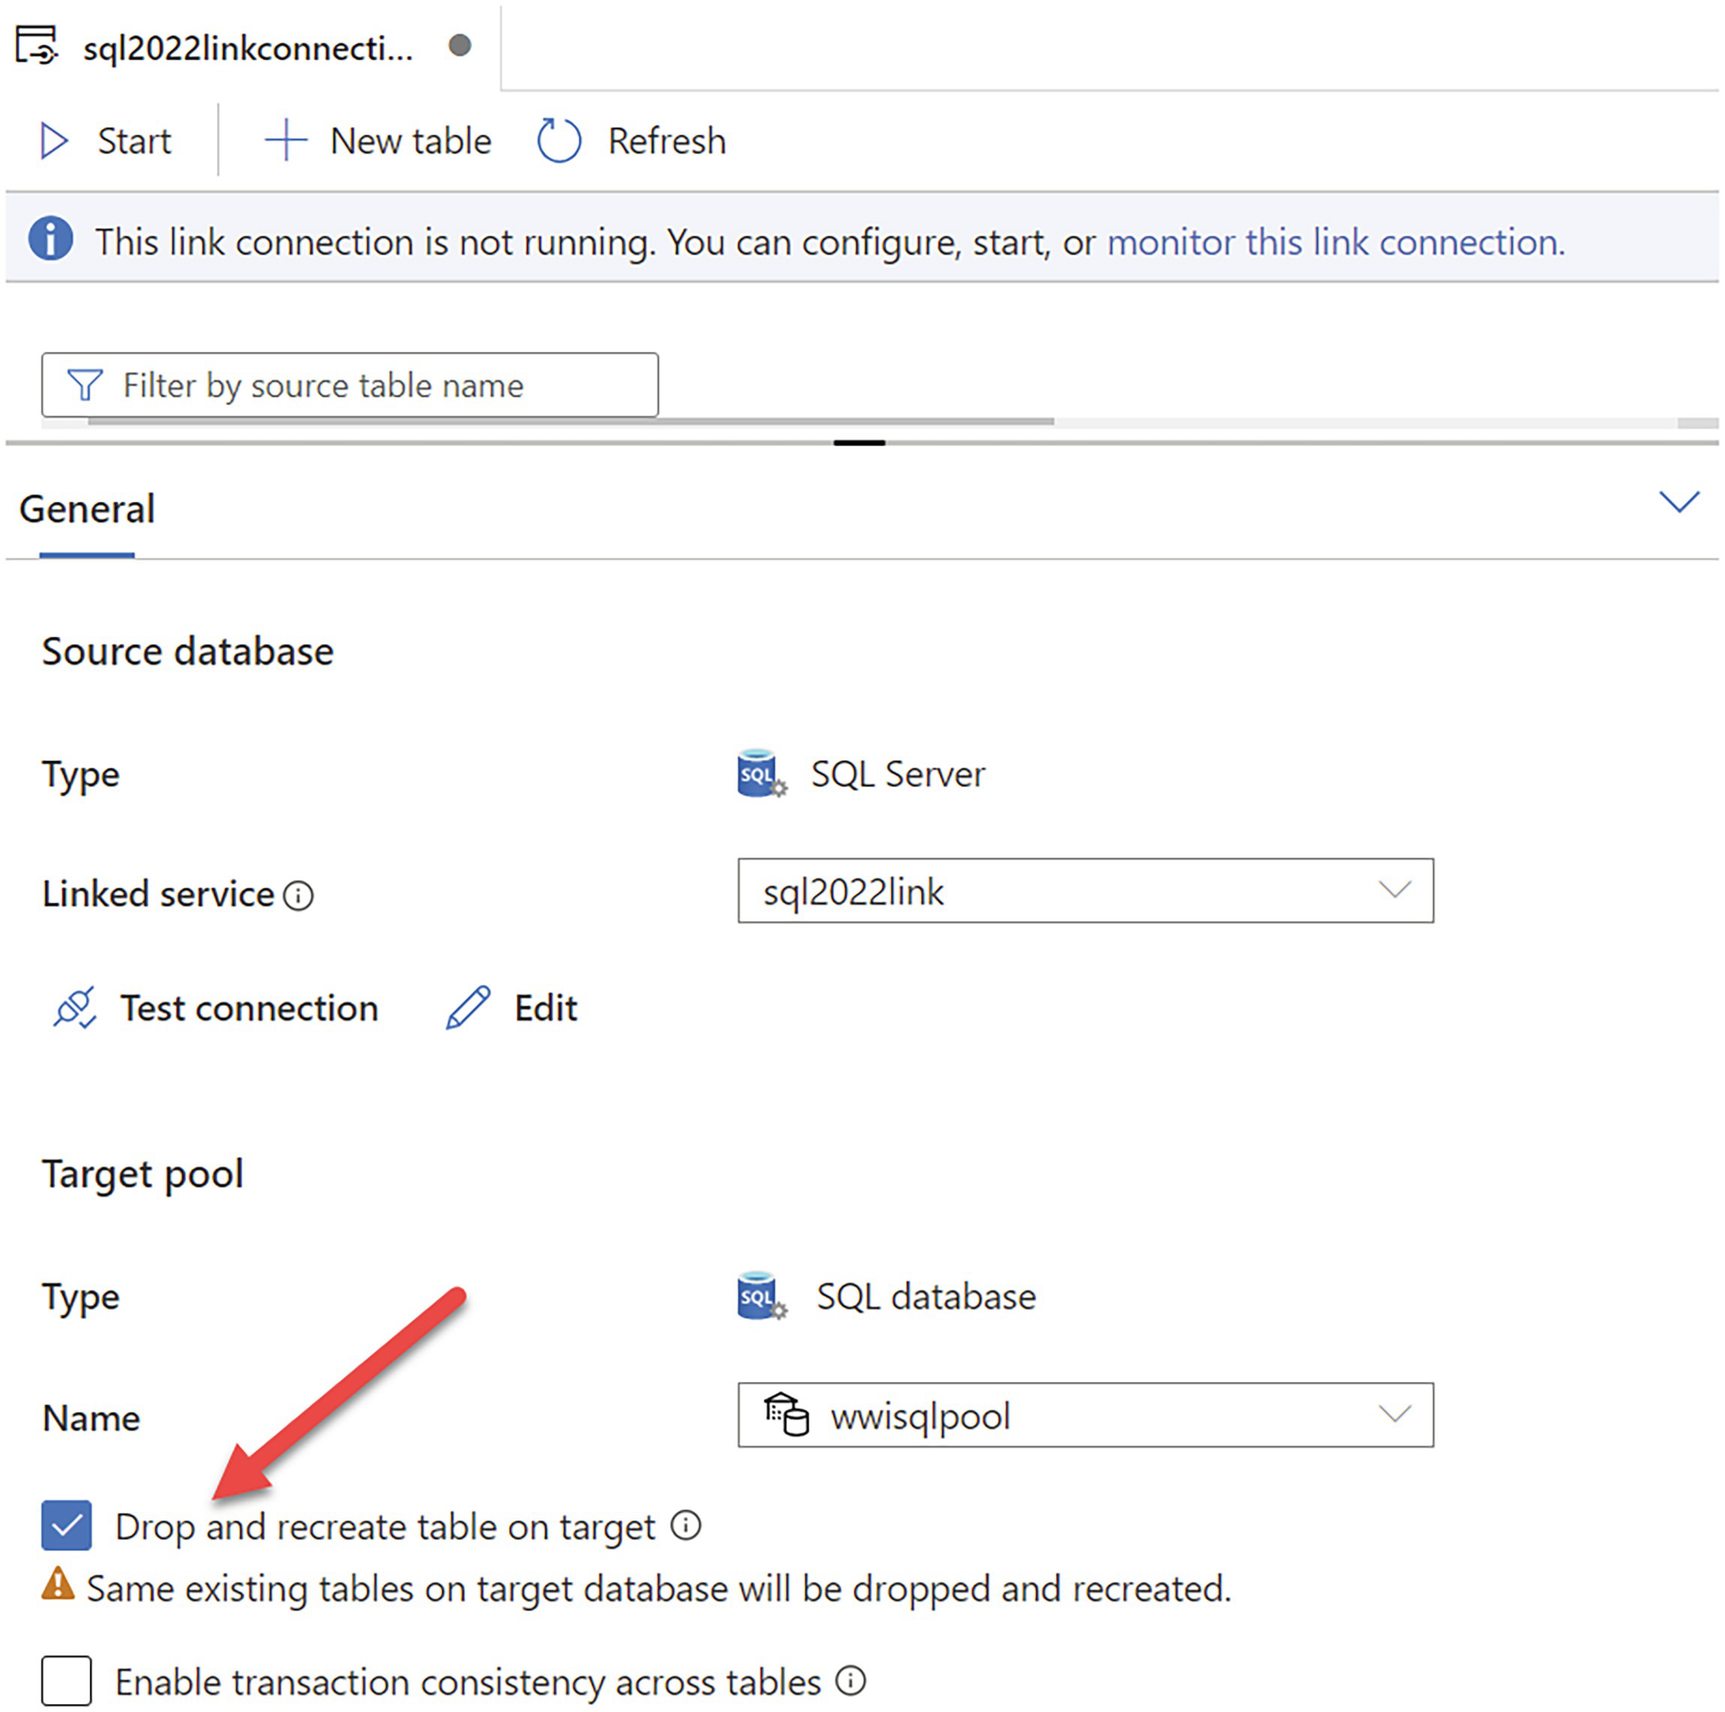
A screenshot of a tab titled s q l 2022 link connection. An arrow points to the checked box for the drop and recreate table on target option under target pool.
Dropping and recreating tables in Synapse pools on a linked connection start
We are also looking at an enhancement to be able to pause and resume the linked connection. If the linked connection is paused, SQL Server will keep feeding data and changes into the landing zone, but these changes won’t appear in Synapse until you resume the linked connection.
Core counts for linked connections
When you create the linked connection, you have a choice called core counts. These core counts are specifically designed for ingestion processing. The more cores you select, the faster your data can be ingested. But larger core counts can also affect costs. We recommend you start with smaller core counts to save costs and adjust upward. The only issue with changing core counts is you must stop and restart the linked connection, which requires a re-snapshot of all the tables (until pause and resume is available).
Scheduled or continuous mode
Another option when you create the linked connection is scheduled or continuous mode. Continuous mode means the ingestion service will always be looking for changes in the landing zone to process data. Scheduled mode allows you to schedule ingestion for certain time ranges. Scheduled mode will help you save ingestion costs but will also delay when data is available to read in SQL pool tables. Using scheduled mode will not affect any latency of transaction processing or log truncation on SQL Server 2022.
Adding or dropping tables to/from the linked connection
You can add or drop tables to/from the linked connection. A new snapshot for the new table will be created and synchronized to the new SQL pool table.
If you want to delete the Synapse workspace, you should first stop all linked connections and delete the linked service to ensure SQL Server is fully aware that Synapse Link is disabled. Otherwise, you might run into log truncation issues.
Landing zone storage
The initial snapshot of tables creates a parquet file for which the size will vary based on how much data is in the SQL source table. Changes to SQL Server data result in a series of CVS and manifest files. We don’t support you reading or directly changing the landing zone, so these files will remain in the landing zone until they are cleaned up. Cleanup happens in the background on a periodic basis or if the link connection is stopped (all files are removed).
SQL pool table index types
For SQL pool tables that are targets for Synapse Link, you have choices when you set up the linked connection for index types. To learn about possible index choices for your workload, read our documentation at https://docs.microsoft.com/azure/synapse-analytics/sql-data-warehouse/sql-data-warehouse-tables-index.
A nice deep dive by Steve Howard that talks about some of these choices and others can be found at https://techcommunity.microsoft.com/t5/azure-synapse-analytics-blog/synapse-link-for-sql-deep-dive/ba-p/3567645.
Transaction Consistency
Synapse Link is designed to only submit changes that are committed to the landing zone. This is a similar concept as replication and CDC technologies. For fault tolerance Synapse Link tracks Log Sequence Numbers (LSNs) to understand which transactions are committed to be fed into the landing zone.
You should expect any performance impact for Synapse Link to be similar to replication or CDC. One difference is that changes are kept in in-memory queues before being published to the landing zone, so performance to the original transactions can be less than other change feed technologies. We limit the size of what data is kept in queues and publish them to the landing zone to ensure we don’t overcommit memory for these queues.
The one issue to keep track of is transaction log truncation. Like replication, we cannot truncate transactions from the log that have not been committed to the landing zone if they involve a table that is enabled for Synapse Link. So latency or issues with the landing zone can affect the ability to truncate the log.
Another option for Synapse Link is transaction consistency across tables. While this option may allow you to use small DWU options and core counts on Synapse, it affects latency of changes applied to Synapse SQL pool tables.
Monitoring Synapse Link
You have several methods to monitor Synapse Link including some that are available in Synapse Studio as you have seen in the exercises in this chapter.
You also have a series of system tables in SQL Server under the changefeed schema of the database you can query to see settings, table groups, and tables including some performance statistics.
There are also Dynamic Management Views (DMVs) you can use including sys.dm_change_feed_errors and sys.dm_change_feed_log_scan_sessions.
If you need to do deep debugging for Synapse Link, there are a series of Extended Events you can use. Search for names in sys.dm_xe_objects that start with synapse_link.
Limits and Restrictions
There are some limits and restrictions for Synapse Link. These limits are evolving and could even be updated by the time SQL Server 2022 becomes generally available. I built the exercises in this book to ensure they would work with limits documented during the preview.
You will find in the documentation certain limits such as source data types, size of rows, the need for a primary key, and unsupported features such as replication, CDC, and In-Memory OLTP. Keep track of the detailed list at https://docs.microsoft.com/azure/synapse-analytics/synapse-link/synapse-link-for-sql-known-issues.
Synapse Link is supported when using SQL HA features like Always On Availability Groups. In an AG scenario, you need to use the name of the listener for the SQL Server name to ensure SHIR always connects to the primary.
Synapse Link Could Change Analytics for You
There are many ways to run analytic workloads in some cases directly against SQL Server. But if you are looking to separate your primary SQL Server application from analytic workloads, Synapse Link could be a great solution. The ability to have SQL Server automatically capture changes and feed them to Synapse is a compelling story.
I asked Chuck Heinzelman, Principal Program Manger over analytics for SQL Server, his thoughts about Synapse Link: “Azure Synapse Link for SQL allows customers to automatically move data from their transactional systems into an MPP-based analytical system without having to write ETL code for the data movement. In addition to the low code/no code approach, customers can benefit from near-real-time data movement as opposed to batch-based processing that comes with traditional ETL systems.”
Azure Active Directory (AAD) Authentication
For as long as SQL Server has been a product, it has supported SQL authentication, the simplest but not the most secure method to log in to SQL Server. As far back as SQL Server 4.2 for Windows NT (I had to go back verify this with my old, printed manuals), SQL Server has supported a concept to log in using integrated authentication with the operating system. In SQL Server 4.2 we called this Integrated Security. Windows NT supported the concept of a directory server, which can be used to authenticate accounts. This technology would eventually become Active Directory (AD) for Windows Server. SQL Server has therefore supported the ability to create logins based on AD accounts and authenticate these logins using servers that support AD (domain controllers). Today we call this Windows authentication for SQL Server.
Along comes Azure Active Directory (AAD). AAD is a managed service for authentication for all types of applications and services. Think of this as a Microsoft managed set of domain controllers that you can use to create your own directory, users, groups, and authentication schemes.
The new EXTERNAL PROVIDER syntax indicates to SQL to use AAD for authentication. To use AAD with Azure SQL, consult our documentation at https://docs.microsoft.com//azure/azure-sql/database/authentication-aad-overview.
Now with SQL Server 2022, we have taken our implementation to support AAD and added this to SQL Server. The syntax is almost identical with Azure SQL. The engine itself already has all the code to support AAD from Azure SQL. The only difference is your SQL Server is probably not running in Azure and the virtual machine or computer is in your network.
How Does AAD Authentication Work?
In Azure SQL, we enhanced the engine to communicate directly with AAD using protocols like OAuth and OpenID. Most developers authenticate users for AAD using libraries such as https://docs.microsoft.com/azure/active-directory/develop/reference-v2-libraries. SQL Server as a host engine needed to do this authentication on behalf of the application. Since AAD doesn’t allow direct communication to any programs, there is some setup required for SQL Server such as an Azure app registration and certificates. You can read more on the details about the use of these protocols with AAD at https://docs.microsoft.com/en-us/azure/active-directory/develop/active-directory-v2-protocols.
For SQL Server to have all the right information to communicate with AAD, it needs specific information stored somewhere. Therefore, this is where the Azure extension for SQL Server comes in. The extension communicates with Azure during your setup of AAD to write into the Windows registry information the engine can read and use to communicate with AAD.
The registry keys are internal to the product, but if you have access, you can see them at HKEY_LOCAL_MACHINESOFTWAREMicrosoftMicrosoft SQL ServerMSSQL15.MSSQLSERVERMSSQLServerFederatedAuthentication. Linux uses similar settings in the mssql.conf file.
AAD authentication for SQL Server is separate from Windows authentication. These are not integrated together. Azure SQL Managed Instance does provide a service to keep your Windows authentication accounts but integrate your authentication with AAD. You can read more at https://docs.microsoft.com/azure/azure-sql/managed-instance/winauth-azuread-overview.
Keep up to date with all the latest information about SQL Server and AAD at https://aka.ms/aadsqlserver.
Setting Up and Using AAD Authentication
Let’s walk through an exercise to set up and configure AAD authentication for SQL Server 2022. These steps are based on the following tutorial at https://docs.microsoft.com/sql/relational-databases/security/authentication-access/azure-ad-authentication-sql-server-automation-setup-tutorial.
Prerequisites
A virtual machine or computer with at least two CPUs and 8Gb RAM. Your virtual machine or computer needs to be capable of connecting to Azure over the Internet.
SQL Server 2022 Evaluation Edition. You will need the database engine feature, and you will also need to set up the Azure extension for SQL Server option during or after setup. You can use instructions that I created in Chapter 2 of the book under the section titled “Setting Up the Azure Extension for SQL Server” or use the instructions in the documentation at https://docs.microsoft.com/sql/database-engine/install-windows/install-sql-server-from-the-installation-wizard-setup. For Linux users, please check the Linux documentation at https://docs.microsoft.com/en-us/sql/linux/sql-server-linux-configure-mssql-conf#azure-ad.
- An Azure subscription using an Azure Active Directory (AAD) account in your organization you have deemed to be the AAD admin for SQL Server. This account should have the following permissions:
Member of the Azure Connected Machine Onboarding group or Contributor role in the resource group associated with the Azure extension for SQL Server
Member of the Azure Connected Machine Resource Administrator role in the resource group associated with the Azure extension for SQL Server
Member of the Reader role in the resource group associated with the Azure extension for SQL Server
Permissions to create an Azure Key Vault
You will need to be able to grant admin consent for an Azure application. In order to grant admin consent, your AAD account must be a member of the Azure AD Global Administrator or Privilege Role Administrator. It is possible in your organization you don’t have this permission, so either you will need to be granted this permission or have another AAD administrator configure this. Do not move forward until you have this permission resolved.
SQL Server Management Studio (SSMS). The latest 18.x build or 19.x build will work.
A copy of the scripts from book samples from the ch3_cloudconnectedaad folder.
Set Up AAD with SQL Server 2022
- 1.
With your permissions properly configured, create a new Azure Key Vault resource. Azure Key Vault is an Azure service to store and protect keys, secrets, and certificates. Use this quick-start guide to create a new key vault at https://docs.microsoft.com/azure/key-vault/general/quick-create-portal. Use the same resource group and region from the SQL Server Azure Arc registration. Add your AAD admin account in the Contributor role for the key vault you created.
- 2.
Set up access for the SQL Server 2022 instance to the Azure Key Vault. Use the Access policies option on the resource menu for the key vault. Select Add access policy. Keep 0 selected for Key permissions. Add the Get and List permissions for Secret and Certificate. Then for Select principal, use the name of the host of your SQL Server (the name of the Azure Arc SQL Server). Your screen should look like Figure 3-40.

A screenshot shows the add access policy tab. The options selected for key permissions, secret permissions, and certificate permissions are 0, 2, and 2 respectively.
Adding access policy for Azure Key Vault
- 3.
Now grant access to the Azure Key Vault to the AAD account you would like to make the AAD admin for SQL Server. This is a similar process to the preceding step except for Key permissions you need Get, List, and Create. You also need Get, List, and Set for Secret and Get, List, and Create for Certificate. It is possible you don’t need this step if you used the AAD admin account to create the Azure Key Vault.
- 4.
Now we will set up the AAD admin for SQL Server using the Azure portal.
Note There are other options for set this including az CLI, PowerShell, and an ARM template. To learn more see the documentation at https://docs.microsoft.com/sql/relational-databases/security/authentication-access/azure-ad-authentication-sql-server-automation-setup-tutorial#setting-up-the-azure-ad-admin-for-the-sql-server.
Find your SQL Server Azure Arc resource in the Azure portal. You can do this by typing the word SQL Server in the Search field at the top of the portal and selecting SQL Server – Azure Arc under services. Choose your SQL Server instance.
Choose Service-managed cert.
Change your key vault to the Azure Key Vault you have created.
Choose Service-managed app registration.
Leave the option for Purview disabled. We will enable Purview policies in the next section of the chapter.

A screenshot shows the b w s q l 2022. The Azure active directory is selected in the left pane. The service certificate and app registration of the s q l server are service managed.
Setting the AAD admin for SQL Server
Now select Save. The top of the screen will show in Progress… Azure is now sending information to your SQL Server through the Azure extension for SQL Server. This can take a few minutes. When successful you will see a message like
Saved successfully, but admin consent may need to be granted to app 'bwsql2022-MSSQLSERVER<nnnnn>'
As mentioned earlier in this chapter, you will now have information written into the Windows registry of your SQL Server (or mssql.conf file for Linux) with a path like ComputerHKEY_LOCAL_MACHINESOFTWAREMicrosoftMicrosoft SQL ServerMSSQL16.MSSQLSERVERMSSQLServerFederatedAuthentication. We don’t support you modifying these registry keys, but it is interesting to see how our software connects. The SQL Server 2022 engine is enhanced to read these keys to know how to connect with Azure Active Directory to authenticate.
- 5.
This leads right into the last step for setup. SQL Server has to use an Azure application as part of communicating with AAD. The app name you saw in the last step was created automatically for you. Now you must grant an admin consent for the Azure application. In the Azure portal, search for Azure Active Directory and choose your organization. Select App registrations on the left-hand menu. The application you want to choose was the one created in step 4 (mine is 'bwsql2022-MSSQLSERVER<nnnnn>). Now select API permissions on the left-hand menu. If you have the proper rights, select Grant admin consent…
Note This is the step that requires you to have Global Administrator or Privileged Role Administrator rights with your AAD. These are highly privileged rights, so you may need someone in your organization to perform this step.

A screenshot shows a p i permissions for b w s q l 2022. The right pane for a p i permission lists 5 configured permissions under Microsoft graph.
Granting access to the Azure app for AAD authentication
If you don’t do this step, you can still use the AAD admin account already set up for SQL Server 2022. But you will not be able to add any other AAD logins or users to SQL Server. You will get an error like Server identity does not have permissions to access MS Graph.
MS Graph stands for Microsoft Graph, which is a service in the Microsoft Identity platform used for Azure application access.
I know there are a lot of steps to set this up. But when you have it all done, using AAD authentication is very easy and powerful.
Using AAD with SQL Server
- 1.You already have an AAD-based login added from the AAD admin account you set up earlier. Let’s find it. Execute the script findaadlogin.sql logged in as the local administrator account. This script uses the following T-SQL statements:USE master;GOSELECT * FROM sys.server_principals WHERE type = 'E'GO
The result should be a single login with the AAD credentials you created earlier. The type = E stands for EXTERNAL_LOGIN. The only type of external logins supported today is AAD.
- 2.
Let’s try to log in with SSMS using the AAD login. From SSMS for Authentication, choose Azure Active Directory – Universal with MFA. Then type in the AAD account. Select Options and make sure Encrypt connection and Trust server certificate are checked. My login screen before I selected Connect looks like Figure 3-43.

A screenshot shows the connect to server tab. The highlighted field entry under login for server name is b w sq l 2022. The connect button is highlighted at the bottom.
Logging into SQL Server with AAD using MFA
Select Connect, and you will be prompted for you Azure account information. If your AAD supports or requires MFA, you will be prompted to use whatever method has been set up (e.g., using your phone). After you have successfully signed in, you will be connected with Object Explorer in SSMS.
- 3.Let’s try to add a new AAD account as a SQL login. Let’s say one of my colleagues Anna Hoffman needs sysadmin access to this SQL Server but wants to use her direct AAD account instead of creating a different account. Anna’s AAD account is [email protected]. Now logged in as the AAD sysadmin login that was originally created and you just connected with, execute the script createaadlogin.sql, which uses the following T-SQL statements:USE master;GOCREATE LOGIN [[email protected]] FROM EXTERNAL PROVIDER;GOEXEC sp_addsrvrolemember @loginame='[email protected]', @rolename='sysadmin';GO
Note the new syntax FROM EXTERNAL PROVIDER (which we already have supported with Azure SQL Database and Azure SQL Managed Instance).
You can now connect to SSMS with AAD with MFA or password-based authentication using this new login.
- 4.Now let’s say another colleague Marisa Mathews needs access to a specific database as a user but doesn’t really need a login or to be a member of the sysadmin role. You can do this with AAD authentication. Connected as the AAD sysadmin login, execute the script createaaduser.sql, which uses the following T-SQL statements:DROP DATABASE IF EXISTS howaboutthemcowboys;GOCREATE DATABASE howboutthemcowboys;GOUSE howboutthemcowboys;GOCREATE USER [[email protected]] FROM EXTERNAL PROVIDER;GO
Now when you try to connect using SSMS with this AAD account, you need to use the Connect to database option under Connection Properties and specify this database. This user will only have access to the database and not the complete instance. This is very similar to the capability we provide with Azure SQL Database.
- 5.One other nice option is AAD groups. Let’s say Anna and Marisa were part of an AAD group called sqlusers. Connected as a sysadmin login, you can execute the script createaadgrouplogin.sql. This script uses the following T-SQL statements:USE master;GOCREATE LOGIN [sqlusers] FROM EXTERNAL PROVIDER;GO
Unfortunately procedures like xp_logininfo don’t work against AAD groups, so to view membership, you will need methods to list AAD groups.
There a few other syntax options for you to create logins and users including Azure applications (passwordless accounts), which you can read more about at https://docs.microsoft.com/en-us/sql/relational-databases/security/authentication-access/azure-ad-authentication-sql-server-setup-tutorial#create-logins-and-users.
We even support AAD authentication for linked servers, which you can read more at https://docs.microsoft.com/sql/relational-databases/security/authentication-access/azure-ad-authentication-sql-server-linked-server.
Microsoft Purview Policy Management
To understand the power of Microsoft Purview policy management, let’s take a scenario. You need to hire a consultant who has very strong skills in performance monitoring for SQL Server. You want this consultant to have access to your SQL Server but only to monitor things like Dynamic Management Views (DMVs) related to performance. You don’t want to have to grant them full sysadmin rights. You will learn in Chapter 6 of the book we have new fixed server roles for just this purpose like ##MS_ServerPerformanceStateReader##. This could meet your needs perfectly. You could even create a guest account in your Azure Active Directory and create a SQL Server login based on that account and assign them to the new role.
Now what if you had to do this across, say, 50 SQL Server instances? You will need to create some scripts to connect to all the instances to create the logins and assign the roles. What happens when the contract is up? It is up to you to create scripts to remove the logins you created earlier across all the instances.
What if you could use a central place to do all of this without creating and maintaining scripts or even directly creating the logins? Microsoft Purview provides a central governance hub to establish access policies for Azure SQL resources including SQL Server 2022 as an Azure Arc–enabled SQL Server. In addition, Microsoft has created some built-in policies to match certain scenarios such as performance monitoring, security auditing, or reading of user table data.
The following blog post at https://cloudblogs.microsoft.com/sqlserver/2022/08/11/microsoft-purview-access-policies-for-sql-server-2022/ by Srdan Bozovic, Lead Program Manager at Microsoft for Purview access policies for SQL, is a great glance at what is possible.
I asked Joachim Hammer, Principal Group Program Manager for security across SQL, his perspective on what Microsoft Purview provides for SQL customers. He said
Comprehensive, unified data governance provided by Microsoft Purview helps protect sensitive data across clouds, apps, and devices and is an important tool in the fight against the growing number of security threats. Microsoft Purview-based access policies, which are now available in SQL Server 2022, provide two advantages over the access controls that are built into today’s database management systems: Access to data is efficiently managed in one place using Purview’s easy-to-use policy dashboard while the enforcement happens at scale across the entire data estate. We are extremely proud to offer powerful, cloud-based data governance in the form of Purview-based access policies to our SQL Server customers, helping them govern and secure all of their SQL Server data, irrespective of where it resides, ground to cloud.
Let’s dive into the details. Let’s see how Purview access policies work and then see them in action with an exercise.
How Do Purview Access Policies Work?
Like Synapse Link, you will use Purview in Azure to author the experience of building policies that affect SQL Server. You will learn to do this through a tool called Purview Governance Portal (I often call this Purview Studio).
The type of access (read, performance monitoring, etc.)
A data source. This will be a SQL Server instance you will register with Purview.
A principal to give access. This is an Azure Active Directory account.
Data – This is to support the concept of a user who just needs to read data perhaps to build reports.
DevOps – This is to support admin users for, for example, performance monitoring and security auditing.
We will continue to invest here and add more types of access policies such as modification of data and self-service data access. Self-service data access allows users to request access to data through a scanned data source, and approvals can be automatically done without creating a specific policy.
Purview access policies are not just for SQL Server. Purview access policies are part of a broader concept for Purview called Data Use Management (DUM), which you can read more about at https://docs.microsoft.com/azure/purview/how-to-enable-data-use-management.
Azure Active Directory (AAD) authentication for SQL Server. This is because policies are only supported for an AAD account.
Azure extension for SQL Server. This agent is used for AAD authentication but will also be used by Purview to provide information for the SQL Server engine to connect to Purview to extract policies.
Enhancements built into the SQL Server engine to the security system to understand how to take policy information and allow connections and access to SQL Server based on the policy.

A 4-step flowchart shows the Microsoft Purview s q l server policy architecture. Steps start with Azure extension for s q l server and end with a a d login.
Architecture of Purview access policies for SQL Server
- 1.
After creating a Purview account, you will use the Azure extension for SQL Server to enable Purview through the Azure Arc–enabled SQL Server capability (remember you already did this to get AAD authentication enabled, which is first required). When you enable Purview, the extension stores key information in the Windows registry or mssql.conf file (Linux) so the SQL Server engine knows how to communicate with Purview.
Note For Windows, the registry key is ComputerHKEY_LOCAL_MACHINESOFTWAREMicrosoftMicrosoft SQL ServerMSSQL16.MSSQLSERVERMSSQLServerPurviewConfig. This is internal information, and we do not support you reading or modifying these registry keys.
- 2.
You will then use Purview Studio to register your Arc-enabled SQL Server instance with Purview and enable Data Use Management (DUM). You can now create policies for Data and DevOps scenarios.
- 3.
The SQL Server engine can then pull policy information from Purview and store in a policy cache (system tables and memory structures). The engine periodically checks for updates to policies and updates the cache (or you can force a refresh).
- 4.
The principal granted access through the policy can then log in to SQL Server and be authenticated with AAD. The engine then can use the policy cache to determine what permissions this principal has access to in SQL Server and user databases.
To make this more real to you, let’s look at an exercise to see an example of a Data and DevOps policy.
Using Purview Access Policies
In this exercise I’ll show you how to use two types of access policies for Purview: Data to read user data and DevOps for performance monitoring.
Prerequisites
A virtual machine or computer with at least two CPUs and 8Gb RAM. Your virtual machine or computer needs to be capable of connecting to Azure over the Internet.
You have fulfilled all the prerequisites earlier in this chapter for Azure Active Directory (AAD) authentication and have followed all the steps as instructed earlier in this chapter to set up AAD with SQL Server 2022.
Permissions in your Azure subscription to create a Microsoft Purview account.
Note that during our preview for SQL Server 2022, Purview data access policies were restricted to certain Azure regions. Please consult with this documentation for the latest updates: https://docs.microsoft.com/azure/purview/how-to-policies-data-owner-arc-sql-server?branch=release-build-purview-sql-policy#prerequisites.
Set Up Microsoft Purview Access Policies
- 1.
You will first need a Microsoft Purview account. Here is a quick-start guide to create a Purview account: https://docs.microsoft.com/azure/purview/create-catalog-portal.
- 2.
There are some permissions you will need to set up with Purview to allow you to create and publish policies and enable DUM. Please follow the steps in this documentation carefully to set up these permissions: https://docs.microsoft.com/azure/purview/how-to-policies-data-owner-arc-sql-server#configuration.
- 3.
Now you need to register your Purview account with the Azure extension for SQL Server through the Azure portal. Find your SQL Server – Azure Arc resource that you created for AAD authentication in the Azure portal. Select on the left-hand menu Azure Active Directory. At the bottom of the screen that is presented, you will see a section called Microsoft Purview access policies. Click Enabled and fill out Microsoft Purview Endpoint by putting in your Purview account name like in Figure 3-45.

A screenshot shows the Microsoft Purview access policies preview tab. Two entries show the app registration i d, and Purview endpoint with an overlay titled your purview account name.
Registering Purview with the Azure extension for SQL Server
The App registration ID will be automatically filled in. This is an AAD ID associated with the Azure application that was registered when you enabled AAD authentication. Select Save at the top of this screen. The status of success or fail is a bit odd as this screen doesn’t just go away when the save is successful.

A screenshot shows the s q l server 2022. The Azure active directory is selected in the left pane. The service certificate and app registration of the s q l server are service managed. External policy-based authorization is enabled.
Azure Arc–enabled SQL Server 2022 configured for AAD and Purview
So how do you know if Purview was enabled on your SQL Server through the Azure extension? One way to see this is to view details of the SQL extension in the portal.

A screenshot shows windows agent dot s q l server. The succeeded status is followed by a status message and resource i d.
Successful extension status for AAD and Purview
- 4.
You will need some AAD accounts to authorize access in the exercise. I will show you two scenarios for two different AAD accounts. For access to read data, I’ll use the account [email protected] that I created in the exercise earlier in this chapter for AAD authentication. For the exercise on DevOps for performance monitoring, I’ll show an example of a guest AAD account. A guest is an account that is not part of your AAD but you are inviting them to access resources in Azure. You can read more about how to invite a guest account in AAD at https://docs.microsoft.com/azure/active-directory/external-identities/b2b-quickstart-add-guest-users-portal.
- 5.
Learn the basics of how to launch Purview Studio from the Azure portal at https://docs.microsoft.com/azure/purview/use-azure-purview-studio. Use the AAD admin account you created earlier in this chapter for the exercises to enable AAD authentication for SQL Server 2022.
Using Microsoft Purview Access Policies
- 1.
The first thing we need to do is register the SQL Server 2022 instance as a data source. Launch Purview Studio from the Azure portal. Choose the Data map icon
 A screenshot shows the data map icon in Microsoft Purview. It is a rhombus-shaped icon featuring 2 dots connected to a circle on top. on the left-hand menu (hover over the icons to see Data map). Your Purview account may have other data sources already registered shown in a visual tree or in a table format. Choose Register at the top of the screen. On the Register sources screen, type in Arc in the Filter by keyword field. Select SQL Server on Azure Arc–enabled servers and select Continue.
You can now choose and fill out fields on the Register sources (SQL Server on Azure Arc–enabled servers) screen. Choose a name (I recommend the same name as your registered server), subscription, and server name (your registered server). Type in your registered server name in the Server endpoint field and leave the (Root) collection as the default.
Select the Enabled option for Data Use Management, which should auto-populate the Application ID (this is the App registration ID that is listed on the Azure Active Directory screen from SQL Server – Azure Arc). Your screen should look similar to Figure 3-48.

A screenshot shows the register sources tab. It has entries for name, azure subscription, server name, server endpoint, select a collection, and application i d. Data use management is enabled.
Registering a SQL Server data source for Purview access policies
Select Register. After a few seconds, you will see the list of data sources again. Select Refresh at the top of the screen to confirm your data source.
If you want to apply a policy against multiple SQL Server instances, you need to register each one first. You only need to register a SQL Server data source once to use with any number of policies.
- 2.
Let’s now create a data policy for another AAD account. I’ll use [email protected] to be granted access to read data for our SQL Server instance. For me, since I created this account as a login in the exercises for AAD, I first deleted the login to avoid any confusion. Turns out that if a login exists for the same AAD account as a policy, we use the union of the permissions of the login and the policy.
Note At the time of the writing of this book, we were looking to add more granular read access for individual objects like specific databases and/or tables in the future. This will require the SQL Server instance to be scanned using the data catalog feature of Microsoft Purview.
Using Purview Studio, select the Data policy icon ![]() A screenshot shows the data policy icon in Microsoft Purview. The icon features a badge with a checkmark over a paper. on the left-hand menu. Select Data policies and then + New policy. Now select Access Control under Policy Types.
A screenshot shows the data policy icon in Microsoft Purview. The icon features a badge with a checkmark over a paper. on the left-hand menu. Select Data policies and then + New policy. Now select Access Control under Policy Types.
For effect choose Allow.
For action choose Read.
For data resources on the new screen, choose Data source type and then choose SQL Server on Azure Arc–enabled servers. Leave Assets alone and select Continue. Choose your server under Data Source Name and select Add.
Note If you have registered multiple SQL Server data sources, this is where you can apply a policy to one or more of them.
For subjects type in the AAD account you want to give read access to in the Select subjects search window and then select Ok.

A screenshot shows the access control policy tab. The field entries for name and description are s q l reader. The policy statement tab is visible at the bottom.
Creating a read policy for SQL Server 2022
- 3.
For the policy to take affect, we need to publish it. Select your policy and select Publish on the right side of the screen. Choose your data source and select Publish at the bottom of the new screen. You should now see a Published On date and time on the screen for your policy.
- 4.
Let’s create a database and data for the new account to read. Execute the script howboutthemcowboys.sql against your SQL Server 2022 instance as your default sysadmin.
- 5.Policies are not immediately applied. SQL Server will check periodically for new policies on a polling interval. Connect to your SQL Server 2022 to immediately apply the new policy. Execute the script policyrefresh.sql, which uses the following T-SQL statements:-- Force immediate download of latest published policiesUSE master;GOexec sp_external_policy_refresh reload;GO
Note On a server start when SQL Server obtains information from Microsoft Purview for policies, you might see messages like the following in the ERRORLOG:
IMDS resource information. Subscription ID: 4fe118d0-bc41-4d7b-869f-0820c87df124, Resource Group: aad-auth-demo-env, Name: SQLSERVER2022.
[JSONWebTokenService::GetCertificateFromCertificateStoreBySubjectName] [AADAuthThumbprint] Thumbprint being used for AAD authentication aRgwszCertificateThumbprint 26289598dfe34092c141edc8a319505bdf0882b6
[CBabylonConfigSubscriber] Purview frequency setting changed. New value: 300
[CBabylonConfigSubscriber] Purview policy expiration time changed to 480 mins
[CBabylonConfigSubscriber] Received update to the config settings
[CBabylonConfigSubscriber] Purview frequency setting changed. New value: 300
[CBabylonConfigSubscriber] Purview policy expiration time changed to 480 mins
[CBabylonConfigSubscriber] Registered for setting updates successfully
Fun fact Babylon is the original project name for Microsoft Purview.
- 6.Using the same technique you learned earlier in this chapter with SSMS, log into SSMS with the account you published the policy for using the MFA option (don’t forget to check the Trust server certificate option). Let’s check the new permissions as a reader to make sure it worked. Execute the script querythecowboys.sql, which executes the following T-SQL statements:USE howboutthemcowboys;GOSELECT * FROM tothesuperbowl;GO
You should get one row back (I hope this is our year<g>). The permission to read data includes system catalog views and limited Dynamic Management Views (DMVs).
- 7.Let’s prove you only have read permissions. Execute the script dropthecowboys.sql, which executes the following T-SQL statements:USE howboutthemcowboys;GODROP TABLE tothesuperbowl;GOYou should now get an error like the following:Msg 3701, Level 14, State 20, Line 3Cannot drop the table 'tothesuperbowl', because it does not exist or you do not have permission.
- 8.Let’s take a quick peek at a few new Dynamic Management Views (DMVs) to see policy information that has been pulled down from Microsoft Purview. Connect as a sysadmin to your SQL Server 2022 instance and execute the script policydmvs.sql, which uses the following T-SQL statements:-- Lists generally supported actionsSELECT * FROM sys.dm_server_external_policy_actions;GO-- Lists the roles that are part of a policy published to this serverSELECT * FROM sys.dm_server_external_policy_roles;GO-- Lists the links between the roles and actions, could be used to join the twoSELECT * FROM sys.dm_server_external_policy_role_actions;GO
The results of dm_server_external_policy_actions are all the possible types of actions a policy can be applied to. Think of these as the detailed types of permissions the Data and DevOps policies apply to. This list will expand as we provide more capabilities. The DMV sys.dm_server_external_policy_roles lists out the detailed roles that apply to Data and DevOps policies including reading, performance monitoring, and security auditing. You will see others in here not implemented yet and roles for Connect, which apply to all roles. This list will also expand as we add more capabilities. The DMV dm_server_external_policy_role_actions is a join of what actions are allowed for specific predefined roles. These DMVs will always be populated even if no policies have been created.
- 9.Since we have created a policy, execute the script policyprincipals.sql, which uses the following T-SQL statements:-- Lists all Azure AD principals that were given connect permissionsSELECT * FROM sys.dm_server_external_policy_principals;GO-- Lists Azure AD principals assigned to a given role on a given resource scopeSELECT * FROM sys.dm_server_external_policy_role_members;GO-- Lists Azure AD principals, joined with roles, joined with their data actionsSELECT * FROM sys.dm_server_external_policy_principal_assigned_actions;GO
Let’s break down the results from these DMVs. dm_server_external_policy_principals will list any AAD account you have granted access through a policy. You will only see one row for an account even if it has been granted access through more than one policy. The aad_object_id column maps to the unique ID in Azure Active Directory for this account. dm_server_external_policy_role_members shows which roles from dm_server_external_policy_roles the AAD account is a member of. Then finally dm_server_external_policy_principal_assigned_actions shows all the permissions for an AAD account assigned through any policy.
- 10.
Let’s show an example of a DevOps policy. Let’s say you hire a consultant to look at performance metrics for your SQL Server for a period of time to help tune and improve performance. You want to grant an AAD guest account access to your SQL Server (or many) but limit them to only access certain operations that allow them to analyze performance but make no changes or access no user data. In Purview Studio, select Data policy from the left-hand menu as you did in step 2. Select DevOps policies and + New policy. For Data source type choose SQL Server on Arc-enabled servers and pick your registered SQL Server and select Select.
Now choose Add/remove subjects and pick the guest AAD account you created for the prerequisites. Your screen should look like Figure 3-50.

A screenshot shows the new policy tab. Policy statement, data resource path, and dev ops roles panes with add or remove button for subject are visible.
Create a DevOps policy for SQL performance monitoring.
- 11.
On your SQL Server instance connected as a sysadmin, execute the script policyrefresh.sql.
- 12.
Execute the scripts policydmvs.sql and policyprincipals.sql as a sysadmin to see the additions to the new AAD guest account and the permissions granted for performance monitoring.
- 13.
Connect with SSMS with the guest ADD account using MFA as you have done before with other AAD accounts in this chapter.
As a refresher my login to SSMS looks like Figure 3-51.
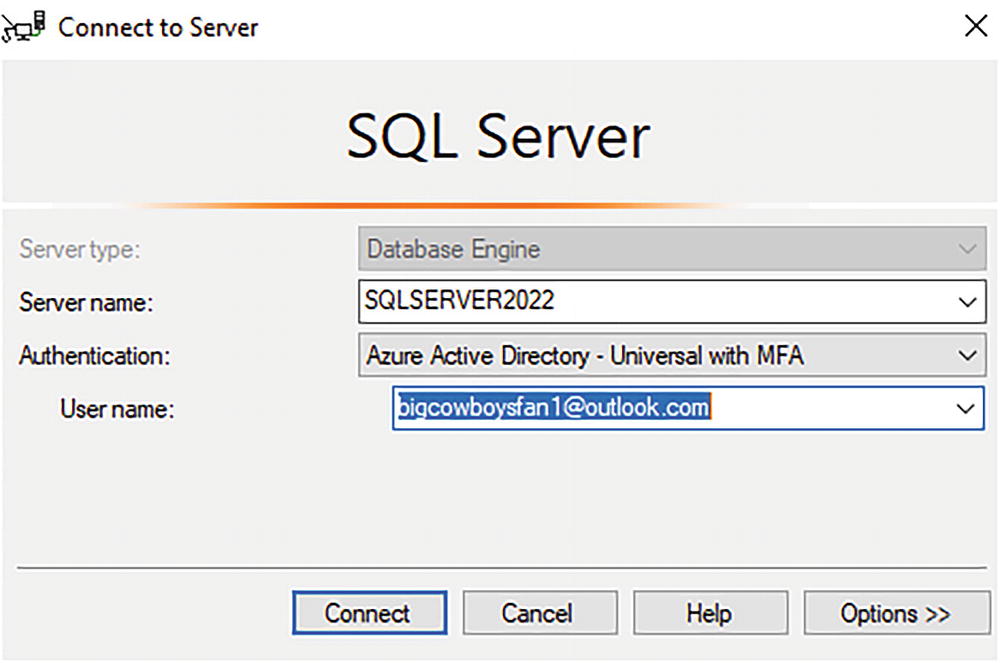
A screenshot shows the connect to server tab. Server type, server name, authentication, user name panes are visible. The connect button is visible at the bottom.
Connecting as a guest AAD account to SQL Server
- 14.Execute the script perfdmvs.sql as the new AAD guest account. This scrip uses the following T-SQL statements:SELECT * FROM sys.dm_exec_requests;GOSELECT * FROM sys.dm_os_wait_stats;GO
Your results should be the same results as you see from a typical admin who can view this type of information.
- 15.Execute the script querythecowboys.sql as the new guest AAD account. Notice you get the following error trying to access user data:Msg 229, Level 14, State 5, Line 3The SELECT permission was denied on the object 'tothesuperbowl', database 'howboutthemcowboys', schema 'dbo'.
- 16.To ensure the account that is granted a policy to just look at performance data cannot make any changes, execute the script sp_configure.sql, which uses the following T-SQL statements:EXEC sp_configure 'show advanced options', 1;GOYou should receive the following error:Msg 15247, Level 16, State 1, Procedure sp_configure, Line 105 [Batch Start Line 0]User does not have permission to perform this action.
- 17.
Let’s say the contract for the consultant with the guest AAD account is now over. You would like to ensure the system is secure and remove access to SQL Server. Let’s do this through Microsoft Purview. In Purview Studio select the Data policy icon from the left-hand menu. Then select DevOps policies. Select the checkbox next to the policy you created and select Delete at the top of the screen. Select Delete again.
- 18.
Now go back to SQL Server and try to connect again with the guest AAD account. You should get a login failure error.
In this exercise you learned how to create policies with Microsoft Purview to grant access to AAD accounts to read data and execute performance monitoring analysis without having to directly create logins and assign roles in SQL Server. SQL Server has been enhanced to integrate policies from Purview into the security permission system so it naturally feels like you granted direct authentication and authorization inside SQL Server.
There is one issue you may encounter using this feature. You will need to extend how you view security information in the system. You will need to use the new DMVs in addition to other security catalog views to see who has access to your system and their permissions. Fortunately, features like SQL Server Audit and Extended Events can track any account that has access through policies.
Connecting SQL to the World
SQL Server is now not just connected to Azure. SQL Server is integrated with Azure to bring to you powerful solutions such as managed disaster recovery, near-real-time analytics, and centralized security and governance. Each of these solutions requires us to enhance the SQL Server engine so that the capabilities you need are seamless and work with the SQL Server ecosystem. There is no requirement to use all of these services. Pick and choose the one you want when you need it. The future for SQL Server hybrid is bright, and for Microsoft and our customers, the journey is just starting.