Containers are changing the way applications are deployed. In this chapter, we will begin with the benefits of container-based application deployment and lay a solid technical foundation of container fundamentals introducing operations such as creating and running containers and persisting data. The chapter will close with the need for container orchestrators and introduce Kubernetes and its benefits. The goal of this chapter is, if you have never seen a container before, to become proficient in container basics before moving on to container orchestration with Kubernetes.
Container-Based Application Deployment
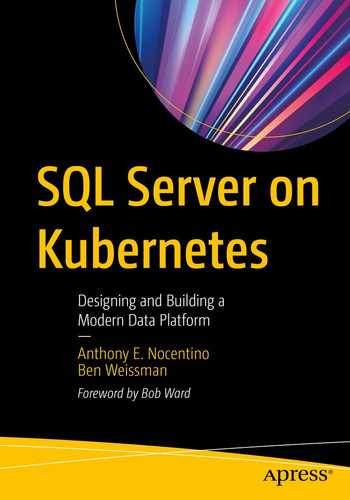
A container is a form of operating system virtualization. For years now, database professionals have become familiar with the concepts of machine virtualization where operating systems are multiplexing the hardware resources of our physical servers, the CPU, memory, and disk. In containers, the underlying operating system, its kernel, and resources are being multiplexed, or shared by applications running on that system. Each container thinks it is the only process running on the operating system. The operating system, in turn, controls access to the underlying hardware as normal. We will explore this isolation concept in more detail shortly. The software that has the responsibility of coordinating this work with the underlying operating system is called a container runtime.

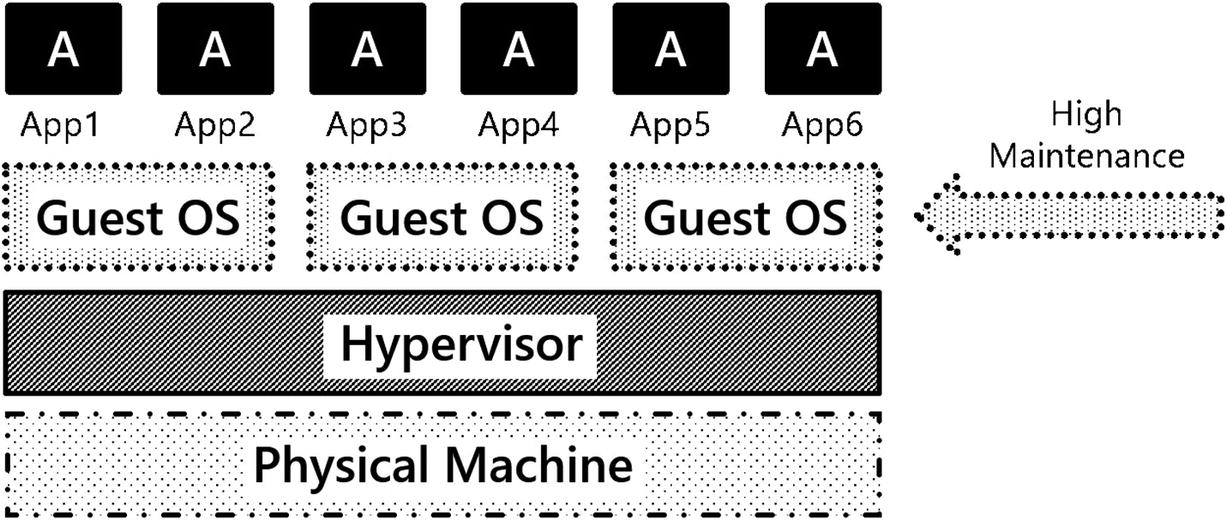
A containerized application
Conventionally, there is only one application inside a container, because the application is the unit of work and also our unit of scaling. When a container starts, it will begin executing a defined application inside it. There are scenarios where you can put multiple applications inside containers if there is a very tight relationship between those applications, for example, an application server and a metrics data collector.
Containers provide isolation . A process running inside a container cannot see any other processes running on the operating system or even processes running inside other containers. This concept is key to the portability and usability of and frankly the success of containers.
Containers also can tie specific libraries to an application, helping you solve application library conflicts. Have you ever had an application that needed to be installed on a dedicated server because it required a specific version of a DLL or library and that version conflicted with another version perhaps supporting a different application? Containers can save you from having to do that. If a container has the required libraries available inside the container image, when loaded, they are isolated to that running container. Additional containers can be started up with potentially conflicting libraries, and those container-based applications will happily run in isolation of each other.

Container-based application deployments
Containers are ephemeral , and this ephemerality is one of the superpowers of containers. When a container is up and running, the container has state in terms of the actual program state and any file data changed inside it. A container can also be deleted, and when deleted. any program state and file data inside the container is deleted.
The ephemerality of containers is key to the concept of how container-based applications are deployed and maintained. Decoupling configuration and state from the container lifecycle itself is a core foundation of containers and also container orchestration. Techniques for decoupling configuration and state for containers are introduced later in this chapter with environment variables and Volumes and later in the book with Kubernetes constructs to help us achieve the same goals.
What’s So Hard About Virtual Machines?
Virtual machines have been strongly seated in enterprise IT as the platform of choice for about the last 20 years. We challenge you, the reader, to think what did virtualizing hardware gain you in your data center. You got better utilization of your hardware… That’s great. But what’s the cheapest thing in your data center? Your hardware. What’s the most expensive thing in your data center? You! Your time is the most expensive resource. When using virtual machines as our platform, there is little to no operational efficiency added to our organization, because virtual machines do not add to optimizing an organization’s most expensive resource, the people.
A traditional implementation of VMs and their applications in an enterprise data center
Operating system resource overhead: Running VMs has an inherent CPU and memory overhead. This CPU time and memory could be better spent supporting applications rather than operating systems.
Operating system patching: Updating operating systems adds very little business value to your organization. It certainly is required to maintain a proper security posture but does not move your business forward.
Troubleshooting: For years and years, systems were built, rolled out into production, and were left alone. If something broke, IT operations had to put on their capes and fix the system.
Operating system upgrades: We think the hardest thing in IT to do is upgrading an operating system, because if you upgrade your OS, what do you have to test? EVERYTHING! This tight coupling of application to OS means each time a change is made to the base OS, it injects risk into our system.
Deployments: End-to-end automated deployments of VMs and their applications are rare in enterprise IT. Moreover, these solutions are often custom-built, point solutions, which can be hard to maintain.
Do any of the challenges of running virtual machine–based platforms mentioned move your business forward? Is anything gained by using virtual machines? We don’t think so…and perhaps there’s a better way.
Containers
When using container-based application deployments, containers directly attack some of the challenges identified when deploying applications on virtual machine–based platforms. Let’s look at what containers bring to the table:
Speed : When compared with VMs, containers are significantly smaller. For example, a virtual machine with SQL Server installed on Windows at a minimum will be 60+GB before you include any user databases. The current container image for SQL Server is about 1.5GB in size. Moving a 1.5GB container image around a modern data center is relatively trivial. Deploying a 60+GB VM can take some time.
Patching: When it comes to patching an application, patching is a separate process from deployment. You’ll likely need additional tooling to do so. Leveraging containers, you can very quickly update your application by simply pulling a new container image for your application and starting a new container up on that newer version of your application. If configuration and state are properly decoupled from the container, our app can pick up and start functioning again on the newer version with little to no impact on the application users.
Troubleshooting: Due to the ephemerality of containers, a primary troubleshooting technique for container-based applications is to kill and redeploy the container. Since the container image is a known good starting point for our program’s state, one can simply restart a container and get back into a good state.
Operating system upgrades: When moving between versions of an operating system, a container can be deleted and recreated on the newer version of the OS. Since an application’s required libraries are contained within the container, risk is reduced when moving between versions of the operating system.
Fast and consistent deployments: When using container-based application deployment, deployments are written in code. Efficiencies are gained in how applications are deployed and maintained. In terms of speed, there is no longer a reliance on humans for the work and also consistency, since there is code that represents the state of the system, which can be used repeatedly in deployment processes. This code is placed into source control and is the configuration artifact for the desired state of the system.
Deployment automation is no longer going to be an afterthought or something to strive for in enterprise IT; it will be the primary way applications are deployed – using source-controlled code defining the desired state of the system. Container-based deployment techniques provide IT organizations the ability to provide services to the business more quickly and consistently and enable IT to maintain infrastructure and applications more easily, adding to organizations’ operational efficiency. Application deployment and maintenance can get done faster and more confidently.
Both Docker and Kubernetes enable IT organizations to write code representing a system’s desired state. This code can then be updated effecting the desired changes to applications, platforms, and systems. Code can be written for initial deployments, applying updates, and patching container-based applications. These techniques can also be used to enable troubleshooting with greater efficiency and if needed build self-healing applications. Each of these concepts will be further explored in much detail later in the book.
The Container Universe
OK, so now that you are familiar with the definition of a container and how it fits into modern application deployment processes, let’s look at the container universe. There are a lot of emerging technologies and techniques, and we want to spend some time here familiarizing you with the names and players in this space.
Docker: In today’s container space, Docker is a technology more than anything. It is a container runtime and collection of tools that enables you to create and run container images and containers on an operating system, sharing the resources of that OS.
Docker Inc.: This is the company that built the tooling and drove the technology to enable containers. Docker Inc. has open sourced the core technologies behind their container runtime and have spun off several open source projects such as containerd (https://containerd.io/), Open Container Initiative (www.opencontainers.org/), and more.
containerd: Is a container runtime that coordinates the lifecycle functions of containers such as pulling container images and creating, starting, and stopping containers. containerd is used by Docker and Kubernetes among others to coordinate container lifecycle functions. In Kubernetes, the container runtime is a pluggable component. containerd is the de facto standard.
- Other container runtimes: The world of containers isn’t all Docker on Linux. There are some other players in the game. Here is just a small sample of the other container runtimes available:
Container Linux/CoreOS (rkt): A purpose-built operating system that emphasizes container-based application deployment using an application container runtime called rkt (pronounced rocket, http://coreos.com/).
Podman: A container runtime for running Linux containers on Red Hat–based operating systems. For more information, visit https://github.com/containers/libpod.
Windows Server 2016: Gives you the ability to run both Windows and Linux containers. For more information, visit https://docs.microsoft.com/en-us/virtualization/ windowscontainers/.
In this chapter, we will use Docker as the container runtime for our single-container deployment scenarios. In later chapters, we will use containerd as the container runtime in our Kubernetes Clusters.
Getting and Running Containers
Let’s talk about what a container image is, how a container image is defined, and where container images live.
Container image: Contains the code, application binaries, libraries, and environment variables to run our application. In the most basic terms, these are the things needed to run our application. A running container image is called a container.
Docker file: Defines the elements of a container image. It tells the container runtime which binary to start up when the container starts, which network ports to expose, and other critical information about the container image to be built.
Container registry: This is where images are stored. Docker Hub is one of many container registries and is a primary place to store and exchange container images. Repositories are ways to organize container images within a container registry.
The Container Lifecycle
A container lifecycle
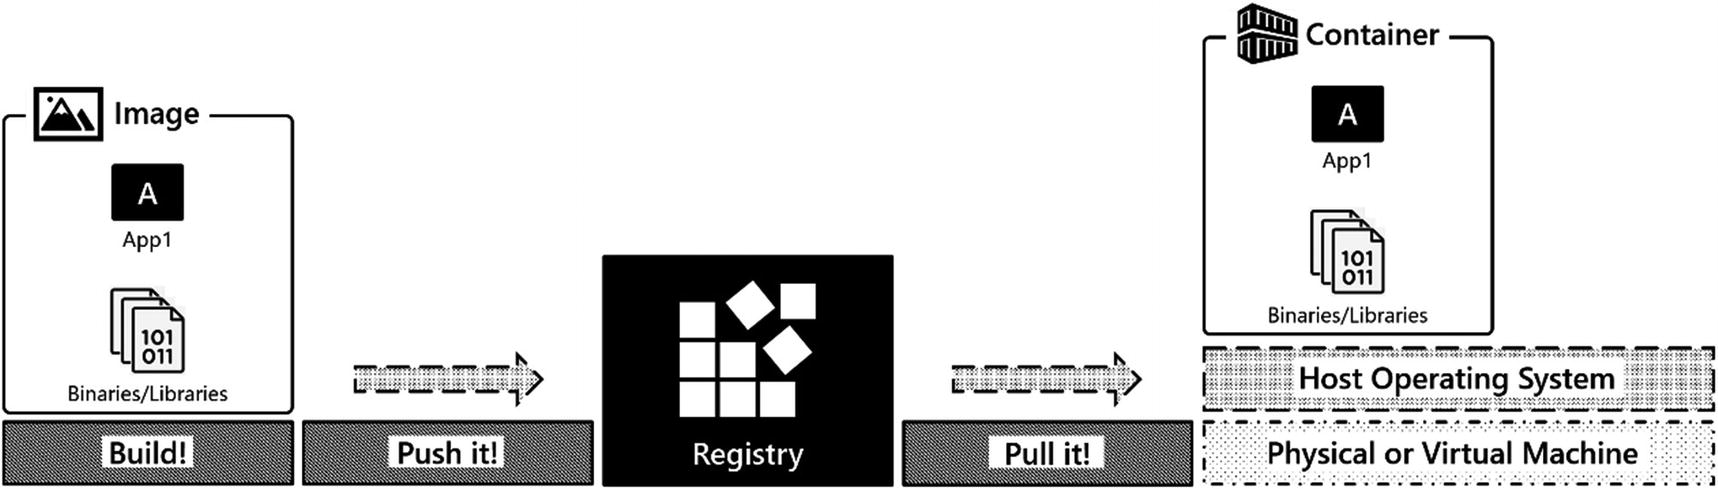
OK, so enough talk. Let’s see how you can deploy SQL Server in a container on Docker. In this book, you will not be building container images. You will be using images available in public container registries. In this chapter, you will be working with SQL Server containers, and those images are available from the Microsoft Container Registry (mcr.microsoft.com).
Working with Container Images
docker pull command for latest SQL Server 2019 image
Command on Bash
Command on Windows
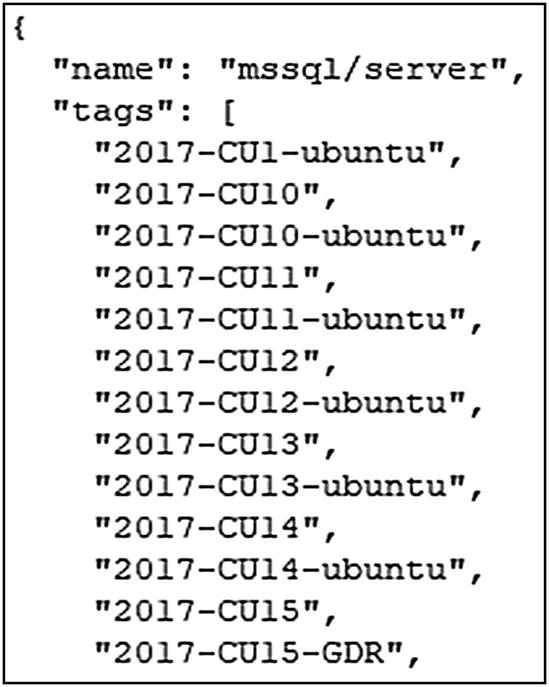
Abbreviated list of container images and their tags
docker pull command to pull container image associated with specific tag
docker image ls command

Output of docker image ls command
It is a common misconception that the creation date shown by the docker image ls command is the date on which the image was pulled. That’s not the case. The creation date really is the date on which the image was created.
A container image can have multiple tags. In the preceding output, if you look closely at the container IMAGE ID, you will notice that both container images have the same value for IMAGE ID. The tags 2019-latest and 2019-CU9-ubuntu-18.04 point to the same container image because the latest image at the time of this writing for SQL Server 2019 is CU9. When a new container image is published into the repository, it will have a new, unique container image ID. The repository administrator will update the latest tag to point to this newest image in that repository.
Starting a Container
docker run command
To run SQL Server in a container, a couple things are required to configure SQL Server for its initial startup. As discussed earlier, decoupling configuration and state is key to running applications in containers. Here is an example of decoupling configuration. SQL Server exposes configuration points as environment variables. And you can inject configuration at runtime by specifying values for those environment variables. In the preceding command, you see --env 'ACCEPT_EULA=Y'. This specifies the value 'Y' for the environment variable ACCEPT_EULA. At startup, SQL Server will look for this value and start up accordingly. Similarly, defined is an environment variable 'MSSQL_SA_PASSWORD=S0methingS@Str0ng!'. This sets the sa password at container startup, which in this case is S0methingS@Str0ng!. While not required, a container name is specified with the --name='sql1' parameter, which is useful when working with containers at the command line and gives us the ability to address the container by its name.
For more information on configurations available as environment variables, check out https://docs.microsoft.com/en-us/sql/linux/sql-server-linux-configure-environment-variables.
In addition to application configuration and name, to access the container-based application over the network, a port must be exposed. The parameter --publish 1433:1433 exposes a port from inside the container to one outside the container on the base operating system. Let’s unpack this a bit, as this is one place we tripped up often when we got started with containers. The first 1433 is the port on which the application is listening on the base operating system. By default, it will listen on the IP address of the host OS, so this is how users and other applications will access the container-based application either locally on the same host or remotely from other hosts. The second 1433 is the port listening “inside” the container. More on this later when in the discussion on container internals. Next is --detach, which tells the container runtime to detach the running process from standard out. This gives us control of our terminal back and runs SQL Server as a background process.
If you are having trouble starting a container, remove the --detach parameter so you can see the container’s log on the screen streamed to standard out. In SQL Server containers, this is the SQL Server Error Log. The most common reason we see when creating a container is the sa password is not complex enough; this will surface quickly when looking at the Error Log. docker logs is also helpful in this scenario.
And finally, the specific container image to start this container from, and in this example, it is mcr.microsoft.com/mssql/server:2019-CU9-ubuntu-18.04.
If the docker run command is successful, it will print the container ID to standard out.
docker ps command

List of containers running on a local system
What If Something Goes Wrong?
docker logs command
Accessing a Container-Based Application
Command line utility sqlcmd to access SQL Server

Container image specified at container startup
Starting a Second Instance of SQL Server
docker run command with unique container name
docker ps will again yield a list of the running containers.

Output of docker ps command
Now that there are two containers up and running, let’s restore a database into one of those containers. In the book downloads, you’ll find a SQL Server database TestDB1.bak and a restore script restore_testdb1.sql.
restore_testdb1.sql
Let’s walk through the process of restoring a database, looking inside the container to see the file layout, and then go through the lifecycle of running a container.
Restoring a Database to SQL Server Running in a Container
The command in Listing 2-12 copies an existing database backup into a container at the directory /var/opt/mssql/data inside the sql2 container, and the command in Listing 2-13 then sets the appropriate permissions on that copied backup file.
docker cp command
chown command inside the container
Execute restore script through sqlcmd

Successful restore of a database
docker exec command
pa -aux command

Output of pa -aux command
Directory listing

Default database directory for SQL Server on Linux
To exit this container, use the exit command and return to our base OS’s shell.
Stopping a Container
docker stop command
Finding Containers on a Local System
At this point, there are two containers on the local system. One container is currently stopped, sql2, and one is still running, sql1. Now execute a docker ps command.

Output of docker ps command. List of running containers
docker ps -a command
In the output displayed in Figure 2-15, both containers are listed, sql1 and sql2. The key piece of information is the STATUS column. sql1 is still up and running, as indicated by a status value 16 minutes ago. For the other container, sql2, the status is Exited (0) 33 seconds; it is currently stopped. The 0 is the exit code from the application. A non-zero exit code indicates an error occurred inside the program; a zero (0) indicates a graceful shutdown.
If you find a non-zero exit code, something went wrong, and you will want to use docker logs to investigate the issue for that container.

Output of docker ps -a command. List of all containers on the respective system
Starting an Existing Container
docker start command
List databases using sqlcmd

List of databases
docker stop command
Removing a Container
docker rm command
docker image ls command

Output of docker image ls command. Container images on the local system
Container Internals
Now, we want to take some time to look at container internals so that you can understand how the operating system implements and provides the isolation to processes and their resources when running inside containers.
A container is a running process with an isolated view of the underlying operating system and its resources. When a container is started from a container image, the container runtime is instructed to start a specific process that is defined in the container image. Also defined is which port the application is listening on, among other configuration information.
As shown earlier, a process listing executed inside the container shows only the processes running inside the container; no other processes on the system are visible. And even though the application is listening on port 1433 inside the container, to access the application, a unique port on the base operating system must be published… How can the operating system provide this isolation for our container-based applications on a single system? This is where Linux namespaces come in.
Namespaces
Linux kernel namespaces (http://man7.org/linux/man-pages/man7/namespaces.7.html) are a kernel construct that provides isolation for processes running on Linux. There are six core namespaces available in Linux, five for resource isolation and one for resource governing. Looking at the following list of namespaces, you can get a feel for what namespaces provide. They provide isolation for programs and the resources the programs are using from the base operating system – things like processes, files, networking, and more.
PID: Process isolation
MNT: File system and mountpoint isolation
NET: Network device and stack isolation
IPC: Interprocess communication
UTS: Unique hostname and domain naming
cgroups: Control Groups enable allocating and controlling access to system resources, like CPU, I/O, and memory.
For more information about how cgroups work, check out this link to the Linux man page: http://man7.org/linux/man-pages/man7/cgroups.7.html.
Union File System
A container image is read-only. When a container is running, any changes to files inside the container are written to a writeable layer using a copy on write technique. The Union File System takes the container image’s base layer and the writeable layer and presents both back to the application as a single unified file system. This technique enables us to start many containers from a single image and gain the efficiencies of reusing that container image’s layer as the starting point for many containers. Each container will have a unique writable layer that has a lifecycle tied to the container. When a container is deleted, this writable layer is deleted too. Which, if you are running a stateful application like SQL Server, does not sound too appealing. Techniques to provide data persistency to our container-based applications are coming up in the next section. The implementation details of Docker’s Union File System have changed over the years from AUFS, UnionFS, and OverlayFS, but the implementation details are out of scope for this conversation.
If you want to dig further into how container images work, we encourage you to check out our colleague Elton Stoneman’s (@EltonStoneman) Pluralsight course “Handling Data and Stateful Applications in Docker” (https://app.pluralsight.com/library/courses/handling-data-stateful-applications-docker/table-of-contents).
Data Persistency in Containers
Containers are ephemeral, meaning when a container is deleted, it goes away…for good. In the preceding section, we introduced that as data changes inside a running container, it is written into a writeable layer and the Union File System has the responsibility of joining the layers together to present a single unified file system to the container-based application and when a container is deleted, the writeable layer is deleted as well. So can containers have data persistency across their lifecycle, from creation to deletion and creation again? You might also be asking, why would we need to delete a container? Shouldn’t we just be able to keep it up and running? Well yes, you can keep a container up and running, but if you need to change out the base container image (perhaps you have a new container image for your application due to an upgrade or some sort of patching), you will need to delete the existing container and start a new container using that new container image.
Docker Volumes
A Docker Volume (https://docs.docker.com/storage/) is a Docker managed resource that is independent of the lifecycle of the container. A Docker Volume allocates storage from the underlying operating system or shared storage and presents that storage into the container at a particular location inside the file system of the container.
Check out the Docker documentation for information on storage drivers by visiting https://docs.docker.com/storage/storagedriver/.
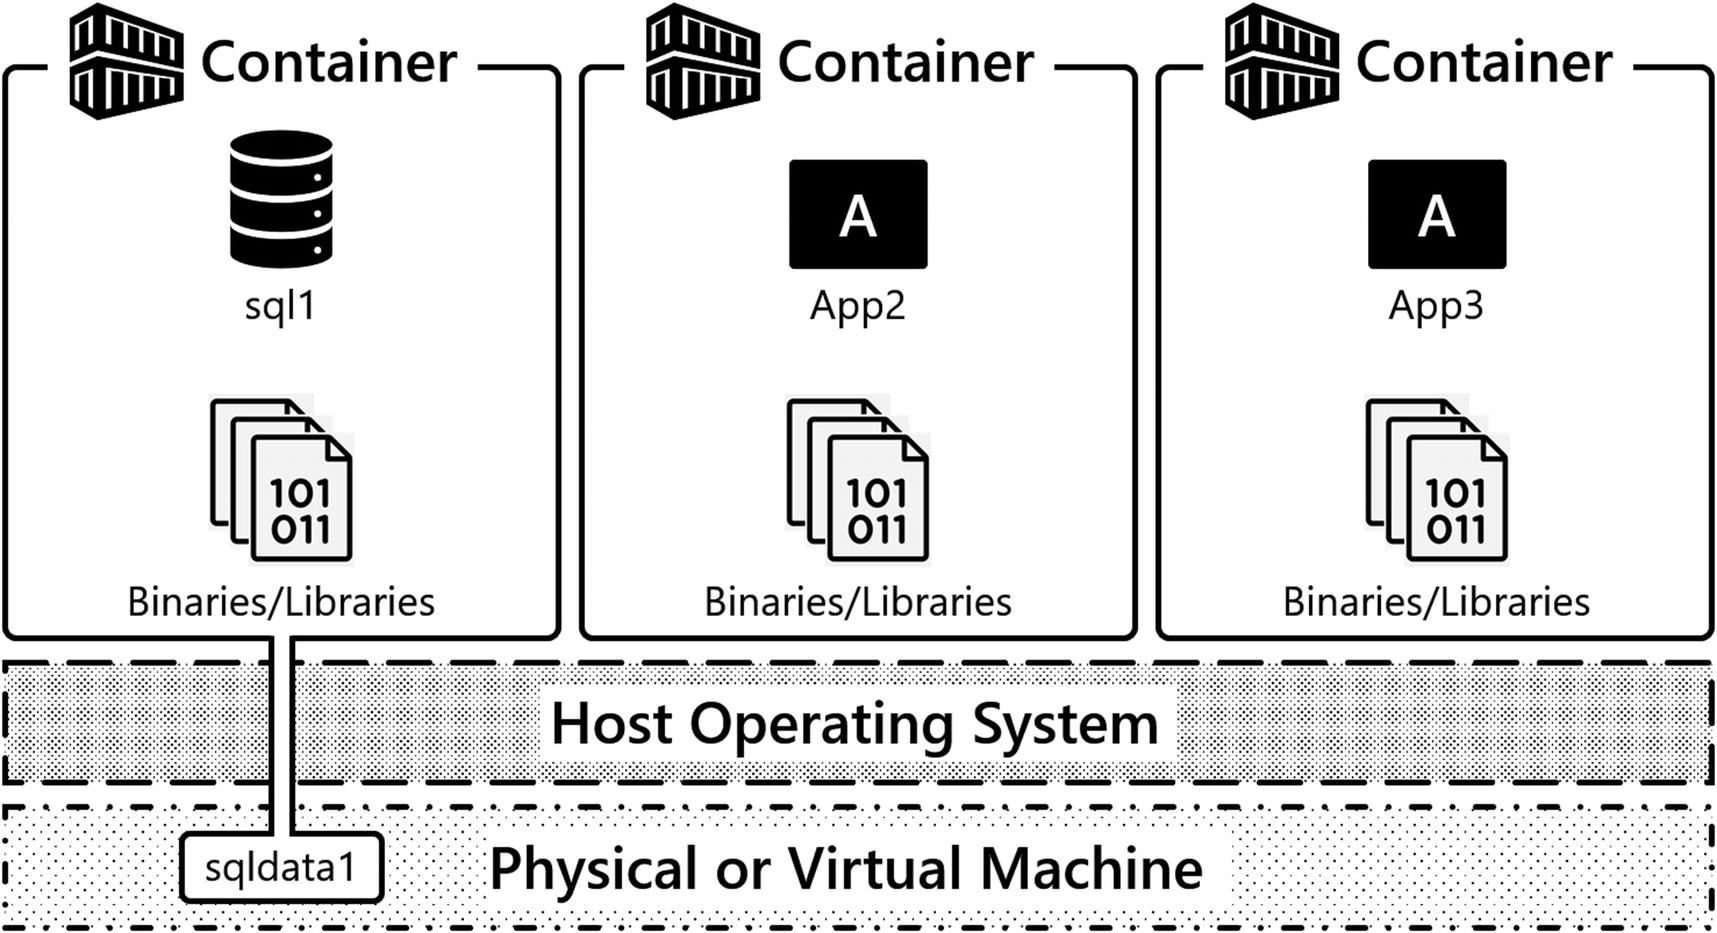
A container with a Volume attached
Let’s look at some code to define a Docker Volume for a SQL Server container.
Creating a Container with a Volume
docker run command – data Volume specification
Let’s unpack that line of code there… -v specifies the configuration of a Volume. This creates a named Volume sqldata1, which will allocate a Volume from the underlying operating system’s file system. The exact location is specific to the container runtime’s platform, Windows, Linux, or MacOS. After the colon, you’ll define where you want the Volume mounted inside the container, so this Volume is mounted at /var/opt/mssql, which is SQL Server’s default instance directory in SQL Server on Linux containers. Inside this directory, you’ll find the data files needed by SQL Server, such as the SQL Server Error Log, Trace files, Extended Event files, and system and user databases. Any data that’s written into /var/opt/mssql is going to be written into the Volume, which is a resource independent of the container.
SQL Server’s binaries live in another part of the file system at /opt/mssql/bin. So, when a container image is replaced with a newer version of SQL Server, the new binaries will be used to start up the container, and our data will be read from /var/opt/mssql, which will persist between container instantiations.
So let’s see this in action and run through a series of demos using SQL Server and Docker Volumes where the following key points will be highlighted. First, starting up a container with a Volume mounted at /var/opt/mssql inside the container and restoring a database. Next, deleting that container. Then, creating a new container that uses that same Volume and finally observing that our data persists independent of the lifecycle of this container. Let’s get started.
In Listing 2-26, a container is defined with a Volume, sqldata1. This Volume is mounted in the file system of the container at /var/opt/mssql, so let’s run this command.
docker cp command
sqlcmd will again confirm the execution.
List all databases through sqlcmd

List of databases on SQL Server instance
List all files and their physical names through sqlcmd
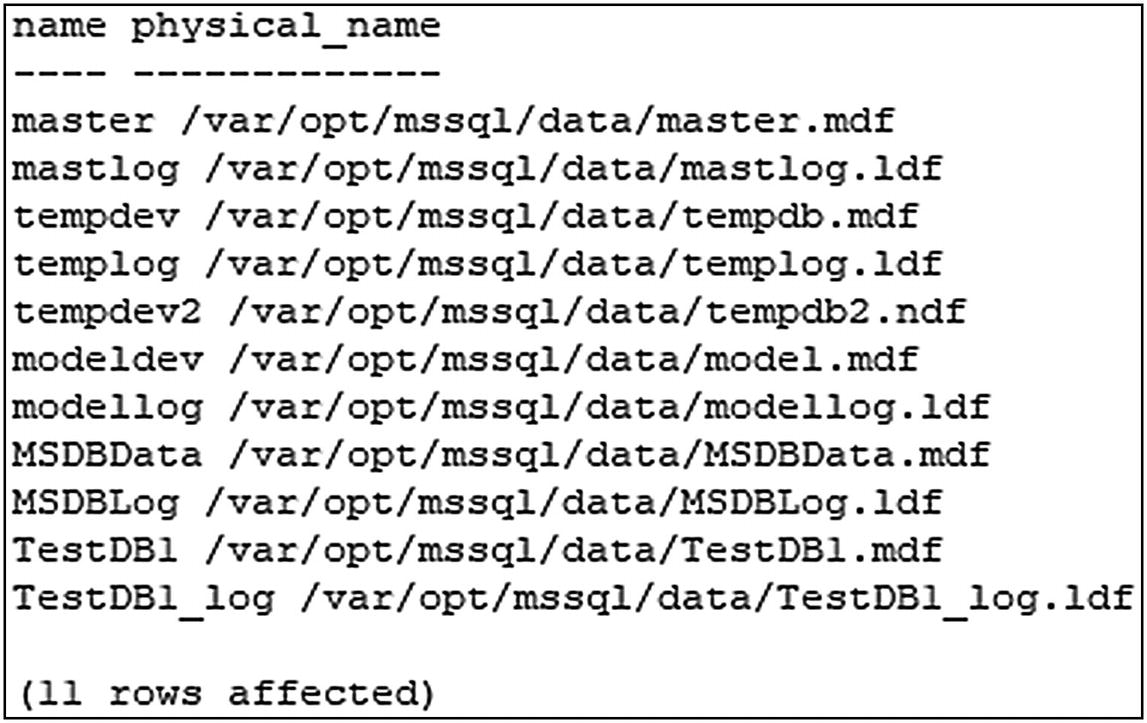
List of files and their locations
The default user database and log file locations are configurable as environment variables.
Check out https://docs.microsoft.com/en-us/sql/linux/sql-server-linux-configure-environment-variables?view=sql-server-ver15 for more details on that. This topic will be examined further in Chapter 7.
Stop and remove the container sql1
docker run command – creation of new container
List all databases through sqlcmd

List of databases on SQL Server instance
docker volume ls command
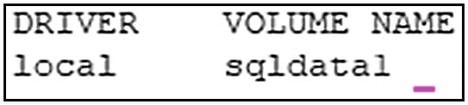
List of Docker Volumes
Looking Deeper into Volumes
docker inspect command

Output of docker inspect – detailed information about Volume
If you’re using Mac or Windows, these files are going to be abstracted away from you. Both Mac and Windows use virtualization technologies, so you can run Linux containers on those platforms. The actual file locations for these will be “inside” the VMs used to provide Linux kernel services to your container runtime. On a native Linux system running Linux containers, you will find these files at the actual file system location defined by Mountpoint.
Stopping and Removing Containers and Volumes
Now that we have highlighted the lifecycle of a container and also how to persist data externally from the container using a Volume, it is time to clean up our resources. We will now show you how to stop containers, delete containers, and also delete Volumes.
docker stop command
docker rm command
docker Volume rm command
Modern Application Deployment
Now that we have discussed core container fundamentals like how to start containers, access those applications, and persist data independent of the container’s lifecycle, let’s shift the conversation to how containers are used in modern application deployment scenarios and introduce the need for container orchestrators.
So far in this chapter, we have showed the configuration to start up a container, expose that application on the network, and also attach persistent storage to a container. But how is this done at scale in production systems? Do you want to be logging into servers and typing docker run each time you need to start up a container? Do you want to be tracking which ports your applications are listening/published on? No, implementing that configuration and also tracking what resources are where and how to access those is not a trivial task. This is where container orchestrators come into play.
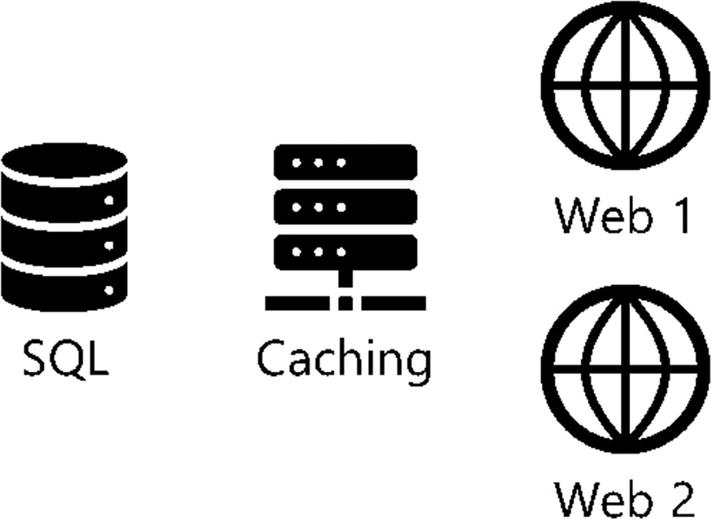
Example application architecture
- 1.
How are these container-based applications deployed in our data center, and how are they started up?
- 2.
Where do these container-based applications run in our data center and on which servers?
- 3.
How do these container-based applications scale, and what if we wanted to scale from 2 to 20 web servers to support a burst in workload?
- 4.
How do we consistently deploy this application stack?
- 5.
How do we deploy this in another environment for testing or perhaps in another data center or cloud?
- 6.
How do we or any of our applications access the services?
- 7.
What IPs or DNS names are associated with these applications?
Container orchestrators help answer these questions.
The Need for Container Orchestrators
A container orchestrator is software that helps manage the deployment of your container-based applications. Container orchestrators are based on the core concepts of desired state and controllers. Container orchestrators will figure out where to run your workload in a collection of compute resources in your data center or cloud, start those containers up, and keep those containers up and running and in the defined state.
Workload placement: Given a collection of servers in a data center, selecting which servers to run containers on.
Managing state: Starting containers and also keeping them online. If something causes a container-based application to stop or become unavailable, a container orchestrator can react and restart the containers.
Speed and consistency of deployment: Code is used to define application deployments. A container orchestrator will deploy what is defined in that code. This code is used to quickly and consistently deploy our applications.
Hide complexity in Clusters: A container orchestrator exposes a programmatic API to interact with so users can be less concerned about the physical infrastructure for our applications and more focused on how applications are deployed.
Persistent application access endpoints: A container orchestrator will track which services are available and provide persistent access to the services provided by our container-based applications.
There are several different container orchestrators available, and in this book, the focus is on Kubernetes (https://kubernetes.io/), as it has become the standard for open source container orchestrators. Therefore, the remainder of this book is focused on how to build a Kubernetes cluster and deploy SQL Server into that environment.
More Resources
Pro SQL Server on Linux: www.apress.com/gp/book/9781484241271
SQL Server 2019 Revealed: www.apress.com/gp/book/9781484254189
Summary
Kubernetes is a container orchestrator, and in this chapter, we have laid the foundation of how containers work. We showed what a container is and how containers provide application isolation. Containers are used to quickly deploy applications, and in our examples, we ran SQL Server in a container. One of the key concepts in this chapter is the need to decouple configuration and state from a container’s lifecycle, and the core tools for that are environment variables to inject configuration and Volumes to persist state (data) independently of a container’s lifecycle. These are core concepts that will be revisited and leveraged throughout the remainder of the book as you learn how to deploy SQL Server on Kubernetes.