Hour 1. Basics
What You’ll Learn in This Hour:
• How easily and quickly you can draw and make an animation
• How to use Flash’s workspace
• How to organize and use panels
• How the Properties panel constantly changes to show you important information
• The common file types related to Flash
The Flash environment is deceptively simple. With it, you can get started drawing and animating right away. However, Flash might not act the way you expect it to.
To make sure you get off on the right foot, it pays to first cover some basics. Although Flash is consistent with other types of software in several ways, there are many more ways in which Flash is different. Experienced users and novices alike should understand the basics covered this hour.
Panels are special tools in Flash that give you access to see and change almost any setting while editing a file. The Properties panel is the most useful panel because it automatically changes as needed. For example, when you select text, the Properties panel enables you to change the font style and size.
Jump Right In and Make an Animation
It’s actually possible to learn to make a Flash animation in a matter of seconds! Although the following task doesn’t cover all there is to learn, it should prove to you that it’s possible to get rolling with Flash very quickly.
Try It Yourself: Make an Animation in 30 Seconds
1. Open Flash and select Flash File (ActionScript 3.0) from the Create New column of Flash’s start page. You see a large white square in the center of your screen (it’s called the Stage). (If the start page wasn’t initially visible, simply select File, New to open the New Document dialog box, select Flash File (ActionScript 3.0) from the General tab, and click OK.)
2. Press the R key to turn your cursor into a Rectangle tool. When you do this, you should notice that the Rectangle tool becomes active in the Tools panel on the left.
3. On the left side of the Stage, click and drag down to the right to draw a medium-sized rectangle. This will be how your animation begins.
4. Make sure that the Timeline panel is visible; if it is not, you can click the Timeline button above the top left of your Stage or select Window, Timeline. The frames in the Timeline are numbered. Click the cell directly under Frame 20; then press F7 to insert a blank keyframe. This is where you will draw as you want the animation to appear at Frame 20 (see Figure 1.1).

Figure 1.1. After selecting Frame 20 in the Timeline, you insert a blank keyframe by pressing F7.
5. Now press the O key to turn the cursor into an Oval tool. Click on the right side of the Stage and drag to draw a medium-sized oval.
6. Finally, return to Frame 1 (where the animation will begin) by clicking the dot underneath the 1 (for Frame 1) in the Timeline. (That dot represents a keyframe that has content—your rectangle.)
7. Make sure the Properties panel is visible; if it is not, select Window, Properties, Properties. Because the Properties panel changes based on what’s selected, you should see properties for Frame 1 (because that’s the last thing you clicked). If the Properties panel doesn’t look like Figure 1.2, click once on the dot underneath Frame 1 in the Timeline. Finally, select Shape from the Tween drop-down menu on the Properties panel. That’s it!

Figure 1.2. When a frame is selected, the Properties panel appears as shown here.
8. To view your animation, simply press the Enter key.
Of course you’ll learn much more about making animations, but it’s almost scary how easy it is to create the one in the preceding task. In a way, this is what makes Flash so challenging—you can see success quickly, but then it’s easy to get carried away and neglect to learn the basics. This book concentrates on the foundational skills necessary so you can grow on your own. Don’t worry—it will be fun. It’s just best to get the basics first.
If you’re using a Macintosh, you’ll be happy to know that Flash on a Macintosh is nearly identical to the Windows version. Macintosh keyboards are different from Windows keyboards, though, so use the following legend to translate keyboard commands from Windows:

For example, if you see in this book Ctrl+X, on a Macintosh you just use Command+X.
The function keys (such as F8) are the same in Windows and Macintosh. Finally, if you are on a Macintosh and have a mouse that includes a right button, it should be programmed to invoke the Control key.
Getting Your Bearings
The key to understanding Flash is always knowing where you are. You’re given the power to edit everything: static graphics, animations, buttons, and more. At all times, you need to be conscious of what you’re currently editing. It’s easy to become disoriented about exactly what element you’re working on. This section helps you get your bearings.
Let’s take a quick tour of the Flash workspace:
• The Stage is the visual workspace. Any graphics placed in this area are visible to the user.
• The Tools panel contains all the many drawing tools in Flash. You can click the double-arrows at the top left of the Tools panel to expand the Tools panel from a one-column to a two-column orientation. The Flash tools are covered in depth in Hour 2, “Drawing and Painting Original Art in Flash.”
• The Timeline contains the sequence of images that make an animation. The Timeline can also include many layers of animations. This way, certain graphics can appear above or below others, and you can have several animations playing simultaneously. The Timeline is first introduced in Hour 7 “Understanding Animation.”
• Panels stay out of the way by collapsing to “icon view” when not in use. Then they appear expanded when in use. Panels can be “docked” above, below, or to the sides of the Stage, or they can float in front of everything. You can also organize panels into groups so that, when expanded or floating, only one panel in a group is visible while the others in the group are accessible from a tab. In addition to all this, floating panels can collapse vertically like a window shade to appear as a thin strip with just the panel’s tabs visible. Basically, you can organize panels to suit your work style.
User is a general term that refers to the person watching your movie or visiting your website. Within this book, I refer to the user frequently. Occasionally, I call the user the audience. I’ve even heard the user referred to as the witness. It really doesn’t matter which term you use—just realize that there’s you (the author, creator, designer) and then there’s the user (or audience, witness, or whatever term you like). As the author, you’ll be able to make edits to the Flash movie, whereas the user can only watch and interact with the movie.
The Stage
The large white rectangle in the center of Flash’s workspace is called the Stage. Text, graphics, photos—anything the user sees—goes on the Stage (see Figure 1.3).

Figure 1.3. The Stage is the large white box in the center. All the visual components of an animation are placed on the Stage.
Think of the Stage as the canvas on which a painter paints or the frame in which a photographer composes pictures. Sometimes you’ll want a graphic to begin outside the Stage and then animate onto the Stage. Off the Stage is the gray area around the outside of the white area. You can see the “off Stage” area only when the View menu shows a check mark next to Pasteboard. The default setting (Pasteboard checked) is preferable because it means that you can position graphics off the Stage. Realize, however, that any changes you make to the View menu affect only what you see. Changes here have no effect on what the user sees.
There’s not too much to learn about the Stage—it’s simply your visual workspace. However, two important concepts are worth covering now: Stage size and zoom level. By default, the Stage is a rectangle that is 550 pixels wide by 400 pixels tall. Later in this hour, in the “Document Properties” section, you’ll see how to change the width and height of a movie. However, the specific dimensions in pixels are less important than the resulting shape of the Stage (called the aspect ratio). The pixel numbers are unimportant because when you deliver a Flash movie to the web, you can specify that Flash scale to any pixel dimension.
Aspect ratio is the ratio of width to height. Any square or rectangular viewing area has an aspect ratio. For example, television has a 4:3 aspect ratio—that is, no matter how big a standard TV screen is, it’s always four units wide and three units tall. 35mm film has an aspect ratio of 3:2 (such as a 4×6-inch print), and high-definition television (HDTV) uses a 16:9 ratio as do many widescreen laptops. Most computer screen resolutions have an aspect ratio of 4:3 (640×480, 800×600, and 1024×768). You can use any ratio you want in a web page; just remember that the portion of the screen you don’t use will be left blank. A “wide-screen” ratio (as wide as 3:1, like film) has a much different aesthetic effect than something with a square ratio (1:1).
To scale means to resize as necessary. A Flash movie retains its aspect ratio when it scales, instead of getting distorted. For example, you could specify that a Flash movie in a web page scale to 100% of the user’s browser window size. You could also scale a movie with the dimensions 100×100 to 400×400.
Not only can you deliver a Flash movie in any size (because Flash scales well), but while working in Flash, you can zoom in on certain portions of the Stage to take a closer look without having any effect on the actual Stage size. The following task introduces a couple of tools that are important to the Stage.
Try It Yourself: Change Your View on the Stage
1. Create a new file by selecting File, New and choosing Flash File (ActionScript 3.0). Select the Pencil tool on the Tools panel (or press Y) and draw a few lines as messy as you’d like. Include an X shape in your drawing.
2. Notice the Zoom control at the top right of the Stage above the Timeline (see Figure 1.4). This control provides one way to change the current view setting. Other ways include selecting View, Magnification and using the Zoom tool (the magnifier button in the Tools panel), which you’ll learn about in more detail in Hour 2.

Figure 1.4. The Zoom control enables you to zoom in on or zoom out of the Stage. Zooming has no effect on what the audience sees.
3. Change the Zoom control to 400%. Notice that everything becomes bigger. You haven’t really changed anything except your view of the screen.
4. Unless you have a huge monitor, you probably can’t see the whole Stage. However, you can view the other parts of the Stage in one of two ways: by using the standard window scrollbars on the right and bottom or by using the Hand tool. The best way to access the Hand tool is to hold down the spacebar. Go ahead and hold down the spacebar; then click and drag. You’re panning to other parts of the Stage without actually moving anything. It’s important to understand that the Hand tool changes only your view port onto the whole Stage. The best thing about using the spacebar to select the Hand tool is that it’s “spring loaded”—that is, the Hand tool is active only while you hold down the spacebar. In Hour 2, you’ll learn about other spring-loaded tools.
5. Now change the Zoom control to Show All. No matter what your screen size, Flash scales the Stage to fit all the content into your window.
6. Several interesting tools are available from the View menu, including grids, guides, and snap settings. Select View, Grid, Show Grid. Behind all the graphics onstage, you see a grid (which the user won’t see), as shown in Figure 1.5. You’ll see next hour how the grid can help you line up graphics perfectly. Notice that after you select View, Grid, you can select Edit Grid to edit the color and spacing of the grid. Turn off the grid now by selecting View, Grid, Show Grid (so that there’s no check mark next to this menu item).

Figure 1.5. Turning on the grid helps you align objects.
7. Guides are just like the grid in that they help you align graphics and they don’t export with the movie. Guides differ from the grid in that that you drag guides into place where you want them. First, select View Rulers (so that there’s a check mark next to this item). Now you can click either ruler and drag toward the Stage to create and put into place a single guide, as shown in Figure 1.6. You make vertical guides by dragging from the left-side ruler, and you make horizontal guides by dragging from the top ruler. To remove the guides, drag them back to the ruler. As with the grid, you find the option to edit the guide settings—as well as a way to lock the guides in place—by selecting View, Guides, Edit Guides.

Figure 1.6. Guides are similar to the grid, but you can position the vertical and horizontal lines wherever you want them.
8. Close the file without saving.
The Tools Panel
The Tools panel is the panel with which you will likely become most familiar. Any time you create or edit anything on the Stage, you need to have one tool selected from the Tools panel. The default location is docked to the left side of the Flash interface.
Although the Tools panel is used primarily to draw on the Stage, it’s also used to edit what you’ve already drawn. In Figure 1.7, the Tools panel is actually divided into several sections. The first four are selection tools, then six creation tools, four modifying tools, two view tools, four settings for color, followed by a variety of options that vary depending on which tool is actively selected.

Figure 1.7. The Tools panel has tools for drawing, editing, and viewing, plus options that vary, depending on the currently selected tool.
The Tools section enables you to create graphics and text (via the Line tool and the Text tool), to edit graphics (via the Eraser tool and the Paint Bucket tool), and to simply select graphics (via the Selection tool, the Subselect tool, and the Lasso tool). You’ll learn about all these tools next hour. The two view tools (Hand tool and Zoom tool) let you change your view of the Stage (as you did in the preceding task). The colors gives you control over the color of objects drawn. Finally, the options area includes additional modifiers for certain tools. Depending on what tool is selected, you might not see anything in the options section.
You’ll look at these tools in detail in the next few hours (in particular, Hour 2 and Hour 6, “Applied Layout Techniques”). For now, go ahead and play with these tools. If you think you lost the Tools panel, you can restore it by selecting Window, Tools.
The Timeline
You’ll look at the Timeline in depth when you start animating in Hour 8, “Animation the Old-Fashioned Way.” Nevertheless, you’ll take a brief tour of the Timeline now. The Timeline contains the sequence of individual images that make up an animation. When the user watches your animation, he sees the images on Frame 1 followed by Frame 2, and so on. It’s as if you took the actual film from a conventional movie and laid it horizontally across the screen, with the beginning on the left and the end toward the right.
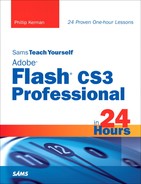
Like many other windows, the Timeline can be undocked so that it floats above everything else, as shown in Figure 1.8. Though, unlike most panels that you drag by their title bar, you need to drag the Timeline from its “gripper” to undock it. Docking is just one more way to organize your workspace. Personally, I like the default arrangement, with the Timeline above the Stage and the Tools panel to the left. I use this arrangement for most of the figures throughout this book. Because the Timeline is a unique panel, know that you can always get it back by selecting Window, Timeline. (See the section “Organizing the Workspace,” later this hour, for more details.)
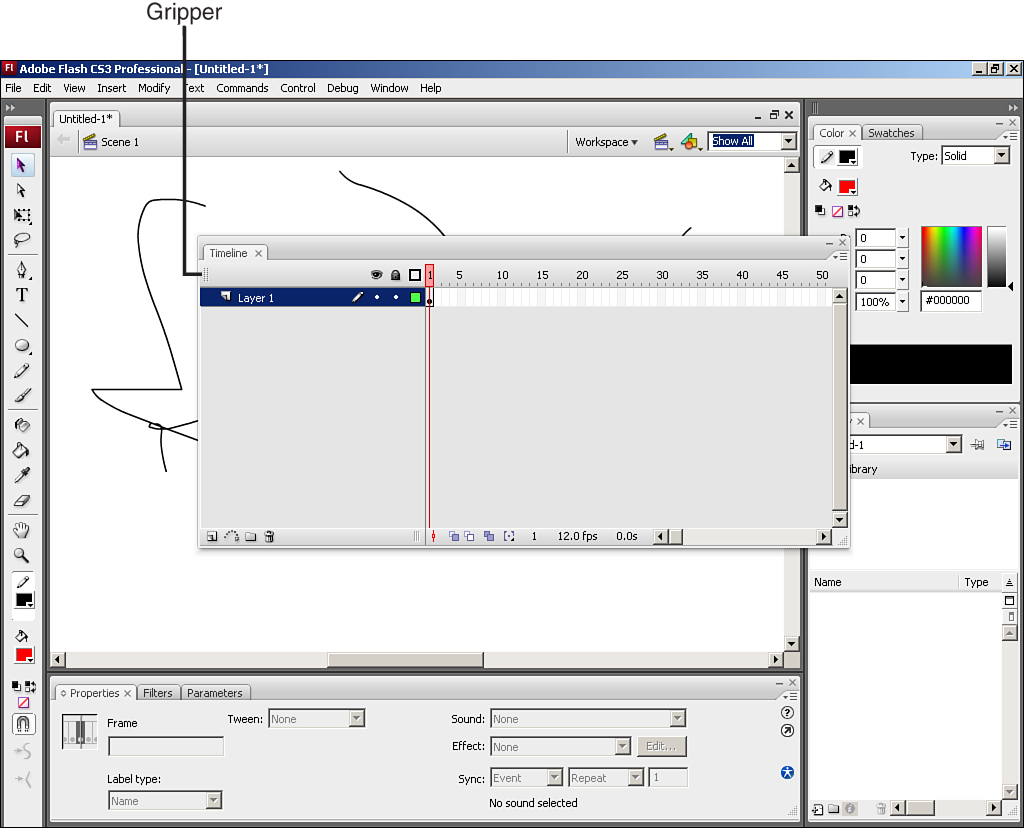
Figure 1.8. The Timeline (and other panels) can be picked up and moved like any floating window. To undock the Timeline, click and drag its gripper.
When you start to create animations, the Timeline includes many visual clues to help you. For example, you can quickly see the length of an animation simply by looking at the Timeline. Also, Flash uses a few subtle icons and color codes in the Timeline; this way, you can see how the animation will play.
In addition to frames, the Timeline lets you have as many layers as you want in animations. As is the case with other drawing programs, objects drawn in one layer appear above or below objects in other layers. Each layer can contain a separate animation. This way, multiple animations can occur at the same time. By using layer names and special effects (such as masking), you can create complex animations. Figure 1.9 shows the Timeline and layers of a finished movie. You’ll learn more about layers in Hour 12, “Using Layers in Animations.”

Figure 1.9. Most animations involve many layers. Each layer is independent of the others.
The Properties Panel
Certainly, you’ll be faced with more windows in Flash than just the Stage, Tools panel, and Timeline (although these are the basic ones). This section looks at the multipurpose Properties panel (also sometimes called the Properties Inspector, or PI for short—though I’ll call it the Properties panel throughout this book).
All panels let you view and change properties of objects. Although you can find nearly two dozen panels listed in the Window menu, you will use one panel almost all the time—the Properties panel. The Properties panel displays properties of the currently selected object so that you can make adjustments. For example, when you select a block of text, the Properties panel lets you view and change the font face and size. When you select a filled shape, you can adjust the fill color of that shape. In addition to modifying objects onstage, the Properties panel lets you modify frames in the Timeline (when you select one) as well as document properties (when nothing is selected). Although you’ll look at only a few variations of the Properties panel this hour, you’ll eventually become familiar with all the different panels. (You can see them all listed under the Window menu.) Because there are so many panels, later this hour you’ll learn ways to organize them to suit your personal workflow.
As you’ll see, using panels is simple. All panels operate in the same manner. You can either keep the panel open and select an object or access the panel after you’ve selected an object. In either case, the panel always reflects the current settings so that you may modify or change them. For example, to change the font size of some text, you just select the text and then make a change in the Properties panel. The key is to keep the text selected while you access the Properties panel. You can also change properties of several objects at once—just select multiple objects (say several blocks of text) and make a change in the panel. (When selecting multiple objects of different types, only the shared properties are visible in the Properties panel.) You’ll learn more about all this in the following tasks.
Finally, if nothing is selected, you can still make changes to the Properties panel (or any panel for that matter). Although this may seem to have no effect, you’re actually specifying what will happen the next time you create an object. For example, if you first select the Text tool and (before clicking onstage) you make a change to the font in the Properties panel, you’ll see that font change in text you create later.
Try It Yourself: Use the Properties Panel to Inspect and Change Fill Colors
1. Create a new file by selecting File, New to open the New dialog box, and then selecting Flash File (ActionScript 3.0) and clicking OK. Make sure that the Properties panel is open. Its default location is below the Stage. If you don’t see it, just select Window, Properties, Properties. Finally, ensure that the Properties panel is at full size by clicking the tiny double arrows to the left of the tab labeled Properties (as shown in Figure 1.10). The Properties panel actually has three states: full, mid-size, and mini (fully collapsed). Keep clicking that double-arrow button until the panel is full sized.

Figure 1.10. You can click the double arrows so that the Properties panel opens all the way, as shown here.
2. Click the Stage and then take a look at the Properties panel to notice the type of information listed (Size, Publish, Background, and so on). The Properties panel is about to change.
3. Select the Brush tool by clicking once in the Tools panel; if the Tools panel is not available, you need to first select it from the Window menu. Notice that when you simply select the Brush tool, the Properties panel changes. Go ahead and paint a squiggly line on the Stage.
4. Before you draw again, select a different color from the Fill Color swatch in the Properties panel. Click the swatch and select a different color (as shown in Figure 1.11). This specifies what color you’re about to paint.

Figure 1.11. Before you paint again, you can select a new color.
5. Paint another squiggly line (in the new color) on a blank area of the Stage. Select the Selection tool by clicking the black arrow at the top left of the Tools panel or by simply pressing the V key.
6. Click once on the first squiggly line to select it. Notice that the Properties panel changes again. Additional information about the shape’s coordinates and size appear. While the shape is still selected, change the fill color by clicking the Fill Color swatch in the Properties panel and picking a new color. (By the way, the swatch with a red line through it—Stroke Color—is for shapes drawn with the Pencil tool.)
By the Way: The Coordinate System
The coordinate system in all multimedia tools (including Flash) refers to locations by pixels in the x (horizontal) axis and the y (vertical) axis. The top-left corner of the screen (or Stage) is considered the origin or 0x,0y. As you move to the right, the x coordinate increases; for example, 100 pixels to the right has the location 100x,0y. As you move down, the y coordinate increases; the bottom-left corner of an 800×600 screen has the location 0x,600y. Just remember that y coordinates increase as you move down (not up, as you might expect). Here’s an interesting challenge: What happens if you set the location of an object to –1000x? The object is moved offscreen 1,000 pixels to the left.
7. Finally, make both squiggly shapes the same color. Make sure that you still have one shape selected and then click and release on the Fill Color swatch. Then (while the cursor looks like an eye-dropper) click the other squiggly shape to sample its color. This is just a quick example of how the cursor changes to tell you what will happen when you click.
The Properties panel adapts to show you properties either of whatever you’ve selected on the Stage or for the tool you’ve just selected. The following sections explore some text options to solidify this concept.
Exploring Text Options
Flash has some really powerful text options. While in a new file or the file you used in the previous task, you can select the Text tool, click the Stage, and then type a few words. When you finish typing, you can click the Selection tool. From the Properties panel, you can select a different font, change the font size, change the color, and control the text in many common ways. By the way, the Format button on the Properties panel (the button that looks like the backwards P paragraph symbol) includes additional options related to margins. There’s also a font-rendering drop-down menu for fine-tune adjustment to how the font appears. By modifying the subtle rendering settings (basically the text’s thickness and its smoothing behavior) you can optimize the performance of animated text or make the text as readable as possible at different sizes and on different monitor types. You’ll explore these options in depth next hour.
Organizing the Workspace
At this point, you’ve probably explored enough to find that your panels are scattered all over the screen. This brings up an interesting point: You’re given a lot of freedom with how you organize your panels. Learning a few concepts will make organizing your workspace easier. There are docked panels, floating panels, and grouped panels. Because the changes you make stick until you change them back, select Window, Workspace Layout, Default so you can follow along.
A docked panel is one that is locked into the Flash application interface around the outside of the Stage—just as, by default, the Tools are the left, Properties panel is at the bottom, and Timeline is at the top. Docked panels completely fill the space between the Stage and the edge of Flash’s application window. In addition, you can dock panels above or below each other within a single docked area. For example, the Library panel is docked below the Color Mixer panel (by default) on the right side. You dock (or undock) panels by dragging the panel’s title bar (or, for some panels, its gripper button at the top left of a panel). You’ll find a complete explanation with Figure 1.12, later.

Figure 1.12. The anatomy of a panel.
If a panel is not docked into the interface then it’s floating above it. (Select Window, Behaviors to see an example of a panel that’s floating by default.) Additionally, you can dock multiple panels above or below each other into a single floating panel. Finally, regardless of whether a panel is docked or floating, you can also group panels into a single tabbed panel—which is the case (by default) for the Properties, Parameters, and Filters panels, all grouped together at the bottom. You can think of grouping as stacking the panels in the same location because you can reveal only one at a time—the others in the group are accessed via their tabs. The variations might sound overly detailed but the options are only there so you can change the layout. Each panel has its purpose and that’s never affected by where you decided to put it. The idea is that you can organize panels to match your work style.
Depending on your screen size, you might find that the panels are preventing you from viewing the entire Stage. A simple press of the F4 key temporarily hides all the panels (except the Timeline, if it’s docked). You can press F4 again to restore them.
In addition to being able to return to the default layout, you can save your own layouts. If you find an arrangement that works well for you just select Window, Workspace, Save Current. You are then prompted to name the set. The name you give the set then appears under Window, Workspace.
Arranging panels can become frustrating if you don’t know the basics. Because panels function unlike many computer standards, the following rundown brings you up to speed as you follow along with Figure 1.12.
First, every panel has an Options menu at the top right of the title bar. This menu provides additional options related to each particular panel, though often it’s just a link to the help documents.
For organizing panels, you can minimize or maximize any panel by clicking the button near the top right of the panel (or even just click the title bar where the panel’s name appears). When minimized, you’ll only see the panel’s tab (or tabs, when more than one panel is grouped).
To undock a panel, you can just drag by the title bar (or, in the case of panels with a gripper, drag the gripper, which is the vertical set of dots at the far left of the title bar). As you drag, you get a preview of which other panels it will snap to when you let go. You can even dock two floating panels together to make a group.
Did you Know?: Preventing Panels from Getting Docked
It can be frustrating if, while dragging a panel into a new position, the panel keeps getting docked or grouped with another panel. Simply hold the Ctrl key (Command on Macintosh) while dragging and you’ll keep the panel from docking.
There’s one more thing to notice about docking panels around the outside of the interface. You can see in Figure 1.12 that the rightmost column includes panels that are docked but also expanded. You can resize the column width (the three vertical lines at the top left of the column) to make it wider, but there’s a limit to how narrow you make it. If you collapse the column to icon view you can squeeze the column even narrower. So small even, that only an icon appears. What’s cool, is that you can click a panel’s icon to make that panel temporarily fly out. When you’re done with the panel, it goes back to icon view. In this way, the panels are still available but nearly completely out of view when they’re not needed.
It might take some time to get used to how the panels behave, but it’s worth taking the time to play around. After you get it, you’ll be able to quickly organize the panels as needed.
The Library
The Library is the best storage facility for all the media elements used in a Flash file. You’ll learn to love the Library for many reasons, as discussed in further detail in Hour 4, “Using the Library for Productivity.” Media placed in the Library can be used repeatedly within a file, and—regardless of how many times you use those media—it doesn’t significantly add to the file size! For example, if you put a drawing of a cloud in the Library, you can then drag 100 copies of the cloud onto the Stage (making a whole sky full of clouds), but deep inside the Flash file, only one cloud exists. Using the Library is one way you can keep Flash movies small.
In practice, the Library is used in two basic ways: for editing and for maintaining (or accessing) the Library’s contents. You might need to edit the contents of one Library item (called a symbol), and when you do, you are editing the contents of the Library. You might also need to access the Library to simply organize all the contents or to drag instances of the symbols into a movie. In such a case, you are maintaining the Library (as opposed to editing its contents).
A symbol is the name for anything—usually something visual, such as a graphic shape—you create and place in a file’s Library. Although different types of symbols exist, the idea is that by creating a symbol, you’re storing the graphic once in the Library. After it is in the Library, the symbol can be used several times throughout a movie without having a significant impact on file size.
An instance is one copy of a symbol used in a movie. Every time you drag a symbol from the Library, you create another instance. It’s not a “copy” in the traditional sense of the word because there’s only one master, and each instance has negligible impact on file size. Think of the original negative of a photograph as the symbol and each print as another instance. You’ll see that, like photographic prints, instances can vary widely (in their sizes, for example).
The Library behaves like any other panel but because it’s so important I wanted to introduce it here. You’ll learn much more about the Library starting in Hour 4.
Getting Around in Flash
As mentioned earlier in this hour, an important concept in Flash is to understand where you are at all times. If you think you’re in the Library, editing the contents of a symbol, for example, you better hope you are really there. It can be confusing because although it’s always possible to figure out where you are in Flash, the clues are often subtle. The following sections look at how you can determine where you are by reading the subtle clues in the interface.
The Current Layer
Although there’s just one main Timeline, earlier in this hour you saw how you can have several layers within the Timeline. At this point you should open a new file and add a layer so that you can explore it; you do this by selecting Insert, Timeline, Layer. It is important to understand that you can be in only one layer at a time. That is, if you draw or paste graphics, they are added to the currently active layer. The current layer is the layer with the pencil icon, as shown in Figure 1.13. You can single-click another layer to make it the active layer (notice that the pencil moves to the layer you click). The key here is to always pay attention to what layer you’re currently editing. For example, if the current layer is locked, you won’t be able to affect it at all.

Figure 1.13. Not only is the current layer highlighted, but it also has the pencil icon, indicating that this is the layer where anything that is drawn or pasted will go.
The Current Frame
In the Timeline, a red marker indicates which frame is currently being viewed (see Figure 1.14). This red current-frame marker can be in only one frame at a time—the frame you’re currently editing. Initially you’ll find that you can’t move the current-frame marker past Frame 1 unless your file has more frames. You’ll have plenty of opportunity to do this later; for now, just realize that the red marker indicates the current frame. If it helps, imagine a time machine. You can visit any moment in time, but you can visit only one moment at a time.

Figure 1.14. The red current-frame marker (on Frame 11 here) can be in only one frame at a time. It’s important to realize where this current-frame marker is located at all times.
Watch Out!: Deleting Frames versus Deleting Items Onstage
Although you’ll learn much more about making edits to your Timeline and Stage in the upcoming hours, it probably won’t hurt to tell you one of the most common errors that relates to “knowing where you are.” When you click the Timeline, you actually select items that are onstage. This means that if you press the Delete button, you’ll delete the items onstage. New users often assume that if they click a cell in the Timeline and press Delete they’ll remove the cell in the Timeline. To do that, you’ll need to right-click and select Remove Frame. Like I say, you’ll get lots of practice with this later, but remember the Delete button deletes objects onstage.
The Current Scene or Current Symbol
By far, the most difficult concept for new Flash users is that in Flash, there’s more than one Timeline! A large or complicated movie can be broken into several scenes. You can think of scenes as chapters in a novel. Deep inside Flash, there’s always just one long Timeline (just like a novel has one continuous story), but if you break a file into scenes, you can access the scenes individually. This is a nice feature because it means you can easily change the order or sequence of the scenes. It should be apparent that at all times you should know in which scene you’re currently working. The name of the current scene is always listed above the Stage (and above the Timeline if it’s docked), on what is called the edit bar—or what I often call the address bar. The default name is “Scene 1,” and you should see this next to the icon for scenes—a movie “clapper” (see Figure 1.15).

Figure 1.15. Above the top-left corner of the Stage, you can see the name of the current scene. The clapper icon indicates that this is the name of a scene.
The edit bar often includes more information than is shown in Figure 1.15. When you learn more about the Library in Hour 4, you’ll see how you can nest instances of symbols inside other symbols. When you double-click a complex object such as a symbol to edit it, everything else on the Stage dims (indicating that those other items are not editable). (This behavior of going inside one object to edit its contents also applies to grouped objects and so-called drawing objects—both of which you’ll learn more about next hour.) In all cases, the best way to determine exactly what you’re currently editing is to look at the edit bar. You might see “Scene 1: Car : Rotating Wheels : Wheel” (as shown in Figure 1.16). This means that you’re in the Wheel symbol that is inside the Rotating Wheels symbol that is inside the Car symbol which is all in Scene 1. Sound pretty hairy? Well, it’s not really so terrible because the edit bar is very clear—you just have to remember to look there.
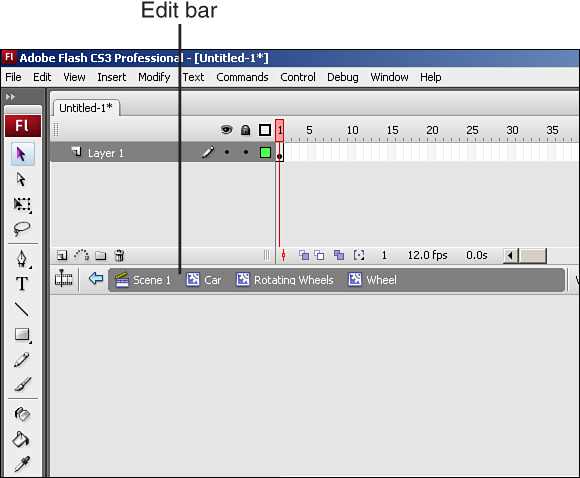
Figure 1.16. Here, the edit bar indicates that you’re deeply nested inside a symbol (Wheel) that’s nested inside other symbols.
Navigating Through the Interface
You’ve seen how the Flash interface gives you clues that tell you where you are at all times. But how did you get where you are in the first place? And how do you get out? Navigating through a Flash file is easy—and maybe that’s why it’s so easy to get lost. Let’s look at a few ways to get around.
The edit bar contains the hierarchy of your current location, and it also provides a means of navigation. You can click the edit bar. If, for example, you’re inside a symbol within Scene 1, you should see “Scene 1: SymbolName.” If you simply click Scene 1, you are taken back to that scene (see Figure 1.17). Any time you see the edit bar, you can navigate back through the hierarchy. Remember that the edit bar provides information and that it’s clickable.

Figure 1.17. The edit bar provides more than just information. You can click the arrow or any name listed to jump back. Here, you can click Car to jump all the way back to the Car symbol.
Finally, you should notice two menus way off to the right of the edit bar: Edit Scene and Edit Symbol (see Figure 1.18). From these two menus, you can jump to any scene or symbol in the current movie. Of course, if you have no symbols and just one scene, using these menus won’t be very interesting. However, in big files, these menus provide a quick way for you to get around.

Figure 1.18. The Edit Scene and Edit Symbol menus are always accessible at the top right of the Stage. They provide the most reliable way to navigate to other scenes and symbols.
There are plenty more ways to get around in Flash, and you’ll see them all in this book. For now, try to feel comfortable moving around and be sure to notice all the clues that Flash gives concerning where you are.
How Not to Get Lost
As a reference, here’s a list of common ways to get lost and how to find your way home. This is a list based on my experience teaching new students—as well as my own experience getting lost! I’m including things here that you haven’t been exposed to yet so feel free to mark this page and revisit it later.
• Edit bar—By far the most common problem is overlooking the fact the edit bar has changed to indicate you’re inside a symbol or group or drawing object. I’ve already said to keep an eye on the edit bar. But what if it’s gone? Amazing but true: You can hide and restore the edit bar via the menu Windows, Toolbars, Edit Bar. I can’t imagine selecting this on purpose, but if for any reason you can’t find it, now you know how to bring the edit bar back.
• Changing Colors—The half-dozen or so color swatches can both determine the color you’re about to draw as well as change an existing color. Remember, if you have something selected, it will change when you change the color swatch. Only when nothing is selected can you set the color for what you’re about to draw. Plus (and this will become clearer next hour) there can be two colors for an object: the stroke and the fill. You’ll see a pair of swatches quite often indicating these independent colors.
• Properties panel—It’s important to know what sort of object you have selected. For example, if you draw a shape with the Brush tool the Properties panel displays “Shape” when you select that shape. There are other object types that you’ll learn about over the next few hours—I promise you’ll understand the attributes of each. People often forget the Properties panel tells you what you have selected. You may think something is a shape (or other type of object) but use the Properties panel to know.
• Info panel—The Info panel displays (and lets you edit) the size and location of any selected object. In addition, it has a little grid button that toggles between showing a circle in the bottom right or a plus sign in the top left. This makes the Info panel reflect coordinates for the selected object’s registration point or its transform point. The plus indicates you’re viewing the registration point option (which is usually the object’s top-left corner). The little circle means you’re viewing the object’s transform point (usually its center). What’s very easy to overlook, however, is that the Properties panel’s X and Y fields always reflect the object’s registration point.
That’s it for the big pitfalls. Naturally, there are many more but I’ll be sure to guide you past them as you encounter them in later hours.
Document Properties
You need to specify a few far-reaching settings early in the creation of any movie. Most of these are found in the Document Properties dialog box, shown in Figure 1.19, which you access by selecting Modify, Document or double-clicking the bottom of the Timeline (where you see 12 fps). You should access the Document Properties dialog box now so that you can experiment with a few of its settings. (Notice that most of the same settings appear in the Properties panel if you click the Stage or otherwise deselect all objects.)
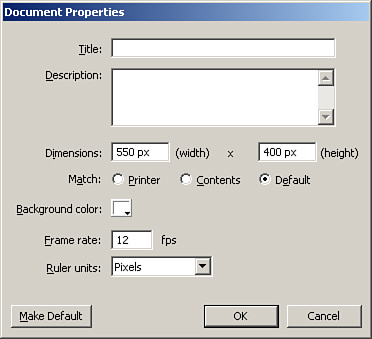
Figure 1.19. The Document Properties dialog box provides many global settings that should be determined at the beginning of every project.
First of all, you need to make sure that Ruler Units is set to Pixels. This is the standard unit of measurement in multimedia and web pages. It’s important to set Ruler Units to Pixels because this affects several other dialog boxes (including the Info panel). Next to Background Color, you should see a white swatch that, when clicked, allows you to change the Stage color. This isn’t actually as useful as you might think because at the time you publish a movie to the web, you can specify any background color you want, and it will override this setting. Feel free to change Background Color any time you want. Maybe gray will be easier on your eyes, or black will make selecting white graphics easier. I often use a bright red background just so it’s super clear while I’m editing. Do whatever you want—not only can you change this setting later, but it also affects only the Stage color while you’re editing.
Two other Document Properties dialog box settings are important to establish early in any project: Frame Rate and Dimensions. Frame Rate specifies the rate—that is, how many frames per second—at which Flash attempts to play. I say attempts because some of your users might not have a computer fast enough to keep up, so Flash just can’t display the specified number of frames in a second. Flash will not exceed the frame rate you specify, but it can get bogged down and not keep up. Dimensions are important only to the degree that they affect the aspect ratio of your Stage, as discussed earlier. You need to decide up front on the shape for your Stage (sorry, it can’t be round). Do you want a wide-screen CinemaScope look, or do you want a square Stage? You might even want a vertical rectangle, such as for a button bar to appear on the left side of a web page. You need to consider this early on because the Stage shape influences how you position graphics, and changing it later makes for a lot of repositioning.
People often confuse frame rate with speed, which is more of a visual effect. Animators can use tricks to make something appear to speed across the screen even while using a very low frame rate. For example, if you see a picture of a car on the left side of the screen and then a fraction of a second later, it’s on the right side of the screen, that may tell your brain that the car is moving fast. However, such a trick requires only two frames—and at a frame rate of 4 fps, the second frame appears only a quarter second after the first! Frame rate—that is, how many chunks into which each second is broken—controls the visual resolution. Four frames a second may look “chunky”—each change occurs only four times a second. However, 30 fps (equivalent to the frame rate of TV) is such a fine increment that you’re not likely to see the steps between discrete frames (although, of course, that’s what’s really happening). By the way, you can still move a car across the screen in a quarter of a second by using 60 fps—it would just involve 15 frames. You’ll explore this topic in great detail in Hours 7, 8, and 23.
File Types
Clearly, the most common use for Flash is to create interactive animations for the web. Sifting through all the different file types involved can be a little confusing. At a minimum, you need to understand three types: source (.fla) files, exported (.swf) files, and or Hypertext Markup Language (HTML—.htm or .html) files.
Source (.fla) Files
One of the two main file types in Flash is the source Flash movie that you save while working. It uses the file extension .fla (often pronounced “fla”). You can open and edit any .fla file, provided that you own Flash. This is your source file. With the .fla file, you can always restore the other file types—but nothing can restore a .fla file (except, maybe, doing all the work over again).
When sharing files with others who need to edit the source file, you share the .fla file. Anyone who has Flash CS3 (for either Mac or Windows) can open and edit the .fla file you create. However, you can’t put .fla files into a web page for people to view—they’re just files that contain your source content.
You can actually save a .fla to share with a co-worker who only has Flash 8. When you select File, Save As you need to select Flash 8 Document from the Save as Type drop-down. Flash strips out any features your file uses that are available only in Flash CS3 (and warns you, too). This feature is great during the transition when people upgrade.
Exported (.swf) Files
When you’re finished editing a source file and ready to distribute your creation, you simply export a .swf (pronounced “swif”) Flash Player file. A .swf file can be viewed by anyone who has an Internet browser and the Flash Player plug-in. The audience can’t edit the .swf—they can only watch it.
The process for creating a new .swf file is simple. You open a .fla file, select File, Export Movie, and then specify the name and file location for the .swf file in the Export Movie dialog box. Although more details are involved, the important point to understand is that exporting involves creating a new file (the .swf file), but the .fla file remains untouched. It’s similar to using Save As or Save a Copy As in some other software programs. Whatever you do, you should always keep a copy of your .fla file. You can always create more .swf files from it—or make edits and then create more .swf files.
There’s one last thing you need to understand now, which applies if you work in a team environment or otherwise plan to exchange .fla files among different machines: Any .fla file you work on opens fine on any machine that has Flash installed. On a Macintosh, you might need to open Flash and then select File, Open, and on a Windows PC, you might need to make sure that the file is named with the extension .fla.
However, there’s one minor catch: The font choice for any text in the .fla file must be present on the machine that is attempting to create the .swf file. It’s not that you can’t share a file if one person’s machine is missing a particular font. Rather, that person cannot edit the text and can’t create a .swf file. You can actually select a substitute font. Any time you open a .fla file that contains fonts that you don’t have installed, you are given the chance to map fonts. That is, you can select what alternative font to use. You can easily avoid this situation by properly installing fonts on everyone’s machine or by simply creating the .swf file on the appropriate machine.
HTML Files That Host the .swf File
If you have any experience creating HTML, the basic process of putting .swf files in a web page should be simple. If you have no HTML experience, it won’t hurt to learn a little HTML, but you really don’t have to. Remember that when you “visit” a web page, you’re not really “going” anywhere. Rather, your browser software downloads a text file (with either an .htm or .html file extension). This HTML file contains not only the words you see on the web page, but additional instructions as well, including the font style and size.
In addition, the HTML file contains details about any of the pictures that are supposed to be seen on the web page—details such as the image file’s name and from where it should download so that you can see it. Putting a Flash Player (.swf) file in a web page is almost as easy as putting a picture in a web page. A few other details (in addition to the filename of the .swf) can be included, such as the background color, whether you want the movie to loop, and other interesting settings that are unique to Flash.
To make this process even easier, Flash includes a feature called Publish (discussed in Hour 19, “Linking a Movie to the Web,” and Hour 24, “Publishing a Creation”), which walks you through the steps of creating both the .swf file and the .html file. Every detail available can be specified in the Publish Settings dialog box (see Figure 1.20). You can specify parameters for each file format that you intend to distribute by using the tabs that appear (only the tabs for the file types you specify appear).

Figure 1.20. In the Publish Settings dialog box, you can decide what file formats you intend to distribute.
Summary
You sure covered a lot of ground this hour without actually creating any finished work. Rest assured you’ll get your hands dirty in the next 23 hours. Besides, the information covered this hour should be useful throughout your Flash career.
In this hour you explored Flash’s main workspace, including the Stage, the Timeline, and the Tools panel. You learned how to change the Stage size (through the Document Properties dialog box) and how to zoom in (by using the Zoom control). You got to see the Tools panel (which you’ll use next hour to create artwork) and how the Properties panel lets you modify graphics onscreen. Although you didn’t do much with the Timeline, you learned to pay close attention to clues, such as the red current-frame marker and the pencil icon, which indicate the active frame and active layer, respectively.
In this hour you learned about other interface clues and navigation tools that help you track your current location at all times. The edit bar at the top left always tells you where you are, and the two menus at the top right let you navigate to other scenes and symbols (provided that you have some).
Finally, you learned about the file formats you’ll likely create in Flash. It’s important to take the time to understand all the files you create. You’ll probably create many files, so it’s also a good idea to keep your files and folders organized so that you can track what’s going on. The old saying “Haste makes waste” is especially true when you have a million files to track. So, just take it easy, pay attention to how the Flash interface changes, and have fun.
Q&A
Q. When I hold down the spacebar (to get the Hand tool) and try moving my view over to the left or up, I can’t go past the left of the Stage or the top of the Stage. Why is that?
A. Most likely the View, Pasteboard menu item isn’t selected (that is, it doesn’t have a check mark next to it). Only when this is selected can you (the author) see outside the Stage. (I recommend leaving this setting in the default, selected state.)
Q. I swear my Properties panel used to be taller. What did I do to get the “slim view”?
A. The Properties panel actually has three different states. Just continue to click the tiny double-arrow button on the left of the Properties panel’s tab to restore the Properties panel’s full view.
Workshop
The Workshop consists of quiz questions and answers to help you solidify your understanding of the material covered in this hour. You should try to answer the questions before checking the answers.
Quiz
1. How do you open and edit a .swf file?
A. You can’t, and unless you have a backup of the .fla file, you’re pretty much out of luck.
B. You can simply select File, Open.
C. You can import it by selecting File, Import.
2. How can you make your animation appear to play really fast?
A. Crank up the frame rate in the Document Properties dialog box to 120.
B. Trick the user by employing age-old animation techniques.
C. Suggest that users purchase the fastest computer they can afford.
3. What is the standard unit of measurement for web pages and multimedia?
A. Inches
B. Centimeters
C. Pixels
Quiz Answers
1. A. Generally, you can’t do anything but watch a .swf file. Truth be told, you can actually import a .swf file (as in Answer C). However, this won’t work if when you exported the .swf file in the first place you specified Protect from Import in the Flash tab of the Publish Settings dialog box. Also, when you import a .swf file, just the sequence of frames is imported (no interactivity), so it’s rarely very useful. In fact, there are third-party tools (such as Manitu Group’s ActionScript Viewer http://buraks.com/asv/) that can extract the media and scripts from a .swf. (You’ll see more third-party tools listed in the online Appendix B “Resources.”) The bottom line is that you should always keep a backup .fla.
2. B. Although increasing the frame rate to 120 fps makes Flash try to play quickly, the chances of it actually playing that fast are unlikely (depending on the computer). So, although Answer A is not entirely wrong, using age-old animation tricks (which are covered in Hour 8, “Animation the Old-Fashioned Way,” and Hour 23, “Advanced Animation Techniques”) is the best way. Something doesn’t actually have to move fast to appear to move fast.
3. C. This isn’t an opinion: The standard is pixels.