
Hour 22. Database Administration Using the MongoDB Shell
What You’ll Learn in This Hour:
![]() Copying, renaming, and moving collections
Copying, renaming, and moving collections
![]() Adding and removing indexes
Adding and removing indexes
![]() Performing validation on a MongoDB database
Performing validation on a MongoDB database
![]() Evaluating queries for optimal performance
Evaluating queries for optimal performance
![]() Finding and diagnosing problem collections and databases
Finding and diagnosing problem collections and databases
![]() Backing up a MongoDB database
Backing up a MongoDB database
![]() Repairing a MongoDB database
Repairing a MongoDB database
So far in this book, most of the hours have been dedicated to implementing MongoDB databases, including creating, populating, accessing, and manipulating collections from the MongoDB shell and other programming platforms. This section switches gears to administrating MongoDB databases from the MongoDB shell.
Database administration means a lot of different things, depending on the circumstances. In general, though, administration is doing whatever it takes to make sure the databases are healthy and available.
This hour covers some of the basic database operations, such as copying, moving, and renaming databases and collections. Then it covers creating and managing indexes, to help you find ways to optimize your database. Next, it explores several performance and diagnostic tasks to ensure a healthy database. Finally, you look at how to repair and back up databases.
Working with Databases and Collections
In Hour 5, "Managing Databases and Collections from the MongoDB Shell," you learned how to create, access, and remove databases and collections. This section extends what you learned there by covering some additional tasks that are less common but very useful. The following sections cover copying databases, renaming collections, and creating capped collections.
Copying Databases
MongoDB provides the capability to copy a database from one server to another, or even to a different location on the same server. You might need to copy databases to move data from an older server that you are planning to remove or simply to have multiple copies of the same data available for different purposes.
To copy a database from one server to another, you need to use the copydb command from the admin database. The copydb command is passed an object that includes the following parameters:
![]() fromhost: Optional. Specifies the hostname of the source
fromhost: Optional. Specifies the hostname of the source mongod instance. If omitted, copydb copies one database to another within a single MongoDB server.
![]() fromdb: Required. Specifies the name of the source database.
fromdb: Required. Specifies the name of the source database.
![]() todb: Required. Specifies the name of the target namespace.
todb: Required. Specifies the name of the target namespace.
![]() slaveOk: Optional Boolean. When
slaveOk: Optional Boolean. When true, copydb copies data from secondary members of a replica set as well as the primary.
![]() username: Optional. Specifies the username credentials on the
username: Optional. Specifies the username credentials on the fromhost MongoDB server.
![]() key: Optional. Specifies a hash of the password used for authentication to the
key: Optional. Specifies a hash of the password used for authentication to the fromhost server.
Renaming Collections
Another common task to perform on collections is to rename them. Renaming a collection enables you to use the same name again with fresh data. This is useful, for example, if you have an application that stores orders in a collection named orders and you want to keep only the current month’s orders. At the end of the month, you can rename the orders collection to orders_MM_YYYY (where MM is the month and YYYY is the year) and allow the application to keep using the orders collection for the new month.
To rename a collection, use the renameCollection command from the admin database. The renameCollection command is passed an object that includes the following parameters:
![]() fromhost: Optional. Specifies the hostname of the source
fromhost: Optional. Specifies the hostname of the source mongod instance. If omitted, copydb copies one database to another within a single MongoDB server.
![]() renameCollection: Required. Specifies the namespace of the collection to rename in the format
renameCollection: Required. Specifies the namespace of the collection to rename in the format database.collection.
![]() todb: Required. Specifies the namespace to rename the collection to in the format
todb: Required. Specifies the namespace to rename the collection to in the format database.collection. If the database is a new database, it is created.
![]() dropTarget: Optional Boolean. When
dropTarget: Optional Boolean. When true, the original collection is deleted; otherwise, it stays there and the rename becomes a copy.
Creating Capped Collections
Capped collections are fixed-size collections that insert, retrieve, and delete documents based on insertion order. This allows the capped collection to support high-throughput operations. Capped collections work similarly to circular buffers: When a collection fills its allocated space, it makes room for new documents by overwriting the oldest documents in the collection.
Capped collection can also be limited based on a maximum number of documents. This is useful in reducing the indexing overhead that can occur when storing large numbers of documents in a collection.
Capped collections are extremely useful for rotating event logs or caching data because you do not need to worry about expending the overhead and effort of implementing code in your application to clean up the collection.
To create a capped collection from the MongoDB shell, you can use the createCollection() method on the db object, specify the capped property, and set both the size (in bytes) and the optional maximum number of documents. For example:
db.createCollection("log", { capped : true, size : 5242880, max : 5000 } )
Working with Indexes
Another important aspect of administrating MongoDB databases is implementing indexes. Indexes provide a faster method for MongoDB to look up documents by creating a simple lookup table.
Watch Out!
Indexes can improve the performance of your database requests, but this also comes at a price. Each time a new document is inserted into a collection, the index must be adjusted. If your database is write intensive, too many indexes can severely hinder performance.
The following sections take you through some of the administrative tasks involving indexes, such as adding new indexes, removing existing indexes, and reindexing a collection.
Adding Indexes
MongoDB enables you to index fields in you collections that make it faster to find documents. When an index is added in MongoDB, a special data structure is created in the background that stores a small portion of a collection’s data and then optimizes the structure of that data to make it faster to find specific documents.
For example, applying an _id index basically creates a sorted array of _id values. When the index is created, you gain certain benefits:
![]() When looking up an object by
When looking up an object by _id, you can perform an optimized search on the ordered index to find the object in question.
![]() Let’s say you want objects back sorted by
Let’s say you want objects back sorted by _id. The sort has already been performed on the index, so it doesn’t need to be done again. MongoDB just needs to read the documents in the order the _id appears in the index.
![]() Now imagine that you want documents 10–20 sorted by
Now imagine that you want documents 10–20 sorted by _id. The operation is just a matter of slicing that chunk out of the index to get the _id values to look up objects.
![]() Best of all, if all you need a list of sorted
Best of all, if all you need a list of sorted _id values, MongoDB does not even need to read the documents; it can just return the values directly from the index.
Keep in mind, however, that those benefits come at a price. The following are some of the costs associated with indexes:
![]() Indexes take up space on disk and in memory.
Indexes take up space on disk and in memory.
![]() Indexes take up processing time when inserting and updating documents. That means database writes to collections with large number of indexes can suffer performance hits.
Indexes take up processing time when inserting and updating documents. That means database writes to collections with large number of indexes can suffer performance hits.
![]() The larger the collection, the greater the cost in resources and performance. Extremely large collections can make it impractical to apply some indexes.
The larger the collection, the greater the cost in resources and performance. Extremely large collections can make it impractical to apply some indexes.
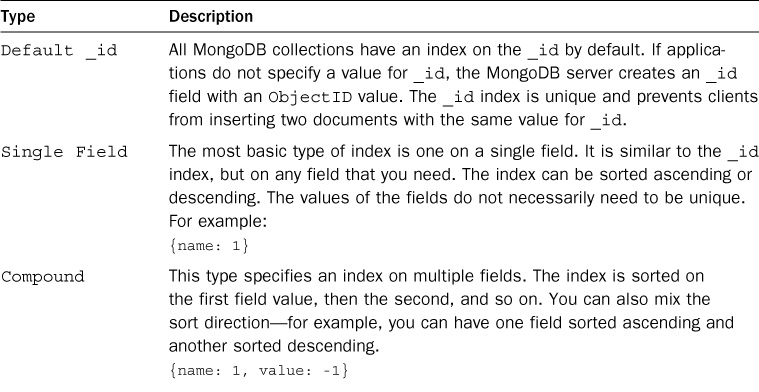
You can apply several different types of indexes to fields in a collection to support various design requirements. Table 22.1 lists the index types.
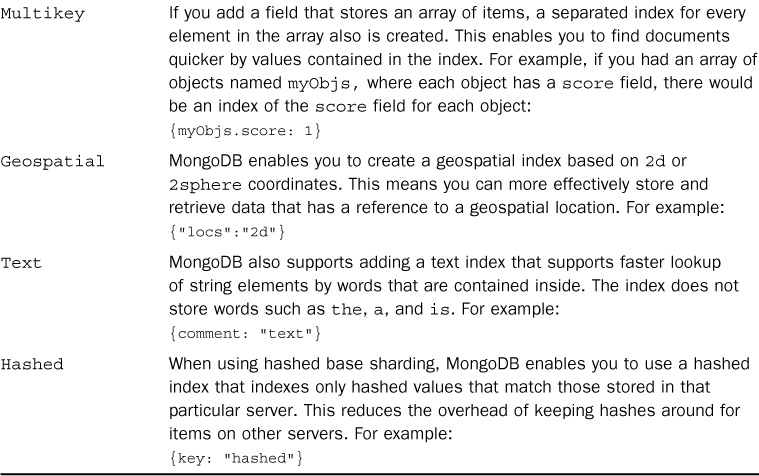
Indexes can also have special properties that define how MongoDB handles the index (see Table 22.2).
You can combine the unique and sparse properties so that the index rejects documents that have a duplicate value for the index field and also rejects documents that do not include the indexed field.
You can create indexes from the MongoDB shell and in most of the MongoDB drivers. To create an index from the MongoDB shell, you use the ensureIndex(index, properties) method. For example, the following creates a unique index named myIndex on the name field ascending and the number field descending:
db.myCollection.ensureIndex({name:1, number: -1},
{background:true, unique:true , name: "myIndex"})
Removing Indexes
Sometimes you need to remove indexes from a collection because they are taking up too many resources on the server or no longer are needed. Removing indexes is simple using the dropIndex(index) method on the Collection object.
The dropIndex() method accepts either the index name or the index definition as the only parameter. For example, if you have an index of {first:1}, the following command removes it:
db.myCollection.dropIndex({first:1})
Also, if you have an index that has been assigned a name in the ensureIndex() method, then you can use that name. For example, if you have an index named myIndex, the following command removes it:
db.myCollection.dropIndex("myIndex")
If you want to remove all indexes from the collection, you can specify the dropIndexes() method. This removes all indexes attached to the collection. For example:
db.myCollection.dropIndexes()
Reindexing a Collection
As with any database that implements indexes, your indexes might not perform well or might have become corrupt and are no longer working. When that occurs, you should use the reIndex() method on the Collection object to reindex the collection.
The reIndex() method drops all indexes on the collection and then re-creates them.
Watch Out!
The reindex operation is expensive in terms of system resources, so do it during off-peak hours. Also, the rebuild of the _id index is performed in the foreground, so no write operations can be completed until that index has been rebuilt.
Understanding Performance and Diagnostic Tasks
An important aspect of database administration is the capability to find and diagnose performance and other database problems. MongoDB provides a wide array of tools that enable you to analyze queries, resource usage, and other information to evaluate the health of the database and find the source of performance and other database problems.
The following sections cover some of the more common tools you might be using to find performance issues and other problems that crop up in your MongoDB implementation.
Viewing Database and Collection Stats
A common task when looking at the overall health of a MongoDB database is to view the database stats. The database stats contain the number of objects, average object size, total data size, index size, and much more. These stats help you determine how large the database is and how many resources on disk and in memory the database consumes.
To view the database stats from the MongoDB shell, use this command:
db.stats()
The following shows sample output for the db.stats() command:
{
"db" : "words",
"collections" : 3,
"objects" : 2679,
"avgObjSize" : 344.60768943635685,
"dataSize" : 923204,
"storageSize" : 2805760,
"numExtents" : 7,
"indexes" : 2,
"indexSize" : 204400,
"fileSize" : 50331648,
"nsSizeMB" : 16,
"dataFileVersion" : {
"major" : 4,
"minor" : 5
},
"ok" : 1
}
You can also go one step further and view the same stats for a specific collection. This helps you identify which collection is taking up the disk space or index space. To view the stats for a collection, you use the following command, where <collection> is the collection name:
db.<collection>.stats()
Validating the Database
Another useful command when trying to check on the health of the database is the validate() method on the Collection object. The validate() method checks the structure of the collection by scanning through the data and indexes. If it detects problems, the output reports them.
For example, to validate the word_stats collection on the words database, you would use
use words
db.word_stats.validate()
You can also perform a more thorough validation by passing true to the validate() method. This performs a deeper, more intensive scan of the data but also takes more time and server resources. For example:
use words
db.word_stats.validate(true)
Profiling MongoDB
If you are experiencing slow database response times, you can implement profiling on a database. Profiling captures data regarding performance of the database that you can view later. You can then look at the data and try to determine which requests are experiencing poor performance.
Database profiling is a useful tool, but it also impacts profiling, so you should enable it only when you are trying to troubleshoot poor performance.
MongoDB provides different levels of profiling, specified by a number. The following describes the different levels:
0: No profiling
1: Profiles only slow operations
2: Profiles all operations
To enable profiling, use the profile database command and specify the level as well as the number of milliseconds that you want to use as the threshold for slow operations.
For example, the following enables profiling at level 1 and specifies 500 milliseconds as the slow operation threshold:
db.runCommand({profile:1, slowms: 500})
The information from profiling is stored in the system.profile collection of the database. Therefore, you can access the profiling information using the following command:
db.system.profile.find()
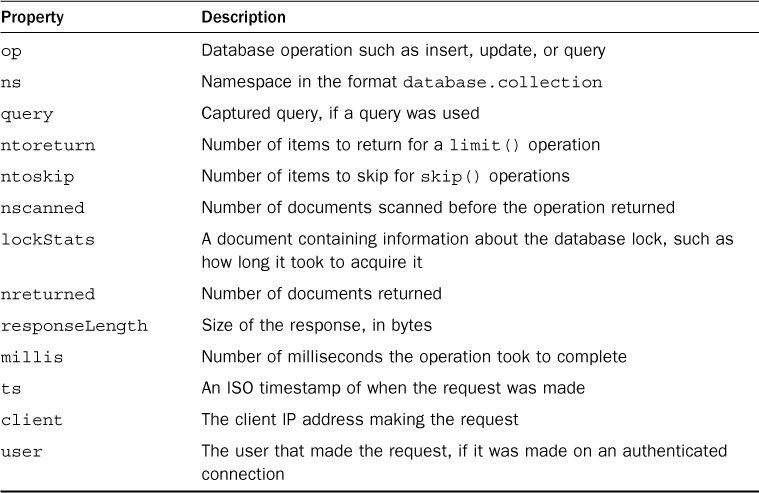
The documents returned from the system.profile.find() operation include performance information about the request. Table 22.3 describes some of the properties of a profile document.
Also, because the profile data is stored as a collection, you can use queries to limit the fields you want to view. For example, the following enables you to see the profile for operations that took more than 10 milliseconds and are newer than a specific ISO date:
db.system.profile.find(
{$and: [
{ts: {$gt: ISODate("2014-02-06T15:15:12.507Z")}},
{millis:{$lt:1}}]})
Evaluating Queries
When you find operations that are taking a long time using profiling, you can evaluate them to see how MongoDB is executing each step of the query. Evaluating the query often helps you understand why some queries take a long time to complete.
To evaluate a query, you can use the explain() method on the cursor returned or append it onto the query request. For example:
db.collection.find({word: "test"}).explain()
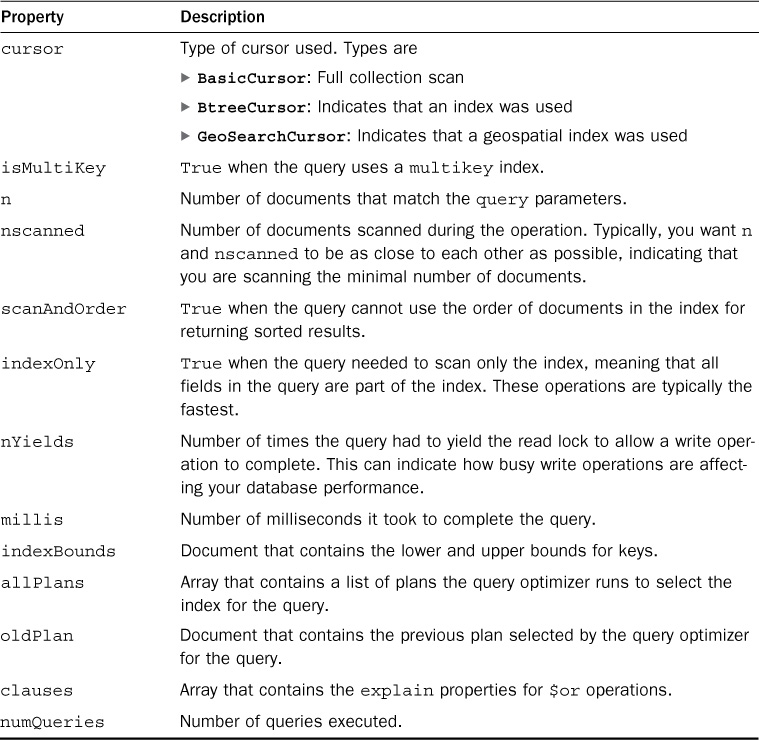
The explain() method returns a document containing information about the MongoDB server’s query plan. The query plan describes how MongoDB finds the documents that match the query, including index usage. Understanding the plan can help you optimize your queries.
Table 22.4 lists some of the more important fields the explain document returns.
Using the top Diagnostic Command
A useful MongoDB command for troubleshooting poor database performance is the top command. The top command simply returns raw usage of each database and provides the number of operations and time spent in operations in microseconds for each operation. This helps you isolate which database(s) are using the most CPU time and which ones are the busiest (often they are not the same).
To execute top, you use the following command from the admin database:
use admin
db.runCommand({top: 1})
The output includes the number of operation executions and time spent for each of the following operation types for each collection in all databases:
![]()
total
![]()
readLock
![]()
writeLock
![]()
getmore
![]()
insert
![]()
update
![]()
remove
![]()
commands
Repairing a MongoDB Database
You want to run a repair on the MongoDB database for a couple reasons. For example, the system might crash, a data integrity problem might manifest in the application, or you might need to reclaim some unused disk space.
You can initiate a repair of a MongoDB database from the MongoDB shell or from the mongod command line. To execute a repair from the command line, use --repair and --repairpath <repair_path> syntax. The <repair_path> specifies the location to store temporary repair files. For example:
mongod --repair --repairpath /tmp/mongdb/data
To execute a repair from the MongoDB client, use the db.repareDatabase(options) command. For example:
db.repareDatabase({ repairDatabase: 1,
preserveClonedFilesOnFailure: <boolean>,
backupOriginalFiles: <boolean> })
When a repair is initiated, all collections in the database are compacted, which reduces the size on disk. Any invalid records in the database also are deleted. Therefore, restoring from backup might be better than running a repair.
The time it takes to run the repair depends on the size of the data. A repair impacts the performance on the systems and should be run during off-peak hours.
Watch Out!
If you are trying to repair a member of a replica set and you have access to an intact copy of your data on another replica, you should restore from that intact copy. repairDatabase deletes the corrupt data, and it will be lost.
Backing Up MongoDB
The best backup strategy for MongoDB is to implement high availability using a replica set. This ensures that the data is as up-to-date as possible and ensures that it is always available. However, you should also consider the following if your data is extremely critical and cannot be replaced:
![]() What if the datacenter fails? In this case, you can back up the data periodically and store it offsite or you can add a replica somewhere offsite.
What if the datacenter fails? In this case, you can back up the data periodically and store it offsite or you can add a replica somewhere offsite.
![]() What if something happens to corrupt the actual application data that gets replicated? This is always a concern. In this instance, the only option is to have a backup from a previous point.
What if something happens to corrupt the actual application data that gets replicated? This is always a concern. In this instance, the only option is to have a backup from a previous point.
If you decide that you need to implement periodic backups of data, you should also consider the impact that backups will have on the system and decide on a strategy. For example:
![]() Production impact: Backups are often intensive and need to be performed when they will have minimal impact on your environment.
Production impact: Backups are often intensive and need to be performed when they will have minimal impact on your environment.
![]() Requirements: If you plan to implement something along the lines of a block-level snapshot to back up the database, you need to ensure that the system infrastructure supports it.
Requirements: If you plan to implement something along the lines of a block-level snapshot to back up the database, you need to ensure that the system infrastructure supports it.
![]() Sharding: If you are sharding the data, all shards must be consistent—you cannot back up one without backing up all. Also, you must stop the writes to the cluster to generate the point-in-time backup.
Sharding: If you are sharding the data, all shards must be consistent—you cannot back up one without backing up all. Also, you must stop the writes to the cluster to generate the point-in-time backup.
![]() Relevant data: You can also reduce the impact that backups have on your system by backing up only data that is critical to your system. For example, if a database will never change, it needs to be backed up only once. If data in a database can easily be regenerated but is very large, it might be worth accepting the cost of regeneration versus frequent backups.
Relevant data: You can also reduce the impact that backups have on your system by backing up only data that is critical to your system. For example, if a database will never change, it needs to be backed up only once. If data in a database can easily be regenerated but is very large, it might be worth accepting the cost of regeneration versus frequent backups.
You have two main approaches for backing up MongoDB. The first is to perform a binary dump of the data using the mongodump command. You can store the binary data offsite for later use. For example, to dump the database for a replica set named rset1 on host mg1.test.net and on a standalone system named mg2.test.net to a folder, call /opt/backup/current. You could use the following command:
mongodump --host rset1/mg1.test.net:27018,mg2.test.net --out /opt/backup/current
To restore a database saved with mongodump, you can use the mongorestore command. The simplest form of mongorestore uses the following syntax on the MongoDB server that is currently shut down:
mongorestore --dbpath <database path> <path to the backup>
For example:
mongorestore --dbpath /opt/data/db /opt/backup/current
You can also restore on a running MongoDB server using the following syntax:
mongorestore --port <database port> <path to the backup>
The second method for backing up MongoDB databases is to use a file system snapshot. The snapshots are quick to complete, but they are also much larger—you need to have journal enabled, and the system has to support the block-level backups. If you are interested in implementing a snapshot method for backups, check out the guide at the following location: http://docs.mongodb.org/manual/tutorial/back-up-databases-with-filesystem-snapshots/.
Summary
In this hour, you explored MongoDB database administration concepts to ensure that the MongoDB databases are healthy and available. First, you learned how to copy, rename, and move collections. Next, you added and removed indexes and learned how to perform a reindex on a collection.
You also explored several performance and diagnostic tools available in MongoDB. The validate command enables you to perform a validation on a database to find any obvious problems. Using profiling, you can analyze which types of operations are taking the most time. You learned how to evaluate queries to see how MongoDB uses indexes. Then you saw how to use top to gather usage stats on collections.
The final sections covered how to repair a MongoDB database and explained some of the methods to back up a MongoDB database.
Q&A
Q. What happens if an index is too large to fit into the memory on the MongoDB server?
A. In that case, each request that uses the index reads the index from disk, which slows performance on the system greatly. Consider trying to break down the index so that it is smaller.
Q. Are there any third-party MongoDB monitoring services for MongoDB?
A. Yes. MongoDB Management Services (MMS) is a free hosted service for monitoring MongoDB deployments. You can find out about MMS at https://mms.mongodb.com/.
Workshop
The workshop consists of a set of questions and answers designed to solidify your understanding of the material covered in this hour. Try answering the questions before looking at the answers.
Quiz
1. How do you view the usage stats on a collection, including the number and time spent in update operations?
2. How do you repair a MongoDB database if you suspect a problem?
3. How do you move a collection?
4. How do you add a unique index on the name and number fields in a collection?
Quiz Answers
1. Use the db.runCommand({top: 1}) command.
2. Execute the db.repairDatabase() method on the database (preferably during nonpeak hours).
3. Use the renameCollection command with dropTarget set to true.
4. Use ensureIndex({name:1, number:1}, {unique: true}) on the collection.
Exercises
1. Run a repair on your example database using the following commands from the MongoDB shell:
use words
db.repareDatabase({ repairDatabase: 1,
preserveClonedFilesOnFailure: false,
backupOriginalFiles: false })
2. Use the mongodbdump command to back up your current MongoDB server with the example code on it. Check the backup location and verify that the backup was successful. Then use mongodbrestore to restore the database to the following location in your <code> folder for this book:
<code>/hour22/restore
Then use the following command to launch mongod using the restore directory and verify that the words database is there.
mongod --dbpath <code>/hour22/restore