Configuring the ACS Server to Interoperate with a Router
This section covers the GUI on the ACS server, which enables it to communicate with a client, such as a router.
Before examining the configuration of the ACS server itself, let’s first review a few things. The ACS server has literally thousands of bells and whistles and options that may be configured and tuned. The goal in this section is to make sure that you are comfortable with the basic concept that the ACS server can be a centralized clearinghouse for user authentication/authorization and a repository for accounting records of what those users actually did. From an administrator’s perspective, this includes which administrator issued which commands on which devices.
One challenge that large organizations face is having several administrators with different areas of responsibility. For example, one administrator may be responsible for the perimeter routers that are running zone-based firewall services. A different administrator might be responsible for the routers that are providing virtual private network (VPN) services, and the list goes on. In situations such as these, it is unwise to give every administrator full administrative rights to every single router. Instead, it makes sense to provide access only to those individuals who need it. For example, administrators who manage the perimeter routers should not have access, or at least full access, to the VPN devices that they do not manage. In this light, ACS can group the routers together into logical organizations called device groups. This way, you put specific routers into a group, and then on the ACS put the administrators who are currently responsible for those routers into a user group and assign that group an authorization role that includes administrative rights of full access for that specific group of routers. This scenario does require a bit more effort for the initial configuration of ACS, but after it is set up, you can just add new administrators and put them into specific groups within ACS, and they automatically receive the rights and access levels they need.
Table 3-4 describes the key components for this type of configuration.

For the demonstration here, we create the following:
![]() Device group for border routers
Device group for border routers
![]() A single router that belongs to the device group
A single router that belongs to the device group
![]() Two groups, an Admin group and a Monitor group
Two groups, an Admin group and a Monitor group
![]() Two users (an administrator belonging to the Admin group and a help desk account belonging to the Monitor group)
Two users (an administrator belonging to the Admin group and a help desk account belonging to the Monitor group)
![]() Two authorization policies (the first stating that members of the Admin group who are accessing devices in the device group should get full privilege level 15 access, the second policy stating that users who are members of the Monitor group will only have privilege level 1 access to the devices in the device group)
Two authorization policies (the first stating that members of the Admin group who are accessing devices in the device group should get full privilege level 15 access, the second policy stating that users who are members of the Monitor group will only have privilege level 1 access to the devices in the device group)
So, with this policy in mind, the first thing is to open a browser window from your local computer to the IP address that is running the ACS server. The URL is https://a.b.c.d/acsadmin, where a.b.c.d is the actual IP address of your server. On a new installation of ACS, the default password is default. Initially, the ACS server is using an SSL self-signed certificate, and you may get a pop-up asking you whether you want to confirm your session to this device, even though your browser does not trust the certificate. You need to agree and continue if you want to manage the ACS server.
A newly installed ACS also requires proper licensing. The licensing information is provided along with the purchased product. Evaluation licenses are also available for individuals interested in evaluating the product. Contacting your Cisco representative to obtain the software is probably the easiest way to get it, and with your Cisco.com account you can register online for an evaluation license.
The first step is to create a device group. You do so by navigating to Network Resources > Network Device Groups > Device Type and clicking Create, as shown in Figure 3-9.

After adding information about this group, click Submit to implement the new network device group. The problem with this device group is that by default there are no network devices in it. To fix that, we add as an example a single router (the router we configured earlier) to be included in this network device group on the ACS server. This is done by navigating to Network Resources > Network Devices and AAA Clients and clicking Create, as shown in Figure 3-10.

In this dialog box, you click the Select button to the right of the device type and select the device group created from the previous step. In addition to that, you configure the name that the ACS server will know the router by. This name does not have to match the real name of the router, but it is a good idea for it to match so that someone looking at the ACS would know which client (the router) is being referred to in the configuration of the ACS. The IP address of this client (the router) is the reachable address of the router from the perspective of the ACS server. Clicking the box next to TACACS+ lets the ACS server know which protocol to expect from this client, and having the correct password (the one that matches the password configured earlier on the router) is also required for successful communication. After reviewing the information to confirm it is accurate, click Submit.
So, we have created a network device group, and added router R1 as the first network device (ACS client) in this group. The next step is to create a user group, and then create some users in those groups. The two groups we are going to create are an Admin group and a Monitor group. To create these groups, navigate to Users and Identity Stores > Identity Groups and click Create, as shown in Figure 3-11.

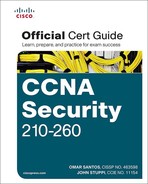
Complete the dialog box by providing the name of the group you are going to create, and then click Submit. You could repeat this process for any additional groups. For this discussion, we create two groups: one named Admin and the other named Monitor. After you click Submit, a summary of your existing groups displays, as shown in Figure 3-12.
These new groups have no users in them by default and have no special permissions by default. The first step to fixing that is to create a couple user accounts and place at least one user account into each group. To create individual users, navigate to Users and Identity Stores > Internal Identity Stores > Users and click Create, as shown in Figure 3-13.

After entering in the name of this user, and a description (if desired), click the Select button from this pop-up window to select which user group you want this user to be a member of. It also specifies the password for this administrator. After verifying the details are correct, click Submit. In this scenario, we are creating one user named admin that belongs to the Admin group, and a second user named help-desk that belongs to the Monitor group. After you click Submit, a summary of your configured users configured on the ACS server displays, as shown in Figure 3-14.

The next step is to configure authorization policies that give full access to users in the Admin group who are trying to access routers in the network device group we created. We also want to give limited access to users in the Monitor group who are trying to access the same devices. We can do this with authorization policies. To create and assign the reservation policies, first navigate to Access Policies > Access Services > Default Device Admin > Authorization and click Create, as shown in Figure 3-15.

In the dialog box, indicate the name of this policy, called in this example AdminRole, and check the box next to the conditions next to identity group, and click the Select button to choose the Admin group created earlier. Use the same process, checking that box next to NDG Device Type (NDG stands for network device group) and then using the Select button, to indicate the device belongs to the group of routers device group that was created earlier.
This is setting up a condition so that if a user who is a member of the Admin group is attempting to access a device that is a member of the specific router group, then as a result we can provide specific access based on a custom shell profile that we can create. To do that, click the Select button next to the Shell Profile option, and you are presented with the screen shown in Figure 3-16. Shell profiles are used for authorization purposes and associated with an authorization policy (AdminRole in this example).

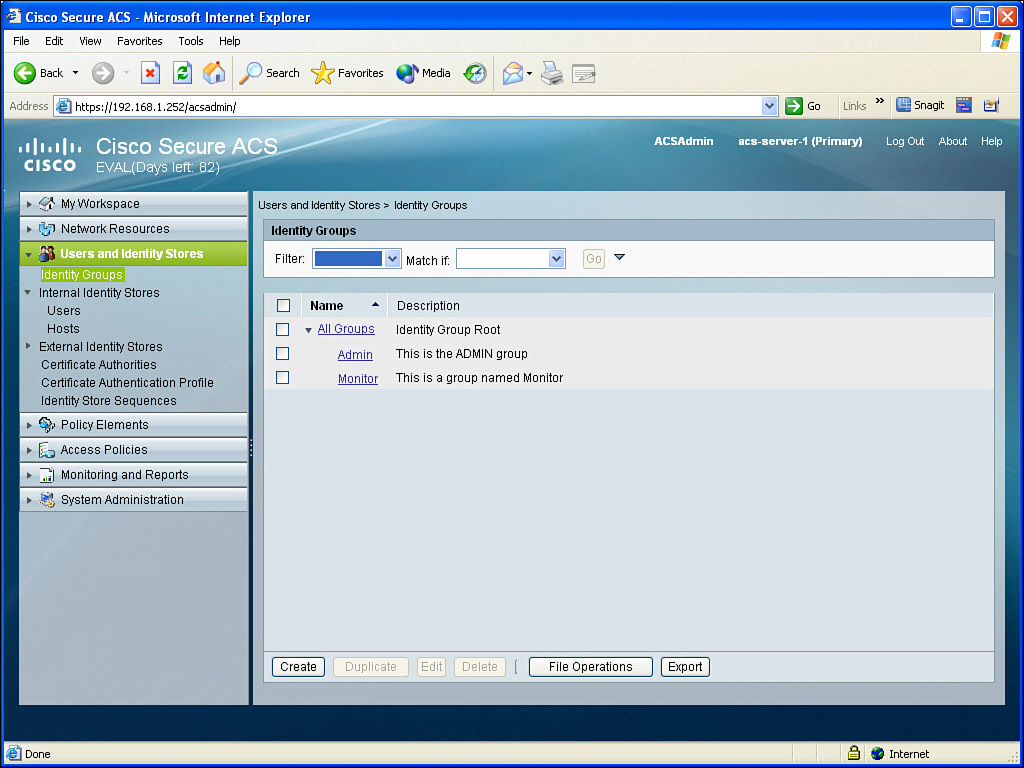
You could assign one of the preconfigured profiles, or you could create your own profile and assign it to this group of users. To create a custom profile, click the Create button, and from the new window that is brought up, name the profile in the dialog box provided, and then display the Common Tasks tab and change the default privilege level to Static, and assign the privilege level of 15, as shown in Figure 3-17.
Note
The higher the privilege level, the more privileges a user has to configure and access information in the device.
Click Submit, and then confirm any dialog boxes presented to you from ACS until the configuration is applied. By using these steps, any users in the Admin group accessing any of the devices in the specified device group will not only be able to authenticate but also be automatically authorized for and placed into privilege level 15 after successfully authenticating on those routers. We repeat this process for the Monitor group, assigning a static privilege level of 1.
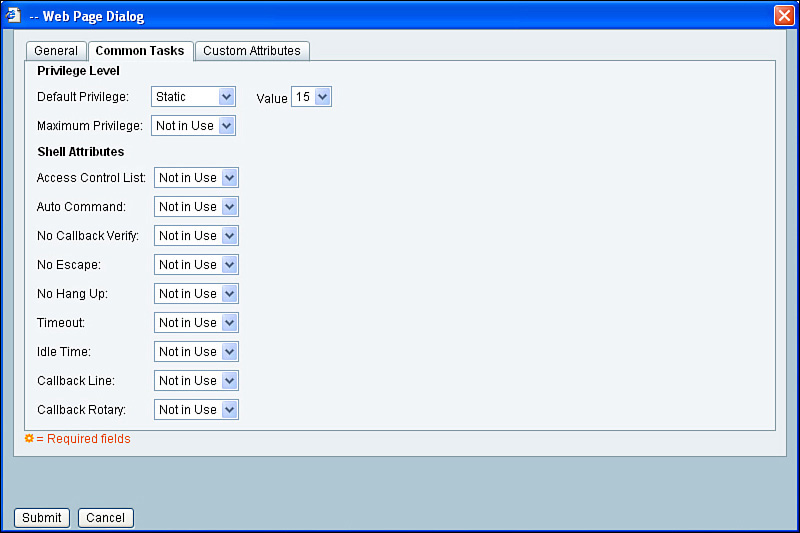
After saving the changes, you can view a summary of the authorization profiles in this same location. Figure 3-18 shows two custom authorization profiles. One applies to admin users in the Admin group accessing devices in the router group, and the other applies to help desk users who are members of the Monitor group accessing the same devices.
In this section, we created device groups and added individual routers, or a least one in this case, to that device group. We also created user groups and put users (in this case, at least one per group) into those groups. We then created custom authorization profiles that indicate which profiles to be applied based on which users in which groups are accessing which devices. The final piece to the puzzle is to verify that it actually works. Let’s do that right now in the next section.