
CHAPTER 8
DOING A LITTLE MATH
Scratch 2.0 provides robust support for performing mathematical calculations. This lets you develop applications that can manipulate numeric data in a variety of ways. Scratch 2.0 provides this support through operator blocks. Operator blocks are reporter blocks, so you can only use them in conjunction with stack code blocks. This chapter provides a thorough review of each of these code blocks and shows you how to create a new Scratch 2.0 application: the Number Guessing game.
The major topics covered in this chapter include
![]() Adding, subtracting, multiplying, and dividing programmatically
Adding, subtracting, multiplying, and dividing programmatically
![]() Generating random numbers using any range you specify
Generating random numbers using any range you specify
![]() Performing different types of numeric comparisons
Performing different types of numeric comparisons
![]() Concatenating values, retrieving characters from strings, and retrieving the length of values
Concatenating values, retrieving characters from strings, and retrieving the length of values
![]() Performing a number of built-in mathematical operations
Performing a number of built-in mathematical operations
ADDITION, SUBTRACTION, MULTIPLICATION, AND DIVISION
Like all modern programming languages, Scratch 2.0 allows programmers to add, subtract, multiply, and divide numeric data. This capability is offered through the code blocks shown in Figure 8.1.
Figure 8.1
These code blocks let Scratch 2.0 programmers perform arithmetic calculations.
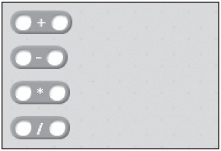
© 2014 Lifelong Kindergarten Group
The use of these code blocks is quite intuitive, with each code block clearly identifying its usage. You can embed these code blocks within any Scratch 2.0 code block that accepts numeric input. For example, the following script demonstrates how to use these code blocks to modify the value assigned to a variable named Count.
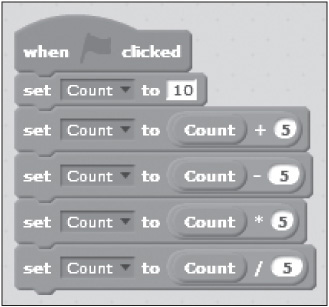
© 2014 Cengage Learning®
Here, the script begins by assigning an initial value of 10 to Count. Next, four sets of code blocks are executed. Each set consists of one stack block and two reporter blocks. The first set of statements sets the value of Count equal to the value currently assigned to Count plus 5, making Count equal to 15. The second set of code blocks sets Count equal to the value currently assigned to Count minus 5, making Count equal to 10. The third set of code blocks sets Count equal to the current value of Count times 5, making Count equal to 50. The last set of code blocks changes the value of Count to 10 by dividing its current value by 5.
UNDERSTANDING THE MATHEMATICAL ORDER OF PRECEDENCE
As is the case with all programming languages, Scratch 2.0 allows you to string together different combinations of operator blocks so you can create more complicated numeric calculations. For example, take a look at the following script.
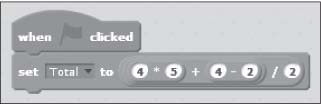
© 2014 Cengage Learning®
Here a small script has been created that evaluates a numeric expression and assigns the result to a variable named Total. This equation was created by embedding a series of operator blocks within one another. Specifically, the equation was created by embedding the code blocks shown in Figure 8.2 into one another.
Figure 8.2
Creating complex formulas by assembling different combinations of code blocks.
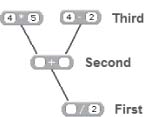
© 2014 Lifelong Kindergarten Group
As shown in Figure 8.2, the equation was assembled by embedding the division code block into a variable block. Next, the addition code block was embedded within the left side of the division code block. Finally, a multiplication code block and a subtraction code block were embedded within the input fields of the addition code block.
Like all programming languages, Scratch 2.0 evaluates the components of mathematical expressions by following a specific order, referred to as the order of precedence. Specifically, Scratch 2.0 evaluates an expression using a top-down approach. When applied to the example shown in Figures 8.2, Scratch 2.0 evaluates it as follows.
1. First, it calculates the value of the two top code blocks. Therefore, 4 is multiplied by 5 yielding a value of 20, and 2 is subtracted from 4 yielding a value of 2. At this stage, the expression has been evaluated as shown here.
20+2/2
2. Next, the expression located in the second-level code bock (the addition block) is evaluated. Therefore, 20 is added to 2 yielding a value of 22. At this stage, the expression has been evaluated as shown here.
22/2
3. Finally, the lowest-level code block is evaluated, dividing 22 by 2 and resulting in a final value of 11.
GENERATING A RANDOM NUMBER
Some applications, such as computer games, require an element of randomness or chance. For example, a game that needs to simulate the rolling of dice needs to be able to create a pair of random numbers in the range of 1 to 6. Scratch 2.0 provides the capability through the code block shown in Figure 8.3.
Figure 8.3
By default, this code block is configured to generate a number in the range of 1 to 10.

© 2014 Lifelong Kindergarten Group
This code block provides a means of generating random integer (whole) numbers using any specified range of numbers. The default range is 1 to 10, but you may change the input fields to suit your needs. If needed, you can generate negative numbers. In addition to hard-coding a numeric range into the control, you can substitute variable blocks by dragging and dropping them into either or both of this code block’s input fields.
To develop an understanding of how this code block works, look at the following example.
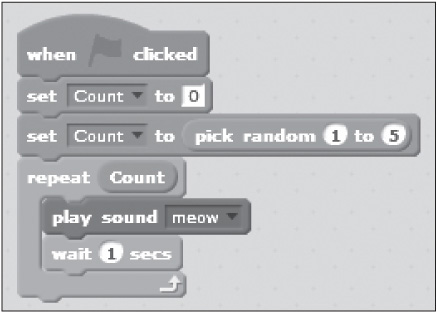
Here, a script has been created that begins by assigning a variable named Count a starting value of 0. Next, the variable’s value is changed by assigning it a randomly selected value in the range of 1 to 5. A loop is then set up to repeat the execution of two embedded code blocks. The loop is designed to repeat a specified number of times and is set up by default to execute 10 times. However, by dragging and dropping an instance of the Count variable block into the loop’s input field, the number of times that the loop executes is randomly determined, depending on the randomly assigned value of Count.
Note
Each time the loop executes, it plays an audio file that sounds like a cat meowing. To give the audio file time to finish playing, a control block was added to pause script execution for one second. To see this script in action, create a new Scratch 2.0 application and add the script to the default cat sprite.
COMPARISON OPERATIONS
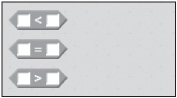
To work with numbers, you often need to mathematically manipulate them, as demonstrated in the previous section. Doing so ultimately leaves you with a result. Typically, you’ll want to do something with this result once it has been calculated. For a simple application, all you may need to do is display its value. However, more often than not, you are going to end up using it to guide the execution of your application in some manner. For example, suppose you want to create a Number Guessing game that automatically generates a random number and then challenges the player to try to guess it. Once the random number is generated and stored in a variable, the player needs to be prompted to try to guess it (perhaps by clicking on one of 10 buttons with numbers printed on them). Once the player’s guess is captured, the application needs to compare the player’s guess against the value of the variable that stores the game’s random number to determine whether the player’s guess is correct. To facilitate this type of comparison operation, Scratch 2.0 provides access to the three code blocks shown in Figure 8.4.
Figure 8.4
These code blocks let you compare any two numeric values.
© 2014 Lifelong Kindergarten Group
The first and last code blocks shown in Figure 8.4 allow you to compare one value against a range of values. The first code block checks to see if the numeric value specified in its first input field is less than the value specified in its second input field. The third code block does the opposite, checking to see if the numeric value specified in its first input field is greater than the value specified in its second input field. The middle code block is used to determine if two values are equal.
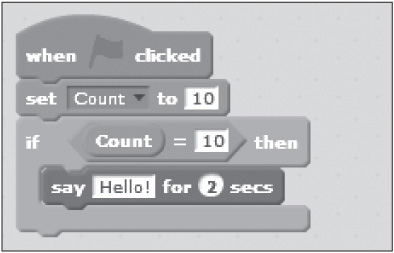
To develop a better understanding of how to work with each of these three code blocks, let’s look at a few examples. In the first example, shown below, a script has been created that executes whenever the green Flag button is clicked. When this happens, the value Count is set equal to 10. Next, an operator block is embedded within a control block to set up a conditional test that evaluates the value assigned to Count and to execute the code block embedded within the control block if the tested condition (for example, Count) is true. Since this is the case, a text string of Hello! is displayed in a speech bubble.
Note
To prove that the embedded operator block is working like it is supposed to, you can change the value assigned to Count to something other than 10 and run the example again. Since the value assigned to Count no longer equals 10, the tested condition would evaluate as false and the text message would not display.
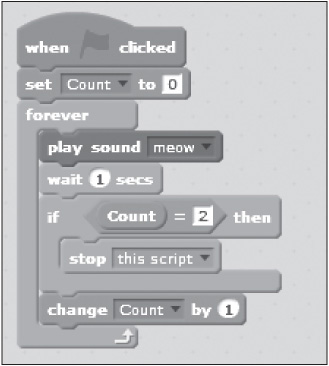
In this next example, the operator block that tests for greater than conditions is used. Again, a script has been set up to execute whenever the green Flag button is clicked. The value assigned to Count is then set to 0, and a control block is used to set up a loop that runs forever (until you provide a means for stopping its execution). A number of code blocks are embedded within the loop. The first block plays an audio file, and the second block pauses script execution for one second to allow Scratch 2.0 time to finish playing the file. Another control block is then used to set up a conditional test that evaluates the value assigned to Count to see if it is greater than 2, and if it is, another control block is used to terminate the script’s execution. If the value assigned to Count is not greater than 2, the last code block located at the bottom of the loop is executed, incrementing the value of Count by one. The loop then repeats and executes again.
© 2014 Cengage Learning®
The first time the loop runs, the value assigned to Count is 0. The loop must iterate two times before the value of Count is set to 3, resulting in the termination of the script’s execution. Because of this, the audio file plays three times.
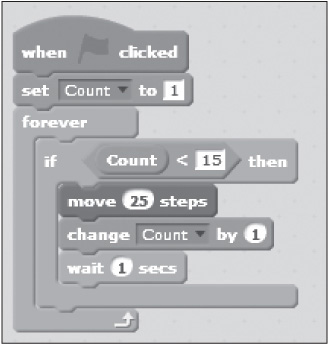
In this final example, shown next, the operator block that tests for less than conditions is used. Like the previous two examples, this script is set up to execute whenever the green Flag button is clicked. When this happens, the value of Count is set to 1. Next, a loop is set up that repeatedly executes as long as the value of Count is less than 15. Each time this test evaluates as true, three embedded code blocks are executed. The first code block moves the sprite 25 steps. The next code block increments the value assigned to Count by one, and the last code block pauses script execution for one second.
© 2014 Cengage Learning®
The way this script is written, its loop will execute 14 times and will stop executing when the value of Count finally reaches 15.
Creating Different Types of Conditional Tests
While Scratch 2.0 supplies you with only three code blocks for performing conditional tests (equality, greater than, and less than), most programming languages support three additional types of conditional tests, allowing you to perform the following comparison operations:
![]() Greater than or equal to
Greater than or equal to
![]() Less than or equal to
Less than or equal to
![]() Not equal to
Not equal to
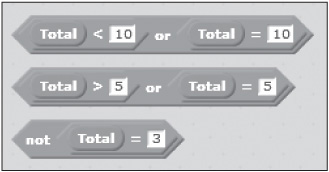
Although Scratch 2.0 does not provide equivalent code blocks, you can easily set up equivalent comparison tests by combining the three code blocks just discussed with Scratch 2.0’s logical comparison code blocks, as shown in Figure 8.5.
Figure 8.5
Creating customized logical comparisons.
© 2014 Lifelong Kindergarten Group
The first combination of code blocks shown in Figure 8.5 creates a test that determines if the value assigned to a variable named Total is less than or equal to 10. This example is made up of five code blocks—two variable blocks, two operator blocks used to perform less than and equality comparisons, and another operator block that is used to tie everything together. The second combination of code blocks shown in Figure 8.5 is similar and is designed to create a test that checks to see if the value assigned to Total is greater than or equal to 5. The last example is made up of three code blocks and is used to evaluate the values assigned to Total to determine if it is not equal to 3. You will learn more about code blocks that support logical comparisons in the next section.
PERFORMING LOGICAL COMPARISONS
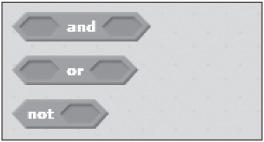
In addition to code blocks designed to perform mathematical and comparison operations, Scratch 2.0 provides access to three code blocks that support logical comparison operations. These code blocks are shown in Figure 8.6.
Figure 8.6
Using these code blocks, you can perform more complex comparison operations.
© 2014 Lifelong Kindergarten Group
The first code block is used to test two different sets of values to determine if both are true. The second code block is used to test two different sets of values to determine if at least one is true. And the last code block lets you evaluate two values to determine if the tested condition is false (not true).
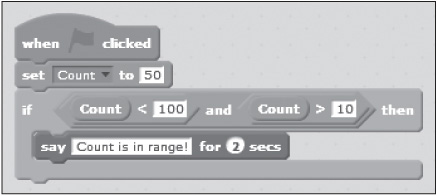
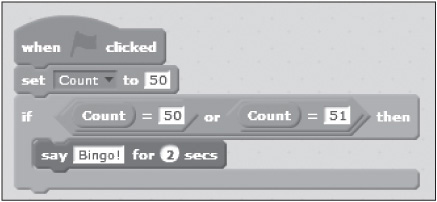
To help you better understand how to work with all three of these code blocks, let’s review a few examples. The first example, shown next, is a script that executes whenever the green Flag button is clicked. When this occurs, the value assigned to the variable Count is set to 50. Next, a control code block is used to analyze the value assigned to Count. If the value of Count is less than 100 but greater than 10, the end statement embedded within the control block is executed. However, if both tested conditions evaluate as false, the embedded code block is not executed.
© 2014 Cengage Learning®
Note
Scratch 2.0 is flexible in its support for operator blocks. For example, if you prefer, you can swap the order in which the two embedded operator blocks occur (for example, checking to see that Count is greater than 10 before checking to make sure that Count is also less than 100), and the results would be the same.
This next example is similar to the previous example, except that instead of ensuring that both tested conditions evaluate as being true, the script has been modified so that only one of the tested conditions has evaluated as true in order for the embedded code block to be executed.
© 2014 Cengage Learning®
This final example shows a script that performs a negative test, checking to see if two values are not equal instead of checking to see if they are equal. As a result, if the value assigned to Count is not equal to 50, which it is not, the code block embedded within the control block is executed.
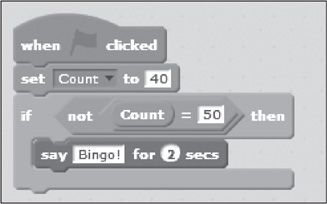
© 2014 Cengage Learning®
MANIPULATING STRINGS
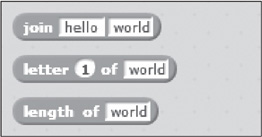
The operator blocks shown in Figure 8.7 are new in Scratch 2.0 and let you take two strings and concatenate them, retrieve a letter from a string, and determine a string’s length.
Figure 8.7
These code blocks concatenate strings, retrieve letters from them, and determine their length.
© 2014 Lifelong Kindergarten Group
The following example demonstrates how to work with all three of the code blocks.
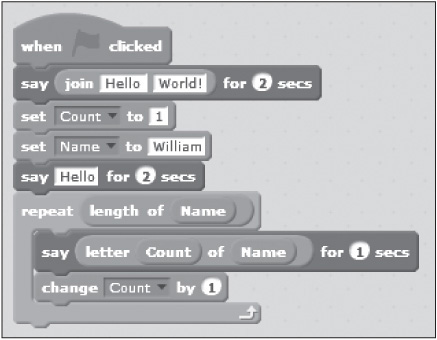
© 2014 Cengage Learning®
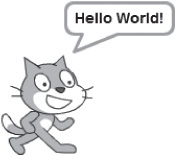
This example executes when the user clicks on the green Flag button, at which time the second code block, which contains an embedded join operator block, takes the text strings of Hello and World! and concatenates them into a string with a blank space separator and then has its sprite say the resulting string, as shown in Figure 8.8.
Figure 8.8
The second code block concatenates the string to have the sprite say “Hello World!”
© 2014 Lifelong Kindergarten Group
The remainder of the script sets the value of a variable named Count to 1 and the value of a second variable named Name to William and uses a looks block to have the default sprite say Hello for 2 seconds. Then a loop is set up to repeat one for each letter that makes up the value of the name (for example, seven times since William consists of seven letters). Within the loop, another looks block, with an embedded letter block, is used to retrieve and say one letter from the word stored in Name. The next code block increments the value assigned to Count by one so that the next time the loop repeats, it retrieves the next letter from Name. By the time the loop completes, every letter that makes up the contents of Name (for example, William) is said by the sprite one at time.
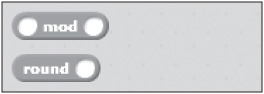
ROUNDING NUMBERS AND RETRIEVING REMAINDERS
The next set of operator blocks, shown in Figure 8.9, let you retrieve the remainder portion of any division operation and round any decimal number to the nearest whole number.
Figure 8.9
These code blocks retrieve remainders and round numbers.
© 2014 Lifelong Kindergarten Group
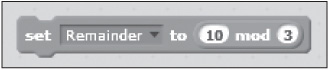
The first code block shown in Figure 8.9 returns the remainder portion of a division operation, also referred to as modulus, as demonstrated in the following example, which divides 10 by 3 and then assigns the modulus (for example, a value of 1) to a variable named Remainder.
© 2014 Cengage Learning®
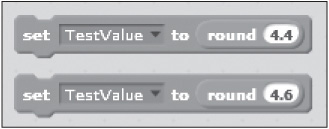
The second code block shown in Figure 8.9 returns the rounded value for a specified numeric value, rounded to the nearest whole number, as demonstrated in the following examples. These examples return values of 4 and 5, respectively.
© 2014 Cengage Learning®
WORKING WITH BUILT-IN MATHEMATICAL FUNCTIONS
In addition to all the mathematical operations that you can put together using the operator blocks previously discussed in this chapter, Scratch 2.0 provides one additional multipurpose code block, as shown in Figure 8.10.
Figure 8.10
This code block can assist you in setting up extremely complex calculations.
© 2014 Lifelong Kindergarten Group
This code block is designed to perform any of 14 different mathematical functions, which can be selected from the code block’s drop-down list. The functions that this code block can perform are outlined in the following list:
![]() abs. Returns the absolute, nonnegative value of a number.
abs. Returns the absolute, nonnegative value of a number.
![]() floor. Returns the largest integer value of a number that is less than or equal to a specified value.
floor. Returns the largest integer value of a number that is less than or equal to a specified value.
![]() ceiling. Returns the smallest integer value of a number that is less than or equal to a specified value.
ceiling. Returns the smallest integer value of a number that is less than or equal to a specified value.
![]() sqrt. Returns the square root of a number.
sqrt. Returns the square root of a number.
![]() sin. Returns a value representing the sine of an angle.
sin. Returns a value representing the sine of an angle.
![]() cos. Returns a value representing the cosine of an angle.
cos. Returns a value representing the cosine of an angle.
![]() tan. Returns a value representing the tangent of an angle.
tan. Returns a value representing the tangent of an angle.
![]() asin. Returns the arc sine for the specified numeric value.
asin. Returns the arc sine for the specified numeric value.
![]() acos. Returns the arc cosine for the specified numeric value.
acos. Returns the arc cosine for the specified numeric value.
![]() atan. Returns the arc tangent for the specific numeric value.
atan. Returns the arc tangent for the specific numeric value.
![]() ln. Returns the inverse of the natural exponent of a specified value (for example, the opposite of e^).
ln. Returns the inverse of the natural exponent of a specified value (for example, the opposite of e^).
![]() log. Returns the natural log of a number.
log. Returns the natural log of a number.
![]() e^. Returns the natural exponent of a specified value.
e^. Returns the natural exponent of a specified value.
![]() 10^. Returns the value of a number raised to the 10th power.
10^. Returns the value of a number raised to the 10th power.
These code blocks can be real time-savers when developing applications that require the use of any of the mathematical functions supported by the code block, saving you the trouble of implementing the underlying programming logic yourself to retrieve similar results. As a result, not only will you spend less time working on the development of your application, but the programming logic that you have to develop will be simplified and easier to maintain since this code block can do most of the heavy lifting for you.
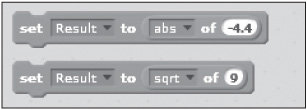
To specify which function you want to work with, all you have to do is select it from the code block’s drop-down list. For example, the following examples demonstrate the use of two different functions provided by this code block.
© 2014 Cengage Learning®
This example consists of two sets of code blocks. The first set of code blocks returns the absolute value of –4.4, which is 4.4, and assigns that value to a variable named Result. The second set of blocks returns the square root of 9, which is 3, and assigns that value to a variable named Result.
DEVELOPING THE NUMBER GUESSING GAME QUIZ PROJECT
The remainder of this chapter is focused on the development of your next Scratch 2.0 application: the Number Guessing game. This application uses operator blocks to generate random numbers for the player to guess and to compare the player’s guesses against the game’s randomly generated number.
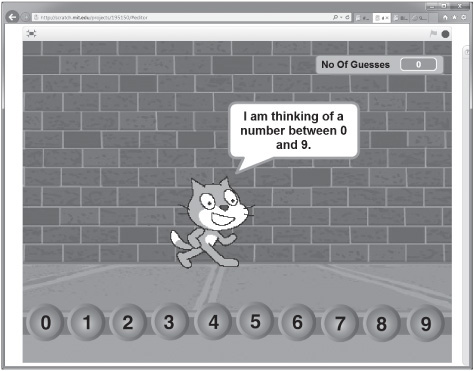
In total, the application is made up of a backdrop, 11 sprites, and 12 scripts. When run, the game challenges the player to guess a randomly generated number in the range of 0 to 9 in as few guesses as possible. Figure 8.11 shows an example of how the game looks when it’s started.
Figure 8.11
The Number Guessing game is moderated by the cat sprite.
© 2014 Lifelong Kindergarten Group
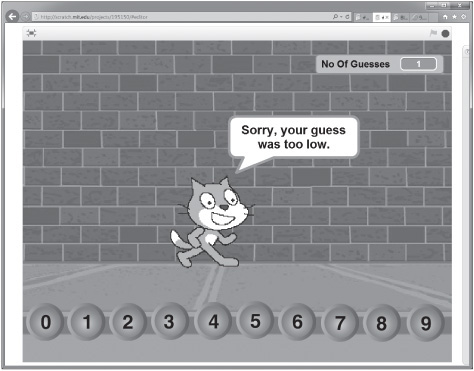
To enter a guess, the player must click on one of the button sprites located at the bottom of the stage. The cat provides immediate feedback after each guess, as demonstrated in Figure 8.12.
Figure 8.12
The cat lets the player know when guesses are too high or too low.
© 2014 Lifelong Kindergarten Group
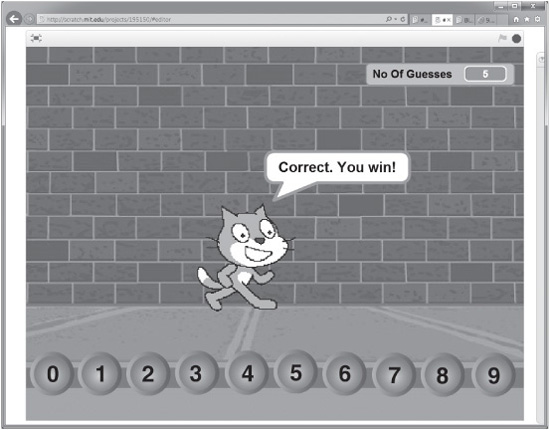
Figure 8.13 shows how the game looks once the player finally manages to guess the game’s secret random number.
Figure 8.13
The player guessed the secret number in five guesses.
© 2014 Lifelong Kindergarten Group
The game automatically generates a new random number at the end of each game so the game is ready to be played again. The development of this application project is created by following a series of steps, as outlined here:
1. Create a new Scratch 2.0 application project.
2. Add a backdrop to the stage.
3. Add and remove sprites.
4. Add variables that the application needs.
5. Add an audio file to the application.
6. Add scripts to each button to collect player guesses.
7. Add the programming logic required to process player guesses.
8. Test your work.
Step 1: Creating a New Scratch 2.0 Project
The first step in the development of the Number Guessing game is to create a new Scratch 2.0 application project. Do so by either opening Scratch 2.0, thereby automatically creating a new Scratch 2.0 application project, or clicking on the File menu and then selecting New.
Step 2: Adding a Stage Backdrop
The next step in the development of the Number Guessing game is to add a backdrop to the stage. To do so, click on the blank stage thumbnail located in the sprite list and then change its backdrop by clicking on the Backdrops tab located at the top of the scripts area. Next, click on the Choose Backdrop from Library icon. When the Backdrop library window opens, click on the Outdoors folder. Then select the brick-wall1 thumbnail and click on the OK button. Since the application needs only one backdrop, remove the default blank backdrop, named backdrop1, from your project.
Step 3: Adding and Removing Sprites
The Number Guessing game is composed of the default cat sprite plus 10 button sprites and a variable monitor, as shown in Figure 8.14.
Figure 8.14
An overview of the different parts of the Number Guessing game.
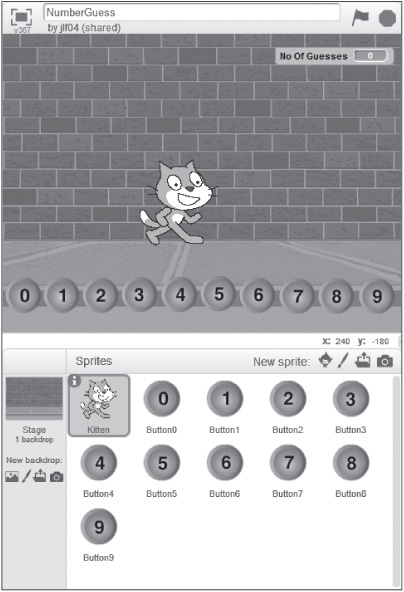
© 2014 Lifelong Kindergarten Group
To add the first of the sprites representing the 10 input buttons, click on the Choose Sprite from Library icon to open the Sprite Library window. Click on the Things category and locate the Button1 sprite. Then click on the OK button. Select the thumbnail for this sprite, and then click on the Costumes tab to display it in the Paint Editor. The sprite is currently too big for the projects purposed. Click on the image until it becomes enclosed within an orange square box. With the sprite selected, click on the Shrink icon, located at the top of the program editor in the menu bar, 12 times to return the size of the sprite to the size needed. Rename this sprite Button0. Right-click in the sprite list and select Duplicate from the menu that appears. Make sure the sprite is named Button1. If it is not, change its name accordingly. Duplicate Button1 eight additional times, creating Button2 through Button 9. Using the Paint Editor, select each of the 10 button sprites, starting with Button0, and paint its number on it, so that Button0 is labeled 0, Button1 is labeled 1, and so on.
When you’re finished painting the button sprites, arrange them in order from left to right across the bottom of the stage, as shown in Figure 8.14. At this point, all that is left in the design of the application’s user interface is the display and reposition of the monitor, which you do in the next step.
Step 4: Adding Variables That the Application Requires
To execute, the Number Guessing game requires three variables, as shown in Figure 8.15. To add these variables to the application, click on the Variables category located at the top of the blocks palette, and then click on the Make a Variable button three times to define global variables named Guess, No Of Guesses, and RandomNo.
Figure 8.15
The Number Guessing game requires three variables.

© 2014 Lifelong Kindergarten Group
The variable named Guess is used to store the most recent guess the player made. The variable named No Of Guesses is used to keep track of the number of guesses the player made during each game. The variable named RandomNo stores the game’s randomly generated secret number. Once you’ve added them, clear the check box controls belonging to the Guess and No Of Guesses variables to prevent their monitors from being displayed. Lastly, drag and drop the monitor for the No Of Guesses variable to the upper-right side of the stage.
Step 5: Adding an Audio File to the Application
The Number Guessing game uses two audio files that are played as sound effects when the player makes incorrect and correct guesses. The audio file played when the player enters a missed guess is the default pop sound, which is automatically included as part of each of the button sprites used in the application. The second audio file is the Fairy-dust sound, which is played whenever the player manages to correctly guess the mystery number.
To add the Fairydust audio file, select the cat sprite thumbnail in the sprites list and then click on the Sounds tab located at the top of the scripts area. Next, click on the Choose Sound from Library icon to display the Sound Library window, click on the Electronic folder, select the Fairydust sound, and click on OK.
Step 6: Adding Scripts to Capture Player Input
The programming logic that drives the Number Guessing application is divided into a series of scripts belonging to the application’s sprites. Specifically, you must add small scripts to each of the button sprites to capture and save player guesses. In addition, you must add two scripts to the cat sprite. These two scripts, which are responsible for starting the game and processing player guesses, are covered in Step 7.
To begin work on each of the scripts belonging to the button sprites, select the sprite representing the 0 button, and then add the following code blocks to it.
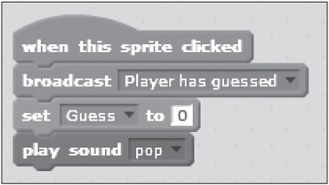
© 2014 Cengage Learning®
The script begins with a hat block that executes whenever the sprite is clicked (for example, when the player clicks on it as a guess). When this occurs, the second code block in the script sends a Player has guessed broadcast message to the other sprites as a signal that the player has submitted a guess. The Player has guessed must be typed into the control block exactly as shown. A third code block is then used to assign a value to the Guess variable, recording the player’s guess. Note that in this example, setting Guess to 0 indicates that the player has submitted a guess of 0. The last code block in the script plays the default pop audio file, which lets the player know that the guess has been processed.
Note
A broadcast message is a message exchanged between sprites that signals when an event of some type has occurred within an application. Broadcast messages are generated by and received using various control code blocks, which you learn about in Chapter 9, “Controlling Script Execution.” For now, all you need to know is that this application uses broadcast messages to coordinate activity and keep track of what is occurring within the game.
The scripts that need to be added to the rest of the button sprites are almost identical to the script that you just added. The only difference is that you need to modify the value that is set in the third code block to properly reflect which button sprite each script belongs to. The easiest way to add these scripts to the other nine button sprites is to drag and drop an instance of the first script onto each of the nine other sprites and then select each sprite, one at a time, and modify the value of the third code block accordingly.
Step 7: Processing Player Guesses
Once scripts have been added to all 10 of the button sprites, it is time to create the two scripts belonging to the cat sprite. The first of these scripts is shown next and is responsible for initializing the game and getting it ready to play.
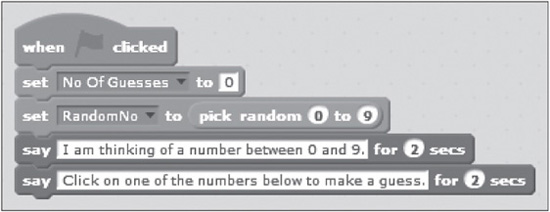
© 2014 Cengage Learning®
This script is executed when the player clicks on the green Flag button. It begins by assigning an initial value of 0 to No Of Guesses and then assigns a randomly generated value in the range of 0 to 9 to a variable named RandomNo. Lastly, it displays a pair of messages that inform the player that the cat is thinking of a number and challenges the player to try to guess it.
The second and final script to be added to the cat sprite is shown next. This script is automatically executed whenever the Player has guessed broadcast message is received. This happens when the player clicks on one of the 10 button sprites. First, the script modifies the value assigned to No Of Guesses by increasing it by one. This allows the application to keep track of the number of guesses that the player has made in the current game.
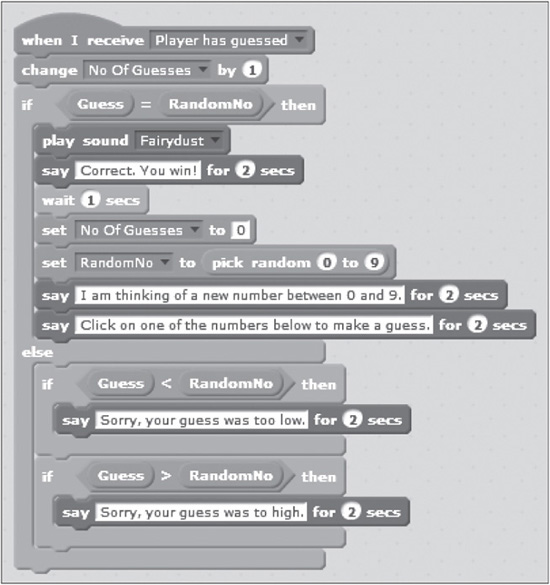
© 2014 Cengage Learning®
The rest of the script is made up of code blocks embedded within a control block. The control block begins by evaluating the value assigned to the Guess variable to see if it is equal to the value assigned to the RandomNo variable. If this is the case, a series of code blocks embedded within the upper portion of the control block are executed. If this is not the case, code blocks embedded in the bottom of the control block are executed.
The code statements located in the upper half of the control block, which execute when the player enters a correct guess, perform the following actions:
![]() Play the
Play the Fairydust audio file that was added to the cat sprite back in Step 5.
![]() Notify the player that the game has been won.
Notify the player that the game has been won.
![]() Pause script execution for one second.
Pause script execution for one second.
![]() Reset the value of
Reset the value of No Of Guesses to 0.
![]() Select a new random number for the game.
Select a new random number for the game.
![]() Challenge the player to play again.
Challenge the player to play again.
If, on the other hand, the player enters an incorrect guess, the code blocks embedded at the bottom of the script are executed. These code blocks are organized into two separate control blocks. The first control block evaluates the value assigned to Guess to see if it is less than RandomNo. If it is, a message is displayed that informs the player that the guess was too low. The second control block determines if the value assigned to Guess is less than RandomNo. If it is, a message is displayed that informs the player that the guess was too high.
Step 8: Saving and Executing Your New Scratch 2.0 Application
At this point, you have all the information you need to create your own copy of the Number Guessing game. If you have not already done so, give your new project a name. Switch to Presentation mode, run the game, and put your new game through its paces. Remember to begin game play by clicking on the green Flag button and following the instructions that the cat sprite provides.