
CHAPTER 7
STORING AND RETRIEVING DATA
All computer applications require some sort of data with which to work as they execute. This is true of even the simplest applications. The data processed by an application may be embedded within it. Data may also be randomly generated or collected from the user as the application executes. To work with and manipulate data, programmers need the ability to store, retrieve, and modify data when an application runs. Within Scratch 2.0 applications, data is managed using either variables or lists. The goal of this chapter is to teach you everything you need to know to begin developing Scratch 2.0 applications that can collect, store, and process application data.
The major topics covered in this chapter include
![]() How to create local, global, and cloud variables
How to create local, global, and cloud variables
![]() How to use variables as a means of storing and retrieving data
How to use variables as a means of storing and retrieving data
![]() How to delete variables that are no longer needed
How to delete variables that are no longer needed
![]() How to view data stored in local variables belonging to other sprites
How to view data stored in local variables belonging to other sprites
![]() How to manage and process collections of data using lists
How to manage and process collections of data using lists
LEARNING HOW TO WORK WITH APPLICATION DATA
Like all computer programs, Scratch 2.0 applications need to be able to process and store data. Data is any type of information that your Scratch 2.0 applications collect, process, and store when executing. Data can also be collected when the user interacts with the application using the keyboard or mouse. Data may be generated by your applications, such as when you create a Scratch 2.0 project that generates and then uses random numbers (covered in Chapter 8, “Do a Little Math”). Data may also be hard-coded within your Scratch 2.0 application projects. For example, you can use the code block shown in Figure 7.1 to store and display a text string within a script.
Figure 7.1
An example of text embedded within a looks code block.

© 2014 Lifelong Kindergarten Group
When executed, a script containing this looks code block displays the hard-coded text string inside a voice bubble. Like most programming languages, Scratch 2.0 lets you work with a number of different types of data. Scratch 2.0 handles each of these different types of data, listed next, differently.
![]() String
String
![]() Boolean
Boolean
![]() Integer
Integer
![]() Real
Real
A string is a piece of text data that you hard-code within Scratch 2.0 applications using different types of looks code blocks, which you will learn how to work with in Chapter 10, “Changing the Way Sprites Look and Behave.” Boolean data is data that Scratch 2.0 automatically generates when you work with different types of operator blocks (which you will learn about in Chapter 8, “Doing a Little Math”). A Boolean value represents data that has an assigned value of either True or False. For example, any time you compare one numeric value against another to see if they are equal, Scratch 2.0 returns a Boolean value. Based on the result of that analysis, you can alter the way your Scratch 2.0 applications execute using control blocks, which are covered in Chapter 9, “Controlling Script Execution.”
An integer is a numeric value that does not include a decimal point (sometimes referred to as a whole number). Scratch 2.0 lets you enter integer values as input into numerous types of code blocks. It also allows you to store numeric data inside variables and lists, allowing you to store, retrieve, and manipulate the data as necessary during application execution. A real number is a number that includes a decimal number.
Scratch 2.0 handles different types of data differently. For example, string data can only be displayed by embedding it within looks code blocks. Integer and real data can also be embedded within code blocks and displayed in monitors. In addition, integer and real data can be added, subtracted, and manipulated in all the different ways that you would to be able to manipulate numeric data. Scratch 2.0 also allows you to use integers and real numbers interchangeably.
Note
Industrial-strength programming languages Microsoft C++ and Visual Basic support a much wider range of data types. However, they all support the same basic types of data that Scratch 2.0 does.
STORING DATA IN VARIABLES
As has already been stated, you can embed numeric data inside different types of code blocks, using it to control the operation of scripts. You can also store numeric data collected when your applications execute using variables. In Scratch 2.0, variables allow you to store, retrieve, and modify numeric data.
Note
Scratch 2.0 can store string or numeric data in variables. Variables cannot, however, be used to store Boolean data.
Creating Scratch 2.0 Variables
To store, modify, and retrieve data in a Scratch 2.0 application, you need to create variables. To work with variables within your Scratch 2.0 applications, you must first define and add them to your application projects. This is done by selecting the Data category in the blocks palette and then clicking on the Variables button located at the top of the blocks palette and clicking on the Make a Variable button, as shown in Figure 7.2.
Figure 7.2
Creating Scratch 2.0 variables.

© 2014 Lifelong Kindergarten Group
Once this button has been clicked, Scratch 2.0 displays the window shown in Figure 7.3, allowing you to assign a name to the variable.
Figure 7.3
Assigning a name to a new Scratch 2.0 variable.

© 2014 Lifelong Kindergarten Group
The name that you assign will be used to create and add five new code blocks to your Scratch 2.0 project, as shown in Figure 7.4.
Figure 7.4
Scratch 2.0 creates five new code blocks for each variable that you create.

© 2014 Lifelong Kindergarten Group
In addition, a monitor showing the variables’ value is automatically displayed on the stage, as demonstrated in Figure 7.5.
Figure 7.5
Every new variable supports a monitor that displays its value.
© 2014 Lifelong Kindergarten Group
Using the five code blocks created for every variable, you can assign an initial value to the variable, change its value while your application is running, and display a monitor on the stage, which shows the variable’s value.
Assigning Variables to Sprites and the Stage
Variables in Scratch 2.0 applications belong to the sprites in which they are defined (or to the stage). Therefore, it is important that when adding new variables to your application, you select the thumbnail for the sprite (or stage) where the variable belongs. For example, variables that need to be accessed by different scripts belonging to different sprites may best be added to the stage, whereas a variable needed only by a specific sprite should be added to that sprite.
Assigning Names to Your Variables
Unlike many programming languages, Scratch 2.0 is flexible when it comes to naming variables. You can make variable names as long or as short as you want. Variable names can include
![]() Letters
Letters
![]() Numbers
Numbers
![]() Special characters
Special characters
![]() Blank spaces
Blank spaces
Because Scratch 2.0 creates a complete set of code blocks for each new variable that you define, it eliminates any concerns about case-sensitivity, making things a lot easier to work with.
Tip
Make your variable names as descriptive as possible. This helps make your scripts self-documenting. Although Scratch 2.0 variable names can be extremely long, it’s a good idea to limit their length to a maximum of 30 characters. This provides you with plenty of room to create descriptive, manageable variable names.
Understanding Variable Scope
One important concept that you need to understand when working with variables is variable scope. A variable’s scope identifies the location within an application that the variable’s value can be modified. Scratch 2.0 supports three levels of variable scope, as outlined here:
![]() Local. Variables that can be modified only by scripts belonging to the sprite in which the variable is defined and created by selecting the For This Sprite Only option when defining the variable’s name.
Local. Variables that can be modified only by scripts belonging to the sprite in which the variable is defined and created by selecting the For This Sprite Only option when defining the variable’s name.
![]() Global. Variables that can be modified by any script in an application and created by selecting the For All Sprites option when defining the variable’s name.
Global. Variables that can be modified by any script in an application and created by selecting the For All Sprites option when defining the variable’s name.
![]() Cloud. Variables that store data on Scratch servers that is persistent across multiple executions of your application project and created by selecting the Cloud Variable (Stored on Server) option when creating the variables.
Cloud. Variables that store data on Scratch servers that is persistent across multiple executions of your application project and created by selecting the Cloud Variable (Stored on Server) option when creating the variables.
Note
Although local variables can only be modified by scripts belonging to the sprite in which they are defined, their assigned values can be retrieved (not modified) by scripts belonging to other sprites using sensing code blocks, as demonstrated a little later in this chapter.
Creating Local Variables
Local variables can be modified only within the sprite in which they are defined. The following procedure outlines the steps involved in creating a local variable:
1. Select the sprite (or stage) to which the variable is to be added.
2. Click on the Data category located at the top of the blocks palette.
3. Click on the Make a Variable button.
4. Enter the name you want to assign to the variable, and then select the For this Sprite Only option, as demonstrated in Figure 7.6.
Figure 7.6
Creating a local variable named Counter.
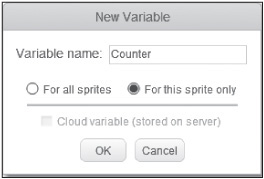
© 2014 Lifelong Kindergarten Group
Since a local variable can only be modified within the sprite in which it has been added, scripts belonging to other sprites cannot modify a local variable. If you need a variable that any script within an application can access, create a global variable as discussed in the next section.
Tip
If you want, you can change the name that you assigned to a variable by right-clicking on the variable block in the blocks palette, clicking on Rename in the menu that appears, and then clicking on the OK button. Once renamed, you should check on any code blocks within your projects scripts that reference the variable because you may have to click on the drop-down list in those code blocks and select the variable’s new name to correct the code block’s association with the variable.
Creating Global Variables
Unlike local variables, a global variable’s value can be modified by any script within the application where it has been defined. You use the same procedure to create a global variable as you do when creating a local variable; the only difference is that you need to leave the default For All Sprites option selected when naming your variable, as demonstrated in Figure 7.7.
Figure 7.7
Creating a global variable named TotalScore.

© 2014 Lifelong Kindergarten Group
Tip
It is considered a good programming practice to restrict the scope of all variables to local whenever possible. This helps to make your applications easier to maintain and eliminates the possibility that you might accidentally modify the variable’s value using scripts belonging to other sprites.
Creating Cloud Variables
Cloud variables are stored on servers maintained as part of the Scratch 2.0 website. Cloud variables are accessible across multiple iterations of program execution. Therefore, they are useful for storing data for things like overall player high scores for a game. Once created, cloud variables are identified within Scratch 2.0 by the presence of a small cloud symbol displayed on the left side of variable code blocks, as demonstrated here.
© 2014 Cengage Learning®
As of the writing of this book, only numeric data can be stored in cloud variables, and Scratchers are limited to a total of 10 cloud variables. Full scratcher status was required to use cloud variables. However, the ability to store string data will eventually follow. You use the same procedure to create a cloud variable as you do when creating local and global variables, but when creating cloud variables, you leave the default For All Sprites option selected and then select the Cloud Variable option, as demonstrated in Figure 7.8.
Figure 7.8
Creating a cloud variable named PlayerHighScores.

© 2014 Lifelong Kindergarten Group
Tip
Cloud variables, like local and global variables, can be renamed and deleted by Shift-clicking on them and selecting either Rename or Delete from the menu that appears.
DELETING VARIABLES WHEN THEY ARE NO LONGER NEEDED
Over time, you may find yourself making numerous changes to your Scratch 2.0 projects. As you do, you may discover that your applications no longer need certain variables. If this is the case, you can clean up your applications by deleting these variables from your projects. Doing so is easy: first, make sure that any references to the variable within the application’s scripts have been removed, and then right-click on the variable (in the blocks palette) and select Delete Variable from the menu that is displayed in Figure 7.9. In response, Scratch 2.0 will delete the variable from the sprite to which it was added.
Figure 7.9
Deleting a variable that is no longer needed.

© 2014 Lifelong Kindergarten Group
Caution
If you delete a variable from a sprite without first removing references to the variable in the sprite’s scripts, Scratch 2.0 deletes the variable but also leaves in place any code blocks in the application’s scripts that reference that variable. As a result, things will not work properly.
ACCESSING VARIABLES BELONGING TO OTHER SPRITES
Data stored in local variables can be changed only by scripts belonging to the sprite the variables have been assigned to. However, Scratch 2.0 does allow scripts belonging to sprites in a project to view data stored in variables belonging to other sprites. To view data stored in another sprite’s local variables, you need to use the sensing block shown in Figure 7.10.
Figure 7.10
Using this code block, you can create a script that can view data stored in another sprite’s local variables.

© 2014 Lifelong Kindergarten Group
This code block lets one sprite retrieve another sprite’s X position, Y position, direction, costume number, size, and volume. It also lets you retrieve values assigned to another sprite’s variable. As demonstrated in Figure 7.11, you can click on the code block’s right pull-down menu to display a listing made up of the stage and all the sprites in the Scratch 2.0 application.
Figure 7.11
Specifying the name of the sprite (or stage) whose variable you want to access.
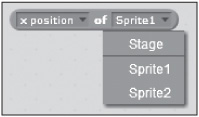
© 2014 Lifelong Kindergarten Group
After selecting the stage or a sprite, you can use the drop-down menu located on the left side of the code block to select and retrieve information for any of the specified items that are listed. A gray horizontal divider bar located at the bottom of the resulting list denotes the sprite’s list of variables, separating the list from other available data, as demonstrated in Figure 7.12.
Figure 7.12
Selecting the variable whose data you want to access.

© 2014 Lifelong Kindergarten Group
Using this code block, you can retrieve data stored in any sprite’s local variables. However, all you can do is read the value assigned to those variables; you cannot modify them.
A QUICK EXAMPLE
To help you become more comfortable with working with variables, let’s look at two quick examples. In the first example, shown next, a script has been created that, when executed, displays the value assigned to a variable named Counter. Remember, by default, every variable that you create has a reporter block with an associated monitor, which Scratch 2.0 displays on the stage.

© 2014 Cengage Learning®
Note
To set up and run this example, you must create a new application, add a variable named Counter to it, and then add the script to the application’s default script.
This script has been set up to execute whenever the green Flag button is pressed. It uses a control block to set up a loop that repeats the execution of two embedded code blocks a total of 10 times. Each time the loop executes, the value assigned to a variable named Counter is increased by 1. The next statement pauses the loop for one second before allowing it to continue running.
By default, Scratch 2.0 assigns a default value of zero to all new variables, which is why the first time you run the previous script, it counts from 1 to 10. However, if you run it again, you will notice that it counts from 11 to 20. If you want, you can change this behavior by explicitly assigning an initial value to the Counter variable, as demonstrated in the following example.

© 2014 Cengage Learning®
Here, the value of Counter has been set to 0 through the addition of a new variable block at the beginning of the script, immediately after its hat code block. As a result, no matter how many times this script executes, it always counts from 1 to 10.
STORING COLLECTIONS OF DATA IN LISTS
Unlike variables, which store a single piece of data at a time, lists store multiple items, allowing a larger collection of items to be retrieved and processed more efficiently during program execution. Items stored in lists are essentially the same things as variables. Lists can store a theoretically unlimited number of items. Lists can store and retrieve any type of values supported by Scratch 2.0, including
![]() String
String
![]() Boolean
Boolean
![]() Integer
Integer
![]() Real
Real
When you’re working with lists, items in the list must be referenced based on their location within the list (for example, their numeric index position). Unlike variables, reference by name is not supported. You can add items to and remove them from a list either manually or programmatically.
Note
Lists in Scratch 2.0 are the equivalent of single-dimensional arrays in other programming languages. Scratch 2.0 does not support multidimensional arrays.
Lists are created within the program editor by selecting the Data category at the top of the blocks palette and then clicking on the Make a List button. In response, the dialog window shown in Figure 7.13 is displayed. To finish creating a list, enter a name for it in the List Name field and then specify whether the list should be accessible by all sprites or only by the sprite to which it has been assigned. Then click on OK.
Figure 7.13
Lists are created in much the same way as variables.

© 2014 Lifelong Kindergarten Group
Note
As of the writing of the second edition of this book, Scratch 2.0 only supports the storage of variables in the cloud. However, the developers of Scratch’s stated anticipation was that lists would soon be supported in the cloud as well.
Once you’ve created the list, Scratch 2.0 automatically creates and adds a list of code blocks, like those shown in Figure 7.14, to the blocks palette. These code blocks let you programmatically interact, add, retrieve, and delete list items and information about the list and its contents.
Figure 7.14
Scratch 2.0 generates the following set of code blocks when you create a new list.
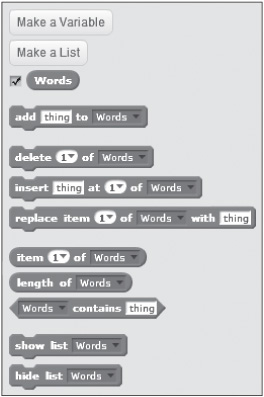
© 2014 Lifelong Kindergarten Group
Figure 7.15 shows the stage monitor that Scratch 2.0 automatically displays when you create a new list. As you can see, the list has no items in it.
Figure 7.15
Scratch 2.0 displays an empty stage monitor on the stage when you create a new list.

© 2014 Lifelong Kindergarten Group
You can manually add items to a list by clicking on the + icon located in the lower-left corner of the list (see Figure 7.16). You can delete an item by selecting its contents and pressing the Delete key, leaving a blank or empty item behind in the list. You can replace an item in a list by overtyping it with a new item. At the bottom of the list monitor is a count showing the length of the list. Each time you add or remove an item from the list, the length of the list is automatically updated. If you add more items to a list than can be displayed by the stage monitor, a scrollbar is automatically added to the monitor, allowing you to scroll up and down and view its contents.
Figure 7.16
An example of a list to which eight entries have been added.
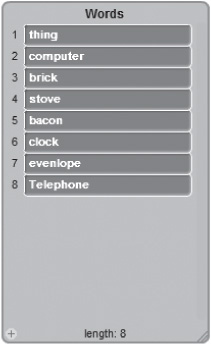
© 2014 Lifelong Kindergarten Group
To get a better understanding of how to programmatically interact with lists, let’s create a new Scratch 2.0 project as shown in Figure 7.16. Begin by creating a new Scratch application and removing the default sprite. Next, add a new list and manually populate it exactly as shown in Figure 7.17.
Figure 7.17
The fully assembled List Manager application project.

© 2014 Lifelong Kindergarten Group
Once the list has been added and populated with items, add four sprites (use the button3 sprite stored in the Things category of the Sprite Library) to the stage and then use the Paint Editor to modify each of these four sprites by adding text labels to them, as shown in Figure 7.17. When clicked, each of these button sprites is used to process items in the list. Add the following script to the uppermost button sprite, labeled Display List. When clicked, it tells you how many items are currently stored in the list.

Next, add the following script to the next button sprite labeled Add Item. This script executes when the button is clicked and prompts you to type a new entry for the list and then add that entry as a new item at the beginning of the list.

© 2014 Cengage Learning®
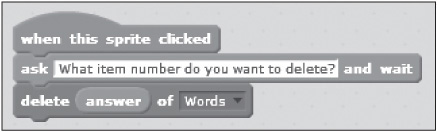
Add the following script to the button sprite labeled Delete Item. This script executes when the button is clicked and prompts you to specify the index number of an item you want to delete from the list. The script then removes that entry from the list.
© 2014 Cengage Learning®
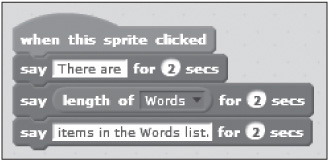
Add the following script to the button sprite labeled List Length. This script executes when the button is clicked and tells you how many items are currently stored in the list.
© 2014 Cengage Learning®
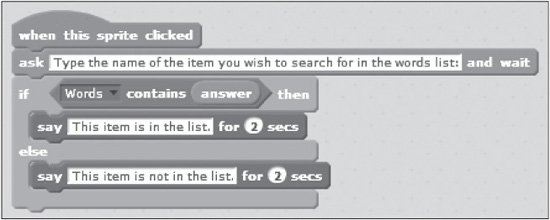
Add the following script to the button sprite labeled Search List. This script executes when the button is clicked and lets you search the content of the list by specifying the name of the word you want to search on. It then informs you if the word is or is not stored in the list.
© 2014 Cengage Learning®
DEVELOPING THE BASKETBALL QUIZ PROJECT
The rest of this chapter is devoted to guiding you through the development of your next Scratch 2.0 application: the NBA trivia quiz. This application makes extensive use of variables to store and retrieve player input and to keep track of the player’s quiz results. In total, the application is made up of a backdrop, six sprites, and six scripts.
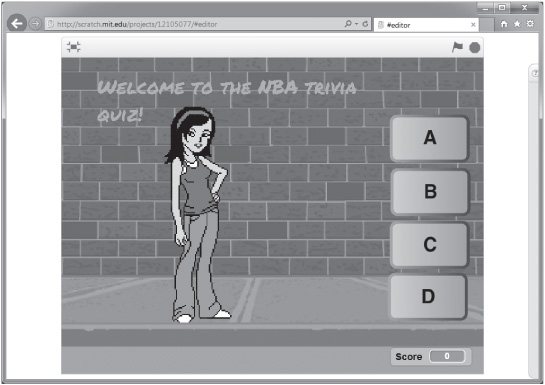
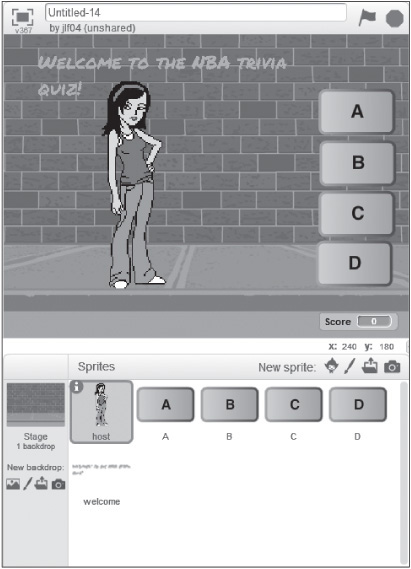
When executed, this application presents the user with an electronic quiz made up of five questions, designed to evaluate the user’s knowledge of NBA trivia. Figure 7.18 shows an example of how the game looks when it’s first started. To begin game play, the user must click on the sprite representing the game’s hostess, at which point she begins administering the quiz.
Figure 7.18
The NBA Trivia Quiz presents the user with a series of multiple choice questions.
© 2014 Lifelong Kindergarten Group
Figure 7.19 provides an example of how the hostess interacts with the user when administering the quiz.
Figure 7.19
The user answers questions by clicking on buttons labeled A, B, C, and D located on the right side of the stage.

© 2014 Lifelong Kindergarten Group
The hostess provides the user with immediate feedback after each question is answered, letting the user know if the answer was correct or incorrect. In addition, the user’s score is automatically tabulated after each answer is evaluated and displayed in a monitor located at the lower right side of the stage.
You can create the development of this application project by following a series of steps, as outlined here:
1. Create a new Scratch 2.0 application project.
2. Add a backdrop to the stage.
3. Add and remove sprites and costumes.
4. Add the variables that the application needs.
5. Add scripts to each button sprite to collect user answers.
6. Add the programming logic required to administer the quiz.
7. Save and execute your work.
Step 1: Creating a New Scratch 2.0 Project
The first step in creating the NBA trivia quiz application is to create a new Scratch 2.0 application project. Do so by either opening Scratch 2.0, thereby automatically creating a new Scratch 2.0 application project, or clicking on the File menu and then selecting New.
Step 2: Selecting an Appropriate Stage Backdrop
Once you have created your new Scratch 2.0 project, it is time to get to work. Let’s begin by adding an appropriate backdrop to the stage. To do so, click on the blank stage thumbnail located in the sprite list. Once selected, modify its backdrop by clicking on the Backdrops tab located at the top of the scripts area. To add a new backdrop to the application, click on the Choose Backdrop from Library icon. When the Backdrop Library window opens, click on the Outdoors folder, select the brick wall1 thumbnail, and click on the OK button.
Since this application requires only one backdrop, you can remove the default blank backdrop, named backdrop1, from your project.
Step 3: Adding and Removing Sprites
This application consists of a number of sprites, representing a hostess who is responsible for administering the quiz, four buttons on which the user must click when answering quiz questions, and a graphic containing a welcoming text message. Before adding any sprites, go ahead and remove the cat sprite from the application, since you won’t need it.
To add the sprite representing the game’s hostess, click on the Choose Sprite from Library icon located at the top of the sprite list to open the Sprite Library window. Drill down into the People folder, select the girl4 sprite, and click on the OK button. Enlarge the sprite and reposition it, as demonstrated in Figures 7.18 and 7.19. While you are at it, change the name assigned to the sprite to say host.
Next, click on the Choose Sprite from Library icon, drill down into the Things folder and select the button3 sprite, and click on the window’s OK button. Once the button sprite has been added, select it in the sprites list, and click on the Costumes tab located at the top of the scripts area to open the sprite in the Paint Editor program. Click on the Text button located on the Paint Editor’s toolbar, and then click in the center of the sprite and type an uppercase letter A. Next, rename the sprite A. Drag and drop the sprite to the right side of the stage, as shown in Figures 7.18 and 7.19.
Using the same series of steps outlined in the previous paragraph, add three additional instances of the button3 sprite to the application, naming them B, C, and D. Once added, align all these button sprites along the right side of the stage just under the A sprite, as demonstrated in Figures 7.18 and 7.19. At this point, you only have one last sprite to add. You need to create this sprite from Scratch 2.0. To do so, click on the Paint New Sprite icon, click on the Text button on the Paint Editor toolbar, set the font type to Marker by selecting that font from the drop-down list that is displayed at the bottom-left side of the Paint Editor, and then click on one of the light blue color swatches in the color palette. Finally, click on the top-left corner of the drawing area and type Welcome to the NBA trivia quiz! as demonstrated in Figure 7.20.
Figure 7.20
Creating a new sprite needed by the NBA Trivia Quiz.

© 2014 Lifelong Kindergarten Group
Rename the next text-based sprite welcome, and then reposition this new sprite at the top of the stage, as shown in Figures 7.18 and 7.19.
Step 4: Adding Variables That the Application Requires
To execute, this application needs three variables, as shown in Figure 7.21. To add these three variables to the application, click on the Data category in the blocks palette, and then click on the Make a Variable button three times to create three global variables named Answer, Clicked, and Score.
Figure 7.21
The NBA trivia quiz requires the addition of three global variables.

© 2014 Lifelong Kindergarten Group
The variable named Answer keeps track of the user’s answers to each quiz question. The variable named Clicked controls application execution, making sure that the script used to administer the quiz pauses and waits each time the user is prompted to answer a new question. The variable named Score keeps track of the user’s score (grade).
By default, Scratch 2.0 displays monitors on the stage for all three of these variables. However, the game only needs to display the Score monitor. Therefore, you should clear the monitor check boxes for the Answer and Clicked variables. At this point, the variable code blocks displayed in the blocks palette should be the same as those shown in Figure 7.21.
The monitor for the Score variable needs to be moved to the lower-right corner of the stage, as shown in Figure 7.18 and 7.19.
Step 5: Adding Scripts to Button Sprites to Collect User Input
The programming logic that controls the overall administration of the quiz will be added to the host sprite, which is responsible for displaying quiz questions, collecting user answers, and then grading the results. To answer quiz questions, the user must click on one of the four sprite buttons (A, B, C, or D) when prompted by the hostess. Each of these four sprites has a small script belonging to it, which sets two variables when it is clicked. Following is the script that is executed when the A sprite is clicked.

As you can see, this script begins with a hat block that executes whenever the A button is clicked. When this happens, the valued assigned to the Clicked variable is set to 1. The value assigned to the Answer variable is also set to 1.
The Clicked variable is used in the application to keep track of when the user answers a question. This variable’s value is set to 1 when the A sprite is clicked, indicating that the user has submitted an answer. Once a script belonging to the host sprite has evaluated the answer, the value of Clicked is set back to 0, making the application ready to process a new question. The Answer variable identifies which button has been clicked. Assigning a value of 1 to this variable indicates that the A sprite has been clicked.
The programming needed by the B sprite is shown next. As you can see, it is almost identical to the code assigned to the A sprite, with the value assigned to the Clicked variable being set to 1 when the button is clicked. Note that the value assigned to the Answer variable is 2, indicating that the second button (the B sprite) has been clicked.

© 2014 Cengage Learning®
The code blocks that make up the C sprite scripts are shown next. As you can see, the third code block is used to identify when it is clicked.

© 2014 Cengage Learning®
As you have probably anticipated, the code blocks that make up the script for the D sprite, shown next, assign a value of 4 to the Answer variable.

© 2014 Cengage Learning®
Step 6: Automating the Administration of the Quiz
At this point, you should have added scripts to each of the button sprites that indicate when they have been clicked and uniquely identify which of the four buttons was selected. Now it is time to create the two scripts belonging to the host sprite. The first script, shown next, is responsible for starting the application and getting the application ready to administer the quiz.

© 2014 Cengage Learning®
As you can see, this script has been set up to execute when the user clicks on the green Flag button. When this happens, the values assigned to all three of the script’s variables are set to 0 (setting the score to zero, indicating that none of the buttons has been clicked, and that no answer has been specified). Next, two looks code blocks are used to display instructions, welcoming the user and then instructing her to click on the hostess when she’s ready to begin taking the quiz.
The host sprite’s second script, shown here, is responsible for the overall administration of the quiz. As you can see, it is pretty big and is made up of many different types of code blocks, some of which you have not learned about yet. As such, this chapter provides only a high-level overview of the script. Once you have read Chapters 9 and 10, you may want to return and review this script again.

© 2014 Cengage Learning®

This script begins with a hat code block that executes when the user clicks on the host sprite. Next, the script’s execution is paused for one second, and then a looks block is used to display a text message, presenting the user with the quiz’s first question. The next code block, which contains a pair of embedded code blocks, pauses script execution and waits until the value assigned to the Clicked variable is set to 1 (which occurs only when the user specifies an answer by clicking on one of the four button sprites).
The value assigned to Clicked is then reset to 0, making the variable ready for the next quiz question. Next, a control code block is used to evaluate the user’s answer to the quiz question. This is accomplished by checking to see if the player clicked on the A sprite, as indicated by a value of 1 being assigned to Clicked. If this is the case, the user’s score is increased by 20, and a looks block is used to display a text message informing the user that her answer was correct. If this is not the case, the user is notified that the answer provided was incorrect.
The next four quiz questions are administered using programming logic that is identical to that used to administer the first question, the only difference being that a different question is presented and a different answer is required. Finally, once the last quiz question has been processed, the script’s execution is paused for two seconds, after which the user’s grade (the value assigned to Score) is evaluated to see if it is greater than 60, in which case the hostess announces that the user has passed the quiz. If this is not the case, the hostess announces that the user has failed. Either way, a three-second pause ensues, after which the values assigned to all three variables are reset to their default starting value of 0 to make the quiz ready for the next person. Finally, one last control block is executed, ensuring that all scripts within the application terminate their execution.
Step 7: Testing Your New Application
At this point, you have all the information you need to create your own copy of the NBA trivia quiz. Assuming that you have been following along and creating your copy of the application as you made your way through this chapter, your application project should look something like the example shown in Figure 7.22.
Figure 7.22
The completed application consists of a stage backdrop, six sprites, and six scripts.
© 2014 Lifelong Kindergarten Group
If you have not done so, go ahead and give your new application a name, switch to full screen mode, and start the NBA trivia quiz. As you test your new application, make sure that the feedback the hostess is providing after each answer is correct. In addition, keep an eye on the Score monitor and make sure that the game is correctly tabulating your grade.