4. Bridge Scripts
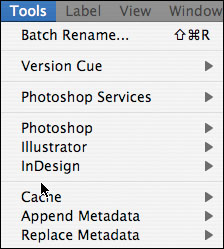
Adobe Bridge comes with scripts that allow you to run operations on the files that you select in the main Bridge window with the other CS2 applications you have installed. If you only have a single product from the Creative Suite 2 (other than Photoshop CS2), then you may not have any Bridge scripts, as the Creative Suite or Photoshop CS2 installer installs them. The Bridge scripts appear under the Tools menu next to the name of each application. What’s cool is that from time to time Adobe and third-party developers may offer additional Bridge scripts for you to download. As of the writing of this book, there are already some pretty cool new scripts released that you can download: http://share.studio.adobe.com/adBrowseSubmit.asp?c+222.
Photoshop Scripts for the Bridge
Photoshop CS2 offers the most scripts for the Bridge. This is due largely to the fact that most of these functions existed in the Photoshop File Browser before the Bridge came onto the scene. So it was a natural fit for Adobe to move these functions over to the Bridge. Let’s take a look.

The Photoshop Batch Script
The Batch script is the first Photoshop script in the Tools > Photoshop menu. When you select one or more images in the Bridge window and choose Batch from the Tools > Photoshop menu, you’ll be able to run predefined Photoshop actions on the images you selected. The script will launch Photoshop CS2 and immediately bring up the Batch dialog box and reference the images from the Bridge. You can then choose which action you want to run from the popup list and run the action on your selected images.

The Photoshop Contact Sheet Script
Contact Sheets are made up of multiple thumbnails of single-page Photoshop documents. For example, if you were going to burn your images to a CD or DVD and you wanted to have a visual record of what you burned on the disc, you could use the Contact Sheet script to build that Contact Sheet for you in the Bridge. To use this script, select one or more images (you probably want at least two, otherwise you could simply print the single image). Then choose Contact Sheet II from the Tools > Photoshop menu. Photoshop CS2 will launch or come to the foreground and present you with a dialog box to set up how you want your Contact Sheet to look.
If you are going to make an insert for your CD/DVD jewel case then you probably want to change your dimensions to 4”x 4”and change the number of rows and columns to four each. When you click OK, Photoshop will build a new document for your new contact sheet. If you have more than 16 images selected, Photoshop will continue building new documents until it runs out of images. You can then print each page out, trim them, and insert them in your jewel cases.

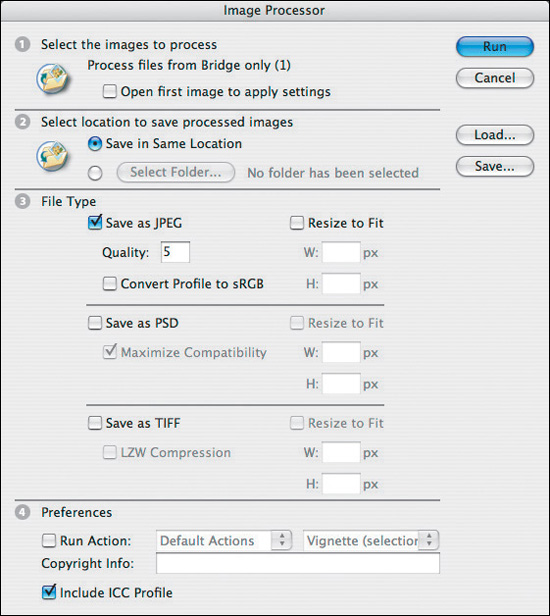
The Photoshop Image Processor Script
If you regularly work in Photoshop, chances are you’re doing the same operations over and over again. The Image Processor script covers a couple of functions that I do almost daily. For example, I convert images to JPEG or TIFF and I need them to fit a certain pixel dimension. You could create your own custom action to do this in Photoshop, but then you’d have to change the action every time one or more of the parameters changed. The work has been done for you with the Image Processor script. Select the images you want to process and choose Image Processor from the Tools > Photoshop menu. In the Image Processor dialog box, you can decide if you want the images to be processed to the same location or to a different folder. You can pick the file type you want and even choose multiple file types in case you need a JPEG for emailing and PSD for working with the highest quality image you can get. Optionally, you can choose to resize the images to fit a certain pixel width or height (it’s probably best to pick one or the other as picking both could lead to a distorted image if the aspect ratio is not the same). Lastly, you can choose to run an additional action and embed your copyright info or ICC color profile. You can save your settings to an external file and load them back in as needed so that you don’t have to remember them from session to session. Once you’ve made your selections, click Run to begin the processing in Photoshop.
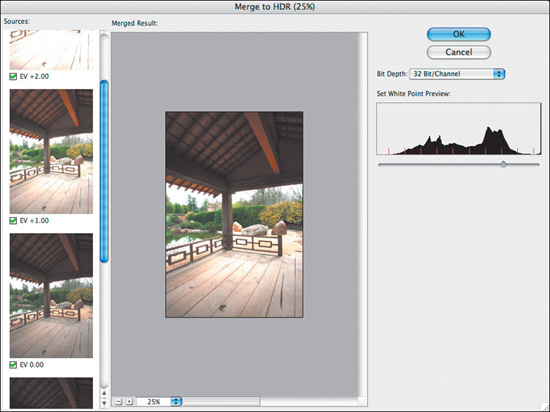
The Photoshop Merge to HDR Script
Photoshop CS2 introduced the HDR (High Dynamic Range) function. High-end and prosumer photographers will use the HDR command to combine multiple images of the same scene to capture the dynamic range of the scene into a single HDR image. So if you shot the same exact scene using different settings on your camera to bring out the highlights in one shot, the shadows in another shot, and the midtones in another shot you could merge them together using the HDR command to produce a single image that would be nearly impossible to capture in one shot. The images must all be the same size and should be shot with a tripod and be the same exact scene. If you have two or more images that meet this criteria, you can select them in the Bridge and choose Merge to HDR from the Tools > Photoshop menu. Photoshop CS2 will start merging the images and then present you with a dialog box so that you can preview the result.
The Photoshop PDF Presentation Script
The PDF Presentation function allows you to easily share your images with people who may not have a photo-editing tool or you can use it to send someone a Group of images via email. The next time you want to either create a multiple-page PDF of your images or a presentation that goes full screen and advances automatically, select your images in the Bridge and choose PDF Presentation from the Tools > Photoshop menu. Photoshop will launch or come to the foreground and bring up the PDF Presentation dialog box. You can then choose between a simple Multi-Page Document or a Presentation that plays automatically on the recipient’s computer. If you do choose Presentation, you can then set it to advance automatically by the number of seconds that you want, choose whether it will loop or not after the last page, and set whether or not you want transitions between the slides. Once you make your choices, click Save and you will be given the opportunity to pick the destination folder and filename as well as set your PDF options for compatibility, compression, and security.

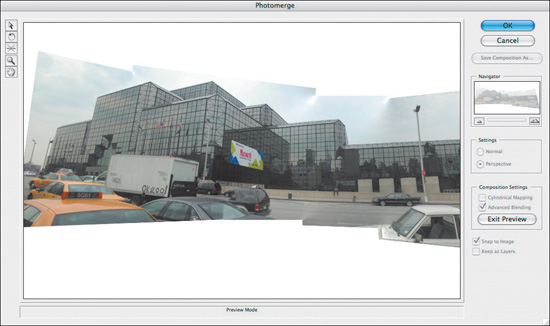
The Photoshop Photomerge Script
Photomerge has long been a favorite of mine as it allows you to shoot a panoramic scene as multiple shots and then join those shots together afterwards in Photoshop. You can also use Photomerge to combine images together that were scanned in multiple pieces because your scanner couldn’t accommodate the large format of your print. When you have images to combine, select them in the Bridge and choose Photomerge from the Tools > Photoshop menu. Photoshop CS2 will launch or come to the foreground and automatically start opening your images and looking for overlap so that it can align them into one panoramic or merged scene. Once it’s done, it will show you a preview from which you can apply additional settings, such as Advance Blending and Perspective. When you click OK in the dialog box, Photoshop CS2 will build your merged photo and create a new document in Photoshop.
The Photoshop Picture Package Script
Picture Package will make you a hero among friends and family. It allows you to take your photographic masterpiece and create a sheet of photos at various sizes so that you can print one sheet of photos and not waste paper. You start by selecting at least one image in the Bridge and then choose Picture Package from the Tools > Photoshop menu. Photoshop CS2 will launch or come to the foreground and then present you with the Picture Package dialog box. Your selected image will be there in the default layout; you can choose your Page Size, Layout, and Resolution. There are other options, such as Label, which will print below each picture, but in most cases you’re not going to want labels taking up the space. Once you have your settings, click OK.
There is a secret tip for the Picture Package. Let’s say that you want the majority of the pictures on the page to be of one person or one shot, but you want to selectively swap out one or more of the images for different images. You can do this by simply clicking on the image you want to swap out while it’s in the Layout preview in the Picture Package dialog box. The Select an Image dialog box will appear allowing you to choose a different image for that spot.

The Photoshop Web Photo Gallery Script
Occasionally you’ll want to show your images on the Web. After all, it’s the “in” thing to do. Most ISPs offer Web storage space as part of the monthly agreement, which means that you can upload your own HTML pages to your Web space via FTP or WebDAV. Adobe offers a great HTML authoring tool with the Creative Suite 2 Premium called GoLive. However, you have an easier tool for this task. You can use the Web Photo Gallery script without having to know anything about creating HTML.
To get started, select the images that you want to post on the Web as a gallery. Choose Web Photo Gallery from the Tools > Photoshop menu and Photoshop CS2 will launch or come to the foreground. Next, Photoshop will present you with the Web Photo Gallery dialog box asking you to pick a style for your gallery. There are several to choose from, and the new Photoshop CS2 even includes some Macromedia Flash-based ones. Although you have the option to enter your email address, it’s not required and you probably shouldn’t use it unless you really need to, otherwise you could be inundated by spammers. You can then choose a Destination folder for your gallery to be built in and choose options for your thumbnail/image sizes and captions. Once you have your settings set, click the OK button and Photoshop will go to work building your gallery. Once it’s complete, Photoshop will automatically launch the gallery index.html page and show it in your default Web browser. You can then use an FTP utility to upload the page to your hosted Web space.

Illustrator
At the time this book went to press there were only a couple of Illustrator Bridge scripts. By the time you read this, there could be several new ones available to download from the Adobe Exchange site.

The Illustrator Live Trace Script
Illustrator CS2 has the ability to automatically trace bitmapped images and create beautiful vector artwork from them. The process involves creating a new document, placing the bitmapped graphic on the page, selecting it, and clicking the Live Trace button on the Options bar. However, if you have several images to trace and you want to do it in batches, you can do so from the Bridge with the Live Trace script. Select one or more bitmapped images in the Bridge. Choose Live Trace from the Tools > Illustrator menu. In the Live Trace dialog box in the Bridge you can pick your settings. You can choose a preset for your trace settings. You can choose to vectorize all the documents to individual layers in a single document or leave this option unchecked and Illustrator will generate a new document for each bitmapped document you have selected. You can then choose a destination folder for your new files and even pick a naming convention for the new files. If you don’t use a new naming convention, the script will use the original document name with the .ai file extension. Click OK to let the script run.

The Illustrator Export to Flash Script
If you have a multiple-layer Illustrator file, you can convert that file to an animated Flash (.SWF) file that could be put up on your Web site. There are two ways to go about this—one way doesn’t give you any control and the other does. There are two scripts in the Export to Flash menu. One is called Quick Export and the other is called Custom Export. Choosing Quick Export gives you a straight export to .SWF format with no options. This would be useful if you just wanted to put a vector logo up on the Web and have it remain as a scalable vector in the Flash format. However, if you want to control your export options and enable the layers to SWF frames options, you’re going to want to choose the Custom Export from the Tools > Illustrator menu. The Export to Flash dialog box appears, and here you can control how your layers will be treated in the .SWF file as well as the appearance, animation, and image quality. Once you have the settings set the way you want, click OK to generate your .SWF file.

InDesign
At the time this book went to press there was only one InDesign Bridge script. Although there’s only one, it’s a very cool one that allows you to make a contact sheet in InDesign. By the time you read this, there could be several new ones available to download from the Adobe Exchange site.

The Create InDesign Contact Sheet Script
We’ve already covered creating Contact Sheets in Photoshop. So you may be wondering, “why is there a need for InDesign to be able to create Contact Sheets, too?” There’s one answer to that, and it’s “flexibility!” With a Photoshop contact sheet your data will all be converted to pixels at a single resolution. So even if you included vector images, they would be converted to bitmaps on your contact sheet. InDesign is resolution independent. Therefore, you can include both raster and vector images on your InDesign contact sheet pages and they will print at whatever resolution your printer supports. Also it’s a lot easier to swap out images in InDesign frames than it is from Photoshop layers.

Select your images in the Bridge and choose Create InDesign Contact Sheet from the Tools > InDesign menu. The Contact Sheet dialog box appears, which allows you to specify the settings for your Contact Sheet pages. You can choose how your images will be placed, either Across First or Down First. You can then choose how many columns and rows you want. Next you can choose your spacing options for how close the images will be to each other and whether or not you want the images to rotate to fit better. As with the Photoshop contact sheet, you have the option to include a caption under each picture. What’s really cool is that you can use an InDesign template to customize the look and feel of your Contact Sheet pages. This really broadens the possibility for this script as it could be used for things like yearbooks, scrapbooks, or photo albums. You also have the option to output directly to PDF. Once you’re happy with your settings click OK and watch it work.
Script Manager
Now that we’ve taken a good look at the scripts that come with the Creative Suite, I want to remind you that third parties can also create scripts. If you know JavaScript, you can even create your own scripts. Once you start getting additional scripts you’ll probably want some way to control which ones load and which ones don’t. The Bridge gives you this control with the Adobe Script Manager. You can open the Script Manager by choosing it from the Bridge menu (PC: Edit menu). You’ll be able to click on each script and get a full description of what the script does and choose whether or not the script should load on startup of the Bridge. At the bottom of the window you’ll be able to see the path to where your scripts are located. Also by default the Bridge is set to automatically load new scripts. You can disable this check box if you want.
