Appendix D. A Hands-On Example of Applying the Principle of Least Privilege
In this appendix, I will try to show you a hands-on example of how security professionals can apply the principle of least privilege (PoLP) to create Identity and Access Management (IAM) policies on AWS. Chapter 2 talked about PoLP at length, but as a reminder, the purpose of PoLP is to ensure that each principal (an AWS user or AWS role) within an organization gets only the bare minimum access privileges they need in order to perform their job and nothing more. Access is controlled on AWS using IAM policies. Each IAM policy in an account should serve a specific purpose and exist independently of the principal to which it is attached.
Let us consider a typical organization that has many departments. For the sake of this example, I want to allow employees of the finance department to gain access to objects in a certain Amazon Simple Storage Service (Amazon S3) bucket within the organization’s account. As a responsible security administrator, I want to make sure that I apply the PoLP while defining access policies for the principals (users or roles) within my organization.
Hence, in order to secure access, I will enforce the following conditions:
The principal who this policy is attached to should have the AWS tag department set to finance. In other words, I want to make sure that the principal (user or the role who attempts to gain access to these objects) belongs to the finance department.
Multifactor authentication (MFA) should be enabled on the account of the principal before they can gain access to any kind of data. This will prevent imposters from fooling the authentication system and stealing financial details.
Objects must be accessed only over a “secure transport” (HTTPS connection).
Step 1: Create an AWS IAM Policy for Your Task
For the purpose of this appendix, I will be creating an access policy using the AWS visual editor, which can be launched by going to the Identity and Access Management page and clicking on “Create policy,” as seen in Figure D-1.
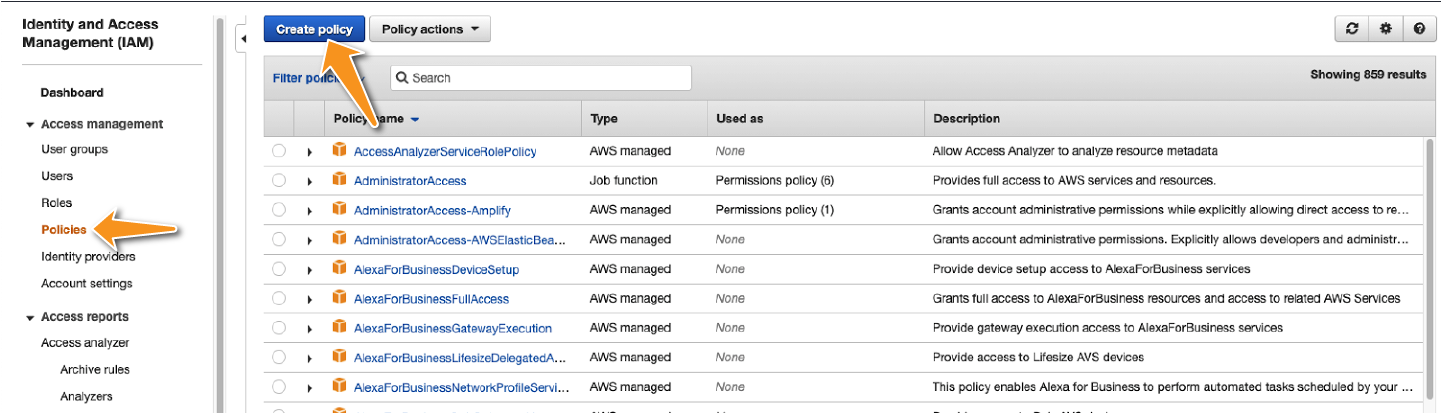
Figure D-1. The first step toward creating a policy is to open the visual editor in the Policies tab on the Identity and Access Management (IAM) page.
Once you are in the visual editor for creating the IAM policy, you can start defining your IAM policy. Upon framing the policy, you can attach it to a principal in the account. This will grant them (the principal) qualified access to AWS resources. Recall from Chapter 2 that an IAM policy is a collection of statements that allow or deny access to resources. So, the next step is to start defining each of the individual statements within the policy.
Step 2: Defining the Service, Actions, and Effect Parameters of an IAM Policy
You can then define your policy statements one by one in the wizard by selecting the service you wish to specify (allow or deny) access to (in this case AWS S3) and then selecting the action you wish to specify access to. You may also import existing policy statements from AWS-managed policies as elaborated further. This step is illustrated in Figure D-2.

Figure D-2. You could either import policy statements from an AWS-managed policy by clicking on (1) and then customizing as necessary. Or you could specify your statements by selecting the service and action that you wish to control access to (2) and then selecting whether you wish to grant or deny access (3).
If you already have an AWS-managed policy that fits your application use case, you can automatically import the policy statements from that AWS-managed policy and work off the boilerplate, as seen in Figure D-3.

Figure D-3. If you import an AWS-managed policy, AWS will import the common policy statements for you so you can sharpen the security controls around a baseline policy.
Step 3: Defining the Resource
Though it is tempting to provide access to all resources that match the service you define in Step 2, based on PoLP, it is best to qualify access only to the resources that you want to grant access to. This can be done by explicitly specifying the resource in the “Resources” section of the wizard, as shown in Figure D-4.
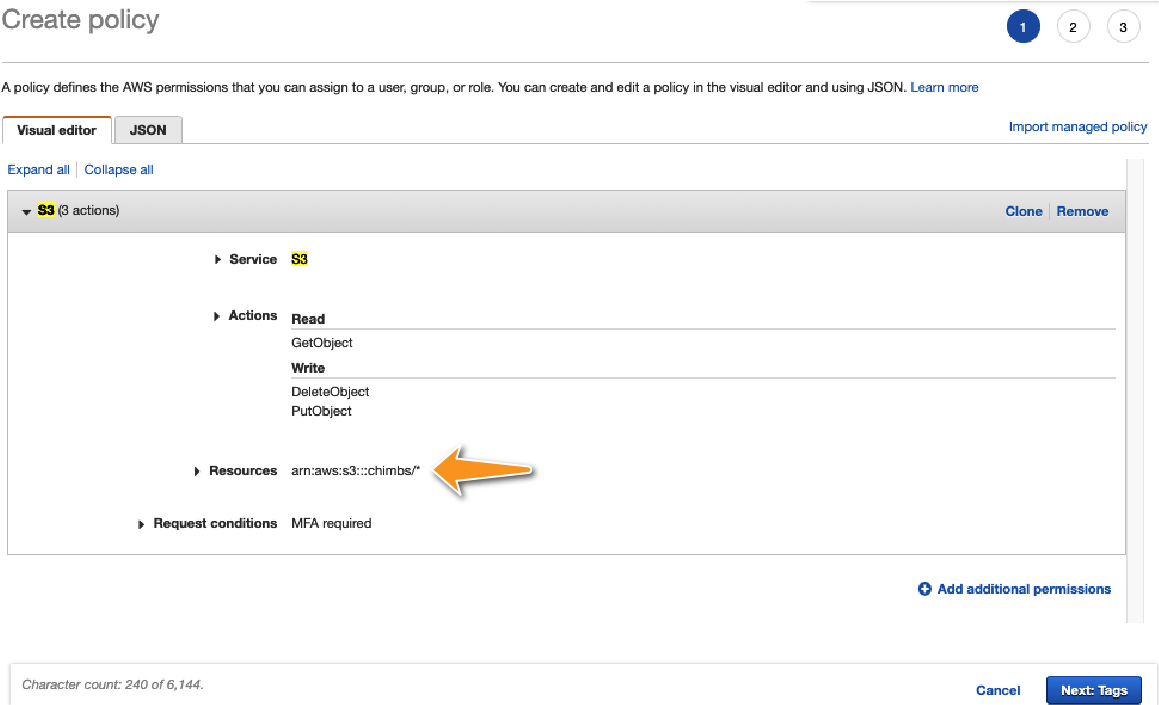
Figure D-4. Adding a resource ensures that least privilege is applied to all the statements in your policy.
Step 4: Request Conditions
One of the most powerful tools that AWS provides you with is the ability to add conditions to your access control policies. By applying these conditions, you are ensuring that you can take the context of a request into account when deciding whether to grant (or deny) access. These conditions are specified on the policy in Figure D-5.

Figure D-5. IAM conditions are a strong way of enabling or disabling fine-grained access to your resources. In this case, I am forcing the principal to have MFA, have a tag {department: finance}, and use a secure transport while accessing this resource.
As you can see in Figure D-5, you can conditionally allow or block access in two ways:
Specify your condition within the statement that allows access to the resource.
Create another statement that denies access to any request that does not satisfy the condition.
Tip
Because statements that explicitly deny access tend to trump statements that allow access, in my personal experience, it is best to add multiple statements with a “deny” clause in order to evaluate conditional logic.
There are many powerful conditions that are available in AWS to make it possible to sharpen the access control mechanisms for just about every use case you can imagine. A list of all the conditions can be found in an AWS article on context keys.
Step 5: Confirm the Resulting Policy
You can confirm the resulting policy that you created using Steps 1–4 by going into the JSON tab of the policy and checking the statements within the policy. Figure D-6 shows the JSON summary of all the statements that we have created until now.

Figure D-6. You can always switch to the JSON tab to check the result of the AWS Visual IAM Policy editor.
Step 6: Save the Policy
Once you have confirmed that your policy statements match your expectations, you can save your policy within your AWS account as a customer-managed policy, as shown in Figure D-7.

Figure D-7. As mentioned in Chapter 2, a policy is a standalone control and can exist independent of a principal.
Tip
Be sure to use descriptive names to save your policies. In large organizations, a planned reuse of IAM policies can help in maintaining scalability.
Step 7: Attach the Policy to a Principal
Each time a new employee joins your finance department, you can attach this policy to the employee to grant them access to the S3 bucket. Figure D-8 shows an example of an IAM policy getting attached to a user named “gaurav.”
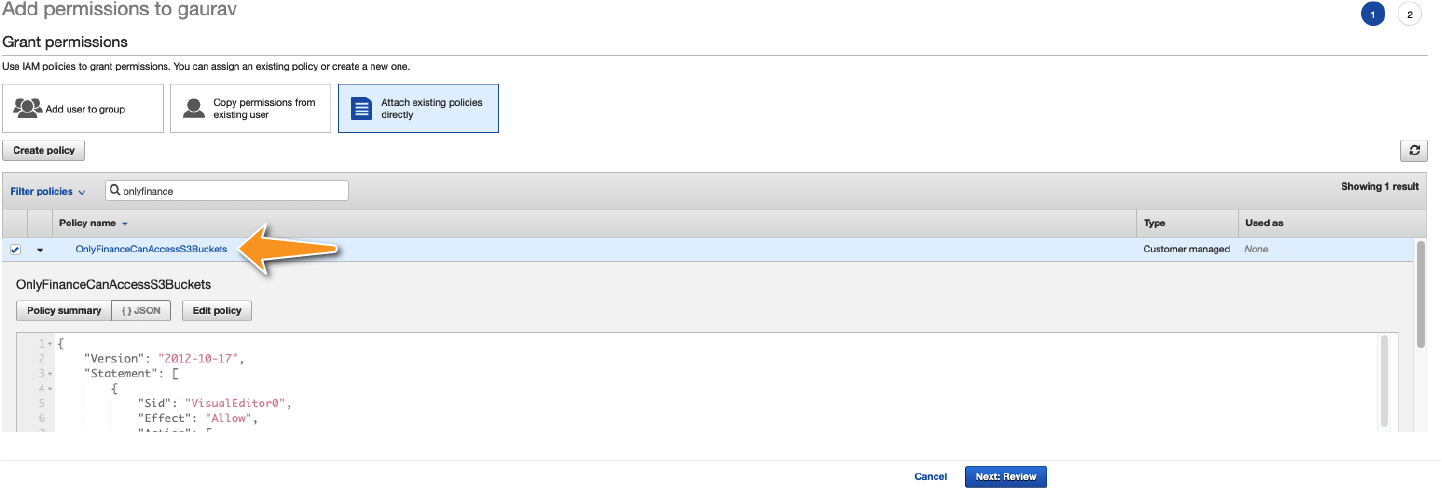
Figure D-8. You can attach policies to users or roles by going to the Identity and Access Management page and going into the “Add permissions” wizard on your desired user in the Users tab. (Or going into the “Attach policies” wizard on your desired role in the Roles tab).
Summary
This appendix showed you how you can use the AWS visual IAM policy editor to create strong and focused AWS policies that provide granular and precise control against unauthorized access. Your IAM policy can contain multiple statements that ensure that PoLP is applied while granting access to your resources. To further fine-tune access control, you can use IAM policy conditions to ensure compliance with various security policy requirements within your organization.
You can use statements and conditions to make sure of the following:
Only the right set of principals are granted access to the resources
The access is granted only under the right circumstances by examining the context of the request
Access is explicitly denied when some required security conditions are not satisfied while requesting access.